Contents Strom & Akku ....................41 About this Concise User Guide ..............1 Installation der Treiber ................. 42 System Startup ....................4 Wireless-LAN-Modul (Option) ..............43 System Map: Front View with Display Open ..........5 Bluetooth-Modul (Option) ................43 LED Indicator ....................6 Windows Hello Kamera (Option) ..............44 Keyboard ......................7 TPM (Option) ....................
Seite 4
Contenidos Sommario Acerca de esta Guía del Usuario Concisa .............73 Informazioni su questa guida rapida ............. 97 Guía rápida para empezar ................76 Guida di avvio rapido ................. 100 Mapa del sistema: Vista frontal con la pantalla abierta .......77 Descrizione del sistema: Vista anteriore con lo schermo aperto ....101 Indicador LED ....................78 Indicatore LED ...................
About this Concise User Guide This quick guide is a brief introduction to getting your system started. This is a supplement, and not a substitute for the expanded English language User’s Manual in Adobe Acrobat format on the Device Drivers & Utilities + User’s Manual disc supplied with your computer.
Instructions for Care and Operation Safety Information • Only use an AC/DC adapter approved for use with this computer. The computer is quite rugged, but it can be damaged. To pre- • Use only the power cord and batteries indicated in this manual. vent this, follow these suggestions: Do not dispose of batteries in a fire.
Seite 7
Polymer/Lithium-Ion Battery Precautions Note the following information which is specific to Polymer/Lithium-Ion batteries only, and where applicable, this overrides the general battery precaution information. • Polymer/Lithium-Ion batteries may experience a slight expansion or swelling, however this is part of the battery’s safety mechanism and is not a cause for concern.
System Startup 1. Remove all packing materials. 2. Place the computer on a stable surface. Shut Down 3. Securely attach any peripherals you want to use with the Note that you should always computer (e.g. keyboard and mouse) to their ports. shut your computer down by 4.
System Map: Front View with Display Open Figure 2 Front View with Display Open 1. Webcam* (Factory Option) Windows Hello Camera* *When the camera is in use, the LED next to the cam- era) will be illuminated. 2. Built-In Array Microphone 3.
LED Indicator Screen Rotation The computer’s LCD can be opened up to 180 degrees, The LED indicator on the computer displays helpful infor- and you can use the Fn + R key combination to fully rotate mation about the current status of the computer. the screen.
Keyboard The keyboard has a numeric keypad for easy numeric data input. Pressing Fn + Num Lk turns on/off the numeric keypad. It also features function keys to allow you to change operational features instantly. White-LED Keyboard Refer to White-LED Keyboard on page 13.
Function Keys & Visual Indicators The function keys (F1 - F12 etc.) will act as hot keys when pressed while the Fn key is held down. In addition to the basic function key combinations, some visual indicators are available when the Control Center driver is installed. Keys Function/Visual Indicators Keys...
Left, Right & Rear Views System Map: Left Right Rear Figure 5 - Left, Right & Rear Views 1. LED Indicator 6. Speakers 2. DC-In Jack 7. Power Button 3. HDMI-Out Port 8. MicroSD Card Reader 4. USB 3.2 Gen 2 Type-A Port 9.
System Map: Bottom & Front Views USIM Card Orientation Note that the USIM card’s readable side (with the gold-colored contacts) should face downwards as illustrated. USIM Card Ejection Simply press on the USIM card to eject it, however do not do this while a connection is in progress. If you do eject the card while a 4G connection is ongoing, you will need to shut down the system, reinsert the USIM card, restart the system and...
Control Center . You can also press the Fn + Esc key com- Run the Control Center from the Start menu in Windows bination, or double-click the icon in the notification area of the taskbar to access the Control Center. The Con- trol Center provides quick access to Power Modes, Fan settings and LED Keyboard configuration.
Power Modes Fan Speed Control Power Modes allows you to adjust the power mode by clicking the appropriate icon. Figure 9 - Fan Speed Control You can set the fan speed to Maximum (full power) or Automatic/Slient. The fan speed will adjust itself auto- Figure 8 - Power Modes matically to control the heat of the CPU/GPU.
White-LED Keyboard The LED Keyboard application can be accessed by clicking LED Keyboard in the Control Center or from the Start menu in Windows Figure 10 - LED Keyboard Application KB Sleep Timer Enable and then select the amount of time for which the system is idle before the keyboard LED enters sleep mode (i.e. the LED keyboard illumination will turn off to save power).
Windows 11 Start Menu, Context Menu, Taskbar, Control Panel and Settings Figure 11 Start Menu, Most of the apps, control panels, utilities and programs within Windows 11 can be Context Menu, accessed from the Start Menu by clicking the icon in the taskbar in the lower Taskbar, Con- left corner of the screen (or by pressing the Windows Logo Key...
Video Features Display Devices Note that you can use external displays connected to the The system features an Intel integrated GPU. You can HDMI-Out port and/or Thunderbolt 4 port. See your dis- switch display devices, and configure display options, play device manual to see which formats are supported. from the Display control panel in Windows as long as the video driver is installed.
Audio Features To configure the displays using the Display control pan- You can configure the audio options on your computer 1. Attach your external display(s) to the appropriate port, and turn from the Sound control panel in Windows. Access the it(them) on.
Power & battery Sleep (Modern Standby) This system supports Sleep mode as Modern Standby. The Power & battery control panel allows you to quickly In this case the system will continue to download mail, adjust power options for Screen and sleep, Power mode, Windows updates, calendar updates and even VoIP calls Battery saver and Battery usage etc.
Driver Installation The Device Drivers & Utilities + User’s Manual disc contains the drivers and utilities necessary for the proper operation of the computer. This setup will probably have already been done for you. If this is not the case, insert the disc and click Install Drivers (button), or Option Drivers (button) to access the Optional driver menu.
Wireless LAN Module (Option) Bluetooth Module (Option) Make sure the Wireless LAN module is turned on (and not Make sure the Bluetooth module is turned on (and not in in Airplane Mode) before configuration begins. Airplane Mode) before configuration begins. WLAN Configuration in Windows Bluetooth Configuration in Windows 1.
Windows Hello Camera (Op- 9. Keep looking directly at the screen and the system will scan your face (the blue bar underneath your picture indicates the progress tion) of the scan). 10. The system will then prompt with “All Set!”, so click Close to exit The Windows Hello camera is compatible with the Win- the Setup Wizard.
TPM (Option) Figure 18 Before setting up the TPM (Trusted Platform Module) BitLocker Drive Encryption functions you must initialize the security platform. (TPM Administra- tion) Activating TPM 1. Restart the computer. 4. The TPM Management window allows you to configure the TPM 2.
Troubleshooting Problem Possible Cause - Solution The Wireless LAN/Bluetooth modules The modules are off as the computer is in Airplane Mode. Use the Fn + F11 key cannot be detected. combination to toggle Airplane Mode on/off (see Table 2 on page The Camera module cannot be The module is off.
Specifications BIOS Keyboard 128Mb SPI Flash ROM White-LED Keyboard Insyde BIOS (Factory Option) Keyboard Memory Latest Specification Information Audio Dual Channel DDR4 The specifications listed in this sec- On Board DDR4 8GB High Definition Audio Compliant Interface tion are correct at the time of going to One 260 Pin SO-DIMM Socket Supporting 2 * Built-In Speakers press.
Seite 28
Communication Interface Dimensions & Weight 1.0M HD Webcam One Thunderbolt 4 Port with Power Delivery 322mm (w) * 216.8mm (d) * 16.5mm (h) (DC-In) 990g with 36Wh battery (Factory Option) 2.0M FHD Webcam One USB 3.2 Gen 1 Type-A Port One USB 3.2 Gen 2 Type-A Port 1,150g with 73Wh battery (Factory Option) Windows Hello Camera...
Über das Ausführliche Benutzerhandbuch Diese Kurzanleitung soll einen Überblick über die Schritte geben, die dazu notwendig sind, das System zu starten. Dieses ist nur eine Ergänzung und kein Ersatz für das erweiterte englischsprachige Benutzerhandbuch, das auf der mitgelieferten Disc Device Drivers & Utilities + User's Manual im Adobe-Acrobat-Format vorliegt. Diese Disc enthält auch die Treiber und Utility-Programme, die für einen einwandfreien Betrieb des Computers notwendig sind (Hinweis: Das Unternehmen behält sich das Recht vor, diese Publikation ohne Vorankündigung zu überarbeiten und den Inhalt zu verändern).
Hinweise zu Pflege und Betrieb • Wenn der Computer heruntergefallen ist oder beschädigt wurde (berüh- ren Sie nicht die giftige Flüssigkeit des Bildschirms). Das Notebook ist zwar sehr stabil, kann aber dennoch be- • Wenn ein ungewöhnlicher Geruch, Hitze oder Rauch aus dem Computer schädigt werden.
Seite 31
Vorsichtsmaßnahmen für Polymer-/Lithium-Ionen Akkus Beachten Sie die folgenden Hinweise, die sich speziell auf Polymer-/Lithium-Ionen Akkus beziehen. Diese Hinweise haben zudem Vorrang gegenüber den Allgemeinen Akku Sicherheitshinweisen. • Polymer-/Lithium-Ionen Akkus können sich etwas ausdehnen oder anschwellen. Dies ist Teil des Sicherheitsmechanismus des Akkus und kein Anlass zur Sorge.
Schnellstart 1. Entfernen Sie das gesamte Verpackungsmaterial. 2. Legen Sie den Computer auf eine stabile Unterlage. Herunterfahren 3. Schließen Sie alle Peripheriegeräte, die Sie mit dem Computer verwenden wollen (z. B. Tastatur und Maus), an die Bitte beachten Sie, daß der entsprechenden Schnittstellen an.
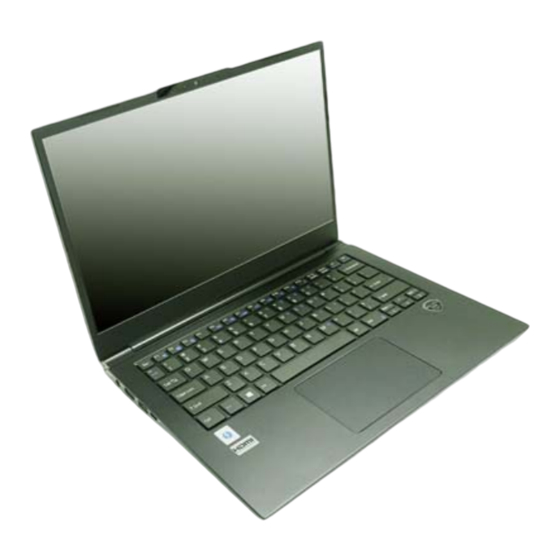
Systemübersicht: Ansicht von vorne mit geöffnetem Bildschirm Abb. 2 Ansicht von vorne mit geöffnetem Bildschirm 1. Webcam* Oder (Werkseitige Option) Windows Hello Kamera* *Wenn die Kamera verwendet wird, leuchtet die LED (neben der Kamera). 2. Eingebautes Array-Mikrofon 3. Bildschirm 4. Lüftungsöffnung 5.
LED-Anzeige Bildschirmdrehung Das LCD des Computers kann bis zu 180 Grad geöffnet wer- Die LED-Anzeige auf dem Computer zeigt wichtige Infor- den, und Sie können die Tastenkombination Fn + R ver- mationen über den aktuellen Status des Computers. wenden, um den Bildschirm vollständig zu drehen. Sie Symbol Farbe Beschreibung...
Tastatur Die Tastatur hat eine eingebettete Nummerntastatur für einfache Zahleneingabe. Durch Drücken auf Fn + Num wird die Num- merntastatur ein- und ausgeschaltet. Zusätzlich gibt es Funktionstasten, über die Sie direkt zwischen den Funktionen umschalten können. Weiße LED-Tastatur Siehe Weiße LED-Tastatur auf Seite 37.
Funktionstasten und visuelle Anzeigen Wenn die Funktionstasten (F1 - F12) gleichzeitig mit der Fn-Taste gedrückt werden, funktionieren sie wie Hotkeys. Neben den Tastenkombinationen für die Grundfunktionen gibt es einige visuelle Anzeigen, wenn der Control Center-Treiber in- stalliert ist. Tasten Funktion/ Visuelle Anzeigen Tasten Funktion/ Visuelle Anzeigen Fn +...
Systemübersicht: Ansicht von unten und vorne Ausrichtung der USIM-Karte Die lesbare Seite der USIM-Karte (die Sei- te, auf der sich die Goldkontakte befinden) muss wie abgebildet nach unten zeigen. USIM Kartenauswurf Drücken Sie einfach auf die USIM-Karte, um sie auszu- werfen.
Control Center Führen Sie das Control Center über das Startmenü in Windows aus. Sie können auch die Tastenkombination Fn + Esc drükken oder auf das Symbol im Infobereich auf der Taskleiste doppelklicken, um das Control Center zu öffnen. Das Control Center bietet einen schnellen Zugriff auf die Leistungsmodi, die Lüfter Einstellungen und die Konfiguration der LED-Tastatur.
Seite 40
Power Modes (Leistungsmodi) FAN Speed Control (LÜFTER Ge- schwindigkeitsregelung) “Power Modes (Leistungsmodi)” ermöglicht es Ihnen, den Leistungsmodus anzupassen, indem Sie auf das ent- sprechende Symbol klikken. Abb. 9 - LÜFTER Geschwindigkeitsregelung Können Sie die Lüftergeschwindigkeit auf Maximal (volle Leistung) oder Automatisch/Lautlos stellen. Die Lüfterge- Abb.
Weiße LED-Tastatur Die LED Keyboard-Anwendung kann durch Klicken auf LED Keyboard im Control Center oder über das Startmenü in Windows aufgerufen werden. Abb. 10 - LED Keyboard-Anwendung Tastatur Sleeptimer Aktivieren und wählen Sie anschließend die Zeitdauer der Leerlaufs, nach der die Tastatur LED den Schlafmodus aufrufen (d.h.
Start-Menü, Kontextmenü, Taskleiste, System- steuerung und Einstellungen von Windows 11 Abb. 11 Start-Menü, Kon- Auf die meisten Apps, Control Panels, Utilities und Programme in Windows 11 können textmenü, Sie über das Start-Menü gelangen. Klicken Sie dazu auf das Symbol in der Taskleis- Taskleiste, Sys- te in der linken unteren Ecke des Bildschirms (oder drücken Sie auf die Windows-Logo- temsteuerung...
Grafikfunktionen Anzeigegeräte Beachten Sie, dass Sie externe Anzeigen nutzen können, die Dieses System verfügt über eine integrierte GPU von Intel. an den HDMI-Ausgangsanschluss und/oder an den Thunder- Wenn der Grafiktreiber installiert ist, können Sie bei bolt 4 Anschluss angeschlossen sind. Lesen Sie die Anlei- Windows im Einstellfenster Anzeige die Anzeigegeräte tung des Anzeigegerätes, um zu erfahren, welche Formate wechseln und Anzeigeoptionen konfigurieren.
Audiofunktionen Konfiguration der Anzeige im Einstellfenster Anzeige: 1. Schließen Sie Ihre externe(n) Anzeige(n) an den entsprechenden Sie können die Audiooptionen für Ihren Computer über die Port an und schalten Sie sie anschließend ein. Systemsteuerung Sound in Windows konfigurieren. Greifen 2. Klicken Sie mit der rechten Maustaste auf den Desktop und dann Sie auf das Bedienfeld Sound über das Element Ein- aus dem Menü...
Strom & Akku Energiesparmodus (Moderner Standbymodus) Über das Bedienfeld Strom & Akku können Sie die Ener- gieoptionen für Bildschirm und Energiesparmodus, Ener- Dieses System unterstützt den Energiesparmodus als Mo- giestatus, Stromsparmodus und Akkunutzung usw. dernes Standby. In diesem Fall lädt das System weiterhin E- schnell anpassen.
Installation der Treiber Die Disc Device Drivers & Utilities + User's Manual enthält die Treiber und Hilfsprogramme, die für das einwandfreie Funk- tionieren des Computers notwendig sind. Möglicherweise wurden diese bereits vorinstalliert. Ist das nicht der Fall, legen Sie die Disc ein, und klicken Sie auf Install Drivers (Schaltfläche) oder Option Drivers (Schaltfläche), um das Treibermenü Optional aufzurufen.
Wireless-LAN-Modul (Option) Bluetooth-Modul (Option) Stellen Sie vor der Konfiguration sicher, dass das Bluetooth- Stellen Sie vor der Konfiguration sicher, dass das WLAN- Modul eingeschaltet ist (Flugzeugmodus deaktiviert). Modul eingeschaltet ist (Flugzeugmodus deaktiviert). Bluetooth-Konfiguration in Windows WLAN-Konfiguration in Windows 1. Klicken Sie auf den Eintrag Einstellungen im Startmenü. 1.
Windows Hello Kamera (Option) 9. Schauen Sie direkt auf den Bildschirm, damit das System Ihr Gesicht scannen kann (die blaue Leiste unter dem Bild zeigt den Die Windows Hello Kamera ist kompatibel mit dem Fortschritt des Scans an). Windows Hello Gesichtserkennung System. Die Windows 10.
TPM (Option) Abb. 18 Bevor Sie die TPM (Trusted Platform Module)-Funktionen Laufwerk- BitLocker- einrichten, müssen Sie die Sicherheitsplattform initialisieren. verschlüsselung (TPM-Verwaltung) Aktivieren der TPM-Funktionen 1. Starten Sie den Computer neu. 4. Im Fenster TPM-Verwaltung können Sie TPM unter Windows 2. Rufen Sie das BIOS auf, indem Sie während des POST-Vorgangs/ verwalten.
Fehlerbehebung Problem Mögliche Ursache - Lösung Die Module Wireless-LAN/ Im Flugzeugmodus sind die Module ausgeschaltet. Mit der Tastenkombination Fn + F11 Bluetooth können nicht erkannt können Sie den Flugzeugmodus ein- oder ausschalten (siehe Tabelle 2 auf Seite 32). werden. Das Kamera-Modul kann nicht Das ist ausgeschaltet.
Technische Daten BIOS Tastatur Insyde BIOS (128Mb SPI Flash-ROM) Weiße LED-Tastatur (mit Nummerntastatur) Oder Speicher (Werkseitige Option) Tastatur Dual Channel DDR4 Aktualität der technischen Daten Audio Onboard DDR4 8GB Die in diesem Teil aufgeführten techni- Ein 260-Pin SODIMM-Sockel High-Definition-Audio-kompatible schen Daten sind zum Zeitpunkt der Schnittstelle Unterstützung von DDR4 3200MHz...
Seite 52
Kommunikation Schnittstellen Abmessungen und Gewicht 1,0M HD Kamera-Modul Ein Thunderbolt 4 Anschluss mit Power 322 (B) x 216,8 (T) x 16,5 (H) mm Oder Delivery (DC-Eingang) 990g mit 36Wh-Akku 2,0M FHD Kamera-Modul Ein USB 3.2 Gen 1 Typ-A Anschluss Oder Oder Ein USB 3.2 Gen 2 Typ-A Anschluss 1,150g mit 73Wh-Akku...
A propos de ce Guide Utilisateur Concis Ce guide rapide est une brève introduction à la mise en route de votre système. Il s’agit d’un supplément, et non pas d’une alternative au Manuel de l’Utilisateur en Anglais complet au format Adobe Acrobat sur le disque Device Drivers & Utilities + User's Manual fourni avec votre ordinateur.
Instructions d’entretien et d’utilisation • Si une odeur inhabituel, de la chaleur ou de la fumée apparaissait sor- tant de votre ordinateur. L’ordinateur est robuste, mais il peut toutefois être endomma- gé. Afin d’éviter ceci, veuillez suivre ces recommandations : Informations de sécurité...
Seite 55
Précautions concernant les batteries polymère/Lithium-Ion Notez les informations suivantes spécifiques aux batteries polymères/Lithium-Ion, et le cas échéant, celles-ci remplacent les in- formations générales de précaution sur les batteries. • Les batteries polymères/Lithium-Ion peuvent présenter une légère dilatation ou gonflement, mais cela est inhérent au mécanisme de sécurité de la batterie et ne représente pas une anomalie.
Guide de démarrage rapide 1. Enlevez tous les memballages. 2. Posez l’ordinateur sur une surface stable. Arrêt 3. Connectez fermement les périphériques que vous souhaitez utiliser avec votre ordinateur (par ex. clavier et souris) à leurs ports respec- Veuillez noter que vous de- tifs.
l'écran ouvert Carte du système: Vue de face avec Figure 2 Vue de face avec l’écran ouvert 1. Webcam* (Option d’usine) Caméra Windows Hello* *Quand la caméra est en cours d'utilisation le Indicateur LED (à côté de la caméra) sera illuminé. 2.
Indicateur LED Rotation de l'écran L'écran LCD de l'ordinateur peut être ouvert jusqu'à 180 de- Le indicateur LED sur votre ordinateur affiche des informa- grés et vous pouvez utiliser la combinaison de touches Fn + tions utiles sur l’état actuel de votre ordinateur. R pour faire pivoter complètement l'écran.
Clavier Le clavier est doté d'un pavé numérique intégré pour une saisie des données numériques plus facile. Le fait d'appuyer sur Fn + Verr Num active ou désactive le pavé numérique. Il est également doté de touches fonction pour vous permettre de changer instantanément de mode opérationnel.
Seite 60
Touches fonction et indicateurs visuels Les touches de fonctions (F1 - F12 etc.) agiront comme touches de raccourci (hot-key) quand pressée en maintenant la touche Fn appuyée. En plus des combinaisons des touches de fonction de base, des indicateurs visuels sont disponibles quand le pi- lote Control Center est installé.
Carte du système: Vues de gauche, droite et arrière Gauche Droit Arrière Figure 5 - Vues de gauche, droite et arrière 1. Indicateur LED 6. Haut-parleurs 2. Prise d’entrée DC 7. Bouton d'alimentation 3. Prise de sortie HDMI 8. Lecteur de carte MicroSD 4.
Carte du système: Vues de dessous et face Orientation de la carte USIM Notez que le côté lisible de la carte USIM (avec les contacts dorés) doit être orienté vers le haut comme illustré. Ejection de la carte USIM Il suffit d'appuyer sur la carte USIM pour l'éjecter, cependant ne faites pas cela lorsqu'une connexion est en cours.
Control Center Exécutez le Control Center à partir du Menu Démarrer dans Windows . Vous pouvez également appuyer sur la combinaison de touches Fn + Échap ou double-cliquer sur l'icône dans la zone de notification de la barre des tâches pour accéder au Control Center. Le Control Center permet d'accéder rapidement aux Modes d'alimentation, aux réglages du Ventilateur et à...
Seite 64
Power Modes (Modes d'alimentation) FAN Speed Control (Contrôle de la vi- tesse du VENTILATEUR) « Modes d'alimentation » vous permet d'ajuster le mode d'alimentation en cliquant sur l'icône appropriée. Figure 9 - Contrôle de la vitesse du VENTILATEUR Vous pouvez régler la vitesse du ventilateur sur Maximum Figure 8 - Modes d'alimentation (pleine puissance) ou Automatique/Silencieux à...
Clavier à LED blanche Vous pouvez accéder à l'application LED Keyboard en cliquant sur LED Keyboard dans le Control Center ou à partir du Menu Démarrer dans Windows Figure 10 - Application LED Keyboard Minuterie de veille du clavier Activez puis sélectionnez la durée pendant laquelle le système est inactif avant que la LED du clavier n'entre en mode veille (c'est-à-dire que l'éclairage du clavier LED s'éteigne pour économiser de l'énergie).
Menu Démarrer, Menu contextuel, Barre des tâches, Panneau de configuration et Figure 11 Menu Démarrer, Paramètres de Windows 11 Menu contex- tuel, Barre des La plupart des applications, panneaux de configuration, utilitaires et programmes dans tâches, Panneau Windows 11 sont accessibles depuis le Menu Démarrer en cliquant sur l'icône dans de configuration la barre des tâches dans le coin inférieur gauche de l'écran (ou en appuyant sur la Touche...
Caractéristiques vidéo Périphériques d’affichage Vous pouvez utiliser des écrans externes connectés à la prise Le système comporte un GPU intégré Intel. Vous pouvez de sortie HDMI et/ou au port Thunderbolt 4. Consultez le permuter les dispositifs d'affichage et configurer les options manuel de votre périphérique d'affichage pour connaître les d'affichage depuis le panneau de contrôle Affichage dans formats pris en charge.
Caractéristiques audio Pour configurer les affichages en utilisant le panneau de contrôle Affichage: Vous pouvez configurer les options audio sur votre ordinateur 1. Connectez votre (vos) écran(s) externe(s) au port approprié, puis à partir du panneau de configuration Son dans Windows. Ac- allumez-le(s).
Batterie et alimentation Veille (Veille moderne) Ce système prend en charge le mode Veille en tant que Le panneau de configuration Batterie et alimentation vous Veille moderne. Dans ce cas, le système continuera à télé- permet de régler rapidement les options d'alimentation pour charger les e-mails, les mises à...
Installation du pilote Le disque Device Drivers & Utilities + User’s Manual contient les pilotes et les utilitaires nécessaires pour un bon fonction- nement de votre ordinateur. Cette installation aura probablement déjà été faite pour vous. Si ce n'est pas le cas, insérez le disque et cliquez sur Install Drivers (bouton), ou Option Drivers (bouton) pour accéder au menu des pilotes Optionnels.
Module Bluetooth (Option) Module LAN sans fil (Option) Assurez-vous que le module LAN sans fil est activé (et non Assurez-vous que le module Bluetooth est activé (et non en en Mode Avion) avant que la configuration commence. Mode Avion) avant que la configuration commence. Configuration WLAN dans Windows Configuration Bluetooth dans Windows 1.
Caméra Windows Hello (Option) 9. Regardez directement l'écran de façon continue et le système scannera votre visage (la barre bleue sous votre image indique la La Caméra Windows Hello est compatible avec le système progression du scan). de Reconnaissance faciale de Windows Hello. La caméra 10.
TPM (Option) 3. Cliquez sur Administration du TPM. Figure 18 Avant de paramétrer les fonctions TPM (Module de plateforme Chiffrement de lecteur sécurisée) vous devez initialiser la plateforme de sécurité. BitLocker (Administration du TPM) Activer TPM 4. La fenêtre de gestion du TPM vous permet de configurer le TPM 1.
Dépannage Problème Cause possible - résolution modules sans fil/ Les modules sont désactivés quand l'ordinateur est en Mode Avion. Utilisez la combinaison de Bluetooth ne peuvent pas être touches Fn + F11 pour activer ou désactiver le Mode Avion (voir le Tableau 2 à...
Spécifications BIOS Clavier Insyde BIOS (SPI Flash ROM de 128Mb) Clavier à LED blanche Mémoire (Option d’usine) Clavier Dernières informations de Double canal DDR4 spécification DDR4 8Go intégrée Les spécifications énumérées dans cette Un emplacement SODIMM 260 broches, Interface conforme HDA (Son Haute section sont correctes à...
Seite 76
Communication Interface Dimensions physiques & poids 1,0M caméra HD Un port Thunderbolt 4 avec Power Delivery 322 (l) x 216,8 (p) x 16,5 (h) m (entrée DC) 990g avec batterie 36Wh Un port USB 3.2 Gen 1 Type-A (Option d’usine) 2,0M caméra FHD Un port USB 3.2 Gen 2 Type-A 1,150g avec batterie 73Wh (Option d’usine) Module de caméra...
Acerca de esta Guía del Usuario Concisa Esta guía rápida es una breve introducción para poner su sistema en funcionamiento. Es un suplemento y no un sustituto del Manual del usuario completo en inglés en formato Adobe Acrobat del disco Device Drivers & Utilities + User's Manual suministrado con el ordenador.
Instrucciones para el cuidado y funcio- • Si hay un olor fuera de lo normal, calor o humo que sale del orde- nador. namiento Información de seguridad El ordenador portátil es muy robusto, pero puede dañarse. Para • Utilice solamente un adaptador de alimentación aprobado para su evitar esto, siga estas sugerencias: uso con este ordenador.
Seite 79
Precauciones a tomar con la batería de iones de litio/polímero Tenga en cuenta la información siguiente específica para baterías de iones de litio/polímero; además, donde corresponda, invalida la información sobre precauciones para baterías normales. • Las baterías de iones de litio/polímero pueden aumentar o hincharse ligeramente, sin embargo, esto es parte del mecanismo de seguridad de la batería y o supone un problema.
Guía rápida para empezar 1. Quite todos los materiales del embalaje. 2. Coloque el ordenador en una superficie estable. Apagar 3. Conecte en los puertos correspondientes los periféricos que desee utilizar con el ordenador (p. ej. teclado y ratón). Por favor, tenga en cuenta que debería siempre apagar 4.
Mapa del sistema: Vista frontal con la pantalla abierta Figura 2 Vista frontal con la pantalla abierta 1. Cámara web* (Opción de fábrica) Cámara Windows Hello* *Cuando la cámara esté en uso, el LED (al lado de la cámara) se iluminará. 2.
Indicador LED Rotación de la pantalla La pantalla LCD del ordenador se puede abrir hasta 180 El indicador LED en su ordenador muestra una valiosa grados y puede usar la combinación de teclas Fn + R para información sobre el estado actual del ordenador. girar completamente la pantalla.
Teclado El teclado tiene un teclado numérico para una entrada fácil de datos numéricos. Al presionar Fn + Bloq Num el teclado numérico se habilita o inhabilita. También incluye las teclas de función para permitirle cambiar las características operacionales al instante. Teclado con LED blanco Consulte "Teclado con LED blanco"...
Seite 84
Teclas de función e indicadores visuales Las teclas de función (F1 - F12 etc.) actuarán como teclas directas (Hot-Key) cuando se pulsan junto con la tecla Fn. Además de las combinaciones de teclas de función básicas algunos indicadores visuales están disponibles cuando el controlador de Control Center está...
Mapa del sistema: Vistas izquierda, derecha y posterior Lateral izquierdo Lateral derecho Parte posterior Figura 5 - Vistas izquierda, derecha y posterior 1. Indicador LED 6. Altavoces 2. Conector de entrada DC 7. Botón de encendido 3. Puerto de salida de HDMI 8.
Mapa del sistema: Vistas inferior y frontal Orientación de la tarjeta USIM Tenga en cuenta que el lateral le- gible de la tarjeta USIM (con los contactos dorados) debería mirar hacia arriba, como se ilustra. Expulsión de la tarjeta USIM Simplemente presione la tarjeta USIM para expulsarla, pero no lo haga mientras la tarjeta está...
Control Center Ejecute el Control Center desde el menú Inicio en Windows . También puede presionar la combinación de teclas Fn + Esc o hacer doble clic en el icono en el área de notificación de la barra de tareas para acceder al Control Center.
Seite 88
Power Modes (Modos de encendido) FAN Speed Control (Control de velocidad de FAN) “Power Modes (Modos de encendido)” le permite ajustar el modo de alimentación haciendo clic en el icono apropiado. Figura 9 - Control de velocidad de FAN Desde este elemento del menú puede ajustar la velocidad del Figura 8 - Modos de encendido (ventilador) a Máximo...
Teclado con LED blanco Se puede acceder a la aplicación LED Keyboard haciendo clic en LED Keyboard en el Control Center o desde el menú Inicio en Windows Figura 10 - Aplicación LED Keyboard Temporizador de suspensión del teclado Habilite y seleccione la cantidad de tiempo que el sistema debe estar inactivo para que el teclado LED entre en modo de suspensión (p.
Menú Inicio, Menú contextual, Barra de tareas, Panel de control y Configuración de Windows Figura 11 Menú Inicio, Menú contex- tual, Barra de Se puede acceder a la mayoría de las apps, paneles de control, utilidades y programas en tareas, Panel de Windows 11 desde el menú...
Parámetros de vídeo Dispositivos de pantalla Tenga en cuenta que puede usar pantallas externas El sistema incluye una GPU integrada de Intel. Puede conectadas al puerto de salida de HDMI y/o al puerto cambiar los dispositivos de pantalla y configurar las Thunderbolt 4.
Características de audio Configurar las pantallas usando el panel de control Pantalla: Puede configurar las opciones de audio de su ordenador en el 1. Conecte la(s) pantalla(s) externa(s) al puerto apropiado y panel de control de Sonido en Windows. Acceda al panel de enciéndala(s).
Energía y batería Suspensión (Standby moderno) Este sistema admite el modo Suspensión como modo El panel de control de Energía y batería le permite ajustar Standby moderno. En este caso, el sistema continuará rápidamente las opciones de energía: Pantalla y suspensión, descargando correo, actualizaciones...
Instalación de controladores El disco Device Drivers & Utilities + User’s Manual contiene los controladores y utilitarios necesarios para utilizar el ordenador correctamente. Inserte el disco y haga clic en Install Drivers (botón), u Option Drivers (botón) para acceder al menú...
Módulo LAN Wireless (Opción) Módulo Bluetooth (Opción) Asegúrese de que el módulo LAN inalámbrica esté Asegúrese de que el módulo Bluetooth esté encendido (y no encendido (y no en Modo de avión) antes de comenzar la en Modo de avión) antes de comenzar la configuración. configuración.
Cámara Windows Hello (Opción) 8. Necesitará escribir el número pin en la primera configuración. 9. Mantenga la vista directa sobre la pantalla y el sistema escaneará La cámara Windows Hello es compatible con el sistema de su cara (la barra azul bajo su imagen indica el progreso del Reconocimiento de caras de Windows Hello.
TPM (Opción) Figura 18 Antes de configurar las funciones del TPM (Módulo de Cifrado de unidad plataforma segura) deberá iniciar la plataforma de seguridad. BitLocker (Administración de Activar TPM TPM) 1. Reinicie el ordenador. 4. La ventana Administración del TPM le permite configurar el TPM 2.
Solución de problemas Problema Posible causa - Solución Los módulos WLAN y Los módulos están apagados cuando el equipo está en Modo Avión. Utilice la combinación de Bluetooth no pueden teclas Fn + F11 para activar/desactivar el Modo Avión (vea la Tabla 2 en la página 80).
Especificaciones BIOS Teclado Insyde BIOS (SPI Flash ROM de 128Mb) Teclado con LED blanco Memoria (Opción de fábrica) Teclado DDR4 de doble canal Información actualizada de Audio DDR4 8GB incluido especificaciones Un zócalo de 260 pins SODIMM, para Interfaz compatible HDA (Sonido de alta Las especificaciones listadas en esta memoria DDR4 3200MHz definición)
Seite 100
Comunicaciones Interfaz Dimensiones y peso 322 (a) x 216,8 (l) x 16,5 (h) mm Cámara web HD 1,0M Un puerto Thunderbolt 4 con Power Delivery (entrada DC) 990g con batería de 36Wh (Opción de fábrica) Cámara web FHD 2,0M Un puerto USB 3.2 Gen 1 Tipo-A 1,150g con batería de 73Wh Un puerto USB 3.2 Gen 2 Tipo-A (Opción de fábrica) Módulo cámara...
Informazioni su questa guida rapida Questa guida rapida rappresenta un’introduzione rapida all’avvio del sistema. Si tratta di un supplemento e non di una sostituzione del Manuale per l'utente completo in lingua inglese nel formato Adobe Acrobat, memorizzato sul disco Device Drivers &...
Istruzioni per la custodia e il funziona- • Se c'è un odore non usuale, calore o fumo che fuoriesce dal compu- ter. mento Informazioni di sicurezza Il computer notebook è abbastanza rigido, ma è possibile che possa essere danneggiato. Per evitare qualsiasi danno, attenersi •...
Seite 103
Precauzioni per la batteria polimero/litio-ione Le informazioni seguenti sono molto importanti e si riferiscono unicamente alle batterie ai polimeri/agli ioni di litio e, ove appli- cabile, hanno priorità rispetto alle precauzioni generali relative alle batterie. • Le batterie ai polimeri/agli ioni di litio possono espandersi o gonfiarsi leggermente, tuttavia questo fa parte del meccanismo di sicurezza della batteria e non deve essere causa di preoccupazione.
Guida di avvio rapido 1. Eliminare tutti i materiali di imballo. 2. Appoggiare il computer su una superficie stabile. Spegnimento 3. Collegare bene le periferiche che si desidera usare con il computer È importante tenere presen- (per esempio tastiera e mouse) alle porte corrispondenti. te che è...
Descrizione del sistema: Vista anteriore con lo schermo aperto Figura 2 Vista anteriore con lo schermo aperto 1. Webcam* (Opzione di fabbrica) Camera Windows Hello* *Quando si utilizza la camera, l'indicatore LED (accanto alla camera) si illumina. 2. Microfono array integrato 3.
Indicatore LED Rotazione dello schermo L’LCD del computer si può aprire fino a 180°, e puoi usare L'indicatore sul computer segnala importanti la combinazione di tasti Fn + R per ruotare completamente informazioni relative allo stato corrente del computer. lo schermo. Puoi usare questa funzione per ruotare lo schermo e mostrarlo, eventualmente, a chi di sta di fronte.
Tastiera Nella tastiera è stato integrato un tastierino numerico per un facile inserimento dei numeri. Premere Fn + Bloc Num per commutare l’attivazione e la disattivazione della tastiera numerica. Dispone anche di tasti funzione che consentono di cambiare istantaneamente le funzionalità operative. Tastiera con LED bianchi Vedere "Tastiera con LED bianchi"...
Tasti funzione e indicatori visivi I tasti funzione (da F1 a F12) agiscono come Hot-Key quando premuti tenendo premuto il tasto Fn. In aggiunta alle combinazioni di tasti funzione base, quando è installato il driver Control Center alcuni indicatori visivi sono disponibili. Tasti Tasti funzione e indicatori visivi Tasti...
Descrizione del sistema: Vista sinistra, destra e posteriore Lato sinistro Lato destro Lato posteriore Figura 5 - Vista sinistra, destra e posteriore 1. Indicatore LED 6. Altoparlanti 2. Jack di ingresso DC 7. Pulsante di alimentazione 3. Porta uscita HDMI 8.
Descrizione del sistema: Vista inferiore e anteriore Orientamento della scheda USIM Si noti che il lato leggibile della sche- da USIM, quello con i contatti di colo- re oro, deve essere rivolto verso l'alto, come illustrato in figura. Espulsione scheda USIM Premere la scheda USIM per espellerla, tuttavia non eseguire questa operazione quando la connessione è...
Control Center Esegui il Control Center dal menu Start di Windows . È anche possibile premere la combinazione di tasti Fn + Esc oppure fare doppio clic sull'icona nell'area di notifica della barra delle applicazioni per accedere al Control Center. Il Control Center consente di accedere rapidamente alle Modalità di Alimentazione, alle impostazioni della Ventola e alla configurazione della Tastiera a LED.
Seite 112
Power Modes (Modalità di FAN Speed Control (Controllo della alimentazione) velocità del VENTOLA) La "Power Modes (Modalità di alimentazione)" consente di regolare la modalità di alimentazione facendo clic sull'icona appropriata. Figura 9 - Controllo della velocità del VENTOLA Da questa voce di menu è possibile impostare la velocità della ventola su Massimo (potenza massima) o Automatico/ Silenzioso.
Tastiera con LED bianchi È possibile accedere all'applicazione LED Keyboard facendo clic su LED Keyboard nel Control Center o dal menu Start di Windows Figura 10 - Applicazione LED Keyboard Timer inattività tastiera Attiva e seleziona la quantità di tempo per il quale il sistema è inattivo prima che la tastiera LED attivi la modalità sleep (cioè l’illuminazione della tastiera LED si spegnerà...
Menu Start, Menu contestuale, Barra delle applicazioni, Pannello di controllo e Figura 11 Menu Start, Menu Impostazioni di Windows 11 contestuale, Bar- ra delle applica- La maggioranza delle app, pannelli di controllo, utilità e programmi all’interno di zioni, Pannello di Windows 11 sono accessibili dal menu Start cliccando l’icona nella barra delle controllo e Impo-...
Funzioni video Dispositivi di visualizzazione Si prega di notare che è possibile usare display esterni Il sistema è dotato di una GPU integrata Intel. È possibile connessi alle porte uscita HDMI e/o Thunderbolt 4. Vedere selezionare i dispositivi di visualizzazione e configurare le il manuale del display per vedere i formati supportati.
Funzionalità audio Configurare i display utilizzando il pannello di controllo Schermo: È possibile configurare le opzioni audio del computer dal 1. Collegare il/i display esterno/i alla porta corretta e quindi pannello di controllo Audio di Windows. Accedi al pannello accendere. di controllo Audio dalle Impostazioni (Sistema >...
Alimentazione e batteria Sospensione (Standby moderno) Il sistema supporta la modalità sospensione come versione Il pannello di controllo Alimentazione e batteria permette moderna dello standby. In questo caso il sistema continuerà di regolare rapidamente le opzioni di alimentazione per a scaricare la posta, gli aggiornamenti di Windows, gli Schermo e sospensione, Modalità...
Installazione driver Il disco Device Drivers & Utilities + User’s Manual contiene i driver e le utilità necessari per il corretto funzionamento del computer. Inserire il disco e fare clic su Install Drivers (pulsante), oppure il pulsante Option Drivers per accedere al menu del driver opzionale.
Modulo LAN Wireless (Opzione) Modulo Bluetooth (Opzione) Accertarsi che il modulo Wireless LAN sia attivato (e non in Accertarsi che il modulo Bluetooth sia attivato (e non in Modalità aereo) prima di iniziare la configurazione. Modalità aereo) prima di iniziare la configurazione. Configurazione WLAN in Windows Configurazione Bluetooth in Windows 1.
Camera Windows Hello (Opzione) 9. Guarda direttamente allo schermo e il sistema effettuerà la scansione della tua faccia (la barra blu sotto la tua immagine La camera Windows Hello è compatibile con il sistema di indica la progressione della scansione). Riconoscimento del volto Windows Hello.
TPM (Opzione) 3. Fare clic su Amministrazione TPM. Figura 18 Prima di configurare le funzioni TPM (Trusted Platform Crittografia unità Module) è necessario inizializzare la piattaforma di sicurezza. BitLocker (Amministrazione Attivazione di TPM TPM) 1. Riavviare il computer. 4. La finestra di gestione TPM vi consente di configurare il TPM 2.
Risoluzione dei problemi Problema Possibile causa - Soluzione Non è possibile rilevare i moduli I moduli sono disattivati quando il computer si trova nella modalità aereo. Utilizzare la LAN Wireless e Bluetooth. combinazione di tasti Fn + F11 per attivare/disattivare la modalità aereo (vedere la Tabella 2 a pagina 104).
Specifiche tecniche BIOS Tastiera Insyde BIOS (SPI Flash ROM da 128Mb) Tastiera con LED bianchi Memoria (Opzione di fabbrica) Tastiera Ultimi aggiornamenti delle Dual Channel DDR4 specifiche tecniche Audio On Board DDR4 8GB Le specifiche tecniche elencate in que- Una presa SODIMM 260 pin, dotata di Interfaccia conforme High Definition Audio sta sezione sono corrette al momento di...
Seite 124
Comunicazione Interfaccia Dimensioni fisiche & Peso Webcam HD 1,0M Una porta Thunderbolt 4 con Power Delivery 322 (B) x 216,8 (T) x 16,5 (H) mm (ingresso DC) 990g con batteria 36Wh (Opzione di fabbrica) Webcam FHD 2,0M Una porta USB 3.2 Gen 1 Tipo-A Una porta USB 3.2 Gen 2 Tipo-A 1,150g con batteria 73Wh (Opzione di fabbrica) Modulo di camera...