Herunterladen Inhalt Inhalt Diese Seite drucken
Inhaltsverzeichnis

Werbung

Verfügbare Sprachen
  • DE

Verfügbare Sprachen

  • DEUTSCH, seite 37

Werbung

Inhaltsverzeichnis
loading

Inhaltszusammenfassung für Clevo W370ST

  • Seite 3: Introduction (English)

    Introduction (English) Introducción (Español) This Concise User’s Guide introduces the main features Esta Guía del Usuario Concisa le presenta las caracterís- of your computer. The English version of this guide be- ticas principales de su ordenador. La versión española de gins on page 1.
  • Seite 4: Inhaltsverzeichnis

    Contents Inhalt About this Concise User Guide ............1 Über das Ausführliche Benutzerhandbuch ........31 System Startup ..................3 Schnellstart ..................33 RAID Setup ..................5 RAID Setup ..................35 System Map: Front View with LCD Panel Open (Model A) ...8 Systemübersicht: Ansicht von vorne mit geöffnetem System Map: Front View with LCD Panel Open (Model B) ....9 LCD-Bildschirm (Modell A) ............38 LED Indicators ................10...
  • Seite 5 Sommaire Contenidos A propos de ce Guide Utilisateur Concis ........61 Acerca de esta Guía del Usuario Concisa ........91 Guide de démarrage rapide .............63 Guía rápida para empezar ..............93 Configuration RAID ...............65 Configuración RAID ...............95 Carte du système: Vue de face avec l’écran LCD ouvert Mapa del sistema: Vista frontal con panel LCD abierto (Modelo A) (Modèle A) ..................68 Mapa del sistema: Vista frontal con panel LCD abierto Modelo B ...
  • Seite 6 Sommario Informazioni su questa guida rapida ..........121 Guida di avvio rapido ..............123 Configurazione RAID ..............125 Descrizione del sistema: Vista anteriore con pannello LCD aperto (Modello A) ..................128 Descrizione del sistema: Vista anteriore con pannello LCD aperto (Modello B) ...................129 Indicatori LED ................130 Pulsanti Hot-Key &...
  • Seite 7: About This Concise User Guide

    About this Concise User Guide This quick guide is a brief introduction to getting your system started. This is a supplement, and not a substitute for the expanded English language User’s Manual in Adobe Acrobat format on the Device Drivers & Utilities + User’s Manual disc supplied with your computer.
  • Seite 8: Instructions For Care And Operation

    Instructions for Care and Operation to work with a damaged battery in place, it may cause circuit damage, which may possibly result in fire. The computer is quite rugged, but it can be damaged. To prevent this, • Make sure that your computer is completely powered off before putting it into a travel bag (or any such container).
  • Seite 9: System Startup

    System Startup 1. Remove all packing materials. 2. Place the computer on a stable surface. 3. Insert the battery and make sure it is locked in position. 4. Securely attach any peripherals you want to use with the computer (e.g. keyboard and mouse) to their ports. 5.
  • Seite 10 Model Differences This notebook series includes two different model types that mainly differ as indicated in the table below. Note that your model may appear slightly different from those pictured in this manual. Feature Model A Model B Display Type 15.6”...
  • Seite 11: Raid Setup

    RAID Setup Prepare the following before setting up your serial ATA hard disks in RAID mode: You may use your hard disks in combination with Striping (RAID 0), Mirroring (RAID 1) or Recovery for either The Microsoft Windows 8 OS disc. fault tolerance or performance.
  • Seite 12 16. Go to RAID Level: and press <Enter>. • For Windows 8 32bit = D:\Options\RAID\f6flpy-x86 • For Windows 8 64bit = D:\Options\RAID\f6flpy-x64 17. Choose the RAID Level required (see Table 2 on page 5) and press <Enter>. 4. Start-up your notebook computer and press <F2> to enter the BIOS.
  • Seite 13 24. The RAID volume will then be created and the RAID information 28. Select the DVD drive containing the Windows 8 OS DVD and will be displayed under Intel(R) Rapid Storage Technology (in press <Enter>. the Advanced menu). 29. Press a key at system startup to begin installing Windows from your Microsoft Windows 8 disc.
  • Seite 14: System Map: Front View With Lcd Panel Open (Model A)

    System Map: Front View with LCD Panel Open (Model A) Figure 5 Front View with LCD Panel Open (Model A) 1. PC Camera (Optional) 2. *PC Camera LED *When the PC camera is in use, the LED will be illuminated in red. 3.
  • Seite 15: System Map: Front View With Lcd Panel Open (Model B)

    System Map: Front View with LCD Panel Open (Model B) Figure 6 Front View with LCD Panel Open (Model B)  1. PC Camera (Optional) 2. *PC Camera LED Wireless Device *When the PC camera Operation Aboard is in use, the LED will Aircraft be illuminated in red.
  • Seite 16: Led Indicators

    LED Indicators The LED indicators on the computer display helpful infor- Icon Color Description mation about the current status of the computer. Icon Color Description Model A Model B The AC/DC Adapter is Plugged Orange Green UMA Mode Activated Green The Computer is On Orange Optimus Mode Activated...
  • Seite 17: Hot Key Buttons & Keyboard

    Hot Key Buttons & Keyboard Press the Hot Key buttons on the computer to toggle the The keyboard has a numeric keypad for easy numeric data appropriate function on/off. input. Pressing NumLk turns on/off the numeric keypad. It also features function keys to allow you to change oper- ational features instantly.
  • Seite 18: Function Keys

    Function Keys The function keys (F1 - F11 etc.) will act as hot keys when pressed while the Fn key is held down. In addition to the basic function key combinations, some visual indicators are available (in the Windows Desktop application only and not in the Start Screen) when the hot key driver is installed.
  • Seite 19: Control Center

    Control Center When in the Windows Desktop application ( not in the Start Screen), press the Fn + Esc key combination, or double- click the icon in the notification area of the taskbar to toggle the Control Center on/off. The Control Center gives quick access to frequently used controls, and enables you to quickly turn modules on/off.
  • Seite 20 Power Status Sleep The Power Status icon will show whether you are cur- Click the Sleep button to bring up the Hibernate rently powered by the battery, or by the AC/DC adapter Sleep buttons, and click either button to have the plugged in to a working power outlet.
  • Seite 21: System Map: Front, Left, Right & Rear Views (Model A)

    System Map: Front, Left, Right & Rear Views (Model A) Figure 9 Front, Left, Right & Rear Views (Model A) Front 1. LED Indicators 2. Security Lock Slot 3. USB 2.0 Port Left 4. S/PDIF-Out Jack 5. Microphone-In Jack 6. Headphone-Out Jack 7.
  • Seite 22: System Map: Front, Left, Right & Rear Views (Model B)

    System Map: Front, Left, Right & Rear Views (Model B) Figure 10 Front, Left, Right & Rear Front Views (Model B) 1. LED Indicators 2. Security Lock Slot 3. USB 2.0 Port Left 4. S/PDIF-Out Jack 5. Microphone-In Jack 6. Headphone-Out Jack 7.
  • Seite 23: System Map: Bottom View

    System Map: Bottom View Model A Model B Figure 11  Bottom View 1. Component Bay Cover  The CPU is not a user ser- 2. Vent viceable part. Accessing 3. Battery Battery Information the CPU in any way may 4.
  • Seite 24: Windows Control Panel

    Windows Control Panel Throughout this manual you will see an instruction to open the Control Panel. In Windows 8 right-click the lower left hot corner to bring up the context menu (or use the Windows Logo Key + X key combination) and select Control Panel.
  • Seite 25: Apps & Tiles

    Apps & Tiles The Windows 8 Start screen will contain a number of apps, and many more will be installed as you add more applica- tions etc. Not all of these apps can fit on one screen so you will often need use the slider at the bottom of the screen in order to view all the necessary Apps.
  • Seite 26: Video Features

    Video Features To access the Intel® Graphics and Media Control Pan- The system features both an Intel’s Integrated GPU (for 1. Go to the Control Panel. power-saving) and an NVIDIA’s discrete GPU (for per- Click Intel(R) Graphics and Media in the icon view. formance).
  • Seite 27 ® NVIDIA Optimus Technology ™ Nvidia Optimus technology is a seamless technology ® ™ Icon Color Description designed to get best performance from the graphics sys- tem while allowing longer battery life, without having to UMA Mode Activated Green The system will use the Intel inte- manually change settings.
  • Seite 28 Display Devices Using the Windows Logo Key Key Combination to Switch Displays Besides the built-in LCD you can also use an external monitor/flat panel display/TV (TV through HDMI-Out You can also use the + P key combination (or Fn + F7 port only), connected to the external monitor port or to the ) to quickly change display configuration and modes (this HDMI-Out port (High-Definition Multimedia Interface)
  • Seite 29: Audio Features

    Audio Features Sound Blaster Cinema EQ Install the Sound Blaster Cinema application to allow You can configure the audio options on your computer you to configure the audio settings to your requirements from the Sound control panel in Windows, from the for the best performance in games, music and movies.
  • Seite 30: Fingerprint Reader

    Fingerprint Reader 10. Your fingerprints will now be enrolled (you may enroll any additional fingerprints at any time). (Optional for Model A Only) Install the driver and enroll your fingerprints as instructed  below before use. Help Fingerprint Reader Driver Installation Click the Help icon and select a 1.
  • Seite 31: 3G Module

    3G Module (Optional for Model A Only) If you have included an optional 3G module in your purchase option, follow the instructions below to install the USIM card (which will be provided by your service provider), and then run the appropriate application supplied with your module.
  • Seite 32: Driver Installation

    Driver Installation  The Device Drivers & Utilities + User’s Manual disc contains the drivers and utilities Driver Installation necessary for the proper operation of the computer. This setup will probably have already General Guidelines been done for you. If this is not the case, insert the disc and click Install Drivers (button), As a general guide follow or Option Drivers (button) to access the Optional driver menu.
  • Seite 33: Troubleshooting

    Troubleshooting Problem Possible Cause - Solution Wireless LAN/ The modules are off as the computer is in Airplane Mode. Check the LED indicator and/or Bluetooth modules cannot function key indicator to see if it is in Airplane Mode (see Table 4 on page 10).
  • Seite 34: Specifications

    Specifications Audio Model A: High Definition Audio Compliant Interface  15.6" (39.62cm) HD+/ FHD Sound Blaster™ Cinema Model B: 2 * Built-In Speakers Latest Specification Information Built-In Microphone 17.3" (43.94cm) HD+/ FHD The specifications listed in this section Memory Video Adapter are correct at the time of going to Intel®...
  • Seite 35 Interface Communication Environmental Spec One USB 2.0 Port Built-In Gigabit Ethernet LAN Temperature ° ° Three USB 3.0 Ports (Factory Option) 2M HD PC Camera Mod- Operating: 5 C - 35 One eSATA Port (USB 3.0 Port Combined) Non-Operating: -20°C - 60°C (Factory Option) 3G Mini-Card Module One HDMI-Out Port Relative Humidity...
  • Seite 37: Über Das Ausführliche Benutzerhandbuch

    Über das Ausführliche Benutzerhandbuch Diese Kurzanleitung soll einen Überblick über die Schritte geben, die dazu notwendig sind, das System zu starten. Dieses ist nur eine Ergänzung und kein Ersatz für das erweiterte englischsprachige Benutzerhandbuch, das auf der mitgelieferten Disc Device Drivers & Utilities + User's Manual im Adobe-Acrobat-Format vorliegt. Diese Disc enthält auch die Treiber und Utility-Programme, die für einen einwandfreien Betrieb des Computers notwendig sind (Hinweis: Das Unternehmen behält sich das Recht vor, diese Publikation ohne Vorankündigung zu überarbeiten und den Inhalt zu verändern).
  • Seite 38: Sicherheitsinformationen

    Hinweise zu Pflege und Betrieb explodieren. Richten Sie sich nach den regional gültigen Entsorgungsvorschriften. • Verwenden Sie den Akku nicht mehr, wenn er heruntergefallen ist oder in ande- Das Notebook ist zwar sehr stabil, kann aber dennoch beschädigt werden. rer Weise beschädigt (z.B. verzogen) ist. Auch wenn der Computer mit dem beschädigten Akku zu funktionieren schein, können dadurch Stromkreise Damit es nicht dazu kommt, sollten Sie die folgenden Hinweise beachten: beschädigt werden, die schließlich einen Brand verursachen können.
  • Seite 39: Schnellstart

    Schnellstart 1. Entfernen Sie das gesamte Verpackungsmaterial. 2. Legen Sie den Computer auf eine stabile Unterlage. 3. Setzen Sie den Akku ein, und stellen Sie sicher, dass sie fest sitzt. 4. Schließen Sie alle Peripheriegeräte, die Sie mit dem Computer verwenden wollen (z.
  • Seite 40: Modellunterschiede

    Modellunterschiede Diese Notebookserie umfasst zwei verschiedene Modelltypen, die sich in Folgendem unterscheiden. Es ist möglich, dass das von Ihnen erworbene Modell von dem in diesem Benutzerhandbuch abgebildeten Modell abweicht. Funktion Modell A Modell B LCD-Typ 15,6” (39,62cm) HD+/ FHD 17,3” (43,94cm) HD+/ FHD 3G-Modul Option Nicht unterstützt...
  • Seite 41: Raid Setup

    RAID Setup Um die Serial ATA-Festplatten im RAID-Modus einrichten können, benötigen Sie Folgendes: Sie können Ihre Festplatten für jede beliebige Fehlertoleranz 1. Die Microsoft Windows 8 Betriebssystem-Disc. oder Leistung in Kombination mit Striping (RAID 0), Mirro- 2. Eine Festplatte im primären HDD-Schacht installiert. ring (RAID 1) oder Recovery verwenden.
  • Seite 42 4. Starten Sie den Computer und drücken Sie auf die Taste <F2>, um 17. Wählen Sie die erforderliche RAID-Ebene (siehe Tabelle 2 auf in das BIOS zu gelangen. Seite 35) und drücken Sie auf die Eingabetaste. 5. Gehen Sie zum Menü Boot, wählen Sie OS Select und drücken •...
  • Seite 43 29. Drücken Sie während des Systemstarts auf eine Taste, um die Installation von Windows von der Microsoft Windows 8-DVD zu starten. 30. Drücken Sie auf Weiter > Jetzt installieren, um die Installation des Betriebssystems wie herkömmlich fortzusetzen (die Anleitung zur Installation des Windows-Betriebssystems finden Sie in der Windows- Dokumentation).
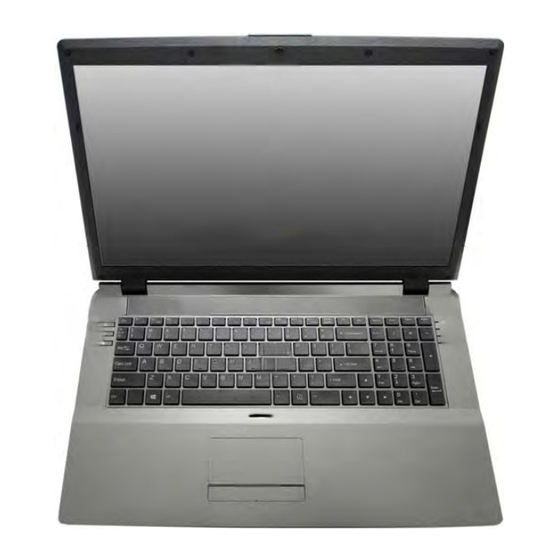
  • Seite 44: Systemübersicht: Ansicht Von Vorne Mit Geöffnetem Lcd-Bildschirm (Modell A)

    Systemübersicht: Ansicht von vorne mit geöffnetem LCD-Bild- schirm (Modell A) Abb. 5 Ansicht von vorne mit ge- öffnetem LCD-Bildschirm (Modell A) 1. PC-Kamera (optional) 2. *LED der PC-Kamera *Wenn die PC-Kamera verwendet wird, leuchtet die LED rot.LCD-Bild- schirm 15,6” (39,62cm) 3.
  • Seite 45 Systemübersicht: Ansicht von vorne mit geöffnetem LCD-Bild- schirm (Modell B) Abb. 6  Ansicht von vorne mit ge- öffnetem LCD-Bildschirm Die Benutzung (Modell B) drahtlos angeschlossener 1. PC-Kamera (optional) Geräte in Flugzeugen 2. *LED der PC-Kamera In der Regel ist die Be- *Wenn die PC-Kamera nutzung jeglicher...
  • Seite 46: Led-Anzeigen

    LED-Anzeigen Symbol Farbe Beschreibung Die LED-Anzeigen auf dem Computer zeigen wichtige Informationen über den aktuellen Status des Computers. Symbol Farbe Beschreibung Modell B Modell A Der AC/DC-Adapter ist ange- Grün UMA-Modus aktiviert Orange schlossen Orange Optimus-Modus aktiviert Grün Der Computer ist angeschaltet Orange Diskrete GPU (dGPU) von NVIDIA aktiviert Das System ist im konfigurierten...
  • Seite 47: Hot-Key-Tasten & Tastatur

    Hot-Key-Tasten & Tastatur Drücken Sie auf die Hot-Key-Tasten des Computers, um die Die Tastatur hat eine eingebettete Nummerntastatur für jeweilige Funktion ein-/auszuschalten. einfache Zahleneingabe. Durch Drücken auf Num wird die Nummerntastatur ein- und ausgeschaltet. Zusätzlich gibt es Funktionstasten, über die Sie direkt zwischen den Funk- Symbol Beschreibung tionen umschalten können.
  • Seite 48: Funktionstasten

    Funktionstasten Wenn die Funktionstasten (F1 - F11) gleichzeitig mit der Fn-Taste gedrückt werden, funktionieren sie wie Hotkeys. Neben den Tastenkombinationen für die Grundfunktionen gibt es einige visuelle Anzeigen (nur bei der Windows Desktop-An- wendung, aber nicht im Startbildschirm), wenn der Hotkey Treiber installiert ist Tasten Funktion/ Visuelle Anzeigen Tasten...
  • Seite 49: Control Center (Steuerzentrum)

    Control Center (Steuerzentrum) Drücken Sie auf die Tastenkombination Fn + Esc, oder doppelklicken Sie auf das Symbol im Infobereich auf der Taskleis- te um das Control Center (Steuerzentrum) ein-/auszuschalten in der Windows Desktop-Anwendung (nicht Startbild- schirm). Das Control Center (Steuerzentrum) bietet den schnellen Zugriff auf häufig verwendete Funktionen, und Sie haben hier die Möglichkeit, Module direkt ein-/auszuschalten.
  • Seite 50: Time Zone (Zeitzone)

    Power Status (Energiestatus) Sleep (Schalter) Das Energiestatus-Symbol zeigt an, ob die Stromversor- Klicken Sie auf den Schalter für den Ruhezustand, um die gung aktuell über den Akku oder über das an das Stromnetz Schaltflächen Ruhezustand oder Schlaf aufzuru- angeschlossene Netzteil erfolgt. Die Energiestatus-Anzeige fen.
  • Seite 51: Systemübersicht: Ansicht Von Vorne, Links, Rechts Und Hinten (Modell A)

    Systemübersicht: Ansicht von vorne, links, rechts und hinten (Mo- dell A) Abb. 9 Vorderseite Ansicht von vorne, links, rechts und hinten (Modell 1. LED-Anzeigen Linke Seite 2. Sicherheitsschloß-Buchse 3. USB 2.0 Anschluss 4. S/PDIF-Ausgangsbuchse 5. Mikrofon-Eingangs- buchse Rechte Seite 6. Kopfhörer-Ausgangs- buchse 7.
  • Seite 52: Systemübersicht: Ansicht Von Vorne, Links, Rechts Und Hinten (Modell B)

    Systemübersicht: Ansicht von vorne, links, rechts und hinten (Mo- dell B) Abb. 10 Vorderseite Ansicht von vorne, links, rechts und hinten (Modell 1. LED-Anzeigen 2. Sicherheitsschloß-Buchse Linke Seite 3. USB 2.0 Anschluss 4. S/PDIF-Ausgangsbuchse 5. Mikrofon-Eingangs- buchse 6. Kopfhörer-Ausgangs- Rechte Seite buchse 7.
  • Seite 53: Systemübersicht: Ansicht Von Unten

    Systemübersicht: Ansicht von unten Modell A Modell B Abb. 11  Ansicht von unten 1. Komponen- Die CPU darf nicht vom An-  tenfachabdekkung wender repariert werden. 2. Luftungsoffnung Jeglicher Zugriff auf die CPU Hinweis zum Akku 3. Akku führt zum Verlust der Garan- Ein neuer Akku sollte bei seiner ersten Verwendung zuerst einmal 4.
  • Seite 54: Windows Systemsteuerung

    Windows Systemsteuerung In diesem Handbuch finden Sie eine Anleitung zum Öffnen der Systemsteuerung. Klicken Sie mit der rechten Maustaste in die linke untere Hot Corner in Windows 8, um das Kontextmenü aufzurufen (verwenden Sie die Tastenkombination Windows-Logo-Taste + X). Wählen Sie dann Systemsteuerung. Verschieben Sie die Maus in die linke untere Ecke Abb.
  • Seite 55: Apps Und Kacheln

    Apps und Kacheln Der Startbildschirm von Windows 8 enthält bereits eine Reihe von Apps, die mit jeder weiteren Installation erweitert wird. Wenn auf dem Bildschirm nicht ausreichend Platz ist, um alle Apps anzuzeigen, können Sie den Schieberegler am unteren Rand des Bildschirms verwenden, um das Fenster entsprechend zu verschieben und die gewünschten Apps sehen zu können.
  • Seite 56: Grafikfunktionen

    Grafikfunktionen Dieses System verfügt sowohl über eine integrierte GPU So rufen Sie die Intel® Steuerung für Grafik und Medien von Intel (zum Energie sparen) und eine diskrete GPU von auf: NVIDIA (für die Leistung). Wenn die Videotreiber in- 1. Rufen Sie die Systemsteuerung auf. stalliert sind, können Sie die Anzeigegeräte wechseln und die 2.
  • Seite 57: Nvidia® Optimus™-Technologie

    Nvidia® Optimus™-Technologie Die Nvidia® Optimus™-Technologie ist eine nahtlose Symbol Farbe Beschreibung Technologie, mit der bei längerer Akkubetriebsdauer die höchstmögliche Leistung des Grafiksystems erreicht wird, UMA-Modus aktiviert Grün Das System verwendet unr die integ- ohne manuell die Einstellungen ändern zu müssen. Wenn rierte GPU (iGPU) von Intel eine Anwendung gestartet wird, die eine besonders hohe Leistung oder Qualität erfordert, wird die diskrete GPU...
  • Seite 58: Anzeigegeräte

    Anzeigegeräte Wechseln der Anzeigegeräte mit der Neben dem integrierten LCD-Monitor können Sie auch Windows-Logo-Taste und der Taste P einen externen VGA-Monitor/Flachbildschirm oder ein Wenn Sie gleichzeitig auf die Tasten und P (oder Fn + Fernsehgerät (an die Schnittstelle für externen Monitor oder F7) drücken, konnen Sie bei Windows schnell und einfach an den HDMI-Ausgangsanschluss angeschlossen) als An- die Anzeigeeinstellungen und -modi wechseln (was be-...
  • Seite 59: Audiofunktionen

    Audiofunktionen Sound Blaster Cinema EQ Mit der Anwendung Sound Blaster Cinema können Sie die Sie können die Audio-Einstellungen Ihres Computers über Audioeinstellungen nach Ihren Anforderungen konfigurie- die Windows-Systemeinstellungen bei Sound , über das ren, um eine bestmögliche Audioleistung bei Spielen und der HD VDeck-Symbol auf dem Desktop oder über das VIA HD Wiedergabe von Musik und Videos zu erreichen.
  • Seite 60: Fingerabdruckleser

    Fingerabdruckleser 7. Sie werden nun aufgefordert, einen weiteren Finger anzumelden (es wird empfohlen, mehrere Finger anzumelden ). (Optional nur für Modell A) 8. Wenn Sie mehrere Fingerabdrücke angemeldet haben, klicken Sie Installieren Sie die Treiber und melden Sie Ihre Fingerab- zum Fortfahren auf die Schaltfläche.
  • Seite 61: 3G-Modul

    3G-Modul (Optional nur für Modell A) Wenn Ihr Modell das optionale 3G-Modul enthält, folgen Sie den nachfolgenden Anweisungen, um die USIM-Karte zu in- stallieren (Sie erhalten sie von Ihrem Dienstanbieter). Installieren Sie dann die Anwendung. Einsetzen der USIM-Karte 1. Schalten Sie den Computer aus, drehen Sie es herum, und nehmen Sie den Akku heraus.
  • Seite 62: Installation Der Treiber

    Installation der Treiber  Die Disc Device Drivers & Utilities + User's Manual enthält die Treiber und Hilfspro- gramme, die für das einwandfreie Funktionieren des Computers notwendig sind. Möglicher- Allgemeine Hinweise zur Treiberinstallation weise wurden diese bereits vorinstalliert. Ist das nicht der Fall, legen Sie die Disc ein, und klicken Sie auf Install Drivers (Schaltfläche) oder Option Drivers (Schaltfläche), um das Wenn Sie keine fortge- schrittenen...
  • Seite 63: Fehlerbehebung

    Fehlerbehebung Problem Mögliche Ursache - Lösung Die Module Wireless-LAN/ Im Flugzeugmodus sind die Module ausgeschaltet. Prüfen Sie der LED-Anzeige und/ Bluetooth können nicht erkannt oder Funktionstastenanzeige, ob der Computer im Flugzeugmodus ist (siehe Tabelle 4 auf werden. Seite 40). Mit der Tastenkombination Fn + F11 oder der Flugzeugmodus-Taste können Sie den Flugzeugmodus ein- oder ausschalten (siehe Tabelle 7 auf Seite...
  • Seite 64: Technische Daten

    Technische Daten Audio Modell A: High-Definition-Audio-kompatible Schnittstelle 15,6" (39,62cm) HD+/ FHD  2 eingebaute Lautsprecher Modell B: Aktualität der technischen Daten Eingebautes Mikrofon 17,3" (43,94cm) HD+/ FHD Sound Blaster™ Cinema Die in diesem Teil aufgeführten tech- Videoadapter nischen Daten sind zum Zeitpunkt der Speicher Integrierte GPU von Intel®...
  • Seite 65 Schnittstellen Kommunikation Umgebungsbedingungen Ein USB 2.0-Anschluss 1 Gbit Ethernet-LAN eingebaut Temperatur Drei USB 3.0-Anschlüsse (Werkseitige Option) 2M HD PC-Kamera- In Betrieb: 5ºC – 35ºC Modul Bei Aufbewahrung: -20ºC – 60ºC Ein eSATA-Anschluss (kombinierter USB 3.0-Anschluss) (Werkseitige Option) 3G Mini-Card-Modul Relative Luftfeuchtigkeit (Nur Modell A) Ein HDMI-Ausgangsanschluss In Betrieb: 20 –...
  • Seite 67: A Propos De Ce Guide Utilisateur Concis

    A propos de ce Guide Utilisateur Concis Ce guide rapide est une brève introduction à la mise en route de votre système. Il s’agit d’un supplément, et non pas d’une alternative au Manuel de l’Utilisateur en Anglais complet au format Adobe Acrobat sur le disque Device Drivers & Utilities + User's Manual fourni avec votre ordinateur.
  • Seite 68: Instructions D'entretien Et D'utilisation

    Instructions d’entretien et d’utilisation continue de fonctionner avec la batterie en place, cela peut détériorer le circuit, pouvant déclencher un incendie. L’ordinateur est robuste, mais il peut toutefois être endommagé. Afin • Assurez-vous que votre ordinateur est complètement éteint avant de le mettre dans un sac de voyage (ou tout autre bagage similaire).
  • Seite 69: Guide De Démarrage Rapide

    Guide de démarrage rapide 1. Enlevez tous les memballages. 2. Posez l’ordinateur sur une surface stable. 3. Installez la batterie et assurez-vous qu’elle correctement positionnée. 4. Connectez fermement les périphériques que vous souhaitez utiliser avec votre ordinateur (par ex. clavier et souris) à leurs ports respectifs.
  • Seite 70 Différences de modèles Cette série d’ordinateurs portables inclut deux types de modèles dont les différences sont indiquées dans le tableau ci-des- sous. Remarquez que l’apparence de votre modèle peut être légèrement différente de celles présentées dans ce manuel. Caractéristique Modèle A Modèle B Type de LCD 15,6”...
  • Seite 71: Configuration Raid

    Configuration RAID Avant de configurer votre disque dur Serial ATA en mode RAID, vous devrez préparer ce qui suit : Vous pouvez utiliser vos disques durs en RAID 0 (Striping), RAID 1 (Mirroring) ou Recovery (Récupération) pour amé- 1. Le disque de SE Microsoft Windows 8. liorer la tolérance aux pannes et les performances.
  • Seite 72 16. Allez à RAID Level: et appuyez sur Entrée. • For Windows 8 32bit = D:\Options\RAID\f6flpy-x86 17. Choisissez le niveau RAID requis (voir le Tableau 2 à la page • For Windows 8 64bit = D:\Options\RAID\f6flpy-x64 et appuyez sur Entrée. 4.
  • Seite 73 24. Le volume RAID sera alors créé et les informations RAID seront 28. Sélectionnez le lecteur de DVD contenant le DVD du SE affichées sous Intel(R) Rapid Storage Technology (dans le menu Windows 8 et appuyez sur Entrée. Advanced). 29. Appuyez sur une touche au démarrage du système pour commencer à...
  • Seite 74: Carte Du Système: Vue De Face Avec L'écran Lcd Ouvert (Modèle A)

    Carte du système: Vue de face avec l’écran LCD ouvert (Modèle A) Figure 5 Vue de face avec l’écran LCD ouvert (Modèle A) 1. Caméra PC (optionnelle) 2. *Indicateur LED de caméra *Quand la caméra PC est en cours d'utilisation le Indicateur LED sera illuminé...
  • Seite 75: Carte Du Système: Vue De Face Avec L'écran Lcd Ouvert (Modèle B)

    Carte du système: Vue de face avec l’écran LCD ouvert (Modèle B) Figure 6 Vue de face avec l’écran LCD ouvert (Modèle B)  1. Caméra PC (optionnelle) 2. *Indicateur LED de caméra Utilisation des appareils sans fil à *Quand la caméra PC est bord d'un avion en cours d'utilisation le L'utilisation de tout...
  • Seite 76: Lndicateurs Led

    lndicateurs LED Les indicateurs LED sur votre ordinateur affichent des infor- Icône Couleur Description mations utiles sur l’état actuel de votre ordinateur. Icône Couleur Description Modèle A Modèle B Orange L'adaptateur AC/DC est branché Vert L’ordinateur est allumé Vert Mode UMA activé Vert Le système est dans le mode de Orange...
  • Seite 77: Boutons Hot-Key & Clavier

    Boutons Hot-Key & Clavier Appuyez sur les boutons Hot-Key sur l’ordinateur pour acti- Le clavier est doté d'un pavé numérique intégré pour une sai- ver/désactiver la fonction appropriée. sie des données numériques plus facile. Le fait d'appuyer sur Verr Num active ou désactive le pavé numérique. Il est éga- lement doté...
  • Seite 78: Touches Fonction

    Touches fonction Les touches de fonctions (F1 - F11 etc.) agiront comme touches de raccourci (hot-key) quand pressée en maintenant la touche Fn appuyée. En plus des combinaisons des touches de fonction de base, des indicateurs visuels sont disponibles (dans l'ap- plication Bureau de Windows uniquement et pas dans l'écran d'accueil) quand le pilote de touches de raccourci (HotKey Driver) est installé.
  • Seite 79: Control Center (Centre De Contrôle)

    Control Center (Centre de contrôle) Lorsque vous êtes dans l'application Bureau de Windows (pas dans l'écran d'accueil) appuyez sur la combinaison de touches Fn + Échap ou double-cliquez sur l'icône dans la zone de notification de la barre des tâches pour activer/désactiver le Control Center (Centre de contrôle).
  • Seite 80 Power Status (État d'alimentation) Sleep (Veille) L'icône État d'alimentation indique si vous êtes actuelle- Cliquez sur le bouton Veille pour faire apparaître les boutons ment alimenté par la batterie, ou par l'adaptateur AC/DC Veille Prolongée ou Veille , et cliquez sur l’un des branché...
  • Seite 81: Carte Du Système: Vues De Face, Gauche, Droite, Arrière & Dessous (Modèle A)

    Carte du système: Vues de face, gauche, droite, arrière & dessous (Modèle A) Figure 9 Face Vues de face, gauche, droite, arrière & dessous (Modèle A) 1. Indicateurs LED Gauche 2. Fente de verrouillage de sécurité 3. Port USB 2.0 4.
  • Seite 82: Carte Du Système: Vues De Face, Gauche, Droite, Arrière & Dessous (Modèle B)

    Carte du système: Vues de face, gauche, droite, arrière & dessous (Modèle B) Figure 10 Face Vues de face, gauche, droite, arrière & dessous (Modèle B) 1. Indicateurs LED Gauche 2. Fente de verrouillage de sécurité 3. Port USB 2.0 4.
  • Seite 83: Carte Du Système: Vue D'en Dessous

    Carte du système: Vue d’en dessous Modèle A Modèle B  Figure 11 Vue d’en dessous 1. Couvercle de baie de Veuillez ne pas essayer d’ou-  composant vrir ou de forcer le processeur UC de votre ordinateur. Le fait Informations batterie 2.
  • Seite 84: Panneau De Configuration De Windows

    Panneau de Configuration de Windows Tout au long de ce manuel, vous verrez une instruction pour ouvrir le Panneau de Configuration. Dans Windows 8 cliquez- droit sur le coin chaud inférieur gauche pour faire apparaître le menu contextuel (utilisez la combinaison de touches Touche Logo de Windows + X) et sélectionnez Panneau de Configuration.
  • Seite 85: Applications Et Vignettes

    Applications et Vignettes L'écran d'accueil de Windows 8 contiendra un certain nombre d'applications, et bien d'autres seront installées lorsque vous ajouterez des applications, etc. Toutes ces applications peuvent tenir sur un seul écran ainsi vous aurez souvent besoin d'uti- liser le curseur au bas de l'écran afin d'afficher toutes les applications nécessaires. Barre des charmes de Windows Le côté...
  • Seite 86: Caractéristiques Vidéo

    Caractéristiques vidéo Le système comporte à la fois un GPU intégré Intel (pour Pour accéder au panneau de configuration graphiques et l’économie d’énergie) et un GPU discret NVIDIA (pour les média Intel: performances). Vous pouvez changer de périphérique d’affi- 1. Allez au Panneau de Configuration. chage, et configurer les options d’affichage dès le moment 2.
  • Seite 87 Technologie Nvidia® Optimus™ Icône Couleur Description La technologie Nvidia® Optimus™ est une technologie Mode UMA activé transparente conçue pour tirer les meilleures performances Vert Le système utilisera le GPU Intel inté- du système graphique tout en permettant une durée de batte- gré...
  • Seite 88 Périphériques d’affichage Utilisez la combinaison de touches du En plus du LCD intégré, vous pouvez aussi utiliser un moni- logo de Windows + P pour changer teur VGA externe/écran plat ou TV (connecté au port moni- d'affichage teur externe ou à la prise de sortie HDMI) comme Vous pouvez utiliser la combinaison de touches + P (ou périphérique d'affichage.
  • Seite 89: Caractéristiques Audio

    Caractéristiques audio Sound Blaster Cinema EQ Installez l'application Sound Blaster Cinema afin de pou- Vous pouvez configurer les options audio de votre ordinateur voir configurer les paramètres audio adéquats permettant à partir du panneau de configuration Son dans Windows, d’obtenir les meilleures performances de jeux, de musique et à...
  • Seite 90: Lecteur D'empreintes Digitales

    Lecteur d'empreintes digitales 8. Cliquez sur le bouton pour continuer une fois que vous avez enregistré un certain nombre d'empreintes digitales. (Optionnel pour Modèle A seulement) 9. Entrez les informations requises et cliquez sur le bouton pour Installez le pilote et enregistrez vos empreintes digitales enregistrer votre logiciel, ou cliquez pour l’enregistrer plus tard.
  • Seite 91: Module 3G

    Module 3G (Optionnel pour Modèle A seulement) Si votre option d'achat comporte un module 3G optionnel, suivez les instructions ci-dessous pour installer la carte USIM (qui vous sera fournie par votre fournisseur de service), et installez ensuite l'application. Insérer la carte USIM 1.
  • Seite 92: Installation Du Pilote

    Installation du pilote  Le disque Device Drivers & Utilities + User’s Manual contient les pilotes et les utilitaires nécessaires pour un bon fonctionnement de votre ordinateur. Cette installation aura proba- Directives générales pour l'installation du pilote blement déjà été faite pour vous. Si ce n'est pas le cas, insérez le disque et cliquez sur Install Drivers (bouton), ou Option Drivers (bouton) pour accéder au menu des pilotes Option- D'une manière...
  • Seite 93: Dépannage

    Dépannage Problème Cause possible - résolution modules sans fil/ Les modules sont désactivés quand l'ordinateur est en Mode Avion. Vérifiez l'indicateur LED Bluetooth ne peuvent pas être et/ou l’indicateur de la touche de fonction pour voir si l'ordinateur est en Mode Avion (voir détectés.
  • Seite 94: Spécifications

    Spécifications Options d’écrans LCD Modèle A: Interface conforme HDA (Son Haute  Définition) 15,6" (39,62cm) HD+/ FHD Sound Blaster™ Cinema Dernières informations de Modèle B: 2 haut-parleurs intégrés spécification 17,3" (43,94cm) HD+/ FHD Microphone intégré Les spécifications énumérées dans Adaptateur vidéo Mémoire cette section sont correctes à...
  • Seite 95 Interface Communication Spécifications environnementales Un port USB 2.0 1Gbit réseau Ethernet intégré Température ° ° Trois ports USB 3.0 (Option d’usine) 2M caméra PC HD En fonction : 5 C- 35 ° ° Un port eSATA (port USB 3.0 combiné) (Option d’usine) Module Mini-carte Eteint : -20 C - 60...
  • Seite 97: Acerca De Esta Guía Del Usuario Concisa

    Acerca de esta Guía del Usuario Concisa Esta guía rápida es una breve introducción para poner su sistema en funcionamiento. Es un suplemento y no un sustituto del Manual del usuario completo en inglés en formato Adobe Acrobat del disco Device Drivers & Utilities + User's Manual suministrado con el ordenador.
  • Seite 98: Instrucciones Para El Cuidado Y Funcionamiento

    Instrucciones para el cuidado y funcio- doblada o retorcida). Incluso si el ordenador sigue funcionando con una batería dañada, puede provocar daños en el circuito que podrían causar namiento fuego. • Compruebe que su ordenador esté completamente apagado antes de intro- El ordenador portátil es muy robusto, pero puede dañarse.
  • Seite 99: Guía Rápida Para Empezar

    Guía rápida para empezar 1. Quite todos los materiales del embalaje. 2. Coloque el ordenador en una superficie estable. 3. Inserte la batería y asegúrese de que quede bloqueada en su posición. 4. Conecte en los puertos correspondientes los periféricos que desee utilizar con el ordenador (p.
  • Seite 100: Diferencias De Modelos

    Diferencias de modelos Esta serie de portátil incluye dos tipos de modelos distintos que se diferencian según se indica en la siguiente tabla. Tenga en cuenta que el modelo puede parecer ligeramente distinto al de las imágenes en este manual. Característica Modelo A Modelo B...
  • Seite 101: Configuración Raid

    ación RAID Antes de configurar su disco duro Serial ATA en el modo Configur RAID necesitará preparar lo siguiente: Puede utilizar sus discos duros combinando en Tira (RAID 0), Espejo (RAID 1) o Recovery (Recuperación) para tolerancia de 1. El disco del SO Microsoft Windows 8. fallo o rendimiento.
  • Seite 102 4. Inicie su ordenador y pulse <F2> para entrar en la BIOS. 18. Vaya a cualquiera de los discos listados bajo Select Disks: y seleccione un nombre de disco y presione Entrar. 5. Vaya al menú Boot, seleccione OS Select y pulse Entrar. 19.
  • Seite 103 30. Pulse Siguiente > Instalar ahora para continuar instalando el sistema operativo normalmente (consulte su documentación de Windows si necesita instrucciones sobre la instalación del SO Windows). 31. Aparecerá un mensaje pidiéndole que cargue el controlador (Load Driver). 32. Haga clic en Examinar y busque la ubicación donde ha copiado los archivos en su unidad Flash USB o disco duro externo USB (X: indica la unidad Flash USB o disco duro externo USB): •...
  • Seite 104: Mapa Del Sistema: Vista Frontal Con Panel Lcd Abierto (Modelo A)

    Mapa del sistema: Vista frontal con panel LCD abierto (Modelo A) Figura 5 Vista frontal con panel LCD abierto (Modelo A) 1. Cámara PC (opcional) 2. *LED de cámara PC *Cuando la cámara PC esté en uso, el LED se iluminará...
  • Seite 105: Mapa Del Sistema: Vista Frontal Con Panel Lcd Abierto Modelo B

    Mapa del sistema: Vista frontal con panel LCD abierto Modelo B Figura 6 Vista frontal con panel LCD abierto (Modelo B)  1. Cámara PC (opcional) Uso de dispositivos 2. *LED de cámara PC inalámbricos a bordo *Cuando la cámara PC esté...
  • Seite 106: Indicadores Led

    Indicadores LED Icono Color Descripción Los indicadores LED en su ordenador muestran una valiosa información sobre el estado actual del ordenador. Icono Color Descripción Modelo A Modelo B Naranja El adaptador AC/DC está conectado Verde Modo UMA activado Verde El ordenador está encendido Naranja Modo Optimus activado Verde...
  • Seite 107: Botones Hot-Key & Teclado

    otones Hot-Key & Teclado El teclado tiene un teclado numérico para una entrada fácil de datos numéricos. Al presionar Bloq Num el teclado Presione los botones Hot-Key en el ordenador para activar o numérico se habilita o inhabilita. También incluye las teclas desactivar la función apropiada.
  • Seite 108: Teclas De Función

    Teclas de función Las teclas de función (F1 - F11 etc.) actuarán como teclas directas (Hot-Key) cuando se pulsan junto con la tecla Fn. Además de las combinaciones de teclas de función básicas algunos indicadores visuales están disponibles (sólo en la aplicación Escritorio de Windows y no en la pantalla Inicio) cuando el controlador de teclas directas está...
  • Seite 109: Control Center (Centro De Control)

    Control Center (Centro de control) Presione la combinación de teclas Fn + Esc o haga doble clic en el icono en el área de notificación de la barra de tareas para activar o desactivar el Control Center (Centro de control) en la aplicación Escritorio de Windows (no en la pantalla Inicio).
  • Seite 110 Power Status (Estado de energía) Sleep (Suspender) El icono Estado de energía mostrará si la alimentación Haga clic en el botón Suspender para abrir los botones actual viene dada por la batería o por el adaptador AC/DC Hibernar o Suspender y haga clic en uno de esos enchufado en una toma de corriente.
  • Seite 111: Mapa Del Sistema: Vistas Frontal, Izquierda, Derecha Y Posterior (Modelo A)

    Mapa del sistema: Vistas frontal, izquierda, derecha y posterior (Modelo A) Figura 9 Parte frontal Parte frontal Vistas frontal, izquierda, derecha y posterior (Mo- delo A) 1. Indicadores LED 2. Ranura del cierre de Lateral izquierdo seguridad 3. Puerto USB 2.0 4.
  • Seite 112: Mapa Del Sistema: Vistas Frontal, Izquierda, Derecha Y Posterior (Modelo B)

    Mapa del sistema: Vistas frontal, izquierda, derecha y posterior (Modelo B) Figura 10 Parte frontal Vistas frontal, izquierda, derecha y posterior (Mo- delo B) 1. Indicadores LED Lateral izquierdo 2. Ranura del cierre de seguridad 3. Puerto USB 2.0 4. Conector de salida S/PDIF 5.
  • Seite 113: Mapa Del Sistema: Vista Inferior

    Mapa del sistema: Vista inferior Modelo A Modelo B  Figura 11 Vista inferior  1. Tapa de la bahía El usuario no debe manipu- Información de la batería componente lar la CPU. El acceso a la CPU de cualquier modo pue- 2.
  • Seite 114: Panel De Control De Windows

    Panel de Control de Windows A lo largo de este manual verá una instrucción para abrir el Panel de Control. En Windows 8 haga clic con el botón derecho en la esquina inferior izquierda para abrir el menú contextual (o utilice la combinación Tecla de Windows + tecla X) y seleccionar Panel de Control.
  • Seite 115: Apps Y Mosaicos

    Apps y Mosaicos La pantalla de Inicio de Windows 8 contendrá varias apps y muchas más se instalarán conforme añada más aplicaciones, etc. No todas estas apps caben en una pantalla, por lo que a menudo deberá usar el control deslizante de la parte inferior de la pantalla para ver todas las apps necesarias.
  • Seite 116: Parámetros De Vídeo

    Parámetros de vídeo El sistema incluyo una GPU integrada de Intel (para el Para acceder al Panel de control de gráficos y multimedia ahorro de energía) y una GPU discreta NVIDIA (para Intel®: mayor rendimiento). Puede cambiar los dispositivos de 1.
  • Seite 117 Tecnología Nvidia® Optimus™ Icono Color Descripción La tecnología Nvidia® Optimus™ es una tecnología sin Modo UMA activado interrupciones diseñada para obtener el mejor rendimiento Verde El sistema utilizará solamente la GPU del sistema de gráficos permitiendo una mayor duración de integrada (iGPU) la batería, sin tener que cambiar la configuración Modo Optimus activado...
  • Seite 118 Dispositivos y opciones de pantalla Usar la combinación de teclas del logotipo Windows + P para cambiar Además del LCD incorporado, también puede utilizar un monitor VGA/pantalla plana o TV (conectado al puerto para entre pantallas monitor externo o al puerto de salida de HDMI) como Puede usar la combinación de teclas + P (o Fn + F7) para dispositivo de pantalla.
  • Seite 119: Características De Audio

    Características de audio Sound Blaster Cinema EQ Instale la aplicación Sound Blaster Cinema para poder Puede configurar las opciones de audio en su ordenador ajustar la configuración de audio según sus necesidades para desde el panel de control de Sonido en Windows, desde el obtener el mejor rendimiento en juegos, música y películas.
  • Seite 120: Lector De Huellas Digitales

    Lector de huellas digitales 8. Haga clic en el botón para continuar una vez registrado un número de huellas digitales. (Opcional sólo para Modelo A) 9. Escriba la información necesaria y haga clic en el botón para Instale el controlador y registre sus huellas digitales como se registrar su software o haga clic para registrarlo más tarde.
  • Seite 121: Módulo 3G

    Módulo 3G (Opcional sólo para Modelo A) Si ha incluido un módulo opcional 3G en su opción de compra, siga las instrucciones siguientes para instalar la tarjeta USIM (suministrada por su proveedor de servicios) y luego instale la aplicación. Insertar la tarjeta USIM 1.
  • Seite 122: Instalación De Controladores

    Instalación de controladores  El disco Device Drivers & Utilities + User’s Manual contiene los controladores y utilitarios necesarios para utilizar el ordenador correctamente. Inserte el disco y haga clic en Install Directrices generales para la instalación del Drivers (botón), u Option Drivers (botón) para acceder al menú de controladores opcional. controlador Instale los controladores en el orden indicado en la Figura...
  • Seite 123: Solución De Problemas

    Solución de problemas Problema Posible causa - Solución Los módulos WLAN y Bluetooth no Los módulos están apagados cuando el equipo está en Modo Avión. Compruebe el pueden detectarse. indicador LED y/o el indicador de la tecla de función para ver si el equipo está en Modo Avión (vea la Tabla 4 en la página 100).
  • Seite 124: Especificaciones

    Especificaciones Opciones del LCD Audio Modelo A: Interfaz compatible HDA (Sonido de alta definición)  15,6" (39,62cm) HD+/ FHD Sound Blaster™ Cinema Modelo B: Información actualizada de 2 altavoces incorporados especificaciones 17,3" (43,94cm) HD+/ FHD Micrófono incorporado Las especificaciones listadas en esta Adaptador de vídeo Memoria sección son correctas en el momento de...
  • Seite 125 Interfaz Comunicaciones Ranuras Mini-Card Un puerto USB 2.0 LAN Ethernet de 1Gbit incorporada Modelo A: Tres puertos USB 3.0 (Opción de fábrica) Módulo cámara PC 2M Ranura 1 para módulo LAN inalámbrica o módulo combo Bluetooth y LAN Un puerto eSATA (puerto USB 3.0 Inalámbrica combinado) (Opción de fábrica) Módulo Mini-Card 3G...
  • Seite 127: Informazioni Su Questa Guida Rapida

    Informazioni su questa guida rapida Questa guida rapida rappresenta un’introduzione rapida all’avvio del sistema. Si tratta di un supplemento e non di una sostituzione del Manuale per l'utente completo in lingua inglese nel formato Adobe Acrobat, memorizzato sul disco Device Drivers &...
  • Seite 128: Istruzioni Per La Custodia E Il Funzionamento

    Istruzioni per la custodia e il funziona- che sembri danneggiata (es. piegata o torta). Anche se il computer continua a funzionare con una batteria danneggiata, questa può provocare danni ai mento circuiti risultanti in pericolo di incendio. • Assicurarsi che il computer sia completamente spento prima di inserirlo in Il computer notebook è...
  • Seite 129: Guida Di Avvio Rapido

    Guida di avvio rapido 1. Eliminare tutti i materiali di imballo. 2. Appoggiare il computer su una superficie stabile. 3. Inserire la batteria e verificare che sia bloccata in posizione. 4. Collegare bene le periferiche che si desidera usare con il computer (per esempio tastiera e mouse) alle porte corrispondenti.
  • Seite 130 Differenze dei modelli Questa serie di notebook comprende due tipi di modelli differenti che variano tra loro per le caratteristiche indicate nella tabella seguente. Si noti che il proprio modello potrebbe essere leggermente diverso da quelli raffigurati nell'intero manuale. Funzionalità Modello A Modello B Tipo di schermo LCD...
  • Seite 131: Configurazione Raid

    Configurazione RAID Prima di configurare il disco rigido Serial ATA in modalità RAID è necessario disporre di quanto segue: È possibile combinare i dischi rigidi in modalità Striping (RAID 0), Mirroring (RAID 1) o Recovery (Ripristino) per 1. Il disco del sistema operativo Microsoft Windows 8. ottenere la protezione di fault tolerance o maggiore 2.
  • Seite 132 16. Passare a RAID Level: e premere Invio. • For Windows 8 32bit = D:\Options\RAID\f6flpy-x86 17. Scegliere il livello RAID richiesto (vedere la Tabella 2 a • For Windows 8 64bit = D:\Options\RAID\f6flpy-x64 pagina 125) e premere Invio. 4. Accendere il computer e premere <F2> per entrare nel BIOS. 5.
  • Seite 133 29. Premere un tasto qualsiasi all'avvio del sistema per iniziare l'installazione di Windows dal disco Microsoft Windows 8. 30. Premere Avanti > Installa per continuare l'installazione del sistema operativo normalmente (vedere la documentazione di Windows se occorrono istruzioni sull'installazione del sistema operativo Windows).
  • Seite 134: Descrizione Del Sistema: Vista Anteriore Con Pannello Lcd Aperto (Modello A)

    Descrizione del sistema: Vista anteriore con pannello LCD aperto (Modello A) Figura 5 Vista anteriore con pannel- lo LCD aperto (Modello A) 1. Camera PC (opzionale) 2. *LED della camera PC *Quando si utilizza la camera PC, l'indicatore LED si illumina in rosso. 3.
  • Seite 135: Descrizione Del Sistema: Vista Anteriore Con Pannello Lcd Aperto (Modello B)

    Descrizione del sistema: Vista anteriore con pannello LCD aperto (Modello B) Figura 6 Vista anteriore con pannel- lo LCD aperto (Modello B) 1. Camera PC (opzionale)  2. *LED della camera PC *Quando si utilizza la Funzionamento del camera PC, l'indicatore dispositivo senza fili LED si illumina in rosso.
  • Seite 136: Indicatori Led

    Indicatori LED Icona Colore Descrizione Gli indicatori LED sul computer segnalano importanti informazioni relative allo stato corrente del computer. Icona Colore Descrizione Modello A Modello B Arancione L'adattatore AC/DC è collegato Verde Modalità UMA attivata Verde Il computer è acceso Arancione Modalità...
  • Seite 137: Pulsanti Hot-Key & Tastiera

    Pulsanti Hot-Key & Tastiera Nella tastiera è stato integrato un tastierino numerico per un facile inserimento dei numeri. Premere Bloc Num per Premere i pulsanti Hot-Key sul computer per attivare/disatti- commutare l’attivazione e la disattivazione della tastiera vare le funzioni desiderate. numerica.
  • Seite 138: Tasti Funzione

    Tasti funzione I tasti funzione (da F1 a F11) agiscono come Hot-Key quando premuti tenendo premuto il tasto Fn. In aggiunta alle combinazioni di tasti funzione base, quando è installato il driver hot key (HotKey Driver) alcuni indicatori visivi sono disponibili (solo nell'applicazione Windows Desktop e non nella schermata Start).
  • Seite 139: Control Center (Centro Di Controllo)

    Control Center (Centro di controllo) Premere la combinazione di tasti Fn + Esc oppure fare doppio clic sull'icona nell'area di notifica della barra delle applicazioni per attivare/disattivare il Control Center (Centro di controllo) dall'interno dell'applicazione Windows Desktop (non nella Schermata Start). Il Control Center (Centro di controllo) consente di accedere rapidamente ai controlli utilizzati più...
  • Seite 140 Power Status (Stato di alimentazione) Sospensione L'icona Stato di alimentazione viene visualizzata se Fare clic sul pulsante Sospensione per mostrare i pulsanti attualmente il computer è alimentatore con la batteria, Ibernazione e Sospensione , quindi scegliere uno oppure mediante l'alimentatore collegato in una presa dei pulsanti per porre il computer nella modalità...
  • Seite 141: Descrizione Del Sistema: Vista Anteriore, Sinistra, Destra E Posteriore (Modello A)

    Descrizione del sistema: Vista anteriore, sinistra, destra e posteriore (Modello A) Figura 9 Parte frontal Lato anteriore Vista anteriore, sinistra, destra e posteriore (Mo- dello A) 1. Indicatori LED 2. Slot blocco di sicurezza Lato sinistro 3. Porta USB 2.0 4.
  • Seite 142: Descrizione Del Sistema: Vista Anteriore, Sinistra, Destra E Posteriore (Modello B)

    Descrizione del sistema: Vista anteriore, sinistra, destra e posteriore (Modello B) Figura 10 Lato anteriore Vista anteriore, sinistra, de- stra e posteriore (Modello 1. Indicatori LED Lato sinistro 2. Slot blocco di sicurezza 3. Porta USB 2.0 4. Jack uscita S/PDIF 5.
  • Seite 143: Descrizione Del Sistema: Vista Inferiore

    Descrizione del sistema: Vista inferiore Modello A Modello B  Figura 11 Vista inferiore  La CPU non è un componente che 1. Coperchio bay necessita assistenza parte Informazioni sulla batteria Component dell’utente. Accedere alla CPU in 2. Ventola Prima di utilizzare una batteria nuova, scaricarla prima completa- qualsiasi modo implica una violazio- 3.
  • Seite 144: Pannello Di Controllo E Desktop Di Windows

    Pannello di controllo e Desktop di Windows In questo manuale sarà richiesto di aprire il Pannello di controllo. In Windows 8 fare clic con il pulsante destro del mouse nell'angolo inferiore sinistro per far apparire il menu contestuale (o utilizzare la combinazione di tasti Tasto logo Windows + X) e selezionare Pannello di controllo.
  • Seite 145: App & Titoli

    App & Titoli La schermata di avvio di Windows 8 conterrà un numero di app, e molte altre ancora saranno installate come si aggiungono ulteriori applicazioni ecc. Non tutte queste applicazioni troveranno posto su uno schermo, così, spesso, per visualizzare tutte le applicazioni necessarie, sarà...
  • Seite 146: Funzioni Video

    Funzioni video Il sistema è dotato sia di una GPU integrata Intel (per il Per accedere al Pannello di controllo grafica e multimedia risparmio energetico) sia di una GPU discreta NVIDIA (per Intel®: le prestazioni). È possibile modificare le Impostazioni di 1.
  • Seite 147 Tecnologia Nvidia® Optimus™ Icona Colore Descrizione La tecnologia Nvidia® Optimus™ è un sistema avanzato Modalità UMA attivata progettato per ottenere le prestazioni migliori dal sistema Verde Il sistema utilizzerà solo la GPU inte- grafico risparmiando al tempo stesso la batteria, senza dover grata Intel (iGPU) cambiare manualmente le impostazioni.
  • Seite 148 Dispositivi di visualizzazione Utilizzo della combinazione di tasti logo Oltre allo schermo LCD integrato, è possibile utilizzare un di Windows + P per passare da una monitor VGA/LCD a schermo piatto o una TV (collegato visualizzazione all'altra alla porta per monitor esterno o alla porta uscita HDMI) È...
  • Seite 149: Funzionalità Audio

    Funzionalità audio Sound Blaster Cinema EQ Installare l'applicazione Sound Blaster Cinema per È possibile configurare le opzioni audio del computer dal consentire all'utente di configurare le impostazioni audio in pannello di controllo Audio di Windows, dall'icona HD base ai propri requisiti per ottenere le prestazioni migliori in VDeck sul desktop o dal pannello di controllo VIA HD giochi, musica e filmati.
  • Seite 150: Lettore D'impronte Digitali

    Lettore d’impronte digitali 8. Una volta registrare diverse impronte digitali, fare clic sul pulsante per continuare. (Opzionale solo per il Modello A) 9. Immettere le informazioni richieste e fare clic sul pulsante di Installare il driver e registrare le proprie impronte seguendo registrazione del software, oppure scegliere di registrare in un secondo momento.
  • Seite 151: Modulo 3G

    Modulo 3G (Opzionale solo per il Modello A) Se nell'opzione di acquisto è stato incluso un modulo 3G opzionale, seguire le istruzioni sotto per installare la carta USIM (presumibilmente fornita dal proprio operatore), quindi installare l'applicazione. Inserimento della carta USIM 1.
  • Seite 152: Installazione Driver

    Installazione driver  Il disco Device Drivers & Utilities + User’s Manual contiene i driver e le utilità necessari per il corretto funzionamento del computer. Inserire il disco e fare clic su Install Drivers Linee guida generali per (pulsante), oppure il pulsante Option Drivers per accedere al menu del driver opzionale. l'installazione dei driver Installare i driver attenendosi all'ordine indicato nella Figura...
  • Seite 153: Risoluzione Dei Problemi

    Risoluzione dei problemi Problema Possibile causa - Soluzione Non è possibile rilevare i moduli LAN I moduli sono disattivati quando il computer si trova nella modalità aereo. Controllare il Wireless e Bluetooth. LED indicatore e/o l'indicatore del tasto funzione per vedere se il computer è in modalità...
  • Seite 154: Specifiche Tecniche

    Specifiche tecniche Opzioni di LCD Audio Modello A: Interfaccia conforme HDA  15,6" (39,62cm) HD+/ FHD Sound Blaster™ Cinema 2 altoparlanti incorporati Modello B: Ultimi aggiornamenti delle Microfono incorporato 17,3" (43,94cm) HD+/ FHD specifiche tecniche Memoria Adattatore video Le specifiche tecniche elencate in que- Tre prese SODIMM 204 pin, dotate di sta sezione sono corrette al momento GPU integrata Intel®...
  • Seite 155 Interfaccia Comunicazione Requisiti ambientali Una porte USB 2.0 Gigabit Ethernet LAN integrata Temperatura ° ° Tre porte USB 3.0 (Opzione di fabbrica) Modulo di camera In esercizio: 5 C - 35 ° ° PC 2M HD Una porta eSATA (porta USB 3.0 Non in esercizio: -20 C - 60 combinata)

Diese Anleitung auch für:

W350st

Inhaltsverzeichnis