Herunterladen Inhalt Inhalt Diese Seite drucken

Werbung

Verfügbare Sprachen
  • DE

Verfügbare Sprachen

  • DEUTSCH, seite 48
QUICK START GUIDE
GUIDE D'UTILISATION RAPIDE
GUÍA DE UTILIZACIÓN RÁPIDA
SCHNELLSTART-ANLEITUNG
GUIDA DI RIFERIMENTO RAPIDO
BEKNOPTE GEBRUIKSHANDLEIDING
GUIA DE UTILIZAÇÃO RÁPIDA
‫دليل المس ـ ـتخدم المختصر‬

Werbung

Inhaltsverzeichnis
loading

Inhaltszusammenfassung für Parrot MAMBO

  • Seite 1 QUICK START GUIDE GUIDE D’UTILISATION RAPIDE GUÍA DE UTILIZACIÓN RÁPIDA SCHNELLSTART-ANLEITUNG GUIDA DI RIFERIMENTO RAPIDO BEKNOPTE GEBRUIKSHANDLEIDING GUIA DE UTILIZAÇÃO RÁPIDA ‫دليل المس ـ ـتخدم المختصر‬...
  • Seite 3 English ........4 Français ........18 Español ........32 Deutsch ........46 Italiano ........60 Nederlands ......74 Português ....... 88 ....... 102...
  • Seite 4 PRESENTATION OF THE PARROT MAMBO Hull Connector Hull Warning lights Charge Micro USB port Contact Battery enclosure On/Off button Camera...
  • Seite 5: Charging The Battery

    CHARGING THE BATTERY 1. Insert the battery in the slot provided for this purpose. 2. With the micro USB cable, connect the Parrot Mambo to a computer or a USB power adapter.
  • Seite 6 Google Play ® download the free FreeFlight Mini application to your smartphone or tablet. CONNECTING TO THE PARROT MAMBO 1. Insert the battery in the slot provided for this purpose or press the On/Off button. > The Parrot Mambo turns on.
  • Seite 7 2. Place the Parrot Mambo on a flat surface with the propellers up. 3. Wait until the warning lights turn green. 4. On your smartphone, turn on the Bluetooth ® function and open the FreeFlight Mini application. > The application automatically connects to the Parrot Mambo.
  • Seite 8: Taking Off

    TAKING OFF 1. Place the Parrot Mambo on a flat surface with the propellers up. 2. In the FreeFlight Mini application, press START 3. Select the type of accessory used (with or without hulls). 4. Press TAKE-OFF > The Parrot Mambo takes off and stabilises at 1...
  • Seite 9 LANDING To land the Parrot Mambo, press the button. > The Parrot Mambo lands. FLYING Joystick mode is the default flying mode. Go up Go forward Pre-programmed Turn left Move right patterns LANDING Turn right Move left Go down Land...
  • Seite 10 ACCESSORIES HULLS Attach the hulls to the Parrot Mambo’s arms. Make sure the hulls are properly secured on the Parrot Mambo’s contacts by pressing on them. To remove the hulls: gently remove the hulls from...
  • Seite 11 GRABBER 1. Turn on your Parrot Mambo and connect it to your smartphone. 2. Attach the Grabber under the Parrot Mambo. 3. Pass the brick inside the Parrot Mambo’s arms.
  • Seite 12 4. Attach the Grabber’s brick onto the connector. > The brick’s warning light turns green. The FreeFlight Mini application automatically detects the Grabber. 5. In FreeFlight Mini, press to open and close the Grabber. To remove the Grabber: remove the brick from the connector and then gently unclip the Grabber’s fastenings.
  • Seite 13 CANNON 1. Turn on and connect your Parrot Mambo. 2. Insert up to 6 balls into the Cannon’s cartridge. 3. Secure the Cannon to the connector. > The brick’s warning light turns green. The FreeFlight Mini application automatically detects the Cannon.
  • Seite 14 WARNING LIGHT INDICATIONS Steady The Parrot Mambo is orange light starting up. Steady The Parrot Mambo is green light ready for use. The Parrot Mambo’s Flashing battery is low. red light > Charge the battery. The Parrot Mambo has detected a problem.
  • Seite 15: General Information

    Keep the Parrot Mambo away from high voltage power lines, buildings or any other potentially hazardous areas. Do not use this device near liquids. Do not place the Parrot Mambo on water or on a wet surface as this could cause irreparable damage.
  • Seite 16 The statement of compliance is available at the following address: www.parrot.com/fr/ce/?parrot-mambo TRADEMARKS Parrot Mambo, Parrot Swing as well as their respective logos are trademarks of Parrot Drones SAS. Parrot and the Parrot logos are trademarks of Parrot S.A. App Store is a trademark of Apple Inc.
  • Seite 17 II appliances which display the symbol. Use only 6 mm diameter balls (reference MCPLA01357A_Chonggao) sold by PARROT DRONES. Warning. Do not aim at eyes or face or body part. MANUFACTURER INFORMATION The Parrot Mambo is manufactured by: PARROT DRONES SAS - 174 Quai de...
  • Seite 18 PRÉSENTATION DU PARROT MAMBO Carène Connecteur Carène Voyants lumineux Port micro- charge Plot Languette Emplacement de la batterie Switch On/Off Caméra...
  • Seite 19: Charger La Batterie

    CHARGER LA BATTERIE 1. Insérez la batterie dans l’emplacement prévu à cet effet. 2. Avec le câble micro-USB, connectez le Parrot Mambo à un ordinateur ou à un adaptateur secteur USB. La LED de charge est rouge fixe pendant la charge.
  • Seite 20: Télécharger L'application

    Connectez-vous sur l’App Store ou sur Google Play ® et téléchargez l’application gratuite FreeFlight Mini. SE CONNECTER AU PARROT MAMBO 1. Insérez la batterie dans l’emplacement prévu à cet effet ou appuyez sur le switch On/Off. > Le Parrot Mambo s’allume.
  • Seite 21 2. Posez le Parrot Mambo sur une surface plane, les hélices vers le haut. 3. Attendez que les voyants lumineux passent au vert. 4. Sur votre smartphone, activez la fonction Bluetooth ® et ouvrez l’application FreeFlight Mini. > L’application se connecte automatiquement au Parrot Mambo.
  • Seite 22 2. Dans l’application FreeFlight Mini, appuyez sur START 3. Sélectionnez le type d’accessoire utilisé (avec ou sans carènes). 4. Appuyez sur TAKE-OFF > Le Parrot Mambo décolle et se stabilise à 1 mètre du sol en attente de commandes.
  • Seite 23 ATTERRIR Pour faire atterrir le Parrot Mambo, appuyez sur le bouton > Le Parrot Mambo atterrit. PILOTER Le mode manette est le mode de pilotage par défaut. Monter Avancer Pivoter déplacer vers la vers la Figures gauche droite pré-programmées LANDING...
  • Seite 24 ACCESSOIRES CARÈNES Fixez les carènes sur les bras du Parrot Mambo. Assurez-vous que les carènes sont bien fixées sur les plots du Parrot Mambo en appuyant dessus. Retirer les carènes : retirez délicatement les carènes...
  • Seite 25 GRABBER 1. Allumez votre Parrot Mambo et connectez-le à votre smartphone. 2. Fixez le Grabber sous le Parrot Mambo. 3. Faites passer la brique à l’intérieur des bras du Parrot Mambo.
  • Seite 26 4. Fixez la brique du Grabber sur le connecteur. > Le voyant lumineux de la brique devient vert. L’application FreeFlight Mini détecte le Grabber automatiquement. 5. Dans FreeFlight Mini, appuyez sur pour ouvrir et fermer le Grabber. Retirer le Grabber : retirez la brique du connecteur puis déclipsez délicatement les fixations du Grabber.
  • Seite 27 CANNON 1. Allumez et connectez votre Parrot Mambo. 2. Insérez jusqu’à 6 billes dans le chargeur du Cannon. 3. Fixez le Cannon sur le connecteur. > Le voyant lumineux de la brique devient vert. L’application FreeFlight Mini détecte le Cannon automatiquement.
  • Seite 28 COMPORTEMENT DES VOYANTS LUMINEUX Le Parrot Mambo Orange est en cours de fixe démarrage. Vert Le Parrot Mambo est fixe prêt à être utilisé. La batterie du Parrot Rouge Mambo est faible. clignotant > Rechargez la batterie. Le Parrot Mambo a détecté...
  • Seite 29: Informations Générales

    Parrot Mambo. Utilisez uniquement les accessoires spécifiés par Parrot Drones SAS. Si du sable ou de la poussière pénètre dans le Parrot Mambo , celui-ci peut ne plus fonctionner correctement, de manière irréversible. N’utilisez pas le Parrot Mambo dans des conditions météorologiques défavorables (pluie, vent fort, neige) ou lorsque les conditions de visibilité...
  • Seite 30: Déclaration De Conformité Ue

    Vous favoriserez ainsi la réutilisation durable des ressources matérielles. Nous vous invitons à contacter votre revendeur ou à vous renseigner auprès de votre mairie afin de savoir où et comment le Parrot Mambo peut être recyclé.
  • Seite 31 Attention. Ne pas viser les yeux ou le visage ou toute partie du corps. INFORMATIONS FABRIQUANT Le Parrot Mambo est fabriqué par : PARROT DRONES SAS - 174 Quai de Jemmapes - 75010 Paris (France) - RCS Paris 808 408 074...
  • Seite 32 PRESENTACIÓN DEL PARROT MAMBO Carena Conector Carena Pilotos luminosos Piloto Puerto de carga micro USB Contacto Anilla Compartimento de la batería Botón de encendido Cámara...
  • Seite 33: Carga De La Batería

    CARGA DE LA BATERÍA 1. Coloca la batería en el compartimento previsto a tal efecto. 2. Con el cable micro USB, conecta el Parrot Mambo a un ordenador o un adaptador de alimentación con puerto USB.
  • Seite 34 Google Play™ para ® descargar la aplicación gratuita FreeFlight Mini en tu móvil o tableta. CONECTARSE AL PARROT MAMBO 1. Coloca la batería en el compartimento previsto a tal efecto y pulsa en el botón de encendido. > Parrot Mambo se enciende.
  • Seite 35 2. Apoya el Parrot Mambo sobre una superficie plana, con las hélices hacia arriba. 3. Espera a que los pilotos luminosos se pongan en verde. 4. En el móvil, activa el Bluetooth y abre la ® aplicación FreeFlight Mini. > La aplicación se conecta automáticamente al Parrot Mambo.
  • Seite 36 2. En la aplicación FreeFlight Mini, pulsa en START 3. Selecciona el tipo de accesorio utilizado (con o sin carena). 4. Pulsa en TAKE-OFF > Parrot Mambo despega y se estabiliza a 1 metro del suelo a la espera de órdenes.
  • Seite 37 ATERRIZAR Para hacer aterrizar el Parrot Mambo, pulsa en el botón > Parrot Mambo aterriza. PILOTAR El modo manecilla es el modo de pilotaje por defecto. Subir Avanzar Desplazarse Girar a la hacia la Figuras izquierda derecha preprogramadas LANDING Girar a la...
  • Seite 38 ACCESORIOS CARENAS Fija las carenas en los brazos del Parrot Mambo. Comprueba que las carenas estén bien colocadas en los contactos del Parrot Mambo pulsando encima. Retirar las carenas: retira con cuidado las carenas...
  • Seite 39 GRABBER 1. Enciende el Parrot Mambo y conéctalo al teléfono. 2. Fija el Grabber por debajo del Parrot Mambo. 3. Pasa el ladrillo por dentro de los brazos del Parrot Mambo.
  • Seite 40 4. Fija el ladrillo del Grabber al conector. > El piloto luminoso del ladrillo se pone en verde. La aplicación FreeFlight Mini detecta el Grabber automáticamente. 5. En FreeFlight Mini, pulsa en para abrir y cerrar el Grabber. Retirar el Grabber: retira el ladrillo del conector para desenganchar las fijaciones del Grabber con cuidado.
  • Seite 41 CANNON 1. Enciende y conecta tu Parrot Mambo. 2. Introduce hasta 6 bolas en el cargador del Cannon. 3. Fija el cañón al conector. > El piloto luminoso del ladrillo se pone en verde. La aplicación FreeFlight Mini detecta el Cannon automáticamente.
  • Seite 42 COMPORTAMIENTO DE LOS PILOTOS LUMINOSOS Naranja Parrot Mambo se está fijo encendiendo. Verde Parrot Mambo está listo fijo para usarse. Poca batería en el Parpadeo Parrot Mambo. en rojo > Vuelve a cargar la batería. Parrot Mambo ha detectado un problema.
  • Seite 43: Información General

    Durante el vuelo, las hélices del Parrot Mambo pueden provocar daños a per- sonas, animales u objetos. No se debe tocar el Parrot Mambo durante el vuelo. Antes de manipular el Parrot Mambo con las manos, hay que mantener una distancia de seguridad y esperar a que las hélices se detengan por completo.
  • Seite 44: Declaración De Conformidad

    Parrot Mambo, Parrot Swing y sus logotipos respectivos son marcas de Parrot Drones, SAS. Parrot y los logotipos de Parrot son marcas que pertenecen a Parrot, S. A. App Store es una marca de servicio de Apple Inc Google Play es una marca de Google Inc.
  • Seite 45: Información Del Fabricante

    Clase II que lleve el símbolo correspondiente. INFORMACIÓN DEL FABRICANTE Parrot Mambo está fabricado por: PARROT DRONES, SAS. 174, quai de Jem- mapes; 75010 París (Francia). Inscrita en el Registro mercantil de París con el n.º 808 408 074...
  • Seite 46: Übersicht Über Die Parrot Mambo

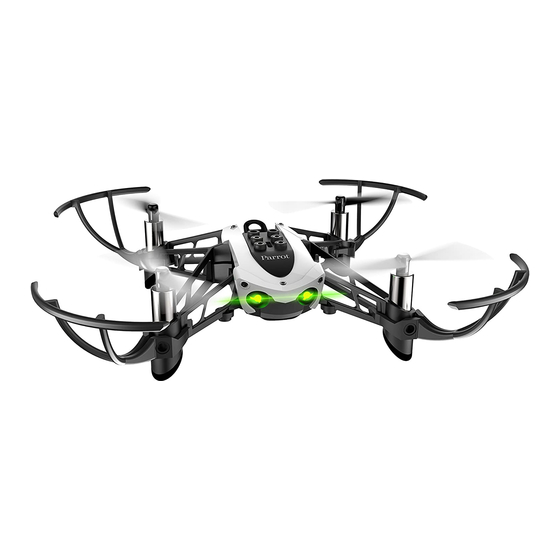
    ÜBERSICHT ÜBER DIE PARROT MAMBO Verkleidung Konnektor Verkleidung Leuchtanzeigen LED-La- Micro-USB- deanzeige Anschluss Unterbau Zunge Batteriefach On/Off - Knopf Kamera...
  • Seite 47: Laden Des Akkus

    LADEN DES AKKUS 1. Legen Sie den Akku in das dafür vorgesehene Fach. 2. Verbinden Sie die Parrot Mambo über das Micro-USB-Kabel mit einem Computer oder einem USB-Power-Adapter.
  • Seite 48: Herunterladen Der App

    Sie die kostenlose App FreeFlight Mini auf Ihr Smartphone oder Ihr Tablet herunter. VERBINDUNG MIT DER PARROT MAMBO HERSTELLEN 1. Legen Sie den Akku in das dafür vorgesehene Fach oder drücken Sie den On/Off-Knopf. > Die Parrot Mambo schaltet sich ein.
  • Seite 49 2. Stellen Sie die Parrot Mambo auf eine flache Oberfläche, die Propeller zeigen nach oben. 3. Warten Sie, bis die Leuchtanzeigen grün werden. 4. Aktivieren Sie auf Ihrem Smartphone die Bluetooth -Funktion und öffnen Sie die App ® FreeFlight Mini.
  • Seite 50 STARTEN 1. Stellen Sie die Parrot Mambo auf eine flache Oberfläche, die Propeller zeigen nach oben. 2. Drücken Sie in der App FreeFlight Mini auf START 3. Wählen Sie die Art des verwendeten Zubehörs (mit oder ohne Verkleidung). 4. Drücken Sie auf TAKE-OFF >...
  • Seite 51 LANDEN Zur Landung der Parrot Mambo drücken Sie auf den Knopf > Die Parrot Mambo landet. STEUERN Der Standard-Steuerungsmodus ist die Joystick- Steuerung. Nach oben Vorwärts Nach links Nach rechts Vorprogrammierte schwenken fliegen Figuren LANDING Nach links Nach rechts fliegen...
  • Seite 52: Vorprogrammierte Figuren

    ZUBEHÖR VERKLEIDUNGEN Befestigen Sie die Verkleidungen auf den Armen der Parrot Mambo. Vergewissern Sie sich, dass die Verkleidungen ordnungsgemäß am Unterbau der Parrot Mambo befestigt sind, indem sie darauf drücken. Abnehmen der Verkleidungen: nehmen Sie die Verkleidungen vorsichtig vom Unterbau der Parrot...
  • Seite 53 GRABBER 1. Schalten Sie Ihre Parrot Mambo ein und verbinden Sie sie mit Ihrem Smartphone. 2. Befestigen Sie den Grabber unter der Parrot Mambo. 3. Führen Sie den Baustein in die Arme der Parrot Mambo.
  • Seite 54 4. Stecken Sie den Grabber-Baustein auf den Konnektor. > Die Leuchtanzeige des Bausteins leuchtet grün. Die App FreeFlight Mini erkennt den Grabber automatisch. 5. Drücken Sie in der FreeFlight Mini auf , um den Grabber zu öffnen und zu schließen. Abnehmen des Grabbers: nehmen Sie den Baustein vom Konnektor ab und klipsen Sie die Halterungen des Grabbers vorsichtig ab.
  • Seite 55 CANNON 1. Schalten Sie Ihre Parrot Mambo ein und stellen Sie eine Verbindung her. 2. Legen Sie bis zu 6 Kugeln in das Magazin der Cannon. 3. Setzen Sie das Kanonenrohr auf den Konnektor. > Die Leuchtanzeige des Bausteins leuchtet grün.
  • Seite 56 VERHALTEN DER LEUCHTANZEIGEN Dauerhaft Die Parrot Mambo startet orange gerade. Dauerhaft Die Parrot Mambo ist grün bereit zur Nutzung. Der Akku der Parrot Rotes Mambo ist schwach. Blinken > Laden Sie den Akku auf. Die Parrot Mambo hat ein Problem erkannt.
  • Seite 57: Allgemeine Informationen

    Gerät entworfenen Kugeln. Verwenden Sie nur das von Parrot Drones SAS vorgegebene Zubehör. Wenn Sand oder Staub in die Parrot Mambo eindringen, kann es sein, dass sie unwiderruflich nicht mehr ordnungsgemäß funktioniert. Verwenden Sie die Parrot Mambo nicht bei ungünstigen Witterungsbedin- gungen (Regen, Sturm, Schnee) oder bei unzureichenden Sichtbedingungen (Nacht).
  • Seite 58: Produktentsorgung

    Konformität wird von einer Verwendung mit einer geringeren Entfernung ab- geraten. MARKEN Parrot Mambo, Parrot Swing sowie ihre jeweiligen Logos sind Marken der Par- rot Drones SAS. Parrot und die Parrot Logos sind eingetragene Markenzeichen der Parrot S.A. App Store ist eine Dienstleistungsmarke von Apple Inc.
  • Seite 59 Material der Klasse II angeschlossen werden, welches das links abgebildete Symbol trägt. HERSTELLERINFORMATIONEN Der Parrot Mambo wird hergestellt von: PARROT DRONES SAS - 174 Quai de Jemmapes - 75010 Paris (Frankreich) - RCS Paris 808 408 074 www.parrot.com...
  • Seite 60 PRESENTAZIONE DEL PARROT MAMBO Carena Connettore Carena Indicatori luminosi Porta di carica micro-USB Supporto Linguetta Vano della batteria Pulsante On/Off Fotocamera...
  • Seite 61: Caricare La Batteria

    CARICARE LA BATTERIA 1. Inserisci la batteria nel vano previsto allo scopo. 2. Con il cavo micro-USB, collega il Parrot Mambo a un computer o a un adattatore di rete USB.
  • Seite 62 Accedi ad App Store o Google Play e scarica ® gratuitamente l’applicazione FreeFlight Mini sul tuo smartphone o tablet. CONNETTERSI AL PARROT MAMBO 1. Inserisci la batteria nel vano previsto allo scopo o premi il pulsante On/Off. > Il Parrot Mambo si accende.
  • Seite 63 2. Posa il Parrot Mambo su una superficie piana, con le eliche verso l’alto. 3. Attendi che gli indicatori luminosi diventino di colore verde. 4. Sullo smartphone, attiva la funzione Bluetooth ® e apri l’applicazione FreeFlight Mini. > L’applicazione si connette automaticamente al Parrot Mambo.
  • Seite 64 2. Nell’applicazione FreeFlight Mini, premi START 3. Seleziona il tipo di accessorio utilizzato (con o senza carene). 4. Premi TAKE-OFF > Il Parrot Mambo decolla e si stabilizza a 1 metro dal suolo in attesa di comandi.
  • Seite 65 ATTERRARE Per far atterrare il Parrot Mambo, premi il pulsante > Il Parrot Mambo atterra. PILOTARE La modalità controller è la modalità di pilotaggio predefinita. Salire Avanzare Girare a Spostarsi a Figure sinistra destra pre-programmate LANDING Girare a Spostarsi a...
  • Seite 66 ACCESSORI CARENE Fissa le carene sui bracci del Parrot Mambo. Assicurati che le carene siano ben fissate sui supporti del Parrot Mambo facendo pressione. Rimuovere le carene: rimuovi delicatamente le carene dai supporti del Parrot Mambo.
  • Seite 67 GRABBER 1. Accendi il Parrot Mambo e connettilo al tuo smartphone. 2. Fissa il Grabber sotto il Parrot Mambo. 3. Fai passare il mattoncino all’interno dei bracci del Parrot Mambo.
  • Seite 68 4. Fissa il mattoncino del Grabber sul connettore. > L’indicatore luminoso del mattoncino diventa verde. L’applicazione FreeFlight Mini rileva il Grabber automaticamente. 5. In FreeFlight Mini, premi per aprire e chiudere il Grabber. Rimuovere il Grabber: rimuovi il mattoncino dal connettore, quindi sgancia delicatamente i fissaggi del Grabber.
  • Seite 69 CANNON 1. Accendi e connetti il tuo Parrot Mambo. 2. Inserisci fino a 6 biglie nel caricatore del Cannon. 3. Fissa il Cannon sul connettore. > L’indicatore luminoso del mattoncino diventa verde. L’applicazione FreeFlight Mini rileva il cannone automaticamente. 4. Premi...
  • Seite 70 COMPORTAMENTO DEGLI INDICATORI LUMINOSI Arancio Il Parrot Mambo si sta fisso avviando. Verde Il Parrot Mambo è fisso pronto per l’uso. La batteria del Parrot Rosso Mambo è scarica. lampeggiante > Carica la batteria. Il Parrot Mambo ha rilevato un problema.
  • Seite 71: Informazioni Generali

    Le eliche del Parrot Mambo in volo possono causare danni a persone, animali o cose. Non toccare il Parrot Mambo in volo. Mantieni una distanza di sicurezza e attendi che le eliche si siano fermate del tutto prima di maneggiare il Parrot Mambo.
  • Seite 72: Dichiarazione Di Conformità Ue

    Per garantire la conformità, l’utilizzo a una distanza inferiore non è raccomandato. MARCHI Parrot Mambo, Parrot Swing nonché i relativi loghi sono marchi di Parrot Drones SAS. Parrot e i loghi Parrot sono marchi registrati di Parrot S.A.
  • Seite 73: Informazioni Sul Produttore

    II che riporta il simbolo qui a fianco. INFORMAZIONI SUL PRODUTTORE Il Parrot Mambo è prodotto da: PARROT DRONES SAS - 174 Quai de Jem- mapes - 75010 Parigi (Francia) - RCS Parigi 808 408 074 www.parrot.com...
  • Seite 74 PRESENTATIE VAN DE PARROT MAMBO Extra propeller Connector Extra propeller Controlelampjes Oplaadlampje Portaal micro-USB Contactplaat Lipje Compartiment voor de batterij On/Off-knop Camera...
  • Seite 75: Batterij Opladen

    BATTERIJ OPLADEN 1. Plaats de batterij in het daarvoor voorzien compartiment. 2. Sluit de Parrot Mambo aan op een computer of op een USB-adapter met de micro-USB kabel.
  • Seite 76: Downloaden Van De Applicatie

    Google Play , en ® download gratis de applicatie FreeFlight Mini op uw smartphone of tablet. AANSLUITING OP PARROT MAMBO 1. Plaats de batterij in het daarvoor voorzien compartiment en druk op de On/Off-knop. > De Parrot Mambo gaat aan.
  • Seite 77 2. Plaats de Parrot Mambo op een vlak oppervlak, de propellers naar boven. 3. Wacht tot de lampjes groen zijn. 4. Activeer de Bluetooth -functie op uw smartphone ® en open de applicatie FreeFlight Mini. > De applicatie maakt automatisch verbinding met de Parrot Mambo.
  • Seite 78 FreeFlight Mini-applicatie. START 3. Selecteer het type accessoire dat u gebruikt (met of zonder extra propellers). 4. Druk op TAKE-OFF > De Parrot Mambo stijgt op en blijft 1 meter boven de grond hangen in afwachting van het volgende bevel.
  • Seite 79 LANDEN Om de Parrot Mambo te laten landen drukt u op > De Parrot Mambo landt. BESTUREN De modus met bedieningspaneel is de standaard besturingsmodus. Stijgen Vooruit Naar rechts Voorgeprogrammeerde Naar links gaan figuren LANDING Naar rechts Naar links gaan...
  • Seite 80 ACCESSOIRES EXTRA PROPELLERS Bevestig de extra propellers op de armen van de Parrot Mambo. Zorg ervoor dat de extra propellers goed vastzitten aan de contactplaten van de Parrot Mambo, controleer dit door op de extra propellers te drukken.
  • Seite 81 GRABBER 1. Zet uw Parrot Mambo aan en sluit deze aan op uw smartphone. 2. Bevestig de Grabber onder de Parrot Mambo. 3. Plaats het blokje tussen de armen van de Parrot Mambo.
  • Seite 82 4. Bevestig het blokje van de Grabber op de connector. > Het controlelampje van het blokje wordt nu groen. De FreeFlight Mini-applicatie detec- teert de Grabber automatisch. 5. Druk op in FreeFlight Mini om de Grabber te openen en te sluiten. De Grabber verwijderen: haal het blokje van de connector en verwijder daarna voorzichtig de bevestigingen van de Grabber.
  • Seite 83 CANNON 1. Zet uw Parrot Mambo aan en maak verbinding. 2. Doe maximaal 6 balletjes in het reservoir van de Cannon. 3. Bevestig het Cannon op de connector. > Het controlelampje van het blokje wordt nu groen. De FreeFlight Mini-applicatie detecteert het kanon automatisch.
  • Seite 84 WERKING VAN DE CONTROLELAMPJES Brandt continu De Parrot Mambo is oranje bezig met opstarten. Brandt continu De Parrot Mambo is groen klaar voor gebruik. De batterij van de Parrot Mambo is bijna Knippert leeg. rood > Laad de batterij op.
  • Seite 85: Algemene Informatie

    Parrot Mambo. Gebruik alleen accessoires die door Par- rot Drones SAS aanbevolen worden. Als zand of stof in de Parrot Mambo komt, kan het zijn dat het apparaat perma- nent beschadigd is en dus niet meer goed functioneert.
  • Seite 86 Bluetooth SIG, Inc. ® and any use of these trademarks by Parrot Drones SAS is done under licence. Alle andere merken die in deze handleiding vermeld staan, zijn eigendom van de respectievelijke eigenaren.
  • Seite 87 II die voorzien is van het symbool hiernaast. INFORMATIE VAN DE FABRICANT De Parrot Flypad/Parrot Swing is vervaardigd door: PARROT DRONES SAS - 174 Quai de Jemmapes - 75010 Parijs (Frankrijk) - RCS Paris 808 408 074 www.parrot.com...
  • Seite 88 APRESENTAÇÃO DO PARROT MAMBO Carina Conector Carina Indicadores luminosos LED de carrega- Porta micro mento Plot Patilha Localização da bateria Botão On/Off Câmara...
  • Seite 89: Carregar A Bateria

    CARREGAR A BATERIA 1. Colocar a bateria no compartimento previsto para o efeito. 2. Com o cabo micro USB, ligar o Parrot Mambo a um computador ou a um adaptador de corrente USB.
  • Seite 90: Transferir A Aplicação

    Google Play ® transfira a aplicação gratuita FreeFlight Mini para o seu smartphone ou tablet. LIGAÇÃO AO PARROT MAMBO 1. Colocar a bateria no compartimento previsto para o efeito ou premir o botão On/Off. > O Parrot Mambo liga-se.
  • Seite 91 2. Posar o Parrot Mambo sobre uma superfície plana, com as hélices para cima. 3. Esperar até que os indicadores luminosos fiquem verdes. 4. No smartphone, ativar a função Bluetooth ® abrir a aplicação FreeFlight Mini. > A aplicação liga-se automaticamente ao Parrot Mambo.
  • Seite 92 2. Na aplicação FreeFlight Mini, premir START 3. Selecionar o tipo de acessório utilizado (com ou sem carinas). 4. Premir TAKE-OFF > O Parrot Mambo decola e estabiliza a 1 metro do solo a aguardar os comandos.
  • Seite 93 ATERRAGEM Para aterrar o Parrot Mambo premir o botão > O Parrot Mambo aterra. PILOTAR O modo de alavanca é o modo de pilotagem predefinido. Montar Avançar Deslocar-se Virar à para a Figuras esquerda direita pré-programadas LANDING Virar à Deslocar-se...
  • Seite 94 ACESSÓRIOS CARINAS Fixar as carinas nos braços do Parrot Mambo. Assegurar-se de que as carinas estão bem fixadas no Parrot Mambo, apoiando em cima. Retirar as carinas: retirar cuidadosamente as carinas...
  • Seite 95 GRABBER 1. Ligar o Parrot Mambo e ligá-lo ao smartphone. 2. Fixar o Grabber por baixo do Parrot Mambo. 3. Passar o bloco pelo interior dos braços do Parrot Mambo.
  • Seite 96 4. Fixar o bloco do Grabber ao conector. > O indicador luminoso do bloco fica verde. A aplicação FreeFlight Mini deteta o Grabber automaticamente. 5. No FreeFlight Mini, premir o para abrir e fechar o Grabber. Retirar o Grabber: retirar o bloco do conector e desencaixar cuidadosamente as fixações do Grabber.
  • Seite 97 CANNON 1. Ligar o Parrot Mambo. 2. Colocar até 6 esferas no carregador do Cannon. 3. Fixar o Cannon ao conector. > O indicador luminoso do bloco fica verde. A aplicação FreeFlight Mini deteta o canhão au- tomaticamente. 4. Premir o...
  • Seite 98 COMPORTAMENTO DOS INDICADORES LUMINOSOS O Parrot Mambo está Cor de laranja fixo a iniciar. O Parrot Mambo está Verde fixo pronto a ser utilizado. A bateria do Parrot Vermelho Mambo está fraca. intermitente > Carregar a bateria. O Parrot Mambo detetou um problema.
  • Seite 99: Informações Gerais

    Parrot ou a partir do site www.parrot.com. PRECAUÇÕES DE UTILIZAÇÃO E MANUTENÇÃO A utilização do Parrot Mambo por crianças com menos de 14 anos não é aconselhável. O Parrot Mambo é um aeromodelo concebido para fins recreativos e de lazer.
  • Seite 100: Declaração De Conformidade

    Para garantir a conformidade,u ma distância menor não é recomendada. MARCAS Parrot Mambo, Parrot Swing bem como os seus respetivos logotipos são mar- cas registadas de Parrot drones SAS. Parrot e os logótipos Parrot são marcas registadas de Parrot S.A.
  • Seite 101: Informações Do Fabricante

    O produto apenas deve ser ligado a material de classe II com o sím- bolo apresentado ao lado. INFORMAÇÕES DO FABRICANTE O Parrot Mambo é fabricado por : PARROT DRONES SAS - 174 Quai de Jem- mapes - 75010 Paris (França) - RCS Paris 808 408 074 www.parrot.com...
  • Seite 102 PARROT MAMBO ‫تقديم‬ ‫الموصل‬ ‫القوس المحيط‬ ‫القوس المحيط‬ ‫بالمروحة‬ ‫المؤشرات الضوئية‬ ‫•مؤشر‬ ‫منفذ‬ ‫الشحن‬ micro-USB ‫قطعة ارتكاز‬ ‫اللسين‬ ‫التثبيت‬ ‫حجرة البطارية‬ ‫زر تشغيل\إيقاف‬ ‫الكاميرا‬...
  • Seite 103 ‫شحن البطارية‬ .‫قم بإدخال البطارية في الحجرة المخصصة لهذا الغرض‬ Parrot ‫، قم بتوصيل جهاز‬micro-USB ‫باستخدام كابل‬ .USB ‫ بالكمبيوتر أو بمح و ّ ل قابس كهربائي‬Mambo...
  • Seite 104 App Store‫ادخل على متجر‬ ® ‫ المجاني على هاتفك الذكي أو جهاز‬FreeFlight Mini ‫بتنزيل تطبيق‬ .‫الحاسوب اللوحي الخاص بك‬ PARROT MAMBO ‫االتصال بجهاز‬ ‫قم بإدخال البطارية في الحجرة المخصصة لهذا الغرض أو‬ .‫اضغط على زر تشغيل\إيقاف‬ .Parrot Mambo ‫يبدأ تشغيل جهاز‬ >...
  • Seite 105 ‫ على سطح مستو والمراوح جهة‬Parrot Mambo ‫2. ضع جهاز‬ .‫األعلى‬ .‫3. انتظر حتى تتحول المؤشرات الضوئية إلى اللون األخضر‬ ‫ وافتح التطبيق‬Bluetooth ‫4. في هاتفك الذكي، قم بتنشيط وظيفة‬ ® .FreeFlight Mini .Parrot Mambo ‫يتصل التطبيق تلقائ ي ً ا بجهاز‬...
  • Seite 106 ‫ على سطح مستو، والمراوح جهة‬Parrot Mambo ‫ضع جهاز‬ .‫األعلى‬ ‫، اضغط على‬FreeFlight Mini ‫في التطبيق‬ START .)‫حدد نوع الملحق المستخدم (مع أو بدون أقواس محيطة بالمراوح‬ ‫اضغط على‬ TAKE-OFF ‫ وتستقر على ارتفاع 1 متر من األرض في‬Parrot Mambo ‫تقلع‬ > .‫انتظار أوامر التوجيه‬...
  • Seite 107 ‫الهبوط‬ ‫، اضغط على الزر‬Parrot Mambo ‫لهبوط الطائرة‬ .‫ تهبط‬Parrot Mambo ‫الطائرة‬ > ‫التوجيه‬ .‫ هو وضع التوجيه االفتراضي‬manette ‫وضع‬ ‫صعود‬ ‫تقدم‬ ‫دوران جهة‬ ‫االنتقال إلى جهة‬ ‫اليسار‬ ‫اليمين‬ ‫أشكال مبرمجة مسب ق ً ا‬ LANDING ‫دوران جهة‬ ‫االنتقال إلى جهة‬...
  • Seite 108 ‫األقواس المحيطة بالمراوح‬ Parrot ‫قم بتثبيت األقواس المحيطة بالمراوح على أذرع الطائرة‬ ‫. تأكد من أن األقواس المحيطة بالمراوح مثبتة جي د ً ا على قطع‬Mambo .‫ارتكاز التثبيت عن طريق الضغط عليها‬ ‫إزالة األقواس المحيطة بالمراوح: انزع برفق األقواس المحيطة‬...
  • Seite 109 GRABBER .‫ وقم بتوصيله بهاتفك الذكي‬Parrot Mambo ‫قم بتشغيل‬ .Parrot Mambo ‫ بأسفل‬Grabber ‫قم بتثبيت‬ .Parrot Mambo ‫قم بتمرير اللبنة إلى داخل أذرع‬...
  • Seite 110 .Parrot Mambo ‫4. قم بتمرير اللبنة إلى داخل أذرع‬ ‫.رضخألا نوللا ىلإ ةنبلل يئوضلا رشؤملا لوحتي‬ ‫ قيبطتلا موقي‬FreeFlight Mini ‫ فاشتكاب‬Grabber ‫.ا ً يئاقلت‬ ‫لفتح وقفل‬ ‫، اضغط على‬FreeFlight Mini ‫5. في التطبيق‬ .Grabber ‫: انزع اللبنة من الموصل ثم فك بلطف مشابك تثبيت‬Grabber ‫إزالة‬...
  • Seite 111 CANNON .Parrot Mambo ‫1. قم بتشغيل وتوصيل‬ ‫2. قم بإدراج حتى 6 رصاصات في ملقم‬ . Cannon .‫3. قم بتثبيت البندقية على الموصل‬ ‫يتحول المؤشر الضوئي للبنة إلى اللون األخضر. التطبيق‬ > .‫ يكتشف البندقية تلقائ ي ً ا‬FreeFlight Mini .
  • Seite 112 ‫أداء المؤشرات الضوئية‬ ‫ قيد بدء‬Parrot Mambo ‫الطائرة‬ ‫وميض برتقالي ثابت‬ .‫التشغيل‬ ‫وميض أخضر ثابت‬ .‫ جاهزة لالستخدام‬Parrot Mambo .‫ ضعيفة‬Parrot Mambo ‫بطارية‬ ‫وميض أحمر متقطع‬ .‫> أعد شحن البطارية‬ ‫ اكتشف وجود‬Parrot Mambo .‫مشكلة‬ ‫ نشط‬Bluetooth ‫> تأكد من أن‬...
  • Seite 113 ‫ بعي د ً ا عن خطوط كهرباء الجهد العالي والمباني أو أي منطقة أخرى يحتمل أن‬Parrot Mambo ‫ابق على‬ .‫تكون خطرة‬ ‫ على الماء أو على سطح مبلل، فقد‬Parrot Mambo ‫ال تستخ د ِ م هذا الجهاز بالقرب من المواد السائلة. ال تضع‬ .‫يسبب ذلك ضر ر ًا ال يمكن إصالحه‬...
  • Seite 114 ‫بالبيئة وبالصحة اإلنسانية، لذا يرجى فصلها عن باقي أنواع المخلفات وإعادة تدويرها بطريقة‬ ‫مسئولة. وهكذا، فأنتم تقومون بتشجيع إعادة االستخدام المستمر للموارد المادية. ندعوك للتواصل مع‬ .Parrot Mambo ‫البائع أو االستعالم من خالل دار البلدية للتعرف على أين وكيف يمكن إعادة تدوير جهاز‬ ‫إعالن المطابقة وف ق ً ا لالتحاد األوروبي‬...
  • Seite 115 ‫مسافة 02 سم بين هوائ ي ّ المنتج واألشخاص. لضمان االمتثال والمطابقة، ال يوصى باستخدام المنتج على‬ .‫مسافة أقل من ذلك‬ ‫معلومات الشركة المصنعة‬ Parrot Mambo: PARROT DRONES SAS - 174 Quai de Jemmapes - ‫قام بتصنيع جهاز‬ 75010 Paris )France( - RCS Paris 808 408 074 www.parrot.com...

Inhaltsverzeichnis