Herunterladen Diese Seite drucken
Brita mypure P1 Gebrauchsanleitung
Vorschau ausblenden Andere Handbücher für mypure P1:

Werbung

Verfügbare Sprachen
  • DE

Verfügbare Sprachen

  • DEUTSCH, seite 47
mypure P1
Instructions for use | Mode d'emploi
Manual de instrucciones | Instruções de utilização
Gebrauchsanleitung | Instruzione per l'uso
使用說明
Instrukcja obsługi | Gebruiksaanwijzing | 

Werbung

loading

Inhaltszusammenfassung für Brita mypure P1

  • Seite 1 P1 Instructions for use | Mode d‘emploi Manual de instrucciones | Instruções de utilização Gebrauchsanleitung | Instruzione per l’uso 使用說明 Instrukcja obsługi | Gebruiksaanwijzing | ...
  • Seite 2 Index ENGLISH I. Congratulations Page II. Quality from the very start Page 4 – 11 III. Important notes Page IV. BRITA, quality and satisfaction guaranteed Page FRANÇAIS I. Nous vous félicitons Page II. La qualité dès l’installation Page 15 – 22 III. Important Page IV. BRITA et la satisfaction totale Page ESPAÑOL I. Felicidades Página 25 II. Calidad desde el principio Página 26 – 33 III. Notas importantes Página 34 IV. BRITA calidad y satisfacción garantizadas Página 35 I. Parabéns...
  • Seite 3 I. Congratulations on your new BRITA system ® Thank you for choosing BRITA quality for cleaner, clearer great tasting BRITA filtered water straight from your BRITA Dispenser with BRITA Cartrdige Status Indicator. Your BRITA system offers many advantages BRITA filtered water • Great tasting filtered water at your fingertips • F iltered water is ideal for bringing out the full potential of your food and tastes great for everyday drinking • W ater is a fundamental part of food preparation and can i nfluence the results of your cooking at home. BRITA Dispenser • It is economical, convenient and easy to use The P 1000 filter cartridge is the key to cleaner, clearer great tasting BRITA filtered water from BRITA Cartridge the BRITA Dispenser! Status Indicator The P 1000 has a constant filtration performance for limescale reduction thanks to its multilevel BRITA filtration system. The professional filter head allows three filtration settings for medium hard, hard and very hard water. Depending on the by- pass setting, metal ions such as lead and copper can be reduced from the drinking water during the flow process. The P 1000 filter cartridge reduces limescale and substances, e.g. chlorine, that affect taste and odour. Lifetime of the P 1000 filter cartridge The lifetime of the P 1000 cartridge is dependent on your individual volume usage and your water conditions. For optimum BRITA filtra-...
  • Seite 4 2 Contents of the mypure P1 Compact Water Filtration System To ensure you get the best result from your mypure P1 Filtration System, please follow these instructions carefully. Your mypure P1 Filtration System includes the following (see fig. 1): 1. P 1000 filter head with three settings including a c onvenient l ocking handle 2. Flexible wall mount 3. P 1000 water filter cartridge 4. BRITA Dispenser 5. BRITA Cartridge Status Indicator 6. Battery (CR2032) 7 . Hose (1), length = 800 mm and 3/8" nut on both sides 8. H ose (2), length = 800 mm, 3/8" nut on one side and 7/16" nut on the other 9. U K only: Adapter 1/2" female thread to 3/8" male thread, Adapter 1/2" male thread to 3/8" female thread 10. Usage Instructions 11. Carbonate hardness testing strip 12. T-piece...
  • Seite 5 Prior to installation, read the Technical Data (chapter 6) and the Important Information (chapter 8). After storage and transport below 0°C, the product must be stored in the open Now you can change the setting for the hardness of your water. original packaging for at least 24 hours at the stated ambient The filter head is set to "B" by default. To change the setting, use temperatures (chapter 6) for operation. an Allen key (4 mm). Turn in the direction of the arrow until the "C" symbol appears in the window. Turn against the direction of the arrow until the "A" symbol appears in the window (fig. 3). The filter head contains a flow regulator already installed. It guarantees 3.1 Step 1: Selecting the carbonate hardness smooth water flow from your BRITA Dispenser even at higher setting (A/B/C) on the filter head water pressures. The filter head offers three settings for medium hard water (A), hard 3.2 Step 2: Starting the BRITA Cartridge Status water (B) and very hard water (C). Please follow the instructions below to adjust to the right setting for your local water. First carry Indicator out a carbonate hardness test using the supplied testing strip. The strip can be found in the outer wrapping of these Usage Instruc- The BRITA Cartridge Status Indicator reminds you through three dif- tions. ferent coloured flashing lights when to exchange the filter cartridge. Using the testing strip: A Commissioning: • I mmerse all reaction zones of the test strip in a glass of your r egular tap water (15 - 30 °C) for 1 second (not in running Remove the battery strip. water!). (fig. 2). The BRITA Cartridge Status Indicator shows the default setting: • S hake off excess liquid from the strip and after 1 min check how the left LED will flash two times for the hardness setting B and the many reaction zones changed their colour on the test strip.
  • Seite 6 To ensure optimal performance, you should change the filter car- tridge on a regular basis. The BRITA Cartridge Status Indicator in the Depending on the setting you chose for the filter head you will BRITA lever tells you when to change the filter cartridge. programm the BRITA Cartridge Status Indicator as follows: a To reset, push both buttons of the BRITA Cartridge Status Indica- D Signals tor at the same time for three seconds until the colored LED light flashes green, yellow and red. Make sure you push both buttons The three lights in the BRITA lever are only activated in the filtering at the same time. position. They indicate: b The button on the left side (HARDNESS) is to choose the water – G reen light: The BRITA filter is working at optimum performance. hardness. Push the button repeatedly until the correct setting for – Y ellow light: 90 % of the filter capacity has been used. water hardness appears: R emember to buy a new replacement filter cartridge. For water hardness setting A the LED flashes once – R ed light: The filter cartridge needs to be changed. For water hardness setting B the LED flashes two times For water hardness setting C the LED flashes three times E Resetting the BRITA Cartridge Status Indicator (see table below). c The button on the right side (CARTRIDGE) is to set the cartridge If the maximum volume is reached or the cartridge has been used you are using. Push the button repeatedly until the correct set-...
  • Seite 7 3.3 Step 3: Installing the BRITA Dispenser Please note that you will need the right drilling equipment for your particular work surface or base. Make sure the area To install the BRITA Dispenser, firstly ensure you have all the com- under the BRITA Dispenser is stable, especially if your work ponents required (see fig. 6). surface is not made from wood. Please check the drilling requirements for the material, use the appropriate drill and/ or consult a specialist. Drill a hole (with a 12-mm bit) into the work surface where you wish to set up the BRITA Dispenser. Next, install the BRITA Dispenser (see fig. 6). Then put the base (2) over the hole and fix the BRITA D ispenser (1) in place using the supplied counter plate (4), the gasket (3), the locking ring (5) and the hexagon nut (6). 12 mm 3.4 Step 4: Attaching the hoses Drill We recommend that you first arrange all parts you need in front of you. Before installation, please ensure that you have a 3/8" or 1/2" cold water supply so that you can connect the mypure P1 Filtration System in addition to your existing kitchen tap. Recommended tools for installation: an adjust- able wrench and a allen key. For wall mounting (optional), you need: two screws (e.g. 5 mm thread diameter) and, if required, two wall plugs suitable for your type of wall. Please follow the diagram on the next page (see fig. 7) and perform the steps in the right order. (fig. 6) A a) Turn off the cold water supply b) Please make sure your existing kitchen tap is pressureless by 1. BRITA Dispenser opening the lever 2. Base...
  • Seite 8 800 mm female threads of the two hose ends. c) Now connect one end of the hose (1) to the filter head inlet. This is labelled “IN” (inlet) and marked with an arrow. Make sure the gasket is seated correctly! d) Now connect the other end of the hose (1) to your free cold water supply/installed t-piece and ensure that the gasket is 3/8” correctly positioned! ! 3/8” or Adapter If your cold water supply does not fit the 3/8" connector Hose 1: on the hose (1), use the supplied adapter if required. Your 3/8” 800 mm mypure P1 Filtration System comes with a 1/2" adapter. Please go to your nearest supplier for adapters in other sizes. Cold water C a) Put the hose (2) in place. (fig. 7) supply b) Connect the small end, with the gasket that has already been inserted into the hose (2), to the BRITA Dispenser already installed (see Step 3.3). D a) Insert the appropriate gasket (3/8”) into the 3/8” end of the hose (2) and connect the 3/8” end of the hose (2) to the outlet of the filter head, labelled with an “OUT” arrow. b) Make sure all connections are tightened properly. Avoid over tightening. c) Turn on the cold water supply. The max. tightening torque for the G3/8" connections may not exceed 14 Nm! Only hose connections with gaskets (5) may be used, because hoses with conical screw connections damage the connections of the filter head and invalidate any warranty claims! ENGLISH...
  • Seite 9 3.5 Step 5: Inserting the filter cartridge (see fig. 8) 3.6 Step 6 (optional): Space-saving wall mount to install the cartridge under the sink A Remove protective strap (1). (see fig. 8) (see fig. 9) B Insert the filter cartridge (4) vertically into the filter head (5). Please make sure the flush hose of the filter head is at the o utside. During assembly, note the installation dimensions, bending radii of the hoses and dimensions of the accessories. The C Turn the locking handle (3) until you feel it engages. system can be operated vertically and horizontally. When using the wall mount, install vertically only! (fig. 8) (fig. 9) The filter cartridge can only be inserted when the locking handle is open. Make sure that the filter cartridge is positioned correctly. A Attach the wall mount in place using the two matching screws and use two wall plugs, if necessary, depending on the type of wall. B Engage the filter head (2) in the wall mount (1). Please use the fixation holes (4). ENGLISH...
  • Seite 10 A-setting, up to 1700 liters with the B-setting and up 1100 liters 3.7 Step 7: Commissioning with the C-setting. Please take this into consideration while reset- ting your BRITA Cartridge Status Indicator. Before use, make sure that you have followed all the steps correctly and all the parts are fitted. Place a suitable container under the cartridge to catch any leakages. 5 Maintenance A Turn on the cold water supply and check the system carefully for any leaks. Regularly check the filter system for leaks. Regularly check the B Open the valve on your BRITA Dispenser and rinse through until hoses for kinks. Kinked hoses must be replaced. the filtered water runs clear and without any b ubbles (at least 2 litres). Prior to exchanging the filter system, read the Technical Data (chapter 6) and the Important Notes (chapter 8). 4 Replacing the filter cartridge Regularly clean the outside of the filter system with a soft, damp cloth. If the maximum volume is reached or the cartridge has been used for 12 months from commissioning, the BRITA Cartidge Status Do not use any abrasive chemicals, cleaning solutions or Indicator will flash red to remind you that the cartridge needs to be astringent cleaning agents. replaced. Read the Important Notes (chapter 8) prior to exchange. After stor- age and transport below 0°C, the product must be stored in the open original packaging for at least 24 hours at the stated ambient temperatures (chapter 6) for operation. The filter cartridge can be pivoted by 90° in the wall mount for easy removal. When the locking handle is open, the water supply to the cartridge is interrupted and by-passing with direct water flow from the water inlet to the outlet is possible.
  • Seite 11 Water inlet connection G3/8" 6 Technical data of the P 1000 cartridge Water outlet connection G3/8" Operating pressure 2 bar to max. 8.6 bar Water intake temperature 4°C to 30°C 7 Troubleshooting operation 4°C to 40°C Ambient tem- perature for storage/transport –20°C to 50°C A No water flow Cause: Water intake closed. P 1000 Up to 1200 L Capacity up to carbon- Troubleshooting: O pen the water intake at the upstream shut-off ate hardness 10 °dH at valve or by closing the locking handle (3) on the setting "A" P 3000 Up to 3400 L filter head. Check hoses for kinks. P 1000 Up to 600 L Capacity from carbonate B No or low water flow in spite of open water intake hardness 10 to 17 °dH at Cause: Mains pressure too low.
  • Seite 12 III. Important notes 8 Important notes Optimum use Protect the P 1000 water filter cartridge from direct sunlight and • B RITA recommends that the filter system is not left unused for mechanical damage. Do not assemble near sources of heat and a long period. If the mypure P1 Filtration System is not used for open flames. A stop valve must be installed before the filter system several days (2–3 days), we recommend that the filter system be intake hose. If the water pressure is greater than 8.6 bar, a pres- flushed with the flushing volume X indicated in the table below. sure reducer must be installed in front of the filter system. The After stagnation periods of over 4 weeks, the filter should be mypure P1 Filtration System is only suitable for domestic use. flushed with flushing volume Y or else replaced. Please also note the maximum usage period of the filter cartridge is 12 months. Only water of drinking water quality may be used as intake water for the BRITA water filter system. The BRITA water filter system is Flushing volume X after 2–3 days stagnation Flushing volume only suitable for cold water use within the supply water tem- perature stated in chapter 6. No microbiologically impaired water P 1000 2 Litres or water of unknown quality may be used without appropriate P 3000 3 Litres disinfection. Flushing volume Y after 4 weeks stagnation Flushing volume If you have a low pressure boiler, make sure you only connect the P 1000 to the cold water supply with the angle valve, and not to the P 1000 20 Litres low pressure boiler. P 3000...
  • Seite 13 IV. BRITA , quality and satisfaction guaranteed ® Correct disposal of the BRITA Cartridge The BRITA service hotline cares Status Indicator Do you have any questions about your BRITA product? Or on the sub- The BRITA Cartridge Status Indicator has an ject of water filtration? Give us a call! You can find the contact details expected lifetime of approx. 5 years. At the end for your BRITA customer service team next to your country code on of the lifetime of the BRITA Cartridge Status the back of this booklet. Indicator, remember that it must be disposed according to the local applicable regulations and statutory requirements. Please contact your BRITA The best side of water: www.brita.net Customer Service team if your BRITA Cartridge Status Indicator is at the end of its lifetime. Are you looking for your nearest BRITA retailer? Do you want more detailed information about BRITA products? Or about the BRITA com- pany? Want to make the most of one of BRITA’s service offers? Up- Exclusion of liability to-date information, consumer tips, seasonal competitions, delicious coffee and tea recipes can be found around the clock at www.brita.net BRITA shall not be held liable for any damage, including subsequent damage, arising from the incorrect use of the product. Registering your product online 100% satisfaction: the BRITA guarantee Benefit from registering your product online. For more information We are confident that this BRITA product will on this and your registration code, see the leaflet in your mypure P1 meet your demands in terms of quality and Filtration System. performance. If this product does not meet your expectations, we will accept its return within 30 days of the date of purchase and reimburse the purchase price. Just send the product with your Over 40 years of experience is a guarantee proof of purchase (receipt) and the grounds for...
  • Seite 14 I. Nous vous félicitons pour l’achat de ce système BRITA ® Merci d'avoir choisi la qualité BRITA pour de l'eau filtrée BRITA au goût agréable directement à partir de votre distributeur d'eau BRITA avec indicateur de changement de cartouche LED. Ce système BRITA offre de nombreux avantages L'eau filtrée BRITA • Une eau au goût agréable d'un simple geste • L 'eau filtrée révèle la saveur de vos aliments et offre une eau au goût agréable pour votre consommation quotidienne • L 'eau est un élément essentiel de la cuisine qui influence le Distributeur d'eau BRITA goût de vos préparations culinaires. • Utilisation simple, pratique et économique La cartouche P 1000 est l'élément clé du Indicateur de concept de filtration BRITA qui fournit de l'eau changement de cartouche BRITA plus pure, plus claire et au goût agréable, avec le distributeur BRITA ! La cartouche P 1000 assure une filtration constante pour la dureté de l'eau grâce au système de filtration à plusieurs niveaux BRITA. La tête filtrante professionnelle permet trois réglages : eau moyennement dure, eau dure et eau très dure. En fonction du reglage by-pass, le passage de l’eau potable dans le filtre permet de réduire la présence des ions metalliques comme le plomb et le cuivre. La cartouche filtrante P 1000 reduit la teneur en calcaire et des principales substances qui alterent les caracteristiques olfactives et gustatives de l’eau, comme le chlore, pour restituer le gout naturel. Durée d'utilisation de la cartouche filtrante P 1000 La durée d'utilisation de la cartouche filtrante P 1000 dépend de votre consommation d'eau personnelle et de la qualité de votre...
  • Seite 15 2 Contenu du kit mypure P1 Pour obtenir les meilleurs résultats avec le kit de filtration BRITA mypure P1, veuillez lire attentivement les présentes instructions. Le kit de filtration mypure P1 comprend les éléments suivants (voir fig. 1): 1. Tête de filtre P 1000 à 3 réglages, avec poignée de verrouillage 2. Fixation murale pratique 3. Cartouche filtrante P 1000 4. D istributeur d'eau BRITA 5. Indicateur de changement de cartouche BRITA 6. Pile (CR2032) 7 . Tuyau (1), longueur = 800 mm et écrous 3/8" des deux côtés 8. T uyau (2), longueur = 800 mm, écrou 3/8" d'un côté et écrou 7/16" de l'autre 9. R oyaume-Uni uniquement: Adaptateur filetage intérieur 1/2" - filetage extérieur 3/8", Adaptateur filetage extérieur 1/2" - filetage intérieur 3/8" 10. Mode d'emploi 11. Bandelette pour test de dureté de l'eau 12. Pièce de raccord en T 13. Joints...
  • Seite 16 (fig. 2) (fig. 3) 6) ainsi que les instructions importantes (chapitre 8) avant l'in- stallation. Après un stockage et un transport en dessous de 0 °C, stockez le produit avec l'emballage d'origine ouvert au Vous pouvez à présent adapter le réglage de la dureté de votre eau. moins 24 heures avant sa mise en service à la température Le réglage par défaut de la tête de filtre est « B ». Pour changer ambiante du lieu d'installation (chapitre 6). le réglage, utilisez une clé Allen (4 mm). Tournez-la dans le sens de la flèche jusqu'à l'apparition du symbole « C » dans la fenêtre. Tournez-la dans le sens opposé à la flèche jusqu'à l'apparition du symbole « A » dans la fenêtre (fig. 3). La tête de filtre est équipée 3.1 Etape 1: sélection de la dureté carbonate d'un régulateur de débit. Il garantit un débit optimal de l'eau (A/B/C) sur la tête de filtre distribuée par votre distributeur d'eau BRITA même lorsque la pression est élevée. La tête de filtre permet trois réglages: eau moyennement dure (A), eau dure (B) et eau très dure (C). Pour ajuster le réglage en fonction de la qualité de votre eau locale, suivez les instructions ci-des- 3.2 Etape 2 : Démarrage de l'indicateur de sous. Effectuez d'abord un test de la dureté carbonate en utilisant changement de cartouche BRITA la bandelette fournie. La bandelette est jointe à l'emballage des présentes instructions. L'indicateur de changement de cartouche BRITA vous indique Utilisation de la bandelette : automatiquement au moyen de trois voyants lumineux quand rem- • P longez la zone réactive de la bandelette de test dans un verre placer la cartouche filtrante. d'eau du robinet fraîche (de 15 à 30 °C) pendant 1 seconde (pas sous l'eau du robinet !). (fig. 2).
  • Seite 17 Pour réinitialiser, maintenez les 2 boutons de l'indicateur de changement de cartouche enfoncés pendant trois secondes D Signaux jusqu'à ce que les LED de couleur verte, jaune et rouge c lignotent. Les trois voyants lumineux dans le levier BRITA sont uniquement activés durant la filtration. Ils indiquent les informations suivantes : b Le bouton de gauche (Hardness) sert à sélectionner le réglage de dureté de l'eau. Appuyez à plusieurs reprises sur le bouton – V oyant vert: la cartouche filtrante BRITA fonctionne. jusqu'à ce que le bon réglage de dureté de l'eau apparaisse: – V oyant jaune: la capacité de filtration est utilisée à 90 %. Pour le réglage de dureté de l'eau A , la LED clignote une fois Pensez à acheter une nouvelle cartouche. Pour le réglage de dureté de l'eau B , la LED clignote deux fois – V oyant rouge: vous devez changer votre cartouche filtrante. Pour le réglage de dureté de l'eau C , la LED clignote trois fois (voir tableau ci-dessous) E Réinitialisation de l'indicateur de changement de c Le bouton de droite (Cartridge) sert à sélectionner la cartouche cartouche BRITA que vous utilisez. Appuyez à plusieurs reprises sur le bouton jusqu'à ce que le bon réglage de cartouche apparaisse: Pour le...
  • Seite 18 3.4 Etape 4 : fixation des tuyaux 12 mm Nous vous recommandons de disposer toutes les pièces nécessaires devant vous. Avant l'installation, vérifiez que vous disposez d'un raccord d'alimentation en eau froide 3/8" ou 1/2" de manière à pouvoir raccorder le kit de filtration mypure P1. Outillage recommandé pour l'installation : une clé Allen (5 mm) et une perceuse 12 mm. Pour le montage mural (facultatif), vous avez besoin de : deux vis (par ex. 5 mm) et, le cas échéant, deux chevilles adaptées à votre type de mur. Veuillez vous référer à l'illustration suivante (voir fig. 7) et effectuer les étapes dans l'ordre indiqué. (fig. 6) Veuillez lire attentivement toutes les instructions avant de com- mencer l'installation. A a) Coupez l'arrivée d'eau froide. 1. Distributeur d'eau BRITA b) Assurez-vous que votre robinet de cuisine est fermé lorsque vous ouvrez le levier. 2. Base (plan de travail) L'eau ne doit pas couler du robinet ! 3. Joint 4. Contre-plaque c) Installez la pièce de raccord en T fourni 5. Bague de blocage d) Dévissez le tuyau femelle 3/8" de votre robinet de cuisine 6. E crou hexagonal (7/16") pour le retirer de votre arrivée d'eau mâle 3/8". Cherchez un endroit adéquat pour le distributeur d'eau BRITA à e) Reliez la pièce de raccord en T à l'arrivée d'eau froide. côté de l'évier. Nous vous recommandons de l'installer près de a. M ontez le joint 3/8" sur l'écrou femelle de la pièce de l'évier sur le plan de travail (à côté du robinet principal). Avant de...
  • Seite 19 3/8” d) Connectez maintenant l'autre extrémité du tuyau (1) à l'alimen- ! 3/8" ou tation en eau froide libre/ raccord en T installé et assurez-vous adaptateur que le joint est correctement positionné. Tuyau 1: 3/8” 800 mm Si votre alimentation en eau froide ne convient pas au raccord 3/8" du tuyau (1), utilisez l'adaptateur fourni. Le kit de filtration mypure P1 comprend un adaptateur 1/2". Si vous avez besoin d'autres adaptateurs, adressez vous au profes- Alimentation en sionnel le plus proche. eau froide (fig. 7) C a) Raccordez le tuyau (2). b) Raccordez la petite extrémité avec le joint déjà inséré sur le tuyau (2) au distributeur d'eau BRITA déjà installé (voir l'étape 3.3). D a) Montez le joint approprié (3/8") sur l'extrémité du tuyau 3/8" (2), puis raccordez l'extrémité du tuyau 3/8" (2) à la sortie de la tête filtrante repérée par la flèche « OUT ». b) Assurez-vous d'avoir bien serré tous les raccords. Ne serrez pas excessivement. c) Ouvrez l'arrivée d'eau froide. Le couple de serrage pour les raccords G3/8" ne doit pas dépasser 14 Nm ! Utilisez seulement des raccords à joints plats (5), car les géométries de joints coniques endomma- gent les raccords de la tête de filtre et entraînent l'annulation de la garantie ! FRANÇAIS...
  • Seite 20 3.5 Etape 5 : mise en place de la 3.6 Etape 6 (facultative) : fixation murale pour cartouche filtrante (voir fig. 7) un montage peu encombrant de la cartouche sous l'évier (voir fig. 9) A Retirez la languette de protection (1). (voir fig. 8) B Insérez la cartouche filtrante (4) verticalement dans la tête de Tenez compte des dimensions du système, des accessoires filtre (5). Veillez à ce que le tuyau de rinçage de la tête de filtre et des rayons de courbure des tuyaux. La mise en service soit à l'extérieur. est possible en position verticale ou horizontale. En cas d'uti- C Tournez la poignée de verrouillage (3) jusqu'à ce qu'elle s'en- lisation de la fixation murale, installez le filtre à la verticale ! clenche. (fig. 8) (fig. 9) L'insertion de la cartouche filtrante est possible uniquement A Montez la fixation murale en utilisant 2 vis adéquates et si lorsque la poignée de verrouillage est ouverte. Veillez à n écessaire 2 chevilles, selon le type de mur. ce que la cartouche filtrante soit positionnée correctement. B Engagez la tête de filtre (2) dans la fixation murale (1). Veuillez utiliser les trous de fixation (4). FRANÇAIS...
  • Seite 21 4 Changement de la cartouche filtrante Avant de remplacer le système de filtration, lisez les car- actéristiques techniques (chapitre 6) ainsi que les informa- Si le volume maximum est atteint ou que la cartouche a été utilisée tions importantes (chapitre 8) pendant 12 mois depuis sa mise en service, un voyant rouge de l'indicateur lumineux de changement de cartouche BRITA se met à Nettoyez régulièrement l'extérieur du système de filtration à l'aide clignoter pour vous rappeler de changer la cartouche. d'un chiffon doux et humide. Lisez attentivement les informations importantes (chapitre 8) avant de remplacer la cartouche. Après un stockage et un transport en N'utilisez pas de produits chimiques ou détergents abrasifs dessous de 0 °C, le produit doit être laissé dans son emballage ni de nettoyants agressifs. d'origine ouvert pendant au moins 24 heures avant d'être mis en service à la température ambiante du lieu d'installation (chapitre 6). Vous avez la possibilité de tourner la cartouche filtrante de 90° dans la fixation murale pour la retirer plus facilement. Quand la poignée de verrouillage est ouverte, la circulation de l’eau n’est pas interrompue. Remplacement de la cartouche P 1000 (voir fig. 8) : A Ouvrez la poignée de verrouillage (3). B Placez un récipient adapté sous le tuyau de rinçage pour recueillir l'eau qui coule. Ouvrez le robinet de purge (2) et dépressurisez le système. Fermez à nouveau le robinet de purge (2). C Retirez la cartouche filtrante saturée (4) de la tête de filtre (5) – Veuillez noter que la cartouche est fermement fixée, vous pouvez donc tirer dessus sans risquer de la casser. D Insérez la nouvelle cartouche filtrante (voir le chapitre 3.5). E Fermez la poignée de verrouillage (3). F R éinitialisez l'indicateur de changement de cartouche BRITA (chapitre 5). G Ouvrez le levier BRITA de votre robinet BRITA et rincez le sys- tème jusqu'à ce que l'eau soit limpide et ne contienne plus d'air (laissez couler au moins 2 litres d'eau). FRANÇAIS...
  • Seite 22 Position de fonctionnement Horizontale et verticale 6 Caractéristiques techniques des cartouches P 1000 et P 3000 Raccord de l'arrivée d'eau G3/8" Raccord de la sortie d'eau G3/8" Pression de fonctionnement de 2 à 8,6 bars max. Température de l'arrivée d'eau de 4 °C à 30 °C 7 Dépannage Fonctionnement de 4 °C à 40 °C Température ambiante en Stockage/transport de -20 °C à 50 °C A Absence d'eau Cause : A rrivée d'eau fermée. P 1000 Jusqu'à 1 200 L Capacité jusqu'à 8,5 dH de dureté de l'eau avec Solution : O uvrez l'arrivée d'eau avec le robinet d'arrêt placé en réglage « A » P 3000 Jusqu'à 3 400 L amont ou en fermant la poignée de verrouillage (3) de la tête de filtre (2). P 1000 Jusqu'à 600 L Capacité de 8,5 à 17 dH B Absence d'eau ou faible débit bien que l'arrivée soit ouverte...
  • Seite 23 III. Important 8 Important Utilisation optimale Evitez d'exposer la cartouche filtrante P 1000 à un rayonnement • B RITA recommande d'utiliser le système de filtration régulière- solaire direct ou à des dommages mécaniques. Ne placez pas le ment. En cas de non-utilisation du système BRITA mypure P1 système à proximité de sources de chaleur ou de flammes nues. pendant 2 ou 3 jours, nous vous recommandons de le rincer en Montez un robinet d'arrêt en amont du tuyau d'alimentation du sys- faisant couler le volume X indiqué dans le tableau ci-dessous. tème de filtration. Si la pression est supérieure à 8,6 bars, installez Après une période d'inutilisation de plus de 4 semaines, rincez un limiteur de pression en amont du système de filtration. Le Kit de le système de filtration en faisant couler le volume Y ou rem- filtration mypure P1 est réservé à un usage ménager uniquement. placez-le. N'oubliez pas que la durée d'utilisation de la cartouche filtrante est limitée à 12 mois. Utilisez seulement de l'eau potable avec le système de filtration BRITA. Le système de filtration BRITA convient seulement à de Volume de rinçage X après 2 ou 3 jours de Volume de l'eau froide utilisée dans la plage de température indiquée au non-utilisation rinçage c hapitre 6. N'utilisez en aucun cas de l'eau chargée de contami- nants microbiologiques ou de l'eau dont la qualité microbiologique P 1000 2 litres est inconnue sans effectuer une stérilisation appropriée. P 3000 3 litres En cas d'utilisation d'un chauffe-eau à basse pression, veillez à Volume de rinçage Y après 4 semaines de Volume de raccorder la cartouche filtrante P 1000 à l'arrivée d'eau froide avec...
  • Seite 24 IV. BRITA et la satisfaction totale ® BRITA est à votre écoute Veillez à mettre au rebut l'indicateur de changement de cartouche BRITA conformément Avez-vous des questions sur votre produit BRITA ? Ou sur la filtration aux directives environnementales de l’eau ? Alors contactez-nous ! Les coordonnées figurent à côté de l’abréviation de votre pays. L'indicateur de changement de cartouche BRITA a une durée de vie d'environ 5 ans. Veillez à le met- tre au rebut à l'issue de cette période conformé-...
  • Seite 25 I. Le felicitamos por su nuevo sistema BRITA ® Gracias por elegir la calidad de BRITA para obtener agua filtrada BRITA más limpia y con un sabor mucho más agradable directamente desde su grifo BRITA con indicador de estado del filtro BRITA. El sistema BRITA le ofrece muchas ventajas El agua filtrada BRITA • Agua filtrada de excelente sabor a su alcance • E l agua filtrada es ideal para sacar todo el potencial de sus alimentos y ofrece un sabor excelente todos los días • E l agua es una parte fundamental de la preparación de a limentos y puede influir en los resultados de su cocina. Dispensador BRITA • Es económico, cómodo y fácil de usar El cartucho filtrante P 1000 es la clave para Indicador de conseguir la transparencia y el agradable e stado del filtro sabor del agua filtrada BRITA directamente BRITA desde su grifo BRITA El P 1000 ofrece un rendimiento de filtración constante de la cal gracias al sistema de filtración BRITA de varias etapas. El cabezal de filtro profesional permite tres ajustes de filtración, según sea para agua semidura, dura y muy dura. En función del ajuste de mezcla, los iones metálicos como el plomo y el cobre se pueden reducir del agua potable durante el procedimiento de flujo. El cartucho filtrante P 1000 reduce los depositos calcareos y sus- tancias como por ejemplo el cloro, que afectan al sabor y al olor, para un perfecto sabor natural.
  • Seite 26 2 Contenido del kit mypure P1 Para garantizar el mejor resultado del kit filtrante de agua BRITA mypure P1, siga estas instrucciones detenidamente. El kit filtrante de agua mypure P1 incluye lo siguiente (ver Fig. 1): 1. C abezal del filtro P 1000 con 2 ajustes y una útil llave de cierre 2. Cómodo montaje mural 3. Cartucho filtrante de agua P 1000 4. G rifo BRITA 5. Indicador de estado del filtro BRITA 6. Pila (CR2032) 7 . M anguera (1), longitud = 800 mm y tuerca de 3/8" a ambos lados 8. M anguera (2), longitud = 800 mm, tuerca de 3/8" en un lado y tuerca de 7/16" en el otro 9. S ólo el Reino Unido: Adaptador de rosca interior de 1/2" a rosca exterior de 3/8",Adaptador de rosca exterior de 1/2" a rosca interior de 3/8"...
  • Seite 27 Puede encontrar la tira en el envoltorio exterior de este manual de instrucciones. Utilización de la tira de test: • S umerja todas las zonas de reacción de la tira de test en un vaso de agua del grifo (15 - 30 °C) durante 1 segundo (no la sumerja (fig. 2) (fig. 3) en agua corriente). (fig. 2). • A gite la tira de test para eliminar el exceso de líquido y, tras 1 Ahora puede cambiar el ajuste de la dureza de su agua. El cabezal minuto, compruebe cuántas zonas de la tira de test han cam- biado de color. de filtro está ajustado a ""B"" de forma predeterminada. Para cam- biar este ajuste, use una llave Allen (4 mm). Gire en el sentido de En función del número de las zonas de reacción que han cambiado la flecha hasta que se muestre el símbolo ""C"" en la ventana. Gire de color, recomendamos ajustar el cabezal del filtro de la siguiente en el sentido contrario a la flecha hasta que se muestre el símbolo forma: ""A"" en la ventana (fig. 3). El cabezal del filtro contiene un regulador de flujo instalado para garantizar la fluidez del caudal de agua proce- dente del grifo incluso a altas presiones de agua. 3.2 Paso 2: Iniciación del indicador electrónico de cambio de cartucho BRITA El indicador de estado del filtro BRITA le avisa, mediante tres luces intermitentes de diferentes colores, cuándo se debe cambiar el cartucho filtrante. A Comienzo: Retire la tira de la pila. El indicador del estado del filtro mostrará la configuración predeterminada: el LED izquierdo parpadeará dos ESPAÑOL...
  • Seite 28 BRITA parpadeen en colores verde, amarillo y rojo. Asegúrese de pulsar ambos botones a la vez. Cambie con regularidad el cartucho filtrante para garantizar un rendimiento óptimo. El indicador de estado del filtro BRITA de la b El botón izquierdo (Hardness) es para elegir la dureza del agua. palanca BRITA le indica cuándo cambiar el cartucho filtrante. Pulse repetidamente hasta que le aparezca la correcta configura- ción para la dureza de agua: D Señales Para la configuración de la dureza del agua A, el LED parpadeará una vez En la tapa superior situado en el mando hay tres luces que solo se Para la configuración de la dureza del agua B, el LED parpadeará encienden en la posición de filtrado. Indicación de las luces: dos veces – Luz verde: el filtro del grifo BRITA está funcionando. Para la configuración de la dureza del agua C, el LED parpadeará tres veces (véase la siguiente tabla). – L uz amarilla: se ha utilizado el 90% de la capacidad de filtrado. Acuérdese de comprar un cartucho filtrante nuevo de repuesto. c El botón derecho (Cartridge) es para configurar el filtro que está usando. Pulse el botón repetidamente hasta que le aparezca la – Luz roja: se debe cambiar el cartucho filtrante. correcta configuración para el cartucho: Para el filtro P 1000, el LED parpadeará una vez E Reprogramación del indicador de estado del filtro BRITA Para el filtro P 3000, el LED parpadeará dos veces Si se ha alcanzado el volumen máximo de filtración o se ha utilizado Para el filtro A 1000, el LED parpadeará tres veces el cartucho durante 12 meses, el LED del indicador de estado del (véase la siguiente tabla). filtro BRITA empezará a parpadear en rojo (solo si el mando BRITA d Para modificar la configuración, simplemente pulse el botón...
  • Seite 29 Para reiniciar, quite el indicador de estado del filtro de la palanca. 1. Grifo BRITA Pulse ambos botones del indicador al mismo tiempo durante tres 2. Base segundos hasta que el LED parpadee en colores verde, amarillo y (Superficie de trabajo) rojo. Asegúrese de presionar ambos botones a la vez. 3. Junta Coloque el indicador de estado del filtro de forma adecuada en el mando del grifo BRITA (véase fig. 4). Tenga en cuenta que el lado 4. Contraplaca de la batería debe quedar encarado al logotipo de BRITA en la 5. Anillo de bloqueo palanca. 6. Tuerca hexagonal (7/16") F Cambio de la batería Antes de empezar, busque un lugar adecuado para instalar el grifo BRITA cerca del fregadero. Recomendamos instalarlo junto al frega- La batería se puede cambiar sin perder los ajustes anteriores del dero, en la superficie de trabajo (junto al grifo p rincipal). Asegúrese indicador de estado del filtro. de que bajo el fregadero o el orificio taladrado hay suficiente espa- cio para el cartucho filtrante P 1000 y las dos mangueras. Datos técnicos: • Pila: 1x CR2032 (extraíble) Tenga en cuenta que necesitará el taladro adecuado para la • Duración de la pila: aprox. 2 años base o superficie de trabajo concreta. Confirme que el área bajo el grifo es estable, especialmente si la superficie de No sumergir el indicador de estado del filtro en agua. trabajo no es de madera. Compruebe los requisitos de talad- rado para el material, use el taladro adecuado o consulte a un experto. 3.3 Paso 3: Instalación del grifo BRITA Taladre un orificio (con una broca de 12 mm) en la superficie de Para instalar el grifo BRITA, compruebe primero que tiene todos los trabajo en la que desee instalar el grifo BRITA.
  • Seite 30 S ólo para grifos de cocina con conexiones a presión (para grifos de cocina con tubos): Conecte el tubo del grifo de cocina a una de las dos conex- iones de la pieza en T de 3/8". Utilice la tuerca de conexión a presión con componentes de sellado (como se ha usado anteriormente) y el tubo para conectar el grifo de cocina de 3/8" a la conexión de la pieza en T de 3/8". B a) Conecte la manguera (1). Manguera 2: b) Inserte las juntas medianas (3/8") en las respectivas roscas 800 mm interiores de ambos extremos de la manguera. c) Conecte un extremo de la manguera (1) a la entrada del cabezal del filtro. Se identifica con «IN» (entrada) y una flecha. Asegúrese de que la junta está correctamente asentada. d) Ahora conecte el otro extremo de la manguera (1) a la toma libre de agua fría y asegúrese de que la junta está en la 3/8” posición correcta. ! 3/8" o adaptador Si el grifo de agua fría no encaja en el racor de 3/8" instalado en la manguera (1), tendrá que usar el adaptador suminis- Manguera 1: 3/8” trado. El kit mypure P1 incluye un adaptador de 1/2". Acuda 800 mm a su distribuidor más cercano para adquirir adaptadores de otros tamaños. Toma de C a) Coloque la manguera (2) en su sitio. agua fría (fig. 7) b) Conecte el extremo pequeño, con la junta que ya ha intro- ducido en la manguera (2), en el grifo BRITA que ha instalado (consulte el paso 3.3). ESPAÑOL...
  • Seite 31 3.5 Paso 5: Inserción del cartucho filtrante 3.6 Paso 6 (opcional): Montaje mural para (ver fig. 8) i nstalar el cartucho bajo el fregadero y ahorrar espacio (ver fig. 9) A Quite la cinta protectora (1). (ver fig. 8) B Inserte el cartucho filtrante (4) verticalmente en el cabezal de Durante el montaje, tome nota de las dimensiones de filtro (5). Por favor asegúrese de que la manguera del cabezal del instalación, el radio de curvatura de las mangueras y las filtro esté en el exterior. dimensiones de los accesorios. El sistema puede funcionar C Gire la llave de cierre (3) hasta que se acople. instalado vertical y horizontalmente. Si va a usar el montaje mural, instálelo sólo verticalmente. (fig. 8) (fig. 9) El cartucho filtrante sólo se puede insertar con la llave de cierre abierta. Compruebe que el cartucho filtrante queda en la posición A Fije el soporte de pared con los dos tornillos adecuados y, si es correcta. necesario, utilice dos tacos según el tipo de pared. B Instale el cabezal de filtro (2) en el soporte de pared (1). Utilice para ello los orificios de fijación (4). ESPAÑOL...
  • Seite 32 °dH y ajuste ""A"" C Retire el cartucho filtrante gastado (4) del cabezal de filtro (5); P 3000 Hasta 3400 l tenga en cuenta que el cartucho filtrante está encajado firmemente, por lo que tendrá que tirar con fuerza sin temor a P 1000 Hasta 600 l Capacidad con dureza de romperlo. carbonatos de 10 a 17 °dH y ajuste ""B"" P 3000 Hasta 1700 l D Inserte el nuevo cartucho filtrante (consulte el capítulo 3.5). E Cierre la llave de cierre (3). P 1000 Hasta 400 l Capacidad con dureza de F Ponga a cero del indicador de estado del filtro BRITA carbonatos de 17 a 24 (capítulo 3.2). °dH y ajuste ""C"" P 3000 Hasta 1100 l G A bra la palanca con la inscripción BRITA del grifo BRITA y deje Flujo nominal 60 L/h correr el agua filtrada hasta que salga limpia y sin burbujas (al menos 2 litros). ESPAÑOL...
  • Seite 33 Causa: E l cabezal del filtro no está montado en Pérdida de presión por caudal nominal 0,25 bares la dirección del flujo de agua / mangueras de servicio conectadas incorrectamente. Volumen del cartucho vacio Solución del problema: D esmonte el cabezal del filtro y las mangu- eras para instalarlos en el sentido del flujo P 1000 1,0 kg/1,6 kg de agua (capítulo 3.4). Peso (seco/mojado) P 3000 1,8 kg/2,8 kg C Fugas Causa: L as conexiones atornilladas no se han Sistema de P 1000 119 mm/108 mm/265 mm asegurado correctamente. filtro (cabezal Solución del problema: C ompruebe la presión de agua. Compruebe de filtro con todas las conexiones atornilladas y món- cartucho P 3000 117 mm/104 mm/417 mm telas según lo descrito en el capítulo 3.4. filtrante) D LED no parpadea P 1000 108 mm/108 mm/259 mm Causa: l a batería no está colocada correctamente...
  • Seite 34 III. Notas importantes 8 Notas importantes Uso óptimo Proteja de cartucho filtrante P 1000 de la luz directa del sol y de daños • B RITA recomienda que el sistema filtrante no permanezca sin mecánicos. No realice el montaje cerca de fuentes de calor ni llamas usarse durante períodos prolongados. Si el sistema filtrante abiertas. Se debe instalar una válvula de retención antes de la mangu- BRITA mypure P1 no se usa durante varios días (2–3 días), era de admisión del sistema de filtro. El kit filtrante de agua mypure recomendamos enjuagar con el volumen X indicado en la P1 sólo está indicado para uso doméstico. siguiente tabla. Tras períodos de parada de más de 4 semanas, el filtro se debe enjuagar con el volumen Y o bien sustituirse. Tenga El sistema filtrante de agua BRITA sólo se debe usar con agua también en cuenta que el período de uso máximo del cartucho potable. El sistema de filtro de agua BRITA sólo está indicado para su filtrante es de 12 meses. uso con agua fría con la temperatura indicada en el capítulo 6. No se deberá usar agua de calidad desconocida ni con propiedades microbi- Volumen de enjuague X tras 2–3 días sin Volumen de ológicas alteradas sin la debida desinfección. utilizar enjuague Si tiene un calentador de baja presión, asegúrese de que sólo conecta P 1000 2 litros el filtro P 1000 a la toma de agua fría con la válvula angular, y no al calentador. P 3000 3 litros Con independencia del tipo de agua, deberá usar utensilios o herv- Volumen de enjuague Y tras 4 semanas sin Volumen de idores de acero inoxidable con resistencias de acero inoxidable. Esto...
  • Seite 35 IV. BRITA , calidad y satisfacción garantizadas ® Eliminación correcta del indicador de estado Línea de atención al cliente de BRITA del filtro BRITA ¿Tiene alguna pregunta sobre su producto BRITA? ¿O sobre el tema de la El indicador de estado del filtro BRITA tiene una filtración de agua? ¡Llámenos! Encontrará los datos de contacto del servi- vida útil aproximada de 5 años. Al final de la vida cio de atención al cliente BRITA de su país en el reverso de este manual. útil del indicador de estado del filtro BRITA, recu- erde que debe eliminarse de acuerdo con las nor- mativas locales aplicables y los requisitos legales. Lo mejor del agua: www.brita.es Comuníquese con el departamento de Atención al Cliente de BRITA si su indicador de estado del ¿Busca su distribuidor BRITA más próximo? ¿Desea información más filtro BRITA se encuentra al final de su vida útil. detallada sobre los productos BRITA? ¿O sobre la compañía BRITA? ¿Quiere sacar el máximo partido de las ofertas de servicio BRITA? En www.brita.es encontrará en todo momento información actual- Limitación de responsabilidad izada, consejos para los consumidores, concursos de temporada, y deliciosas recetas de café y té. BRITA no será responsable de daños, incluidos daños derivados, oca- sionados por el uso incorrecto del producto. Registro del producto en Internet Satisfacción 100%: la garantía de BRITA Benefíciese al registrar su producto en Internet. Para obtener más información sobre las ventajas y el código de registro, consulte el Estamos seguros de que este producto BRITA folleto incluido en su kit mypure P1. satisfará sus demandas de calidad y rendimiento. Si el producto no cumple sus expectativas, lo puede devolver en un plazo de 30 días desde la fecha de compra y le reembolsaremos el precio Más de 40 años de experiencia constituyen abonado. Tan solo tiene que enviar el producto una garantía de calidad con su ticket de compra (recibo) a la dirección del...
  • Seite 36 I. Parabéns pelo seu novo sistema BRITA ® Agradecemos que tenha escolhido a qualidade BRITA para obter uma água filtrada mais limpa, mais nítida e mais gostosa diretamente do dispensador de água BRITA com indicador de status do cartucho. O sistema BRITA proporciona diversas vantagens A água filtrada BRITA...
  • Seite 37 2 anos. Só poderá apresentar um pedido de garantia caso todas as instruções existentes neste manual tenham sido seguidas e respeitadas. 2 Componentes do conjunto mypure P1 Para se assegurar de que o conjunto de filtro de água mypure P1 da BRITA lhe oferece os melhores resultados, siga cuidadosamente estas instruções. O seu conjunto de filtro de água premium mypure P1 inclui o seguinte (ver fig. 1):...
  • Seite 38 A Colocação em serviço: Definição Retire a fita da pilha. O indicador de estado do cartucho BRITA número de zonas mostrará o valor predeterminado: o LED esquerdo piscará duas de reação que apre- vezes para ajustar o nível de dureza B e o LED direito piscará...
  • Seite 39 (ver o seguinte quadro). D Sinais c O botão direito (Cartridge) serve para marcar o cartucho que está As três luzes na alavanca da BRITA só se acendem durante a a ser utilizado. filtragem. Carregar repetidamente no botão hasta que apareça o ajuste...
  • Seite 40 Faça um furo (com uma ponta de 12 mm) na superfície de trabalho, no local onde pretende instalar o distribuidor de água BRITA. A seguir, instale o distribuidor de água BRITA (ver fig. 6). Depois posicione a base (2) sobre o orifício e fixe o distribuidor de água BRITA (1) na respetiva posição utilizando a chapa da bancada forne-...
  • Seite 41 Se o seu abastecimento de água não se ajustar ao conector ! 3/8" ou de 3/8" da tubagem (1), use o adaptador fornecido. O seu adaptador conjunto mypure P1 é fornecido com um adaptador de 1/2". Desloque-se ao fornecedor mais próximo para obter adapta- Tubagem 1: 3/8”...
  • Seite 42 3.5 Passo 5: Inserir a carga filtrante (ver fig. 8) 3.6 Passo 6 (opcional): suporte de parede e conomizador de espaço para instalar a A Retirar a banda protetora (1) (consulte fig. 8) carga sob o lava-loiça (ver fig. 9) B Inserir o cartucho de filtro (4) verticalmente na base do filtro (5). Deverá assegurar-se de que a mangueira de descarga da base do filtro está...
  • Seite 43 G Abra a alavanca da BRITA da sua torneira BRITA e deixe correr 3.7 Passo 7: Colocação em serviço água até que a água filtrada saia limpa e sem bolhas (pelo menos 2 litros). Antes de utilizar, certifique-se de que seguiu corretamente A substituição da carga filtrante P 3000 é idêntica à substituição da todos os passos e de que todas as peças estão instaladas.
  • Seite 44 Fluxo de funcionamento nominal 60 L/h 7 Resolução de problemas Perda de pressão pelo fluxo de fun- 0,25 bar A Sem fluxo de água cionamento nominal Causa: Entrada da água fechada. Volume do leito Solução: Abra a entrada da água na válvula de corte a montante ou P 1000 1,0 kg/1,6 kg feche o manípulo de fecho (3) na cabeça do filtro (2).
  • Seite 45 • A BRITA recomenda a utilização frequente do sistema de filtração. danos mecânicos. Não efetue a montagem junto a fontes de calor Caso o sistema de filtração mypure P1 da BRITA não seja utilizado e a chamas abertas. É necessário instalar uma válvula de retenção por vários dias (2 a 3 dias), recomendamos a lavagem do sistema...
  • Seite 46 808 300 130. Muito obrigado. O indicador de estado do cartucho BRITA tem Tem dúvidas acerca do seu produto BRITA? Ou acerca do processo uma vida útil esperada de aprox. 5 anos. No final de filtração de água? Entre em contacto connosco! Pode encontrar as...
  • Seite 47 
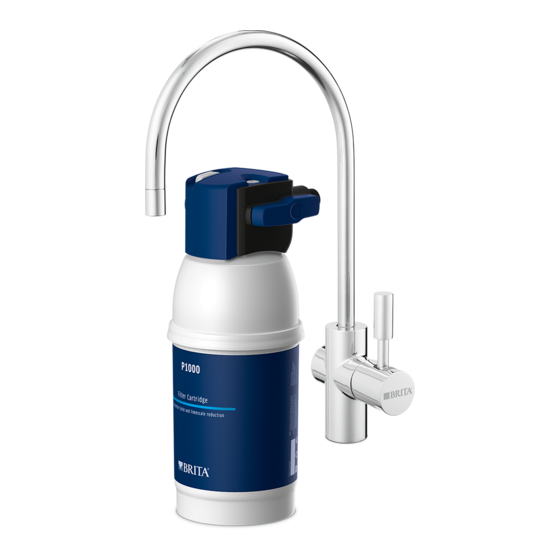
® I. Herzlichen Glückwunsch zu Ihrem neuen BRITA mypure P1 Wasserfilter Set Wir freuen uns, dass Sie sich für die Qualität von BRITA entschieden haben. Und damit für weiches und wohlschmeckendes, BRITA gefiltertes Wasser direkt aus Ihrer BRITA Küchenarmatur mit Kartuschen-Statusanzeige. Ihr BRITA mypure P1 Wasserfilter überzeugt durch viele Vorteile BRITA gefiltertes Wasser • w ohlschmeckendes BRITA gefiltertes Wasser jeder Zeit zur Ver- fügung • W asser ist der grundlegende Bestandteil für die Zubereitung von Speisen und kann somit das Ergebnis des Kochens beeinflus- BRITA sen. K üchenarmatur • d ie Armatur ist sehr ökonomisch, praktisch und einfach zu benut- Die BRITA Filterkartusche P 1000 ist der Garant BRITA Kartus- chen-Statusanzeige für weiches, wohlschmeckendes, BRITA gefiltertes Wasser direkt aus der BRITA Küchenarmatur! Die P 1000 bietet eine konstante Filtrationsleistung zur Kalkredu- zierung durch die mehrstufige BRITA Wasserfiltration. Der professionelle Filterkopf bietet drei Einstellungsmöglichkeiten für mäßig kalkhaltiges, kalkhaltiges und stark kalkhaltiges Wasser. In Abhängigkeit von der Verschnitteinstellung werden dem Trink- wasser im Durchflussverfahren Metall-Ionen, wie Blei und Kupfer entzogen.
  • Seite 48 II. Für Qualität von Anfang an 1 Gewährleistungsbestimmungen Das BRITA mypure P1 Wasserfilter Set unterliegt der gesetzlichen Gewährleistung von 2 Jahren. Ein Gewährleistungsanspruch kann nur innerhalb dieser Zeit geltend gemacht werden, wenn alle Hin- weise dieser Anleitung genau befolgt und beachtet werden. 2 Inhalt des BRITA mypure P1 Wasserfilter Sets Um sicherzugehen, dass Sie das beste Ergebnis mit Ihrem BRITA mypure P1 Wasserfilter Set erzielen, folgen Sie bitte dieser Gebrauchsanweisung. Folgende Komponenten sind im BRITA mypure P1 Wasserfilter Set enthalten (vgl. Abb. 1): 1. F ilterkopf mit 3 Einstellmöglichkeiten inklusive komfortablem Verriegelungsgriff 2. Praktische Wandhalterung 3. P 1000 Filterkartusche 4. BRITA Küchenarmatur 5. BRITA Kartuschen-Statusanzeige 6. Knopfbatterie (CR2032) 7 . S chlauch (1), Länge = 800 mm und beidseitige 3/8 Zoll Ü berwurfmutter 8. S chlauch (2), Länge = 800 mm, einseitige 3/8 Zoll Überwurf- mutter und einseitige 7/16 Zoll Überwurfmutter...
  • Seite 49 3.1 Schritt 1: Einstellung der Wasserhärte (A/B/C) "B" gesetzt. Bitte benutzen Sie einen Inbusschlüssel (4 mm) um die am Filterkopf Einstellung zu ändern. Wenn Sie den Inbusschlüssel in die Richtung des Pfeils drehen, ändern Sie die Einstellung auf "C". Bei einer Dre- Der Filterkopf Ihres Wasserfilter Sets bietet drei Einstellungsmög- hung gegen den Pfeil ändern Sie die Einstellung auf "A". Ein kleines Fenster auf dem Filterkopf zeigt Ihnen die momentane Einstellung lichkeiten für mäßig kalkhaltiges (A), kalkhaltiges (B) und stark kalk- (Abb 3). Der Filterkopf beinhaltet einen vorinstallierten Regulator haltiges Wasser (C). Bitte beachten sie folgende Anweisungen, um des Wasserdrucks. Er garantiert einen ausgeglichenen Wasserfluss die richtige Einstellung für Ihr lokales Wasser vorzunehmen. in Ihrer BRITA Küchenarmatur selbst bei hohem Wasserdruck. Führen Sie zunächst den Wasserhärte-Test mit Hilfe des beilie- genden Teststreifens durch. Sie finden den Teststreifen auf dem äußeren Umschlag der Gebrauchsanweisung. 3.2 Schritt 2: Aktivierung der BRITA Kartuschen- Anwendung des Teststreifens: Statusanzeige • T auchen Sie alle Reaktionsfelder des Teststreifens eine Sekunde in ein Glas Ihres Leitungswassers ein (15 - 30 °C). Achtung: nicht in fließendes Leitungswasser (Abb. 2). Die BRITA Kartuschen-Statusanzeige erinnert Sie mittels der drei • S chütteln Sie die restliche Flüssigkeit vom Teststreifen ab und verschiedenen aufleuchtenden Farben rechtzeitig an den Kartu- überprüfen Sie nach einer Minute wie viele Reaktionsfelder ihre schenwechsel. Farbe verändert haben. A Inbetriebnahme: Je nach Anzahl der Reaktionsfelder, die ihre Farbe verändert haben, werden folgende Einstellungen des Filterkopfes empfohlen: Entfernen Sie den Batteriestreifen. Die Standardeinstellung der BRITA Kartuschen-Statusanzeige blinkt Einstellung wie folgt: Die linke LED blinkt zweimal für die Wasserhärteein-...
  • Seite 50 1. Hardness 2. Cartridge (Abb. 4) (Abb. 5) B Erste Aktivierung der BRITA Kartuschen- Statusanzeige: blinken blinken b linken Je nachdem welche Einstellung Sie in Schritt 1 am Filterkopf vorge- Wasserhärteeinstellung (Hardness) A nommen haben, programmieren Sie die BRITA Kartuschen- Status- Einstellung der Filterkartusche P 1000 P 3000 A 1000 anzeige wie folgt (Abb. 5): (Cartridge) a Um die BRITA Kartuschen-Statusanzeige zurückzusetzen, halten Sie den beide Knöpfe (siehe Abb. 5) am Gehäuse der BRITA C So funktioniert die BRITA Kartuschen-Statusanzeige Kartuschen-Statusanzeige drei Sekunden lang gedrückt, bis die Anzeige nacheinander grün, gelb und rot blinkt. Um eine optimale Leistung zu garantieren, sollte die Filterkartusche regelmäßig ausgetauscht werden. Die BRITA Kartuschen-Statusan- b Drücken Sie den Knopf auf der linken Seite (HARDNESS), um zeige am BRITA Hebel zeigt an, wann die Filterkartusche gewech- den Wasserhärtegrad auszuwählen. Drücken Sie den Knopf so selt werden muss. oft bis der korrekte Wasserhärtegrad angezeigt wird: Für Wasserhärtegrad A leuchtet die LED einmal D Signale Für Wasserhärtegrad B leuchtet die LED zweimal Für Wasserhärtegrad C leuchtet die LED dreimal Die LED leuchtet nur dann, wenn Sie den BRITA Hebel für gefilter- (siehe untenstehende Tabelle).
  • Seite 51 üssen. Führen Sie die BRITA Kartuschen-Statusanzeige in die dafür 1. BRITA Küchenarmatur vorgesehene Vorrichtung am Hebel ihrer BRITA Küchenarmatur ein 2. Fußplatte (siehe Abb. 4). Beachten Sie beim Einsetzen die korrekte Richtung. (Arbeitsplatte) 3. Flachdichtung F Batteriewechsel 4. Konterplatte Die Knopfbatterie kann ausgewechselt werden ohne, dass die 5. Sicherungsring bereits getätigten Einstellungen verloren gehen. 6. Sechskantmutter (7/16 Zoll) Technische Daten: Zu Beginn bestimmen Sie einen geeigneten Platz für die Anbrin- gung der BRITA Küchenarmatur an Ihrer Spüle. Wir empfehlen, • Batterieversorgung: 1x CR2032 (herausnehmbar) die Montage hinter der Spüle auf der Arbeitsplatte (neben der • Lebensdauer der Batterie: ca. 2 Jahre Hauptküchenarmatur). Bitte stellen Sie sicher, dass für die BRITA Küchenarmatur 5 cm Platz vorhanden ist. Bitte beachten Sie, dass Die Kartuschen-Statusanzeige darf nicht ins Wasser getaucht unterhalb der Spüle, bzw. der Bohrung, ausreichend Platz für die werden. P 1000 Filterkartusche und die zwei Schläuche ist. Bitte beachten Sie, dass Ihre Arbeitsplatte bzw. –unterlage je nach Material unterschiedliche Bohranforderungen haben 3.3 Schritt 3: Installation der kann. Stellen Sie den stabilen Sitz der Armatur sicher, insbesondere dann wenn Ihre Arbeitsplatte nicht aus Holz BRITA Küchenarmatur sein sollte. Bitte überprüfen Sie die Bohranforderungen des Materials, verwenden Sie einen geeigneten Bohrer und/oder Um die BRITA Küchenarmatur zu installieren, legen Sie sich wenden Sie sich an einen fachkundigen Installateur. zunächst alle benötigten Teile zurecht (vgl. Abb. 6).
  • Seite 52 Küchenarmatur (für Armaturen mit Rohren) Verbinden Sie das Wasserhahnrohr mit einem der beiden 3/8"-T-Stück-Anschlüsse. Verbinden Sie den 3/8"-Küchenar- matur über die vorhandene Überwurfmutter der Quetsch- verbindung samt Dichtungsringen und das Rohr mit dem 3/8"-T-Stück-Anschluss. B a) Legen Sie Schlauch (1) bereit b) Legen Sie die mittelgroßen (3/8 Zoll) Flachdichtungen am jeweiligen Innengewinde der beiden Schlauchenden ein. Schlauch 2: 800 mm c) Schließen Sie nun ein Ende des Schlauches (1) an den Eingang des Filterkopfes an. Dieser ist durch „IN“ (Eingang) und einen Pfeil gekennzeichnet. Bitte auf den richtigen Sitz der Flachdich- tung achten! d) Schließen Sie nun das andere Ende des Schlauches (1) an Ihren freien Kaltwasseranschluss/das installierte T-Stück an und achten Sie bitte ebenfalls auf den richtigen Sitz der Flachdichtung! 3/8” 3/8" oder Adapter Sollte Ihr Kaltwasseranschluss nicht zu dem 3/8 Zoll Auss- chluss des Schlauches (1) passen, so können Sie gegebenen- Schlauch 1: falls den beiliegenden Adapter verwenden. Ihrem mypure P1 3/8” 800 mm liegt ein 1/2 Zoll Adapter zusätzlich bei. Bei Sondergrößen bitte im Fachhandel passende Größe beziehen. C a) Legen Sie den Schlauch (2) bereit. Kaltwasser- (Abb. 7) anschluss b) Verschrauben Sie nun das kleine Ende des Schlauchs mit der vorinstallierten Flachdichtung mit der bereits installierten BRITA Küchenarmatur. (vgl. Schritt 3.3). DEUTSCH...
  • Seite 53 3.5 Schritt 5: Einsetzen der Filterkartusche 3.6 Schritt 6 (optional): Platzsparende (vgl. Abb. 8) W andhalterung zur Montage der Kartusche unter der Spüle (vgl. Abb. 9) A Schutzkappe (1) abziehen. B Filterkartusche (4) senkrecht in den Filterkopf (5) einsetzen. Stel- Bei der Montage, beachten Sie Einbaumaße, Biegeradien len Sie sicher, dass sich der Spülschlauch des Filterkopfes an der der Schläuche und Abmessungen des Zubehörs. Die P 1000 Außenseite befindet. Filterkartusche kann vertikal und horizontal betrieben C Verriegelungsgriff (3) bis zum spürbaren Einrasten drehen. werden. Mit der Wandhalterung ist nur ein vertikaler Betrieb möglich! (Abb. 8) (Abb. 9) Filterkartusche kann nur bei geöffnetem Verriegelungsgriff eingesetzt werden. A Montieren Sie die Wandhalterung an vorgesehener Position Auf richtige Positionierung der Filterkartusche achten. mit Hilfe von zwei passenden Schrauben und falls nötig je nach Wandbeschaffenheit mit 2 Dübeln. B Filterkopf (2) in die Wandhalterung (1) einrasten. Hierbei vorgege- bene Einrastmulde (4) beachten. DEUTSCH...
  • Seite 54 Bis zu 3400 L unter den Filter. Öffnen Sie das Spülventil (2), um das System drucklos zu machen. Schließen Sie das Spülventil (2) wieder. Kapazität von Karbon- P 1000 Bis zu 600 L C Erschöpfte Filterkartusche (4) aus Filterkopf (5) entnehmen. athärte 10 bis 17 °dH bei Bitte beachten Sie, die Kartusche ist sehr fest in dem Filterkopf Einstellung "B" P 3000 Bis zu 1700 L eingebettet. Sie können die Kartusche kräftig rausziehen ohne sie zu brechen. P 1000 Bis zu 400 L Kapazität von Karbon- D Einsetzen der neuen Filterkartusche (siehe Kapitel 4). athärte 17 bis 24 °dH bei Einstellung "C" P 3000 Bis zu 1100 L E Verriegelungsgriff (3) schließen. F Setzen Sie die BRITA Kartuschen-Statusanzeige zurück Nenndurchfluss 60 L/h ( Kapitel 5). Druckverlust bei Nenndurchfluss 0,25 bar G Ö ffnen Sie den BRITA Hahn soweit auf bis klares gefiltertes Wasser ohne Wasserbläschen fließt (ca. 2 Liter) Bettvolumen DEUTSCH...
  • Seite 55 Alimentarius Austriacus genannten Werte kommen. C Undichtigkeit • E s wird generell empfohlen, Leitungswasser für bestimmte Ursache: V erschraubungen nicht ordnungsgemäß montiert. Personengruppen (z. B. immungeschwächte Menschen, Babys) Fehlerbehebung: L eitungsdruck überprüfen. Sämtliche Verschrau- abzukochen. Dies gilt auch für gefiltertes Wasser. bungen überprüfen gemäß Kapitel 3.4. • H inweis für Nierenkranke oder Dialysepatienten: Während des D LED der BRITA Kartuschen-Statusanzeige blinkt nicht Filtervorgangs kann es zu einer leichten Erhöhung des Kalium- Ursache: Batterie nicht richtig eingelegt oder verbraucht. gehalts kommen. Fehlerbehebung: Ü berprüfung der Batterie auf richtigen Einbau, • D as Wasserfiltrat ist gemäß EN 1717 in die Kategorie 2 eingestuft. ggf. Batterie austauschen. Ursache: Batterie ist leer. Fehlerbehebung: Wechseln Sie die Batterie aus.
  • Seite 56 BRITA Produkte erfüllen Ihre Ansprüche an Sie es innerhalb von 1–2 Tagen. Qualität und Leistung. Sollte Sie dieses Produkt wider Erwarten nicht überzeugen, nimmt BRITA es innerhalb von 30 Tagen ab Kaufdatum zurück Kaliumempfindlich? und erstattet den Kaufpreis. Bitte wenden Sie sich dazu an den BRITA Verbraucherservice in Ihrem Während des Filterns kommt es anfänglich zu einer leichten Erhö- Land. Die Kontaktdaten finden Sie neben Ihrem hung des Kaliumgehalts. Allerdings enthält ein Liter BRITA gefilter- Ländercode auf der R ückseite dieser Gebrauch- tes Wasser weniger Kalium als z. B. ein Apfel! Sollten Sie nieren- sanweisung. krank sein und/oder eine spezielle Kaliumdiät einhalten müssen, empfehlen wir Ihnen eine vorherige Abstimmung mit Ihrem Arzt. BRITA Recycling: für unsere Umwelt Natürliche Spuren Aus gemeinsamer Verantwortung für unsere Umwelt besteht die Möglichkeit, die P 1000 Filterkartuschen bei vielen BRITA Händlern Wie jedes Naturprodukt unterliegen die Bestandteile der P 1000 z urückzugeben. natürlichen Schwankungen. Diese können zu leichtem Abrieb kleiner Kohlepartikel ins gefilterte Wasser führen, die als schwarze Partikel Weitere Informationen zum Thema BRITA wahrgenommen werden können. Diese Partikel beeinträchtigen nicht R ecycling finden Sie auf www.brita.net. Ihre Gesundheit. Werden Sie verschluckt, so verlassen Sie den Körper unverändert auf dem natür l ichen Wege. Sollten Sie Kohlepartikel in Ihrem gefilterten Wasser entdecken, empfiehlt BRITA die P 1000 Filterkartusche zu spülen bis der Partikelaustritt abgeklungen ist. DEUTSCH...
  • Seite 57 Noch Fragen? Die gebührenfreie BRITA Service-Hotline Haben Sie Fragen zu Ihrem BRITA Produkt? Oder zum Thema W asserfiltration? Rufen Sie einfach an! Die Kontaktdaten Ihres BRITA Verbraucherservice finden Sie neben Ihrem Ländercode auf der R ückseite dieser Gebrauchsanweisung. Die beste Seite des Wassers: www.brita.net Suchen Sie den nächstgelegenen BRITA Händler? Wünschen Sie detaillierte Informationen zu BRITA Produkten? Oder zum Unternehmen BRITA? Möchten Sie von BRITAs Serviceangeboten profitieren? Aktuelle Infos, Verbrauchertipps, saisonale Gewinnspiele, leckere Kaffee- und Teerezepte gibt’s rund um die Uhr auf www.brita.net Ihre Online Produktregistrierung Nutzen Sie die Vorteile der Produktregistrierung im Internet. Nähere Informationen hierzu, sowie Ihren Registrierungscode finden Sie auf dem Beileger in Ihrem mypure P1 Set. Über 40 Jahre Erfahrung bürgen für Qualität Seit über 40 Jahren steht BRITA für ständige Inno- vation und höchste Qualität in der Ent w icklung von Wasserfiltrationslösungen. Um den hohen Qualitätsansprüchen im Hause BRITA gerecht zu werden, gibt es strenge interne und externe Qualitätskontrollen. Der unabhängige und renom- mierte TÜV SÜD kontrolliert regelmäßig die gleich bleibende Qualität der Haushalts-Wasserfilter und der Filterkartuschen. Der TÜV SÜD bescheinigt den BRITA Haushalts-Wasser fi ltern sowie original Filterkartuschen regelmäßig Lebensmittelechtheit (Food Grade Quality) gemäß der deutschen und europäischen Gesetzgebung. DEUTSCH...
  • Seite 58 I. Ci congratuliamo per l’acquisto del vostro nuovo sistema BRITA ® Vi ringraziamo per aver scelto la qualità BRITA per acqua filtrata BRITA dal gusto buono direttamente dal vostro rubinetto BRITA con LED dotato di indicatore di tempo e volume.
  • Seite 59 II. Qualità fin dall’inizio 1 Termini di garanzia Il sistema filtrante mypure P1 è coperto da una garanzia prescritta dalla legge di 2 anni. Un reclamo in garanzia può essere inoltrato esclusivamente se sono state seguite ed osservate tutte le istru- zioni presenti in questo libretto.
  • Seite 60 Prima di tutto è necessario eseguire il test della durezza dell'acqua L'indicatore della durata del filtro BRITA ti ricorda quando è tempo utilizzando la cartina in dotazione. La cartina si trova nella confe- di sostituire il filtro attraverso una luce lampeggiante di tre colori zione dove hai trovato questo libretto d'istruzioni.
  • Seite 61 Per resettare, premi contemporaneamente entrambi i tasti dell'In- D Segnali dicatore della durata del filtro BRITA per tre secondi fino a che il LED lampeggia con luce verde, gialla e rossa. Ricorda di premere Le tre luci sulla manopola del rubinetto BRITA si attivano mentre il entrambi i tasti nello stesso momento.
  • Seite 62 BRITA. Successivamente, installare il rubinetto BRITA (vedere fig. 5). Quindi, poggiare la base (2) sul foro e fissarvi il dispenser BRITA (1) utilizzando la contropiastra (4), la guarnizione (3), l'anello di bloccag- gio (5) ed il dado esagonale (6) in dotazione.
  • Seite 63 Se l'erogazione di acqua fredda non è compatibile con il adattatore connettore 3/8" sul tubo flessibile (1), è necessario applicare l'adattatore fornito. Con il set mypure P1 viene fornito un Tubo flessibile 3/8” adattatore 1/2". Contattare il rivenditore locale per adattatori 1: 800 mm di altre dimensioni.
  • Seite 64 3.5 Fase 5: Inserimento del filtro (vedere fig. 8) 3.6 Fase 6 (opzionale): fissaggio a parete salvaspazio per installare il filtro sotto il A Rimuovere il cappuccio protettivo (1) (vedere fig. 8). lavello (vedere fig. 9) B Inserire il filtro (4) in posizione verticale sulla testa del filtro (2). Fate attenzione che il tubo di sfiato del filtro di trovi all'esterno. Durante il montaggio, prestare attenzione alle dimensioni di C Ruotare l'impugnatura di fissaggio (3) fino a quando non si installazione, ai raggi di inclinazione dei tubi flessibili ed alle...
  • Seite 65 5 Riparazione che il sistema non presenti perdite. B A prire la manopola del rubinetto BRITA e pulire a fondo il sistema Verificare regolarmente la presenza di eventuali perdite nel sistema filtrante. Lasciar scorrere almeno 2 litri fino a quando l'acqua filtrante.
  • Seite 66 Collegamento in ingresso per l'acqua G3/8" 6 Dati tecnici della filtro P 1000 Collegamento in uscita per l'acqua G3/8" Pressione d'esercizio Da 2 a 8,6 bar (max.) Temperatura di ingresso dell'acqua Da 4 °C a 30 °C 7 Risoluzione dei problemi il funzionamento Da 4 °C a 40 °C Temperatura immagazzinaggio/ A Nessun flusso d'acqua...
  • Seite 67 Il set acqua Y o sostituito. Ricordare anche che il filtro non può essere di filtri per acqua mypure P1 è stato progettato esclusivamente per utilizzato per un periodo superiore a 12 mesi.
  • Seite 68 Numero Verde BRITA Avete domande sul vostro prodotto BRITA? O sulla filtrazione dell'acqua? Contattateci! Troverete i dettagli di contatto del Servizio di assistenza alla clientela BRITA accanto al codice del vostro Paese sul retro del presente libretto. ITALIAN...
  • Seite 69 I. Gratulujemy zakupu nowego systemu filtracji BRITA ® Dziękujemy za wybór czystszej, smaczniejszej, bardziej przejrzystej filtrowanej wody BRITA bezpośrednio ze specjalnego kranu BRITA ze wskaźnikiem wymiany wkładu BRITA. System filtracji BRITA ma wiele zalet Filtrowana woda BRITA • Filtrowaną wodę o doskonałym smaku płynącą prosto z kranu • F iltrowaną wodę stanowiącą idealną bazę do przygotowywania zimnych i gorących napojów • L epszy smak potraw. Woda, będąc podstawowym składnikiem wykorzystywanym do przygotowywania potraw, ma znaczący Kran do filtrowanej wpływ na ich smak. wody BRITA • Ekonomiczność, wygodę i łatwość użytkowania Wkład filtrujący P 1000 to czystsza, Wskaźnik wymiany wkładu BRITA smaczniejsza, bardziej przejrzysta woda BRITA bezpośrednio z kranu do filtrowanej wody BRITA! Model P 1000 zapewnia stałą wydajność filtrowania, redukując twardość węglanową wody dzięki wielostopniowemu systemowi filtracji BRITA. Profesjonalna głowica filtra umożliwia wybór jednego z trzech ustawień filtracji: dla średnio twardej, twardej i bardzo twardej wody. W zależności od ustawienia na głowicy, w czasie przepływu wody przez filtr, jony metali, takich jak ołów i miedź, mogą zostać usunięte z wody pitnej. Wkład filtrujący P 1000 redukuje kamień oraz substancje, które negatywnie wpływają na smak i zapach wody pitnej (np. chlor). Czas użytkowania wkładu filtrującego P 1000 Czas użytkowania wkładu P 1000 zależy od indywidualnej intensywności użytkowania oraz parametrów wody. Aby zapewnić optymalną wydajność filtrowania wkładu BRITA zaleca wymianę...
  • Seite 70 Dla uzyskania najlepszych rezultatów filtracji prosimy o dokładne zapoznanie się z niniejszą instrukcją obsługi zestawu BRITA mypure P1. Zawartość zestawu instalacyjnego mypure P1 (patrz rys. 1): 1. g łowica filtra z trzema ustawieniami i wygodnym uchwytem blokującym 2. uchwyt do wygodnego montażu ściennego 3. wkład filtrujący P 1000 4. k ran do wody filtrowanej BRITA 5. wskaźnik wymiany wkładów BRITA 6. bateria (CR2032) 7 . w ąż (1), długość = 800 mm z gwintem wewnętrznym 3/8" na obu końcówkach 8. w ąż (2), długość = 800 mm z gwintem wewnętrznym 3/8" na jednej końcówce i 7/16" na drugiej 9. T ylko w Wielkiej Brytanii: przejściówka z gwintu wewnętrznego ½” na gwint zewnętrzny 3/8” , Przejściówka z gwintu zewnętrz- nego ½” na gwint wewnętrzny 3/8”...
  • Seite 71 W tej wersji produktu istnieje możliwość dokonania bardziej precyzyjnych ustawień twardości wody. Na głowicy filtra dokonano Głowica filtra oferuje trzy ustawienia: do wody średnio twardej (A), fabrycznie ustawień odpowiadającym literze "B". Aby dokonać twardej (B) oraz bardzo twardej (C). Aby dostosować odpowiednie zmiany ustawienia należy użyć klucza imbusowego (4 mm). Umieść ustawienie do twardości dostępnej wody, postępuj zgodnie z poniż- klucz w otworze regulacyjnym i przekręć go zgodnie z kierunkiem szymi wskazówkami. wskazywanym przez strzałkę, aż do momentu pojawienia się w okienku litery "C". W celu dokonania ustawienia "A" przekręcaj dalej W pierwszej kolejności przeprowadź test twardości węglanowej klucz imbusowy w tym samym kierunku, aż do pojawienia się litery wody przy użyciu dostarczonego w komplecie paska testowego. (rys. 3). Głowica posiada już zainstalowany regulator przepływu Pasek jest przymocowany do okładki instrukcji obsługi. wody. Gwarantuje on płynny strumień wody z kranu BRITA nawet w Użycie paska testowego: przypadku wysokiego ciśnienia wody. • Z anurz wszystkie pola reakcji paska testowego w szklance wody z kranu (15-30°C) na 1 sekundę (nie wkładaj paska pod strumień bieżącej wody!). (rys. 2). • S trząśnij nadmiar wody z paska i po upływie 1 minuty sprawdź, 3.2 Krok 2: Uruchomienie wskaźnika wymiany ile pól reakcji na pasku testowym zmieniło kolor. wkładów do baterii BRITA W zależności od tego, ile pól reakcji zmieniło kolor, zaleca się usta- wienie głowicy filtra w następujący sposób: Wskaźnik przypomina o konieczności wymiany wkładu filtracyj- nego BRITA za pośrednictwem trzech migających diod w różnych Ustawienie kolorach. liczba pól reakcji, A Włączanie które zmieniły kolor...
  • Seite 72 1. Twardość 2. Typ wkładu (rys. 4) (rys. 5) B Wstępne programowanie wskaźnika wymiany wkładu 1x błysk 2x błyski 3x błyski BRITA: Ustawienia twardości wody Zależnie od wybranych ustawień głowicy filtra należy zaprogramo- ( Hardness) wać wskaźnik wymiany wkładu BRITA w następujący sposób Ustawienia typu wkładu P 1000 P 3000 A 1000 (patrz rys. 5): filtrującego (Cartridge) a Aby zresetować wskaźnik naciśnij jednocześnie oba przyciski wskaźnika wymiany wkładu BRITA przez trzy sekundy, kiedy to C Działanie wskaźnika wymiany wkładu BRITA LED zaświeci się po kolei na zielono, żółto i czerwono. Upewnij Aby osiągnąć najlepsze efekty, zaleca się regularną wymianę wkła- się, że oba przyciski zostały naciśnięte jednocześnie. dów filtracyjnych. Wskaźnik wymiany wkładu BRITA znajdujący się b Przycisk po lewej stronie (Hardness) służy do ustawień twardości w dźwigni kranu informuje, kiedy należy wymienić wkład filtracyjny. wody. Naciśnij przycisk do momentu pojawienia się właściwego ustawienia: D Sygnały Dla twardości odpowiadającymi ustawieniu A - LED zaświeci się raz Dla twardości odpowiadającymi ustawieniu B - LED zaświeci się Trzy diody w dźwigni BRITA są aktywne tylko w położeniu filtrowania. dwa razy Wskazania diod: Dla twardości odpowiadającymi ustawieniu C - LED zaświeci się...
  • Seite 73 Następnie włóż wskaźnik wymiany wkładu BRITA z powrotem we 1. Kran do filtrowanej wody BRITA właściwe miejsce w dźwigni kranu BRITA (zobacz rys. 4). Zwróć 2. Podstawa uwagę na prawidłowe umieszczenie wskaźnika. (blat kuchenny) F Wymiana baterii 3. Uszczelka 4. Podkładka kontrująca Bateria może zostać wymieniona bez utraty wcześniejszych usta- wień wskaźnika wymiany wkładu BRITA. 5. Pierścień blokujący 6. Sześciokątna nakrętka (7/16") Dane techniczne: Aby rozpocząć instalację, znajdź w pobliżu zlewu odpowiednie • Bateria: 1 x CR2032 (wymienna) miejsce, w którym można zainstalować kran do filtrowanej wody • Żywotność baterii: ok. 2 lata BRITA. Zalecana jest instalacja obok zlewu na blacie kuchennym (obok głównego kranu). Upewnij się, że pod zlewem jest wystar- czająca ilość miejsca na wkład filtrujący P 1000, dwa węże oraz do Nie zanurzaj wskaźnika wymiany wkładu w wodzie. wywiercenia odpowiedniego otworu. Pamiętaj o tym, że należy użyć wiertarki i wierteł odpow- 3.3 Krok 3: Instalacja kranu do filtrowanej wody iednich do materiału, z jakiego wykonany jest blat kuchenny BRITA lub podstawa. Upewnij się, że powierzchnia pod kranem jest stabilna. Jest to istotne zwłaszcza w przypadku blatów Aby zainstalować kran do filtrowanej wody BRITA, w pierwszej wykonanych z materiałów innych niż drewno. Zapoznaj się kolejności sprawdź, czy są dostępne wszystkie potrzebne elementy z wymaganiami dotyczącymi wiercenia danego materiału, (patrz rys. 6). użyj odpowiedniego wiertła i/lub skonsultuj się ze specjalistą. Wywierć za pomocą wiertła 12 mm otwór w powierzchni, na której będzie zainstalowany kran do filtrowanej wody BRITA. Zainstaluj kran do wody BRITA (patrz rys. 6).
  • Seite 74 Woda nie powinna wypływać z kranu! Uważaj, aby nie dokręcić ich zbyt mocno. c) Otwórz dopływ zimnej wody c) Instalacja dostarczonego trójnika d) Odkręć dotychczasowy wąż 3/8" kranu kuchennego z gwintem Maksymalny moment dokręcania połączeń G3/8" nie może wewnętrznym od dopływu zimnej wody 3/8". przekraczać 14 Nm! Węże można podłączać wyłącznie e) Podłącz trójnik do dopływu zimnej wody. z uszczelkami (5), ponieważ śruby stożkowe mogą uszkodzić przyłącza głowicy filtra i spowodować unieważnienie a. W łóż uszczelkę 3/8" do gwintu wewnętrznego załączonego gwarancji! trójnika. b. T ę końcówkę trójnika przykręć do dopływu zimnej wody. f) Drugą końcówkę węża z pkt B podłącz do kranu BRITA z diodami a. W przypadku kranów z elastycznymi wężami: Standardowy Podłącz wąż kranu kuchennego do jednego z dwóch połączeń kran kuchenny 3/8" z gwintem zewnętrznym. Sprawdź, czy końcówka węża posiada uszczelkę. Uszczelka ta stanowi stały lub odrębny element węża w zależności od typu węża kuchennego. b. W przypadku kranów kuchennych z połączeniami zacisko- wymi. Podłącz rurkę kranu kuchennego do jednego z dwóch połączeń 3/8" trójnika z gwintem zewnętrznym. Wykorzystaj dostępną nakrętkę do połączenia zaciskowego do połącze- nia rurki do trójnika Wąż 2:...
  • Seite 75 3.5 Krok 5: Instalacja wkładu filtrującego 3.6 Krok 6 (opcjonalnie): Wygodny montaż (patrz rys. 8) w kładu na ścianie pod zlewem w celu oszczędzenia miejsca (patrz rys. 9) A Usuń pasek zabezpieczający. (patrz rys. 8) B U mieść wkład filtrujący (4) pionowo w głowicy filtra (5). Upewnij Podczas montażu należy wziąć pod uwagę wymiary się, że wężyk odpowietrzający, stanowiący część głowicy znaj- instalacji, kąty zgięcia węży i wymiary akcesoriów. System duje się na zewnątrz głowicy. może być zamontowany pionowo lub poziomo. Mocowania C Obróć uchwyt blokujący (3), aż do jego zatrzaśnięcia. naścienne służą wyłącznie do montażu pionowego! (rys. 8) (rys. 9) Wkład filtrujący można instalować wyłącznie przy odblokow- anym uchwycie. Upewnij się, że wkład filtrujący jest A Przymocuj mocowanie ścienne za pomocą dwóch pasujących prawidłowo ułożony. wkrętów, w razie potrzeby używając dwóch kołków (zależnie od typu ściany). B Wsuń głowicę filtra (2) w mocowanie ścienne (1), aż do jej zatrza- śnięcia. Skorzystaj z otworów mocujących (4)." POLSKI...
  • Seite 76 P 1000. Wydajność wkładu P 3000 przy ustawieniu „A” wynosi 3.7 Krok 7: Włączanie - do 3400 litrów, przy ustawieniu „B” – do 1700 litrów, a przy ustawieniu „C” – do 1100 litrów. Należy pamiętać o tym podczas Przed użyciem należy się upewnić, że wszystkie kroki zostały resetowania wskaźnika wymiany wkładu filtracyjnych BRITA. poprawnie wykonane oraz że wszystkie elementy są prawi- dłowo dopasowane. Umieść pod wkładem odpowiedni zbiornik na wyciekającą wodę. 5 Konserwacja A Odkręć dopływ zimnej wody i sprawdź, czy system nie p rzecieka. B Otwórz zawór kranu i przepuść przez wkład wodę do momentu, Regularnie sprawdzaj, czy system filtracyjny nie przecieka. Regu- aż będzie ona przezroczysta i bez pęcherzyków powietrza larnie sprawdzaj, czy węże nie są pozaginane. Zagięte węże należy (co n ajmniej 2 litry). wymienić. Przed przystąpieniem do wymiany systemu filtrującego 4 Wymiana wkładu filtrującego zapoznaj się z rozdziałem 6 „Dane techniczne” i rozdziałem 8 „Ważne informacje” . Gdy zostanie osiągnięta maksymalna wydajność wkładu lub będzie on używany przez 12 miesięcy od chwili zamontowania, diodowy Regularnie czyść system filtracyjny z zewnątrz miękką, wilgotną wskaźnik wymiany wkładu BRITA zacznie migać na czerwono, szmatką. przypominając o konieczności wymiany wkładu. Przed wymianą wkładu filtracyjnego zapoznaj się z rozdziałem 8 Nie używaj substancji ściernych, roztworów czyszczących ani „Ważne informacje” . Jeśli produkt był przechowywany i transporto- agresywnych środków czyszczących.
  • Seite 77 Przepływ znamionowy 60 L/h 7 Rozwiązywanie problemów Spadek ciśnienia przy przepływie 0,25 bara A Brak przepływu wody nominalnym Przyczyna: Odcięty pobór wody. Objętość złoża Rozwiązanie: O twórz dopływ wody, odkręcając zawór odcinający P 1000 1,0 kg/1,6 kg lub zamykając uchwyt blokujący (3) znajdujący się na Ciężar (mokry/suchy) głowicy filtra (2). P 3000 1,8 kg/2,8 kg B Słaby przepływ wody lub jego brak mimo otwartego System dopływu wody P 1000 119 mm/108 mm/265 mm filtracyjny Przyczyna: Zbyt niskie ciśnienie w sieci. (głowica filtra Rozwiązanie: S prawdź ciśnienie sieci. Jeżeli problem nie zniknie, z wkładem P 3000 117 mm/104 mm/417 mm sprawdź system filtracyjny oraz wkład filtrujący.
  • Seite 78 III. Ważne informacje 8 Ważne informacje Optymalne wykorzystanie Wkład filtrujący do wody P 1000 należy chronić przed bezpośrednim • B RITA zaleca, aby filtr nie był pozostawiany przez dłuższy czas nasłonecznieniem i uszkodzeniami mechanicznymi. Nie ustawiać w bez użytku. Jeżeli system filtracyjny BRITA mypure P1 nie był pobliżu źródeł ciepła i otwartego ognia. Przed wężem wejściowym używany przez kilka dni (2–3 dni), zalecane jest przepłukanie systemu filtracyjnego musi być zainstalowany zawór odcinający. systemu wodą w objętości X zgodnie z poniższą tabelą. W razie Jeżeli ciśnienie wody jest większe niż 8,6 bara, przed systemem fil- przestoju dłuższego niż 4 tygodnie przepłukać filtr wodą w obję- tracyjnym należy zainstalować reduktor ciśnienia. System filtracyjny tości Y lub wymienić. Należy również pamiętać o tym, że maksy- mypure P1 nadaje się wyłącznie do użytku domowego (filtracji malny okres użytkowania wkładu filtrującego wynosi 12 miesięcy. wody wodociągowej). Ilość wody do przepłukania X po 2-3 dniach Ilość wody do System filtracyjny wody BRITA może pobierać wyłącznie wodę przestoju przepłukania pitną. System filtracyjny wody BRITA służy wyłącznie do filtrowania zimnej wody, której temperatura znajduje się w zakresie podanym P 1000 2 litry w rozdziale 6. Nie stosować w przypadku wody, w której mogą P 3000 3 litry występować zanieczyszczenia mikrobiologiczne, lub wody o nie- przebadanej jakości bez zastosowania odpowiedniej dezynfekcji. Woda Woda w objętości Y po 4 tygodniach p rzestoju w objętości...
  • Seite 79 Od ponad 40 lat BRITA nieustannie dąży do wprowadzania innowacji i zapewniania maksy- Wyłączenie odpowiedzialności malnej jakości opracowywanych rozwiązań do filtrowania wody. W celu zaspokojenia zapotrze- bowania na wysoką jakość BRITA wprowadza Firma BRITA nie ponosi odpowiedzialności za jakiekolwiek szkody, surową wewnętrzną i zewnętrzną kontrolę jakości. w tym wynikające z powodu nienależytego użytkowania produktu. Niezależne, renomowane standardy kontroli TÜV SÜD nieustannie podtrzymują jakość filtrów do wody i wkładów przeznaczonych do użytku 100% satysfakcji: Gwarancja BRITA domowego. TÜV SÜD certyfikuje poziom jakości spożywczej filtrów do wody BRITA i wkładów P Jesteśmy przekonani, że ten produkt BRITA 1000 zgodnie z prawodawstwem niemieckim i spełni Państwa oczekiwania w zakresie jakości i europejskim. wydajności. Jeżeli ten produkt nie spełni Państwa oczekiwań, w ciągu 30 dni przyjmiemy jego zwrot oraz zrefundujemy koszt zakupu. Wystarczy wysłać produkt wraz z paragonem, podając powody niezadowolenia, numer telefonu i numer konta, na adres biura obsługi klientów w Państwa kraju (dostępny na odwrocie tej broszury). Infolinia serwisu BRITA jest do T wojej dyspozycji Czy masz jakieś pytania dotyczące produktu BRITA lub filtrowania wody? Zadzwoń do nas! Informacje kontaktowe biura obsługi klienta BRITA znajdują się na odwrocie tej broszury. Najlepsza strona wody: www.brita.net Szukasz najbliższego sprzedawcy produktów marki BRITA? Chcesz uzyskać więcej informacji o produktach BRITA lub o firmie BRITA? Czy chcesz mieć dostęp do korzystnych ofert serwisowych BRITA? Aktualne informacje, porady dla klientów, konkursy sezonowe, przepisy na wspaniałą kawę i herbatę są dostępne przez 24 godziny na dobę na stronie www.brita.net. POLSKI...
  • Seite 80 I. Gefeliciteerd met de aanschaf van uw nieuwe BRITA waterfiltersysteem ® Hartelijk dank dat u voor een kwaliteitsproduct van BRITA hebt gekozen. Hiermee kiest u voor fris en heerlijk zacht BRITA gefilterd water rechtstreeks uit uw BRITA dispenser met statusindicator. Uw BRITA systeem biedt tal van voordelen BRITA gefilterd water • F ris en heerlijk, zacht BRITA gefilterd water direct binnen hand- bereik • G efilterd water is de ideale basis voor uw gerechten en dageli- jkse dranken • W ater is een belangrijk element voor de bereiding van uw eten BRITA en is van invloed op de smaak en het uiterlijk van uw gerechten. w aterdispenser • D e BRITA Kraan is zuinig, comfortabel en eenvoudig te gebruiken Het P 1000 filterpatroon is essentieel voor fris BRITA status- indicator en heerlijk zacht BRITA gefilterd water direct uit uw BRITA waterdispenser Het P 1000 filter zorgt voor een constante filtratie van kalk, dankzij het meervoudige BRITA filtratiesysteem. Met de professionele filterkop zijn drie filtratie-instellingen m ogelijk: één voor gemiddeld hard water, één voor hard water en één voor zeer hard water. Afhankelijk van de bypass-instelling worden er tijdens de doorstroming metaalionen als lood en koper, die in het drinkwater aanwezig kunnen zijn, verminderd.
  • Seite 81 2 Inhoud van de mypure P1 set Volg de aanwijzingen nauwkeurig op, zodat u er zeker van kunt zijn dat uw BRITA mypure P1 waterfilterset het beste resultaat oplevert. Uw mypure P1 waterfilterset omvat de volgende componenten: (zie fig. 1): 1. P rofessionele P 1000 filterkop met 3 instellingen en een handige vergrendeling 2. Handige muursteun 3. P 1000 waterfilterpatroon 4. BRITA waterdispenser 5. BRITA statusindicator 6. Batterij (CR2032) 7 . Slang (1), lengte = 800 mm en 3/8" moer aan beide kanten 8. S lang (16), lengte = 800 mm, 3/8" moer aan één kant en een 7/2" moer aan de andere kant 9. A lleen voor het Verenigd Koninkrijk: Adapter van 1/2" binnen- draad naar 3/8" buitendraad, Adapter van 1/2" buitendraad naar 3/8" binnendraad 10. Gebruiksaanwijzing 11. Teststrip voor waterhardheid 12. T-stuk 13. Pakkingen...
  • Seite 82 (in hoofdstuk 8) te lezen. Na opslag en transport bij tempera- turen onder 0°C moet het product eerst gedurende minimaal U kunt nu de instelling voor de hardheid van uw water aanpassen. 24 uur in de open originele verpakking worden bewaard bij De filterkop is standaard ingesteld op ""B"". Om de instelling te de genoemde omgevingstemperaturen (zie hoofdstuk 6) wijzigen, dient u een inbussleutel (4 mm) te gebruiken. Draai in voordat het in gebruik mag worden genomen. de richting van de pijl tot de ""C"" in het venster verschijnt. Draai in de tegengestelde richting van de pijl tot de ""A"" in het venster verschijnt (fi g. 3). De filterkop bevat al een doorstroomregelaar. Het garandeert een constante watertoevoer van uw BRITA waterdis- 3.1 Stap 1: Carbonaathardheid (A/B/C) selecteren penser, ook in geval van een hogere waterdruk. op de filterkop Met de professionele filterkop zijn drie filtratie-instellingen mogelijk: één voor gemiddeld hard water (A), één voor hard water (B) en één 3.2 Stap 2: De BRITA statusindicator starten voor zeer hard water (C). Volg de onderstaande instructies voor de juiste instelling voor uw leidingwater. De BRITA statusindicator geeft door middel van drie verschillend Voer eerst een carbonaathardheidstest uit met behulp van de meegeleverde strip. De strip treft u aan in de verpakking van deze gekleurde knipperende lampjes aan wanneer het filterpatroon moet gebruiksaanwijzing. worden vervangen. Gebruik van de teststrip: A Ingebruikname: • D ompel alle reactiezones op de teststrip gedurende 1 sec. in een glas koud leidingwater van 15 - 30 °C (niet in stromend water!). Verwijder de batterij strip. (fig. 2). De BRITA Statusindicator is ingesteld op de standaard instelling: het linker LED lampje zal één keer knipperen voor de hardheidsin- • S chud het overtollige water van de teststrip en controleer na stelling B en het rechter LED lampje zal twee keer knipperen voor 1 minuut hoeveel reactiezones van kleur zijn veranderd.
  • Seite 83 B Eerste programmering van de BRITA statusindicator: C Hoe de BRITA statusindicator werkt Afhankelijk van de instelling die u kiest voor de filterkop kunt u de Om een optimale werking te garanderen, dient u het filterpatroon BRITA Statusindicator als volgt programmeren: regelmatig te vervangen. De LED indicator voor de filterpatroon- vervanging in de BRITA hendel geeft aan wanneer u het filterpa- a Druk om te resetten beide knoppen op de statusindicator tegelijk troon dient te vervangen. in gedurende 3 seconden totdat het gekleurde LED lampje groen, geel en rood gaat knipperen. Let erop dat u beide knop- D Signalen pen tegelijk indrukt. De drie lampjes in de BRITA hendel worden alleen geactiveerd in b De linkerknop (HARDNESS) is bedoeld om de waterhardheid in de filterstand. Ze geven het volgende aan: te stellen. Druk herhaaldelijk op deze knop totdat de juiste instel- ling te zien is: – Groen lampje: het filter van de BRITA Kraan is in werking. Voor hardheidsinstelling A zal het LED lampje één keer knip- – G eel lampje: 90% van de filtercapaciteit is verbruikt. Vergeet niet peren. een nieuwe filterpatroon aan te schaffen. Voor hardheidsinstelling B zal het LED lampje twee keer knip- – Rood lampje: het filterpatroon moet worden vervangen peren. Voor hardheidsinstelling C zal het lampje drie keer knipperen (zie tabel hieronder). E De BRITA statusindicator opnieuw programmeren c De knop aan de rechterkant (CARTRIDGE) is bedoeld om het Wanneer het maximale volume wordt bereikt of als de filterpa- juiste filterpatroon te selecteren. Druk herhaaldelijk op deze troon reeds 12 maanden in gebruik is, begint de LED van de BRITA knop totdat de juiste instelling voor de filterkop te zien is: Voor statusindicator voor het filterpatroon in de kleur rood te knipperen filterpatroon P 1000 zal het LED lampje één keer knipperen. Voor...
  • Seite 84 3.3 Stap 3: De BRITA waterdispenser installeren Zorg dat u het juiste boorgereedschap tot uw beschikking heeft voor uw speciale werkvlak of afdichtring. Zorg ervoor Voordat u de BRITA waterdispenser installeert, dient u eerst te con- dat het gebied onder de dispenser stabiel is, vooral wanneer troleren of u alle benodigde onderdelen compleet zijn. (zie fig. 6). het werkvlak niet van hout is gemaakt. Controleer de ben- odigdheden voor het te boren materiaal, gebruik de juiste boor en/of raadpleeg een vakspecialist. Boor een gat (met een 12-mm bit) in het aanrecht waar u de BRITA waterdispenser wilt installeren. Installeer daarna de BRITA waterdispenser (zie fig. 6). Plaats de afdichtring (2) op het gat en bevestig de BRITA water- dispenser (1) op zijn plaats met behulp van de klemplaat (4), de pakking (3), de borgring (5) en de zeskantmoer (6). 12 mm-boor 3.4 Stap 4: Slangen aansluiten We raden u aan eerst alle benodigde onderdelen vóór u neer te leggen. Controleer vóór de installatie of u over een extra 3/8-inch of 1/2-inch koudwatertoevoer beschikt, zodat u de mypure P1 waterfilterset kunt aansluiten naast de bestaande waterkraan. Aanbevolen voor installatie: inbus- sleutel (5 mm), 12 mm-boor. Voor muurmontage (optioneel) hebt u nodig: twee schroeven ( d iameter 5 mm) en, indien nodig, twee geschikte muurpluggen. Volg onderstaande diagram (zie fig. 6) en voer de stappen in de (fig. 6) juiste volgorde uit. A a) Sluit de koudwatertoevoer af. b) Zorg ervoor dat de bestaande keukenkraan drukvrij is door de 1. BRITA waterdispenser hendel open te zetten 2. Afdichtring (Aanrecht) Er mag geen water uit de bestaande keukenkraan stromen! 3. Pakking...
  • Seite 85 B a) Breng de slang (1) op zijn plaats aan filterkopaansluitingen beschadigen. Garantieclaims vervallen b) Plaats de middelgrote (3/8") pakkingen in desbetreffende indien andere aansluitingen worden gebruikt. binnendraden van de twee slanguiteinden. c) Sluit nu één uiteinde van de slang (1) aan op de inlaat van de filterkop. Dit uiteinde is voorzien van een etiket met daarop „IN“ (ingang) gemarkeerd met een pijl. Zorg ervoor dat de pakking correct geplaatst is! Bestaande d) Sluit nu het andere uiteinde van de slang (1) aan op uw vrije waterkraan koudwatertoevoer/ geïnstalleerd T-stuk en zorg ervoor dat de pakking goed op zijn plaats zit. Als de 3/8" koppeling op de slang (1) niet op uw koudwater- toevoer past, dient u de meegeleverde adapter te gebruiken. Met de mypure P1 set is een 1/2" adapter meegeleverd. Zonodig kunt u bij uw lokale bouwmarkt ook adapters met andere maten aanschaffen. Slang 2: 800 mm C a) Breng de slang (2) op zijn plaats aan. b) Sluit het nauwe uiteinde met de pakking die al is aangebracht in de slang (2) aan op de reeds geïnstalleerde BRITA waterdis- penser (zie stap 3.3). 3/8” ! 3/8" of adapter Slang 1: 3/8” 800 mm Koudwater- (fig. 7) toevoer NEDERLANDS...
  • Seite 86 3.5 Stap 5: Filterpatroon aanbrengen (zie fig. 8) 3.6 Stap 6 (optioneel): Ruimtebesparende m uursteun voor bevestiging van het A Verwijder beschermband (1). (zie fig. 8) filterpatroon onder de gootsteen (zie fig. 9) B Plaats het filterpatroon (4) verticaal in de filterkop (5). Zorg ervoor dat de spoelslang van de filterkop aan de buitenkant zit. Houd bij de montage rekening met de bouwmaten van het C Draai de vergrendeling (3) tot u voelt dat hij in de goede stand apparaat, de buigradius van de slangen en de afmetingen staat. van de accessoires. Het systeem kan zowel verticaal als horizontaal worden bediend. Als u gebruikmaakt van de muursteun, monteer het systeem dan uitsluitend in verticale positie. (fig. 8) Het filterpatroon kan alleen worden aangebracht als de ver- (fig. 9) grendeling open is. Zorg ervoor dat het filterpatroon correct geplaatst is. A Bevestig de muursteun op zijn plaats met de twee bijbehorende schroeven en gebruik afhankelijk van het muurtype zo nodig ook twee muurpluggen. B Steek de filterkop (2) in de muursteun (1). Gebruik de beves- tigingsgaten (4). NEDERLANDS...
  • Seite 87 G D raai de BRITA gemerkte hendel op uw BRITA Kraan open en 3.7 Stap 7: Ingebruikname spoel het systeem totdat het gefilterde water helder en zonder luchtbellen stroomt (minstens 2 liter). Zorg ervoor dat alle stappen correct zijn uitgevoerd en alle U vervangt het P 3000 filterpatroon op dezelfde manier als het onderdelen zijn gemonteerd voordat u de dispenser in gebruik P 1000 filter. Het P 3000 filterpatroon kan tot 3400 liter meegaan neemt. Plaats een geschikte opvangbak voor het spoelwater bij instelling A, tot 1700 liter bij instelling B en tot 1100 liter bij onder de filterpatroon. instelling C. Houd hier rekening mee wanneer u uw BRITA Kraan A Draai de koudwatertoevoer open en controleer het systeem statusindicator reset. nauwkeurig op lekkage. B Draai de BRITA waterdispenser open en spoel het systeem totdat het gefilterde water helder en zonder luchtbellen stroomt. 5 Onderhoud (Minstens 2 liter) Controleer het filtersysteem regelmatig op lekkage. Controleer de slangen regelmatig op knikken. Slangen met knikken moeten 4 Het filterpatroon vervangen worden vervangen. Wanneer het maximale volume wordt bereikt of als het filterpa- Lees vóór het vervangen van het filtersysteem eerst de troon reeds 12 maanden in gebruik is, begint de LED van de BRITA Technische Gegevens (hoofdstuk 6) en Belangrijke opmerkin- statusindicator in de kleur rood te knipperen om u eraan te herin- gen (hoofdstuk 8). neren dat het filterpatroon moet worden vervangen. Maak de buitenkant van het filtersysteem regelmatig schoon met Lees Belangrijke opmerkingen (hoofdstuk 8) vóór het vervan- een zachte, vochtige doek.
  • Seite 88 Nominale doorstroming 60 L/h 7 Probleemoplossingen Drukverlies bij nominale service-door- 0,25 bar A Geen doorstromend water stroming Probleem: Wateringang gesloten. Netto volume Oplossing: O pen de wateringang bij de stroomopwaarts geplaatste P 1000 1,0 kg/1,6 kg afsluitklep of via het sluiten van vergrendeling (3) op Gewicht (droog/nat) filterkop (2). P 3000 1,8 kg/2,8 kg B Geen of weinig waterdoorstroming ondanks de open w ateringang P 1000 119 mm/108 mm/265 mm Filter- Probleem: Te lage druk op de waterleiding systeem (filterkop met Oplossing: C ontroleer waterdruk. Als de storing blijft, controleer filterpatroon) P 3000 117 mm/104 mm/417 mm dan het filtersysteem en het filterpatroon en vervang deze indien nodig.
  • Seite 89 III. Belangrijke opmerkingen 8 Belangrijke opmerkingen Optimaal gebruik Bescherm het P 1000 waterfilterpatroon tegen direct zonlicht en • B RITA raadt aan het filtersysteem niet voor langere tijd ongebruikt mechanische beschadigingen. Monteer de waterfilterset niet in de te laten. Als het BRITA mypure P1 waterfiltersysteem enkele nabijheid van warmtebronnen en open vuur. Er moet een afsluitklep dagen (2 tot 3 dagen) buiten gebruik is geweest, raden wij u aan worden gemonteerd vóór de ingangslang van het filtersysteem. Als het filtersysteem te spoelen met het volume X dat in de tabel de waterdruk groter is dan 8,6 bar, moet er een drukreduceerklep hieronder staat aangegeven. Bij stilstandperioden langer dan 4 vóór het filtersysteem worden geïnstalleerd. De mypure P1 waterfil- weken, moet het filter worden gespoeld met volume Y of anders terset is uitsluitend geschikt voor huishoudelijk gebruik. worden vervangen. Denk er ook aan dat de maximale gebruiks- periode van de filterpatroon 12 maanden bedraagt. Alleen water van drinkwaterkwaliteit mag worden gebruikt voor waterconsumptie via het BRITA waterfiltersysteem. Het BRITA Spoelvolume X na 2-3 dagen stilstand Spoelvolume waterfiltersysteem is uitsluitend geschikt voor gebruik van koud water waarvan de temperatuur overeenkomt met de temperatuur P 1000 2 Litres die is vermeld in hoofdstuk 6. Water dat microbiologisch onveilig of P 3000 3 Litres van onbekende kwaliteit is, mag niet zonder voldoende ontsmetting worden gebruikt. Spoelvolume Y na 4 weken stilstand Spoelvolume Als u een lagedrukboiler hebt, moet u ervoor zorgen dat u de P 1000 P 1000 20 liter uitsluitend aansluit op de koudwatertoevoer met de haakse kraan en niet op de lagedrukboiler.
  • Seite 90 Online registreren van uw product Profiteer van de online registratie van uw product. Meer informatie 100% tevreden: de BRITA garantie over dit onderwerp en uw registratiecode vindt u in de brochure bij uw mypure P1 Set. Wij vertrouwen erop dat dit BRITA product zal voldoen aan uw verwachtingen ten aanzien van kwaliteit en prestaties. Voldoet ons product echter niet aan uw verwachtingen, dan dient u het binnen Kwaliteit gewaarborgd door meer dan 30 dagen na de aankoopdatum aan ons te retour- 40 jaar ervaring neren, waarna wij u de aankoopprijs terugbetalen. U hoeft alleen maar het product met uw aankoop- Al meer dan 40 jaar staat BRITA garant voor (of ontvangst-) bewijs naar onze Klantenservice continue innovatie en optimale kwaliteit in de voor uw land (zoals vermeld op de achterkant van ontwikkeling van waterfiltratieoplossingen. De dit boekje) te sturen. Vermeld ook de reden van uw hoge kwaliteitseisen van BRITA worden gestaafd ontevredenheid, en uw telefoon- en banknummer. door middel van strenge interne en externe kwal- iteitscontroles. Het gerenommeerde onafhankeli- jke testinstituut TÜV SÜD inspecteert regelmatig BRITA recycling: milieuvriendelijk of de kwaliteit van de waterfilters en filterpatronen voor huishoudelijk gebruik gelijk blijft. TÜV SÜD Met het oog op onze gezamenlijke verantwoor- certificeert de levensmiddelenkwaliteit van de delijkheid voor het milieu, kunt u uw gebruikte BRITA w aterfilters en filterpatroon conform de P 1000 filterpatronen bij diverse BRITA dealers Duitse en Europese wetgeving. inleveren. Voor meer over BRITA en details over recycling, kijk op www.brita.net. NEDERLANDS...
  • Seite 91 NEDERLANDS...
  • Seite 92 系統 ® I. 恭喜您擁用新的 BRITA 感謝您選購高品質的BRITA產品,您將可以直接從附有濾芯狀態顯示器 的BRITA濾水龍頭,享受更潔淨、更清澈、口感更好的BRITA過濾水。 BRITA 系統能為您帶來許多好處 BRITA 過濾水 • 輕鬆方便享受好喝的過濾水 • 過濾水能帶出食材的鮮甜原味,讓您每天享受口感極佳的飲水 • 水對於烹調前的備菜準備至關重要,會影響最終料理成敗 • 經濟實惠又方便,享受好水輕而易舉 BRITA 濾水龍頭 P 1000 濾芯是您直接從 BRITA 濾水龍頭享受更純 淨、更清澈、口感更好的 BRITA 過濾水的關鍵! 多層次的 BRITA 過濾程序可使 P 1000 持續提供碳酸鹽硬度的過 BRITA 濾效能。 濾芯狀態顯示器 專業濾芯頭具提供 3 種設定:中硬水、硬水與超硬水 依過濾模式設定而定,在飲用水流經濾芯的過程中可以減少金屬離 子(如鉛和銅)。 P 1000 濾芯減少影響口感與氣味的水垢與物質, 例如氯氣。 P 1000 濾芯壽命 根據您個別水量使用與水質狀況,P 1000濾芯壽命會有所不同。 依據使用 BRITA過濾技術的最佳成效,我們建議您每12 個月更換 濾芯。 請依據BRITA LED 濾芯更換顯示器的顏色提示,更換您的 濾芯。 如欲深入瞭解 BRITA LED濾芯更換顯示器,請參閱第 3.2 章。 P 1000 濾芯 繁體中文...
  • Seite 93 II. 品質從起步做起 1 保固條款 mypure P1 濾水系統提供 2 年保固。 僅在遵照本說明書內所有指示 的情況下提供保固。 2 mypure P1硬水軟化櫥下濾水系統內容 為了確保能充分發揮 mypure P1 濾水系統性能,請仔細依照以下說 明操作。 您的 mypure P1 濾水系統包括下列內容 (請見圖 1): 1. 提供 3 種設定的濾芯頭具,包含便利的鎖定把手 2. 便利的壁掛架 3. P 1000 濾芯 4. 附有濾芯狀態顯示器的BRITA濾水龍頭 5. BRITA濾芯狀態顯示器 6. 電池 (CR2032) 7. 水 管 (1),長度 = 800 公釐,一側為 1/2 英吋螺帽,另一側為 3/8 英吋螺帽 8. 水 管 (2),長度 = 800 公釐,一側為 3/8 英吋螺帽,另一側為 7/16 英吋螺帽 9. 使用說明 10. 碳酸鹽硬度試紙 11. 1/2英吋三角凡爾 12. 墊片 安裝建議工具:管鉗、六角螺絲小扳手(4 公釐)、扳手、螺絲起子 與12公釐鑽孔機。如要壁掛安裝濾芯 (選擇性),您會需要:兩個螺絲...
  • Seite 94 (圖 3) 必須在第7章所述的涵蓋溫度區間下,於開啟的原始包裝中置 放至少 24 小時後再進行操作。 您現在可依據水質硬度變更設定。根據預設,濾芯頭具設為「B」。 若要變更設定,請使用六角螺絲小扳手 (4 公釐)。 依箭頭方向旋轉, 3.1 步驟 1:請在濾芯頭具上選擇碳酸鹽硬度設定 直到視窗顯示「C」符號。 依箭頭方向旋轉,直到視窗顯示「A」符 號 (圖 3)。濾芯頭具已預先安裝了流量調整器。 即便在更高的水壓 (A/B/C) 下,流量調整器仍可確保流經您 BRITA 濾水龍頭的水流依然穩定順 暢。 濾芯頭具提供 3 種設定:中硬水 (A)、硬水 (B) 與超硬水 (C)。 請依 據當地的自來水水質,遵照下列指示調整至合適設定。 請先使用隨附的試紙進行碳酸鹽測試。 試紙隨附於使用說明的外包 裝中。 試紙用法: 3.2 步驟 2:啟用 BRITA LED 濾芯更換顯示器 • 將 試紙的反應區浸入一杯自來水 (15 - 30 °C) 中約 1 秒 (請勿浸入 流動的自來水中!)。 (圖 2)。 BRITA LED 濾芯更換顯示器會閃爍三種不同顏色,提醒您是否應更 • 將 試紙上多餘的水甩乾,靜待 1 分鐘後,請觀察有幾個反應區產 換濾芯。 生顏色變化。 A 開始使用: 根據產生顏色變化的反應區數目,我們建議您將濾芯頭具設定如下: 移除電池條 設定 BRITA濾芯狀態顯示器將顯示預設設定:左方的LED燈將閃爍兩次顯 示水質硬度設定B;右方的LED燈將閃爍一次顯示濾芯設定 P 1000 產生顏色變化的反應 。請在首次安裝前先設定濾芯狀態顯示器。 區數目...
  • Seite 95 F 更換電池 LED燈閃爍2次為濾芯 P 3000 LED燈閃爍3次為濾芯 A 1000 更換濾芯狀態顯示器的電池時並不需要重新調整水質設定。 (請參考下方表格) 技術資料: d 按下按鈕直到顯示正確相應的LED燈,即可改變設定。 • 電池:1 顆 CR2032 (可卸除) e 請將BRITA濾芯狀態顯示器裝入BRITA濾水龍頭開關控制桿的適當 位置 (請參考圖表 4)。請注意設備裝置的正確方向。 • 電池壽命:約 2 年 1. Hardness 請勿將濾芯狀態顯示器浸入水中。 2. Cartridge (圖 5) 閃爍一次 閃爍二次 閃爍三次 水質硬度設定 (Hardness) A 濾芯設定 (Cartridge) P 1000 P 3000 A 1000 C BRITA LED 濾芯更換顯示器如何運作? 為確保最佳性能,請定期更換濾芯。 BRITA 切換桿中的 LED 濾芯更 換顯示器告訴您何時應更換濾芯。 D 信號 BRITA 切換桿的三個燈號只有在過濾器處於過濾位置時才會啟動。 三個燈號指示如下: - 綠燈:BRITA 水龍頭過濾器運作中。 - 黃燈:已使用 90% 濾水容量。 請記得購買新的更換濾芯。 - 紅燈:需要更換濾芯 繁體中文...
  • Seite 96 3.3 步驟 3:安裝 BRITA 濾水龍頭 請注意必須為您的工作台或基座準備合適的鑽孔設備。 請確 認濾水龍頭下方的區域平穩安全,尤其在您的工作台並非木製 安裝 BRITA 濾水龍頭前,請先將所有需要的工具擺放在您面前 時特別重要。 請檢查該材質的鑽孔要求、使用合適鑽頭和/或 請教專業人員。 (請見圖 6). 在要安裝 BRITA 濾水龍頭的工作台位置上,鑽一個洞 (使用 12 公 釐鑽頭)。 接下來,安裝 BRITA 濾水龍頭 (參見圖5)。 將底座 (2) 放在洞口上,使用隨附的背板 (4)、墊片 (3)、鎖定拉環 (5) 和六角螺帽 (6),將 BRITA 濾水龍頭 (1) 固定就位。 3.4 步驟 4:連接水管 12 公釐鑽頭 !注意:建議您先將會用到的所有零件擺放在您面前。 在安裝前, 請先確認您有一條可用的 1/2 英吋冷水進水管,才能在現有水龍頭 之外連接 mypure P1 濾水系統 如果您沒有可用的 1/2 英吋冷水進水 管,請連絡專業人員。 安裝建議工具:六角螺絲小扳手 (5 公釐) 和 12 公釐鑽頭。 如需選用壁掛方式,您將需要兩個螺絲釘(例如5公釐 螺紋直徑)以及兩個合適您牆壁的壁虎(如有需要)。 請依照下頁圖示(參見圖7)並按照正確步驟裝設。 a) 關閉冷水供水管。 b) 請打開冷水位置的控制桿以確認您現有的廚房水龍頭在冷水端 之水壓較低。 c) 移除冷水供水管(角閥)的冷水水管。 d) 將一個墊片(1/2英吋)裝入與三角凡爾相接的六角螺帽並使之與 (圖 6) 冷水供水管連接。 e) 以下僅適用於具有可彎曲水管的廚房水龍頭: 連接您廚房水龍頭的冷水水管與三角凡爾。請確保墊片放置正 確。視您的廚房水龍頭水管而定,此墊片可能屬於水管的一部 1. BRITA 濾水龍頭...
  • Seite 97 3.5 步驟 5:插入濾芯 (請見圖 8) A 移除保護條(1).(參見圖8) 現有廚房水 B 將濾芯(4)以垂直方向裝到頭具(5)中。請確保頭具上的水管是在頭 龍頭 具外面。 C 轉動鎖定把手 (3),請依箭頭指示方向, 將鎖定把手旋轉至定位處。 水管 2: 800 公釐 1/2" 水管 1: 800 公釐 熱水供水口 冷水供水管 (圖 7) (圖 8) 鎖定把手必須在開啟狀態,才能插入濾芯。 請確定濾芯放在正確位置。 繁體中文...
  • Seite 98 B 開啟水龍頭的水閥,讓水流出,直到過濾水變得清澈無泡沫 可垂直安裝! (至少 2 公升)。 4 更換濾芯 若已達到最大濾水量或濾芯自啟用日起算已使用 12 個月,BRITA LED 濾芯更換顯示器 LED 燈會閃爍紅色,提醒您應更換濾芯。 更換前請詳閱「重要須知」(第 8 章)。 在 0°C 下進行儲存及運送 後,本產品必須在所述的環境溫度下(第 6 章),於開啟的原始包裝中 儲存至少 24 小時,以進行操作。 您可在壁掛上將濾芯旋轉 90 度,以方便取下。 鎖定把手開啟 時,濾芯進水會受到干擾,可能會有水流繞過濾芯,直接由注 水口流到出水口。 更換 P 1000 (請見圖 8): A 開啟鎖定把手 (3)。 B 將 適當容器放置於水管 下,盛接流出來的水。開啟沖水閥 (2), 釋放濾水系統內壓力。再次關閉沖水閥 (2)。 C 將 壽命耗盡的濾芯 (4) 自濾芯頭具 (5) 移除 –請注意,濾芯安裝相 當牢固,因此請用力將濾芯拉出,無須擔心損壞。 D 插入新的濾芯 (請參閱第 3.5 章)。 E 關閉鎖定把手 (3)。 F 重新設定 BRITA 濾芯更換顯示器 (第 5 章) G 開 啟 BRITA 水龍頭的切換桿,讓水流出,直到過濾水變得清澈無 (圖 9) 泡沫 (請至少過濾 2 公升)。 更換 P 3000 替換濾芯的步驟與更換 P 1000 的步驟完全相同。 A 根據牆壁材質,使用兩個相符的螺絲和壁掛固定座(如有需要), P 3000 於 A 設定下濾水量最多可達 3400 公升,於 B 設定下最多 將壁掛連接定位。 可達1700 公升, 於 C 設定下最多則可達 1100 公升。 設定您的 B 將濾芯頭具 (2) 接上壁掛架 (1)。 請使用固定孔 (4)。 BRITA LED 濾芯更換顯示器時,請考量上述濾水量資訊。 繁體中文...
  • Seite 99 5 保養 119 公釐/108 公釐/265 P 1000 公釐 濾水系統 定期檢查濾水系統是否有漏水情形。 定期檢查水管是否糾結。 (濾芯頭具加 糾結的水管必須進行更換。 濾芯) 117 公釐/104 公釐/417 P 3000 公釐 安裝濾水系統前,請先閱讀「技術資料」(第 6 章) 和「重要 108 公釐/108 公釐/259 須知」(第 8 章)。 P 1000 公釐 濾芯 請定期使用沾濕的軟布清潔濾水系統外部。 104 公釐 /104 公釐/410 P 3000 尺寸(寬/深/高) 公釐 請勿使用具腐蝕性的化學物質、清潔液或收斂性清潔劑。 137 公釐/130 公釐/265 P 1000 公釐 安裝尺寸 (使用壁掛 6 P 1000 與 P 3000 濾芯技術資料 架進行垂直 安裝) 137 公釐/128 公釐/417 P 3000 公釐 操作壓力 2 bar 至最多 8.6 bar 進水溫度 4°C 至 30°C 操作位置...
  • Seite 100 III. 重要須知 D LED燈不會閃爍 最佳使用方式 原因: 沒有正確安裝電池或電池沒電 疑難排解: 檢查電池是否正確安裝。如果有需要,請更換電池。 • B RITA 不建議您將濾水產品長時間放置不使用。 如果有數天 (2 至 3 天)未使用 BRITA 水龍頭,我們建議您依據下表指示的沖 原因: 電池電量耗盡。 洗量X 來清洗濾水系統。 超過 4 週未使用時,應使用沖洗量 Y 來 疑難排解: 更換電池。 清洗濾水系統。 另請注意,無論實際濾水用量為何,濾芯的最長 使用期限皆為 12 個月。 和使用一般水龍頭時一樣,請先讓水流出一段時間後即可享用 8 重要須知 BRITA過濾水。 2 至 3 天未使用的沖洗水量 X 沖洗水量 請勿將 P 1000 濾芯放在日光直射之處,並避免造成機械性損害。 請勿在靠近熱源或火焰的地方組裝此產品。 止水閥必須安裝在濾水 P 1000 2 公升 系統的進水水管之前。 BRITA 水龍頭系統僅適合居家使用。唯有符 P 3000 3 公升 合飲用水品質的水,方可注入BRITA 濾水系統。 BRITA 濾芯僅適合 使用在第6 章所述溫度範圍內的冷水。 經微生物汙染或未知品質的。 4 週未使用的沖洗水量 Y 沖洗水量 如果您擁有低壓的熱水器,請確認您只有將P 1000 與 P 1000 20 公升 冷水供水管的角閥連接,而非與低壓熱水器連接。...
  • Seite 101 IV. BRITA,品質與滿意保證 正確棄置 BRITA LED 濾芯更換顯示器 線上註冊產品 BRITA LED 濾芯更換顯示器的使用壽命約 5 年。 請至www.register.brita.net 註冊您所購買的產品並取得優惠 濾芯更換顯示器使用壽命結束時,請記得這些裝置 必須依照相關法規棄置。如對於濾芯更換顯示器更 換有疑問,請聯繫您當地BRITA客服單位洽詢。 超過 40 年的經驗,品質保證 超過 40 年來,BRITA 不斷在濾水解決方案領 域致力創新並追求最高品質。 採用嚴格內部 與外部品質控管,一切都為了確保 BRITA 符 免責聲明 合高品質。 富有盛名的獨立 TÜV SÜD 定期 監控家用過濾產品與濾芯 的品質。 TÜV SÜD 因不正確使用本產品而導致的損害 (包括後續損害),BRITA將不會承擔 依據德國與歐盟標準,授予 BRITA過濾產品與濾芯 任何責任。 達到食品級品質之認證。 BRITA 服務專線 對於 BRITA 產品有任何疑問, 或濾水有任何疑問嗎? 請立即來電! 您 可以在本手冊背面,於您所在國家/地區的國別碼旁邊找到 BRITA 顧客 服務團隊的詳細連絡資訊。 最佳好水之網址:www.brita.net 在尋找離您最近的 BRITA 銷售據點嗎? 想更瞭解BRITA 產品 或BRITA 公司嗎?想更充分利用 BRITA的服務嗎? 您可以隨時在下列網站找到 最新資訊、使用者秘訣、當季活動資訊、美味的咖啡和茶水食譜: www.brita.net 繁體中文...
  • Seite 102 繁體中文...
  • Seite 103 繁體中文...
  • Seite 104 N° AZUR: 0810 73 15 45 Faks: +48 22 721 24 49 Tel.: 00800 14789632 www.brita.fr www.brita.pl www.brita.be BRITA Wasser-Filter-Systeme AG BRITA Water Filter Systems Ltd. BRITA Iberia S.L.U., Gassmatt 6 BRITA House Carrer de Valencia, 307, 2º 4ª, CH-6025 Neudorf/LU 9 Granville Way 08009 - Barcelona Verbraucherservice/Téléphone client/...

Diese Anleitung auch für:

1025434