ELNA eXperience 540S Gebrauchsanleitung
Inhaltsverzeichnis
Quicklinks
Inhaltsverzeichnis

Verwandte Anleitungen für ELNA eXperience 540S


Inhaltszusammenfassung für ELNA eXperience 540S
- Seite 2 IMPORTANT SAFETY INSTRUCTIONS This appliance is not intended for use by persons (including children) with reduced physical, sensory or mental capabilities, or lack of experience and knowledge, unless they have been given supervision or instruction concerning use of the appliance by a person responsible for their safety. Children should be supervised to ensure that they do not play with the appliance.
- Seite 3 INSTRUCTIONS DE SÉCURITÉ IMPORTANTES Cette machine a été conçue et fabriquée uniquement pour un usage DOMESTIQUE. Cette machine n’est pas un jouet. Ne pas laisser des enfants jouer avec la machine. Cette machine n’a pas été conçue pour l’usage des enfants ou des personnes atteintes de troubles mentaux sans surveillance adéquate.
- Seite 4 WICHTIGE SICHERHEITSHINWEISE Ihre Nähmaschine eignet sich nur für den HAUSGEBRAUCH. Lesen Sie vor Inbetriebnahme dieser Maschine alle Anweisungen. GEFAHR – Befolgen Sie die nachstehenden Anweisungen, um das Risiko eines Stromschlags zu mindern: Lassen Sie Ihre Nähmaschine niemals unbeaufsichtigt, wenn sie an den Netzstrom angeschlossen ist. Trennen Sie die Maschine nach der Benutzung und vor der Reinigung immer vom Netzstrom.
-
Seite 5: Inhaltsverzeichnis
TABLE OF CONTENTS SECTION I. MACHINE PARTS AND FUNCTIONS Satin Stitch Applique ..........46 Name of Parts ............2 Whip and Rolled Hem ..........48 3-step Zigzag (Multiple zigzag) ....... 48 Standard Accessories ..........4 Mending a Tear ............48 Extension table and Free Arm ........ - Seite 6 TABLE DES MATIÈRES SECTION I. COMPOSANTS ET FONCTIONS DE LA Réglage de la largeur du point ......45 MACHINE Réglage de la longueur du point ......45 Dénomination des composants ......... 3 Surfilage au point zigzag ......... 47 Accessoires standard ..........5 Appliqué...
- Seite 7 INHALTSVERZEICHNIS ABSCHNITT I. MASCHINENTEILE UND Einstellen der Knopflochbreite ......59 FUNKTIONEN Einstellen der Knopflochstichdichte ...... 59 Teilebezeichnungen ..........3 Doppellagiges Knopfloch ........59 Standardzubehör ............5 Runde und Angenknopflöcher ......... 61 Anstecktisch (Zubehörfach) ........5 Einstellen der Knopflochbreite ......61 Knopflöcher mit Einlauffaden ........
-
Seite 8: Section I. Machine Parts And Functions
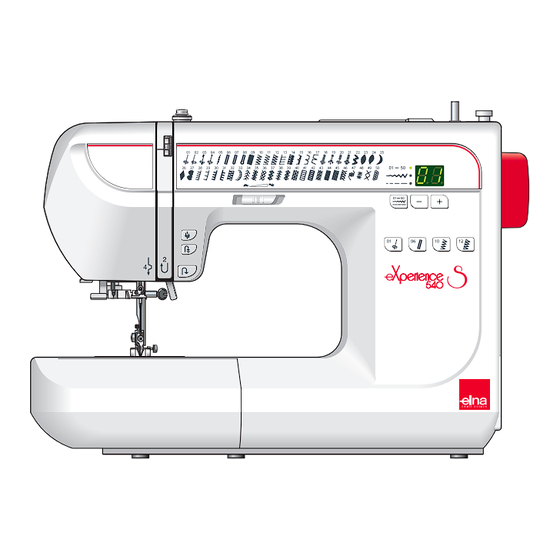
SECTION I. MACHINE PARTS AND FUNCTIONS Name of Parts 1. Direct pattern selection buttons 2. Mode selection button 3. Minus (–) button 4. Plus (+) button 5. Indicator window 6. Spool holder (large) 7. Spool pin 8. Bobbin winding thread guide 9. -
Seite 9: Abschnitt Imaschinenteile Und Funktionen
SECTION I. ABSCHNITT I COMPOSANTS ET FONCTIONS DE LA MASCHINENTEILE UND FUNKTIONEN MACHINE Teilebezeichnungen Dénomination des composants 1. Muster-Direktwähltasten Boutons de sélection directe des motifs 2. Modusauswahltaste Boutons de sélection des modes 3. Minus-Taste (–) Bouton Moins (–) 4. Plus-Taste (+) Bouton Plus (+) 5. -
Seite 10: Standard Accessories
Standard Accessories Many sewing accessories can be stored in the extension table q or accessory storage box w. 1. Zipper Foot E 2. Satin Stitch Foot F 3. Overlock Foot C 4. Automatic Buttonhole Foot R 5. Screw key 6. Bobbins 7. -
Seite 11: Accessoires Standard
Accessoires standard Standardzubehör Das vielfältige Nähzubehör ist im Anstecktisch q Un certain nombre d’accessoires de couture sont rangés dans la table rallonge q. untergebracht. 1. Pied à semelle étroite E 1. Reißverschlussfuß E 2. Pied de point passé F 2. Federstichfuß F 3. -
Seite 12: Section Ii. Getting Ready To Sew Connecting Machine To Power Supply
SECTION II. GETTING READY TO SEW Connecting Machine to Power Supply IMPORTANT: When using your sewing machine the first few times, place waste fabric under the presser foot and run the machine without thread for a few minutes. Wipe away excess oil. Before connecting the power cord, make sure the voltage and frequency shown on the machine are identical to your electrical power. -
Seite 13: Section Ii. Préparation Des Travaux De Couture Branchement De La Machine Sur L'alimentation Électrique
SECTION II. PRÉPARATION DES ABSCHNITT II. VORBEREITUNGEN TRAVAUX DE COUTURE VOR DEM NÄHEN Branchement de la machine sur l’alimentation Anschluss der Maschine an den Netzstrom électrique WICHTIG: Legen Sie die ersten paar Male, wenn Sie Ihre Nähmaschine benutzen, einen Stoffrest unter den Nähfuß IMPORTANT: Lors des quelques premières utilisations de la und benutzen Sie die Maschine einige Minuten lang ohne machine à... -
Seite 14: Controlling Sewing Speed
Controlling Sewing Speed Speed control slider You can limit the maximum sewing speed with the speed control slider according to your sewing needs. To increase sewing speed, slide it to the right. To decrease sewing speed, slide it to the left. Foot control Pressing on the foot control can vary sewing speed. -
Seite 15: Contrôle De La Vitesse De Couture
Contrôle de la vitesse de couture Regulieren der Nähgeschwindigkeit Curseur de réglage de la vitesse Geschwindigkeitsbegrenzer Vous pouvez régler la vitesse maximum de couture selon Je nach Ihren Nähanforderungen können Sie die maximale vos besoins à l’aide du curseur de réglage de la vitesse. Nähgeschwindigkeit über den Geschwindigkeitsbegrenzer Pour accroître la vitesse de couture, déplacez le curseur beschränken. -
Seite 16: Main Function Of Keys
Main Function of Keys q Reverse Key If you are sewing 1, 2 (straight stitches), 10 (zigzag stitch) or 11 (3-step zigzag stitch), press and hold this key. The machine will sew in reverse until you release the key while using the foot control. -
Seite 17: Fonction Des Touches Principales
Fonction des touches principales Hauptfunktionen der Tasten q Touche de marche arrière q Taste zum Rückwärtsnähen En mode de couture 1, 2 (points droits), 10 (point zigzag) Nähen Sie 1, 2 (gerade Stiche), 10 (Zickzackstich) oder ou 11 (point zigzag à 3 étapes), appuyer sur 11 (3-Schritt-Zickzackstich), drücken und... -
Seite 18: Mode Key
Mode Key Each time you press this key the mode will change in the following order: (1) Pattern selection mode The green light on the top will turn on. To select the pattern, press the key until the pattern number of the desired stitch is indicated (see the stitch chart below). -
Seite 19: Touche Mode
r Touche Mode r Modus-Taste Chaque appui sur cette touche permet de changer de mode Mit jedem Drücken dieser Taste wird der Modus in folgender dans l’ordre suivant : Reihenfolge geändert: (1) Mode de sélection du motif (1) Musterauswahl-Modus Le voyant vert situé en haut s’allume. Die grüne Lampe (oben) leuchtet auf. -
Seite 20: How To Drop The Feed Dog
How to Drop the Feed Dog The feed dog can be dropped out of position for special sewing techniques: free motion embroidery, stippling, button sewing, etc. Locate the feed dog lever on the back of the machine. Slide the lever either to the right (down) q or to the left (up) w. -
Seite 21: Abaissement De La Griffe D'entraînement
Abaissement de la griffe d’entraînement Senken des Transporteurs Il est possible de déplacer la griffe d’entraînement et de Der Transporteur kann für spezielle Nähtechniken gesenkt l’abaisser pour des techniques particulières de couture : und weggedrückt werden: Freihand-Sticken, Punktieren, broderie en mouvement libre, pointillé, pose de boutons, etc. Knopfannähen, etc. -
Seite 22: Raising And Lowering Presser Foot
Raising and Lowering Presser Foot The Presser foot lever q raises and lowers the presser foot. You can raise the presser foot about 6.5 mm (1/4˝) higher than the normal up position w for easy removal of the presser foot or to place heavy fabrics under the presser foot. -
Seite 23: Relevage Et Abaissement Du Pied Presseur
Relevage et abaissement du pied presseur Heben und Senken des Nähfußes Le levier de pied presseur q sert à relever et à abaisser le Der Nähfußhebel q hebt und senkt den Nähfuß. pied presseur. Sie können den Nähfuß etwa 6,5 mm über die normale gehobene Stellung w heben, damit der Nähfuß... -
Seite 24: Changing Needles
Changing Needles Turn ON the power switch. Press the Up/Down needle key q to raise the needle. Lower the presser foot. Turn OFF the power switch. Turn the needle clamp screw w counterclockwise to loosen. Remove the needle from the clamp. Insert the new needle into needle clamp with the flat side r to the back, pushing it up against the stopper pin e. -
Seite 25: Changement D'aiguille
Auswechseln der Nadeln Changement d’aiguille Schalten Sie den Netzschalter EIN. Drücken Sie die Taste q Mettre l’interrupteur d’alimentation en position de marche. zum Hochstellen / Senken der Nadel, um die Nadel Appuyer sur la touche de montée/descente d’aiguille q afin hochzustellen. -
Seite 26: Needle Definitions
Needle Definitions The illustration identifies the main parts of a sewing machine needle. q Body w Shaft e Long groove (round side of needle) r Short groove (flat side of needle) t Eye y Point A: Universal – an all-purpose needle that handles most woven and knit fabrics. -
Seite 27: Définitions Des Aiguilles
Définitions des aiguilles Nadeldefinitionen L’illustration identifie les parties principales d’une aiguille de Die Abbildung veranschaulicht die Hauptteile einer machine à coudre. Nähmaschinennadel. q Corps q Körper w Tige w Schaft e Grande rainure (côté rond de l’aiguille) e Lange Rille (runde Seite der Nadel) r Petite rainure (côté... -
Seite 28: Winding The Bobbin
Winding the Bobbin Removing the bobbin To remove bobbin, slide bobbin cover plate release button q to the right and lift away the bobbin cover plate w. Lift out the bobbin e. Turn ON the power switch. Always use bobbin type supplied with machine. Setting the spool of thread Lift up the spool pin. -
Seite 29: Bobinage De La Canette
Spulen Bobinage de la canette Entnahme der Spule Retrait de la canette Soll die Spule entfernt werden, schieben Sie den Knopf zum Pour retirer la canette, faire coulisser le bouton d’ouverture Freistellen der Abdeckplatte der Spule q nach rechts und du couvercle de canette q vers la droite et enlever le heben Sie die Abdeckplatte der Spule w an. -
Seite 30: Inserting The Bobbin
Inserting the bobbin z Place the bobbin in the bobbin holder w with the thread q running off counterclockwise. x Guide the thread into the notch on the front e of the bobbin holder. c Draw the thread to the left, sliding it between the tension spring blades r. -
Seite 31: Insertion De La Canette
Insertion de la canette Einsetzen der Spule z Legen Sie die Spule in den Spulenhalter w ein, wobei z Placer la canette dans le porte-canette w de façon à ce das Garn q gegen den Uhrzeigersinn abläuft. que le fil q se déroule dans le sens contraire des aiguilles d’une montre. -
Seite 32: Threading The Machine
Threading the Machine Raise the presser foot. Press the Up/Down needle key to raise the thread take-up lever to its highest position. z Draw the thread from the spool. Hold the upper thread q at the spool with your finger. x Slip the thread under the thread guide w from the right and down along the right channel e. -
Seite 33: Montage Du Fil Sur La Machine
Montage du fil sur la machine Einfädeln der Maschine Relever le pied presseur. Appuyer sur la touche de montée/ Stellen Sie den Nähfuß hoch. Drücken Sie die Taste zum descente d’aiguille afin de relever le levier releveur de fil Hochstellen / Senken der Nadel, um den Fadenhebel in dans sa position la plus haute. -
Seite 34: Built-In Needle Threader
Built-in Needle Threader z Press the Up/Down Needle key q until the needle is in an up position. Turn OFF the power switch. Lower the presser foot. Lower the needle threader lever w as far as it will go. Hook e is automatically inserted into the needle eye. -
Seite 35: Enfile-Aiguille Intégré
Enfile-aiguille intégré Eingebauter Einfädler z Appuyer sur la touche de montée/descente d’aiguille q z Drücken Sie die Taste q zum Hochstellen / Senken der jusqu’à ce que l’aiguille soit en position haute. Mettre Nadel, bis sich die Nadel in ihrer höchsten Position l’interrupteur d’alimentation en position d’arrêt. -
Seite 36: Section Iii. Basic Sewing Straight Stitch
SECTION III. BASIC SEWING Straight Stitch Machine settings q Pattern: w Presser foot: Zigzag foot A e Needle thread tension: 2–6 Starting to sew Raise the presser foot and position the fabric next to a seam guide line on the needle plate. Lower the needle into the fabric where you wish to start. -
Seite 37: Section Iii. Couture Classique Point Droit
SECTION III. COUTURE CLASSIQUE ABSCHNITT III. GRUNDSTICHE Point droit Geradstich Réglages de la machine Maschineneinstellungen q Motif: q Muster: N° 01 w Pied presseur: Pied zigzag A w Nähfuß: Zickzack-Nähfuß A e Tension du fil d’aiguille: 2–6 e Oberfadenspannung: 2–6 Lancement du travail de couture So beginnen Sie zu nähen Relever le pied presseur, puis positionner le tissu à... -
Seite 38: Adjusting Stitch Length
Adjusting Stitch Length When you activate the stitch length mode, the stitch length can be set between 0.0 and 5.0. Press the mode key to activate stitch length adjustment (the bottom green light turns on). The preset value 2.2 will be indicated. Press the plus key to lengthen the stitch length. -
Seite 39: Réglage De La Longueur Du Point
Réglage de la longueur du point Einstellen der Stichlänge Une fois le mode de longueur de point activé, il est possible Im aktivierten Stichlängenmodus kann die Stichlänge de régler la longueur du point entre 0,0 et 5,0. zwischen 0,0 und 5,0 eingestellt werden. Appuyer sur la touche de mode pour activer le réglage Drücken Sie die Modustaste... -
Seite 40: Seam Allowance Lines
Seam Allowance Lines The lines on the needle plate and bobbin cover plate help you measure seam width. The numbers indicate the distance (in millimeters and inches) between the center needle position 3.5 w and the seam allowance line q. Use the seam allowance line as a guide for the fabric edge e. -
Seite 41: Lignes De Guidage
Lignes de guidage Nahtzugabelinien Les lignes tracées sur la plaque à aiguille et le couvercle de Die Linien auf der Stichplatte und der Abdeckplatte der canette vous permettent de mesurer la largeur de couture. Spule helfen Ihnen, die Saumbreite zu messen. Les chiffres indiquent la distance (en millimètres et en Die Zahlen geben den Abstand (in Millimetern und Zoll) pouces) entre la position centrale d’aiguille 3,5 w et la ligne... -
Seite 42: Variety Of Straight Stitches And Recommended Feet
Variety of Straight Stitches and Recommended Feet #01, #02 Straight stitch:Zigzag foot A Pattern #01 is for seaming and for zipper sewing. Pattern #02 is for seaming edge of fabrics. #03 Lock-a-matic stitch: Zigzag foot A Use this stitch to secure the beginning and the end of a seam with backstitching. -
Seite 43: Die Verschiedenen Geradstiche Und Empfohlenen Nähfüße
Die verschiedenen Geradstiche und Divers points droits et pieds recommandés empfohlenen Nähfüße Nr. 01, Nr. 02 Geradstich: Zickzack-Nähfuß A ° 01, n ° 02 point droit: pied zigzag A Muster Nr. 01 eignet sich zum Säumen und Einnähen von Le motif n° 01 s’utilise pour les coutures d’assemblage et la Reißverschlüssen. -
Seite 44: Gathering
Gathering Machine settings q Pattern: w Presser foot: Zigzag foot A e Needle thread tension: 1–3 Gathering with straight stitches works best on light to medium weight fabrics. Decrease tension to between 1 and 3. Increase stitch length to 5.0. Sew two rows of parallel stitches. -
Seite 45: Fronces
Rüschung Fronces Maschineneinstellungen Réglages de la machine q Muster: q Motif: N° 01 w Nähfuß: Zickzack-Nähfuß A w Pied presseur: pied zigzag A e Oberfadenspannung: e Tension du fil d’aiguille: Les fronces au point droit donnent de meilleurs résultats sur Für Rüschen mit geraden Stichen eignen sich besonders les tissus fins à... -
Seite 46: Zipper Insertion
Zipper Insertion Machine Settings q Pattern: w Presser foot: Zipper foot E e Needle thread tension: 2–6 CAUTION: When sewing with the zipper foot, make sure to use pattern 01 (straight stitch with the center needle position). Otherwise the needle may hit the foot and possibly break. -
Seite 47: Einsetzen Eines Reißverschlusses
Einsetzen eines Reißverschlusses Pose de fermetures à glissière Réglages de la machine Maschineneinstellungen q Motif: N° 01 q Muster: w Nähfuß: Reißverschlussfuß E w Pied presseur: Pied à semelle étroite E e Oberfadenspannung: 2-6 e Tension du fil d’aiguille: 2-6 VORSICHT: ATTENTION : Beim Nähen mit dem Reißverschlussfuß... - Seite 48 Close zipper. Turn zipper face up (right seam allowance forms a small fold at basting line) and smooth zipper teeth away from seam. Attach foot with right side pin. Reset straight stitch length to 2.5. Starting at the bottom, sew through the folded seam allowance and zipper tape.
- Seite 49 Fermer la fermeture à glissière. Retourner la fermeture face Schließen Sie den Reißverschluss. Drehen Sie den en haut (la réserve de couture de droite forme un petit pli sur Reißverschluss um (die rechte Nahtzugabe bildet eine la ligne de bâti) et dégager les dents de la couture. Fixer le kleine Falte an der Heftlinie) und streichen Sie die pied avec la tige de droite.
-
Seite 50: Zigzag Stitch
Zigzag Stitch Machine Settings q Pattern: w Presser foot: Zigzag foot A e Needle thread tension: 3 – 7 The zigzag stitch is a very versatile stitch. Simply change its width and length. Use the zigzag to finish raw seam edges, sew narrow hems, sew satin stitch appliques and create beautiful monograms. -
Seite 51: Point Zigzag
Point zigzag Zickzackstich Réglages de la machine Maschineneinstellungen q Motif: N° 10 q Muster: w Pied presseur: w Nähfuß: Pied zigzag A Zickzack-Nähfuß A e Tension du fil d’aiguille: 3 – 7 e Oberfadenspannung: 3 – 7 Le point zigzag est un point très polyvalent. Il suffit d’en Der Zickzackstich ist ein sehr vielseitiger Stich. -
Seite 52: Overcasting With Zigzag Stitch
Overcasting with Zigzag Stitch Machine Settings q Pattern: w Presser foot: Overlock foot C e Needle thread tension: 3–7 Simple zigzag stitching is used for finishing raw seam edges (overcasting) on most woven fabrics to prevent fabric from unraveling. This is the fastest way to finish an edge. -
Seite 53: Surfilage Au Point Zigzag
Surfilage au point zigzag Überwendlichnähen mit Zickzackstich Réglages de la machine Maschineneinstellungen q Motif: N° 10 q Muster: w Pied presseur: Pied pour de surjet C w Nähfuß: Kantennähfuß C e Tension du fil d’aiguille: 3–7 e Oberfadenspannung: 3–7 Ce point zigzag simple s’utilise pour finir les bords cousus Einfache Zickzackstiche werden zum Versäubern von vifs (surfilage) sur la plupart des étoffes tissées, afin Schnittkanten (Umstechen) auf den meisten Webstoffen... -
Seite 54: Whip And Rolled Hem
Whip and Rolled Hem Machine Settings q Pattern: w Presser foot: Satin stitch foot F e Needle thread tension: 3–7 This technique produces a beautiful edge on ruffles and hems. It should only be used for lightweight fabrics and is commonly used in heirloom sewing. Decrease stitch width to 3.5 and stitch length to 0.8. -
Seite 55: Ourlet En Surjet Et Rouleautés
Überwendlich- und Rollnaht Ourlets en surjet et rouleautés Maschineneinstellungen Réglages de la machine q Muster: q Motif: N° 10 w Nähfuß: Federstichfuß F w Pied presseur: Pied pour point passé F e Oberfadenspannung: e Tension du fil d’aiguille: Diese Technik erzielt wunderschöne Kanten an Rüschen Cette technique produit une belle finition des bords sur les und Säumen. -
Seite 56: Overcasting Stitch
Overcasting Stitch Machine Settings q Pattern: w Presser foot: Overlock foot C e Needle thread tension: 3–7 A reinforced straight stitch and zigzag are sewn simultaneously. If your seam does not need to be opened flat, this stitch will sew the seam and overcast the edge in one operation. -
Seite 57: Point De Surfilage
Point de surfilage Überwendlichstich Réglages de la machine Maschineneinstellungen q Motif: q Muster: N° 12 w Pied presseur: Pied de surjet C w Nähfuß: Kantennähfuß C e Tension du fil d’aiguille: e Oberfadenspannung: La machine coud simultanément un point droit renforcé et un Ein verstärkter Stich, bei dem gleichzeitig ein Geradstich point zigzag. -
Seite 58: Buttonhole Variations
Buttonhole Variations • The size of a buttonhole is automatically set by placing a button in the rear of automatic buttonhole foot R. • The button holder of the foot takes a button size of 0.5 cm (3/16˝) to 2.5 cm (1˝) in diameter. •... -
Seite 59: Variantes De Boutonnière
Variantes de boutonnière Knopflochvariationen • La dimension de la boutonnière est automatiquement • Die Größe des Knopfloches wird automatisch eingestellt, déterminée en plaçant le bouton à l’arrière du pied pour indem ein Knopf hinten in den automatischen boutonnière automatique R. Knopflochfuß... -
Seite 60: Classic Buttonhole
Classic Buttonhole Machine Settings q Pattern: w Presser foot: Automatic buttonhole foot R e Needle thread tension: 1–5 Starting to sew Press the up/down needle key to raise the needle. Attach the automatic buttonhole foot R snapping the pin w into the groove q of the foot holder. Pull the button holder to the back, and place the button in it. -
Seite 61: Lancement Du Travail De Couture
Boutonnière classique Klassisches Knopfloch Réglages de la machine Maschineneinstellungen q Motif: N° 06 q Muster: w Pied presseur: w Nähfuß: Pied pour boutonnière Automatischer automatique R Knopflochfuß R e Tension du fil d’aiguille: e Oberfadenspannung: Lancement du travail de couture So beginnen Sie zu nähen z Appuyer sur la touche de montée/descente d'aiguille afin z Drücken Sie die Taste zum Hochstellen / Senken der... - Seite 62 b Start the machine to sew the buttonhole. The buttonhole will be automatically sewn. Step 1 Step 1: The machine will sew the front bartack and the left row first. Then it goes back to the starting point with straight stitch. Step 2: The machine will sew the right row.
- Seite 63 b Démarrer la machine pour coudre la boutonnière. b Starten Sie die Maschine, um das Knopfloch zu nähen La couture de la boutonnière se fait automatiquement. zu beginnen. Das Knopfloch wird automatisch genäht. Étape 1: La machine commence par coudre la bride d'arrêt avant et le côté...
-
Seite 64: Adjusting The Buttonhole Width
Adjusting the Buttonhole Width Press the mode key to activate the stitch width adjustment. Press the plus key to increase the buttonhole width. Press the minus key to decrease the buttonhole width * The width can be altered between 2.5 and 7.0. Adjusting the Buttonhole Stitch Density Press the mode key to activate the stitch length... -
Seite 65: Réglage De La Largeur De La Boutonnière
Réglage de la largeur de la boutonnière Einstellen der Knopflochbreite Appuyer sur la touche de mode pour activer le réglage Drücken Sie die Modustaste , um die de largeur de point. Stichbreitenjustierung zu aktivieren. Appuyer sur la touche plus pour accroître la largeur de Drücken Sie die Plustaste , um die Knopflochbreite zu boutonnière. -
Seite 66: Round End And Keyhole Buttonholes
Rounded End and Keyhole Buttonholes Machine Settings q Stitch pattern: #07 or #08 w Foot: Automatic buttonhole foot R e Needle thread tension: 1–5 The sewing procedure is the same as the square buttonhole #06. Adjusting the Buttonhole Width Rounded buttonhole Press the mode key to activate the stitch width adjustment. -
Seite 67: Boutonnières Arrondies Et Tailleur
Boutonnières arrondies et tailleur Runde und Augenknopflöcher Réglages de la machine Maschineneinstellungen q Motif de point: N° 07 ou 08 q Stichmuster: #07 oder #08 w Pied presseur: Pied pour boutonnière w Fuß: Automatischer Knopflochfuß R e Oberfadenspannung: automatique R e Tension du fil d’aiguille: 1-5 La technique de couture est identique à... -
Seite 68: Corded Buttonhole
Corded Buttonhole Machine Settings q Pattern: w Presser foot: Automatic buttonhole foot R e Thread tension dial: 1-5 To sew a corded buttonhole, follow the same procedure as for a square buttonhole. z With the automatic buttonhole foot R raised, hook the filler cord on the spur q on the back of the buttonhole foot. -
Seite 69: Boutonnière Cordonnet
Boutonnière cordonnet Knopflöcher mit Einlauffaden Réglages de la machine Maschineneinstellungen q Motif: N° 06 q Muster: w Pied presseur: w Nähfuß: Pied pour boutonnière Automatischer automatique R Knopflochfuß R e Molette de tension du fil: e Oberfadenspannung: Pour coudre une boutonnière cordonnet, suivre les mêmes Befolgen Sie beim Nähen eines Knopfloches mit étapes que pour la boutonnière carrée. -
Seite 70: Button Sewing
Button Sewing Machine Settings q Pattern: w Presser foot: Satin stitch foot F e Needle thread tension: 3–7 r Feed dog: Down Hand sewing buttons to a garment is very timeconsuming. Sew them on in one quick, easy step. z Unthread the needle thread. Set the stitch width according to the position of the holes in the button. -
Seite 71: Couture Des Boutons
Couture des boutons Annähen von Knöpfen Réglages de la machine Maschineneinstellungen q Motif: N° 10 q Muster: w Pied presseur: w Nähfuß: Pied pour point passé F Federstichfuß F e Tension du fil d’aiguille: e Oberfadenspannung: r Griffe d’entraînement: r Transporteur: Position abaissée Abgesenkt Coudre les boutons à... -
Seite 72: Darning
Darning Machine Settings q Pattern: w Presser foot: Automatic buttonhole foot R e Needle thread tension: 1–6 Extend the buttonholder q completely open. Place both threads to the left under the foot. Insert fabric under the foot and lower the needle at the starting point w. -
Seite 73: Reprises
Reprises Stopfen Réglages de la machine Maschineneinstellungen q Motif: N° 09 q Muster: w Pied presseur: w Nähfuß: Pied de boutonnière Automatischer automatique R Knopflochfuß R e Tension du fil d’aiguille: e Oberfadenspannung: Ouvrir complètement le porte-bouton q. Placer les deux fils Ziehen Sie den Knopfhalter q ganz auf. -
Seite 74: Blind Hem Stitches
Blind Hem Stitches Machine settings q Stitch pattern: #15 or #16 w Foot: Zigzag foot A e Needle thread tension: 1–4 The woven blind hem is a great method of finishing a hemline or sleeve. Finish the raw hem edge with a zigzag or 3 step zigzag before sewing the blind hem. -
Seite 75: Points D'ourlet Invisible
Points d’ourlet invisible Blindsäumen Réglages de la machine Maschineneinstellungen q Motif de point: N° 15 ou 16 q Muster: #15 oder #16 w Pied presseur: Pied zigzag A w Nähfuß: Zickzack-Nähfuß A e Tension du fil d’aiguille: e Oberfadenspannung: L’ourlet invisible pour étoffes tissées est une excellente Der gewebte Blindsaum ist eine ausgezeichnete Methode méthode pour finir un ourlet ou une manche. -
Seite 76: Section Iv. Decorative Stitches Super Stretch Stitch
SECTION IV. DECORATIVE STITCHES Super Stretch Stitch q Pattern: w Presser foot: Zigzag stitch foot A e Needle thread tension: 1–4 This stitch is recommended for sewing fabrics such as swimwear and stretch velour as it provides the greatest amount of stretchability and strength. Seams lie flat and do not lose their shape. -
Seite 77: Section Iv. Points Décoratifs
SECTION IV. POINTS DÉCORATIFS ABSCHNITT IV. ZIERSTICHE Point super stretch Superstretch Stich Réglages de la machine Maschineneinstellungen q Motif: N° 13 q Muster: w Pied presseur: w Nähfuß: Pied zigzag A Zickzack-Nähfuß A e Tension du fil d’aiguille: e Oberfadenspannung: Ce point est conseillé... -
Seite 78: Applique Sewing
Applique Sewing Machine Settings q Pattern: #28 to #31 w Presser foot: Satin stitch foot F e Needle thread tension: 1–4 r Presser foot pressure lever: 2 Place the applique on the fabric and baste it in place. Sew, guiding the edge of the applique along the slit q on the foot, so that the needle falls off the edge of the applique when it swings to the right. -
Seite 79: Appliqués
Applikation Appliqués Maschineneinstellungen Réglages de la machine q Muster: #28 bis #31 q Motif: N° 28 à 31 w Nähfuß: Federstichfuß F w Pied presseur: Pied de point passé F e Oberfadenspannung: e Tension du fil d’aiguille: r Fußdruck: r Pression du pied: Placer l’appliqué... -
Seite 80: Smocking
Smocking Machine setting q Pattern: #36, #43–#45 w Presser Foot : Satin stitch foot F e Needle thread tension: 1–4 Smocking is a delicate, decorative treatment on children’s clothing or women’s blouses. Choose a soft, lightweight fabric such as batiste, gingham or challis. Cut the fabric three times the finished width. -
Seite 81: Nid D'abeille
Nid d’abeille Wabenstich Réglages de la machine Maschineneinstellungen q Motif: N° 36, #43–#45 q Muster: #36, #43–#45 w Pied presseur: Pied pour point passé F w Nähfuß: Federstichfuß F e Tension du fil d’aiguille: e Oberfadenspannung: Ce point décoratif et raffiné est particulièrement indiqué pour Dieser dekorative, raffinierte Stich benützt man agrémenter des chemisiers ou des vêtements d’enfants. -
Seite 82: Pattern Combination
Pattern Combination Machine Settings q Pattern: #27 and #47 (example) w Presser foot: Satin stitch foot F e Needle thread tension: 1–4 To combine 2 units of pattern #27 and one unit of pattern #47: Sew pattern #27 and press the auto-lock key q while sewing the second unit. -
Seite 83: Combinaison De Motifs
Combinaison de motifs Musterkombinationen Réglages de la machine Maschineneinstellungen q Motif: q Muster: No 27 et 47 (exemple) #27 und #47 (Beispiel) w Pied presseur: w Nähfuß: Pied pour point passé F Federstichfuß F e Tension du fil d’aiguille: 1-4 e Oberfadenspannung: Pour combiner 2 unités du motif n°... -
Seite 84: Using The Fine Adjustment Dial
Using the Fine Adjustment Dial The sewing results of the stretch patterns may vary depending upon the sewing conditions, such as sewing speed, type of the fabric, number of layers etc. Always test sew on a scrap piece of the fabric that you wish to use. -
Seite 85: Utilisation De La Molette De Réglage Fin
Utilisation de la molette de réglage fin Benutzen der Feineinstellscheibe Les résultats obtenus avec les motifs pour tissus extensibles Die Nähergebnisse von Stretchmustern können je nach den peuvent varier selon les conditions de couture (vitesse de Nähbedingungen, wie Nähgeschwindigkeit, Stoffart, couture, type de tissu, nombre d’épaisseurs, etc.). -
Seite 86: Cleaning The Hook Race
Cleaning the Hook Race WARNING: Turn the power switch off and unplug the machine before cleaning. NOTE: Do not dismantle the machine in any way other than what is explained in this section. z Remove the setscrew w on the needle plate e with a screw key q. -
Seite 87: Nettoyage Du Logement Du Crochet
Nettoyage du logement du crochet Reinigen der Greiferlaufbahn AVERTISSEMENT: WARNHINWEIS: Mettre l'interrupteur d'alimentation sur la position arrêt et Schalten Sie die Maschine am Netzschalter aus und débrancher la machine avant de procéder au nettoyage. ziehen Sie den Stecker ab, bevor Sie die Maschine reinigen. -
Seite 88: Problems And Warning Signals
Problems and Warning Signals If a buzzer sounds and the indicator shows a warning sign, follow the guidance below. Warning signal Cause Try this The power is turned on with the foot control not Connect the foot control and restart being connected. -
Seite 89: Problèmes Et Signaux D'alerte
Problèmes et signaux d’alerte Si une alarme sonore se déclenche et qu'un signal d'avertissement s'affiche sur l'indicateur, suivre les conseils ci-après. Signal d'alerte Cause Essayer ceci La machine a été mise sous tension sans que la Raccorder la pédale et redémarrer la pédale soit raccordée. -
Seite 90: Probleme Und Warnanzeigen
Probleme und Warnanzeigen Ertönt der Summer und erscheint auf der Anzeige ein Warnhinweis, befolgen Sie die nachstehenden Anweisungen. Warnsignal Ursache Versuchen Sie Folgendes Die Stromversorgung ist eingeschaltet, aber der Schließen Sie den Fußanlasser an Fußanlasser ist nicht angeschlossen. und starten Sie die Maschine neu. Fußanlasser wurde beim Nähen von elektrisch getrennt. -
Seite 91: Troubleshooting
Troubleshooting Reference Condition Cause 1. The needle thread is not threaded properly. Page 26, 28 The needle thread 2. The needle thread tension is too tight. Page 16 breaks. 3. The needle is bent or blunt. Page 18 4. The needle is incorrectly inserted. Page 18 5. -
Seite 92: Résolution Des Problèmes
Résolution des problèmes Références Anomalie Cause 1. Le fil d’aiguille n’est pas bien enfilé. Page 27, 29 Le fil d’aiguille casse. 2. Le fil d’aiguille est trop tendu. Page 17 3. L’aiguille est tordue ou émoussée. Page 19 4. L’aiguille est mal positionnée. Page 19 5. - Seite 93 Problemlösungen Seite Problem Ursache Oberfaden reißt 1. Oberfaden nicht richtig eingefädelt. Seiten 27, 29 2. Oberfadenspannung zu stark. Seite 17 3. Nadel verbogen oder stumpf. Seite 19 4. Nadel falsch eingesetzt. Seite 19 5. Ober- und Unterfaden bei Nähbeginn nicht unter Nähfuß gelegt (nicht zur Rückseite des Nähfußes gezogen).
-
Seite 94: Index
INDEX Needle Threader ........2, 28 Needles ..........18, 20 Accessories ............ 4 Accessory Storage ......... 4 Overcasting ..........46, 50 Applique ..........46, 72 Auto-Lock Key ........10, 30 Part Names ............ 2 Patchwork ............ 72 Blind Hem Stitches ........68 Patterns Bobbin Combining .......... -
Seite 95: Index
INDEX Patchwork ................. 73 Pédale ................. 9 Accessories ................. 5 Pied presseur Aiguilles ............... 19, 21 Installation et retrait ............. 15 Ampoule ................79 Relevage et abaissement ..........17 Appliqué ..............46, 72 Plaque frontale ..............3 Arrêt d’une couture ............31 Point cocotte .............. - Seite 96 INDEX Nadeleinfädler ............3, 29 Nadeln ..............19, 21 Nadelposition ..............33 3-Schritt-Zickzack ............49 Nahtzugabelinien ............35 Nähfuß Anbringen und Entfernen ........15 Abdeckplatte ..............3 Heben und Senken ..........17 Annähen von Knöpfen ............ 65 Netzschalter ..............3, 7 Anschluss der Maschine an den Netzstrom .....
- Seite 100 843-801-970 (E/F/G)