ELNA Sew Mini Bedienungsanleitung
Inhaltsverzeichnis
Inhaltsverzeichnis
Fehlerbehebung

Verwandte Anleitungen für ELNA Sew Mini


Inhaltszusammenfassung für ELNA Sew Mini
- Seite 1 INSTRUCTION BOOK LIVRE D'INSTRUCTIONS BEDIENUNGSANLEITUNG...
-
Seite 2: Important Safety Instructions
IMPORTANT SAFETY INSTRUCTIONS This sewing machine is not a toy. Do not allow children to play with this machine. The machine is not intended for use by infants or mentally disabled persons without proper supervision. When using an electrical appliance, basic safety precautions should always be followed, including the followings: Read all instructions before using this appliance. -
Seite 3: Consignes De Sécurité Importantes
CONSIGNES DE SÉCURITÉ IMPORTANTES Cette machine à coudre n'est pas un jouet. Ne permettez pas aux enfants de jouer avec cette machine. La machine n'est pas prévue à l'usage des enfants en bas âge ou des personnes mentalement handicapées sans surveillance appropriée. Pour utiliser un appareil électrique, il faut toujours respecter les consignes de sécurité... -
Seite 4: Wichtige Sicherheitshinweise
WICHTIGE SICHERHEITSHINWEISE Diese Nähmaschine ist kein Spielzeug. Erlauben Sie Kindern nicht, mit der Maschine zu spielen. Die Maschine darf nicht ohne geeignete Aufsicht von Kindern oder geistig behinderten Personen benutzt werden. Bei der Benutzung eines elektrischen Geräts sind stets grundlegende Sicherheitsvorkehrungen zu treffen, darunter: Lesen Sie vor Inbetriebnahme dieses Geräts alle Anweisungen. -
Seite 5: Inhaltsverzeichnis
INHALTSVERZEICHNIS TABLE OF CONTENTS SECTION 1. NAMES OF PARTS TEIL 1.TEILEBEZEICHNUNGEN Names of Parts ..........2 Teilebezeichnungen ........3 Standard Accessories ........4 Standardzubehöu und Aufbewahrung .... 5 SECTION 2. GETTING READY TO SEW TEIL 2. VORBEREITUNGEN FÜR DAS NÄHEN Connecting Machine to Power Supply ... -
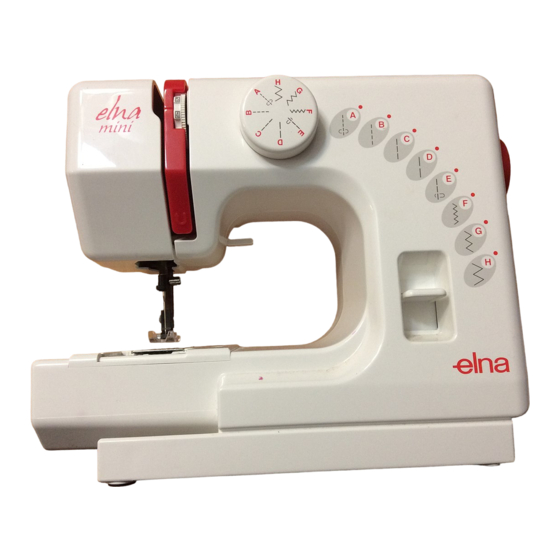
Seite 6: Section 1. Names Of Parts
SECTION 1. NAMES OF PARTS Names of Parts q Bobbin winding tension disk w Upper thread guide e Thread take-up lever r Thread tension dial t Needle plate y Hook cover plate u Reverse stitch lever i Stitch selector o Needle Clamp screw !0 Needle bar thread guide !1 Needle !2 Presser foot... -
Seite 7: Partie 1. Identification Des Piéces Identification Des Pièces
ARTIE 1. TEIL 1. IDENTIFICATION DES PIÉCES TEILEBEZEICHNUNGEN Teilebezeichnungen Identification des pièces Spulerspannungsscheibe q Bobineuse a disque de tension w Guide du fil supérieur Obere Fadenführung Fadenhebel e Releveur tendeur du fil r Molette de réglage de la tension du fil Fadenspannungsregler Stichplatte t Plaque d'aiguille... -
Seite 8: Standard Accessories
Standard Accessories q Bobbin w Needle e Threader r AC adapter t Foot switch SECTION 2. GETTING READY TO SEW Connecting Machine to Power Supply WARNING: Do not use any AC adapter other than one included in the standard accessory. Before connecting the AC adapter, make sure the voltage and frequency shown on the AC adapter conform to your electrical power. -
Seite 9: Warnhinweis
Accessoires standard Serienmäßiges Zubehör Cannete Spule Aiguille Nadel Enfile-aiguille Nadeleinfädler Adapteur à C.A. Wechselstromadapter Pédale de interrupteur Fußpedal PARTIE 2. TEIL 2. PRÉPAREZ-VOUS À COUDRE VORBEREITUNGEN FÜR DAS NÄHEN Anschluss der Maschine an den Netzstrom Branchez la machine WARNHINWEIS: AVERTISSEMENT: Benutzen Sie nur den Wechselstromadapter, der als N'utilisez aucun adapteur à... -
Seite 10: Presser Foot Lifter
Presser Foot Lifter The presser foot lifter raises and lowers the presser foot. You can raise it higher than the normal up position to more easily place fabric under the foot. Remember to lower the presser foot onto the fabric before starting to sew. q Presser foot lifter w Normal up position e Highest position... -
Seite 11: Relève-Pied Presseur
Relève-pied presseur Nähfußhebel Le relève pied presseur remonte et abaisse le pied Der Nähfußhebel hebt und senkt den Nähfuß. presseur. Vous pouvez le remonter plus haut que la Sie können ihn über die normale Hochstellposition position normale pour vous aider à passer un tissu hinaus anheben, um den Stoff leichter unter den épais sous le pied. -
Seite 12: Bobbin Winding
Bobbin Winding The spool pin is stored in the back of the sewing machine. Pull out the spool pin. Place the spool of thread on it. The end of the thread should be coming out from the spool as shown. q Spool pin w End of the thread e Spool of thread... -
Seite 13: Bobinage D'une Canette De Fil
Bobinage d’une canette de fil Spulen Le port-bobine est stockée dans le dos de la Die Spulspindel befindet sich an der Rückseite der machine. Soulevez le port-bobine. Placez la bobine Maschine. Ziehen Sie die Spulspindel heraus. là-dessus. L'extrémité du fil vient dehors de la Setzen Sie eine Garnrolle auf. - Seite 14 WARNING: The needle and take-up lever moves up and down while winding the bobbin. Keep fingers away from all moving parts. Special care is required around the sewing machine needle. To avoid possible injury, do not touch any moving parts. Draw thread from the spool.
- Seite 15 WARNHINWEIS: AVERTISSEMENT: Während des Spulens bewegen sich Nadel und L’aiguille et le levier releveur de fil se déplace en haut Fadenhebel auf und ab. et en bas tandis qu'enroulement de bobine. Halten Sie Ihre Finger von allen beweglichen Teilen Tenez les doigts à l’écart de toutes les pièces mobiles. fern.
-
Seite 16: Inserting The Bobbin
Inserting the bobbin Place the bobbin in the bobbin holder with the thread running off counterclockwise. q Thread w Bobbin holder Guide the thread into the notch on the front of the bobbin holder. e Notch on the front Draw the thread to the left, sliding it between the tension spring blades. -
Seite 17: Introduction De La Canette
Introduction de la canette Einsetzen der Spule Legen Sie die Spule in den Spulenhalter ein, wobei Placez la canette dans le porte-canette avec le fil das Garn gegen den Uhrzeigersinn abläuft. tournant dans le sens contraire des aiguilles d’une montre. Garn q Fil Spulenhalter... -
Seite 18: Threading The Machine
Threading the Machine WARNING: Disconnect the AC adapter from the machine before threading. * Place a spool on the spool pin, with thread coming off as shown. * Raise the thread take-up lever to its highest position by turning the handwheel counter- clockwise. -
Seite 19: Enfilage De La Machine
Enfilage de la machine Einfädeln der Maschine AVERTISSEMENT: WARNHINWEIS: Démontez l'adapteur à C.A. de la machine avant Trennen Sie den Wechselstromadapter von der l’enfiletage. Maschine, bevor Sie mit dem Einfädeln beginnen. * Placez la bobine de fil sur le porte-bobine, avec * Setzen Sie eine Garnrolle auf die Spulspindel und le fil sortant de la bobine comme illustré. -
Seite 20: Drawing Up Bobbin Thread
Drawing up Bobbin Thread Raise the presser foot. Hold the needle thread lightly with your left hand and rotate the handwheel counterclockwise, toward you, for one complete turn. q Needle thread Bring the bobbin thread up by pulling the needle thread. w Bobbin thread Pull both threads 4˝... -
Seite 21: Comment Faire Monter Le Fil De La Canette
Comment faire monter le fil de la canette Heraufholen des Unterfadens Faites monter le pied presseur. Tenez le fil de Stellen Sie den Nähfuß hoch. Halten Sie den l’aiguille souplement de la main gauche, et tournez Oberfaden leicht in der linken Hand fest und drehen le volant d’un tour complet en sens antihoraire. -
Seite 22: Changing Needle
Changing Needle WARNING: Disconnect the AC adapter from the machine before changing the needle. Raise the needle by turning the handwheel and lower the presser foot. Loosen the needle clamp screw by turning it counterclockwise. Remove the needle from the needle clamp. Insert a new needle into the needle clamp with the flat side to the rear. -
Seite 23: Changer L'aiguille
Changer l’aiguille Auswechseln der Nadel WARNHINWEIS: AVERTISSEMENT: Trennen Sie den Wechselstromadapter von der Démontez l'adapteur à C.A. de la machine avant Maschine, bevor Sie mit dem Auswechseln der Nadel changer l’aiguille. beginnen. Faites monter l’aiguille et abaissez le pied presseur. Drehen Sie das Handrad, um die Nadel anzuheben, und senken Sie den Nähfuß. -
Seite 24: Adjusting The Needle Thread Tension
Adjusting the Needle Thread Tension Balanced tension The ideal straight stitch has threads locked between two layers of fabric, as illustrated. Turn the dial to adjust the tension. q To loosen w To tighten The tension requires adjustment depending on: - stiffness and thickness of the fabric - number of fabric layers - type of stitch... -
Seite 25: Réglage De La Tension Du Fil De L'aiguille
Einstellen der Oberfadenspannung Réglage de la tension du fil de l’aiguille Ausgeglichene Fadenspannung Tension correcte Beim idealen Geradstich werden die Fäden zwischen Le point droit parfait doit présenter des fils croisés zwei Stofflagen wie dargestellt miteinander entre les deux épaisseurs de tissu, comme illustré à verschlungen. -
Seite 26: Stitch Selector
Stitch Selector Raise the needle above the fabric. CAUTION: To avoid needle or fabric damage, make sure the needle is up and out of the fabric while selecting a stitch. Turn the dial to select the desired pattern by setting the symbol letter at the setting mark. q Symbol letter w Setting mark NOTE:... -
Seite 27: Sélecteur De Point
Sélecteur de point Stichwahlregler Levez l’aiguille au-dessaus du tissu. Stellen Sie die Nadel über dem Stoff hoch. ATTENTION: VORSICHT: Afin d’éviter d’endommager l’aiguille ou le Vermeiden Sie eine Beschädigung von Nadel oder tissu,assurez-vous que l’aiguille est toujours Stoff, indem Sie sicherstellen, dass die Nadel bei der remontée à... -
Seite 28: Section 3. Basic Sewing Straight Stitch
SECTION 3. BASIC SEWING Straight Stitch Stitch selector: A – D, E Needle thread tension: 2 to 6 NOTE: The stitch length of pattern E is the same as that of C. Starting to sew Raise the presser foot and position the fabric on the needle plate. -
Seite 29: Partie 3. Couture De Base Point Droit
TEIL 3. EINFACHES NÄHEN PARTIE 3. COUTURE DE BASE Geradstich Point droit Stichwahlregler: A – D, E Selecteur de point: A – D, E Oberfadenspannung: 2 bis 6 Tension du fil de l’aiguille: 2 à 6 REMARQUE: HINWEIS: La longueur de point du modèle E est identique que Die Länge des Stiches E entspricht der Länge des celle de C. -
Seite 30: Turning A Square Corner
Turning a Square Corner Stop stitching at the corner of the fabric. Lower the needle by turning the handwheel counterclockwise. Raise the presser foot and turn the fabric counterclockwise 90°. Lower the presser foot and begin stitching in the new direction. Basic Zigzag Stitch selector: F, G, H... -
Seite 31: Pour Coudre Un Angle Droit
Pour coudre un angle droit Ändern der Nährichtung um 90º Arrêtez de coudre lorsque le bord du tissu arrive au Hören Sie an der Stoffecke zu nähen auf. lignes du guide-virage. Stellen Sie die Nadel durch Drehen des Handrades Abaissez l’aiguille en tournant le volant dans le sens gegen den Uhrzeigersinn an. -
Seite 32: Cleaning The Bobbin Holder
SECTION 4. CARE OF YOUR MACHINE Cleaning the Bobbin Holder CAUTION: Disconnect the AC adapter jack before cleaning the machine. Do not dismantle the machine other than as explained in this section. Remove the hook cover plate by sliding it toward you. -
Seite 33: Partie 4. Entretien De Votre Machine Nettoyage Du Porte-Canette
PARTIE 4. TEIL 4. ENTRETIEN DE VOTRE MACHINE PFLEGE IHRER NÄHMASCHINE Nettoyage du porte-canette Reinigen des Spulenhalters VORSICHT: ATTENTION: Trennen Sie den Wechselstromadapter von der Débranchez la prise d'adapteur à C.A. avant de Maschine, bevor Sie mit der Reinigung beginnen. nettoyer la machine. -
Seite 34: Troubleshooting
Troubleshooting Condition Cause Reference 1. The needle thread is not threaded properly. Page 14 2. The needle thread tension is too tight. The needle Page 20 thread breaks. 3. The needle is bent or blunt. Page 18 4. The needle is incorrectly inserted. Page 18 5. -
Seite 35: En Cas De Problème
En cas de problème Problème Reference Causes possibles Le fil d’aiguille se 1. Le fil d’aiguille n’est pas passé correctement. Page 15 casse. 2. La tension du fil d’aiguille est trop forte. Page 21 3. L’aiguille est tordue ou émoussée. Page 19 4. -
Seite 36: Problemlösungen
Problemlösungen Seite Problem Ursache Seite 15 Oberfaden reißt 1. Oberfaden nicht richtig eingefädelt. Seite 21 2. Oberfadenspannung zu stark. Seite 19 3. Nadel verbogen oder stumpf. Seite 19 4. Nadel falsch eingesetzt. 5. Ober- und Unterfaden bei Seite 25 Nähbeginn nicht unter Nähfuß gelegt. Seite 25 6. - Seite 37 525-800-158 (En/Fr/Ge) Printed in Thailand Imprimé en Thailand Gedruckt in Thailand...