Ergotron LX Montageanleitung
Vorschau ausblenden
Andere Handbücher für LX:
- Bedienungsanleitung ,
- Benutzerhandbuch (28 Seiten) ,
- Montageanleitungen (24 Seiten)
Quicklinks
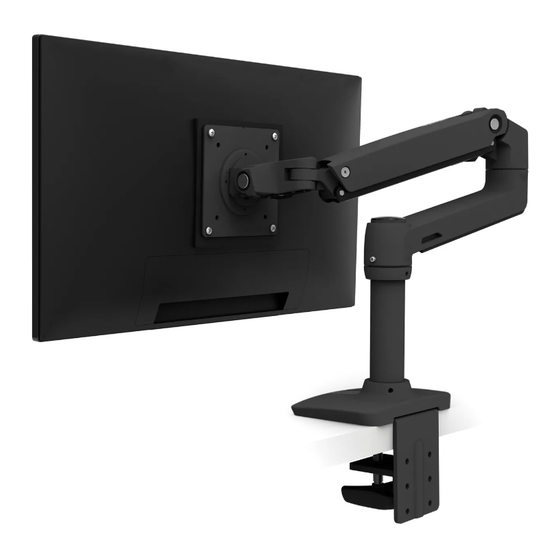
LX Dual Desk Mount LCD Arm
1
2.5-12 lbs
(1.14 - 5.45 kg)
7 - 20 lbs
(3.2 - 9.1 kg)
7 - 20 lbs
(3.2 - 9.1 kg)
7 - 20 lbs
(3.2 - 9.1 kg)
< .63" (16 mm)
.5" - 1.63" (11 - 41 mm)
2.5mm
1.42" - 2.6" (36 - 66 mm)
For more information on this product or installation visit:
www.ergotron.com
888-45-172-W-01 rev. H • 09/11
4x
4x
M4 x 10mm
M4 x 10mm
360°
4x
1x
M4 x 10mm
4x
M4 x 10mm
Attach portrait/landscape rotation stop screw
Acoplar tornillo tope de rotación vertical/horizontal
Fixez la vis de rotation verticale/horizontale
Anbringen der Stopschraube für die Portrait-/Landschaftsrotation.
Staande/liggende draaistopschroef aansluiten
Fissare la vite di arresto sulla posizione ritratto/paesaggio
縦/横回転止めネジを取付ける
安装纵向/横向旋转止动螺丝
Warning: Because mounting surface materials can vary widely, it is imperative that you make sure
mounting surface is strong enough to handle mounted product and equipment.
M3 x 6mm
360°
0°
M3 x 6mm
Laptop with docking station or port replicator
Notebook con estación de acoplamiento o replicador de puertos
Ordinateur portable avec station d'accueil ou duplicateurs de ports
Notebook mit Docking Station oder Port Replicator
Notebook met docking station of poortreplicator
Notebook con alloggiamento di espansione o replicatore delle porte
ドッキングステーションまたはポートレプリケーター付きノート型パソコン
带有扩展坞或端口复制器的笔记本电脑
도킹 스테이션 또는 포트 복제기가 있는 노트북
1x
2x
M3 x 6mm
CAUTION: For secure arm attachment and to avoid
equipment damage, plate must make contact
0.31" - 2"*
< 3"
with underside of desk on both sides of the hole.
(8 - 51 mm)
(80 mm)
Precaución: Para fi jar el brazo de forma segura y
evitar que el equipo resulte dañado, la placa debe
hacer contacto con la cara inferior de la mesa a
ambos lados del orifi cio.
Attention : Pour une fi xation au bras sûre et pour
éviter que le matériel soit endommagé, la plaque
*Bolt must be centered in hole.
doit être en contact avec le dessous du bureau des
deux côtés du trou.
Vorsicht: Um eine sichere Armbefestigung zu
gewährleisten und eine Beschädigung des Geräts
zu vermeiden, muss die Platte Kontakt mit der
Unterseite des Schreibtischs und beiden Seiten
des Lochs haben.
Let op: Om de arm stevig te bevestigen en om
schade aan de apparatuur te voorkomen, moet
de plaat contact maken met de onderkant van het
bureau aan beide kanten van de opening.
Attenzione: per fi ssare bene il braccio e prevenire
danni all'attrezzatura, la piastra deve essere a con-
tatto con il lato inferiore del tavolo da entrambi i
lati del foro.
注意: アームをしっかり接続し、機器の損傷を
防ぐために、プレートは穴の両側で机の下部と
接触するようにしてください。
小心: 为了确保支臂安装牢固并避免损坏设
备,安装板在孔的两侧均须与桌面的下侧接触。
www.ergotron.com

Verwandte Anleitungen für Ergotron LX


Inhaltszusammenfassung für Ergotron LX
- Seite 1 LX Dual Desk Mount LCD Arm www.ergotron.com Laptop with docking station or port replicator Notebook con estación de acoplamiento o replicador de puertos M3 x 6mm Ordinateur portable avec station d’accueil ou duplicateurs de ports Notebook mit Docking Station oder Port Replicator...
- Seite 2 Adjustment · Ajuste · Réglage · Einstellung · Instellen · Regolazione · 調整 · 调节 · 조절 Follow these instructions to tighten or loosen tension. Siga estas instrucciones para ajustar o afl ojar la tensión. IMPORTANT! This product will need tension adjustments once installation is complete. Make sure all equipment is properly installed on the product before attempting range of motion or tension Suivez ces instructions pour desserrer ou resserrer la tension.
- Seite 3 LX Dual Desk Mount Arm User's Guide Guía del usuario Manuel de l’utilisateur Benutzerhandbuch Gebruikersgids Guida per l’utente ユーザーガイド 用户指南 사용자 안내서 IMPORTANT! This product will need tension adjustments once installation is complete. Make sure all equipment is properly installed on the product before attempting range of motion or tension adjustments.
- Seite 4 7 - 20 lbs (3.2 - 9.1 kg) 7 - 20 lbs 7 - 20 lbs 2.5 - 12 lbs (3.2 - 9.1 kg) (3.2 - 9.1 kg) (1.1 - 5.4 kg) 360° 70° 360° 360° 13" (330 mm) 180° 5°...
- Seite 5 Choose Mounting Method Elija el método de montaje Choisissez une méthode de fi xation Wählen Sie die Befestigungsmethode Kies de montagemethode Scegliere il metodo di montaggio 取り付け方法の選択 选取安装方法 < .63" (16 mm) .5" - 1.63" (11 - 41 mm) 0.31" - 2"* <...
- Seite 6 Attach Display Attach Notebook ATORNILLE MONITOR Ajustar el portátil FIXER L’ECRAN Installer le l’ordinateur portable Montar o ecrã Montage des Notebooks Montage des Displays Bevestig notebook Bevestig beeldscherm Fissare il portatile Fissare il display ノート型パソコンを取付ける ノート型パソコンを取付ける 连接笔记本电脑 安装显示器 노트북 연결 디스플레이...
- Seite 7 Attach Notebook Ajustar el portátil Installer le l’ordinateur portable Montage des Notebooks Bevestig notebook Fissare il portatile ノート型パソコンを取付ける 连接笔记本电脑 노트북 연결 Attach portrait/landscape rotation stop screw Acoplar tornillo tope de rotación vertical/horizontal M3 x 6mm Fixez la vis de rotation verticale/horizontale Anbringen der Stopschraube für die Portrait-/Landschaftsrotation.
- Seite 8 Place Notebook Colocar portátil Placez l’ordinateur portable Pa ds will help prevent notebook from slipping, but they will not hold all notebooks on the Colocar o portátil tray in all circumstances. Use caution while tilting the tray, since some angles may cause the Notebook platzieren notebook to fall off resulting in equipment damage or personal injury.
- Seite 9 Place docking station and notebook Colocar plataforma de fi jación y portátil Placez la station d’accueil et l’ordinateur portable Platzieren der Docking-Station und des Notebooks. Dockstation en notebook plaatsen Collocare la base e il portatile ドッキング ステーションおよびノート型パソコンを配置する 放置坞站和笔记本电脑 도킹 스테이션과 노트북 배치 888-45-175-W-00 rev.D •...
- Seite 10 2.5mm >180º 180º WARNING: Desk Clamp Installations: The range of motion (side-to- side) for two Extensions/Arms on one pole mounted with the Desk Clamp option is limited to 180º forward (over front of desk clamp base). NOTE: Grommet Mount Installations: The range of motion (side-to- side) for two Extensions/Arms on one pole mounted with the Grommet Mount option is 360º...
- Seite 11 CABLE ROUTING Leave Slack in cable GUÍA DE CABLEADO No deje el cable excesivamente tenso CHEMIN DE CÂBLE Laisser du mou dans le câble KABELFÜHRUNG Berücksichtigen Sie entsprechendes Kabelspiel LEIDT DE KABEL Geef wat extra lengte in de kabel INSTRADARE I CAVI Lasciare del gioco nel cavo ケーブル配線...
- Seite 12 Adjustment · Ajuste · Réglage · Einstellung · Instellen · Regolazione · 調整 · 调节 · 조절 Follow these instructions to tighten or loosen tension. Siga estas instrucciones para ajustar o afl ojar la tensión. Suivez ces instructions pour desserrer ou resserrer la tension. Befolgen Sie diese Anleitung, um die Spannung zu lockern oder zu verstärken.
- Seite 13 Arm Swing – Side-to-side Follow these instructions to tighten or loosen tension. Giro del brazo (derecha e izquierda) Siga estas instrucciones para ajustar o afl ojar la tensión. Mouvement du bras : Droite et Gauche Suivez ces instructions pour desserrer ou resserrer la tension. Schwenken- links und rechts Befolgen Sie diese Anleitung, um die Spannung zu lockern oder zu verstärken.
- Seite 14 Set Your Workstation to Work For YOU! Confi gure su estación de trabajo para que trabaje para USTED. Ajustez votre station de travail en fonction de VOS besoins ! Richten Sie Ihren Arbeitsplatz so ein, dass er für SIE arbeitet! Stel uw werkstation zo in dat het voor U werkt! Approntare la stazione di lavoro nella posizione ergonomica ottimale.