Exsys EX-1301-2 Bedienungsanleitung
Verfügbare Sprachen
Verfügbare Sprachen
EX
EX-
EX
-
-
1301
1301
1301-
-
-
2
2
2
DRIVER INSTALLATION :
Windows XP/Vista/2000/Server 2008&2003/Win7 (32&64-Bit) :
Windows will recognize a new "FT232R USB UART" and open the hardware assistant.
Please choose manual installation and put the driver CD into your CD-Rom drive. Enter
the Path "D:\USB_to_IO\FTDI\(32_64bit)Win7_XP_Vista_2008_2008R2_2003_2000".
into the box for the Path/Source and click at >next/continue<. Now Windows search for
the drivers in the specified directory. Follow the hardware assistant and finish the instal-
lation. If Windows recognizes other new devices repeat the above described steps.
Attention! Restart Windows in any case after installing the drivers.
CHECK THE INSTALLED DRIVER:
Click at Start<>Run< then enter "compmgmt.msc" and click at >OK<. In the windows
that open select >Device Manager<. Under "Ports (COM and LPT)" you should find
one more new "USB Serial Port„ as sample (COM5). If you see this or similar entries
the module is installed correctly.
INSTALL THE PERIPHERAL DEVICE:
The speed from the serial ports can be set to the maximum baud rate of 115.2Kbaud.
With double click select for example >Device manager< > USB Serial Port (COM5)<.
Now you can select the different settings of baud rate, stop/start-bits etc. This setting
you can use also for the other COM ports.
Windows 98/98SE/ME:
Windows will recognize a new "FT232R USB UART" and open the hardware assistant.
Please choose manual installation and put the driver CD into your CD-Rom drive (as
sample D:) . Now enter the Path "D:\USB_to_IO\FTDI\Win98_ME" into the box for the
Path/Source and click at >next/continue<. Now Windows search for the drivers in the
specified directory. Follow the hardware assistant and finish the installation. If Windows
recognizes other new devices repeat the above described steps. Attention! Restart
Windows in any case after installing the drivers.
CHECK THE INSTALLED DRIVER:
Click at Start<>Run< then enter "compmgmt.msc" and click at >OK<. In the windows
that open select >Device Manager<. Under "Ports (COM and LPT)" you should find
one more new "USB Serial Port„ as sample (COM3). If you see this or similar entries
the module is installed correctly.
CHANGE PORT NUMBER:
If you like to change the port number for example COM 3 to COM 5, open the >Device
Manager< click at >COM3<, >Settings< and then >Advance<. There you can change
between COM 3 to 256.
LINUX:
There are drivers available for Linux. The drivers are located in the folder
"D:\USB_to_IO\FTDI\Linux x86_64" on the driver CD. They are supported by the most
versions of Linux. Because each individual distribution and kernel version of Linux is
different, sadly we cant provide a installation instruction. Please refer to the installation
manual for standard IO ports from your Linux version !
MAC:
There are drivers available for MAC. The drivers are located in the folder
"D:\USB_to_IO\FTDI\MAC OSX or Mac_OS_9_8" on the driver CD. They are sup-
ported by the most versions of MAC OS. Because each individual version of MAC OS is
different, sadly we cant provide a installation instruction. Please refer to the installation
manual for standard IO ports from your MAC OS version !
5
English
English
English
EX-
EX
EX
-
-
1301-
1301
1301
-
-
2
2
2
English
English
English
AUFBAU :
S1
BESCHREIBUNG & TECHNISCHE DATEN :
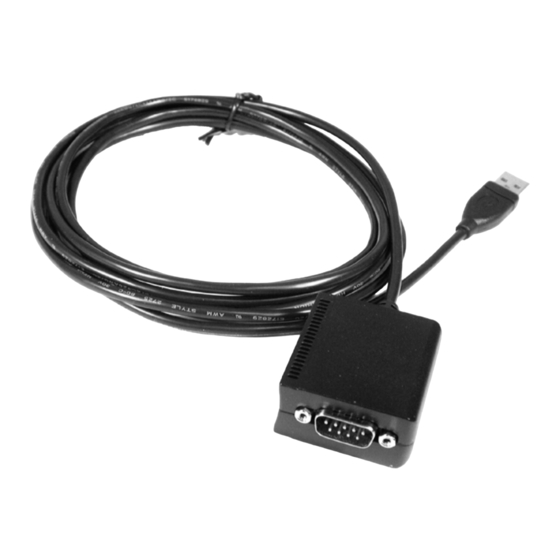
Die EX-1301-2 ist ein Modul zur Umsetzung von USB auf eine RS-232 Schnittstelle mit
FIFO 16C550 Ports für den Anschluss von High Speed Seriellen RS-232 Peripherie
Geräten (z.B. Modem, Plotter usw.) Das USB Modul ist Hot Plug & Play fähig. Für die
Einstellungen der I/O Adressen und Interrupts sind keine Jumper und Einstellungen
notwendig. Sie werden vom System BIOS und beim Installieren des Betriebssystems
automatisch vorgenommen.
Kompatibilität:
Betriebssysteme:
Anschlüsse:
Lieferumfang:
Zertifikate:
JUMPER EINSTELLUNG & ANSCHLÜSSE:
DB 9M:
USB A Buchse:
HARDWARE INSTALLATION :
Beachten Sie bitte die folgenden Installationshinweise. Da es grosse Unterschiede bei
Computern gibt, können wir Ihnen nur eine generelle Anleitung zum Einbau der EX-1301-2
geben. Bei Unklarheiten halten Sie sich bitte an die Bedienungsanleitung Ihres Computer-
systems.
1.
6
Bedienungsanleitung
Bedienungsanleitung
Vers. 1.1 / 22.08.11
9 Pin Stecker Seriell RS-232
USB 1.1 & 2.0 Anschluss
WIN 9.x/ME/2000/XP/Server 2003/Vista/Linux/MAC
1 x 9 Pin Sub-D Stecker, 1 x USB A-Buchse
EX-1301-2, Anleitung, CD,
CE CE CE CE
/ FCC / RoHS / WEEE
DE97424562 / WHQL
Seriell 9 Pin D-SUB Stecker:
Pin
Signal
Pin
1
CDC
4
2
RXD
5
GROUND
3
TXD
6
USB 2.0 A-Buchse:
Pin
Signal
Pin
1
VCC
3
2
DATA-
4
Verbinden sie nur das Ende (A-Stecker) des mitgelieferten Kabels mit der USB A-
Buchse an ihrem PC.
1
USB A–Anschluss
Signal
Pin
Signal
DTR
7
RTS
8
CTS
DSR
9
RI
Achtung!
Signal
Stecker nie umge-
kehrt oder mit
DATA+
Gewalt einstecken.
GND

Verwandte Anleitungen für Exsys EX-1301-2


Inhaltszusammenfassung für Exsys EX-1301-2
- Seite 2 -ROM Laufwerk ein (z.B. Laufwerk D:). Lassen sie nicht automatisch nach dem Treiber suchen. Geben sie “D:\USB_to_IO\FTDI\Win98_ME” in das Feld "Quelldatei Pfad etc." The EX-1301-2 is a plug & play high-speed USB to Serial module for USB 1.1 and 2.0 ein.