Fantec MB-X2U31R Handbuch
2x 3,5“/2,5“ sata hdd/ssd usb3.1 generation ii typ-c 10g technologie

Verwandte Anleitungen für Fantec MB-X2U31R


Inhaltszusammenfassung für Fantec MB-X2U31R
- Seite 1 FANTEC MB-X2U31R Handbuch / Manual 2x 3,5“/2,5“ SATA HDD/SSD USB3.1 Generation II* Typ-C 10G Technologie * 2,5“ SSD/HDD nur zusammen mit optionalem Zubehör „FANTEC MB-Bracket 25“ (Art.Nr.:2534). * 2,5“ SSD/HDD only together with optional accessory „FANTEC MB-Bracket 25“ (Art.No.:2534).
- Seite 2 USB 3.1 Typ-C Anschluss, Gen II bis zu 10 Gbit/s USB 2.0/3.0 kompatibel ein zusätzlich, passendes Kabel mit Stecker Typ-A (im Lieferumfang enthalten.) Lüfter Die gelochten Fronttüren zusammen mit dem 40mm Lüfter, bieten eine optimale Kühlung. 2,5“ SDD/HDD 2,5“ SSD/HDD nur zusammen mit optionalem Zubehör: „FANTEC MB-Bracket 25“ (Art.Nr.:2534).
- Seite 3 Hinweise Punkt • Befolgen Sie alle Hinweise. • Benutzen Sie das Gerät nicht in unmittelbarer Nähe von Wasser. • Reinigen Sie das Gerät mit einem weichen trockenen Tuch. • Blockieren Sie keine Ventilationsöffnungen. • Nehmen Sie die Installation entsprechend dieser Anleitungen vor. •...
-
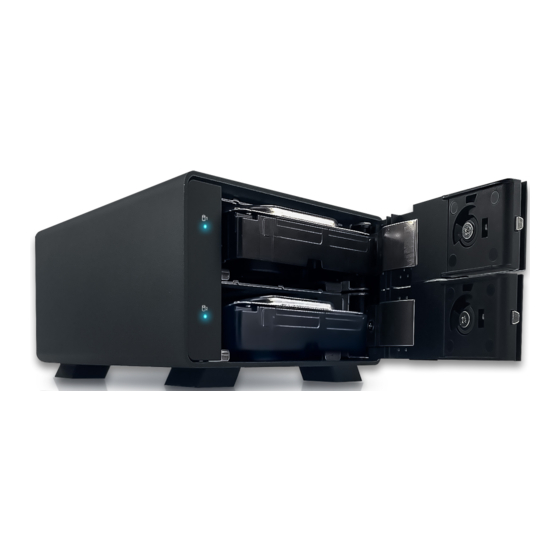
Seite 4: Vorder- Und Rückseite
Vorder- und Rückseite Punkt... -
Seite 5: Erklärung
Erklärung Punkt Beschreibung - Vorne Status LED für jede Festplatte: leuchtet Blau: Festplatte ist eingeschaltet und aktiv blinkt Blau: auf die Festplatte wird zugegriffen LED ist aus: die Festplatte ist ausgeschaltet, oder das Kabel USB ist abgezogen. Die Festplatte ist eingeschaltet, aber inaktiv: z.B. - Seite 6 Installation Punkt 1. Schließen Sie das Stromkabel an und schalten Sie das Gerät ein. Schließen Sie das USB Kabel an und verbinden Sie das andere Ende des Kabels mit Ihrem PC. 2. Schliessen Sie die Tür auf und ziehen Sie am Türgriff, um den Einschub zu öffnen.
- Seite 7 Installation Punkt 4. Schieben Sie die Festplatten in das Gehäuse 5. Schließen Sie die Tür. 6. Zur Entnahme der Festplatte, führen Sie in Ihrem Betriebssystem die Aktion „Hardware sicher entfernen“ aus, schalten das Gehäuse an der Rückseite aus, öffnen SIe die Tür und entnehmen Sie die Festplatte wieder.
-
Seite 8: Single Mode
RAID Mode - SETUP Punkt SETUP SINGLE MODE Das MB-X2U31R bietet vier verschiedene Modi an: • die RAID Modi RAID1, RAID0 Striping und RAID0 Spanning (BIG), • den Modus SINGLE. In diesem Manual wird der SINGLE MODE beschrieben. Wenn Sie ein RAID1 oder RAID0 nutzen möchten, informieren Sie sich bitte in dem PDF-Manual. - Seite 9 RAID Mode - SETUP Punkt 1. Schalten Sie das Gehäuse ab und starten Sie an Ihrem PC die Datenträgerverwaltung. 2. Stellen Sie den Schalter (4) an der Rückseite in die Stellung „SINGLE“: beide Schalter sind nach oben gerichtet. 3. Setzen Sie eine oder zwei Festplatten ein, schließen das Gehäuse an einen PC an und schalten Sie das Gehäuse ein.
-
Seite 10: Microsoft Windows
Festplatten initialisieren und formatieren Punkt Microsoft Windows Falls Sie unformatierte Festplatten verwenden müssen diese zunächst initialisiert werden. Dazu tippen Sie auf die Windowstaste auf Ihrer Tastatur und geben “diskmgmt.msc” (ohne Anführungszeichen) ein. Danach drücken Sie die “ENTER” Taste. 1. Initialisieren Sie die neue Festplatte 2. - Seite 11 Festplatten initialisieren und formatieren Punkt 3. Festplatte ist fertig formatiert. MBR oder GPT Modus Wichtig: Bitte benutzen Sie GPT wenn die Festplatte eine Kapazität über 2TB hat. Benutzen Sie MBR wenn die Festplattenkapazität max. 2TB ist. Ausgewählter MBR Modus für Festplatte unter 2TB MBR (Master Boot Record) Ausgewählter GPT Modus für Festplatte über 2TB GPT (GUID Partition Table)
-
Seite 12: Mac Os X Ab 10.13 Oder Höher
Festplatten initialisieren und formatieren Punkt MAC OS X ab 10.13 oder höher 1. Starten Sie das „Festplattendienstprogramm“. 2. Festplatte initialisieren. 3. klicken Sie auf Löschen > selektieren Sie Details und drücken Sie auf Löschen. - Seite 13 Festplatten initialisieren und formatieren Punkt 4. Festplatte wird formatiert. 5. Festplatte fertig formatiert...
- Seite 14 Problembehandlung Punkt Wenn die eingesetzte Festplatte nicht einschaltet, prüfen Sie, ob das Stromkabel richtig eingesteckt ist und der zentrale Einschalterein- geschaltet ist. Falls die USB Verbindung nicht aufgebaut wird, überprüfen Sie, ob das USB Kabel gesteckt ist. Falls Ihr USB Probleme macht: USB3 Treiber, die bei der Installation eines Betriebssystems mitgeliefert werden, sind oftmals nicht optimal auf Ihr Mainboard ab- gestimmt.
- Seite 15 Anschrift für RMA Sendungen: FANTEC GmbH Abteilung RMA/Service Billwerder Billdeich 605B 21033 Hamburg Konformitätserklätung: Hiermit erklären wir, dass der Artikel mit den Bestimmungen der RL 1999/EG übereinstimmt http://www.fantec.de/unternehmen/bestimmungenrichtlinien/ce/ Tippfehler, Irrtümer und Änderungen vorbehalten. Abbildungen ähnlich FANTEC GmbH, 2023 - Alle Rechte vorbehalten.