
Verwandte Anleitungen für Electrolux WKU30SSP


Inhaltszusammenfassung für Electrolux WKU30SSP
- Seite 1 WKU30SSP Weinkühlschrank Benutzerinformation Cave à vin Notice d'utilisation Cantinetta Istruzioni per l’uso Wine Cabinet User Manual...
-
Seite 2: Inhaltsverzeichnis
13. GARANTIE..................... 18 14. UMWELTTIPPS....................19 WIR DENKEN AN SIE Vielen Dank für Ihren Kauf eines Electrolux-Geräts. Sie haben ein Produkt gewählt, das jahrzehntelange professionelle Erfahrung und Innovation mit sich bringt. Das ausgeklügelte und stilvolle Produkt wurde für Sie entwickelt. So können Sie jedes Mal, wenn Sie das Produkt verwenden, sicher sein, dass Sie... -
Seite 3: Sicherheitshinweise
DEUTSCH SICHERHEITSHINWEISE Lesen Sie vor der Montage und dem Gebrauch des Geräts zuerst die Bedienungsanleitung. Bei Verletzungen oder Schäden infolge nicht ordnungsgemäßer Montage oder Verwendung übernimmt der Hersteller keine Haftung. Bewahren Sie die Anleitung zum Nachschlagen an einem sicheren und zugänglichen Ort auf. -
Seite 4: Allgemeine Sicherheit
1.2 Allgemeine Sicherheit Dieses Gerät ist nur zur Lagerung von Wein bestimmt. • Dieses Gerät ist für den Hausgebrauch in einem • Einfamilienhaus in Innenräumen bestimmt. Dieses Gerät darf in Büros, Hotelzimmern, • Gästezimmern in Pensionen, Bauernhöfen und anderen ähnlichen Unterkünften verwendet werden, wenn diese Nutzung das (durchschnittliche) Nutzungsniveau im Haushalt nicht überschreitet. -
Seite 5: Sicherheitsanweisungen
DEUTSCH einer ähnlich qualifizierten Person zur Vermeidung einer Gefahrenquelle ersetzt werden. 2. SICHERHEITSANWEISUNGEN 2.1 Montage um den Fußboden nicht zu verkratzen. WARNUNG! 2.2 Elektrischer Anschluss Die Montage des Geräts darf nur von einer qualifizierten WARNUNG! Fachkraft durchgeführt Brand- und werden. Stromschlaggefahr. -
Seite 6: Innenbeleuchtung
2.3 Gebrauch Ersatzlampen: Diese Lampen müssen extremen physikalischen WARNUNG! Bedingungen in Haushaltsgeräten Es besteht Verletzungs-, standhalten, wie z.B. Temperatur, Verbrennungs-, Vibration, Feuchtigkeit, oder sollen Stromschlag- oder Informationen über den Brandgefahr. Betriebszustand des Gerätes anzeigen. Sie sind nicht für den Einsatz in anderen Geräten... -
Seite 7: Entsorgung
DEUTSCH können und nicht alle Ersatzteile für • Entfernen Sie die Tür, um zu alle Modelle relevant sind. verhindern, dass sich Kinder oder • Türdichtungen sind innerhalb von 10 Haustiere in dem Gerät einschließen. Jahren nach Produkteinstellung des • Der Kältekreislauf und die Modells erhältlich. -
Seite 8: Aufstellungsort
¹ Höhe, Breite und Tiefe des Geräts ohne Der ordnungsgemäße Griff Betrieb des Geräts wird nur innerhalb des angegebenen Platzbedarf während des Betriebs ² Temperaturbereichs gewährleistet. Wenn Sie Zweifel bezüglich der Installation des Geräts haben, wenden Sie sich bitte an den Verkäufer, unseren... -
Seite 9: Produktbeschreibung
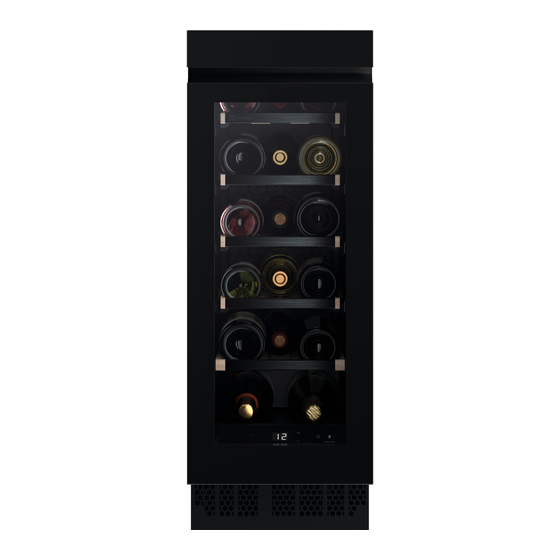
DEUTSCH VORSICHT! Wenn Sie den Türanschlag wechseln, schützen Sie den Boden mit einem strapazierfähigen Material vor Kratzern. 4. PRODUKTBESCHREIBUNG 4.1 Produktübersicht Bedienfeld Dreifachverglaste Glastür Ablage Griff Fuß Dichtung Zierrahmen 5. BETRIEB WARNUNG! Verschütten Sie keine Flüssigkeiten auf das Bedienfeld. Das kann zu Schäden am Gerät führen und die Gefahr eines Stromschlags erhöhen. -
Seite 10: Ein- Und Ausschalten
Taste für Temperaturabfall Kellermodus-Taste Lichttaste 5.2 Anzeige A. Temperaturanzeige 5.3 Ein- und Ausschalten Sie die gewünschte Temperatur erreicht haben. Um das Gerät einzuschalten: Standardmäßig zeigen die 1. Stecken Sie den Stecker in die Temperaturziffern die Wandsteckdose. aktuelle Temperatur an. - Seite 11 DEUTSCH 2. Licht-Verhalten A wird angezeigt. Zum Aktivieren von Child Lock, halten Tippen Sie erneut auf die Taste Sie die Cellar Mode-Taste 3 Sekunden „Licht“, um zur Helligkeit L zu lang gedrückt. Wenn der Modus gelangen. eingeschaltet ist, zeigt das Display 3.
-
Seite 12: Alarm - Tür Offen
°C oder °F 5 Sekunden lang Der Alarm wird ausgelöst, wenn die auf dem Display. Temperatur des Fachs länger als 60 Minuten 2°C unter der eingestellten 5.10 Demo-Modus Temperatur liegt. Während des Alarms: Aktivieren Sie den Demo-Modus, um die Funktionen des Geräts zu... -
Seite 13: Entfernen Und Einsetzen Von Regalen
DEUTSCH ausgelegt (18 nach Entnahme des 2. Haken Sie einen der hinteren Haken unteren Regals) , wenn diese der Ablage aus. folgendermaßen platziert werden: • 2 Flaschen auf Ebene 1 und 2, • 3 Flaschen auf den Ebenen 3 - 6, Ablageflächen für 16 Flaschen Um die Ablage zu lösen, genügt es, nur einen... -
Seite 14: Tipps Und Hinweise
5. Ziehen Sie die Ablage mehrmals heraus und schieben Sie sie wieder in das Gerät. Drücken Sie sie dann wieder fest nach unten, um zu überprüfen, ob sie richtig in den Schienen eingehängt ist. 6. Schieben Sie die Ablage wieder ins Gerät hinein. -
Seite 15: Reinigen Des Innenraums
DEUTSCH 8.4 Den Geräteabfluss reinigen Dieses Gerät enthält Kohlenwasserstoffe in Reinigen Sie die Abflussöffnung seinem Kältekreislauf. Aus regelmäßig, um zu verhindern, dass diesem Grund dürfen die Wasser überläuft und auf die gelagerten Wartung und das Nachfüllen Flaschen tropft. Die Abflussöffnung ausschließlich durch befindet sich unten links des Geräts. -
Seite 16: Problembehebung
• Die meisten Stromausfälle werden • Wenn die Stromversorgung für eine innerhalb weniger Stunden behoben längere Zeit unterbrochen wird, führen und haben keinen Einfluss auf die Sie bitte die oben beschriebenen Temperatur Ihres Geräts, wenn Sie Schritte durch. die Tür so wenig wie möglich öffnen. -
Seite 17: Austauschen Der Lampe
DEUTSCH Störung Mögliche Ursache Lösung Der Schutzschalter hat Schalten Sie den Schutz‐ ausgelöst oder eine Si‐ schalter ein oder wechseln cherung ist durchge‐ Sie die Sicherung. brannt. Die Lampe ist defekt. Wenden Sie sich an den au‐ torisierten Kundendienst. Die Lichttaste funktioniert Wenden Sie sich an den au‐... -
Seite 18: Geräusche
10. GERÄUSCHE SSSRRR! BRRR! CLICK! HISSS! BLUBB! 11. TECHNISCHE DATEN Die technischen Daten befinden sich auf dem Typenschild innen im Gerät sowie Spannung 230 - 240 V auf der Energieplakette. Frequenz 50 Hz 12. INFORMATIONEN FÜR PRÜFINSTITUTE Die Installation und die Vorbereitung des sind in dieser Bedienungsanleitung in Geräts für eine eventuelle EcoDesign-... -
Seite 19: Umwelttipps
DEUTSCH Servicestellen Morgenstrasse 131 3018 Bern Langgasse 10 9008 St. Gallen Am Mattenhof 4a/b 6010 Kriens Schlossstrasse 1 4133 Pratteln Comercialstrasse 19 7000 Chur Ersatzteilverkauf Industriestrasse 10, Material, Arbeits- und Reisezeit. Die 5506 Mägenwil, Tel. 0848 848 111 Garantieleistung entfällt bei Nichtbeachtung der Fachberatung/Verkauf Badenerstrasse Gebrauchsanweisung und... - Seite 20 14. EN MATIÈRE DE PROTECTION DE L'ENVIRONNEMENT......37 NOUS PENSONS À VOUS Merci d’avoir choisi un appareil Electrolux. Vous avez choisi un produit qui bénéficie de décennies d'expérience professionnelle et d'innovation. Ingénieux et élégant, il a été pensé pour vous. C'est la raison pour laquelle vous pouvez avoir la certitude d'obtenir d'excellents résultats à...
-
Seite 21: Informations De Sécurité
FRANÇAIS INFORMATIONS DE SÉCURITÉ Avant d'installer et d'utiliser cet appareil, lisez soigneusement les instructions fournies. Le fabricant ne pourra être tenu pour responsable des blessures et dégâts résultant d'une mauvaise installation ou utilisation. Conservez toujours les instructions dans un lieu sûr et accessible pour vous y référer ultérieurement. 1.1 Sécurité... -
Seite 22: Sécurité Générale
1.2 Sécurité générale Cet appareil est uniquement destiné à la conservation • du vin. Cet appareil est conçu pour un usage domestique • unique, dans un environnement intérieur. Cet appareil peut être utilisé dans les bureaux, les • chambres d’hôtel, les chambres d’hôtes, les maisons d’hôtes de ferme et d’autres hébergements similaires... -
Seite 23: Consignes De Sécurité
FRANÇAIS Si le câble d’alimentation est endommagé, il doit être • remplacé par le fabricant, son service après-vente ou par un professionnel qualifié afin d’éviter un danger. 2. CONSIGNES DE SÉCURITÉ 2.1 Installation 2.2 Branchement électrique AVERTISSEMENT! AVERTISSEMENT! L'appareil doit être installé Risque d'incendie ou uniquement par un d'électrocution. -
Seite 24: Éclairage Interne
2.3 Utilisation électroménagers, telles que la température, les vibrations, l’humidité, AVERTISSEMENT! ou sont conçues pour signaler des Risque de blessures, de informations sur le statut opérationnel brûlures, d'électrocution ou de l’appareil. Elles ne sont pas d'incendie. destinées à être utilisées dans d'autres applications et ne conviennent pas à... -
Seite 25: Mise Au Rebut
FRANÇAIS • Les joints de portes seront • Le circuit frigorifique et les matériaux disponibles pendant 10 ans après d'isolation de cet appareil préservent l’arrêt du modèle. la couche d'ozone. • La mousse isolante contient un gaz 2.7 Mise au rebut inflammable. -
Seite 26: Emplacement
Seul le respect de la plage Dimensions hors-tout ¹ de températures spécifiée peut garantir un bon fonctionnement de l’appareil. ¹ hauteur, largeur et profondeur de En cas de doute concernant l’appareil sans la poignée l’emplacement d’installation de l’appareil, veuillez Espace requis en service ²... -
Seite 27: Description De L'appareil
FRANÇAIS ATTENTION! À chaque étape de réversibilité de la porte, protégez le sol pour éviter les rayures dues aux matériaux durs. 4. DESCRIPTION DE L’APPAREIL 4.1 Présentation du produit Bandeau de commande Porte en triple vitrage Étagère Poignée Pied Joint Cadre décoratif 5. -
Seite 28: Mise En Fonctionnement Et Mise À L'arrêt
Touche d’augmentation de Touche Éclairage température Touche mode Cave Touche de diminution de température 5.2 Affichage A. Indicateur de température 5.3 Mise en fonctionnement et diminution de température et maintenez-la enfoncée jusqu’à ce que mise à l’arrêt vous atteigniez la température souhaitée. - Seite 29 FRANÇAIS 5.7 Mode Child Lock 3 secondes pour accéder au menu de réglage de l’éclairage. Activez la fonction Child Lock pour 2. Le comportement de l’éclairage A verrouiller les touches et éviter toute apparaît. Appuyez à nouveau sur la opération accidentelle. touche Éclairage pour accéder à...
-
Seite 30: Mode Demo
1. Appuyez simultanément sur les L’alarme se déclenche lorsque la touches Cellar Mode et de diminution température du compartiment est 2°C de température. inférieure à la température réglée 2. Une fois que vous avez sélectionné pendant plus de 60 minutes. - Seite 31 FRANÇAIS • Pour les vins rouges vieillis, entre La partie inférieure de la clayette est +14°C et +18°C. équipée d’une paire de guides au milieu et d’une paire de crochets à l’arrière. L’appareil est conçu pour stocker jusqu’à Pour sortir le plateau : 16 (18 après le retrait de l’étagère du 1.
-
Seite 32: Conseils
5. Tirez plusieurs fois sur l’étagère et poussez-la dans l’appareil, puis appuyez à nouveau fermement dessus pour vérifier qu’elle est correctement accrochée aux rails. 6. Repoussez la clayette dans l’appareil. 2. Insérez la clayette en diagonale par rapport à l’appareil. -
Seite 33: Nettoyage De L'intérieur
FRANÇAIS déborde et ne coule sur les bouteilles Cet appareil contient des stockées. L'orifice d'écoulement est situé hydrocarbures dans son dans la partie inférieure gauche de circuit de réfrigération ; l'appareil. l'entretien et la recharge ne Avant le nettoyage, retirez les deux doivent donc être effectués clayettes inférieures. -
Seite 34: Dépannage
• Si l’alimentation doit être coupée plus longtemps, vous devez prendre les 9. DÉPANNAGE AVERTISSEMENT! Reportez-vous aux chapitres relatifs à la Sécurité. 9.1 Que faire si... -
Seite 35: Remplacement De L'ampoule
FRANÇAIS Problème Cause probable Solution L’éclairage est défectu‐ Veuillez contacter le service eux. après-vente agréé. Le bouton d’éclairage ne Veuillez contacter le service fonctionne pas. après-vente agréé. Trop de vibrations. L’appareil n’est pas posi‐ Vérifiez que l’appareil est tionné correctement. stable. -
Seite 36: Bruits
10. BRUITS SSSRRR! BRRR! CLICK! HISSS! BLUBB! 11. DONNÉES TECHNIQUES Les caractéristiques techniques figurent sur la plaque signalétique située sur à Tension 230 - 240 V l’intérieur de l’appareil et sur l’étiquette Fréquence 50 Hz énergétique. 12. INFORMATIONS POUR LES LABORATOIRES D’ESSAIS... -
Seite 37: Garantie
FRANÇAIS GARANTIE Service-clientèle Points de Service Industriestrasse 10 Le Trési 6 Via Violino 11 5506 Mägenwil 1028 Préverenges 6928 Manno Morgenstrasse 131 3018 Bern Langgasse 10 9008 St. Gallen Am Mattenhof 4a/b 6010 Kriens Schlossstrasse 1 4133 Pratteln Comercialstrasse 19 7000 Chur Points de vente de rechange Notre garantie couvre les frais de mains... - Seite 38 Pour la Suisse: Où aller avec les appareils usagés ? Partout où des appareils neufs sont vendus, mais aussi dans un centre de collecte ou une entreprise de récupération officiels SENS. La liste des centres de collecte officiels SENS est disponible sous www.erecycling.ch...
- Seite 39 14. CONSIDERAZIONI SULL'AMBIENTE............56 PENSIAMO A TE Grazie per aver acquistato un elettrodomestico Electrolux. Hai scelto un prodotto che ha alle spalle decenni di esperienza professionale e innovazione. Ingegnoso ed elegante, è stato progettato pensando a te. Quindi, in qualsiasi momento lo utilizzi, avrai la certezza di ottenere sempre i migliori risultati.
-
Seite 40: Informazioni Di Sicurezza
INFORMAZIONI DI SICUREZZA Leggere attentamente le istruzioni fornite prima di installare e utilizzare l'apparecchiatura. I produttori non sono responsabili di eventuali lesioni o danni derivanti da un'installazione o un uso scorretti. Conservare sempre le istruzioni in un luogo sicuro e accessibile per poterle consultare in futuro. - Seite 41 ITALIANO Quest’apparecchiatura è progettata per un uso • domestico singolo in un ambiente interno. Quest’apparecchiatura può essere utilizzata in uffici, • camere d'albergo, camere di bed & breakfast, alloggi in agriturismi e altre sistemazioni simili in cui tale utilizzo non superi i livelli di utilizzo domestico (medi). AVVERTENZA: Verificare che le aperture di •...
-
Seite 42: Istruzioni Di Sicurezza
2. ISTRUZIONI DI SICUREZZA 2.1 Installazione 2.2 Collegamento elettrico AVVERTENZA! AVVERTENZA! L’installazione Rischio di incendio e scossa dell'apparecchiatura deve elettrica. essere eseguita da personale qualificato. AVVERTENZA! In fase di posizionamento • Rimuovere tutti i materiali di dell'apparecchiatura, imballaggio. verificare che il cavo di •... -
Seite 43: Illuminazione Interna
ITALIANO 2.5 Pulizia e cura L'apparecchiatura contiene gas AVVERTENZA! infiammabile, isobutano (R600a), un gas Vi è il rischio di ferirsi o naturale con un alto livello di danneggiare compatibilità ambientale, Fare attenzione l'apparecchiatura. a non danneggiare il circuito refrigerante che contiene isobutano. •... -
Seite 44: Installazione
• Staccare la spina dall'alimentazione • La schiuma isolante contiene gas elettrica. infiammabili. Contattare le autorità • Tagliare il cavo di rete e smaltirlo. locali per ricevere informazioni su • Rimuovere la porta per evitare che come smaltire correttamente bambini e animali domestici l'apparecchiatura. - Seite 45 ITALIANO Deve essere possibile Spazio complessivo necessario du‐ scollegare l’apparecchiatura rante l’uso ³ dalla rete elettrica. Eseguire perciò l’installazione facendo sì che la spina rimanga facilmente accessibile. 3.3 Collegamento elettrico ³ l’altezza, la larghezza e la profondità • Prima di inserire la spina, verificare dell’apparecchiatura, compresa la che la tensione e la frequenza maniglia, più...
-
Seite 46: Descrizione Del Prodotto
4. DESCRIZIONE DEL PRODOTTO 4.1 Panoramica del prodotto Pannello dei comandi Porta a triplo vetro Ripiano Maniglia Piede Guarnizione Cornice decorativa 5. FUNZIONAMENTO AVVERTENZA! Non versare liquidi sul pannello di controllo. Ciò può danneggiare l’apparecchiatura e aumentare il rischio di scosse elettriche. -
Seite 47: Accensione E Spegnimento
ITALIANO 5.2 Display A. Indicatore della temperatura 5.3 Accensione e spegnimento Per impostazione predefinita le cifre della temperatura Per accendere l’apparecchiatura: mostrano la temperatura 1. Inserire la spina nella presa a muro. attuale. Quando si tocca una 2. Se il display è spento, toccare e volta o si inizia a selezionare tenere premuto il tasto di riduzione un’impostazione nuova,... - Seite 48 Se si preme un tasto diverso Comportamento della luce (A): da Cellar Mode, il display si comporta come quando la • 1A sportello aperto: luci al livello di modalità è attivata. luminosità massimo, sportello chiuso: luci spente, Per disattivare la modalità Child Lock, •...
-
Seite 49: Uso Quotidiano
ITALIANO Per attivare la modalità Demo, tenere Durante l'allarme: premuti contemporaneamente i tasti • il display mostra Lº che lampeggia della luce e Cellar Mode per 10 secondi. Premere un tasto qualsiasi sul pannello Quando la modalità è attiva, il display dei comandi per disattivare l’allarme. -
Seite 50: Rimozione E Installazione Dei Ripiani
Livelli di conservazione delle 16 bottiglie Per staccare il ripiano, basta sganciare solo un gancio • 3 bottiglie sui livelli 3 - 6, posteriore. • 6 bottiglie sul livello 1 - 2, Livelli di conservazione delle 18 3. Sollevare leggermente il ripiano ed bottiglie estrarlo dall'apparecchiatura. -
Seite 51: Consigli E Suggerimenti
ITALIANO 2. Inserire il ripiano diagonalmente 6. Spingere il ripiano rispetto all'apparecchiatura. nell'apparecchiatura. 3. Posizionare le guide sulle rotaie. ATTENZIONE! 4. Premere saldamente il ripiano verso Prima di posizionare le il basso per bloccare entrambi i ganci bottiglie di vino sugli scaffali, sulle rotaie. -
Seite 52: Pulizia Dell'interno
8.2 Pulizia dell'interno Prima di utilizzare l'apparecchiatura per la prima volta, lavare l'interno e gli accessori con acqua tiepida e sapone neutro per eliminare il tipico odore dei prodotti nuovi, quindi asciugare accuratamente. ATTENZIONE! Non usare detergenti, polveri abrasive, detergenti a base... -
Seite 53: Risoluzione Dei Problemi
ITALIANO 9. RISOLUZIONE DEI PROBLEMI AVVERTENZA! Fare riferimento ai capitoli sulla sicurezza. 9.1 Cosa fare se… Problema Causa possibile Soluzione L’apparecchiatura non fun‐ L’apparecchiatura è Accendere l’apparecchiatu‐ ziona. spenta. La spina non è collegata Collegare correttamente la correttamente alla presa spina alla presa elettrica. -
Seite 54: Sostituzione Della Lampadina
Problema Causa possibile Soluzione Troppe vibrazioni. L’apparecchiatura non è Controllare che l'apparec‐ supportata correttamen‐ chiatura abbia una posizione stabile. L’apparecchiatura è rumo‐ L’apparecchiatura non è Controllare che l'apparec‐ rosa. supportata correttamen‐ chiatura abbia una posizione stabile. L’acqua scorre sulla pia‐... -
Seite 55: Rumori
ITALIANO 10. RUMORI SSSRRR! BRRR! CLICK! HISSS! BLUBB! 11. DATI TECNICI I dati tecnici sono riportati sulla targhetta dei dati applicata sul lato esterno Tensione 230 – 240 V dell’apparecchiatura e sull’etichetta dei Frequenza 50 Hz valori energetici. 12. INFORMAZIONI PER GLI ISTITUTI DI TEST L'installazione e la preparazione devono essere conformi a quanto dell'apparecchiatura per qualsiasi verifica... -
Seite 56: Considerazioni Sull'ambiente
Servizio dopo vendita Morgenstrasse 131 3018 Bern Langgasse 10 9008 St. Gallen Am Mattenhof 4a/b 6010 Kriens Schlossstrasse 1 4133 Pratteln Comercialstrasse 19 7000 Chur Vendita pezzi di ricambio del certificato di garanzia o dello Industriestrasse 10, 5506 Mägenwil,Tel. - Seite 57 14. ENVIRONMENTAL CONCERNS..............73 WE’RE THINKING OF YOU Thank you for purchasing an Electrolux appliance. You’ve chosen a product that brings with it decades of professional experience and innovation. Ingenious and stylish, it has been designed with you in mind. So whenever you use it, you can be safe in the knowledge that you’ll get great results every time.
-
Seite 58: Safety Information
SAFETY INFORMATION Before the installation and use of the appliance, carefully read the supplied instructions. The manufacturer is not responsible for any injuries or damage that are the result of incorrect installation or usage. Always keep the instructions in a safe and accessible location for future reference. -
Seite 59: Safety Instructions
ENGLISH houses and other similar accommodation where such use does not exceed (average) domestic usage levels. WARNING: Keep ventilation openings, in the • appliance enclosure or in the built-in structure, clear of obstruction. WARNING: Do not use mechanical devices or other •... -
Seite 60: Electrical Connection
2.3 Use • Do not install the appliance close to radiators or cookers, ovens, or hobs, unless otherwise specified in the WARNING! installation instructions. Risk of injury, burns, electric • Do not expose the appliance to the shock or fire. -
Seite 61: Installation
ENGLISH 2.5 Care and cleaning door hinges, trays and baskets. Please note that some of these spare WARNING! parts are only available to Risk of injury or damage to professional repairers, and that not all the appliance. spare parts are relevant for all models. - Seite 62 3.1 Dimensions 90° Overall dimensions ¹ Overall space required in use ³ ³ the height, width and depth of the appliance including the handle, plus the space necessary for free circulation of the cooling air, plus the space necessary ¹...
-
Seite 63: Door Reversibility
ENGLISH domestic power supply socket is not The correct operation of the earthed, connect the appliance to a appliance can only be separate earth in compliance with guaranteed within the current regulations, consulting a specified temperature range. qualified electrician. • The manufacturer declines all If you have any doubts responsibility if the above safety regarding where to install the... -
Seite 64: Operation
5. OPERATION WARNING! Do not spill any liquids on the control panel. This may damage the equipment and increase the risk of electric shock. 5.1 Control panel Display Light key Temperature increase key Cellar Mode key Temperature decrease key 5.2 Display... -
Seite 65: Light Setup
ENGLISH decrease key until you reach the Light brightness (L): desired temperature. • 9L is the brightest setting while 1L is the dimmest one. By default, the temperature digits show the current 5.6 Cellaring temperature. When you tap once or start selecting a new In this mode, the appliance switches to setting, the displayed digits the preset default temperature of 12°C. -
Seite 66: Demo Mode
1. Tap and hold the Cellar Mode and than the set temperature for more than Temperature increase keys 60 minutes. simultaneously for 5 seconds. During the alarm: 2. The display shows Of for 2 seconds • the display shows blinking Hº... - Seite 67 ENGLISH 6.2 Removing and installing Recommended storage temperatures: shelves • For champagne and sparkling wines, between +6°C and +8°C. Removing shelves • For white wines, between +10°C and The bottom part of the shelf is equipped +12°C. with a pair of guides in the middle and a •...
-
Seite 68: Hints And Tips
5. Several times pull the shelf out and push it back into the appliance, then once again press it down firmly, to check if it is hooked correctly on the rails. 6. Push the shelf back into the appliance. -
Seite 69: Cleaning The Interior
ENGLISH 8.2 Cleaning the interior Before using the appliance for the first time, the interior and all internal accessories should be washed with lukewarm water and some neutral soap to remove the typical smell of a brand- new product, then dried thoroughly. CAUTION! Do not use detergents, abrasive powders, chlorine... - Seite 70 9.1 What to do if... Problem Possible cause Solution The appliance does not The appliance is switch‐ Switch on the appliance. operate. ed off. The mains plug is not Connect the mains plug to connected to the mains the mains socket correctly.
-
Seite 71: Replacing The Lamp
ENGLISH Problem Possible cause Solution Water flows inside the Products prevent that Make sure that products do wine cabinet. water flows into the water not touch the rear plate. collector. The temperature in the The temperature regula‐ Set a higher or lower tem‐ wine cabinet is too low or tor is not set correctly. -
Seite 72: Noises
10. NOISES SSSRRR! BRRR! CLICK! HISSS! BLUBB! 11. TECHNICAL DATA The technical information is situated in the rating plate on the internal side of the Voltage 230-240 V appliance and on the energy label. Frequency 50 Hz 12. INFORMATION FOR TEST INSTITUTES... -
Seite 73: Environmental Concerns
ENGLISH Point of Service Morgenstrasse 131 3018 Bern Langgasse 10 9008 St. Gallen Am Mattenhof 4a/b 6010 Kriens Schlossstrasse 1 4133 Pratteln Comercialstrasse 19 7000 Chur Spare parts service Industriestrasse 10, guarantee covers the costs of materials, 5506 Mägenwil, Tel. 0848 848 111 labour and travel. - Seite 76 www.electrolux.com/shop...