Viessmann H0 4511 Bedienungsanleitung
H0 form-vorsignal dreibegriffig, mit zwei antrieben
Inhaltsverzeichnis
Bedienungsanleitung
Operation Manual
4511
H0 Form-Vorsignal
dreibegriffig, mit zwei Antrieben
H0 Semaphore Distant Signal
three-aspect signal, with two drive units
DE
1. Wichtige Hinweise .....................
2. Einleitung ...................................
3. Aufstellung .................................
4. Funktionskontrolle .....................
5. Einbau .......................................
6. Anschluss ..................................
7. Fehlersuche und Abhilfe ............
8. Technische Daten ......................
Abbildungen ...............................
EN
2
1. Important information .................
2
2. Introduction .................................
2
3. Setting up signals .......................
2
4. Checking the function .................
3
5. Installation ..................................
3
6. Connection .................................
3
7. Trouble-shooting .........................
3
8. Technical data ............................
6
Figures .......................................
Innovation,
die bewegt!
4
4
4
4
5
5
5
5
6
Inhaltsverzeichnis

Verwandte Anleitungen für Viessmann H0 4511


Inhaltszusammenfassung für Viessmann H0 4511
-
Seite 1: Inhaltsverzeichnis
Bedienungsanleitung Operation Manual 4511 H0 Form-Vorsignal dreibegriffig, mit zwei Antrieben H0 Semaphore Distant Signal three-aspect signal, with two drive units 1. Wichtige Hinweise ..... 1. Important information ....2. Einleitung ........2. Introduction ......... 3. Aufstellung ......... 3. Setting up signals ....... 4. -
Seite 2: Wichtige Hinweise
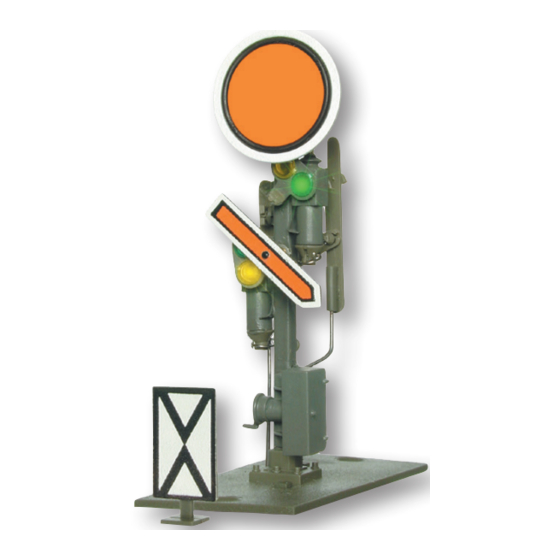
Das vorliegende Formsignal verfügt über zwei elektromagnetische Antriebe, Endlagenabschaltung und einen Kontakt zur Zugbeeinflussung. Viessmann-Formsignale haben sehr filigrane Masten. Daher sollten Sie das Signal nie am Mast anfassen, sondern immer nur an der Bodenplatte bzw. am Antriebszylinder (Abb. 1). Bei einem Ausbau aus der Modellbahnplatte nicht oben ziehen, sondern das Signal unter der Platte am Antriebszylinder greifen und nach oben hinausschieben! 3. -
Seite 3: Einbau
Gleichstrombetrieb: Schließen Sie die beiden gelben Kabel an den Minuspol des Trafos an. 6.1 Analoge Ansteuerung In Abb. 6 zeigen wir Ihnen, wie einfach Sie die dreibegriffigen Formsignale mit Hilfe der Viessmann Tastenstellpulte, Art. 5546 (ohne Rückmeldung) oder Art. 5548 (mit Rückmeldung durch LEDs) anschließen können. Schalter, Taster und Relais anderer Hersteller können Sie auch verwenden. -
Seite 4: Important Information
Manual 2. Introduction Viessmann semaphores stand out for their prototypical slow arm movement and they are simple to mount and connect. This signal has two electromagnetic drive units, en position switch-off and an integrated contact for train control. Viessmann semaphores have finely detailed metal masts (fig. 1). Therefore, you should never grasp the masts but only the drive unit for mounting or dismounting. -
Seite 5: Connection
The semaphore home signals can also be operated with a digital system. Refer to fig. 8 for the correct wiring. When connecting e. g. to the Viessmann Motorola digital decoder, item 5211 (MM) you have to make sure to connect, besides the blue cables for signal control, also the yellow cable (without marker) for power supply. -
Seite 6: Abbildungen
Abb. 1 Abb. 2 Fig. 1 Fig. 2 Halt erwarten Fahrt erwarten Langsamfahrt erwarten expect stop expect proceed expect proceed slowly Abb. 3 Fig. 3 75 m 75 m 100 m 400 m, 700 m oder 1000 m Vorsignalbaken Vorsignal Hauptsignal warning beacons distant signal... - Seite 7 Semaphore signal with two drive units. Steuermodul. Nicht entfernen! Control module. Do not remove! z. B. / e. g. Tasten - Stellpult 5216 Viessmann 5548 Abb. 7 Fig. 7 Diese Maßnahme darf nur im stromlosen Zu- stand ausgeführt werden! Nadel oder dün-...
- Seite 8 Abb. 8 Fig. 8 rot / red braun / brown Viessmann 5211 Magnetartikeldecoder z. B. / e. g. 5211 gelb / yellow Steuermodul. Nicht entfernen! grün / green Control Unit. Do not remove! rot / red 3 x blau / blue...