Herunterladen Inhalt Inhalt Diese Seite drucken
Klarstein COMBO AIR Bedienungsanleitung

Klarstein COMBO AIR Bedienungsanleitung

Heißluftfritteuse und grill

Werbung

Verfügbare Sprachen
  • DE

Verfügbare Sprachen

  • DEUTSCH, seite 1
COMBO AIR
Heißluftfritteuse und Grill
Hot Air Fryer and Grill
Freidora de aire caliente y grill
Friteuse à air chaud et gril
Friggitrice ad aria calda e griglia
10041330 10041331
www.klarstein.com

Werbung

Inhaltsverzeichnis
loading

Inhaltszusammenfassung für Klarstein COMBO AIR

  • Seite 1 COMBO AIR Heißluftfritteuse und Grill Hot Air Fryer and Grill Freidora de aire caliente y grill Friteuse à air chaud et gril Friggitrice ad aria calda e griglia 10041330 10041331 www.klarstein.com...
  • Seite 3: Inhaltsverzeichnis

    Sehr geehrter Kunde, wir gratulieren Ihnen zum Erwerb Ihres Gerätes. Lesen Sie die folgenden Hinweise sorgfältig durch und befolgen Sie diese, um möglichen Schäden vorzubeugen. Für Schäden, die durch Missachtung der Hinweise und unsachgemäßen Gebrauch entstehen, übernehmen wir keine Haftung. Scannen Sie den folgenden QR-Code, um Zugriff auf die aktuellste Bedienungsanleitung und weitere Informationen rund um das Produkt zu erhalten.
  • Seite 4: Sicherheitshinweise

    SICHERHEITSHINWEISE • Überprüfen Sie vor der ersten Verwendung, ob die Spannung Ihrer Steckdose mit der angegebenen Spannung übereinstimmt. • Tauchen Sie das Netzkabel oder das Gerät selbst nicht in Wasser oder andere Flüssigkeiten, um einen Stromschlag zu vermeiden. • Halten Sie Kinder und Haustiere während des Betriebs vom Gerät fern. •...
  • Seite 5 • Das Gerät ist nur für den häuslichen Gebrauch im Innenbereich ausgelegt. • Verwenden Sie das Gerät ausschließlich für den dafür vorgesehenen Verwendungszweck. • Bewahren Sie diese Bedienungsanleitung für den zukünftigen Gebrauch auf. • Kinder ab 8 Jahren, psychisch, sensorisch und körperlich eingeschränkte Menschen dürfen das Gerät nur benutzen, wenn sie vorher von einer für sie verantwortlichen Aufsichtsperson ausführlich mit den Funktionen und den Sicherheitsvorkehrungen vertraut gemacht wurden und die damit...
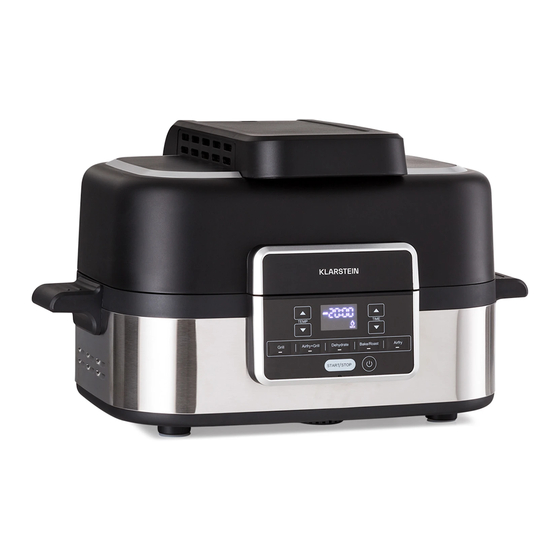
  • Seite 6: Geräteübersicht

    GERÄTEÜBERSICHT Griff Frittierkorb Deckel Innenbehälter Bedienfeld Gehäuse Tragegriff Frittierkorb Innenbehälter...
  • Seite 7: Bedienfeld

    Ölabscheider Frittierkorb + Innenbehälter BEDIENFELD Temperatur (-) Zeit (+) Temperatur (+) Zeit (-) Anzeige „Kein Behälter“ Menüs (mit Anzeige) Stunde/Minute START/STOP LED-Display Ein-/Ausschalttaste Voreingestellte Temperaturstufen...
  • Seite 8: Tastenfunktionen

    TASTENFUNKTIONEN Taste Ein-/Ausschalten Ein-/Ausschalten des Geräts. Taste START/STOP Durch Drücken der Taste START/STOP, kann das Gerät eingeschaltet werden. Wenn sich das Gerät im Betriebsmodus befindet, kann es durch Drücken der Taste START/STOP pausiert werden. Halten Sie die Taste START/STOP gedrückt, um in das aktuelle Menü...
  • Seite 9 Taste Zeit (+) Die Betriebszeit kann durch Drücken der Taste TIME gesteigert werden. Halten Sie die Taste gedrückt, um die Zeit schnell anzupassen. Die Zeit kann nicht angepasst werden, wenn das Gerät den Betrieb startet. Taste Zeit (-) Die Betriebszeit kann durch Drücken der Taste TIME reduziert werden.
  • Seite 10: Vor Der Ersten Verwendung

    VOR DER ERSTEN VERWENDUNG Entfernen Sie vor der ersten Verwendung des Geräts alle Verpackungsmaterialien, Aufkleber und Aufschriften vom Gerät. Entnehmen Sie alle abnehmbaren Geräteteile und reinigen Sie diese in Seifenwasser, spülen Sie diese anschließend mit sauberem Wasser ab und trocknen Sie diese mit einem sauberen Tuch oder Papiertuch. Bringen Sie Geräteteile an und platzieren Sie das Gerät auf einer geeigneten Fläche.
  • Seite 11 Grill Hinweis: Für die Grillfunktion darf nur der Innentopf zum Grillen von Lebensmitteln wie Rindersteak verwendet werden. Öffnen Sie die obere Abdeckung und platzieren Sie den Innentopf im Gehäuse. Stecken Sie den Netzstecker in die Steckdose und drücken Sie die Ein- und Ausschalttaste.
  • Seite 12 Airfry + Grill Hinweis: Für diese Funktion können der Innenbehälter oder der Innenbehälter mit Frittierkorb zum Grillen und Frittieren von Lebensmitteln verwendet werden. Öffnen Sie die obere Abdeckung und platzieren Sie den Innenbehälter in der richtigen Position im Gehäuse. Stecken Sie den Netzstecker des Geräts in die Steckdose und drücken Sie die Ein-/Ausschalttaste.
  • Seite 13 Wenn der Countdown abgeschlossen ist, ist ein Piepton zu hören und das Gerät stoppt den Betrieb automatisch. Hinweis: Nachdem die Speisen gut durchgegart sind, arbeiten die Ventilatoren noch 20 Minuten weiter und hören dann auf zu laufen. Öffnen Sie die obere Abdeckung. Entnehmen Sie die Lebensmittel. Diese können nun serviert werden.
  • Seite 14: Backen Und Rösten

    Hinweis: Die obere Abdeckung muss bei der Funktion „Dehydrate“ geschlossen werden. Andernfalls kann das Gerät den Betrieb nicht starten. Wenn die obere Abdeckung während der Zubereitung geöffnet wird, wird die Zubereitung pausiert. Nach 5 Minuten piept das Gerät, das Gerät stoppt den Betrieb und schaltet sich automatisch aus.
  • Seite 15 Drücken Sie zum Starten des Vorheizens die Taste START/STOP. Auf dem LED-Bildschirm wird das wird die noch verbleibende Zeit angezeigt und der Countdown beginnt. Hinweis: Die obere Abdeckung muss bei der Funktion „Bake/Roast“ geschlossen werden. Andernfalls kann das Gerät den Betrieb nicht starten. Wenn die obere Abdeckung während der Zubereitung geöffnet wird, wird die Zubereitung pausiert.
  • Seite 16: Reinigung Und Pflege

    Hinweis: Wenn Sie die Tasten 3 Sekunden lang gleichzeitig gedrückt halten, können Sie zwischen °C und °F wechseln. Die Temperatur und die Zeit können nicht angepasst werden, nachdem das Gerät den Betrieb gestartet hat. Drücken Sie zum Starten des Vorheizens die Taste START/STOP. Auf dem LED- Bildschirm wird das wird angezeigt.
  • Seite 17 • Reinigen Sie das Gerät keinesfalls mit einer Bürste. • Reinigen Sie das Gerät nicht mit Metallwerkzeugen, um zu vermeiden, dass die Beschichtung beschädigt wird. • Reinigen Sie den Ölabscheider nach dem Gebrauch. Drücken Sie die Verschlüsse des Ölabscheiders, um diesen zu entfernen (siehe Abbildung 2 und 3).
  • Seite 18: Spezielle Entsorgungshinweise Für Verbraucher In Deutschland

    SPEZIELLE ENTSORGUNGSHINWEISE FÜR VERBRAUCHER IN DEUTSCHLAND Entsorgen Sie Ihre Altgeräte fachgerecht. Dadurch wird gewährleistet, dass die Altgeräte umweltgerecht verwertet und negative Auswirkungen auf die Umwelt und menschliche Gesundheit vermieden werden. Bei der Entsorgung sind folgende Regeln zu beachten: • Jeder Verbraucher ist gesetzlich verpflichtet, Elektro- und Elek- tronikaltgeräte (Altgeräte) sowie Batterien und Akkus getrennt vom Hausmüll zu entsorgen.
  • Seite 19 • Bei einem Vertrieb unter Verwendung von Fernkommunikationsmitteln ist die unentgeltliche Abholung am Ort der Abgabe auf Elektro- und Elektronikgeräte der Kategorien 1, 2 und 4 gemäß § 2 Abs. 1 ElektroG, nämlich „Wärmeüberträger“, „Bildschirmgeräte“ (Oberfläche von mehr als 100 cm²) oder „Großgeräte“...
  • Seite 20: Hinweise Zur Entsorgung

    HINWEISE ZUR ENTSORGUNG Wenn es in Ihrem Land eine gesetzliche Regelung zur Entsorgung von elektrischen und elektronischen Geräten gibt, weist dieses Symbol auf dem Produkt oder auf der Verpackung darauf hin, dass dieses Produkt nicht im Hausmüll entsorgt werden darf. Stattdessen muss es zu einer Sammelstelle für das Recycling von elektrischen und elektronischen Geräten gebracht werden.
  • Seite 21: Technical Data

    Dear customer, Congratulations on your purchase. Please read the following instructions carefully and follow them to prevent potential damage. We accept no liability for damage caused by disregarding the instructions and improper use. Please scan the QR code to access the latest operating instructions and further information about the product.
  • Seite 22: Safety Instructions

    SAFETY INSTRUCTIONS • Before using for the first time, check that the voltage of your socket corresponds to the voltage specified. • To avoid electric shock, do not immerse the power cord or the device itself in water or other liquids. •...
  • Seite 23 • The device is designed for domestic use only. • Only use the device for its intended purpose. • Keep these operating instructions for future reference. • Children over 8 years as well as mentally, sensory and physically impaired persons may only use the device if they have been informed in detail about the functions and safety precautions by a supervisor responsible for them beforehand and understand the associated risks.
  • Seite 24: Device Overview

    DEVICE OVERVIEW Handle Frying basket Cover Inner container Control panel Housing Carrying handle Frying basket Inner container...
  • Seite 25: Control Panel

    Oil separator Frying basket + inner container CONTROL PANEL Temperature (-) Time (+) Temperature (+) Time (-) “No container“ display Menus (with indicator) Hour/Minute START/STOP LED display On/off button Preset temperature settings...
  • Seite 26: Button Functions

    BUTTON FUNCTIONS On/off switch: Switches the unit on/off. START/STOP button By pressing the START/STOP button, the unit can be switched on. When the unit is in operating mode, it can be paused by pressing the START/STOP button. Press and hold the START/STOP button to return to the current menu. Display The display flashes for all functions, except the grill function, if no container has been inserted or the lid is not closed properly.
  • Seite 27 Time (+) button The operating time can be increased by pressing the TIME button . Press and hold the button to adjust the time quickly. The time cannot be adjusted once the device starts operation. Time (-) button The operating time can be decreased by pressing the TIME button.
  • Seite 28: Before First Use

    BEFORE FIRST USE Before using the unit for the first time, remove all packaging materials, stickers and labels from the unit. Remove all removable parts of the device and clean them in soapy water, then rinse them with clean water and dry them with a clean cloth or paper towel. Attach unit parts and place the unit on a suitable surface.
  • Seite 29 Grill Note: For the grill function, only the inner pot may be used for grilling food such as beef steak. Open the top cover and place the inner pot in the housing. Insert the mains plug into the socket and press the on/off button. The grill indicator light comes on steadily and the preset temperature setting lights up on the LED screen.
  • Seite 30 Airfry + Grill Note: For this function, the inner container or the inner container with deep- frying basket can be used for grilling and deep-frying food. Open the top cover and place the inner container in the right position in the housing.
  • Seite 31 When the countdown is complete, a beep is heard and the unit stops operating automatically. Note: After food is cooked well, the cooling fans will continue to keep working for 20 minutes and then stop running. Open the top cover. Remove the food. The food can now be served. 10.
  • Seite 32: Baking And Roasting

    Note: The top cover must be closed when using the Dehydrate function. Otherwise, the unit cannot start operation. If the top cover is closed during preparation, preparation is paused. After 5 minutes, the unit beeps, the unit stops operating and switches off automatically. When the countdown is complete, a beep is heard and the unit stops operating automatically.
  • Seite 33 Press the START/STOP button to start preheating. The LED screen displays the remaining time and the countdown starts. Note: The top cover must be closed when using the Bake/Roast function. Otherwise, the unit cannot start operation. If the top cover is closed during preparation, preparation is paused.
  • Seite 34: Cleaning And Care

    Note: If you hold down the buttons simultaneously for 3 seconds, you can switch between °C and °F. The temperature and time cannot be adjusted after the unit has started operation. Press the START/STOP button to start preheating. is displayed on the LED screen.
  • Seite 35 • Never clean the device with a brush. • To avoid damaging the coating, do not clean the device with metal tools. • Clean the oil separator after use. Press the catches of the oil separator to remove it (see figure 2 and 3). The oil separator must be reinserted correctly after cleaning to avoid an insufficient cooking result.
  • Seite 36: Disposal Considerations

    DISPOSAL CONSIDERATIONS If there is a legal regulation in your country regarding the disposal of electrical and electronic equipment, this symbol on the product or on the packaging indicates that this product must not be disposed of with household waste. Instead, it must be taken to a collection point for the recycling of electrical and electronic equipment.
  • Seite 37: Datos Técnicos

    Estimado cliente: Le felicitamos por la adquisición de este producto. Lea atentamente el siguiente manual y siga cuidadosamente las instrucciones de uso con el fin de evitar posibles daños. La empresa no se responsabiliza de los daños ocasionados por un uso indebido del producto o por haber desatendido las indicaciones de seguridad.
  • Seite 38: Indicaciones De Seguridad

    INDICACIONES DE SEGURIDAD • Antes de utilizar el aparato, compruebe que la tensión de la toma de corriente coincida con la indicada en la placa técnica del aparato. • No sumerja el aparato, el cable de alimentación ni el enchufe en agua ni en ningún otro líquido para evitar descargas eléctricas.
  • Seite 39 • El aparato solamente es apto para un uso doméstico y en interiores. • Utilice el aparato solamente para el fi n indicado en este manual. • Conserve este manual de instrucciones para usos posteriores. • Los niños mayores de 8 años y las personas con discapacidad física, sensorial o psíquica pueden utilizar el aparato si han sido previamente instruidos por una persona responsable sobre el funcionamiento del mismo y conocen las funciones, las indicaciones de seguridad y los riesgos asociados.
  • Seite 40: Vista General Del Aparato

    VISTA GENERAL DEL APARATO Cesta para freír Tapa Contenedor interior Panel de control Carcasa Asa de transporte Cesta para freír Contenedor interior...
  • Seite 41: Panel De Control

    Separador de aceite Cesta para freír + recipiente interior PANEL DE CONTROL Temperatura (-) Tiempo (+) Temperatura (+) Tiempo (-) Indicación „Sin contenedor“ Menús (con pantalla) Hora/minuto START/STOP Pantalla LED Botón de encendido/apagado Niveles de temperatura preestablecidos...
  • Seite 42: Funciones De Las Teclas

    FUNCIONES DE LAS TECLAS Tecla encender/apagar Enciende y apaga la unidad. Botón START/STOP Pulsando el botón START/STOP se puede encender el aparato. Cuando la unidad está en modo de funcionamiento, se puede pausar pulsando el botón START/ STOP. Mantenga pulsado el botón START/STOP para volver al menú actual. Indicador El indicador parpadea en todas las funciones, excepto en la función grill, si no se ha introducido ningún recipiente o la tapa no está...
  • Seite 43 Tecla de tiempo (+) El tiempo de funcionamiento se puede aumentar pulsando el botón TIME Mantenga pulsado el botón para ajustar la hora rápidamente. Cuando la unidad comienza a funcionar, la temperatura no puede ser ajustada. Tecla de tiempo (+) El tiempo de funcionamiento se puede aumentar pulsando el botón TIME Mantenga pulsado el botón para ajustar la hora rápidamente.
  • Seite 44: Antes Del Primer Uso

    ANTES DEL PRIMER USO Antes de utilizar el aparato por primera vez, retire todos los materiales de embalaje, adhesivos y etiquetas del aparato. Retira todas las piezas desmontables del aparato y límpielas con agua jabonosa, luego acláralas con agua limpia y sécalas con un paño limpio o una toalla de papel.
  • Seite 45 Grill Nota: Para la función de grill, sólo se puede utilizar la olla interior para asar alimentos como un filete de ternera. Abra la tapa superior y coloque la olla interior en la carcasa. Enchufe la clavija de red en la toma de corriente y pulse el botón de encendido/apagado.
  • Seite 46 Airfry + Grill Nota: Para esta función, se puede utilizar el recipiente interior o el recipiente interior con cesta para freír para asar y freír alimentos. Abra la tapa superior y coloque el recipiente interior en la posición correcta en la carcasa. Introduzca el enchufe del aparato en la toma de corriente y pulse el botón de encendido/apagado.
  • Seite 47 Cuando se completa la cuenta atrás, se oye un pitido y el aparato deja de funcionar automáticamente. Nota: Después de que los alimentos estén bien cocinados, los ventiladores de refrigeración seguirán funcionando durante 20 minutos y luego dejarán de funcionar. Abra la tapa superior.
  • Seite 48 Nota: La tapa superior debe estar abierta cuando se utiliza la función de grill. De lo contrario, la unidad no puede comenzar a funcionar. Si la tapa superior se cierra durante la preparación, ésta se detiene. Después de 5 minutos, el aparato emite un pitido, deja de funcionar y se apaga automáticamente.
  • Seite 49 Pulse la tecla START/STOP para comenzar el precalentamiento. La pantalla LED muestra el tiempo restante y se inicia la cuenta atrás. Nota: La tapa superior debe estar abierta cuando se utiliza la función de "Hornear/asar". De lo contrario, la unidad no puede comenzar a funcionar. Si la tapa superior se cierra durante la preparación, ésta se detiene.
  • Seite 50: Limpieza Y Cuidado

    Nota: Si mantiene pulsados los botones simultáneamente durante 3 segundos, puede cambiar entre °C y °F. La temperatura y la hora no se pueden ajustar después de que la unidad haya comenzado a funcionar. Pulse la tecla START/STOP para comenzar el precalentamiento. En la pantalla de LED aparece el símbolo Nota: La tapa superior debe estar cerrada cuando se utiliza la función de "Airfry".
  • Seite 51 • Nunca limpie el aparato con un cepillo. • No limpie el aparato con herramientas metálicas para no dañar el revestimiento. • Limpia el separador de aceite después de su uso. Presiona los cierres del separador de aceite para retirarlo (ver figura 2 y 3). El separador de aceite debe volver a colocarse correctamente después de la limpieza para evitar un resultado de cocción insuficiente.
  • Seite 52: Indicaciones Sobre La Retirada Del Aparato

    INDICACIONES SOBRE LA RETIRADA DEL APARATO Si en su país existe una disposición legal relativa a la eliminación de aparatos eléctricos y electrónicos, este símbolo estampado en el producto o en el embalaje advierte de que no debe eliminarse como residuo doméstico.
  • Seite 53: Fiche Technique

    Cher client, chère cliente, Toutes nos félicitations pour l’acquisition de ce nouvel appareil. Lisez attentivement les indications suivantes et suivez-les pour éviter d'éventuels dommages. Nous ne saurions être tenus pour responsables des dommages dus au non-respect des consignes et à la mauvaise utilisation de l’appareil.
  • Seite 54: Consignes De Sécurité

    CONSIGNES DE SÉCURITÉ • Avant la première utilisation, vérifiez que la tension de votre prise correspond à la tension spécifiée. • Pour éviter toute décharge électrique, ne plongez pas le cordon d'alimentation ou l'appareil dans l'eau ou dans tout autre liquide. •...
  • Seite 55 • L'appareil est conçu pour un usage domestique en intérieur uniquement. • Utilisez l'appareil uniquement aux fi ns prévues. • Conservez ce mode d'emploi pour vous y référer ultérieurement. • Les enfants à partir de 8 ans et les personnes souff rant de handicaps mentaux, sensoriels et physiques ne peuvent utiliser l'appareil que s'ils ont été...
  • Seite 56: Descriptif De L'appareil

    DESCRIPTIF DE L'APPAREIL Poignée Panier à friture Couvercle cuve intérieure Panneau de commande Boîtier Poignée de transport Panier à friture cuve intérieure...
  • Seite 57: Panneau De Commande

    Séparateur d'huile Panier à friture + cuve intérieure PANNEAU DE COMMANDE Température (-) Temps (+) Température (+) Temps (-) Affichage « pas de récipient » Menus (avec affichage) Heure/minute START/STOP Écran LED Touche marche/arrêt Niveaux de température préréglés...
  • Seite 58: Fonction Des Touches

    FONCTION DES TOUCHES Touche pour allumer / éteindre Pour allumer / éteindre l'appareil. Touche START/STOP En appuyant sur la touche START/STOP, vous mettez l'appareil en marche. Lorsque l'appareil est en mode de fonctionnement, vous pouvez le mettre en pause en appuyant sur la touche START/STOP.
  • Seite 59 Touche Temps (+) Vous pouvez augmenter la durée de fonctionnement en appuyant sur la touche TIME . Maintenez la touche pour ajuster rapidement la durée. Lorsque l'appareil démarre la cuisson, vous ne pouvez plus ajuster la durée. Touche Temps (-) Vous pouvez réduire la durée de fonctionnement en appuyant sur la touche TIME .
  • Seite 60: Avant La Première Utilisation

    AVANT LA PREMIÈRE UTILISATION Avant d'installer l'appareil pour la première fois, retirez tous les matériaux d'emballage, autocollants et étiquettes. Retirez toutes les éléments amovibles de l'appareil et nettoyez-les dans de l'eau savonneuse, puis rincez-les à l'eau propre et séchez-les avec un chiffon propre ou une serviette en papier.
  • Seite 61 Gril Remarque : Pour la fonction gril, seule la cuve intérieure peut être utilisée pour griller des aliments tels que le steak de bœuf. Ouvrez le couvercle supérieur et placez la cuve intérieure dans l'appareil. Branchez la fiche dans la prise et appuyez sur la touche de marche arrêt. Le voyant lumineux du gril s'allume en continu et le réglage de température prédéfini s'allume sur l'écran LED.
  • Seite 62 Airfry + Gril Remarque : pour cette fonction, la cuve intérieure ou la cuve intérieure avec panier à friture peuvent être utilisés pour griller et frire des aliments. Ouvrez le couvercle supérieur et placez la cuve intérieure dans l'appareil dans sa position correcte.
  • Seite 63 Lorsque le compte à rebours est terminé, un bip retentit et l'appareil s'arrête automatiquement. Remarque : Une fois les aliments bien cuits, les ventilateurs de refroidissement continuent de fonctionner pendant 20 minutes, puis s‘arrêtent. Ouvrez le couvercle supérieur. Retirez les aliments. Ceux-ci peuvent maintenant être servis.
  • Seite 64 Remarque : Le couvercle supérieur doit être fermé lors de l'utilisation de la fonction « Dehydrate ». Dans le cas contraire, l'appareil ne peut pas démarrer. Si vous fermez le couvercle supérieur pendant la préparation, celle-ci se met en pause. Après 5 minutes, l‘appareil émet un bip, l‘appareil arrête de fonctionner et s‘éteint automatiquement.
  • Seite 65 Pour démarrer le préchauffage, appuyez sur la touche START / STOP. Le temps restant s'affiche sur l'écran LED et le compte à rebours commence. Remarque : Le couvercle supérieur doit être fermé lors de l'utilisation de la fonction « Bake/Roast ». Dans le cas contraire, l'appareil ne peut pas démarrer. Si vous fermez le couvercle supérieur pendant la préparation, celle-ci se met en pause.
  • Seite 66: Nettoyage Et Entretien

    Remarque : Maintenez simultanément les touches pendant 3 secondes pour passer de °C à °F. La température et la durée ne peuvent plus être modifiées après le démarrage de l'appareil. Pour démarrer le préchauffage, appuyez sur la touche START / STOP. L'écran LED affiche Remarque : Le couvercle supérieur doit être fermé...
  • Seite 67 • Ne nettoyez jamais l'appareil avec une brosse. • Ne nettoyez pas l'appareil avec des outils métalliques afin d'éviter d'endommager le revêtement. • Nettoyez le séparateur d'huile après utilisation. Appuyez sur les bouchons du séparateur d'huile pour le retirer (voir les illustrations 2 et 3). Après le nettoyage, remettez correctement en place le séparateur d'huile afin d'éviter un résultat de cuisson insuffisant.
  • Seite 68: Informations Sur Le Recyclage

    INFORMATIONS SUR LE RECYCLAGE Si l'élimination des appareils électriques et électroniques est réglementée dans votre pays, ce symbole sur le produit ou sur l'emballage indique qu'il ne doit pas être mis au rebut avec les ordures ménagères. Vous devez l'acheminer vers un point de collecte pour le recyclage des appareils électriques et électroniques.
  • Seite 69 Gentile cliente, La ringraziamo per l'acquisto del dispositivo. La preghiamo di leggere attentamente le seguenti indicazioni e di seguirle per prevenire eventuali danni. Non ci assumiamo alcuna responsabilità per danni scaturiti da una mancata osservanza delle avvertenze di sicurezza e da un uso improprio del dispositivo.
  • Seite 70: Avvertenze Di Sicurezza

    AVVERTENZE DI SICUREZZA • Prima di procedere all'utilizzo, verificare che la tensione della presa elettrica corrisponda a quella indicata sulla targhetta del dispositivo. • Non immergere il cavo di alimentazione o il dispositivo in acqua o altri liquidi per evitare scosse elettriche. •...
  • Seite 71 • Il dispositivo è adatto solo all’utilizzo domestico in ambienti chiusi. • Utilizzare il dispositivo solo per gli scopi previsti. • Conservare il manuale d'uso per futuri utilizzi. • Bambini a partire da 8 anni e persone con limitate capacità fi siche, psichiche e sensoriali possono utilizzare il dispositivo solo se sono stati istruiti da una persona responsabile della loro supervisione sulle modalità...
  • Seite 72: Descrizione Del Prodotto

    DESCRIZIONE DEL PRODOTTO Impugnatura Cestello per friggere Coperchio Contenitore interno Pannello di controllo Alloggiamento Impugnatura per il trasporto Cestello per friggere Contenitore interno...
  • Seite 73: Pannello Di Controllo

    Separatore d'olio Cestello per friggere + contenitore interno PANNELLO DI CONTROLLO Temperatura (-) Tempo (+) Temperatura (+) Tempo (-) Indicazione Menu (con display) „Nessun contenitore“ Ora/minuto START/STOP Display a LED Tasto ON/OFF Livelli di temperatura preimpostati...
  • Seite 74: Tasti Funzione

    TASTI FUNZIONE Tasto di accensione/spegnimento: accendere/spegnere il dispositivo. Tasto START/STOP Premendo il tasto START/STOP è possibile accendere il dispositivo. Quando il dispositivo è in modalità operativa, può essere messo in pausa premendo il tasto START/STOP. Tenere premuto START/STOP per accedere al menù attuale. Indicazione Se non è...
  • Seite 75 Tasto Tempo (+) La durata di funzionamento può essere aumentata premendo il tasto TIME Tenere premuto il tasto per regolare rapidamente la durata. Quando il dispositivo entra in funzione, non è possibile regolare la durata. Tasto Tempo (-) La durata di funzionamento può essere diminuita premendo il tasto TIME Tenere premuto il tasto per regolare rapidamente la durata.
  • Seite 76: Prima Di Procedere All'utilizzo

    PRIMA DI PROCEDERE ALL'UTILIZZO Prima di utilizzare il dispositivo per la prima volta, rimuovere tutti i materiali di imballaggio, gli adesivi e le scritte dal dispositivo. Staccare tutte le parti rimovibili del dispositivo e pulirle con acqua e sapone, quindi sciacquarle con acqua pulita e asciugarle con un panno pulito o un tovagliolo di carta.
  • Seite 77 Grill Nota: per la funzione grill, è possibile utilizzare solo la pentola interna per grigliare alimenti come bistecche di manzo. Aprire la copertura superiore e inserire la pentola interna nell'alloggiamento. Inserire la spina nella presa e premere il tasto di accensione/spegnimento. La spia del grill resta accesa costantemente e l'impostazione della temperatura predefinita si illumina sullo schermo LED.
  • Seite 78 Airfry + Grill Nota: per grigliare e friggere gli alimenti con questa funzione, è possibile utilizzare solo il contenitore interno o il contenitore interno con cestello. Aprire la copertura superiore e posizionare correttamente il contenitore interno nell'alloggiamento. Inserire la spina del dispositivo nella presa e premere il tasto di accensione/ spegnimento.
  • Seite 79 Al termine del conto alla rovescia, viene emesso un segnale acustico e il dispositivo si arresta automaticamente. Nota: dopo che il cibo è ben cotto, le ventole di raffreddamento continueranno a funzionare per 20 minuti e poi smetteranno di funzionare. Aprire la copertura superiore.
  • Seite 80 Nota: la copertura superiore deve essere chiusa quando si utilizza la funzione "Dehydrate". In caso contrario, il dispositivo non può avviare la preparazione. Se la copertura superiore viene chiusa durante la preparazione, il processo viene messo in pausa. Dopo 5 minuti, il dispositivo emette un segnale acustico, smette di funzionare e si spegne automaticamente.
  • Seite 81 Premere START/STOP per avviare il preriscaldamento. Lo schermo LED mostra il tempo rimanente e inizia il conto alla rovescia. Nota: la copertura superiore deve essere chiusa quando si utilizza la funzione "Bake/Roast". In caso contrario, il dispositivo non può avviare la preparazione. Se la copertura superiore viene chiusa durante la preparazione, il processo viene messo in pausa.
  • Seite 82: Pulizia E Manutenzione

    Nota: tenendo premuti contemporaneamente i tasti per 3 secondi, è possibile passare da °C a °F. La temperatura e la durata non possono essere regolate dopo aver messo in funzione il dispositivo. Premere START/STOP per avviare il preriscaldamento. Sullo schermo a LED compare Nota: la copertura superiore deve essere chiusa quando si utilizza la funzione "Airfry".
  • Seite 83 • Non pulire mai il dispositivo con una spazzola. • Non pulire il dispositivo con attrezzi metallici per evitare di danneggiare il rivestimento. • Pulire il separatore d'olio dopo l'uso. Premere i fermi del separatore d'olio per rimuoverlo (v. immagini 2 e 3). Il separatore d'olio deve essere reinserito correttamente dopo la pulizia per evitare un risultato di cottura insufficiente.
  • Seite 84: Avviso Di Smaltimento

    AVVISO DI SMALTIMENTO Se nel vostro Paese sono vigenti regolamenti legislativi relativi allo smaltimento di dispositivi elettrici ed elettronici, questo simbolo sul prodotto o sull'imballaggio indica che non è consentito smaltire questo prodotto insieme ai rifiuti domestici. Il dispositivo deve invece essere portato in un centro di raccolta per il riciclaggio di dispositivi elettrici ed elettronici.

Diese Anleitung auch für:

1004133010041331

Inhaltsverzeichnis