Herunterladen Inhalt Inhalt Diese Seite drucken
Panasonic CZ-RWSU2 Bedienungsanleitung

Panasonic CZ-RWSU2 Bedienungsanleitung

Drahtloses fernbedienungssystem
Vorschau ausblenden Andere Handbücher für CZ-RWSU2:
Inhaltsverzeichnis

Werbung

Verfügbare Sprachen
  • DE

Verfügbare Sprachen

  • DEUTSCH, seite 47
Panasonic Corporation
Website: http://panasonic.net/
Authorized representative in EU
Panasonic Testing Centre
Panasonic Marketing Europe GmbH
Winsbergring 15, 22525 Hamburg,
Germany
© Panasonic Corporation 2014
All manuals and user guides at all-guides.com
Save these instructions
Conservez précieusement ces instructions
Diese Anleitung aufbewahren
Conservare le presenti istruzioni
Guarde estas instruções
Φυλάξτε αυτές τις οδηγιες
Guarde estas instrucciones
Сохраните эту инструкцию
Збережіть ці інструкції
Wireless Remote Control System
Système de télécommande à infrarouge
Drahtloses Fernbedienungssystem
Sistema Telecomando Senza Fili
Sistema de telecomando sem fi os
Ασύρματο σύστημα τηλεχειριστηριου
Sistema de control remoto inalámbrico
Беспроводная система дистанционного управления
Бездротова система дистанційного керування
Printed in China
DC1110-81214
85464609072028
CZ-RWSU2
CZ-RWSC3
CZ-RWST2
CZ-RWSY2
CZ-RWSL2
CZ-RWSK2
CZ-RWST3
Operating Instructions
Mode d'emploi
Bedienungsanleitung
Istruzioni per l'uso
Instruções de operação
Oδηγίες λειτουργίας
Instrucciones de funcionamiento
Инструкция по эксплуатации
Посібник з експлуатації
Panasonic Corporation
1006 Kadoma, Kadoma City, Osaka, Japan
CV6233312194
REMOTE CONTROL / TÉLÉCOMMANDE / FERNBEDIENUNG /
TELECOMANDO / TELECOMANDO / ΤΗΛΕΧΕΙΡΙΣΤΗΡΙΟ /
CONTROL REMOTO / ПУЛЬТ ДИСТАНЦИОННОГО УПРАВЛЕНИЯ /
ПУЛЬТ ДИСТАНЦІЙНОГО КЕРУВАННЯ
1
2
EN
3
FR
4
DE
IT
5
PT
GR
6
ES
7
RU
UK
8
9
10
11
12
13
14
15
16

Werbung

Inhaltsverzeichnis
loading

Inhaltszusammenfassung für Panasonic CZ-RWSU2

  • Seite 1 Authorized representative in EU Sistema de control remoto inalámbrico Instrucciones de funcionamiento Panasonic Testing Centre Беспроводная система дистанционного управления Инструкция по эксплуатации Panasonic Marketing Europe GmbH Winsbergring 15, 22525 Hamburg, Germany Бездротова система дистанційного керування Посібник з експлуатації Printed in China ©...
  • Seite 2 All manuals and user guides at all-guides.com Receiver / Récepteur / Empfänger / Ricevitore / Receptor / Δέκτης / Receptor / Приёмник / Приймач CZ-RWSU2 CZ-RWST2 CZ-RWSL2 CZ-RWST3 Display / Affi chage/ Anzeige / Display Visor / Οθόνη Visor / Дисплей / Дисплей...
  • Seite 3: Inhaltsverzeichnis

    All manuals and user guides at all-guides.com Contents 1. Important Safety Instructions ..........EN-2 2. Names and Operations ............EN-3 3. Installing Batteries ..............EN-5 4. Setting the Current Time ............EN-6 5. Operation ................EN-7 6. Timer Operation ..............EN-9 7. Adjusting the Wind Direction ..........EN-11 8.
  • Seite 4: Important Safety Instructions

    All manuals and user guides at all-guides.com 1. Important Safety Instructions Before using the system, be sure to read these • Contact your dealer before moving the system “Important Safety Instructions”. Contact your dealer or a professional service After reading this manual, save it in a convenient provider about moving and reinstalling the system.
  • Seite 5: Names And Operations

    All manuals and user guides at all-guides.com 2. Names and Operations One remote control can control a group of up to eight indoor units. REMOTE CONTROL (See Page EN-12) Operation Display 11. Filter button Displays the operation status. (The fi gure CZ-RWSC3 shows all the statuses.) Press to turn off the fi...
  • Seite 6 All manuals and user guides at all-guides.com 2. Names and Operations (Cont.) Receiver Receiver in conjunction with a wired remote control Receives the signal sent from the remote (sold separately). (Consult with the dealer control. where the product was purchased about making the settings.) Emergency operation button Test/On switch...
  • Seite 7: Installing Batteries

    All manuals and user guides at all-guides.com 3. Installing Batteries 1. Remove the cover. 2. Insert two AAA alkaline batteries. Put the batteries in with the polarity [+/–] as shown in the fi gure. 3. Gently insert one end of an unfolded paper clip (or a similar object that can fi...
  • Seite 8: Setting The Current Time

    All manuals and user guides at all-guides.com 4. Setting the Current Time After changing the batteries and pressing reset, be sure to reset the current time. (When reset is pressed, the current time reverts to [ 1. Press for two seconds or more. Once the clock displays starts blinking, the clock can be set.
  • Seite 9: Operation

    All manuals and user guides at all-guides.com 5. Operation , Heat , Dry , Cool , Fan Auto Models that only provide the cooling function cannot operate in the auto or heating modes. Power: Turn on the power of the indoor unit at least 14 hours before operation.
  • Seite 10 All manuals and user guides at all-guides.com 5. Operation (Cont.) If the unit is not heating very effectively with a Low fan speed , switch the fan speed to High Medium. Depending on the indoor unit being used, it may indicate a function that it does not have. (The fan speed is set.) If you cannot turn the air conditioner off in the normal way.
  • Seite 11: Timer Operation

    All manuals and user guides at all-guides.com 6. Timer Operation • When setting the timer, make sure the current time on the remote control is accurate. • The timer’s clock can only be set when the display of the remote control is ON. •...
  • Seite 12 All manuals and user guides at all-guides.com 6. Timer Operation (Cont.) Combining ON and OFF Timers • Setting the ON and OFF timers, respectively. Checking the timer setting • If you press either for the or the , the scheduled time is displayed for four seconds.
  • Seite 13: Adjusting The Wind Direction

    • When the unit is in heating standby, the fl ap (up-down wind direction plate) faces upward. Also, bear in mind that the fl ap starts swinging after the heating standby mode is released, but the display on the remote control indicates Auto Flap during standby heating as well. CZ-RWSU2/CZ-RWST2/CZ-RWSL2/CZ-RWSY2/ In the Heat Mode Indoor Unit (CZ-RWSK2)/CZ-RWST3 Please face the fl...
  • Seite 14: Operating Multiple In/Outdoor Units Simultaneously

    All manuals and user guides at all-guides.com 7. Adjusting the Wind Direction (Cont.) CZ-RWSC3 The available functions differ depending on the indoor unit being used. The wind direction cannot be set via remote control for any models other than those noted below. For more information, please refer to the users’...
  • Seite 15: Using The Remote Control

    All manuals and user guides at all-guides.com 9. Using the Remote Control • Point the transmitter of the remote control at the receiver. When the signal is received correctly it will beep once. (It beeps twice only when the unit starts operating.) •...
  • Seite 16: Addresses

    All manuals and user guides at all-guides.com 11. Addresses In both multi and single unit installations, when more than one indoor unit is installed in the same room with a compatible remote control, addresses can be set up to avoid crosstalk. By setting the address switches on the receivers and matching them with the number of addresses on the remote control, up to six indoor units can be controlled separately with the remote control.
  • Seite 17 All manuals and user guides at all-guides.com Wireless remote • • • • • controller address display CZ-RWSU2 For 1, 2 and 3, set the switch on the right and for 4, S001 S001 5 and 6, to the left.
  • Seite 18 All manuals and user guides at all-guides.com 11. Addresses (Cont.) Setting Addresses (CZ-RWSY2/CZ-RWSK2) (Setting the address of the indoor unit) 1. First of all, set the address for the remote control with Setting Remote Control Address (See Page EN-14). 2. Press [Emergency Operation] of the indoor unit for four seconds or more.
  • Seite 19: Emergency Operation

    • When the remote control is broken. • When the remote control is lost. Figures: CZ-RWSU2, CZ-RWSY2 and CZ-RWST2/CZ-RWST3 are of receivers (inside indoor unit), CZ-RWSL2 is of the operation panel (inside indoor unit) and Indoor Unit (CZ-RWSK2) is of its front panel.
  • Seite 20 All manuals and user guides at all-guides.com 12. Emergency Operation (Cont.) Note • The Test Run/On and Test/On switches are for use when the unit is installed and test run. It is not for normal use. Stop ALL • If the [Normal/Stop ALL] switch is on , the unit cannot receive signals from the remote control.
  • Seite 21: Miscellaneous Settings

    All manuals and user guides at all-guides.com 13. Miscellaneous Settings A variety of changes can be made to settings, depending on the indoor unit being used. Operation mode indicator, time display (24 hour, AM/PM), Heat Max Temp • (These settings are saved in nonvolatile memory in the remote control, so even when its batteries are changed, the settings do not have to be made again.) •...
  • Seite 22: Before Requesting Service

    All manuals and user guides at all-guides.com 14. Before Requesting Service Before requesting service, please check the followings. Problem Cause Solution The unit doesn’t work even The power to the indoor unit is not ON. Make sure the power to the indoor unit is when is pressed on the remote control.
  • Seite 23: Specifi Cations

    All manuals and user guides at all-guides.com 15. Specifi cations CZ-RWSU2/CZ-RWST2/CZ-RWSC3/CZ-RWSY2/CZ-RWSL2/CZ-RWSK2/CZ-RWST3 Dimensions 182 mm (H) X 61 mm (W) X 18.5 mm (D) Wireless Remote Control Power source Two AAA alkaline batteries Clock Accuracy ±30 seconds per month (at 25 °C)
  • Seite 24 All manuals and user guides at all-guides.com...
  • Seite 25 All manuals and user guides at all-guides.com Table des matières 1. Mesures de sécurité importantes .........FR-2 2. Noms et fonctionnement ............FR-3 3. Installation des batteries ............FR-5 4. Réglage de l’heure actuelle ..........FR-6 5. Fonctionnement ..............FR-7 6. Fonctionnement du minuteur..........FR-9 7. Réglage de la direction de l’air ...........FR-11 8.
  • Seite 26: Mesures De Sécurité Importantes

    All manuals and user guides at all-guides.com 1. Mesures de sécurité importantes Avant d’utiliser le système, prenez connaissance de • Contactez votre revendeur avant de déplacer le système ces « Mesures de sécurité importantes ». Contactez votre revendeur ou un fournisseur Une fois que vous aurez lu le présent manuel, de services professionnels lorsque vous conservez-le précieusement.
  • Seite 27: Noms Et Fonctionnement

    All manuals and user guides at all-guides.com 2. Noms et fonctionnement Une télécommande peut commander un groupe de huit appareils TÉLÉCOMMANDE intérieurs. (Cf. la page FR-12) Affi chage du fonctionnement 11. Touche du fi ltre Affi che l’état de fonctionnement de l’appareil. CZ-RWSC3 (La fi...
  • Seite 28 All manuals and user guides at all-guides.com 2. Noms et fonctionnement (suite) Récepteur Récepteur commutateur doit être sur la télécommande Reçoit le signal envoyé à partir de la principale. Vous pouvez également utiliser télécommande. les deux télécommandes avec une télécommande câblée (vendue séparément). Touche de fonctionnement d’urgence (Consultez le revendeur à...
  • Seite 29: Installation Des Batteries

    All manuals and user guides at all-guides.com 3. Installation des batteries 1. Retirez le couvercle. 2. Insérez deux batteries alcalines de type AAA. Insérez-les en respectant la polarité [+/–] comme indiquée dans la fi gure. 3. Insérez sans forcer l’extrémité d’un trombone (ou un objet semblable) dans le trou de réinitialisation, puis appuyez sur le bouton de réinitialisation situé...
  • Seite 30: Réglage De L'heure Actuelle

    All manuals and user guides at all-guides.com 4. Réglage de l’heure actuelle Une fois que vous avez changé les batteries et appuyé sur le bouton de réinitialisation, assurez-vous que vous remettez l’appareil à l’heure. (Lorsque vous appuyez sur le bouton de réinitialisation, l’heure revient sur [ 1.
  • Seite 31 All manuals and user guides at all-guides.com 5. Fonctionnement , Chauffage , Séchage , Refroidissement , Ventilateur Auto Les modèles qui fournissent uniquement la fonction de refroidissement ne peuvent pas fonctionner en mode Auto ou Chauffage. Alimentation : mettez sous tension l’appareil intérieur au moins 14 heures avant son fonctionnement.
  • Seite 32: Fonctionnement

    All manuals and user guides at all-guides.com 5. Fonctionnement (suite) Si l’appareil ne chauffe pas très effi cacement avec une vitesse de ventilateur Basse, passez-la Haute ou sur Moyenne. Selon l’appareil intérieur qui est utilisé, une fonction peut être indiquée, qu’il ne possède pas. (La vitesse du ventilateur est réglée.) Si vous ne pouvez pas éteindre normalement le climatiseur.
  • Seite 33: Fonctionnement Du Minuteur

    All manuals and user guides at all-guides.com 6. Fonctionnement du minuteur • Lorsque vous réglez le minuteur, assurez-vous que l’heure défi nie sur la télécommande est correcte et précise. • L’horloge du minuteur peut uniquement être réglée lorsque l’affi chage de la télécommande est sur MARCHE.
  • Seite 34 All manuals and user guides at all-guides.com 6. Fonctionnement du minuteur (suite) Association des minuteurs MARCHE et ARRÊT • Réglage des minuteurs MARCHE et ARRÊT, respectivement. Vérifi cation du réglage du minuteur • Si vous appuyez sur ou sur , l’heure prévue s’affi che pendant quatre secondes.
  • Seite 35: Réglage De La Direction De L'air

    Gardez également à l’esprit que le volet commence à bouger une fois que le mode Veille du chauffage est déclenché, mais l’affi chage de la télécommande indique Volet Auto en mode Veille du chauffage. CZ-RWSU2/CZ-RWST2/CZ-RWSL2/CZ-RWSY2/ En mode Chauffage Appareil intérieur (CZ-RWSK2)/CZ-RWST3 Veuillez positionnez le volet (plaque de direction de l’air bidirectionnelle)
  • Seite 36: Fonctionnement Simultané De Plusieurs Appareils Intérieurs/ Extérieurs

    All manuals and user guides at all-guides.com 7. Réglage de la direction de l’air (suite) CZ-RWSC3 Les fonctions disponibles diffèrent selon l’appareil intérieur que vous utilisez. La direction de l’air ne peut pas être réglée via une télécommande pour les modèles autres que ceux qui sont indiqués ci- dessous.
  • Seite 37: Utilisation De La Télécommande

    All manuals and user guides at all-guides.com 9. Utilisation de la télécommande • Pointez le transmetteur de la télécommande sur le récepteur. Lorsque le signal est correctement reçu, il bipera une fois. (Il bipe deux fois seulement lorsque le fonctionnement de l’appareil démarre.) •...
  • Seite 38 All manuals and user guides at all-guides.com 11. Addresses Dans les installations d’appareil unique ou de plusieurs appareilslorsque plusieurs appareils intérieurs sont installés dans la même pièce avec une télécommande compatible, vous pouvez défi nir des adresses afi n d’éviter un écho magnétique. En défi...
  • Seite 39 Affi chage de l’adresse de la • • • • • télécommande sans fi l CZ-RWSU2 Pour 1, 2 et 3, défi nissez le commutateur sur la droite et pour 4, 5 et 6, S001 S001 défi nissez-le sur la gauche.
  • Seite 40: Adresses

    All manuals and user guides at all-guides.com 11. Adresses (suite) Défi nition des adresses (CZ-RWSY2/CZ-RWSK2) (Défi nition de l’adresse de l’appareil intérieur) 1. Tout d’abord, défi nissez l’adresse de la télécommande en suivant les instructions de la section Défi nition des adresses de la télécommande (Cf. la page FR-14). 2.
  • Seite 41: Fonctionnement D'urgence

    • Lorsque la télécommande est cassée. • Lorsque la télécommande est perdue. Figures : CZ-RWSU2, CZ-RWSY2 et CZ-RWST2/CZ-RWST3 sont pour les récepteurs (dans l’appareil intérieur), CZ-RWSL2 est pour le panneau de commande (dans l’appareil intérieur) et l’appareil intérieur (CZ-RWSK2) est pour le panneau avant.
  • Seite 42 All manuals and user guides at all-guides.com 12. Fonctionnement d’urgence (suite) Remarque • Les commutateurs Opération de test/Marche (Test Run/On) et Test/Marche doivent être utilisés lorsque l’appareil est installé et qu’un test est en cours, mais pas lors de l’utilisation normale. Arrêter TOUT (Stop ALL) •...
  • Seite 43: Réglages Divers

    All manuals and user guides at all-guides.com 13. Réglages divers Différentes modifi cations peuvent être apportées aux paramètres en fonction de l’appareil intérieur qui est utilisé. Indicateur du mode de fonctionnement, affi chage de l’heure (format 24 heures, matin/après-midi), temp. de chauffage max •...
  • Seite 44: Avant Toute Demande D'intervention

    All manuals and user guides at all-guides.com 14. Avant toute demande d’intervention Avant toute demande d’intervention, vérifi ez les points suivants. Problème Origine Solution L’appareil ne fonctionne pas L’alimentation de l’appareil intérieur n’est Assurez-vous que l’alimentation de même lorsque vous appuyez sur pas sur MARCHE.
  • Seite 45: Spécifi Cations

    All manuals and user guides at all-guides.com 15. Spécifi cations CZ-RWSU2/CZ-RWST2/CZ-RWSC3/CZ-RWSY2/CZ-RWSL2/CZ-RWSK2/CZ-RWST3 Dimensions 182 mm (H) x 61 mm (l) x 18,5 mm (P) Télécommande à infrarouge Source d’énergie Deux batteries alcalines AAA Précision de l’horloge ±30 secondes par mois (à 25 °C)
  • Seite 46 All manuals and user guides at all-guides.com...
  • Seite 47 All manuals and user guides at all-guides.com Inhalt 1. Wichtige Sicherheitshinweise ..........DE-2 2. Bezeichnungen und Funktionen ...........DE-3 3. Einlegen der Batterien............DE-5 4. Einstellen der aktuellen Uhrzeit ..........DE-6 5. Bedienung ................DE-7 6. Betrieb über Zeitschaltuhr ............DE-9 7. Einstellen der Luftlussrichtung ...........DE-11 8.
  • Seite 48: Wichtige Sicherheitshinweise

    All manuals and user guides at all-guides.com 1. Wichtige Sicherheitshinweise Bevor Sie das System verwenden, sollten Sie den • Wenden Sie sich an Ihren Händler, bevor Sie das System bewegen. Abschnitt "Wichtige Sicherheitsanweisungen" lesen. Wenden Sie sich an Ihren Händler oder einen Bewahren Sie danach diese Anleitung an einem professionellen Dienstleister, der das System an sicheren Ort auf.
  • Seite 49: Bezeichnungen Und Funktionen

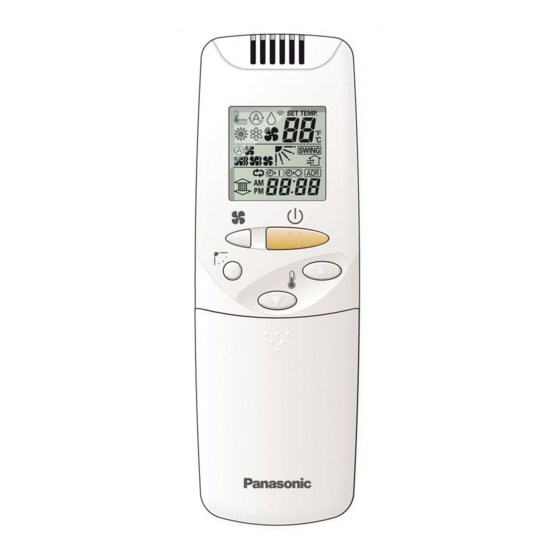
    All manuals and user guides at all-guides.com 2. Bezeichnungen und Funktionen Eine Fernbedienung kann eine Gruppe von bis zu acht FERNBEDIENUNG Raumeinheiten steuern. (Siehe Seite DE-12) Betriebsanzeige 11. Taste Filter Zeigt den Betriebsstatus an. (In der CZ-RWSC3 Abbildung werden alle Anzeigen dargestellt.) Drücken Sie die Taste, um die Filterlampe •...
  • Seite 50: Empfänger

    All manuals and user guides at all-guides.com 2. Bezeichnungen und Funktionen (Fortsetzung) Empfänger Empfänger Im Normalbetrieb sollte dies auf Empfängt das von der Fernbedienung Hauptfernbedienung eingestellt sein. Mit gesendete Signal. einer Kabelfernbedienung (getrennt erhältlich) können beide Funktionen Taste Notbetrieb zusammen verwendet werden. (Wenden Sie Anzeigelampen sich hinsichtlich den Einstellungen an den Tritt ein Fehler auf, leuchtet eine der Lampen.
  • Seite 51: Einlegen Der Batterien

    All manuals and user guides at all-guides.com 3. Einlegen der Batterien 1. Entfernen Sie die Abdeckung. 2. Legen Sie zwei AAA-Alkali-Batterien ein. Legen Sie die Batterien gemäß der abgebildeten Polung [+/–] ein. 3. Stecken Sie die Spitze einer aufgebogenen Büroklammer (oder ein ähnliches, passendes Objekt) in die Reset-Öffnung, drücken Sie die Taste Zurücksetzen im Inneren der Öffnung und Reset-...
  • Seite 52: Einstellen Der Aktuellen Uhrzeit

    All manuals and user guides at all-guides.com 4. Einstellen der aktuellen Uhrzeit Nachdem Sie die Batterien ausgetauscht und die Taste Zurücksetzen gedrückt haben, müssen Sie die aktuelle Zeit neu einstellen. (Wenn die Taste Zurücksetzen gedrückt wurde, wird die aktuelle Zeit auf [ ] zurückgestellt.) 1.
  • Seite 53: Bedienung

    All manuals and user guides at all-guides.com 5. Bedienung , Heizen , Trocknen , Kühlen , Ventilator Auto Bei Modelle, die nur über die Kühl-Funktion verfügen, können die Modi Auto oder Heizen nicht betrieben werden. Stromversorgung: Schalten Sie die Stromversorgung der Raumeinheit mindestens 14 Stunden vor Inbetriebnahme ein.
  • Seite 54 All manuals and user guides at all-guides.com 5. Bedienung (Fortsetzung) Wenn das Gerät in der Einstellung Niedrige Ventilatorgeschwindigkeit nicht sehr gut heizt, schalten Sie die Ventilatorgeschwindigkeit auf Hoch oder Mittel. Je nach verwendeter Raumeinheit, kann eine nicht vorhandene Funktion angezeigt werden. (Die Ventilatorgeschwindigkeit ist eingestellt.) Wenn das Klimagerät nicht normal ausgeschaltet werden kann.
  • Seite 55: Betrieb Über Zeitschaltuhr

    All manuals and user guides at all-guides.com 6. Betrieb über Zeitschaltuhr • Wenn Sie die Zeitschaltuhr einstellen, vergewissern Sie sich, dass die aktuelle Uhrzeit auf der Fernbedienung korrekt ist. • Die Uhrzeit der Zeitschaltuhr kann nur eingestellt werden, wenn die Anzeige der Fernbedienung eingeschaltet ist (EIN).
  • Seite 56: Überprüfen Der Zeitschaltuhr-Einstellung

    All manuals and user guides at all-guides.com 6. Betrieb über Zeitschaltuhr (Fortsetzung) Kombinieren der Zeitschaltuhr EIN und AUS • Einstellen der Zeitschaltuhr EIN und Zeitschaltuhr AUS. Überprüfen der Zeitschaltuhr-Einstellung • Wenn Sie entweder der Tasten oder drücken, wird die eingestellte Zeit vier Sekunden lang angezeigt.
  • Seite 57: Raumeinheit (Cz-Rwsk2)/Cz-Rwst3 Einstellen Der Luftlussrichtung

    Vergessen Sie auch nicht, dass die Lamelle zu schwenken beginnt, wenn der Heiz-Bereitschaftsmodus ausgelöst wird, dass aber auf der Anzeige der Fernbedienung während der Heizbereitschaft ebenfalls Auto Lamellen erscheint. CZ-RWSU2/CZ-RWST2/CZ-RWSL2/CZ-RWSY2/ Raumeinheit (CZ-RWSK2)/CZ-RWST3 Einstellen der Luftlussrichtung Jedes Mal, wenn Sie während des Betriebs drücken,...
  • Seite 58: Gleichzeitiger Betrieb Mehrerer Raum-/Außeneinheiten

    All manuals and user guides at all-guides.com 7. Einstellen der Luftlussrichtung (Fortsetzung) CZ-RWSC3 Die verfügbaren Funktionen unterscheiden sich je nach verwendeter Raumeinheit. Die Luftlussrichtung kann nur für die unten genannten Modelle per Fernbedienung eingestellt werden. Einzelheiten entnehmen Sie bitte dem mit der Raumeinheit mitgelieferten Benutzerhandbuch. Modelle mit 4-Wege-Deckenkassette, Modelle mit 2-Wege-Deckenkassette, Modelle mit 1-Weg-Deckenkassette für hohe decken, Modelle für abgehängte Decken, Wandmodelle Nähere Einzelnheiten entnehmen Sie den Abschnitten Einstellen der Luftlussrichtung und Lamellen-...
  • Seite 59: Verwenden Der Fernbedienung

    All manuals and user guides at all-guides.com 9. Verwenden der Fernbedienung • Richten Sie den Sender der Fernbedienung auf den Empfänger. Wird das Signal korrekt empfangen, wird ein Signalton ausgegeben. (Zwei Signaltöne werden nur dann ausgegeben, wenn das Gerät den Betrieb aufnimmt.) •...
  • Seite 60: Adressen

    All manuals and user guides at all-guides.com 11. Adressen Sowohl bei Mehrgeräte- als auch bei Einzelgeräte-Installationen ist es möglich - wenn sich mehr als eine Raumeinheit im selben Raum mit einer kompatiblen Fernbedienung befi nden - Adressen einzustellen, die Nebensignaleffekte verhindern. Durch die Einstellung der Adressschalter auf den Empfängern und ihrer Zuweisung zu der Anzahl von Adressen auf der Fernbedienung, können bis zu sechs Raumeinheiten separat mit der Fernbedienung gesteuert werden.
  • Seite 61 All manuals and user guides at all-guides.com Adressenanzeige der kabellosen • • • • • Fernbedienung CZ-RWSU2 Für 1, 2 und 3 stellen Sie den Schalter auf Rechts und S001 S001 für 4, 5 und 6 auf Links. Empfang ist in allen...
  • Seite 62 All manuals and user guides at all-guides.com 11. Adressen (Fortsetzung) Einstellen der Adressen (CZ-RWSY2/CZ-RWSK2) (Einstellen der Adresse der Raumeinheit) 1. Als Erstes stellen Sie die Adresse für die Fernbedienung anhand des Abschnitts "Einstellen der Fernbedienungsadressen" ein (Siehe Seite DE-14). 2. Drücken Sie vier Sekunden oder länger [Notbetrieb] der Raumeinheit.
  • Seite 63: Notbetrieb

    • Wenn die Batterien der Fernbedienung versagen. • Wenn die Fernbedienung kaputt ist. • Wenn die Fernbedienung verloren gegangen ist. Zahlen: CZ-RWSU2, CZ-RWSY2 und CZ-RWST2/CZ-RWST3 sind von Empfängern (in der Raumeinheit), CZ-RWSL2 ist von einem Bedienfeld (In der Raumeinheit) und Raumeinheit (CZ-RWSK2) ist von der Frontplatte.
  • Seite 64: Drücken Sie [Notbetrieb]

    All manuals and user guides at all-guides.com 12. Notbetrieb (Fortsetzung) Anmerkung • Die Schalter Testlauf/Ein (Test Run/On) und Test/Ein (Test/On) werden verwendet, wenn das Gerät installiert und einem Testlauf unterzogen wird. Sie werden nicht für den Normalbetrieb benötigt. ALLE stoppen (Stop ALL) •...
  • Seite 65: Sonstige Einstellungen

    All manuals and user guides at all-guides.com 13. Sonstige Einstellungen Je nach verwendeter Raumeinheit können eine Vielzahl von Änderungen an den Einstellungen vorgenommen werden. Betriebsmodus-Anzeige, Uhrzeit-Anzeige (24 Stunden, AM/PM), Heizen Max. Temp • (Diese Einstellungen werden in einem permanenten Speicher der Fernbedienung abgelegt, und müssen, selbst wenn die Batterien ausgetauscht werden, nicht nochmals durchgeführt werden.) •...
  • Seite 66: Vor Der Kundendienstanfrage

    All manuals and user guides at all-guides.com 14. Vor der Kundendienstanfrage Vor der Kundendienstanfrage überprüfen Sie bitte Folgendes. Problem Ursache Lösung Das Gerät funktioniert nicht, Die Stromversorgung der Raumeinheit ist Stellen Sie sicher, dass die nicht auf EIN eingestellt. Stromversorgung der Raumeinheit ist auf selbst wenn auf der EIN eingestellt ist.
  • Seite 67: Technische Daten

    All manuals and user guides at all-guides.com 15. Technische Daten CZ-RWSU2/CZ-RWST2/CZ-RWSC3/CZ-RWSY2/CZ-RWSL2/CZ-RWSK2/CZ-RWST3 Abmessungen 182 mm (H) X 61 mm (B) X 18,5 mm (T) Drahtlose Fernbedienung Stromversorgung Zwei AAA-Alkali-Batterien Uhr-Präzision ±30 Sekunden pro Monat (bei 25 °C) CZ-RWSU2/CZ-RWST2/CZ-RWSC3/CZ-RWSY2/CZ-RWST3 CZ-RWSU2 200 mm (H) X 200 mm (B) X 25 mm (T)
  • Seite 68 All manuals and user guides at all-guides.com...
  • Seite 69 All manuals and user guides at all-guides.com Contenuti 1. Istruzioni Importanti sulla Sicurezza ........IT-2 2. Nomi e Funzioni ..............IT-3 3. Installazione delle Batterie ............. IT-5 4. Impostazione dell’Ora Corrente ..........IT-6 5. Funzionamento ..............IT-7 6. Funzionamento del Timer ............IT-9 7.
  • Seite 70: Istruzioni Importanti Sulla Sicurezza

    All manuals and user guides at all-guides.com 1. Istruzioni Importanti sulla Sicurezza Prima di utilizzare il sistema, assicuratevi di leggere servizio professionale per quanto riguarda lo queste “Istruzioni Importanti sulla Sicurezza”. spostamento e la reinstallazione del sistema. Dopo aver letto il presente manuale, conservatelo Potrebbero verifi...
  • Seite 71: Nomi E Funzioni

    All manuals and user guides at all-guides.com 2. Nomi e Funzioni Un telecomando è in grado di controllare fi no a un gruppo di otto TELECOMANDO apparecchi interni. (Vedere Pagina IT-12) 11. Pulsante fi ltro Display di Funzionamento Visualizza lo stato di funzionamento. (La CZ-RWSC3 fi...
  • Seite 72 All manuals and user guides at all-guides.com 2. Nomi e Funzioni (Cont.) Ricevitore Ricevitore Telecomando, telecomando principale / Riceve il segnale inviato dal telecomando. secondario, interruttore Nell’uso normale, questo dovrebbe essere Pulsante funzionamento di emergenza sul telecomando, principale. E’ inoltre Spie del display possibile usare entrambi insieme ad un Quando si verifi...
  • Seite 73: Installazione Delle Batterie

    All manuals and user guides at all-guides.com 3. Installazione delle Batterie 1. Rimuovere il coperchio. 2. Inserire due batterie alcaline formato AAA. Inserire le batterie con la polarità [+/–] come indicato in fi gura. 3. Inserire delicatamente un’estremità di una graffetta non piegata (o un oggetto simile che possa entrare) nel foro di Reimpostazione e premere il pulsante di reimpostazione all’interno...
  • Seite 74: Impostazione Dell'ora Corrente

    All manuals and user guides at all-guides.com 4. Impostazione dell’Ora Corrente Dopo aver sostituito le batterie e aver premuto reimpostazione, assicurarsi di reimpostare l’ora corrente. (Quando viene premuto il pulsante reimpostazione, l’ora corrente torna 1. Premere per due secondi o più. Una volta che il display dell’orologio inizia a lampeggiare, è...
  • Seite 75 All manuals and user guides at all-guides.com 5. Funzionamento , Riscaldamento , Deumidifi cazione , Raffreddamento , Ventilatore Automatico I modelli che offrono solo la funzione di raffreddamento non possono essere utilizzati nelle modalità automatico o riscaldamento. Alimentazione: Attivare l’alimentazione dell’apparecchio interno almeno 14 ore prima del funzionamento.
  • Seite 76: Funzionamento

    All manuals and user guides at all-guides.com 5. Funzionamento (Cont.) Se l’apparecchio non si riscalda in maniera effi cace con la velocità del ventilatore Bassa , cambiare la velocità del ventilatore su Alta Media. A seconda dell’apparecchio interno che viene utilizzato, può indicare una funzione che non ha. (Viene impostata la velocità...
  • Seite 77: Funzionamento Del Timer

    All manuals and user guides at all-guides.com 6. Funzionamento del Timer • Durante l’impostazione del timer, assicurarsi che l’ora corrente sul telecomando sia precisa. • L’orologio del timer può essere impostato solamente quando il display del telecomando è acceso. • Dopo aver impostato il timer, mettere il telecomando in un luogo dove il suo segnale raggiungerà il ricevitore dell’apparecchio interno.
  • Seite 78 All manuals and user guides at all-guides.com 6. Funzionamento del Timer (Cont.) Combinazione di Timer ON e OFF • Impostazione dei timer ON e OFF, rispettivamente. Controllare l’impostazione del timer • Se premete o per il , l’ora programmata viene visualizzata per quattro secondi. •...
  • Seite 79: Regolazione Della Direzione Del Vento

    è rivolto verso l’alto. Inoltre, tenete a mente che il defl ettore inizia ad oscillare dopo che viene rilasciata la modalità di standby del riscaldamento, ma il telecomando indica Defl ettore Automatico anche durante lo standby del riscaldamento. CZ-RWSU2/CZ-RWST2/CZ-RWSL2/CZ-RWSY2/ Apparecchio Interno (CZ-RWSK2)/CZ-RWST3 Impostare la Direzione del Vento Nella Modalità...
  • Seite 80: Funzionamento Simultaneo Di Apparecchi Interni/Esterni Multipli

    All manuals and user guides at all-guides.com 7. Regolazione della Direzione del Vento (Cont.) CZ-RWSC3 Le funzioni disponibili variano a seconda dell’apparecchio interno utilizzato. E’ impossibile impostare la direzione del vento tramite il telecomando per modelli diversi da quelli specifi cati di sotto.
  • Seite 81: Utilizzo Del Telecomando

    All manuals and user guides at all-guides.com 9. Utilizzo del Telecomando • Puntare il trasmettitore del telecomando al ricevitore. Quando il segnale viene ricevuto correttamente, emetterà un segnale acustico una volta. (Emette un segnale acustico due volte solo quando l’apparecchio inizia a funzionare.) •...
  • Seite 82: Indirizzi

    All manuals and user guides at all-guides.com 11. Indirizzi Sia nelle installazioni multiple che singole, quando viene installato più di un apparecchio interno nella stessa stanza con un telecomando compatibile, è possibile confi gurare gli indirizzi per evitare diafonia. Impostando gli interruttori di indirizzo sui ricevitori e facendoli corrispondere con il numero di indirizzi sul telecomando, è...
  • Seite 83 All manuals and user guides at all-guides.com Display dell’indirizzo del • • • • • telecomando senza fi li CZ-RWSU2 Per 1, 2 e 3, impostare l’interruttore a destra e per S001 S001 4, 5 e 6, a sinistra. La ricezione è...
  • Seite 84 All manuals and user guides at all-guides.com 11. Indirizzi (Cont.) Impostazione degli Indirizzi (CZ-RWSY2/CZ-RWSK2) (Impostazione dell’indirizzo dell’apparecchio interno) 1. Prima di tutto, impostare l’indirizzo per il telecomando con Impostare l’Indirizzo del Telecomando (Vedere Pagina IT-14). 2. Premere [Funzionamento di Emergenza] dell’apparecchio interno per quattro o più...
  • Seite 85: Funzionamento Di Emergenza

    • Quando il telecomando è rotto. • Quando il telecomando è stato perduto. Figure: CZ-RWSU2, CZ-RWSY2 e CZ-RWST2/CZ-RWST3 sono dei ricevitori (all’interno dell’apparecchio interno), CZ-RWSL2 è del pannello di comando (all’interno dell’apparecchio interno) e Apparecchio Interno (CZ-RWSK2) è del suo pannello frontale.
  • Seite 86 All manuals and user guides at all-guides.com 12. Funzionamento di Emergenza (Cont.) Nota • Gli interruttori Collaudo/Acceso e Prova/Acceso (Test Run/On and Test/On switches) sono per l’uso quando l’apparecchio viene installato e collaudato. Non è per l’uso normale. Interrompi TUTTO (Stop ALL) •...
  • Seite 87: Impostazioni Varie

    All manuals and user guides at all-guides.com 13. Impostazioni Varie E’ possibile eseguire una serie di modifi che alle impostazioni, a seconda dell’apparecchio interno utilizzato. Indicatore della modalità di funzionamento, display dell’ora (24 ore, AM/PM), Max Temp Riscaldamento • (Queste impostazioni sono salvate nella memoria non volatile nel telecomando, quindi anche quando le batterie vengono sostituite, le impostazioni non devono essere eseguite nuovamente.) •...
  • Seite 88: Prima Di Richiedere Assistenza

    All manuals and user guides at all-guides.com 14. Prima di Richiedere Assistenza Prima di richiedere assistenza, si prega di verifi care i seguenti punti. Problema Causa Soluzione L’apparecchio non funziona L’alimentazione dell’apparecchio interno non Assicurarsi che l’alimentazione anche quando viene è...
  • Seite 89: Specifi Che

    All manuals and user guides at all-guides.com 15. Specifi che CZ-RWSU2/CZ-RWST2/CZ-RWSC3/CZ-RWSY2/CZ-RWSL2/CZ-RWSK2/CZ-RWST3 Dimensioni 182 mm (A) X 61 mm (L) X 18,5 mm (P) Telecomando senza fi li Alimentazione Due batterie alcaline AAA Precisione dell’Orologio ±30 secondi al mese (a 25 °C)
  • Seite 90 All manuals and user guides at all-guides.com...
  • Seite 91 All manuals and user guides at all-guides.com Índice 1. Instruções de segurança importantes ........PT-2 2. Nomes e operações ..............PT-3 3. Instalar as pilhas ..............PT-5 4. Acertar a hora ...............PT-6 5. Funcionamento ..............PT-7 6. Funcionamento do temporizador ..........PT-9 7. Ajustar a direcção da ventilação .........PT-11 8.
  • Seite 92: Instruções De Segurança Importantes

    All manuals and user guides at all-guides.com 1. Instruções de segurança importantes Antes de utilizar o sistema, certifi que-se de que lê • Contacte o seu representante antes de transportar o sistema estas "Instruções de segurança importantes". Contacte o seu representante ou um fornecedor Após ler este manual, guarde-o num local conveniente.
  • Seite 93: Nomes E Operações

    All manuals and user guides at all-guides.com 2. Nomes e operações Um telecomando pode controlar um grupo de até oito unidades TELECOMANDO interiores. (Consultar a Página PT-12) Visor 11. Botão de fi ltro Apresenta o estado operacional. (A imagem CZ-RWSC3 apresenta todos os estados.) Prima para desligar a luz avisadora do fi...
  • Seite 94 All manuals and user guides at all-guides.com 2. Nomes e operações (Cont.) Receptor Receptor Telecomando, principal / telecomando, Recebe o sinal enviado a partir do secundário, interruptor telecomando. Em utilização normal deve estar em telecomando, principal. Também é possível Botão do funcionamento de emergência utilizar ambos em conjunto com um Luzes avisadoras do visor telecomando com fi...
  • Seite 95: Instalar As Pilhas

    All manuals and user guides at all-guides.com 3. Instalar as pilhas 1. Retire a tampa. 2. Introduza duas pilhas alcalinas AAA. Coloque as pilhas com a polaridade [+/–] tal como ilustrado. 3. Insira suavemente uma extremidade de um clipe de papel não dobrado (ou um objecto semelhante que caiba) no orifício de reiniciação e prima o botão de reiniciação no interior do orifício e volte a colocar a tampa.
  • Seite 96: Acertar A Hora

    All manuals and user guides at all-guides.com 4. Acertar a hora Após substituir as pilhas e premir o botão de reiniciar, certifi que-se de que reinicia a hora actual. (Quando for premido o botão de reiniciação, a hora actual reverte para 1.
  • Seite 97 All manuals and user guides at all-guides.com 5. Funcionamento , Calor , Seco , Frio , Ventilador Auto Os modelos que apenas fornecem a função de arrefecimento não podem funcionar nos modos auto ou de aquecimento. Alimentação: Ligue a alimentação da unidade interior pelo menos 14 horas antes de utilizar.
  • Seite 98: Funcionamento

    All manuals and user guides at all-guides.com 5. Funcionamento (Cont.) Se a unidade não estiver a aquecer de forma efi caz com uma velocidade do ventilador Baixa , mude a velocidade do ventilador para Alta Média. Consoante a unidade interior a ser utilizada, poderá indicar uma função que não tem. (A velocidade do ventilador é...
  • Seite 99: Funcionamento Do Temporizador

    All manuals and user guides at all-guides.com 6. Funcionamento do temporizador • Quando defi nir o temporizador, certifi que-se de que a hora actual no telecomando está precisa. • O relógio do temporizador apenas pode ser defi nido quando o visor no telecomando está ligado. •...
  • Seite 100 All manuals and user guides at all-guides.com 6. Funcionamento do temporizador (Cont.) Combinar os temporizadores Ligar e Desligar • Defi nir os temporizadores Ligar e Desligar, respectivamente. Verifi car a defi nição do temporizador • Se premir para o ou o , a hora programada será...
  • Seite 101: Ajustar A Direcção Da Ventilação

    Além disso, tenha em conta que a aba começa a oscilar após o modo de standby de aquecimento ser desactivado, mas o visor no telecomando indica Auto Flap igualmente durante o aquecimento em standby. CZ-RWSU2/CZ-RWST2/CZ-RWSL2/CZ-RWSY2/ No modo de aquecimento Unidade interior (CZ-RWSK2)/CZ-RWST3 Coloque a aba (chapa de direcção...
  • Seite 102: Utilizar Múltiplas Unidades Interiores/Exteriores Em Simultâneo

    All manuals and user guides at all-guides.com 7. Ajustar a direcção da ventilação (Cont.) CZ-RWSC3 As funções disponíveis são diferentes, consoante a unidade interior que estiver a ser utilizada. A direcção da ventilação não pode ser defi nida através do telecomando para quaisquer outros modelos além dos indicados em baixo.
  • Seite 103: Utilizar O Telecomando

    All manuals and user guides at all-guides.com 9. Utilizar o telecomando • Aponte o transmissor do telecomando ao receptor. Quando o sinal for correctamente recebido, emitirá um aviso acústico. (emite dois avisos acústicos apenas quando a unidade começar a funcionar.) •...
  • Seite 104: Endereços

    All manuals and user guides at all-guides.com 11. Endereços Nas instalações múltiplas e simples, quando está instalada mais do que uma unidade interior na mesma divisão com um telecomando compatível, os endereços podem ser confi gurados para evitar cruzamentos. Ao confi gurar os interruptores de endereços nos receptores e fazendo-os corresponder com o número de endereços no telecomando, podem ser controladas até...
  • Seite 105 All manuals and user guides at all-guides.com Visualização do endereço do • • • • • telecomando sem fi os CZ-RWSU2 Para 1, 2 e 3, coloque o interruptor à direita e S001 S001 para 4, 5 e 6, à esquerda.
  • Seite 106 All manuals and user guides at all-guides.com 11. Endereços (Cont.) Defi nir endereços (CZ-RWSY2/CZ-RWSK2) (defi nir o endereço da unidade interior) 1. Em primeiro lugar, confi gure o endereço do telecomando com Defi nir o endereço do telecomando (Consultar a página PT-14). 2.
  • Seite 107: Funcionamento De Emergência

    • Quando o telecomando estiver avariado. • Quando o telecomando estiver perdido. Ilustrações: CZ-RWSU2, CZ-RWSY2 e CZ-RWST2/CZ-RWST3 são de receptores (dentro da unidade interior), CZ-RWSL2 é do painel de comando (dentro da unidade interior) e Unidade interior (CZ-RWSK2) é do respectivo painel dianteiro.
  • Seite 108 All manuals and user guides at all-guides.com 12. Funcionamento de emergência (Cont.) Nota • Os interruptores Funcionamento de teste/Ligar (Test Run/On) e Teste/Ligar (Test/On) devem ser utilizados quando a unidade é instalada e para um funcionamento de teste. Não se destina a uma utilização normal. Parar tudo (Stop ALL) •...
  • Seite 109: Defi Nições Diversas

    All manuals and user guides at all-guides.com 13. Defi nições diversas Podem ser feitas várias alterações às defi nições, consoante a unidade interior a ser utilizada. Formato das horas (24 horas, AM/PM), temperatura máxima de aquecimento • (Estas defi nições são guardadas em memória não volátil no telecomando, por isso, mesmo quando as baterias são substituídas, as defi...
  • Seite 110: Antes De Pedir Assistência Técnica

    All manuals and user guides at all-guides.com 14. Antes de pedir assistência técnica Antes de pedir assistência técnica, verifi que o seguinte. Problema Causa Solução A unidade não trabalha, mesmo A alimentação da unidade interior Certifi que-se de que a alimentação da quando se prime não está...
  • Seite 111: Especifi Cações

    All manuals and user guides at all-guides.com 15. Especifi cações CZ-RWSU2/CZ-RWST2/CZ-RWSC3/CZ-RWSY2/CZ-RWSL2/CZ-RWSK2/CZ-RWST3 Dimensões 182 mm (A) X 61 mm (L) X 18,5 mm (P) Telecomando sem fi os Fonte de alimentação Duas pilhas AAA alcalinas Precisão do relógio ±30 segundos por mês (a 25 °C)
  • Seite 112 All manuals and user guides at all-guides.com...
  • Seite 113 All manuals and user guides at all-guides.com Περιεχόμενα 1. Σημαντικές πληροφορίες ασφαλείας ........GR-2 2. Ονομασίες και λειτουργίες ........... GR-3 3. Εγκατάσταση μπαταριών ............ GR-5 4. Ρύθμιση της τρέχουσας ώρας ..........GR-6 5. Λειτουργία ................GR-7 6. Λειτουργία χρονοδιακόπτη ..........GR-9 7.
  • Seite 114: Σημαντικές Πληροφορίες Ασφαλείας

    All manuals and user guides at all-guides.com 1. Σημαντικές πληροφορίες ασφαλείας Πριν τη χρήση του συστήματος, διαβάστε τις • Επικοινωνήστε με τον έμπορό σας πριν μετακινήσετε το σύστημα "Σημαντικές πληροφορίες ασφαλείας". Επικοινωνήστε με τον έμπορο σας ή έναν Αφού διαβάσετε το παρόν εγχειρίδιο, φυλάξτε το επαγγελματία...
  • Seite 115: Ονομασίες Και Λειτουργίες

    All manuals and user guides at all-guides.com 2. Ονομασίες και λειτουργίες Ένα τηλεχειριστήριο μπορεί να ελέγχει μια ομάδα μέχρι και οκτώ ΤΗΛΕΧΕΙΡΙΣΤΗΡΙΟ εσωτερικών μονάδων. (Βλ. σελίδα GR-12) Οθόνη λειτουργίας 11. Κουμπί φίλτρου Εμφανίζει την κατάσταση λειτουργίας. (Η CZ-RWSC3 εικόνα εμφανίζει όλες τις καταστάσεις.) Πατήστε...
  • Seite 116 All manuals and user guides at all-guides.com 2. Ονομασίες και λειτουργίες (συνέχ.) Δέκτης Δέκτης κύριο. Επίσης είναι δυνατό να Λαμβάνει το σήμα που μεταδίδεται από το χρησιμοποιείται αμφότερα σε συνδυασμό με τηλεχειριστήριο. ένα ενσύρματο τηλεχειριστήριο (πωλείται ξεχωριστά). (Συμβουλευτείτε τον έμπορο από Κουμπί...
  • Seite 117: Εγκατάσταση Μπαταριών

    All manuals and user guides at all-guides.com 3. Εγκατάσταση μπαταριών 1. Αφαιρέστε το κάλυμμα. 2. Εισαγάγετε δύο αλκαλικές μπαταρίες AAA. Τοποθετήστε τις μπαταρίες με την πολικότητα [+/–] που απεικονίζεται στην εικόνα. 3. Απαλά εισάγετε το ένα άκρο ενός "αναπτυγμένου" συνδετήρα (ή παρόμοιου αντικειμένου που να χωράει) μέσα...
  • Seite 118: Ρύθμιση Της Τρέχουσας Ώρας

    All manuals and user guides at all-guides.com 4. Ρύθμιση της τρέχουσας ώρας Μετά την αλλαγή των μπαταριών και αφού πατήσετε την επαναφορά, βεβαιωθείτε ότι ρυθμίζετε τη σωστή ώρα. (Όταν έχει πατηθεί η επαναφορά, η τρέχουσα ώρα επιστρέφει στο [ 1. Πατήστε το για...
  • Seite 119: Λειτουργία

    All manuals and user guides at all-guides.com 5. Λειτουργία , Θέρμανση , Ξηρός αέρας , Ψύξη , Ανεμιστήρας Αυτόματη Τα μοντέλα που διαθέτουν τη λειτουργία ψύξης δεν μπορούν να λειτουργήσουν στον τρόπο αυτόματης λειτουργίας ή θέρμανσης. Τροφοδοσία: Ενεργοποιήστε την τροφοδοσία της εσωτερικής μονάδας...
  • Seite 120 All manuals and user guides at all-guides.com 5. Λειτουργία (συνέχ.) Εάν η μονάδα δεν θερμαίνει αρκετά αποτελεσματικά με έναν ανεμιστήρα χαμηλής ταχύτητας , αλλάξτε την ταχύτητα του ανεμιστήρα στο Υψηλή ή Μέτρια. Ανάλογα με την εσωτερική μονάδα που χρησιμοποιείται, ενδεχομένως να υποδεικνύεται μια λειτουργία που...
  • Seite 121: Λειτουργία Χρονοδιακόπτη

    All manuals and user guides at all-guides.com 6. Λειτουργία χρονοδιακόπτη • Όταν ρυθμίζετε το χρονοδιακόπτη, βεβαιωθείτε ότι η τρέχουσα ώρα στο τηλεχειριστήριο είναι σωστή. • Το ρολόι του χρονοδιακόπτη μπορεί να ρυθμιστεί μόνο όταν η οθόνη του τηλεχειριστηρίου είναι ΕΝΕΡΓΟΠΟΙΗΜΕΝΗ. •...
  • Seite 122 All manuals and user guides at all-guides.com 6. Λειτουργία χρονοδιακόπτη (συνέχ.) Συνδυασμός χρονοδιακοπτών ΕΝΕΡΓΟΠΟΙΗΣΗΣ και ΑΠΕΝΕΡΓΟΠΟΙΗΣΗΣ • Ρύθμιση των χρονοδιακοπτών ΕΝΕΡΓΟΠΟΙΗΣΗΣ και ΑΠΕΝΕΡΓΟΠΟΙΗΣΗΣ αντίστοιχα. Έλεγχος της ρύθμισης του χρονοδιακόπτη • Εάν πατήσετε για το ή το , εμφανίζεται ο προγραμματισμένος χρόνος για τέσσερα δευτερόλεπτα.
  • Seite 123: Ρύθμιση Της Κατεύθυνσης Αέρα

    αρχίσει να αιωρείται αφού απελευθερωθεί ο τρόπος λειτουργίας αναμονής θέρμανσης, όμως η οθόνη του τηλεχειριστηρίου επίσης θα υποδεικνύει την αυτόματη λειτουργία πτερυγίου κατά τη λειτουργία αναμονής θέρμανσης. CZ-RWSU2/CZ-RWST2/CZ-RWSL2/CZ-RWSY2/ Στον τρόπο λειτουργίας θέρμανσης Εσωτερική μονάδα (CZ-RWSK2)/CZ-RWST3 Στρέψτε το πτερύγιο (έλασμα ανοδικής/ Ρύθμιση...
  • Seite 124: Λειτουργία Πολλαπλών Εσωτερικών Και Εξωτερικών Μονάδων Ταυτόχρονα

    All manuals and user guides at all-guides.com 7. Ρύθμιση της κατεύθυνσης αέρα (συνέχ.) CZ-RWSC3 Οι διαθέσιμες λειτουργίες διαφέρουν ανάλογα με την εσωτερική μονάδα που χρησιμοποιείται. Η κατεύθυνση αέρα δεν μπορεί να ρυθμιστεί από το τηλεχειριστήριο για κανένα από τα μοντέλα εκτός από...
  • Seite 125: Χρήση Του Τηλεχειριστηρίου

    All manuals and user guides at all-guides.com 9. Χρήση του τηλεχειριστηρίου 9. Χρήση του τηλεχειριστηρίου • Στρέψτε τον πομπό του τηλεχειριστηρίου προς τον δέκτη. Σε σωστή λήψη του σήματος, παράγεται ένας ήχος "μπιπ". (Παράγονται δύο ήχοι "μπιπ" όταν η μονάδα αρχίζει να λειτουργεί.) •...
  • Seite 126: Διευθύνσεις

    All manuals and user guides at all-guides.com 11. Διευθύνσεις Στις εγκαταστάσεις πολλαπλών αλλά και μονών μονάδων, όταν έχουν εγκατασταθεί περισσότερες από μία εσωτερικές μονάδες στο ίδιο δωμάτιο με ένα συμβατό τηλεχειριστήριο, μπορείτε να ρυθμίσετε διευθύνσεις ώστε να αποφευχθεί αλληλεπίδραση. Τοποθετώντας διακόπτες διεύθυνσης επάνω στους δέκτες και αντιστοιχίζοντάς τους με τον αριθμό των διευθύνσεων...
  • Seite 127 All manuals and user guides at all-guides.com Ένδειξη διεύθυνσης • • • • • ασύρματου τηλεχειριστηρίου CZ-RWSU2 Για το 1, 2 και 3, ρυθμίστε το διακόπτη προς τα δεξιά και για το 4, 5 και 6 προς τα αριστερά. S001 S001 Η...
  • Seite 128 All manuals and user guides at all-guides.com 11. Διευθύνσεις (συνέχ.) Ρύθμιση διευθύνσεων (CZ-RWSY2/CZ-RWSK2) (Ρύθμιση της διεύθυνσης της εσωτερικής μονάδας) 1. Πρώτα, ρυθμίστε τη διεύθυνση του τηλεχειριστηρίου με βάση το Ρύθμιση διευθύνσεων τηλεχειριστηρίου (βλ. σελίδα GR-14). 2. Πατήστε [Λειτουργία επείγουσας ανάγκης] της...
  • Seite 129: Λειτουργία Έκτακτης Ανάγκης

    Αν χάλασε το τηλεχειριστήριο. • Αν χάσατε το τηλεχειριστήριο. Εικόνες: Τα CZ-RWSU2, CZ-RWSY2 και CZ-RWST2/CZ-RWST3 ανήκουν στο δέκτη (εντός της εσωτερικής μονάδας), το CZ-RWSL2 ανήκει στο πλαίσιο λειτουργίας (εντός της εσωτερικής μονάδας) και η εσωτερική μονάδα (CZ-RWSK2) ανήκει στο πρόσθιο πλαίσιο.
  • Seite 130 All manuals and user guides at all-guides.com 12. Λειτουργία επείγουσας ανάγκης (συνέχ.) Σημειωση • Οι διακόπτες εκτέλεσης δοκιμασίας/ενεργοποίησης (Test Run/On) και οι διακόπτες δοκιμασίας/ενεργοποίησης (Test/On) προορίζονται για χρήση κατά την εγκατάσταση και δοκιμαστική λειτουργία της μονάδας. Δεν προορίζεται για κανονική χρήση. Διακοπή...
  • Seite 131: Διάφορες Ρυθμίσεις

    All manuals and user guides at all-guides.com 13. Διάφορες ρυθμίσεις Μπορείτε να κάνετε πολλές αλλαγές στις ρυθμίσεις, ανάλογα με την εσωτερική μονάδα που χρησιμοποιείτε. Δείκτες τρόπου λειτουργίας, εμφάνιση ώρας (24-ωρη, ΠΜ/ΜΜ), μέγιστη θερμοκρασία θέρμανσης • (Οι ρυθμίσεις αυτές αποθηκεύονται σε μη πτητική μνήμη στο τηλεχειριστήριο, ώστε ακόμα και όταν αλλαχθούν οι...
  • Seite 132: Πριν Καλέσετε Την Τηλεφωνική Εξυπηρέτηση

    All manuals and user guides at all-guides.com 14. Πριν καλέσετε την τηλεφωνική εξυπηρέτηση Πριν απευθυνθείτε στην τεχνική υποστήριξη, παρακαλούμε ελέγξτε τα ακόλουθα. Πρόβλημα Αιτία Λύση Η μονάδα δεν λειτουργεί ακόμη και Η τροφοδοσία της εσωτερικής μονάδας δεν Βεβαιωθείτε ότι η τροφοδοσία της εσωτερικής όταν...
  • Seite 133: Προδιαγραφές

    All manuals and user guides at all-guides.com 15. Προδιαγραφές CZ-RWSU2/CZ-RWST2/CZ-RWSC3/CZ-RWSY2/CZ-RWSL2/CZ-RWSK2/CZ-RWST3 Διαστάσεις 182 mm (Υ) X 61 mm (Π) X 18,5 mm (Δ) Ασύρματο τηλεχειριστήριο Πηγή τροφοδοσίας Δύο αλκαλικές μπαταρίες AAA Ακρίβεια ρολογιού ±30 δευτερόλεπτα ανά μήνα (στους 25 °C) CZ-RWSU2/CZ-RWST2/CZ-RWSC3/CZ-RWSY2/CZ-RWST3 CZ-RWSU2 200 mm (Υ) X 200 mm (Π) X 25 mm (Δ)
  • Seite 134 All manuals and user guides at all-guides.com...
  • Seite 135 All manuals and user guides at all-guides.com Contenido 1. Instrucciones de seguridad importantes ......ES-2 2. Nombres y operaciones ............ES-3 3. Instalación de las pilas ............ES-5 4. Ajuste de la hora actual ............ES-6 5. Funcionamiento ..............ES-7 6. Funcionamiento del temporizador ........ES-9 7.
  • Seite 136: Instrucciones De Seguridad Importantes

    All manuals and user guides at all-guides.com 1. Instrucciones de seguridad importantes Antes de utilizar el sistema, asegúrese de leer las • Póngase en contacto con su distribuidor antes "Instrucciones de seguridad importantes". de trasladar el sistema Después de leer el manual, guárdelo en un lugar Póngase en contacto con su distribuidor o un adecuado.
  • Seite 137: Nombres Y Operaciones

    All manuals and user guides at all-guides.com 2. Nombres y operaciones Un solo control remoto puede controlar un grupo de hasta ocho CONTROL REMOTO unidades interiores. (Véase la página ES-12) Visor de operaciones 11. Botón del fi ltro Muestra el estado de la operación. (La fi gura CZ-RWSC3 muestra todos los estados).
  • Seite 138 All manuals and user guides at all-guides.com 2. Nombres y operaciones (cont.) Receptor Receptor Control remoto, control principal/remoto, Recibe la señal que se envía desde el secundario, interruptor control remoto. Normalmente, debería estar en el control remoto principal. También es posible utilizar Botón de funcionamiento de emergencia los dos en conjunción con un control remoto Lámparas del visor...
  • Seite 139: Instalación De Las Pilas

    All manuals and user guides at all-guides.com 3. Instalación de las pilas 1. Quite la cubierta. 2. Introduzca dos pilas alcalinas AAA. Coloque las pilas con la polaridad [+/–] de la manera que se indica en la fi gura. 3. Introduzca suavemente el extremo de un clip desdoblado (o un objeto similar que encaje) en el orifi...
  • Seite 140: Ajuste De La Hora Actual

    All manuals and user guides at all-guides.com 4. Ajuste de la hora actual Después de cambiar las pilas y pulsar el botón de reinicio, asegúrese de volver a ajustar la hora. (Al pulsar el botón de reinicio, la hora actual cambia a [ 1.
  • Seite 141: Funcionamiento

    All manuals and user guides at all-guides.com 5. Funcionamiento , Calefacción , Deshumidifi cador , Refrigeración , Ventilador Automático Los modelos que sólo tienen la función de refrigeración no funcionan en los modos automático y de calefacción. Encendido: encienda la unidad interior al menos 14 horas antes de ponerla en funcionamiento.
  • Seite 142 All manuals and user guides at all-guides.com 5. Funcionamiento (cont.) Si la unidad no emite calor con la sufi ciente efi ciencia con una velocidad baja del ventilador , utilice una velocidad alta media. En función de la unidad interior que se utilice, podría hacer referencia a una función de la que no dispone.
  • Seite 143: Funcionamiento Del Temporizador

    All manuals and user guides at all-guides.com 6. Funcionamiento del temporizador • Antes de ajustar el temporizador, asegúrese de que la hora del control remoto es correcta. • La hora del temporizador sólo se puede ajustar si el visor del control remoto está encendido. •...
  • Seite 144 All manuals and user guides at all-guides.com 6. Funcionamiento del temporizador (cont.) Combinación de temporizadores de encendido y apagado • Sirve para ajustar temporizadores de encendido y apagado, respectivamente. Comprobación del ajuste del temporizador • Si pulsa para el o el , la hora programada aparece durante cuatro segundos.
  • Seite 145: Ajuste De La Dirección Del Aire

    Auto Flap (Oscilación automática de la aleta) durante el modo en espera de la calefacción. CZ-RWSU2/CZ-RWST2/CZ-RWSL2/CZ-RWSY2/ En el modo de calefacción Unidad interior (CZ-RWSK2)/CZ-RWST3 Oriente la aleta (placa de dirección...
  • Seite 146: Uso Simultáneo De Varias Unidades Interiores/Exteriores

    All manuals and user guides at all-guides.com 7. Ajuste de la dirección del aire (cont.) CZ-RWSC3 Las funciones disponibles son diferentes dependiendo de la unidad interior que se utilice. La dirección del aire no se puede ajustar por medio del control remoto en ningún otro modelo aparte de los que se indican a continuación.
  • Seite 147: Uso Del Control Remoto

    All manuals and user guides at all-guides.com 9. Uso del control remoto • Apunte el transmisor del control remoto hacia el receptor. Cuando la señal se reciba correctamente, emitirá un pitido. (Sólo emite dos pitidos cuando la unidad comienza a funcionar). •...
  • Seite 148: Direcciones

    All manuals and user guides at all-guides.com 11. Direcciones Tanto en las instalaciones de una sola unidad como de varias, si se instala más de una unidad interior en la misma habitación con un control remoto compatible, se pueden confi gurar las direcciones para evitar interferencias.
  • Seite 149 All manuals and user guides at all-guides.com Visualización de dirección en el control • • • • • remoto inalámbrico CZ-RWSU2 Para 1, 2 y 3, ajuste el conmutador a la derecha y, S001 S001 para 4, 5 y 6, a la izquierda. La recepción es Posición del...
  • Seite 150 All manuals and user guides at all-guides.com 11. Direcciones (cont.) Ajuste de direcciones (CZ-RWSY2/CZ-RWSK2) (Ajuste de la dirección de la unidad interior) 1. Antes de nada, ajuste la dirección del control remoto de acuerdo con la sección Ajuste de la dirección del control remoto (véase la página ES-14). 2.
  • Seite 151: Funcionamiento De Emergencia

    • Cuando el control remoto está estropeado. • Cuando el control remoto se ha perdido. Figuras: CZ-RWSU2, CZ-RWSY2 y CZ-RWST2/CZ-RWST3 pertenecen a los receptores (dentro de la unidad interior), CZ-RWSL2 pertenece al panel de operaciones (dentro de la unidad interior) y la unidad interior (CZ-RWSK2) pertenece a su panel frontal.
  • Seite 152 All manuals and user guides at all-guides.com 12. Funcionamiento de emergencia (cont.) Nota • Los interruptores Funcionamiento de prueba/Encendido (Test Run/On) y Prueba/Encendido (Test/On) se utilizan al instalar la unidad para realizar una prueba. No se utilizan de manera habitual. Detener TODO •...
  • Seite 153: Otros Ajustes

    All manuals and user guides at all-guides.com 13. Otros ajustes Se puede realizar una gran variedad de cambios en los ajustes que dependen de la unidad interior que se esté utilizando. Indicador del modo de funcionamiento, visor de hora (24 horas, AM/PM), temperatura máxima de calefacción •...
  • Seite 154: Antes De Solicitar Una Reparación

    All manuals and user guides at all-guides.com 14. Antes de solicitar una reparación Antes de solicitar una reparación, lea lo siguiente. Problema Causa Solución La unidad no funciona ni La unidad interior no está encendida. Asegúrese de que la unidad interior está siquiera cuando se pulsa encendida.
  • Seite 155: Especifi Caciones

    All manuals and user guides at all-guides.com 15. Especifi caciones CZ-RWSU2/CZ-RWST2/CZ-RWSC3/CZ-RWSY2/CZ-RWSL2/CZ-RWSK2/CZ-RWST3 Dimensiones 182 mm (Al) X 61 mm (An) X 18,5 mm (P) Fuente de Control remoto inalámbrico Dos pilas alcalinas AAA alimentación Precisión del reloj ±30 segundos al mes (a 25 °C)
  • Seite 156 All manuals and user guides at all-guides.com...
  • Seite 157 All manuals and user guides at all-guides.com Содержание Важные инструкции по безопасности ..........RU-2 Названия и операции ................RU-3 Установка батареек ..................RU-5 Установка текущего времени ..............RU-6 Управление ..................... RU-7 Управление таймером ................RU-9 Регулировка направления воздушного потока ......RU-11 Управление...
  • Seite 158: Важные Инструкции По Безопасности

    Класс защиты І All manuals and user guides at all-guides.com 1. Важные инструкции по безопасности Перед использованием данной системы • Не проглатывайте батарейку. обязательно прочтите раздел «Важные инструкции Меры предосторожности во время перемещения и ремонта по безопасности». После прочтения данного руководства сохраните •...
  • Seite 159: Названия И Операции

    All manuals and user guides at all-guides.com 2. Названия и операции Один пульт дистанционного управления может использоваться ПУЛЬТ ДИСТАНЦИОННОГО УПРАВЛЕНИЯ максимум для восьми внутренних блоков. (См. стр. RU-12) Дисплей управления 11. Кнопка фильтра Используется для отображения рабочего состояния. CZ-RWSC3 (На рисунке показаны все состояния.) Нажмите...
  • Seite 160 All manuals and user guides at all-guides.com 2. Названия и операции (продолж.) Приёмник Приёмник В обычном режиме работы этот переключатель Используется для приёма сигнала, посланного с должен находиться в положении Пульт пульта дистанционного управления. дистанционного управления, главный. В сочетании с проводным пультом Кнопка...
  • Seite 161: Установка Батареек

    All manuals and user guides at all-guides.com 3. Установка батареек 1. Снимите крышку. 2. Вставьте две щелочные батарейки AAA. Вставьте две батарейки, соблюдая полярность [+/–], как показано на рисунке. 3. Осторожно вставьте один конец разогнутой скрепки для бумаг (или похожего подходящего предмета) в...
  • Seite 162: Установка Текущего Времени

    All manuals and user guides at all-guides.com 4. Установка текущего времени После замены батареек и нажатия кнопки переустановки обязательно переустановите текущее время. (При нажатии кнопки переустановки текущее время вернется к значению 1. Нажмите кнопку на две секунды или дольше. Часы можно будет установить, как только индикация часов начнет мигать.
  • Seite 163: Управление

    All manuals and user guides at all-guides.com 5. Управление Авто , Обогрев , Сушка , Охлаждение , Вентиляция Модели, которые обеспечивают только функцию охлаждения, не могут работать в автоматическом режиме или режиме обогрева. Питание: Включите питание внутреннего блока по крайней мере...
  • Seite 164 All manuals and user guides at all-guides.com 5. Управление (продолж.) Если блок не выполняет обогрев достаточно эффективно при низкой скорости вентилятора , переключите вентилятор на высокую скорость или на среднюю скорость. В зависимости от используемого внутреннего блока может отображаться отсутствующая функция. (Установка...
  • Seite 165: Управление Таймером

    All manuals and user guides at all-guides.com 6. Управление таймером • При установке таймера убедитесь, что текущее время на пульте дистанционного управления установлено точно. • Часы таймера можно установить только в том случае, когда дисплей на пульте дистанционного управления находится в положении ВКЛ. •...
  • Seite 166 All manuals and user guides at all-guides.com 6. Управление таймером (продолж.) Сочетание таймеров ВКЛ и ВЫКЛ • Установка таймеров ВКЛ и ВЫКЛ, соответственно. Проверка установки таймера • При нажатии одной из кнопок для опции или , в течение четырех секунд будет отображаться...
  • Seite 167: Регулировка Направления Воздушного Потока

    потока вверх-вниз) направлена вверх. Помните также, что створка начинает поворачиваться после завершения режима ожидания обогрева, однако индикация на пульте дистанционного управления отображает Автоматический режим створки также и в режиме ожидания обогрева. CZ-RWSU2/CZ-RWST2/CZ-RWSL2/CZ-RWSY2/ В режиме Обогрев Внутренний блок (CZ-RWSK2)/CZ-RWST3 Опустите створку (пластину направления...
  • Seite 168: Управление Несколькими Внутренними/ Внешними Блоками Одновременно

    All manuals and user guides at all-guides.com 7. Регулировка направления воздушного потока (продолж.) CZ-RWSC3 Доступные функции отличаются в зависимости от используемого внутреннего блока. Направление воздушного потока нельзя установить для каких-либо других моделей, кроме перечисленных ниже. Для получения более подробной информации обратитесь к инструкции пользователя, прилагаемой к внутреннему...
  • Seite 169: Использование Пульта Дистанционного Управления

    All manuals and user guides at all-guides.com 9. Использование пульта дистанционного управления • Направьте передатчик пульта дистанционного управления на приёмник. В случае правильного приёма сигнала прозвучит одинарный звуковой сигнал. (Двойной сигнал звучит только в том случае, когда блок начинает работать.) •...
  • Seite 170: Адреса

    All manuals and user guides at all-guides.com 11. Адреса Во избежание перекрестных помех при установке нескольких блоков или одного блока, в случае установки более чем одного внутреннего блока в одном помещении с совместимым пультом дистанционного управления, можно выполнить установку адресов. Путём...
  • Seite 171 All manuals and user guides at all-guides.com Отображение адреса беспроводного • • • • • пульта дистанционного управления CZ-RWSU2 Для установки значения 1, 2 и 3 установите переключатель вправо, а для установи значения S001 S001 4, 5 и 6 установите его влево. Положение...
  • Seite 172 All manuals and user guides at all-guides.com 11. Адреса (продолж.) Установка адресов (CZ-RWSY2/CZ-RWSK2) (Установка адреса внутреннего блока) 1. Прежде всего, установите адрес для пульта дистанционного управления с помощью процедуры установки адресов дистанционного управления (см. стр. RU-14). 2. Нажмите кнопку [Аварийный режим работы] внутреннего...
  • Seite 173: Аварийный Режим Работы

    Если пульт дистанционного управления сломан. • Если пульт дистанционного управления потерян. Рисунки: Устройства CZ-RWSU2, CZ-RWSY2 и CZ-RWST2/CZ-RWST3 представляют собой приёмники (во внутреннем блоке), устройство CZ-RWSL2 представляет собой панель управления (во внутреннем блоке), а внутренний блок (CZ-RWSK2) представляет собой его переднюю панель.
  • Seite 174 All manuals and user guides at all-guides.com 12. Аварийный режим работы (продолж.) Примечание • Переключатели Тест.пуск/Вкл (Test Run/On) и Тест/Вкл (Test/On) предназначены для использования во время установки блока и тестового пуска. Они не предназначены для обычной работы. Останов. ВСЕ (Stop ALL) •...
  • Seite 175: Различные Установки

    All manuals and user guides at all-guides.com 13. Различные установки В зависимости от используемого внутреннего блока с установками можно выполнять различные изменения. Индикатор режима работы, индикация времени (24 часа, AM/PM), максимальная температура обогрева • (Эти установки сохраняются в энергонезависимой памяти пульта дистанционного управления, поэтому даже в случае замены батареек...
  • Seite 176: Перед Обращением В Сервисный Центр

    All manuals and user guides at all-guides.com 14. Перед обращением в сервисный центр Перед обращением в сервисный центр проверьте следующее. Возможная неисправность Вероятная причина Метод устранения Блок не работает даже при нажатии Питание внутреннего блока не включено в положение Убедитесь, что внутренний блок включен в положение кнопки...
  • Seite 177: Технические Характеристики

    All manuals and user guides at all-guides.com 15. Технические характеристики CZ-RWSU2/CZ-RWST2/CZ-RWSC3/CZ-RWSY2/CZ-RWSL2/CZ-RWSK2/CZ-RWST3 Размеры 182 мм (В) X 61 мм (Ш) X 18,5 мм (Г) Беспроводной пульт Источник питания Две щелочные батарейки AAA дистанционного управления Точность часов ±30 секунд в месяц (при 25 °C)
  • Seite 178 All manuals and user guides at all-guides.com...
  • Seite 179 All manuals and user guides at all-guides.com Збережіть ці інструкції! CZ-RWSU2 CZ-RWSC3 CZ-RWST2 CZ-RWSY2 CZ-RWSL2 CZ-RWSK2 CZ-RWST3 Бездротова система дистанційного керування ПОСІБНИК КОРИСТУВАЧА...
  • Seite 180 All manuals and user guides at all-guides.com Зміст Важливі заходи безпеки ................UK-2 Назви частин та операцій ................ UK-3 Встановлення батарей ................UK-5 Налаштування поточного часу .............. UK-6 Експлуатація ....................UK-7 Робота таймера ..................... UK-9 Налаштування напрямку потоку повітря ........UK-11 Одночасне...
  • Seite 181: Важливі Заходи Безпеки

    All manuals and user guides at all-guides.com 1. Важливі заходи безпеки Перед тим як використовувати систему, прочитайте Заходи безпеки під час переміщення і ремонту розділ «Важливі заходи безпеки». Прочитавши цей посібник користувача, зберігайте • Не ремонтуйте систему його в легко доступному місці. У...
  • Seite 182: Назви Частин Та Операцій

    All manuals and user guides at all-guides.com 2. Назви частин та операцій За допомогою одного пульта дистанційного керування можна ПУЛЬТ ДИСТАНЦІЙНОГО КЕРУВАННЯ керувати 8 внутрішніми блоками. (Дивіться стор. UK-12). Дисплей роботи 11. Кнопка фільтра Повідомляє про роботу пристрою. (На малюнку CZ-RWSC3 зображено...
  • Seite 183 All manuals and user guides at all-guides.com 2. Назви частин та операції (продовж.) Приймач Приймач Головний / додатковий пульт Приймає сигнал, надісланий пультом дистанційного керування, перемикач дистанційного керування. У звичайному режимі роботи слід використовувати головний пульт дистанційного Кнопка аварійного режиму керування.
  • Seite 184: Встановлення Батарей

    All manuals and user guides at all-guides.com 3. Встановлення батарей 1. Зніміть кришку. 2. Вставте дві лужні батареї типу AAA. Вставляючи батареї, враховуйте значення полярності [+/–], як показано на малюнку. 3. Обережно вставте в отвір кнопки скидання один кінець розкладеної скріпки для паперів (або подібний...
  • Seite 185: Налаштування Поточного Часу

    All manuals and user guides at all-guides.com 4. Налаштування поточного часу Замінивши батареї і натиснувши кнопку скидання, потрібно перевстановити поточний час. (Після натиснення кнопки скидання заміть поточного часу з'являється значення [ 1. Натисніть кнопку та утримуйте її протягом 2 секунд або довше.
  • Seite 186: Експлуатація

    All manuals and user guides at all-guides.com 5. Експлуатація Авто , Обігрів , Висушування , Охолодження , Вентилятор Моделі, які лише охолоджують, неможливо використовувати в режимах «Авто» та «Обігрів». Живлення: вмикайте живлення для внутрішнього блока щонайменше на 14 годин до використання. 1.
  • Seite 187 All manuals and user guides at all-guides.com 5. Експлуатація (продовж.) Якщо низька швидкість вентилятора блока не забезпечує ефективного обігріву, виберіть високу або середню швидкість вентилятора. Залежно від внутрішнього блока, який використовується, може відображатися функція, якої блок не має. (Швидкість вентилятора встановлено). Якщо...
  • Seite 188: Робота Таймера

    All manuals and user guides at all-guides.com 6. Робота таймера • Налаштовуючи таймер, перевірте, чи час на пульті дистанційного керування є точним. • Таймер можна налаштувати лише коли світиться дисплей пульта дистанційного керування. • Налаштувавши таймер, покладіть пульт дистанційного керування туди, звідки його сигнал дійшов би до...
  • Seite 189 All manuals and user guides at all-guides.com 6. Робота таймера (продовж.) Використання таймерів увімкнення і вимкнення • Налаштування таймерів увімкнення і вимкнення. Перевірка налаштування таймера • Якщо натиснути кнопку для або , запланований час відображатиметься протягом 4 секунд. • Якщо таймер не налаштовано, відображається індикація «--:--». (Початкове налаштування) Зміна...
  • Seite 190: Налаштування Напрямку Потоку Повітря

    виходу з режиму очікування, коли увімкнено режим обігріву, рухома заслінка починає коливатися, однак дисплей пульта дистанційного керування повідомляє про її автоматичне переміщення і в режимі очікування, коли увімкнено режим обігріву. CZ-RWSU2/CZ-RWST2/CZ-RWSL2/CZ-RWSY2/ У режимі обігріву внутрішній блок (CZ-RWSK2)/CZ-RWST3 Розмістіть рухому заслінку (пластина...
  • Seite 191: Одночасне Керування Кількома Внутрішніми/Зовнішніми Блоками

    All manuals and user guides at all-guides.com 7. Налаштування напрямку потоку повітря (продовж.) CZ-RWSC3 Доступні функції відрізняються залежно від внутрішнього блока, який використовується. Налаштувати напрямок потоку повітря за допомогою пульта дистанційного керування можна лише для поданих нижче моделей. Детальнішу інформацію читайте в посібнику користувача, що додається до внутрішнього...
  • Seite 192: Використання Пульта Дистанційного Керування

    All manuals and user guides at all-guides.com 9. Використання пульта дистанційного керування • Спрямуйте передавач пульта дистанційного керування на приймач. У разі належного прийому сигналу один раз лунає звуковий сигнал. (Звуковий сигнал лунає двічі лише тоді, коли блок починає працювати). •...
  • Seite 193: Адреси

    All manuals and user guides at all-guides.com 11. Адреси У разі використання одного та кількох блоків, коли в тій самій кімнаті знаходяться кілька внутрішніх блоків із сумісним пультом дистанційного керування, для запобігання перехресному зв'язку можна налаштувати адреси. Налаштувавши перемикачі адрес на приймачах і підібравши для них номери адрес на пульті дистанційного...
  • Seite 194 All manuals and user guides at all-guides.com Відображення адреси на бездротовому • • • • • пульті дистанційного керування CZ-RWSU2 Для адрес 1, 2 та 3 пересуньте перемикач вправо, а для адрес S001 S001 4, 5 і 6 – вліво. S001 Перемикання...
  • Seite 195 All manuals and user guides at all-guides.com 11. Адреси (продовж.) Налаштування адрес (CZ-RWSY2/CZ-RWSK2) (Налаштування адреси внутрішнього блока) 1. Спочатку налаштуйте адресу для пульта дистанційного керування, виконавши кроки розділу «Налаштування адрес пульта дистанційного керування» (див. стор. UK-14). 2. Натисніть кнопку [Аварійний Режим] на...
  • Seite 196: Аварійний Режим

    • Коли пульт дистанційного керування зламався. • Коли ви загубили пульт дистанційного керування. Малюнки: CZ-RWSU2, CZ-RWSY2 та CZ-RWST2/CZ-RWST3 стосуються приймачів (всередині внутрішнього блока), CZ-RWSL2 стосується панелі керування (всередині внутрішнього блока), а CZ-RWSK2 – передньої панелі внутрішнього блока. CZ-RWSU2/CZ-RWST2/CZ-RWSY2/внутрішній блок (CZ-RWSK2)/CZ-RWST3 Пуск: натисніть...
  • Seite 197 All manuals and user guides at all-guides.com 12. Аварійний режим (продовж.) Примітка • Перемикачі запуску Перевірки/увімкнення (Test Run/On) і Перевірки/увімкнення (Test/On) призначено для використання, коли пристрій встановлено і виконується перевірка. Їх не призначено для звичайного використання. • Якщо перемикач звичайного [Режиму роботи/зупинки роботи всіх пристроїв (Normal/Stop ALL)] встановлено в положення...
  • Seite 198: Інші Налаштування

    All manuals and user guides at all-guides.com 13. Інші налаштування Налаштування можна змінювати залежно від внутрішнього блока, який використовується. Iндикатор режиму роботи, формат відображення часу (24 години, 12 годин), максимальна температура обігріву • (Ці налаштування зберігаються в енергонезалежній пам'яті пульта дистанційного керування, тому навіть у разі заміни...
  • Seite 199: Перш Ніж Звертатися До Центру Обслуговування

    All manuals and user guides at all-guides.com 14. Перш ніж звертатися до центру обслуговування Перш ніж звертатися до центру обслуговування, скористайтеся наведеними нижче порадами. Проблема Причина Вирішення Блок не працює, навіть коли на пульті Внутрішній блок не увімкнено. Перевірте, чи увімкнено внутрішній блок. дистанційного...
  • Seite 200: Технічні Характеристики

    All manuals and user guides at all-guides.com 15. Технічні характеристики CZ-RWSU2/CZ-RWST2/CZ-RWSC3/CZ-RWSY2/CZ-RWSL2/CZ-RWSK2/CZ-RWST3 Розміри 182 мм (В) X 61 мм (Ш) X 18,5 мм (Г) Бездротовий пульт дистанційного Джерело живлення Дві лужні батареї типу AAA керування Точність годинника ±30 секунд на місяць (за темп. 25˚C)
  • Seite 201 6. полібромдефенілові ефіри (PBDE) - не перевищує 0,1wt % ваги речовини або в концентрації до 1000 частин на мільйон. Інформаційний центр Panasonic в Україні Міжнародні дзвінки та дзвінки з Києва: +380-44-490-38-98 Безкоштовні дзвінки зі стаціонарних телефонів в межах України : 0-800-309-880 Уповноважений...
  • Seite 202 All manuals and user guides at all-guides.com...

Inhaltsverzeichnis