Inhaltsverzeichnis
Werbung
Verfügbare Sprachen
Verfügbare Sprachen
Quicklinks
Werbung
Inhaltsverzeichnis
Fehlerbehebung

Verwandte Anleitungen für auna Kara Illumina


Inhaltszusammenfassung für auna Kara Illumina
-
Seite 3: Inhaltsverzeichnis
Sehr geehrter Kunde, wir gratulieren Ihnen zum Erwerb Ihres Gerätes. Lesen Sie die folgenden Hinweise sorgfältig durch und befolgen Sie diese, um möglichen Schäden vorzubeugen. Für Schäden, die durch Missachtung der Hinweise und unsachgemäßen Gebrauch entstehen, übernehmen wir keine Haftung. Scannen Sie den folgenden QR-Code, um Zugriff auf die aktuellste Bedienungsanleitung und weitere Informationen rund um das Produkt zu erhalten:... -
Seite 4: Sicherheitshinweise
SICHERHEITSHINWEISE Allgemeine Hinweise • Blitzschlag - Wenn Sie das Gerät länger nicht benutzen oder es gewittert, ziehen Sie den Stecker aus der Steckdose der trennen Sie das Gerät vom Antennenanschluss. Dadurch werden Schäden am Produkt durch Blitzschlag und Überspannung vermieden. •... -
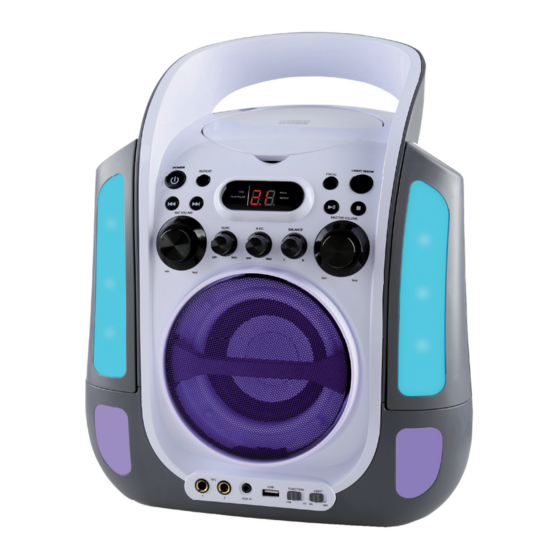
Seite 5: Geräteübersicht
GERÄTEÜBERSICHT Audioausgang (L) DC-Eingang Audioausgang (R) Video-Ausgang... - Seite 6 1 CDG-Anzeige 11 Eingang Mikrofon 1 21 Stop-Taste 2 Play/Pause-Anzeige 12 Eingang Mikrofon 2 22 Play/Pause-Taste 3 Wiederholen-Taste 13 AUX-Eingang 23 Master-Lautstärke 4 Power-Taste 14 USB-Eingang 24 Balance-Regler 5 Zurück-Taste 15 CD-Tür 25 AVC-Regler 6 Vorwärts-Taste 16 LED-Display 26 Lightbox rechts 7 Mikrofonlautstärke 17 Programm-Anzeige 27 Lautsprecher...
-
Seite 7: Inbetriebnahme Und Bedienung
INBETRIEBNAHME UND BEDIENUNG Gerät anschließen Schließen Sie das Netzteil am DC-Eingang an der Rückseite des Geräts an. Stecken Sie dann den Stecker in eine Steckdose. HINWEIS: Wenn Sie das Gerät länger nicht benutzen, ziehen Sie den Stecker aus der Steckdose. - Seite 8 Gerät mit dem TV verbinden Schließen Sie das mitgelieferte Cinch-Kabel (Weiß-Rot-Gelb) an die entsprechend farbigen Anschlüsse an der Rückseite des Geräts an und verbinden Sie mit den jeweils gleichfarbigen Video- und Audio- Eingängen an Ihrem TV-Gerät. Sie können das Audio-Signal auch an Ihre Stereo-Anlage schicken, dazu verbinden Sie das gelbe Video-Kabel mit dem TV-Gerät und die rot-weißen Audio-Kabel mit einem freien (Aux-) Eingang Ihrer Stereo-Anlage.
-
Seite 9: Mikrofon Anschließen
Mikrofon anschließen Schießen Sie das mitgelieferte Mikrofon an den Mic1- oder Mic2- Anschluss unten links am Gerät an. Das Mikrofon wird nun der Musik von CD/CD+G/USB beigemischt. Schalten Sie das Mikrofon vor dem Singen ein und schalten Sie es nach dem Singen immer aus. - Seite 10 Play/Pause-Taste • Drücken Sie einmal auf die Taste, um einen Titel von CD/CD+G/CD-R/ CD-RW oder ein MP3-File von USB abzuspielen. Die Play/Pause-Anzeige geht an. • Drücken Sie während dem Abspielen erneut auf die Taste, um den Titel anzuhalten. Die Play/Pause- Anzeige blinkt. Stop-Taste Drücken während dem Abspielen auf die Taste, um den Titel abzubrechen.
- Seite 11 Programm-Funktion Diese Funktion ermöglicht es Titel in einer bestimmten Reihenfolge abzuspielen. Diese Funktion kann nur programmiert werden sofern gerade kein Titel läuft. Drücken Sie einmal auf die Programm-Taste. Es wird Programm- Nummer 01 angezeigt und die Programm-Anzeige blinkt. Drücken Sie auf die Vorwärts/Zurück-Taste, um einen Titel für das Programm auszuwählen.
- Seite 12 Sie können bis zu 20 (CD)/99 (MP3) Titel program- mieren. Falls Sie versuchen mehr als 20 (CD)/99 (MP3) Titel zu programmieren wird [FU] bzw. [PROG FULL] im Display angezeigt. Wenn Sie das Programm fertig programmiert ist, drücken Sie auf die Play- Taste, um es abzuspielen.
- Seite 13 Sie können sich die Programmliste ansehen, indem sie im Stop-Modus auf die Vorwärts- oder Zurück- Taste drücken. Eingänge und Funktionen • DC-Eingang: Schließen Sie hier den Stecker des mitgelieferten Netzteils • USB-Eingang: Schließen Sie hier eine USB-Speicher (FAT32 formatiert) bis 32 GB an, um MP3-Files abzuspielen. •...
-
Seite 14: Musikwiedergabe Via Cd+G, Usb, Aux-In
MUSIKWIEDERGABE VIA CD+G, USB, AUX-IN Vor dem Start • Schließen Sie das Gerät über das AV-Kabel an einen kompatiblen TV an. • Stecken Sie das Mikrofon in den Mic1- oder Mic2-Anschluss. Hinweis: Achten Sie darauf, dass der Schalter am Mikrofon vor dem Anschließen immer auf OFF steht, um Feedbacks zu vermeiden. - Seite 15 In der obersten Menüzeile sehen Sie die Anzeige [T: 011/118], was bedeutet: Track 11 von insgesamt 118 Tracks wird abgespielt. Falls die Anzahl der Titel auf CD/USB mehr als 100 beträgt, werden die ersten zwei Zahlen der Track-Nummer durch die Buchstaben A bis F ersetzt (a=10, b=11, c=12, d=13, e=14, f=15).
- Seite 16 Wichtige Hinweise zum Abspielen von CDs • Das CD-Laufwerke kann alle kommerziellen CDs problemlos lesen. Das Gerät liest auch selbstgebrannte CD-R/CD-RW, es kann aber bis zu 10 Sekunden dauern, bis die Wiedergabe zu startet. Wenn die Wiedergabe nicht startet, liegt es wahrscheinlich an der Qualität der CD-R/CD- RW und/oder der Kompatibilität der CD-Compilation-Software.
-
Seite 17: Reinigung Und Pflege
Das Gerät als Lautsprecher benutzen Sie können das Gerät auch als reinen Lautsprecher benutzen. Um Feedback während der Benutzung zu vermeiden, halten Sie das Mikrofon während der Benutzung nicht zu nah an den Lautsprecher. Beenden Sie das Abspielen von CD oder USB und entfernen Sie den 3.5 mm Klinkenstecker, falls einer mit dem AUX-Ausgang verbunden sein sollte. -
Seite 18: Fehlerbehebung
FEHLERBEHEBUNG Problem Mögliche Ursache Lösungsansatz Das Gerät geht Das Netzteil ist nicht Schließen Sie das nicht an wenn sie angeschlossen oder Netzteil an und stecken die Power-Taste der Stecker ist nicht Sie den Stecker in die drücken. an die Steckdose Steckdose. - Seite 19 Problem Mögliche Ursache Lösungsansatz Kein Sound Am TV oder an der Wählen Sie die richtige während Audio Stereoanlage wurde Audioquelle am TV oder über TV oder die falsche Audioquelle an der Stereoanlage. Stereoanlage ausgewählt. abgespielt wird. Das Gerät wurde nicht Wählen Sie den AV- richtig an den Fernseher Eingang wenn Sie die...
-
Seite 20: Spezielle Entsorgungshinweise Für Verbraucher In Deutschland
SPEZIELLE ENTSORGUNGSHINWEISE FÜR VERBRAUCHER IN DEUTSCHLAND Entsorgen Sie Ihre Altgeräte fachgerecht. Dadurch wird gewährleistet, dass die Altgeräte umweltgerecht verwertet und negative Auswirkungen auf die Umwelt und menschliche Gesundheit vermieden werden. Bei der Entsorgung sind folgende Regeln zu beachten: • Jeder Verbraucher ist gesetzlich verpflichtet, Elektro- und Elektronikaltgeräte (Altgeräte) sowie Batterien und Akkus getrennt vom Hausmüll zu entsorgen. - Seite 21 • Bei einem Vertrieb unter Verwendung von Fernkommunikationsmitteln ist die unentgeltliche Abholung am Ort der Abgabe auf Elektro- und Elektronikgeräte der Kategorien 1, 2 und 4 gemäß § 2 Abs. 1 ElektroG, nämlich „Wärmeüberträger“, „Bildschirmgeräte“ (Oberfläche von mehr als 100 cm²) oder „Großgeräte“ (letztere mit mindestens einer äußeren Abmessung über 50 Zentimeter) beschränkt.
-
Seite 22: Hinweise Zur Entsorgung
Importeur für Großbritannien: Berlin Brands Group UK Ltd PO Box 1145 Oxford, OX1 9UW United Kingdom Hiermit erklärt Chal-Tec GmbH, dass der Funkanlagentyp Kara Illumina der Richtlinie 2014/53/EU entspricht. Der vollständige Text der EU-Konformitätserklärung ist unter der folgenden Internetadresse verfügbar: use.berlin/10030549... -
Seite 23: Technical Data
Dear customer, Congratulations on the purchase of your device. Please read the following instructions carefully and follow them to prevent potential damage. We accept no liability for damage caused by disregarding the instructions or improper use. Please scan the QR code to access the latest operating instructions and for further information about the product. -
Seite 24: Safety Instructions
SAFETY INSTRUCTIONS General Instructions • Lightning - If you do not use the device for a longer period of time or in the event of electrical storms, unplug the device from the power outlet or disconnect the device from the antenna connection. This prevents damage to the product due to lightning and overvoltage. -
Seite 25: Device Overview
DEVICE OVERVIEW Audio output (L) DC input Audio output (R) Video output... - Seite 26 1 CDG display 11 Microphone input 1 21 Stop button 2 Play/pause display 12 Microphone input 2 22 Play/pause button 3 Repeat button 13 AUX input 23 Master volume 4 Power button 14 USB input 24 Balance control 5 Back button 15 CD door 25 AVC controller 6 Forward button...
-
Seite 27: Setup And Operation
SETUP AND OPERATION Connecting the device Connect the power supply to the DC input on the back of the unit. Then plug the power plug into a mains socket. NOTE: When you will not be using the device for a longer period of time, pull the plug out of the socket. - Seite 28 Connecting the unit to the TV Connect the supplied RCA cable (white-red-yellow) to the corresponding coloured connectors on the back of the unit and connect to the respective video and audio inputs of the same colour on your TV set. You can also send the audio signal to your stereo system - to do this, connect the yellow video cable to the TV set and the (red and white) audio cables to a free (AUX) input on your stereo system.
-
Seite 29: Buttons And Functions
Connecting the microphone Plug the supplied microphone into the Mic1 or Mic2 connector on the bottom left of the unit. The microphone is now mixed with the music from CD/CD+G/USB. Switch on the microphone before singing and always switch it off after singing. -
Seite 30: Play/Pause Button
Play/pause button • Press the button once to play a track from CD/CD+G/CD-R/CD-RW or an MP3 file from USB. The play/pause indicator will come on. • During playback, press the button again to pause the track. The play/ pause display will flash. Stop button During playback, press the button to stop the track. - Seite 31 Programme function This function allows tracks to be played in a specific order. This function can only be programmed if no title is currently playing. Press the programme button once. Programme number 01 is displayed and the programme indicator flashes. Press the forward/back button to select a title for the programme.
- Seite 32 You can programme up to 20 (CD)/99 (MP3) tracks. If you try to programme more than 20 (CD)/99 (MP3) tracks, [FU] or [PROG FULL] will appear in the display. When you have finished programming the programme, press the play button to play it. The programme indicator and the display light up. During playback, you can use the forward/backward button to skip forward or backward one track.
- Seite 33 You can view the programme list by pressing the forward or back button in stop mode. Inputs and functions • DC input: Connect the plug of the supplied power supply unit here. • USB input: Connect a USB memory (FAT32 formatted) up to 32 GB here to play MP3 files.
-
Seite 34: Music Playback Via Cd+G, Usb, Aux-In
MUSIC PLAYBACK VIA CD+G, USB, AUX-IN Before starting • Connect the unit to a compatible TV using the AV cable. • Plug the microphone into the Mic1 or Mic2 connector. Note: Make sure that the switch on the microphone is always in the OFF position before connecting to avoid feedback. - Seite 35 In the top menu line you will see the display [T: 011/118], which means: Track 11 of a total of 118 tracks is being played. If the number of tracks on CD/USB is more than 100, the first two numbers of the track number are replaced by the letters A to F (a=10, b=11, c=12, d=13, e=14, f=15).
- Seite 36 Important notes on playing CDs • The CD drive can read all commercial CDs without any problems. The unit also reads self-burned CD-R/CD-RW, but it may take up to 10 seconds to start playback. If playback does not start, it is probably due to the quality of the CD-R/CD-RW and/or the compatibility of the CD compilation software.
-
Seite 37: Cleaning And Care
Using the device as a speaker You can also use the unit as a pure speaker. To avoid feedback, do not hold the microphone too close to the speaker during use. Stop playback from CD or USB and remove the 3.5 mm jack plug if one is connected to the AUX output. -
Seite 38: Troubleshooting
TROUBLESHOOTING Problem Potential cause Possible solution The unit does not The power supply unit Connect the power turn on when you is not connected or the supply and insert the press the power plug is not connected to plug into the socket. button. - Seite 39 Problem Potential cause Possible solution No sound while The wrong audio source Select the correct audio audio is being was selected on the TV source on the TV or played via TV or or the stereo system. stereo system. stereo system. The unit has not been Select the AV input when connected to the TV...
-
Seite 40: Disposal Considerations
For Great Britain: Hereby, Chal-Tec GmbH declares that the radio equipment type Kara Illumina is in compliance with the relevant statutory requirements. The full text of the declaration of conformity is available at the following... -
Seite 41: Datos Técnicos
Estimado cliente: Le felicitamos por la adquisición de este producto. atentamente siguiente manual siga cuidadosamente las instrucciones de uso con el fin de evitar posibles daños. La empresa no se responsabiliza de los daños ocasionados por un uso indebido del producto o por haber desatendido las indicaciones de seguridad. -
Seite 42: Instrucciones De Seguridad
INSTRUCCIONES DE SEGURIDAD Indicaciones generales • Rayos: si no va a utilizar la unidad durante un período prolongado de tiempo, o si hay rayos, desenchufe la unidad de la toma de corriente y desconecte el conector de la antena. Esto evitará que el producto resulte dañado por los rayos y las subidas de tensión. -
Seite 43: Descripción General Del Aparato
DESCRIPCIÓN GENERAL DEL APARATO Salida de audio (L) Entrada CC Salida de audio (DER) Salida de vídeo... - Seite 44 1 pantalla CDG 11 Entrada de micrófono 1 21 Botón de stop 2 Indicador de reproducción/ 12 Entrada de micrófono 2 22 Botón Play/Pause pausa 3 Botón de repetición 13 Entrada AUX 23 Volumen principal 4 Botón de encendido 14 Entrada USB 24 Control del equilibrio 5 Botón Atrás 15 Tapa de CD...
-
Seite 45: Puesta En Marcha Y Funcionamiento
PUESTA EN MARCHA Y FUNCIONAMIENTO Conectar dispositivos Conecte la fuente de alimentación a la entrada de CC de la parte posterior de la unidad. Conecte el enchufe en una toma de corriente. NOTA: Desconecta el enchufe de la toma de corriente si no va a utilizar el aparato durante un largo periodo de tiempo. - Seite 46 Conexión del aparato al televisor Conecte el cable RCA suministrado (blanco-rojo-amarillo) a los conectores de color correspondientes de la parte trasera de la unidad y conéctelo a las entradas de vídeo y audio del mismo color de su televisor. También puedes enviar la señal de audio al equipo de música; para ello, conecta el cable amarillo (de vídeo) al televisor y los cables de audio (rojo y blanco) a una entrada (auxiliar) disponible en tu equipo de música.
-
Seite 47: Botones Y Funciones
Conectar el micrófono Conecte el micrófono suministrado en el conector Mic1 o Mic2 situado en la parte inferior izquierda de la unidad. El micrófono se mezcla ahora con la música del CD/CD+G/USB. Enciende el micrófono antes de cantar y apágalo siempre después. Nota: No golpee el micrófono mientras esté... - Seite 48 Botón Play/Pause • Pulsa el botón una vez para reproducir una pista desde un CD/ CD+G/CD-R/CD-RW o un archivo MP3 desde un USB. El indicador de reproducción/pausa se enciende. • Durante la reproducción, pulse de nuevo el botón para pausar la pista. El indicador play/pause parpadea.
- Seite 49 Función de programa Esta función permite reproducir las pistas en un orden determinado. Esta función sólo se puede programar si no se está reproduciendo ningún título. Pulse una vez el botón del programa. Aparece el número de programa 01 y el indicador de programa parpadea. Pulse el botón de avance/retroceso para seleccionar un título del programa.
- Seite 50 Puedes programar hasta 20 (CD)/99 (MP3) pistas. Si intenta programar más de 20 (CD)/99 (MP3) pistas, en la pantalla aparece [FU] o [PROG FULL]. Cuando haya terminado de programar el programa, pulse el botón de reproducción para reproducirlo. El indicador de programa y la pantalla se iluminan.
- Seite 51 Puede ver la lista de programas pulsando el botón de avance o retroceso en el modo de parada. Entradas y funciones • Entrada DC: Conecte aquí el enchufe de la fuente de alimentación suministrada. • Entrada USB: Conecta aquí una memoria USB (con formato FAT32) de hasta 32 GB para reproducir archivos MP3.
-
Seite 52: Reproducción De Música Mediante Cd+G, Usb, Aux-In
REPRODUCCIÓN DE MÚSICA MEDIANTE CD+G, USB, AUX-IN Antes del comienzo • Conecta la unidad a un televisor compatible mediante el cable AV. • Conecta el micrófono al conector Mic 1 o Mic 2. Nota: Asegúrese de que el interruptor del micrófono esté siempre en la posición OFF antes de conectarlo para evitar la retroalimentación. - Seite 53 En la línea de menú superior aparece la indicación [T: 011/118], que significa: Se está reproduciendo la pista 11 de un total de 118 pistas. Si el número de pistas del CD/USB es superior a 100, las dos primeras cifras del número de pista se sustituyen por las letras A a F (a=10, b=11, c=12, d=13, e=14, f=15).
- Seite 54 Notas importantes sobre la reproducción de CDs • La unidad de CD puede leer todos los CD comerciales sin problemas. La unidad también lee CD-R/CD-RW autograbados, pero puede tardar hasta 10 segundos en iniciar la reproducción. Si la reproducción no se inicia, probablemente se deba a la calidad del CD-R/CD-RW y/o a la compatibilidad del software de compilación de CD.
-
Seite 55: Limpieza Y Cuidado
Utilización del aparato como altavoz También puedes utilizar la unidad como un puro altavoz. Para evitar la retroalimentación durante el uso, no sostenga el micrófono demasiado cerca del altavoz durante su uso. Deje de reproducir el CD o el USB y retire la clavija de 3,5 mm si está conectada a la salida AUX. -
Seite 56: Reparación De Anomalías
REPARACIÓN DE ANOMALÍAS Problema Posible causa Propuesta de solución El aparato no La fuente de Conecte la fuente de se enciende al alimentación no está alimentación el enchufe pulsar el botón de conectada o el enchufe a la toma de corriente. encendido. - Seite 57 Problema Posible causa Propuesta de solución No hay sonido Se ha seleccionado Seleccione la fuente mientras se una fuente de audio de audio correcta en reproduce el incorrecta en el televisor el televisor o sistema audio en la o en el equipo de música. estéreo.
-
Seite 58: Indicaciones Sobre La Retirada Del Aparato
Oxford, OX1 9UW Reino Unido Chal-Tec GmbH declara por la presente que el tipo de sistema de radio Kara Illumina cumple con la Directiva 2014/53/UE. El texto completo de la declaración de conformidad de la UE está disponible en la siguiente... -
Seite 59: Fiche Technique
Cher client, chère cliente, Toutes nos félicitations pour l’acquisition de ce nouvel appareil. Lisez attentivement les indications suivantes et suivez-les pour éviter d'éventuels dommages. Nous ne saurions être tenus pour responsables des dommages dus au non-respect des consignes et à la mauvaise utilisation de l’appareil. -
Seite 60: Consignes De Sécurité
CONSIGNES DE SÉCURITÉ Consignes générales • Foudre - Si vous prévoyez de ne pas utiliser l'appareil pendant une longue période ou en cas d'orage, retirez la fiche de la prise ou débranchez l'antenne de l'appareil. Cela empêchera la foudre et les surtensions d'endommager le produit. -
Seite 61: Aperçu De L'appareil
APERÇU DE L'APPAREIL Sortie audio (L) Entrée CC Sortie audio (R) Sortie vidéo... - Seite 62 1 Voyant CDG 11 Entrée micro 1 21 Touche Stop 2 Indicateur de lecture/pause 12 Entrée micro 2 22 Touche PLAY/PAUSE 3 Touche de répétition 13 Entrée AUX 23 Volume principal 4 Touche POWER 14 Port USB 24 Réglage de la balance 5 Touche Retour 15 Porte CD 25 Réglage AVC...
-
Seite 63: Mise En Marche Et Utilisation
MISE EN MARCHE ET UTILISATION Branchement de l'appareil Branchez l'adaptateur secteur sur l'entrée CC à l'arrière de l'appareil. Branchez ensuite la fiche dans une prise. REMARQUE : Lorsque vous n'utilisez pas l'appareil pendant une durée prolongée, débranchez la fiche de la prise. - Seite 64 Connexion de l'appareil au téléviseur Connectez le câble RCA fourni (blanc-rouge-jaune) aux prises de couleur correspondante à l'arrière de l'appareil et connectez aux entrées vidéo et audio de la même couleur sur votre téléviseur. Vous pouvez également envoyer le signal audio à votre chaîne stéréo - pour ce faire, branchez le câble vidéo jaune au téléviseur et le câble audio (rouge- blanc) à...
-
Seite 65: Touches Et Fonctions
Connexion du micro Raccordez le micro fourni à la prise Mic1 ou Mic2 en bas à gauche de l'appareil. Le micro est maintenant mélangé à la musique du CD/CD+G/ USB. Allumez le micro avant de chanter et éteignez-le toujours après avoir chanté. - Seite 66 Touche PLAY/PAUSE • Appuyez une fois sur la touche pour lire une piste de CD/CD+G/CD-R/ CD-RW ou un fichier MP3 à partir d'une clé USB. Le témoin de lecture/ pause s'allume. • Pendant la lecture, appuyez à nouveau sur la touche pour mettre le titre en pause.
- Seite 67 Fonction programme Cette fonction permet de lire les titres dans un ordre précis. Cette fonction ne peut être programmée que si aucun titre n'est en cours de lecture. Appuyez une fois sur la touche Programme. Le numéro de programme 01 s'affiche et l'indicateur de programme clignote. Appuyez sur Suivant/Précédent pour sélectionner un titre pour le programme.
- Seite 68 Vous pouvez programmer jusqu'à 20 titres (CD) /99 titres (MP3). Si vous essayez de programmer plus de 20 titres (CD) ou 99 (MP3), [FU] ou [PROG FULL] s'affiche à l'écran. Lorsque la programmation est terminée, appuyez sur Play pour la lire. L'indicateur de programme et l'écran s'allument.
- Seite 69 Vous pouvez consulter la liste des programmes en appuyant sur Suivant ou Précédent en mode stop. Entrées et fonctions • Entrée CC : branchez ici la fiche de l'adaptateur secteur fourni. • Entrée USB : branchez ici une clé USB (formatée FAT32) jusqu'à 32 Go pour lire des fichiers MP3.
-
Seite 70: Lecture De Musique Via Cd+G, Usb, Aux-In
LECTURE DE MUSIQUE VIA CD+G, USB, AUX-IN Avant de commencer • Connectez l'appareil à un téléviseur compatible à l'aide du câble AV. • Branchez le micro dans la prise Mic1 ou Mic2. Remarque : veillez à ce que l'interrupteur du micro soit toujours sur OFF avant de le brancher, afin d'éviter les larsens. - Seite 71 Dans la ligne supérieure du menu, l'indication [T : 011/118] signifie que la piste 11 sur un total de 118 pistes est en cours de lecture. Si le nombre de pistes sur le CD/USB est supérieur à 100, les deux premiers chiffres du numéro de piste sont remplacés par les lettres A à...
- Seite 72 Remarques importantes sur la lecture des CD • Le lecteur de CD peut lire sans problème tous les CD commerciaux. L'appareil lit également les CD-R/CD-RW auto-gravés, mais la lecture peut prendre jusqu'à 10 secondes avant de démarrer. Si la lecture ne démarre pas, cela est probablement dû...
-
Seite 73: Nettoyage Et Entretien
Utiliser l'appareil comme enceinte Vous pouvez également l'utiliser comme simple enceinte. Pour éviter le feedback pendant l'utilisation, ne tenez pas le micro trop près de l'enceinte pendant l'utilisation. Arrêtez la lecture du CD ou de l'USB et retirez la prise jack 3,5 mm si l'une d'entre elles est connectée à... -
Seite 74: Résolution Des Problèmes
RÉSOLUTION DES PROBLÈMES Problème Cause possible Solution L'appareil ne L'adaptateur secteur Connectez l'adaptateur s'allume pas n'est pas branché ou la secteur à l'appareil lorsque vous fiche n'est pas connectée et insérez la fiche appuyez sur à la prise de courant. d'alimentation dans la le bouton prise. - Seite 75 Problème Cause possible Solution Pas de son Une mauvaise source Sélectionnez la bonne pendant la lecture audio a été sélectionnée source audio sur le audio sur la TV ou sur le téléviseur ou la téléviseur ou la chaîne la chaîne stéréo. chaîne stéréo.
-
Seite 76: Informations Sur Le Recyclage
Oxford, OX1 9UW United Kingdom Chal-Tec GmbH déclare par la présente que l'équipement radio de type Kara Illumina est conforme à la directive 2014/53/UE. Le texte intégral de la déclaration de conformité UE est disponible à l'adresse Internet suivante : use.berlin/10030549... - Seite 77 Gentile cliente, La ringraziamo per l'acquisto del dispositivo. La preghiamo di leggere attentamente le seguenti indicazioni e di seguirle per evitare eventuali danni. Non ci assumiamo alcuna responsabilità per danni scaturiti da una mancata osservanza delle indicazioni relative alla sicurezza e da un uso improprio del dispositivo. Scansionare il codice QR seguente per accedere al manuale d'uso più...
-
Seite 78: Avvertenze Di Sicurezza
AVVERTENZE DI SICUREZZA Avvertenze generiche • Colpo di fulmine - Se non si usa più il dispositivo o se ci sono temporali, staccare la spina dalla presa elettrica e scollegare il dispositivo dall'antenna. In questo modo si evitano danni al prodotto dovuti a colpi di fulmine e sovratensione. -
Seite 79: Descrizione Del Dispositivo
DESCRIZIONE DEL DISPOSITIVO Uscita audio (L) Ingresso DC Uscita audio (R) Uscita VIDEO... - Seite 80 1 Indicazione CDG 11 Ingresso microfono 1 21 Tasto Stop 2 Indicazione di riproduzione/ 12 Ingresso microfono 2 22 Tasto Play/Pausa pausa 3 Tasto di ripetizione 13 Ingresso AUX 23 Volume Master 4 Tasto Power 14 Ingresso USB 24 Regolazione Balance 5 Tasto Indietro 15 Sportello del vano CD 25 Regolazione AVC...
-
Seite 81: Messa In Funzione E Utilizzo
MESSA IN FUNZIONE E UTILIZZO Collegare il dispositivo Collegare l'alimentatore all'ingresso DC sul retro del dispositivo. Inserire quindi la spina in una presa elettrica. NOTA: quando non si usa più il dispositivo, staccare la spina dalla presa. - Seite 82 Collegare il dispositivo al televisore Collegare il cavo RCA (bianco-rosso-giallo) incluso in consegna alle connessioni corrispondenti sul lato posteriore del dispositivo e collegarlo poi ai rispettivi ingressi video e audio dello stesso colore sul televisore. Il segnale audio può essere trasmesso anche all'impianto stereo: collegare il cavo video giallo al televisore e il cavo audio (rosso-bianco) a un ingresso Aux libero dell'impianto stereo.
-
Seite 83: Tasti E Funzioni
Collegare il microfono Collegare il microfono in dotazione alla connessione Mic1 o Mic2 in basso a sinistra sul dispositivo. Il microfono viene ora mixato con la musica da CD/CD+G/USB. Accendere il microfono prima di cantare e spegnerlo sempre dopo la performance. - Seite 84 Tasto Play/Pausa • Premere una volta il tasto per riprodurre un brano da CD/CD+G/CD-R/ CD-RW o un file MP3 da USB. L'indicazione di riproduzione/pausa si accende. • Durante la riproduzione, premere nuovamente il tasto per mettere in pausa la traccia. L'indicazione di riproduzione/pausa lampeggia. Tasto Stop Durante la riproduzione, premere il tasto per arrestare la traccia.
- Seite 85 Funzione di programmazione Questa funzione consente di riprodurre le tracce in un ordine specifico. Questa funzione può essere utilizzata solo se non è in corso la riproduzione di alcuna traccia. Premere una volta il tasto di programmazione. Viene mostrato il numero 01 e l'indicazione di programmazione lampeggia.
- Seite 86 È possibile programmare fino a 20 tracce (CD)/99 tracce (MP3). Se si cerca di programmare più di 20 tracce (CD)/99 tracce (MP3), sul display compare [FU] o [PROG FULL]. Una volta terminata la programmazione della playlist, premere il tasto Play per riprodurla.
- Seite 87 È possibile visualizzare le tracce della playlist premendo Avanti o Indietro in modalità Stop. Ingressi e funzioni • Ingresso DC: inserire qui la spina dell'alimentatore in dotazione. • Ingresso USB: collegare qui un supporto di memoria USB (con formattazione FAT32) fino a 32 GB per riprodurre file MP3. •...
- Seite 88 RIPRODUZIONE MUSICALE TRAMITE CD+G, USB, AUX-IN Prima di procedere • Collegare il dispositivo a un televisore compatibile utilizzando il cavo • Collegare il microfono alla connessione Mic1 o Mic2. Nota: prima di effettuare il collegamento, accertarsi che l'interruttore del microfono sia sempre in posizione OFF per evitare feedback. Cantare su tracce CD/CD+G/CD-R/CD-RW o USB Far scorrere il cursore delle funzioni su [CD].
- Seite 89 Nella riga superiore del menu compare [T: 011/118] a indicare che è in corso la riproduzione della traccia 11 su un totale di 118 tracce. Se il numero di tracce su CD/USB è superiore a 100, le prime due cifre del numero della traccia sono sostituite dalle lettere da A a F (a=10, b=11, c=12, d=13, e=14, f=15).
- Seite 90 Note importanti sulla riproduzione dei CD • Il lettore CD è in grado di leggere tutti i CD commerciali senza problemi. Il dispositivo legge anche CD-R/CD-RW masterizzati in casa, ma l'avvio della riproduzione può richiedere fino a 10 secondi. Se la riproduzione non si avvia, ciò...
-
Seite 91: Pulizia E Manutenzione
Utilizzo del dispositivo come altoparlante È possibile utilizzare il dispositivo anche come altoparlante. Per evitare il feedback durante l'uso, non tenere il microfono troppo vicino all'altoparlante durante l'uso. Interrompere la riproduzione CD o USB e rimuovere il jack da 3,5 mm se è... -
Seite 92: Risoluzione Dei Problemi
RISOLUZIONE DEI PROBLEMI Problema Possibile causa Soluzioni Il dispositivo L'alimentatore non è Collegare l'alimentatore non si accende collegato o la spina non e inserire la spina nella quando si preme è inserita nella presa. presa elettrica. il tasto Power. Il dispositivo La presa non trasmette Controllare se la presa non si accende... - Seite 93 Problema Possibile causa Soluzioni Nessun suono È stata selezionata Selezionare la sorgente durante la la sorgente audio audio corretta sul riproduzione sbagliata sul televisore o televisore o sull'impianto dell'audio su sull'impianto stereo. stereo. televisore o Il dispositivo non è stato Selezionare l'ingresso impianto stereo.
-
Seite 94: Dichiarazione Di Conformità
Berlin Brands Group UK Ltd PO Box 1145 Oxford, OX1 9UW United Kingdom Con la presente, Chal-Tec GmbH dichiara l'impianto radio Kara Illumina conforme alla direttiva 2014/53/ UE. Il testo completo della dichiarazione di conformità UE è disponibile al seguente indirizzo Internet: use. berlin/10030549...