Inhaltsverzeichnis
Werbung
Verfügbare Sprachen
Verfügbare Sprachen
Quicklinks
Werbung
Kapitel
Inhaltsverzeichnis

Verwandte Anleitungen für auna Kara Super Star


Inhaltszusammenfassung für auna Kara Super Star
-
Seite 3: Inhaltsverzeichnis
Sehr geehrter Kunde, wir gratulieren Ihnen zum Erwerb Ihres Gerätes. Lesen Sie die folgenden Hinweise sorgfältig durch und befolgen Sie diese, um möglichen Schäden vorzubeugen. Für Schäden, die durch Missachtung der Hinweise und unsachgemäßen Gebrauch entstehen, übernehmen wir keine Haftung. INHALT Technische Daten 4 Sicherheitshinweise 5... -
Seite 4: Technische Daten
TECHNISCHE DATEN Artikelnummer 10031562 Stromversorgung Eingang: AC 100-240 V ~ 50/60 Hz Netzgerät Ausgang: DC 12 V 2 A RMS-Leistung 2 x 2 W Dateiformat: FAT32 Größe des Speichermediums: 1-64 GB AUX-IN 3.5 mm Mikrofone 2 x dynamische Mikrofone... -
Seite 5: Sicherheitshinweise
SICHERHEITSHINWEISE Auswahl des Standorts • Verwenden Sie das Gerät nicht an extrem heißen, kalten, staubigen oder feuchten Orten. • Stellen Sie das Gerät auf eine flache und ebene Oberfläche. • Achten Sie darauf, dass Sie die Luftzirkulation des Geräts nicht behindern, etwa durch einen Ort mit unzureichender Belüftung oder indem Sie es mit einem Tuch bedecken oder es auf einen Teppich stellen. -
Seite 6: Lieferumfang
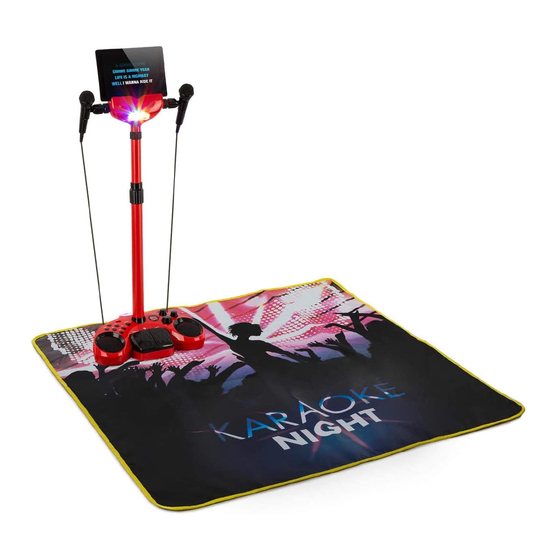
LIEFERUMFANG • 1 x Karaokemaschine • 1 x beleuchtete Bühnenmatte • 2 x Mikrofone mit Kabel (3m/ 10Fuß) • 1 x Netzstromstecker (DC 12 V ~ 2 A Ausgangsleistung) • 1 x Bedienungsanleitung EINFÜHRUNG Bitte lesen Sie die Bedienungsanleitung vor der Inbetriebnahme des Geräts aufmerksam durch, um sich mit allen Funktionen des Geräts vertraut zu machen. -
Seite 7: Aufstellung
AUFSTELLUNG VORSICHT: • Dieses Gerät enthält kleine Teile, die von Kindern verschluckt werden können. • Nur Erwachsene sollten das Gerät installieren. • Die Tablet-/Smartphonehalterung und das Stativ sind nur für leichte und kleine Geräte geeignet. - Seite 8 1. Entfernen Sie vorsichtig das gesamte Verpackungsmaterial. Folgende Teile sollten für den Zusammenbau des Geräts vorhanden sein. A Mikrofonständer und Sockelanschluss B Mikrofonständer (breitere Außenstange) C Höhenanpassung D Mikrofonständer (obere Stange) E Mikrofonhalter und Steckverbindung F Fixierschraube G Gerätebasis 2. Stecken Sie den Mikrofonständer (breitere Außenstange) vollständig in den Sockelanschluss (1).
-
Seite 9: Geräteübersicht
GERÄTEÜBERSICHT... -
Seite 10: Inbetriebnahme
13 LED-Bildschirm Taste für Lichteffekte vorheriger Titel 14 Mikrofonlautstärke nächster Titel 15 DC 12V Eingang Wiedergabe/Pause 16 Anschluss Mikrofon 1 Linkes Pedal (Wiedergabe/ 17 Anschluss Mikrofon 2 Pause) 18 AUX IN-Anschluss Rechtes Pedal (Nächster Titel) 19 Bühnenmattenanschluss Einstellung Lautstärke 20 höhenverstellbarer Einstellung Echo Mikrofonständer Funktionstaste... -
Seite 11: Anschluss Des Mikrofons
• Ziehen Sie Ihre Schuhe aus, bevor Sie die Matte betreten. 1. Verbinden Sie die beleuchtete Bühnenmatte mit dem Bühnenmattenanschluss an der Rückseite des Geräts. 2. Die LED-Umrandung an den 4 Seiten der Bühnenmatte wird aufleuchten und verändert sich je nach Musik. Hinweis: Wenn die Lichter der Bühnenmatte zu grell sein sollten, schalten Sie die Raumbeleuchtung ein. -
Seite 12: Verwendung Von Aux In
VERWENDUNG VON AUX IN Diese Funktion ermöglicht es Ihnen, ein Tablet oder Smartphone (beides nicht im Lieferumfang enthalten) mit heruntergeladener Musik und Texten zum Karaokesingen mit dem Gerät zu verbinden. 1. Legen Sie Ihr externes Gerät in die Tablet-/Smartphonehalterung des Mikrofonständers. -
Seite 13: Verwendung Von Usb
VERWENDUNG VON USB Die Karaokemaschine ist dazu in der Lage, auf USB-Sticks gespeicherte MP3-Audiodateien zu dekodieren und wiederzugeben. Hinweis: Wenn die auf Ihrem USB-Stick gespeicherte Musik nicht mit dem MP3-Standard konform ist, besteht die Möglichkeit, dass diese von der Karaokemaschine nicht richtig wiedergegeben werden kann. 1. -
Seite 14: Verwendung Von Bt
3. Aktivieren Sie die BT-Funktion Ihres externen Geräts und wählen Sie den Suchmodus aus. 4. „Auna Kara“ wird in Ihrer BT-Geräteliste angezeigt werden. 5. Wählen Sie „Auna Kara“ aus und geben Sie, falls notwendig, „0000“ als Passwort ein. 6. Drücken Sie zum Beenden des BT-Modus entweder die Funktionstaste zur Auswahl eines anderen Modus oder deaktivieren Sie die BT-Funktion Ihres externen Geräts. -
Seite 15: Hinweise Zur Entsorgung
stecken. Stellen Sie nun alles wieder so ein, als ob Sie das Gerät zum ersten Mal verwenden würden. HINWEISE ZUR ENTSORGUNG Befindet sich die linke Abbildung (durchgestrichene Mülltonne auf Rädern) auf dem Produkt, gilt die Europäische Richtlinie 2012/19/EU. Diese Produkte dürfen nicht mit dem normalen Hausmüll entsorgt werden. - Seite 16 Dear Customer, Congratulations on purchasing this equipment. Please read this manual carefully and take care of the following hints on installation and use to avoid technical damages. Any failure caused by ignoring the items and cautions mentioned in the operation and installation instructions are not covered by our warranty and any liability.
-
Seite 17: Specifications
SPECIFICATIONS Item number 10031562 Power source Input: AC 100-240 V ~ 50/60 Hz Power adaptor Output: DC 12 V 2 A RMS power 2 x 2 W Dateiformat: FAT32 Größe des Speichermediums: 1-64 GB AUX-IN 3.5 mm Microphone 2 x Dynamic Microphone... -
Seite 18: Safety Instructions
SAFETY INSTRUCTIONS On placement • Do not use the unit in places which are extremely hot, cold, dusty or humid. • Place the unit on a flat and even surface. • Do not restrict the air flow of the unit by placing it in a place with poor ventilation, by covering it with a cloth or by placing it on a carpet. -
Seite 19: Contents Of Your Product
CONTENTS OF YOUR PRODUCT • Auna Karaoke Machine x 1 set • Lighted Stage Mat x 1 pc • Microphone with Cable (3 m / 10 feet) x 2 pcs • AC Adapter (DC 12 V 2 A output) x 1 pc •... -
Seite 20: Installation
INSTALLATION CAUTION: • This product contains small parts. Only adults should install this product. • The Tablet /Smartphone Holder and Stand are designed for light weight and small size tablets only. 1. Carefully remove all packing materials to find parts below for assembly. A. - Seite 21 connector plug (2). 4. The microphone bracket (wider outer pole) socket and Microphone holder and cradle connector plug (5). 5. Fully insert the cradle connector into the Microphone stand (upper pole) and fix it by fixing screw (included) (4). 6. Turn the height adjusting knob in counter-clockwise direction to loosen the joint, then move upper pole up and down to adjust the microphone stand to desired height.
-
Seite 22: Product Overview
PRODUCT OVERVIEW... -
Seite 23: Getting Started
13 LED DISPLAY Light show Button Skip Backward Button 14 Mic. Volume Control Knob Skip Forward Button 15 DC 12V Input Jack Play / Pause Button 16 Mic.1 Input Jack Left Pedal (Play / Pause Button) 17 Mic.2 Input Jack Right Pedal (Skip Forward 18 AUX IN Jack Button ) -
Seite 24: Connecting The Microphone
CONNECTING THE MICROPHONE Caution - Tapping or dropping the microphone while it is on can permanently damage your microphone. Do not swing the microphone around by the cord. Note: To prevent feedback or whistling from occurring, please be sure that the microphone is not too close to unit’s speaker. Turn the ON/OFF switch located on the Microphone to the OFF position when you put the microphone into Mic Holder. -
Seite 25: Aux In
AUX IN This feature allows you to plug a tablet or smartphone (both not included) which contains downloaded music and lyrics for Karaoke singing. 1. Placed your external device in the Tablet/Smartphone Holder on Mic Stand. 2. Plug a 3.5mm audio cable (included) into the headphone jack of your tablet or smartphone and connect the other end (3.5mm plug) into the AUX IN jack on the rear side of this unit. -
Seite 26: Usb Operation
USB OPERATION The system is able to decode and playback MP3 files which are stored in the memory media with USB thumb drive. Note: If music stored in your USB thumb drive does not conform to the MP3 standard, it may not play properly. 1. -
Seite 27: Bt Operation
3. Activate your Bluetooth device and select the search mode. 4. “Auna Kara” will appear on your Bluetooth device list. 5. Select “Auna Kara” and enter “0000” for the password if necessary. 6. To disconnect the Bluetooth function, press the FUNCTION button to switch to another mode or disconnect the function from your Bluetooth device. -
Seite 28: Disposal Considerations
DISPOSAL CONSIDERATIONS According to the European waste regulation 2012/19/EU this symbol on the product or on its packaging indicates that this product may not be treated as household waste. Instead it should be taken to the appropriate collection point for the recycling of electrical and electronic equipment. - Seite 29 Chère cliente, cher client, Toutes nos félicitations pour l’acquisition de ce nouvel appareil. Veuillez lire attentivement les instructions suivantes de branchement et d’utilisation afin d’éviter d’éventuels dommages. Le fabricant ne saurait être tenu pour responsable des dommages dus au non-respect des consignes de sécurité et à...
-
Seite 30: Fiche Technique
FICHE TECHNIQUE Numéro d'article 10031562 Alimentation Entrée : AC 100-240 V ~ 50/60 Hz Netzgerät Sortie : DC 12 V 2 A Puissance RMS 2 x 2 W Système de fichiers : FAT32 Taille des supports de mémoire : 1-64 GB AUX-IN 3.5 mm Microphone... -
Seite 31: Consignes De Sécurité
CONSIGNES DE SÉCURITÉ Protection contre les effets des rayons • N'essayez pas de démonter le boîtier de l'appareil, car le rayon laser est dangereux pour les yeux. • Éteignez immédiatement l'appareil si des liquides ou des objets solides pénètrent à l'intérieur du boîtier. •... -
Seite 32: Livraison
tache sur les meubles. Il est toutefois possible que certains vernis à base d’huile, produits de protection du bois ou sprays de nettoyage ramollissent les pieds et que ceux-ci laissent ensuite des taches ou des résidus de gomme sur les meubles. Pour éviter des dégâts sur vos meubles, il est recommandé... -
Seite 33: Installation
INSTALLATION ATTENTION : • Cet appareil contient des petites pièces qui pourraient être avalées par des enfants. • Seul un adulte peut installer cet appareil. • Le support de tablette ou de smartphone et le trépied ne conviennent que pour des appareils légers et petits. - Seite 34 1. Retirez avec précaution l’ensemble des matériaux d’emballage. Les pièces suivantes doivent être présentes pour l’assemblage de l’appareil. A support de micro et prise de socle B support de microphone (barre extérieure plus large) C ajustement de la hauteur D support de microphone (barre supérieure) E support de microphone et connecteur F vis de fixation G base de l’appareil...
-
Seite 35: Aperçu De L'appareil
APERÇU DE L'APPAREIL... -
Seite 36: Mise En Service
13 Écran LED Touche pour les effets lumineux Titre précédent 14 Volume du micro Titre suivant 15 Entrée DC 12V Lecture/Pause 16 Prise du micro 1 Pédale de gauche (Lecture/ 17 Prise du micro 2 Pause) 18 Prise AUX IN Pédale de droite (Titre suivant) 19 Prise du tapis de scène Réglage du volume... -
Seite 37: Bramchement Du Micro
1. Branchez le tapis de scène lumineux au connecteur du tapis de scène à l'arrière de l'appareil. 2. La bordure LED sur les 4 côtés du tapis de scène s'allume et change en fonction de la musique. Remarque : lorsque les lumières du tapis de scène sont trop faibles, allumez l’éclairage de la pièce. -
Seite 38: Utilisation De Le Prise Aux In
UTILISATION DE LE PRISE AUX IN Cette fonction vous permet de brancher sur l’appareil une tablette ou un smartphone (non fournis) pour chanter pour connecter de la musique et des paroles de karaoké téléchargées. 1. Placez votre appareil externe sur le support de tablette/smartphone du support de micro. -
Seite 39: Utilisation De Usb
UTILISATION DE USB La machine à karaoké est également capable de décoder et lire les fichiers audio MP3 sur clé USB. Remarque : si vos fichiers musicaux enregistrés sur clé USB ne sont pas au format standard MP3, il est possible que la machine à karaoké ne puisse les lire correctement. -
Seite 40: Utilisation Du Bt
4. „Auna Kara“ va s’afficher dans la liste des appareils BT. 5. Choisissez „Auna Kara“ et saisissez si besoin le mot de passe „0000“. 6. Pour quitter le mode BT, appuyez sur la touche de fonction pour sélectionner un autre mode ou bien désactivez la fonction BT de votre appareil externe. -
Seite 41: Conseils Pour Le Recyclage
CONSEILS POUR LE RECYCLAGE Le pictogramme ci-contre apposé sur le produit signifie que la directive européenne 2012/19/UE s‘applique (poubelle à roues barrée d’une croix). Ces produits ne peuvent être jetés dans les poubelles domestiques courantes. Renseignez-vous concernant les règles appliquées pour la collecte d’appareils électriques et électroniques. - Seite 42 Gentile Cliente, La ringraziamo per aver acquistato il dispositivo. La preghiamo di leggere attentamente le seguenti istruzioni per l’uso e di seguirle per evitare possibili danni tecnici. Non ci assumiamo alcuna responsabilità per danni scaturiti da una mancata osservazione delle avvertenze di sicurezza e da un uso improprio del dispositivo.
-
Seite 43: Dati Tecnici
DATI TECNICI Numero articolo 10031562 Alimentazione Ingresso: AC 100-240 V ~ 50/60 Hz Alimentatore Uscita: DC 12 V 2 A Potenza RMS 2 x 2 W Formato file: FAT32 Dimensioni del supporto di memoria: 1-64 GB AUX-IN 3.5 mm Microfoni 2 x microfoni dinamici AVVERTENZE DI SICUREZZA Protezione dall’esposizione alle radiazioni... -
Seite 44: Volume De Consegna
consegna. Condensa • Se il dispositivo viene posizionato in una stanza umida e riscaldata, è possibile che al suo interno si formino gocce d’acqua o condensa. • La funzionalità del dispositivo può essere limitata dalla condensa al suo interno. • In tal caso, lasciare spento il dispositivo per 1-2 ore prima di accenderlo o riscaldare gradualmente la stanza, facendola asciugare prima di procedere all’utilizzo del dispositivo. -
Seite 45: Installazione
Pedale – permette di selezionare la musica Altoparlanti – permettono di condividere la musica con famiglia e amici Effetti luminosi – emozionanti effetti luminosi LED sui 4 lati dello stuoino da palcoscenico USB-Anschluss – possibilità di connettere una chiavetta USB per riprodurre file audio MP3 INSTALLAZIONE ATTENZIONE:... - Seite 46 1. Rimuovere con cura tutto il materiale di imballaggio. I seguenti componenti devono essere disponibili per il montaggio del dispositivo. A Stativo del microfono e collegamento del basamento B Stativo del microfono (asta esterna più larga) C Manopola di regolazione dell’altezza D Stativo del microfono (asta superiore) E Supporto del microfono e connettore a innesto F Viti di fissaggio...
-
Seite 47: Panoramica Del Dispositivo
PANORAMICA DEL DISPOSITIVO... -
Seite 48: Messa In Funzione
13 Schermo LED Tasto per effetti luminosi Titolo precedente 14 Volume microfono Titolo successivo 15 Ingresso DC 12V Play/Pausa 16 Connessione microfono 1 Pedale sinistro (Play/Pausa) 17 Connessione microfono 2 Pedale destro (Titolo 18 Connessione AUX IN successivo) 19 Connessione stuoino da palco Impostazione volume 20 Stativo microfono regolabile in Impostazione eco... -
Seite 49: Collegare Il Microfono
1. Collegare lo stuoino luminoso da palcoscenico con l’apposita connessione sul retro del dispositivo. 2. I bordi LED sui 4 lati dello stuoino si accendono e cambiano in base alla musica. Avvertenza: se le luci dello stuoino dovessero essere troppo intense, accendere la luce nella stanza. -
Seite 50: Utilizzare La Funzione Aux In
UTILIZZARE LA FUNZIONE AUX IN Questa funzione permette di collegare smartphone o tablet (non inclusi nel volume di consegna) con il dispositivo, per utilizzare musica e testi scaricati. 1. Posizionare il dispositivo esterno nel supporto per tablet/smartphone sullo stativo per microfono. 2. -
Seite 51: Utilizzare La Funzione Usb
UTILIZZARE LA FUNZIONE USB Il dispositivo per karaoke è in grado di decodificare e riprodurre file audio MP3 salvati su chiavette USB. Avvertenza: se la musica salvata sulla chiavetta USB non è conforme con lo standard MP3, è possibile che questa non venga riprodotta correttamente dal dispositivo per karaoke. -
Seite 52: Utilizzare La Funzione Bt
4. “Auna Kara” comparirà nell’elenco dei dispositivi BT. 5. Selezionare “Auna Kara” e, se necessario, inserire la password “0000”. 6. Per terminare la modalità BT premere il tasto funzione per selezionare un’altra modalità o disattivare la funzione BT del dispositivo esterno. -
Seite 53: Avviso Di Smaltimento
AVVISO DI SMALTIMENTO Se sul prodotto è presente la figura a sinistra (il bidone dei rifiuti con le ruote), si applica la direttiva europea 2012/19/UE. Questi prodotti non possono essere smaltiti con i rifiuti normali. Informarsi sulle disposizioni vigenti per la raccolta di dispositivi elettrici ed elettronici. Attenersi alle disposizioni vigenti e non smaltire i vecchi dispositivi con i rifiuti domestici. - Seite 54 Estimado cliente: Le felicitamos por la adquisición de este producto. Lea atentamente el siguiente manual y siga cuidadosamente las instrucciones de uso con el fin de evitar posibles daños. La empresa no se responsabiliza de los daños ocasionados por un uso indebido del producto o por haber desatendido las indicaciones de seguridad.
-
Seite 55: Datos Técnicos
DATOS TÉCNICOS Número de artículo 10031562 Entrada: AC 100-240 V ~ 50/60 Hz Fuente de Salida: DC 12 V 2 A alimentación RMS-Leistung 2 x 2 W Formato: FAT32 Tamaño del medio de almacenamiento: 1-64 GB AUX-IN 3.5 mm Micrófono 2 micrófonos dinámicos... -
Seite 56: Indicaciones De Seguridad
INDICACIONES DE SEGURIDAD Auswahl des Standorts • No intente desmontar la carcasa del aparato, ya que la radiación del rayo láser es nociva para los ojos. • Apague inmediatamente el aparato si algún líquido u objeto sólido se filtra en su interior. •... -
Seite 57: Envío
recomendamos que utilice almohadillas de fieltro autoadhesivas. Pegue las almohadillas bajo las patas de goma antes de colocar el aparato sobre un mueble de madera. ENVÍO • 1 x Equipo de karaoke • 1 x Tapete como escenario iluminado • 2 x Micrófonos con cable (3m/10 pies) •... -
Seite 58: Instalación
INSTALACIÓN ATENCIÓN: • Este aparato contiene piezas pequeñas. Mantenga el aparato lejos de los niños para evitar que las traguen. • Solamente los adultos deben instalar el aparato. • El soporte... - Seite 59 1. Retire con cuidado el embalaje. El envío debe incluir los siguientes accesorios. A Trípode para micrófono y base de conexiones B Trípode para micrófono (barra exterior ancha) C Regulador de altura D Trípode para micrófono (barra superior) E Soporte de micrófono y conector F Tornillo de fijación G Base de la unidad principal 2.
-
Seite 60: Vista General Del Aparato
VISTA GENERAL DEL APARATO... -
Seite 61: Puesta En Fucionamiento
13 Pantalla LED otón para el juego de luces Pista anterior 14 Regulador de volumen de micrófono Siguiente pista 15 Entrada DC 12V Reproducción/Pausa 16 Entrada para micrófono 1 Pedal izquierdo (Reproducción/ Pausa) 17 Entrada para micrófono 2 Pedal derecho (siguiente pista) 18 Entrada AUX 19 Conexión para el tapete Regulador de volumen... -
Seite 62: Conctar El Mícrofono
posterior del aparato. 2. Los 4 lados LEDs del tapete se iluminarán y cambiarán de luz según la música. Atención: Si la luz del tapete es muy deslumbrante, encienda la luz de la habitación. CONCTAR EL MÍCROFONO Atención: No tire ni deje caer el micrófono, ya que podría dañarlo de manera permanente. -
Seite 63: Utilizar La Entrada Aux In
UTILIZAR LA ENTRADA AUX IN Esta función le permite conectar una tableta o un teléfono inteligente (no incluidos en el envío) con canciones y letras descargadas para cantar karaoke. 1. Introduzca un dispositivo externo en el soporte de tableta/teléfono inteligente del trípode para micrófono. 2. -
Seite 64: Utilizar El Puerto Usb
UTILIZAR EL PUERTO USB El equipo de karaoke es capaz de descodificar y reproducir archivos de audio MP3 almacenados en los lápices USB. Atención: Si la música almacenada en su lápiz USB no cumple con los estándares MP3, es posible que el equipo de karaoke no la pueda reproducir correctamente. -
Seite 65: Utilizar Bt
3. Active la función Bluetooth en su dispositivo y seleccione el modo de búsqueda. 4. «Auna Kara» aparecerá en su lista de dispositivos Bluetooth. 5. Seleccione «Auna Kara» y si es necesario, introduzca «0000» como contraseña. 6. Para desconectar la función Bluetooth, pulse el botón FUNCTION para cambiar a otro modo o desconecte la función Bluetooth desde su... -
Seite 66: Indicaciones Sobre La Retirada Del Aparato
INDICACIONES SOBRE LA RETIRADA DEL APARATO Si el aparato lleva adherida la ilustración de la izquierda (el contenedor de basura tachado), entonces rige la directiva europea 2012/19/UE. Este producto no debe arrojarse a un contenedor de basura común. Infórmese sobre las leyes territoriales que regulan la recogida separada de aparatos eléctricos y electrónicos.