Herunterladen Inhalt Inhalt Diese Seite drucken
Geemarc DALLAS20 Bedienungsanleitung

Geemarc DALLAS20 Bedienungsanleitung

Grosstastentelefon mit lautstaerkeregelung
Inhaltsverzeichnis

Werbung

Verfügbare Sprachen

Verfügbare Sprachen

1

Werbung

Inhaltsverzeichnis
loading

Inhaltszusammenfassung für Geemarc DALLAS20

  • Seite 2: Inhaltsverzeichnis

    1) INTRODUCTION ............... 4 2) SAFETY INSTRUCTION ............ 4 3) KEY’S DESCRIPTION ............5 Delete key ..................6 4) PHONE’S INSTALLATION ..........7 Unpacking the Telephone ............7 Connecting telephone ..............7 5) PHONE’S SETTING ............7 Moving in the menu ..............7 Settings date &...
  • Seite 3 Call timing .................. 13 Mute function and ringtone mute ..........13 Boost function ................14 Setting VIP numbers ..............14 Smart backlight function ............. 15 8) ONE TOUCH MEMORY BUTTON........15 Record a memory touch button ..........15 Make a call using the memory buttons ........15 9) TROUBLESHOOTING .............
  • Seite 4: Introduction

    This telephone is compatible with hearing aids. It is important that you read the instructions below in order to use your Geemarc telephone to its full potential. Keep this user guide in a safe place for future reference. 2- SAFETY INSTRUCTIONS...
  • Seite 5: Key's Description

    KEY’S DESCRIPTION 6. Avoid using this unit during an electrical storm, move or disconnect the unit, there may be a remote risk of electronic shock from lightning and thunder. 7. Unprofessional person cannot open telephone even meets troubles, please send to service center. 3- KEY’S DESCRIPTION...
  • Seite 6: Delete Key

    KEY’S DESCRIPTION DOWN DEL/R Ring/mute indicator SET/STORE M1 memory key M2memory key Brightness control/ FALSH M3 memory key VIP/ PAUSE Hands-free Hands-free indicator Redial MUTE BOOST Digital dialing key Ring Tone level (Hi- Lo- Off) DELETE KEY Pressing the delete key allows you to erase the digit last entered when you are setting your IP card number and password, or when you are dialing a number you wish to call.
  • Seite 7: Phone's Installation

    PHONE’S INSTALLATION / PHONE’S SETTING 4- PHONE’S INSTALLATION UNPACKING THE TELEPHONE When unpacking the telephone, you should find the following in the box:  1 Dallas 20 unit  1 Dallas 20 handset with curly cord  1 Telephone line cord ...
  • Seite 8: Settings Date & Time

    PHONE’S SETTING between the different items of the sub-menus. You can leave the setting mode by pressing the delete key. SETTING DATE AND TIME When in the setting menu, go to the "SET 1 DATE" sub-menu and press the key. The display shows the year and flashes. Use the arrow keys to set the correct year and press the key to confirm.
  • Seite 9: Settings Pabx Code

    PHONE’S SETTING SETTING PABX CODE When in the setting menu, go to the "SET 3 PCODE" sub-menu and press the key. The display reads “PCODE-” and flashes. Use the arrow keys to select your PABX code from 0 to 9 and press the key to confirm.
  • Seite 10: Setting Alarm Clock

    PHONE’S SETTING telecommunication service provider. If you happen to press the wrong key while entering the aforementioned codes, you can press on the delete key to erase an incorrect digit. Press the key to confirm each code once they have been entered. Setting an automatic IP number allows your telephone to automatically dial said number for you, providing that the phone number you have dialed starts with “0”.
  • Seite 11: Setting Flash Time

    PHONE’S SETTING / CALL LOG INFORMATION alarm will be cancelled automatically. SETTING FLASH TIME When in the setting menu, go to the "SET 6 FLASH" sub-menu and press the key. The display reads “FLASH 4 1000”. There are 4 flash time groups that can be selected depending on the country you are located in.
  • Seite 12: Reviewing Past Incoming Calls And Calling Back

    CALL LOG INFORMATION caller’s number will be shown on the lower line of the display. If an incoming call is not answered, the caller’s number will be saved and the word “NEW” will be visible on the left side of the display. If the same number has called twice or more, the word “REPEAT”...
  • Seite 13: Using Your Phone

    CALL LOG INFORMATION/ USING YOUR PHONE REVIEWING PAST OUTGOING CALLS With the receiver “on-hook”, press the “OUT” key to review the list of the last 17 dialed numbers as well as the call duration for each. Press the “OUT” key each time you wish to see the number dialed before the one shown on the display.
  • Seite 14: Mute Function And Ringtone Mute

    USING YOUR PHONE MUTE FUNCTION AND RINGTONE MUTE A. In the process of talking with someone, you can press the "MUTE" key to send to mute, accompanied by the indicator light, press the "MUTE" key again, the indicator light is off, unmute and continue the call (handle and free It can be used when the state is muted).
  • Seite 15: Smart Backlight Function

    USING YOUR PHONE / ONE TOUCH MEMORY BUTTON is deleted.  When there is an incoming call from a VIP number, the icon is visible on the display next to the number of the person calling. The telephone will also use a different ringtone for the calls from VIP numbers.
  • Seite 16: Troubleshooting

    TROUBLE SHOOTINGS The telephone will dial the number automatically. You can also press the key to dial out the last dialed number. 9- TROUBLE SHOOTINGS No voice Check if the handset is properly connected at the base or line cord is not broken.
  • Seite 17: Guarantee

    10-GUARANTEE From the moment your Geemarc product (Dallas 20) is purchased, Geemarc guarantee it for the period of two years. During this time, all repairs or replacements (at our discretion) are free of charge. Should you experience a problem then contact our help line or visit our website at www.geemarc.com.
  • Seite 18 For product support and help visit our website at www.geemarc.com E-mail : help@geemarc.com telephone 01707 387602 lines are open 09h00 to 16h00 Mon to Fri Geemarc Telecom SA, Parc de l’Etoile 2 Rue Galilée 59760 Grande-Synthe This product is made in China To Geemarc Telecom...
  • Seite 19 1) Introduction ..............21 Consignes de Sécurité ..........21 Descriptif des touches ..........23 Touche d'effacement ............24 4) Installation du téléphone ..........25 Contenu de la boite ............25 Raccordement du téléphone ........... 25 5) Réglages du téléphone ..........26 Navigation dans les menus de réglage ......
  • Seite 20 Utilisation du téléphone ..........33 Utilisation de la fonction de précomposition ....33 Accès aux listes d'appel entrant ou sortant ..... 33 Durée des appels ............34 Fonction secret et arrêt de la sonnerie ......34 Fonction d’amplification ........... 34 Réglage des numéros VIP ..........
  • Seite 21: Introduction

    à jour, car certaines mises à jour et modifications importantes pourraient vous être communiquées ! vous remercions d'avoir acheté notre Geemarc Dallas20. Il s'agit d'un téléphone amplifié à grandes touches. Le clavier à grandes touches est facile à voir et à utiliser, il permet d'éviter toute erreur de numérotation.
  • Seite 22 CONSIGNES DE SECURITE nettoyage liquides ou en aérosol. Utilisez un chiffon humide pour le nettoyage. N'insérez pas d'objets de quelque nature que ce soit dans ce produit par les fentes du boîtier, car ils pourraient toucher des points de tension dangereux ou court-circuiter des composants, ce qui présenterait un risque d'incendie ou d'électrocution.
  • Seite 23: Descriptif Des Touches

    DESCRIPTIF DES TOUCHES 3- DESCRIPTIF DES TOUCHES HAUT SORTIE SUPPRIMER...
  • Seite 24: Touche D'effacement

    DESCRIPTIF DES TOUCHES Indicateur de sonnerie/ silence RÉGLAGE/MÉMORISATION Touche mémoire M1 Touche mémoire M2 Contrôle de la luminosité/ FLASH Touche mémoire M3 VIP/ PAUSE Touche Mains libres Indicateur Mains libres activé ou non MODE SECRET AMPLIFICATEUR Touche de composition Niveau de la sonnerie (Fort, Faible, Arrêt) TOUCHE D'EFFACEMENT La touche d'effacement vous permet de supprimer le dernier...
  • Seite 25: Installation Du Téléphone

    DESCRIPTIF DES TOUCHES / INSTALLATION DU TÉLÉPHONE 3 secondes pour supprimer tous les appels entrants ou les numéros sortants. 4- INSTALLATION DU TÉLÉPHONE CONTENU DE LA BOITE Le téléphone est emballé dans une boîte contenant les éléments suivants :  1 téléphone Dallas 20 ...
  • Seite 26: Réglages Du Téléphone

    RÉGLAGES DU TÉLÉPHONE 5- RÉGLAGES DU TÉLÉPHONE NAVIGATION DANS LES MENUS DE RÉGLAGE Lorsque le combiné est raccroché, appuyez sur la touche pour entrer dans le menu de réglage, l'écran affiche « SET 1 DATE (Régler la date 1) ». En appuyant sur les touches fléchées vous pouvez naviguer dans le menu de réglage et voir les différents sous-menus disponibles.
  • Seite 27: Réglage De L'indicatif Local À 5 Chiffres

    RÉGLAGES DU TÉLÉPHONE pour confirmer. Vous devez maintenant régler le jour et l'heure (d'abord l'heure, puis les minutes). Suivez la même méthode que précédemment et utilisez les touches fléchées pour vous rendre aux valeurs souhaitées avant d'appuyer sur la touche pour confirmer.
  • Seite 28: Réglage Du Code Pabx

    RÉGLAGES DU TÉLÉPHONE RÉGLAGE DU CODE PABX Lorsque vous êtes dans le menu de réglage, allez au sous-menu « SET 3 CODE (Réglage du code 3) » et appuyez sur la touche L'écran affiche « PCODE - »et clignote. Utilisez les touches fléchées pour sélectionner votre code PABX compris entre 0 et 9 et appuyez sur la touche pour confirmer.
  • Seite 29: Réglage De L'alarme

    RÉGLAGES DU TÉLÉPHONE fléchées pour activer ou désactiver la fonction IP automatique. Pour l'activer, sélectionnez « AUTO IP ON (IP automatique activée » et appuyez sur la touche . L’écran affiche maintenant « INPUT CODE (Entrer le code) ». À l'aide des touches numérotées, entrez le numéro de service spécial, le numéro de carte et le mot de passe qui vous ont été...
  • Seite 30: Réglage De La Durée Du Flash

    RÉGLAGES DU TÉLÉPHONE L'écran affiche « 00 -00 OFF ». Utilisez les touches fléchées pour régler l'heure l'alarme, sélectionnant individuellement chaque chiffre de l'heure et des minutes et en appuyant sur la touche pour confirmer chaque chiffre. Pour activer l'alarme, utilisez les touches fléchées pour passer de «...
  • Seite 31: Réglage Du Volume De La Sonnerie

    RÉGLAGES DU TÉLÉPHONE / JOURNAL DES APPELS correct et appuyez sur la touche pour confirmer. RÉGLAGE DU VOLUME DE LA SONNERIE Le commutateur situé à l'arrière du téléphone vous permet de régler le volume de la sonnerie sur « Hi » pour Fort, « Lo » pour Faible ou «...
  • Seite 32: Vérification Du Journal Des Appels Entrants Et Rappel

    JOURNAL DES APPELS existe déjà, un symbole de « doublon » s'affiche. Si le numéro de l'appelant est confidentiel, l'écran LCD affiche « ----P---- ». Si le signal de numéro de l'appelant est hors de portée, « ----O---- » s'affiche. Si le signal de numéro de l'appelant est incorrect, « ----E--- - »...
  • Seite 33: Vérification Du Journal Des Appels Sortants

    JOURNAL DES APPELS / UTILISATION DU TELEPHONE VÉRIFICATION DU JOURNAL DES APPELS SORTANTS Lorsque le récepteur est raccroché, appuyez sur la touche « OUT (Sortie) » pour consulter la liste des 17 derniers numéros composés ainsi que la durée de l'appel pour chacun d'eux. Appuyez sur la touche «...
  • Seite 34: Durée Des Appels

    UTILISATION DU TELEPHONE (unidirectionnelle) pour vérifier les appels sortants. DURÉE DES APPELS Après la composition en mode décroché, le téléphone affiche automatiquement la durée de l’appel. FONCTION SECRET ET ARRÊT DE LA SONNERIE A. En cours d’une conversation avec quelqu'un, vous pouvez appuyer sur la touche «...
  • Seite 35: Fonction De Rétro-Éclairage Intelligent

    UTILISATION DU TELEPHONE par un. Appuyez sur la touche pour enregistrer le numéro qui s'affiche sur l'écran comme numéro VIP. L'icône apparaît à côté du numéro.  Les numéros enregistrés comme numéros VIP ne peuvent pas être supprimés individuellement de la liste des 61 derniers appels entrants.
  • Seite 36: Touches Mémoires

    TOUCHES MEMOIRES 8-TOUCHES MEMOIRES ENREGISTREMENT D’UNE TOUCHE MÉMOIRE Pour mémoriser un numéro dans l'une des touches de mémorisation, lorsque le combiné est « raccroché », composez le numéro que vous souhaitez mémoriser et appuyez sur la touche . L'écran affiche «...
  • Seite 37: Dépannage

    DEPANNAGE 9-DÉPANNAGE Aucun son Vérifiez que le combiné est correctement branché à la base ou que le câble téléphonique n'est pas cassé. Réception uniquement Vérifiez que l'orifice du microphone n'est pas obstrué. Rouille ou fuite des piles Enlevez la rouille puis essuyez le liquide qui fuit. Bruit Déplacez les appareils électroniques autour du Dallas 20.
  • Seite 38 Le produit ne doit pas être altéré ou démonté par quiconque n'étant pas un représentant agréé de Geemarc. La garantie de Geemarc ne limite en aucun cas vos droits légaux. IMPORTANT : VOTRE REÇU FAIT PARTIE DE VOTRE GARANTIE ET DOIT ÊTRE CONSERVÉ...
  • Seite 39 : www.geemarc.com Email : sav@geemarc.fr Téléphone : 03 28 58 75 99 www.geemarc.com ouvert de 09h00 à 16h00 du lundi au vendredi Geemarc Telecom SA, Parc de l’Etoile 2 Rue Galilée 59760 Grande-Synthe Produit fabriqué en Chine pour Geemarc Telecom...
  • Seite 40 1) Einleitung ............42 2) Sicherheitshinweise ......... 42 3) Tastenbeschreibung ........44 ............45 Löschtaste 4) Einrichten des telefons ........46 ........46 Auspacken des Telefons ........46 Anschließen des Telefons 5) Einstellungsmenü ..........47 ....... 47 Navigation im Einstellungsmenü ........
  • Seite 41 . 54 Stummschaltefunktion und Klingelton-Stummschaltung ............. 54 Boost-Funktion ........54 VIP-Nummern einrichten ....55 Intelligente Hintergrundbeleuchtungsfunktion 8) One-touch-speichertaste ......... 55 .......... 55 Speichertaste einrichten ........56 Anruf mit Speichertaste tätigen 9) Fehlersuche ............56 10) Garantie .………………………………………..57 11) Erklärungen…………………………………….58 12) Wiederverwertung…………………………..58...
  • Seite 42: Einleitung

    Benutzerhandbuch, da es wichtige Aktualisierungen und Änderungen geben kann, die Sie beachten sollten !!! Herzlichen Glückwunsch zum Kauf Ihres Geemarc Dallas20. Dies ist ein verstärktes Telefon mit großen Tasten. Das Tastenfeld mit großen Tasten ist leicht zu sehen und zu bedienen und hilft, ein Fehlwählen zu vermeiden.
  • Seite 43 SICHERHEITSHINWEISE sprühbaren Reinigungsmittel. Verwenden Sie zum Reinigen ein feuchtes Tuch. 4.Schieben niemals Gegenstände jeglicher durch Gehäuseschlitze dieses Produkt, gefährliche Spannungspunkte berühren oder Teile kurzschließen können, was zu einem Brand- oder Stromschlagrisiko führen kann. 5.Verschütten Sie niemals Flüssigkeiten jeglicher Art auf dem Produkt.
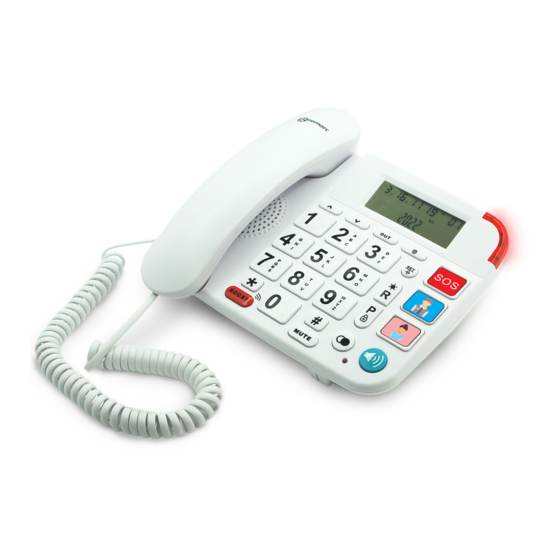
  • Seite 44: Tastenbeschreibung

    TASTENBESCHREIBUNG 3- TASTENBESCHREIBUNG 1. Hoch 2. Runter 3. Aus...
  • Seite 45: Löschtaste

    TASTENBESCHREIBUNG 4. Links/ rechts 5. Anzeige ton/ stummschaltung 6. Einstellen/ speichern 7. M1 speichertaste 8. M2 speichertaste 9. Einstellung der helligkeit/ blinken 10. M3 speichertaste 11. VIP/ pause 12. Freisprechfunktion 13. Anzeige für freisprechfunktion 14. Wiederwahl 15. Stummschaltung 16. Boost 17.
  • Seite 46: Einrichten Des Telefons

    EINRICHTEN DES TELEFONS 4- Einrichten des Telefons AUSPACKEN DES TELEFONS Wenn Sie das Telefon auspacken, sollten Sie Folgendes in der Verpackung finden: 1 Dallas 20 Einheit 1 Dallas 20 Handset mit Spiralkarbel 1 Telefonkabel 1 Bedienungsanleitung ANSCHLIESSEN DES TELEFONS 1 - Schließen Sie das Spiralkabel zwischen der linken Seite der Basis und der Unterseite des Mobilteils an.
  • Seite 47: Einstellungsmenü

    EINSTELLUNGSMENÜ 5-EINSTELLUNGSMENÜ NAVIGATION IM EINSTELLUNGSMENÜ Drücken Sie bei aufgelegtem Hörer die Taste , um das Einstellungsmenü aufzurufen, auf dem Display wird „SET 1 DATE“ angezeigt. Durch Drücken der Pfeiltasten können Sie im Einstellungsmenü navigieren und die verschiedenen verfügbaren Untermenüs anzeigen. Wenn Sie das gesuchte Untermenü...
  • Seite 48: Festlegen Der 5-Stelligen Ortsvorwahl

    EINSTELLUNGSMENÜ mit den Pfeiltasten zu den gewünschten Werten, bevor Sie die Taste zur Bestätigung drücken. Sobald getan, zeigt Display die von Ihnen eingegebenen Informationen an. Nachdem Uhrzeit und Datum eingestellt sind, zeigt das LCD-Display automatisch die entsprechende Woche und den aktuellen Monatskalender an. Das CID-Signal für eingehende Anrufe aktualisiert automatisch Datum und Uhrzeit des ursprünglichen Systems, und das Signal für eingehende DTMF-Anrufe hat keine Auswirkung auf die...
  • Seite 49: Automatische Ip Einrichten

    EINSTELLUNGSMENÜ Wenn auch eine automatische IP-Nummer eingestellt wurde, wählt das Telefon zuerst den PABX-Code und dann die automatische IP-Nummer. Das Telefon pausiert für 700 ms, nachdem die einzelnen PABX-Codes gewählt werden. Um die automatische PABX-Wählfunktion zu deaktivieren, stellen Sie sie über das Untermenü „SET 3 PCODE“ auf „ -“ ein. Das Telefon wählt den ausgehenden Code nicht, und nur die Nummern nach dem ausgehenden Code werden gewählt.
  • Seite 50: Einstellung Des Weckers

    EINSTELLUNGSMENÜ eingehenden und ausgehenden Anrufen, wenn die erste Nummer "0" ist, fügt das Telefon die Nummer automatisch vor der Nummer hinzu. Stellen Sie die IP-Nummer ein. EINSTELLUNG DES WECKERS Gehen Sie im Einstellungsmenü zum Untermenü „SET 5 ALERT“ und drücken Sie die Taste.
  • Seite 51: Ruftonlautstärke Einstellen

    EINSTELLUNGSMENÜ / ANRUFLISTE Frankreich, 600 für die USA oder 1000, falls zutreffend. Mit den Pfeiltasten können Sie die entsprechende Gruppe auswählen und mit der Taste bestätigen. RUFTONLAUTSTÄRKE EINSTELLEN Mit der Umschalttaste auf der Rückseite des Telefons können Sie die Lautstärke des Klingeltons je nach Wunsch entweder auf „Hi“ für laut, „Lo“...
  • Seite 52: Eingegangene Anrufe Überprüfen Und Zurückrufen

    ANRUFLISTE Wenn dieselbe Nummer zweimal oder öfter angerufen hat, erscheint das Wort „REPEAT“ auf der linken Seite des Displays. Wenn es eine bestehende Nummer gibt, erscheint das Zeichen „duplicate“. Wenn die Nummer des Anrufers zurückgehalten wird, zeigt das LCD "----P----" an. Wenn die Nummer des Anrufers außerhalb des Bereichs liegt, wird "----O----"...
  • Seite 53: Anrufliste / Benutzung Des Telefons

    ANRUFLISTE / BENUTZUNG DES TELEFONS Hinweis: Wenn die Nummer des Anrufers 16 Ziffern überschreitet, dann werden nur die letzten 16 Ziffern auf dem Display angezeigt. AUSGEHENDE ANRUFE ÜBERPRÜFEN Drücken Sie bei aufgelegtem Hörer die Taste „OUT“, um die Liste der letzten 12 gewählten Nummern sowie die Gesprächsdauer für jede Nummer anzuzeigen.
  • Seite 54: Anrufzeiten

    BENUTZUNG DES TELEFONS ANRUFZEITEN Nach dem Wählen bei abgehobenem Hörer gibt das Telefon automatisch die Anrufzeit ein, und eine manuelle Zeitmessung ist nicht zulässig. STUMMSCHALTEFUNKTION UND KLINGELTON STUMMSCHALTUNG A. Während Sie mit jemandem sprechen, können Sie die Taste „MUTE“ drücken, um die Stummschaltung zu aktivieren, begleitet von der Anzeigeleuchte, drücken Sie die Taste „MUTE“...
  • Seite 55: Benutzung Des Telefons / One-Touch-Speichertaste

    BENUTZUNG DES TELEFONS / ONE-TOUCH-SPEICHERTASTE Als VIP-Nummern registrierte Nummern können nicht einzeln aus der Liste der letzten 61 eingehenden Anrufe gelöscht werden. Die einzige Möglichkeit, sie zu löschen, besteht darin, alle Nummern auf einmal aus der Liste zu löschen, indem Sie die Löschtaste drei Sekunden lang gedrückt halten.
  • Seite 56: Anruf Mit Speichertaste Tätigen

    ONE-TOUCH-SPEICHERTASTE / FEHLERSUCHE unter“ an. Sie haben dann 3 Sekunden Zeit, um zu wählen, auf welcher der drei Speichertasten Sie die Nummer speichern möchten. Drücken Sie entweder M1, M2 oder M3, um Ihre Wahl zu treffen. Wenn Sie keine Taste drücken, kehrt das Telefon in den Ruhemodus zurück.
  • Seite 57: Garantie

    Sie gratis. Sollten Sie ein Problem feststellen, kontaktieren Sie bitte unsere Hotline oder besuchen Sie unsere Internet-Seite unter www.geemarc.com/de. Die Garantie deckt weder Unfälle noch Fahrlässigkeit oder Bruchschäden an irgendwelchen Teilen ab. An dem Produkt dürfen weder Änderungen vorgenommen...
  • Seite 58: Wiederverwertung

    ERKLÄRUNGEN / WIEDERVERWERTUNG der kein zugelassener Geemarc Vertreter ist. Die Geemarc- Garantie schränkt Ihre gesetzlichen Rechte in keiner Weise ein. WICHTIG: IHRE QUITTUNG IST TEIL IHRER GARANTIE. SIE MUSS AUFBEWAHRT FALL GEWÄHRLEISTUNGSANSPR ÜCHEN VORGELEGT WERDEN. Bitte beachten Sie: Die Garantie ist nur in Deutschland gültig.
  • Seite 59 Produktsupport und Hilfe erhalten Sie auf unserer Webseite unter www.geemarc.com/de Produktsupport und Hilfe erhalten Sie auf unserer Webseite unter www.geemarc.com/de E-mail:kundendienst@geemarc.com Telefon: +49(0)30 209 95 789 Geemarc Telecom SA, Parc de l’Etoile 2 Rue Galilée 59760 Grande-Synthe Von Geemarc Telecom im China hergestellt...
  • Seite 60 UG Dallas 20_EnFrGe_v1.2 Geemarc Telecom SA Parc de l’Etoile 2 Rue Galilée 59760 Grande-Synthe E-mail : help@geemarc.com telephone 01707 387602 lines are open 09h00 to 16h00 Mon to Fri...

Inhaltsverzeichnis