Herunterladen Inhalt Inhalt Diese Seite drucken
auna DiscoFever Bedienungsanleitung
Vorschau ausblenden Andere Handbücher für DiscoFever:

Werbung

Verfügbare Sprachen
  • DE

Verfügbare Sprachen

  • DEUTSCH, seite 1

Werbung

Inhaltsverzeichnis
loading

Inhaltszusammenfassung für auna DiscoFever

  • Seite 3: Inhaltsverzeichnis

    Sehr geehrter Kunde, wir gratulieren Ihnen zum Erwerb Ihres Gerätes. Lesen Sie die folgenden Hinweise sorgfältig durch und befolgen Sie diese, um möglichen Schäden vorzubeugen. Für Schäden, die durch Missachtung der Hinweise und unsachgemäßen Gebrauch entstehen, übernehmen wir keine Haftung. Scannen Sie den folgenden QR-Code, um Zugriff auf die aktuellste Bedienungsanleitung und weitere Informationen rund um das Produkt zu erhalten:...
  • Seite 4: Sicherheitshinweise

    SICHERHEITSHINWEISE Allgemeine Hinweise • Blitzschlag - Wenn Sie das Gerät länger nicht benutzen oder es gewittert, ziehen Sie den Stecker aus der Steckdose der trennen Sie das Gerät vom Antennenanschluss. Dadurch werden Schäden am Produkt durch Blitzschlag und Überspannung vermieden. •...
  • Seite 5: Bedienelemente Und Anschlüsse

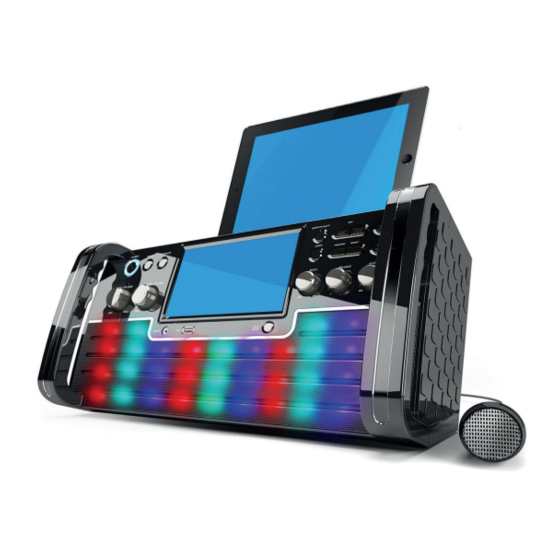
    BEDIENELEMENTE UND ANSCHLÜSSE PROGRAM/REPEAT SCREEN ON/OFF (Bildschirm (Programmieren/ ein/aus) Wiederholmodus) SKIP +/- (Vorspulen/ FUNCTION (Funktion) Zurückspulen) PLAY/PAUSE/PAIR POWER LED (Abspielen/Pause/BT-Gerät (Betriebsleuchte) koppeln) STOP/LIGHT I/O (Stopp/ ON/OFF (Ein/Aus) Licht ein/aus) KEY/PAGE +/- (Karaokespur TFT SCREEN (Bildschirm) anpassen/Blättern vor/ zurück) MIC VOL (Mikrofon- AVC (Automatische Lautstärke) Stimmkontrolle)
  • Seite 6 AUDIO OUT (R) (Rechter MIC 1 (Mikrofon 1) Audioausgang) AUDIO OUT (L) (Linker MIC 2 (Mikrofon 2) Audioausgang) VIDEO OUT (Videoausgang) USB-Anschluss Stromanschluss LINE IN (Audioeingang) Displayanzeigen Aktuelles Medium Programm-Modus Aktueller Track / Tracks Wiederhol-Modus gesamt Abspielen / Pause / Stop Spielzeit...
  • Seite 7: Anschlussvarianten

    Tablet-Halterung • Hängen Sie die Halterung an den Aufnahmen an der Rückseite ein. • Stellen Sie Ihr Tablet im Querformat darauf. Tablet-Halterung ANSCHLUSSVARIANTEN Stromanschluss: Verbinden Sie das Gerät per mitgeliefertem Netzteil mit einer Haushaltssteckdose:...
  • Seite 8 Video: Nutzen Sie das mitgelieferte Video-Kabel (gelb), um den Video- Ausgang (Video Out) der Karaokeanlage mit dem Video-Eingang (Video In) Ihres TV-Geräts/Beamers/etc. zu verbinden. In den meisten Fällen müssen Sie am TV-Gerät/Beamer die Eingangsquelle entsprechend auswählen. Während einige Geräte entsprechende Menüs haben, kann es bei anderen Input-Kanäle geben, die hinter oder vor den regulären Empfangskanälen oder auf der „0“...
  • Seite 9: Allgemeine Bedienung

    Sie die Mikrofonkapseln nicht in Richtung der Lautsprecher und halten Sie die Kapseln nicht mit den Händen zu. ALLGEMEINE BEDIENUNG Gerät ein- und ausschalten: Schalten Sie den DiscoFever mit der Taste POWER ein und aus. Master-Volume einstellen: Stellen Sie mit der Taste MASTER VOL die Lautstärke ein.
  • Seite 10: Karaoke-Funktionen

    Playlisten programmieren Stoppen Sie die Wiedergabe. Im Stop-Modus können Sie Abspiellisten mit bis zu 20 Einträgen programmieren: Drücken Sie PROGRAM/REPEAT. “PRG SET 01:XX” wird auf dem Display angezeigt. Nutzen Sie die VOR/ZURÜCK-Tasten, um den gewünschten Titel auszuwählen. Drücken Sie dann PRO- GRAM, um den gewählten Titel zu Ihrer Playlist hinzuzufügen.
  • Seite 11: Bt-Verbindung Herstellen

    BT-VERBINDUNG HERSTELLEN Schalten Sie mit FUNCTION in den BT-Modus. Aktivieren Sie BT auf Ihrem Smartphone/Tablet und ver- binden Sie mit DISCOFEVER in der Liste der gefundenen Geräte in Reichweite. Sie können nun die Klanginhalte Ihrer mobilen Medienbibliothek über den DiscoFever streamen.
  • Seite 12: Problembehebung

    Gerät lässt sich nicht Überprüfen Sie den Sitz des Netzteils und die einschalten Funktion der Steckdose (Sicherungen?). TV gibt keinen Ton TV-VOL ist auf Minimum? über den DiscoFever TV ausgeschaltet? aus. Cinchkabel lose? TV: Audio-Eingang nicht gewählt? CD Player funktioniert Disc verkehrt herum eingelegt? nicht korrekt.
  • Seite 13: Reinigung Und Pflege

    Kein Mikrofon-Signal. MIC VOL auf Minimum gedreht? Mikrofon ausgeschaltet? Keine Video- TFT ausgeschaltet? Darstellung auf dem Keine Karaoke-CD (CD+G) eingelegt? TFT. Kein Ton im BT-Modus War der Pairing-Vorgang erfolgreich? BT-Gerät stummgeschaltet? REINIGUNG UND PFLEGE Hinweis: Schalten Sie das Gerät vor der Reinigung aus. Entfernen Sie das Netzteil und/oder entfernen Sie die Batterien.
  • Seite 14: Spezielle Entsorgungshinweise Für Verbraucher In Deutschland

    SPEZIELLE ENTSORGUNGSHINWEISE FÜR VERBRAUCHER IN DEUTSCHLAND Entsorgen Sie Ihre Altgeräte fachgerecht. Dadurch wird gewährleistet, dass die Altgeräte umweltgerecht verwertet und negative Auswirkungen auf die Umwelt und menschliche Gesundheit vermieden werden. Bei der Entsorgung sind folgende Regeln zu beachten: • Jeder Verbraucher ist gesetzlich verpflichtet, Elektro- und Elektronikaltgeräte (Altgeräte) sowie Batterien und Akkus getrennt vom Hausmüll zu entsorgen.
  • Seite 15 • Bei einem Vertrieb unter Verwendung von Fernkommunikationsmitteln ist die unentgeltliche Abholung am Ort der Abgabe auf Elektro- und Elektronikgeräte der Kategorien 1, 2 und 4 gemäß § 2 Abs. 1 ElektroG, nämlich „Wärmeüberträger“, „Bildschirmgeräte“ (Oberfläche von mehr als 100 cm²) oder „Großgeräte“ (letztere mit mindestens einer äußeren Abmessung über 50 Zentimeter) beschränkt.
  • Seite 16: Hinweise Zur Entsorgung

    Importeur für Großbritannien: Berlin Brands Group UK Ltd PO Box 1145 Oxford, OX1 9UW United Kingdom Hiermit erklärt Chal-Tec GmbH, dass der Funkanlagentyp DiscoFever der Richtlinie 2014/53/ EU entspricht. Der vollständige Text der EU- Konformitätserklärung ist unter der folgenden Internetadresse verfügbar: use.berlin/10030798...
  • Seite 17: Technical Data

    Dear customer, Congratulations on the purchase of your device. Please read the following instructions carefully and follow them to prevent potential damage. We accept no liability for damage caused by disregarding the instructions or improper use. Please scan the QR code to access the latest operating instructions and for further information about the product.
  • Seite 18: Safety Instructions

    SAFETY INSTRUCTIONS General Instructions • Lightning - If you do not use the device for a longer period of time or in the event of electrical storms, unplug the device from the power outlet or disconnect the device from the antenna connection. This prevents damage to the product due to lightning and overvoltage.
  • Seite 19: Controls And Connections

    CONTROLS AND CONNECTIONS SCREEN ON/OFF (screen PROGRAM/REPEAT on/off) (programming/repeat mode) SKIP +/- (fast forward/ FUNCTION (function) rewind) PLAY/PAUSE/PAIR (play/ POWER LED (operating light) pause/BT device pairing) STOP/LIGHT I/O (stop/light ON/OFF (On/Off) on/off) KEY/PAGE +/- (adjust TFT SCREEN (screen) karaoke track/page forward/ back) MIC VOL (microphone AVC (Automatic Voice...
  • Seite 20 AUDIO OUT (R) (right audio MIC 1 (Microphone 1) output) AUDIO OUT (L) (left audio MIC 2 (microphone 2) output) VIDEO OUT (video output) USB connection Power supply LINE IN (audio input) Display indications Current medium Programme mode Current track / total tracks Repeat mode Play / pause / stop Playtime...
  • Seite 21: Connection Variants

    Tablet holder • Hook the bracket into the slots on the back. • Place your tablet on it in landscape format. Tablet holder CONNECTION VARIANTS Power supply: Connect the unit to a household socket using the power supply unit supplied:...
  • Seite 22 Video: Use the supplied video cable (yellow) to connect the video output (Video Out) of the karaoke system to the video input (Video In) of your TV set/digital projector/etc. In most cases, you will have to select the input source on the TV set/digital projector accordingly.
  • Seite 23: General Operation

    GENERAL OPERATION Switch the unit on and off: Switch the DiscoFever on and off with the POWER button. Set the master volume: Use the MASTER VOL button to adjust the volume.
  • Seite 24: Karaoke Functions

    Program playlists Stop playback. In stop mode, you can programme playlists with up to 20 entries: Press PROGRAM/REPEAT. The display shows “PRG SET 01:XX”. Use the FORWARD/BACK buttons to select your chosen track. Then press PROGRAM to add the selected track to your playlist. Repeat this process up to 20 times.
  • Seite 25: Establishing A Bt Connection

    ESTABLISHING A BT CONNECTION Use FUNCTION to switch to BT mode. Activate BT on your smartphone/ tablet and connect with DISCOFEVER in the list of devices found within range. You can now stream the sound content of your mobile media library via DiscoFever.
  • Seite 26: Troubleshooting

    (fuses?). TV does not emit TV-VOL is at minimum? sound via the TV switched off? DiscoFever. Cinch cable loose? TV: Audio input not selected? CD player not working Disc inserted upside down? correctly. Disc dirty or damaged?
  • Seite 27: Cleaning And Care

    No microphone signal. MIC VOL turned to minimum? Microphone switched off? No video display on TFT switched off? the TFT. No karaoke CD (CD+G) inserted? No sound in BT mode Was the pairing process successful? BT device muted? CLEANING AND CARE Please note: switch off the unit before cleaning.
  • Seite 28: Disposal Instructions

    PO Box 1145 Oxford, OX1 9UW United Kingdom Chal-Tec GmbH hereby declares that the radio equipment type DiscoFever is in compliance with Directive 2014/53/EU. The full text of the EU declaration of conformity is available at the following internet address: use.berlin/10030798...
  • Seite 29: Fiche Technique

    Cher client, chère cliente, Toutes nos félicitations pour l’acquisition de ce nouvel appareil. Lisez attentivement les indications suivantes et suivez-les pour éviter d'éventuels dommages. Nous ne saurions être tenus pour responsables des dommages dus au non-respect des consignes et à la mauvaise utilisation de l’appareil.
  • Seite 30: Consignes De Sécurité

    CONSIGNES DE SÉCURITÉ Consignes générales • Foudre - Si vous prévoyez de ne pas utiliser l'appareil pendant une longue période ou en cas d'orage, retirez la fiche de la prise ou débranchez l'antenne de l'appareil. Cela empêchera la foudre et les surtensions d'endommager le produit.
  • Seite 31: Éléments De Commande Et Connexions

    ÉLÉMENTS DE COMMANDE ET CONNEXIONS SCREEN ON/OFF (Écran PROGRAM/REPEAT activé/désactivé) (programmation/répétition) SKIP +/- (Avance rapide/ FUNCTION (Fonction) retour rapide) PLAY/PAUSE/PAIR (Lecture/ POWER LED (Témoin de Pause/Couplage d'un marche) appareil Bluetooth) STOP/LIGHT I/O (arrêt/ ON/OFF (marche/arrêt) éclairage allumé/éteint) KEY/PAGE +/- (ajuster la TFT SCREEN (écran) piste de karaoké/faire défiler en avant/en arrière)
  • Seite 32 AUDIO OUT (R) (Sortie audio MIC 1 (micro 1) droite) AUDIO OUT (L) (Sortie audio MIC 2 (micro 2) gauche) VIDEO OUT (Sortie VIDEO) Port USB Branchement au secteur LINE IN (entrée audio) Voyants à l'écran Médium actuel Mode programme Piste actuelle / Total des Mode répétition pistes...
  • Seite 33: Autres Possibilités De Connexion

    Support de tablette • Accrochez le support aux logements situés à l'arrière. • Posez votre tablette dessus en mode paysage. Support de tablette AUTRES POSSIBILITÉS DE CONNEXION Branchement sur secteur : Branchez l'appareil sur une prise domestique à l'aide de l'adaptateur fourni.
  • Seite 34 Vidéo: Utilisez le câble vidéo fourni (jaune) pour connecter la sortie vidéo (Video Out) du système de karaoké à l'entrée vidéo (Video In) de votre téléviseur / projecteur / etc. Dans la plupart des cas, vous devez sélectionner la même source d'entrée sur le téléviseur / projecteur.
  • Seite 35: Utilisation Courante

    à la main. UTILISATION COURANTE Allumer et éteindre l'appareil : Allumez et éteignez le DiscoFever en appuyant sur la touche POWER. Régler le volume principal : Réglez le volume à l'aide de la touche MASTER VOL.
  • Seite 36: Fonctions Karaoké

    Programmation d'une liste de lecture Arrêtez la lecture En mode d'arrêt, vous pouvez programmer des listes de lecture contenant jusqu'à 20 titres : Appuyez sur PROGRAM/REPEAT. L'écran affiche « PROG SET 01:XX ». Utilisez les touches AVANCE / RETOUR pour sélectionner le titre souhaité.
  • Seite 37: Établissement De La Connexion Bt

    ÉTABLISSEMENT DE LA CONNEXION BT Passez en mode BT avec FUNCTION. Activez BT sur votre smartphone / tablette et connectez-vous à DISCOFEVER dans la liste des appareils trouvés à portée. Vous pouvez désormais diffuser le contenu audio de votre médiathèque mobile sur le DiscoFever.
  • Seite 38: Résolution Des Problèmes

    (fusibles La TV n'émet pas de Le volume de la TV est-il réglé sur minimum ? son sur le DiscoFever La TV est-elle éteinte ? Câble RCA mal branché ? TV : l'entrée audio est-elle sélectionnée ? Le lecteur CD ne Avez-vous inséré...
  • Seite 39: Nettoyage Et Entretien

    Aucun signal de micro. MIC VOL est-il réglé au minimum ? Le micro est-il éteint ? L'écran TFT n'affiche L'écran TFT est-il éteint ? aucune vidéo. Avez-vous inséré un CD karaoké (CD +G) ? Pas de son en mode L'appairage s'est-il réalisé avec succès L'appareil BT est-il en sourdine ? NETTOYAGE ET ENTRETIEN Remarque : Éteignez toujours l'appareil avant de le nettoyer.
  • Seite 40: Informations Sur Le Recyclage

    Oxford, OX1 9UW United Kingdom Chal-Tec GmbH déclare par la présente que le système radio type DiscoFever est conforme à la directive 2014/53/UE. Le texte intégral de la déclaration de conformité UE est disponible à l'adresse Internet suivante : use.berlin/10030798...
  • Seite 41: Indice

    Estimado cliente: Le felicitamos por la adquisición de este producto. Lea atentamente el siguiente manual y siga cuidadosamente las instrucciones de uso con el fin de evitar posibles daños. La empresa no se responsabiliza de los daños ocasionados por el uso indebido del producto o por haber desatendido las indicaciones de seguridad.
  • Seite 42: Indicaciones De Seguridad

    INDICACIONES DE SEGURIDAD Indicaciones generales • Rayos: si no va a utilizar la unidad durante un período prolongado de tiempo, o si hay rayos, desenchufe la unidad de la toma de corriente y desconecte el conector de la antena. Esto evitará que el producto resulte dañado por los rayos y las subidas de tensión.
  • Seite 43: Controles Y Conexiones

    CONTROLES Y CONEXIONES SCREEN ON/OFF (pantalla PROGRAM/REPEAT (modo encendida/apagada) de programación/repetición) FUNCTION (función) SKIP +/- (avanzar/rebobinar) PLAY/PAUSE/PAIR POWER LED (indicador (reproducción/pausa/ luminoso de funcionamiento) emparejamiento de dispositivos BT) ON/OFF (encendido/ STOP/LIGHT I/O (parada/luz apagado) encendida/apagada) KEY/PAGE +/- (ajustar la TFT SCREEN (pantalla) pista de karaoke/página hacia delante/atrás) MIC VOL (volumen del...
  • Seite 44 AUDIO OUT (R) (salida de MIC 1 (micrófono 1) audio derecha) AUDIO OUT (L) (salida de MIC 2 (micrófono 2) audio izquierda) VIDEO OUT (salida de vídeo) Puerto USB Conexión eléctrica LINE IN (entrada de audio) Indicadores de visualización Medio actual Modo del programa Pista actual / pistas totales Modo de repetición en bucle...
  • Seite 45: Variantes De Conexión

    Soporte para tabletas • Cuelgue el soporte en la parte trasera. • Coloque la tableta encima en horizontal. Soporte para tabletas VARIANTES DE CONEXIÓN Enchufar al suministro eléctrico: conecte el aparato a una toma de corriente doméstica con la fuente de alimentación suministrada:...
  • Seite 46 Vídeo: utilice el cable de vídeo incluido (amarillo) para conectar la salida de vídeo (Video Out) del sistema de karaoke a la entrada de vídeo (Video In) del televisor/proyector/etc. En la mayoría de los casos, hay que seleccionar la fuente de entrada TV/ proyector beamer para seleccionar la fuente de entrada correspondiente.
  • Seite 47: Funcionamiento General

    FUNCIONAMIENTO GENERAL Encender y apagar la unidad: encienda y apague el DiscoFever con el botón POWER. Ajusta el volumen principal: utilice el botón MASTER VOL para ajustar el volumen.
  • Seite 48 Programación de listas de reproducción Detener la reproducción. En el modo de parada, se pueden programar listas de reproducción con un máximo de 20 entradas: Pulse PROGRAM/REPEAT. En la pantalla aparece «PRG SET 01:XX». Utilice los botones FORWARD/ BACK para seleccionar la pista deseada. A continuación, pulse PRO- GRAM para añadir la pista seleccionada a su lista de reproducción.
  • Seite 49 CD+G. ESTABLECER CONEXIÓN BT Pulse FUNCTION para cambiar al modo BT. Active el BT en su smartphone o tableta y emparéjelo con DISCOFEVER en la lista de dispositivos cercanos. Ahora puede transmitir el contenido sonoro de la biblioteca multimedia de su móvil a través de DiscoFever.
  • Seite 50: Resolución De Anomalías

    El televisor no emite ¿El TV-VOL está al mínimo? sonido a través del ¿Televisión apagada? DiscoFever. ¿El cable de la cincha está suelto? TV: ¿No se ha seleccionado la entrada de audio? El reproductor de CD ¿Disco insertado al revés? no funciona ¿Disco sucio o dañado?
  • Seite 51: Limpieza Y Cuidado

    No hay señal de ¿Volumen del micrófono al mínimo? micrófono. ¿Micrófono apagado? No aparece ningún ¿Está apagada la TFT? vídeo en la pantalla. ¿No hay ningún CD de karaoke (CD+G) insertado? No hay sonido en el ¿El proceso de emparejamiento fue exitoso? modo BT ¿Dispositivo BT silenciado? LIMPIEZA Y CUIDADO...
  • Seite 52: Indicaciones Sobre La Retirada Del Aparato

    Oxford, OX1 9UW United Kingdom Chal-Tec GmbH declara por la presente que el tipo de sistema de radio DiscoFever cumple con la Directiva 2014/53/UE. El texto completo de la declaración de conformidad de la UE está disponible en la siguiente...
  • Seite 53: Dati Tecnici

    Gentile cliente, La ringraziamo per l'acquisto del dispositivo. La preghiamo di leggere attentamente le seguenti indicazioni e di seguirle per prevenire eventuali danni. Non ci assumiamo alcuna responsabilità per danni scaturiti da una mancata osservanza delle indicazioni relative alla sicurezza e da un uso improprio del dispositivo.
  • Seite 54: Avvertenze Di Sicurezza

    AVVERTENZE DI SICUREZZA Avvertenze generiche • Colpo di fulmine - Se non si usa più il dispositivo o se ci sono temporali, staccare la spina dalla presa elettrica e scollegare il dispositivo dall'antenna. In questo modo si evitano danni al prodotto dovuti a colpi di fulmine e sovratensione.
  • Seite 55: Elementi Di Controllo E Connessioni

    ELEMENTI DI CONTROLLO E CONNESSIONI PROGRAM/ SCREEN ON/OFF (schermo REPEAT (modalità di acceso/spento) programmazione/ripetizione) FUNCTION (funzione) SKIP +/- (avanti/indietro) PLAY/PAUSE/PAIR POWER LED (spie di (riproduzione/pausa/ funzionamento) accoppiamento di dispositivi STOP/LIGHT I/O (stop/luce ON/OFF (acceso/spento) on/off) KEY/PAGE +/- (regolare la TFT SCREEN (schermo) traccia del karaoke/pagina successiva/precedente) AVC (controllo automatico...
  • Seite 56 AUDIO OUT (R) (uscita audio MIC 1 (microfono 1) destra) AUDIO OUT (L) (uscita audio MIC 2 (microfono 2) sinistra) VIDEO OUT (uscita video) Connessione USB Connessione alla rete LINE IN (ingresso audio) elettrica Indicazioni del display Supporto attuale Modalità di programmazione Traccia attuale/Tracce totali Modalità...
  • Seite 57: Varianti Di Connessione

    Supporto per tablet • Fissare il supporto agli attacchi sul retro. • Posizionarci sopra il tablet in orizzontale. Supporto per tablet VARIANTI DI CONNESSIONE Connessione alla rete elettrica: collegare il dispositivo a una presa elettrica domestica con l'alimentatore incluso in consegna.
  • Seite 58 Video: utilizzare il cavo video incluso in consegna (giallo) per collegare l'uscita video (Video Out) dell'impianto per karaoke con l'ingresso video (Video In) del televisore/proiettore/ecc. Nella maggior parte dei casi, è necessario selezionare la fonte di ingresso corretta su televisore/proiettore. Mentre alcuni dispositivi hanno menu appositi, in altri casi i canali di ingresso possono essere dietro o davanti ai regolari canali di ricezione o su "0".
  • Seite 59: Utilizzo Generico

    UTILIZZO GENERICO Accendere e spegnere il dispositivo: accendere e spegnere DiscoFever con il tasto POWER. Impostare il volume master: usare il tasto MASTER VOL per regolare il volume.
  • Seite 60: Funzioni Karaoke

    Programmare una playlist Fermare la riproduzione. In modalità Stop, possono essere programmate playlist con un massimo di 20 titoli: Premere PROGRAM/REPEAT. Sul display compare "PROG SET 01:XX". Utilizzare i tasti AVANTI/INDIETRO per scegliere il titolo desiderato. Premere PROGRAM per aggiungere alla playlist il titolo selezionato. Ripetere questo procedimento per programmare fino a 20 titoli.
  • Seite 61: Stabilire Il Collegamento Bt

    STABILIRE IL COLLEGAMENTO BT Attivare la modalità BT con FUNCTION. Attivare il BT su smartphone/ tablet e collegarlo con DISCOFEVER nell'elenco dei dispositivi disponibili rilevati. Ora è possibile trasmettere in streaming i contenuti audio dalla raccolta multimediale personale e ascoltarli da DiscoFever.
  • Seite 62: Risoluzione Problemi

    (fusibili?). dispositivo. La TV non trasmette TV-VOL è impostato al minimo? l'audio attraverso La TV è spenta? DiscoFever. Il cavo RCA è allentato? TV: ingresso audio non selezionato? Il lettore CD non Disco inserito al contrario? funziona Disco sporco o danneggiato? correttamente.
  • Seite 63: Pulizia E Manutenzione

    Nessun segnale MIC VOL al minimo? microfono. Microfono spento? Nessuna Display TFT spento? rappresentazione Non è stato inserito alcun CD per karaoke video sul display TFT. (CD+G)? Nessun audio in Il procedimento di accoppiamento ha avuto modalità BT successo? Dispositivo BT in funzione muta? PULIZIA E MANUTENZIONE Nota: spegnere il dispositivo prima di pulirlo.
  • Seite 64: Avviso Di Smaltimento

    Berlin Brands Group UK Ltd PO Box 1145 Oxford, OX1 9UW United Kingdom Con la presente, Chal-Tec GmbH dichiara l'impianto radio DiscoFever conforme alla direttiva 2014/53/UE. Il testo completo della dichiarazione di conformità UE è disponibile al seguente indirizzo internet: use. berlin/10030798...

Diese Anleitung auch für:

1003079710030798

Inhaltsverzeichnis