Herunterladen Inhalt Inhalt Diese Seite drucken

Werbung

Verfügbare Sprachen
  • DE

Verfügbare Sprachen

  • DEUTSCH, seite 1

Werbung

Inhaltsverzeichnis
loading

Inhaltszusammenfassung für auna Rockstar Plus

  • Seite 3: Inhaltsverzeichnis

    Sehr geehrter Kunde, wir gratulieren Ihnen zum Erwerb Ihres Gerätes. Lesen Sie die folgenden Hinweise sorgfältig durch und befolgen Sie diese, um möglichen Schäden vorzubeugen. Für Schäden, die durch Missachtung der Hinweise und unsachgemäßen Gebrauch entstehen, übernehmen wir keine Haftung. Scannen Sie den folgenden QR-Code, um Zugriff auf die aktuellste Bedienungsanleitung und weitere Informationen rund um das Produkt zu erhalten:...
  • Seite 4: Sicherheitshinweise

    SICHERHEITSHINWEISE Allgemeine Hinweise • Blitzschlag - Wenn Sie das Gerät länger nicht benutzen oder es gewittert, ziehen Sie den Stecker aus der Steckdose oder trennen Sie das Gerät vom Antennenanschluss. Dadurch werden Schäden am Produkt durch Blitzschlag und Überspannung vermieden. •...
  • Seite 5: Lieferumfang

    LIEFERUMFANG • Karaokeanlage (1x) • Netzteiladapter (1x) • RCA-Kabel (1x) • Mikrofon mit Kabel (1x) • Bedienungsanleitung (1x)
  • Seite 6: Geräteübersicht

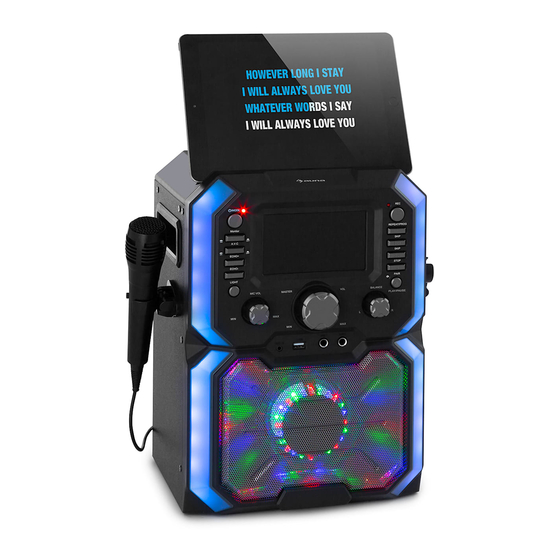
    GERÄTEÜBERSICHT Vorderseite Bildschirm Lautstärkeregler Mikrofon Hauptlautstärkeregler CD-Fach Aufnahmeanzeige AUX-IN-Anschluss Leistungsanzeige Aufnahmetaste (REC) USB-Anschluss Ein-/Ausschalten/Modus Speichern/Wiederholen 24 Anschluss Mikrofon 1 Monitor ein/aus Überspringen - (SKIP -) Anschluss Mikrofon 2 AVC ein/aus Überspringen + (SKIP +) 26 LED-Dekorationsleuchte Echo + Stopptaste Metallgitter Echo - BT-Anzeige LED-Dekorationsleuchte...
  • Seite 7 Rückseite Griff Video-Ausgang Audio-Ausgang (L) Mikrofonhalter Audio-Ausgang (R) Netzteil-Anschluss...
  • Seite 8: Anschlüsse

    ANSCHLÜSSE Mikrofon anschließen Sie können das Mikrofon sowohl mit dem Anschluss MIC 1 (24) als auch mit dem Anschluss MIC 2 (25) verbinden. Hinweis: Lassen Sie das Mikrofon nicht herunterfallen, da dies zu Schäden am Mikrofon oder am Lautsprecher führen kann. Verdrehen oder knicken Sie das Mikrofonkabel nicht, da es dadurch beschädigt werden könnte.
  • Seite 9: Bedienung

    BEDIENUNG Line-IN-Anschluss Drücken Sie die EIN/AUS-Taste (4), um das Gerät einzuschalten. 2. Stecken Sie den Anschluss des 3,5-mm-Audiokabels (nicht im Lieferumfang enthalten) in den AUX-IN-Anschluss (19) des Geräts. 3. Drücken Sie die MODE-Taste (4) auf der Vorderseite des Geräts, um in den AUX-IN-Modus zu wechseln.
  • Seite 10 3. Drücken Sie mehrfach die MODE-Taste (4), um den CDF/CD-Modus auszuwählen. Auf dem Bildschirm wird dann „CD“ angezeigt. Während des Einlesens blinkt „CD Reading“ auf dem Bildschirm auf. Sobald die CD gelesen wurde wird die Gesamtzahl der auf der CD befindlichen Titel auf dem Bildschirm angezeigt.
  • Seite 11: Wiederholen (Repeat)

    USB-Wiedergabe Drücken Sie zum Einschalten des Geräts die EIN/AUS-Taste (4) . 2. Stecken Sie einen USB-Stick in den USB-Anschluss (23) des Geräts. 3. Drücken Sie mehrfach die MODE-Taste (4), um in den USB-Modus zu gelangen. Auf dem Bildschirm wird „USB“ angezeigt. Solange der USB- Stick eingelesen wird, blinkt auf dem Bildschirm „USB READING“...
  • Seite 12 10. PAUSE: • Drücken Sie zum Pausieren während der Wiedergabe die PLAY/ PAUSE-Taste (19). Die PLAY/PAUSE-Anzeige blinkt während des Pausierens auf. • Drücken Sie die PLAY/PAUSE-Taste (19) erneut, um die Wiedergabe fortzusetzen. 11. Drücken Sie zum Stoppen der Wiedergabe die STOP-Taste (17). 12.
  • Seite 13 5. Starten Sie die Wiedergabe auf dem BT-Gerät. Drücken Sie während der Wiedergabe die PLAY/PAUSE-Taste (16), um die Wiedergabe zu pausieren. 6. Drücken Sie zur Auswahl des nächsten oder vorherigen Titels die Tasten SKIP -/+ (17). Aufnahme-Funktion Drücken Sie zum Aufnehmen Ihres Gesangs sowie der Musik die REC- Taste (13).
  • Seite 14: Reinigung Und Pflege

    REINIGUNG UND PFLEGE • Schalten Sie das Gerät vor der Reinigung aus und ziehen Sie den Netzstecker aus der Steckdose. • Wenn das Gerät staubig ist, wischen Sie es mit einem weichen und trockenen Staubtuch ab. • Reinigen Sie das Gerät mit einem weichen Tuch. •...
  • Seite 15 Problem Mögliche Ursache Lösungsmöglichkeit Kein Ton, wenn Der Ton am Fernseher ist Stellen Sie die Lautstärke an Fernseher stummgeschaltet oder zu am Fernseher ein. angeschlossen. leise eingestellt. Es wurde nicht die richtige Wählen Sie die Quelle am Fernseher richtige Quelle aus (für ausgewählt.
  • Seite 16 Problem Mögliche Ursache Lösungsmöglichkeit USB-Dateien Die USB-Dateien sind Ersetzen Sie die Dateien. werden nicht beschädigt. wiedergegeben. Das Dateiformat Nutzen Sie Dateien eines kann nicht vom Gerät kompatiblen Formats. wiedergegeben werden. Der USB-Stick wird nicht Nutzen Sie einen anderen vom Gerät unterstützt. USB-Stick.
  • Seite 17: Hinweise Zur Entsorgung

    HINWEISE ZUR ENTSORGUNG Befi ndet sich die linke Abbildung (durchgestrichene Mülltonne auf Rädern) auf dem Produkt, gilt die Europäische Richtlinie 2012/19/EU. Diese Produkte dürfen nicht mit dem normalen Hausmüll entsorgt werden. Informieren Sie sich über die örtlichen Regelungen zur getrennten Sammlung elektrischer und elektronischer Gerätschaften.
  • Seite 19: Technical Data

    Dear Customer, Congratulations on purchasing this device. Please read the following instructions carefully and follow them to prevent possible damages. We assume no liability for damage caused by disregard of the instructions and improper use. Scan the QR code to get access to the latest user manual and more product information.
  • Seite 20: Safety Instructions

    SAFETY INSTRUCTIONS General information • This product is not intended for commercial use. Household use only. • Lightning - If you are not going to use the device for a long time or if there is a storm, disconnect the plug from the electrical outlet and disconnect the device from the antenna connector.
  • Seite 21: Scope Of Delivery

    SCOPE OF DELIVERY • Karaoke system (1x) • AC adapter (1x) • RCA cable (1x) • Wired microphone (1x) • Instruction manual (1x)
  • Seite 22: Device Overview

    DEVICE OVERVIEW Front LED SCREEN MIC VOL Knob MASTER VOL Knob CD Compartment REC Indicator AUX IN Jack Power Indicator REC Button USB Jack POWER/MODE Button REPEAT/PROG Button 24 MIC 1 Jack Monitor on/off Button SKIP- Button MIC 2 Jack A.V.C on/off Button SKIP+ Button 26 LED Decoration Light...
  • Seite 23 Back Handle VIDEO OUT Jack AUDIO OUT (L) Jack Microphone Holder AUDIO OUT (R) Jack DC IN Jack...
  • Seite 24: Connections

    CONNECTIONS Connecting the microphone Connect the microphone into MIC 1 jack (24) as well as MIC 2 jack (25) when desired. Notes: Do not drop or tap the microphone as damage to the microphone or speaker may occur. Do not twirl the microphone by cord as it will cause damage to the encased wiring.
  • Seite 25: Operation

    OPERATION Connecting to Line-in jack Press the POWER button (4) to turn the unit on. 2. Insert the 3.5 mm audio cable (not included) into the AUX IN jack (22) of the unit. 3. Press the MODE button (4) on the front panel to switch to AUX IN mode. 4.
  • Seite 26 4. Press the PLAY/PAUSE button (19) to start playback. If listening to a CD+G file, the image and lyrics will appear on the screen: 5. Adjust the volume to a comfortable level using the MASTER VOL knob (21). 6. Connect microphones and slide the ON/OFF switch on the microphone to the ON position.
  • Seite 27 NOTE: If connected to a TV or other audio source, adjust the volume of the TV using its own volume control. 5. Adjust the volume to a comfortable level using the MASTER VOL knob (21). NOTE: If connected to a TV or other audio source, adjust the volume of the TV using its own volume control.
  • Seite 28 3. Turn on your device’s BT option in settings to search for a discoverable device with a BT signal. Select “Rockstar Plus“ from the device results on the BT menu. NOTE: Also refer to the user manual of your BT device for detailed instructions.
  • Seite 29: Cleaning And Care

    Using programming MODE While in the STOP mode, press the REPEAT/PROG button (8). ”PROG SET 01” will appear on the display indicating the fi rst program is ready to program. 2. Select the fi rst track by using the SKIP -/+ buttons (15 and 16). 3.
  • Seite 30: Troubleshooting

    TROUBLESHOOTING Before contacting costumer service, check the troubleshooting information listed in the table. Problem Possible Cause Possible Solution No Power. The unit is turned off. Press the POWER button to turn on the unit. The power cord is not Make sure that the connected correctly.
  • Seite 31 Problem Possible Cause Possible Solution No sound from The microphone is not Make sure that the the microphone. properly connected to microphone is correctly one of the microphone connected to the MIC 1 or jacks. MIC 2 jack. The microphone is turned Slide the microphone off.
  • Seite 32: Hints On Disposal

    HINTS ON DISPOSAL According to the European waste regulation 2012/19/ EU this symbol on the product or on its packaging indicates that this product may not be treated as household waste. Instead it should be taken to the appropriate collection point for the recycling of electrical and electronic equipment.
  • Seite 35: Fiche Technique

    Chère cliente, cher client, Toutes nos félicitations pour l’acquisition de ce nouvel appareil. Veuillez lire attentivement et respecter les instructions de ce mode d’emploi afin d’éviter d’éventuels dommages. Le fabricant ne saurait être tenu pour responsable des dommages dus au non-respect des consignes de sécurité...
  • Seite 36: Consignes De Sécurité

    CONSIGNES DE SÉCURITÉ Consignes générales • Foudre - Si vous n‘utilisez pas l‘appareil pendant une longue période ou s‘il y a de l‘orage, débranchez la fiche de la prise et débranchez l‘antenne de l‘appareil. Cela évite d‘endommager le produit à cause de la foudre et des surtensions.
  • Seite 37: Contenu De L'emballage

    CONTENU DE L‘EMBALLAGE • Chaîne karaoké (1x) • Adaptateur secteur (1x) • Câble RCA (1x) • Micro filaire (1x) • Mode d‘emploi (1x)
  • Seite 38: Aperçu De L'appareil

    APERÇU DE L‘APPAREIL Face avant Écran Réglage volume du micro Réglage volume principal Compartiment CD Témoin d'enregistrement Prise AUX-IN Affichage de la puissance Touche d'enregistrement Port USB (REC) Marche/arrêt/mode Mémorisation /répétition Prise de micro 1 Moniteur marche/arrêt Saut de titre - (SKIP -) Prise de micro 2 AVC marche/arrêt Saut de titre + (SKIP +)
  • Seite 39 Dos de l‘appareil Poignée Sortie Vidéo Sortie audio (L) Support de micro Sortie audio (R) Prise de l’adaptateur secteur...
  • Seite 40: Connexions

    CONNEXIONS Branchement du micro Vous pouvez connecter le micro à la prise MIC 1 (24) et à la prise MIC 2 (25). Remarque : Ne faites pas tomber le micro car cela pourrait endommager celui-ci ou l‘enceinte. Ne tordez pas et ne pliez pas le câble du micro, car cela pourrait l‘endommager.
  • Seite 41: Utilisation

    UTILISATION Prise Line-IN Appuyez sur le bouton ON / OFF (4) pour allumer l‘appareil. 2. Branchez la fiche du câble audio 3,5 mm (non fourni) dans la prise AUX- IN (19) de l‘appareil. 3. Appuyez sur MODE (4) à l‘avant de l‘appareil pour passer en mode AUX-IN.
  • Seite 42 3. Appuyez plusieurs fois sur MODE (4) pour sélectionner le mode CDG / CD. L‘écran affiche „CD“. Pendant que l‘appareil parcourt le CD, l‘écran affiche „CD Reading“ en clignotant. Dès que le CD est lu, le nombre total de titres se trouvant sur le CD s‘affiche à l‘écran. 4.
  • Seite 43: Répétition (Repeat)

    Lecture par USB Pour allumer l‘appareil, appuyez sur MARCHE / ARRÊT (4). 2. Insérez une clé USB dans le port USB (23) de l‘appareil. 3. Appuyez plusieurs fois sur la touche MODE (4) pour accéder au mode USB. L‘écran affiche „USB“. Tant que la clé USB est en cours de lecture, l‘écran affiche „USB READING“...
  • Seite 44 Fonction BT Suivez les étapes ci-dessous pour coupler un appareil BT externe : Allumez l‘appareil en appuyant sur la touche MARCHE / ARRÊT (4). 2. Pour choisir le mode BT, appuyez plusieurs fois sur la touche MODE (4). L‘écran affiche „BLUETOOTH“. L‘appareil recherche automatiquement les appareils précédemment connectés en BT (si d‘autres appareils externes BT ont déjà...
  • Seite 45: Fonction Enregistrement

    5. Démarrez la lecture sur l‘appareil BT. Pendant la lecture, appuyez sur PLAY/PAUSE (16) pour interrompre la lecture. 6. Pour sélectionner la piste suivante ou précédente, appuyez sur les touches SKIP -/+ (17). Fonction enregistrement Appuyez sur la touche REC (13) pour enregistrer votre chant et votre musique.
  • Seite 46: Nettoyage Et Entretien

    NETTOYAGE ET ENTRETIEN • Avant de nettoyer l‘appareil, éteignez-le et débranchez la fi che de la prise. • Si l‘appareil est poussiéreux, essuyez-le avec un chiff on doux et sec. • Nettoyez l‘appareil avec un chiff on doux. • N‘utilisez pas de cire, de sprays de polissage ou de produits de nettoyage agressifs pour le nettoyage.
  • Seite 47 Problème Cause possible Possibilité de solution Pas de son Le son du téléviseur est Réglez le volume sur le lorsque coupé ou réglé trop bas. téléviseur. l'appareil est La source correcte n'a pas Sélectionnez la bonne branché au été sélectionnée sur le source (généralement téléviseur.
  • Seite 48 Problème Cause possible Possibilité de solution Impossible La fonction BT de votre Activez la fonction BT de d'appairer appareil externe est votre appareil externe un appareil désactivée. (voir son mode d'emploi). externe. L'appareil n'est pas en Appuyez sur le bouton mode de couplage.
  • Seite 49: Informations Sur Le Recyclage

    INFORMATIONS SUR LE RECYCLAGE Le pictogramme ci-contre apposé sur le produit signifi e que la directive européenne 2012/19/UE s‘applique (poubelle à roues barrée d’une croix). Ces produits ne peuvent être jetés dans les poubelles domestiques courantes. Renseignez-vous concernant les règles appliquées pour la collecte d’appareils électriques et électroniques.
  • Seite 51 Estimado cliente: Le felicitamos por la adquisición de este producto. atentamente siguiente manual siga cuidadosamente las instrucciones de uso con el fin de evitar posibles daños. La empresa no se responsabiliza de los daños ocasionados por un uso indebido del producto o por haber desatendido las indicaciones de seguridad.
  • Seite 52: Indicaciones De Seguridad

    INDICACIONES DE SEGURIDAD Indicaciones generales • Relámpago - Si no va a utilizar el aparato durante un periodo largo de tiempo o si hay una tormenta eléctrica, desenchufe el aparato de la toma de corriente y desconecte el conector de antena. De este modo, protegerá...
  • Seite 53: Contenido Del Envío

    CONTENIDO DEL ENVÍO • Equipo de karaoke (1x) • Adaptador de alimentación (1x) • Cable RCA (1x) • Micrófono con cable (1x) • Manual de instrucciones (1x)
  • Seite 54: Descripción Del Aparato

    DESCRIPCIÓN DEL APARATO Parte delantera Pantalla Control volumen micrófono 21 Control volumen principal Compartimento del CD Indicador de grabación Conector AUX-IN Indicador de potencia Botón de grabación (REC) Conector USB On/Off/Modo Guardar/Repetición Conector micrófono 1 Monitor on/off Saltar - (SKIP -) Conector micrófono 2 AVC on/off Saltar + (SKIP +)
  • Seite 55 Parte trasera Salida de Video Salida de audio (Izda.) Soporte del micrófono Salida de audio (Dcha.) 6 Conexión a fuente de alimentación...
  • Seite 56 CONEXIONES Conectando el micrófono Puede conectar el micrófono a los conectores MIC 1 (20) y MIC 2 (21). Nota: No deje caer el micrófono ya que esto puede dañar el micrófono o el altavoz. No tuerza ni doble el cable del micrófono, ya que puede dañarlo.
  • Seite 57 FUNCIONAMIENTO Conector AUX-IN Presione el botón ON/OFF (4) para encender la unidad. 2. Enchufe el conector del cable de audio de 3,5 mm (no incluido) en el conector AUX-IN (19) de la unidad. 3. Presione el botón MODE (4) en el frente de la unidad para cambiar al modo AUX-IN.
  • Seite 58 3. Presione el botón MODE (4) varias veces para seleccionar el modo CDG/CD La pantalla mostrará „Cd“. Durante la lectura „---“ parpadea en la pantalla. Una vez que se ha leído el CD, el número total de pistas del CD se muestra en la pantalla. 4.
  • Seite 59 Reproducción USB Presione el botón ON/OFF (4) para encender el dispositivo. 2. Inserte una memoria USB en el puerto USB (23) del aparato. 3. Presione el botón MODE (4) varias veces para entrar en el modo USB. En la pantalla aparece „USB“. Mientras se lea la memoria USB, “USB READING“...
  • Seite 60 10. PAUSE: • Presione el botón PLAY/PAUSE (19) para hacer una pausa durante la reproducción. El indicador de REPRODUCCIÓN/PAUSA parpadeará durante la pausa. • Presione el botón PLAY/PAUSE (19) de nuevo para reanudar la reproducción. 11. Presione el botón STOP (17) para detener la reproducción. 12.
  • Seite 61 5. Inicie la reproducción en el dispositivo BT. Durante la reproducción, presione el botón PLAY/PAUSE (16) para detener la reproducción. 6. Presione los botones SKIP -/+ (17) para seleccionar la pista siguiente o anterior. Función de grabación Presione el botón REC (13) para grabar sus voces y música La grabación comienza y el indicador REC (12) se enciende continuamente.
  • Seite 62: Limpieza Y Cuidado

    LIMPIEZA Y CUIDADO • Antes de limpiar, apague la unidad y desenchufe el cable de alimentación de la toma de corriente. • Si la unidad está polvorienta, límpiela con un paño suave y seco. • Limpie la unidad con un paño suave. •...
  • Seite 63 Problema Posible causa Posible solución No hay sonido El sonido de la televisión Ajusta el volumen del cuando se está silenciado o televisor. conecta a la TV. demasiado bajo. La fuente correcta no Seleccione la fuente se selecciona en la correcta (generalmente televisión.
  • Seite 64 Problema Posible causa Posible solución Los archivos Los archivos USB están Reemplace los archivos. USB no se dañados. reproducen. El formato del archivo no Use archivos de un puede ser reproducido formato compatible. por el dispositivo. La memoria USB no Use una unidad flash USB es compatible con el diferente.
  • Seite 65: Retirada Del Aparato

    RETIRADA DEL APARATO Según el Reglamento europeo de residuos 2012/19/ UE, este símbolo en el producto o en su embalaje indica que este producto no puede tratarse como basura doméstica. En su lugar, debe ser llevado al punto de recogida adecuado para el reciclaje de aparatos eléctricos y electrónicos.
  • Seite 67: Dati Tecnici

    Gentile cliente, La ringraziamo per aver acquistato il dispositivo. La preghiamo di leggere attentamente le seguenti istruzioni per l’uso e di seguirle per evitare possibili danni tecnici. Non ci assumiamo alcuna responsabilità per danni scaturiti da una mancata osservazione delle avvertenze di sicurezza e da un uso improprio del dispositivo.
  • Seite 68: Avvertenze Di Sicurezza

    AVVERTENZE DI SICUREZZA Avvertenze generali • Colpo di fulmine – Se il dispositivo non viene utilizzato o c’è un temporale, staccare la spina dalla presa di corrente e scollegare il dispositivo dalla connessione dell’antenna. In questo modo si evitano danni al dispositivo dovuti a colpi di fulmine o sovratensione. •...
  • Seite 69: Volume Di Consegna

    VOLUME DI CONSEGNA • Impianto di karaoke (1x) • Adattatore di rete (1x) • Cavo RCA (1x) • Microfono con cavo (1x) • Manuale di istruzioni (1x)
  • Seite 70: Descrizione Del Prodotto

    DESCRIZIONE DEL PRODOTTO Lato frontale Display Volume microfono Manopola volume principale Vano CD Spia registrazione Presa AUX-IN Spia potenza Tasto registrazione (REC) Presa USB Modalità On/Off Salvare/Ripetere Presa microfono 1 Monitor on/off Saltare - (SKIP -) Presa microfono 2 AVC on/off Saltare+ (SKIP +) Luce a LED decorativa Eco +...
  • Seite 71 Vista posteriore Maniaco Uscita video Uscita audio (S) Portamicrofono Uscita audio (D) Collegamento cavo di rete...
  • Seite 72 COLLEGAMENTI Come collegare il microfono È possibile collegare il microfono sia alla presa MIC1 (24) che MIC2 (25). Nota: non lasciar cadere il microfono per terra perché ciò potrebbe causare danni all’altoparlante e al microfono stesso. Non torcere o piegare il cavo del microfono perché potrebbe danneggiarsi. Come collegare il dispositivo a un televisore Per poter riprodurre video, testi di canzoni e audio tramite il televisore, eseguire i seguenti passaggi:...
  • Seite 73 FUNZIONAMENTO Connettore AUX-IN Premere il tasto ON/OFF (4) per accendere il dispositivo. 2. Inserire il cavo audio da 3,5 mm (non incluso nel volume di consegna) nell’ingresso AUX (19) del dispositivo. 3. Premere il tasto MODE (4) sul lato frontale del dispositivo per accedere alla modalità...
  • Seite 74 3. Premere ripetutamente il tasto MODE (4) per selezionare la modalità CDF/CD. Sullo schermo appare “CD”. Durante l’acquisizione lampeggia “CD Reading” sullo schermo. Non appena il CD è stato letto, sullo schermo appare la quantità dei brani che si trovano sul CD. 4.
  • Seite 75 Riproduzione USB Premere il tasto on/off (4) per accendere il dispositivo. 2. Inserire una penna USB nella presa USB (23) del dispositivo. 3. Premere più volte il tasto MODE (4) per accedere alla modalità USB. Sullo schermo appare “USB”. Finché il dispositivo continua a leggere la penna USB, sullo schermo lampeggia “USB READING”...
  • Seite 76 3. Attivare la funzione BT del proprio dispositivo esterno. Aprire la lista dei dispositivi e selezionare “Rockstar Plus”. NOTA : ulteriori istruzioni riguardanti l’utilizzo della funzione BT del dispositivo esterno si trovano nel suo manuale.
  • Seite 77 5. Avviare la riproduzione sul dispositivo BT. Premere il tasto PLAY/PAUSE (16) durante la riproduzione per mettere in pausa. 6. Premere i tasti SKIP +/- (17) per selezionare il brano precedente o successivo. Funzione di registrazione Premere il tasto REC (13) per registrare il canto e la musica. La registrazione inizia e la spia REC (12) lampeggia in continuazione.
  • Seite 78: Pulizia E Manutenzione

    PULIZIA E MANUTENZIONE • Spegnere il dispositivo prima di eseguire lavori di pulizia e togliere la spina dalla presa elettrica. • Se il dispositivo è impolverato pulirlo con un panno morbido e asciutto. • Pulire il dispositivo con un panno morbido. •...
  • Seite 79 Problema Causa possibile Soluzione Sullo schermo La spina video non è stata Inserire correttamente la della TV non inserita correttamente. spina video. appaiono i testi Sulla TV è stata scelta la Selezionare la fonte delle canzoni. fonte sbagliata. corretta (solitamente AV). Il file/brano riprodotto Solo i file che contengono non contiene testi di...
  • Seite 80 Problema Causa possibile Soluzione Non si può La funzione BT del proprio Attivare la funzione BT accoppiare dispositivo esterno è del proprio dispositivo il dispositivo disattivata. esterno (vedi il suo esterno BT con manuale di istruzioni). l’impianto di Il dispositivo non si Premere il tasto PAIR karaoke.
  • Seite 81: Dichiarazione Di Conformità

    AVVISO DI SMALTIMENTO Se sul prodotto è presente la fi gura a sinistra (il bidone dei rifi uti con le ruote), si applica la direttiva europea 2012/19/UE. Questi prodotti non possono essere smaltiti con i rifi uti normali. Informarsi sulle disposizioni vigenti per la raccolta di dispositivi elettrici ed elettronici.

Diese Anleitung auch für:

10035746

Inhaltsverzeichnis