Petsafe Stay & Play Bedienungsanleitung
Drahtloser zaun mit halsband mit austauschbarer batterie
Vorschau ausblenden
Andere Handbücher für Stay & Play:
- Gebrauchsanleitung (104 Seiten) ,
- Bedienungsanleitung (32 Seiten) ,
- Los geht's (73 Seiten)
Get Started!
Commençons !
Aan de slag!
¡En marcha!
Inizio!
Auf geht's!
Stay & Play
™
Wireless Fence with Replaceable Battery Collar
e
Clôture anti-fugue sans fil avec collier à pile remplaçable
f
Draadloze omheining met halsband met verwisselbare batterij
d
Limitador de zona sin cable con collar de batería reemplazable
s
Sistema antifuga senza fili dotato di collare alimentato con
i
batteria sostituibile
Drahtloser Zaun mit Halsband mit austauschbarer Batterie
g
Inhaltsverzeichnis

Verwandte Anleitungen für Petsafe Stay & Play


Inhaltszusammenfassung für Petsafe Stay & Play
- Seite 1 Stay & Play ™ Wireless Fence with Replaceable Battery Collar Clôture anti-fugue sans fil avec collier à pile remplaçable Draadloze omheining met halsband met verwisselbare batterij Limitador de zona sin cable con collar de batería reemplazable Sistema antifuga senza fili dotato di collare alimentato con batteria sostituibile Drahtloser Zaun mit Halsband mit austauschbarer Batterie Get Started!
- Seite 2 Keep your best friend safe on his home ground. Créez un terrain sécurisé pour votre compagnon. Houd je beste vriend veilig rond je huis. Tu perro disfrutará en un espacio seguro. Create un ambiente più sicuro per il vostro migliore amico. Schützen Sie Ihren knuffigen Freund zu Hause durch einen sicheren Auslauf.
-
Seite 3: Before We Begin
e Before we begin As you set up your new wireless fence, keep in mind: This product creates a wireless play area for your pet to explore. The transmitter emits a radio signal in a 3- to 32-metre radius in all directions, creating a circular boundary called the pet area. Small flags will visually reinforce where the boundary zone is. -
Seite 4: Antes De Empezar
d Voor we aan de slag gaan Houd bij het opzetten van uw nieuwe draadloze omheining rekening met het volgende: Dit product creëert een draadloze speelruimte die uw huisdier kan verkennen. De zender stuurt een radiosignaal uit in een straal van 3 tot 32 meter in alle richtingen. Hierdoor ontstaat een cirkelvormige grens die de vrije ruimte voor het huisdier wordt genoemd. -
Seite 5: Prima Di Iniziare
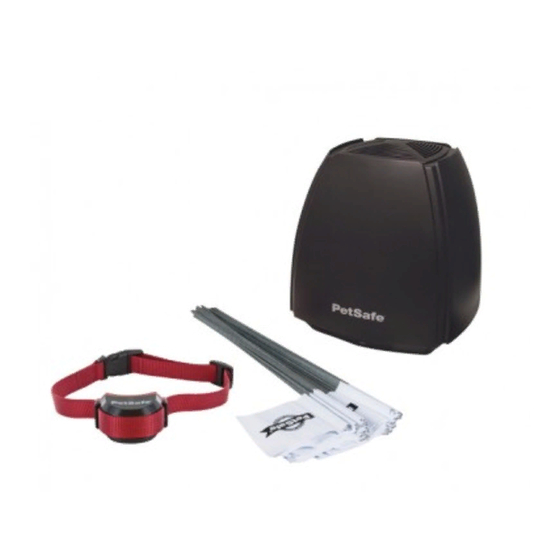
i Prima di iniziare Quando si configura il nuovo sistema antifuga senza fili, è bene tenere a mente che: Questo prodotto crea un’area di gioco senza fili che l’animale domestico potrà esplorare liberamente. Il trasmettitore emette un segnale radio con un raggio che va da 3 a 32 metri in tutte le direzioni creando un confine circolare che viene indicato come zona autorizzata. - Seite 6 What you have Dit is wat je hebt Di cosa disponi Ce que vous avez Lo que tiene Das haben Sie Mounting screws Vis de fixation Bevestigingsschroeven Tornillos de montaje Viti di montaggio Befestigungsschrauben Receiver collar with short contact points Mounting anchors Collier-récepteur avec points de contact courts Mounting bracket...
-
Seite 7: What You Need
What you need: Lo que necesitas: • Screwdriver • Destornillador • Scissors • Tijeras • Lighter • Encendedor • Tape measure • Cinta métrica • Non-metallic collar and lead • Collar no metálico y correa Ce dont vous avez : Di cosa hai bisogno: •... - Seite 9 Locate the battery on the underside of the receiver collar. The arrow on the battery should be lined up with the triangle on the receiver collar. In this position, the battery is installed but is not yet locked in place. This prevents the battery from draining prior to purchase. Important: Always remove the receiver collar from your pet before installing or replacing the battery.
- Seite 11 Using the edge of the test light tool, rotate the battery clockwise until the arrow on the battery lines up with the lock symbol on the receiver collar. The battery is now locked in place and powering the receiver collar. À...
- Seite 12 Mode button Bouton de sélection du mode Modusknop Botón de modo de funcionamiento Selettore della modalità di funzionamento Modusregler...
- Seite 13 Turn the receiver collar on by pressing and holding the mode button for 5 seconds. The indicator light will glow for 5 seconds (green or red to indicate battery status), and then will emit a series of red flashes representing the current static stimulation level.
- Seite 14 Controlelampje Betekenis Groen, 5 seconden continu of langzaam De batterij heeft voldoende lading. knipperend (elke 4 tot 5 seconden) Rood, 5 seconden continu of langzaam De batterijlading is laag; vervang de batterij. knipperend (elke 4 tot 5 seconden) Rood, snel knipperend Het aantal keer knipperen geeft het huidige stimulatieniveau weer: 1 keer knipperen = 1 toon...
- Seite 15 To determine the stimulation level, press the mode button once and then count the red flashes (1 flash = level 1, 2 flashes = level 2, and so on). To increase the stimulation level, press the mode button once to view the current stimulation level, then press the mode button again within 5 seconds. Each time you press the mode button within 5 seconds of the previous set of flashes, the stimulation level increases by one.
- Seite 16 Pet area Transmitter Zone autorisée à votre Émetteur animal de compagnie Zender Vrije ruimte voor het huisdier La zona para mascota Transmisor La zona autorizzata per il Trasmettitore tuo animale domestico Sendegerät Der Aufenthaltsbereich...
- Seite 17 Select a location for the transmitter. It should be: • On the ground floor of your home, in a dry, well-ventilated area where temperatures do not go below -23°C or above 40°C. • At least 60 centimetres above the floor, mounted to a wall or placed on a non-metal table or other hard surface to ensure proper ventilation. •...
- Seite 19 Plug the power adaptor into a wall outlet, then insert the other end into the power jack on the underside of the transmitter. Branchez l’adaptateur sur une prise murale, puis insérez l’autre extrémité dans la prise électrique sous l’émetteur. Steek de stroomadapter in een stopcontact en steek het andere uiteinde in de voedingsaansluiting aan de onderkant van de zender. Enchufe el adaptador de corriente a una toma de pared.
- Seite 21 At the back of the transmitter, slide the power switch to the on (l) position. The light on the front of the transmitter glows blue when the transmitter is powered on and functioning correctly. À l’arrière de l’émetteur, faites glisser l’interrupteur de tension en position marche (l). Le voyant à...
- Seite 22 Pet area radius, with boundary switch set to: Boundary control dial setting - (low) + (high) 1.5 metres 1.5 metres Referring to the table at right, set the boundary switch and boundary control 3 metres 6 metres dial as needed to achieve the desired pet area radius. 4.5 metres 10.5 metres You can determine this radius by measuring the distance between the...
- Seite 23 Straal huisdierenzone, met grensschakelaar Instelling van de ingesteld op: grenscontroleknop - (laag) + (hoog) Raadpleeg de tabel rechts en stel de grensschakelaar en de 1,5 meter 1,5 meter grenscontroleknop in zoals nodig om de gewenste straal van de vrije ruimte 3 meter 6 meter voor het huisdier te bereiken.
- Seite 24 Pet area Zone autorisée à votre animal de compagnie Vrije ruimte voor het huisdier La zona para mascota La zona autorizzata per il tuo animale domestico Der Aufenthaltsbereich...
- Seite 25 Once your boundary is set, it is important to walk around your garden and make sure the pet area lies within your boundaries and stops at least 3 metres away from any danger areas like roadways. The easiest way to do this is to use your receiver collar and test light tool. Make sure that the transmitter and receiver collar are on and that the receiver collar is set to stimulation level 2 or above.
- Seite 26 Boundary El límite La limite Il confine De begrenzing Die Grenze 3 m Flag spacing Espace de 3 m entre les fanions 3 m vlagafstand Distancia de 3 m entre banderines 3 m Distanza tra le bandierine Transmitter Transmisor 3 m Fähnchenabstand Émetteur Trasmettitore Zender...
- Seite 27 Now that you have made the necessary adjustments to your pet area, it is time to place the boundary flags. These flags will act as a visual aid for your dog during the training phase. Hold the test light contacts to the receiver collar contact points and walk toward the boundary zone while holding the collar at waist height. As soon as the collar beeps, stop and place a boundary flag in the ground.
- Seite 28 Éteignez le collier-récepteur en maintenant le bouton de sélection du mode appuyé pendant 5 secondes. Profitez de ce que votre chien soit détendu pour placer le collier-récepteur autour de son cou. Le logo PetSafe doit être orienté vers le haut et les points de contact doivent être centrés directement sous le menton de votre ®...
- Seite 29 Apague el collar receptor presionando y manteniendo presionado el botón de modo de funcionamiento durante 5 segundos. Con su mascota cómodamente de pie, coloque el collar receptor alrededor de su cuello. El logotipo de PetSafe debe estar hacia arriba y los puntos de contacto deben estar centrados ®...
- Seite 31 With a little time and a lot of praise, your pet will learn to roam freely within the pet area (while avoiding the boundary zone). Whether your pet loves rolling on his back in the grass or playing a game of fetch, the PetSafe Stay & Play Wireless Fence with Replaceable Battery Collar will ®...
- Seite 32 Mounting the transmitter Montaje del transmisor Montage de l’émetteur Installare il trasmettitore De zender bevestigen Montage des Sendegeräts Once you have tested your fence system and are confident you have chosen the best transmitter location, you can wall mount the transmitter if desired. Hold the mounting bracket against the wall and mark the hole locations.
- Seite 33 Nadat u uw heksysteem hebt getest en zeker weet dat u de beste zenderlocatie hebt gekozen, kunt u de zender desgewenst aan de muur bevestigen. Houd de bevestigingsbeugel tegen de muur en markeer de locaties van de gaten. Boor gaten voor de bevestigingsschroeven of ankers. Als u de zender monteert: •...
- Seite 34 Replacing the receiver collar battery Reemplazo de la pila del collar receptor Sostituzione della batteria del Remplacement de la pile du collier-récepteur collare ricevitore Batterie des Empfängerhalsbands De batterij van de ontvangerhalsband austauschen vervangen Remove the receiver collar from your pet. Discharge all power by pressing and holding the mode button for at least 30 seconds, until the indicator light is no longer illuminated.
- Seite 35 Insert the new battery, lining up the arrow on the battery with the triangle on the receiver collar. Use the edge of the test light tool to turn the battery clockwise until the arrow on the battery lines up with the lock symbol on the receiver collar. Insérez une pile neuve en alignant la flèche de la pile sur le triangle du collier- récepteur.
- Seite 36 Resolving a power loss alarm Resolver una alarma de pérdida de alimentación Résolution d’un problème d’alarme Allarme di interruzione dell’alimentazione: de perte de puissance come risolvere Een alarm bij stroomuitval oplossen Stromverlust-Alarm abstellen The transmitter has a built-in power loss alarm that will emit an intermittent tone for at least 20 minutes if the transmitter loses power. If you hear this alarm, it means that your boundary is no longer active, and your pet is no longer being contained.
- Seite 37 Understanding the receiver collar lights Entender las luces y las señales acústicas and tones del collar receptor Comprendre les signaux sonores et les Comprensione dei segnali acustici e témoins d’état lumineux du collier-récepteur luminosi emessi dal collare ricevitore De lampjes en tonen van de Bedeutung der LED-Leuchten und ontvangerhalsband begrijpen Tonsignale des Empfängerhalsbands...
- Seite 38 La siguiente tabla explica las luces indicadoras y las señales acústicas que notará si su mascota se acerca al límite o lo sobrepasa: Estado de activación del collar receptor Luz indicadora Luz indicadora Meaning Parpadeo rápido en verde Señal acústica de advertencia Su mascota está...
- Seite 39 Set your dog on the path to success with some fun, consistent training. Faites de lui un compagnon épanoui grâce à un dressage amusant et régulier. Vrijheid blijheid dankzij leuke, consistente training. Con un poco de paciencia y mucha diversión aprenderá...
- Seite 40 00 800 18 18 20 20 00 800 18 18 20 20 800-457-3911 Radio Systems Corporation Radio Systems PetSafe Europe Ltd. Radio Systems Australia Pty Ltd. 10427 PetSafe Way 2nd Floor, Elgee Building, Market Square Suite 11001 Australia Fair Office Towers Knoxville, TN 37932 USA Dundalk, Co.