Herunterladen Inhalt Inhalt Diese Seite drucken
Inhaltsverzeichnis

Werbung

Verfügbare Sprachen

Verfügbare Sprachen

ITM-A / ADS
G
MANUAL
F
NOTICE
N
HANDLEIDING
GNDF
D
ANLEITUNG

Werbung

Inhaltsverzeichnis
loading

Inhaltszusammenfassung für Fancom ITM-A / ADS

  • Seite 1 GNDF ITM-A / ADS MANUAL HANDLEIDING ANLEITUNG NOTICE...
  • Seite 2 Gndf N.B.: The original, authentic version of this manual is the English version produced by Fancom B.V. or one of its daughter companies (referred to further as Fancom). Any modifications introduced to this manual by third parties have neither been checked nor approved by Fancom. Modifications are taken by Fancom to include translations into languages other than English and the insertion and/or deletion of text and/or illustrations to/from the original contents.
  • Seite 3: Inhaltsverzeichnis

    Gndf Table of contents General introduction ..........................1 How to use this manual ........................1 Fancom helpdesk ........................... 1 Safety instructions and warnings ....................2 Possibilities of the ITM-A ........................... 3 ITM-A without analog output - ITM-A ....................3 ITM-A with analog output - ITM-A ....................3 Installing the ITM-A .............................
  • Seite 4: General Introduction

    Warning indicating danger to humans or animals. Electrical shock hazard. Danger to humans and animals. Example of a practical application of the described functionality. Calculation example. Fancom helpdesk For any questions and support, please contact the local Fancom Sales & Service Center.
  • Seite 5: Safety Instructions And Warnings

    This paragraph contains a number of general safety instructions. The installation of the device and remedying of any malfunctions should be performed by a certified electrical installer according to the applicable norms. The guarantee does not apply if this product is installed in any other way than is indicated by Fancom. Disconnect power before installation.
  • Seite 6: Possibilities Of The Itm-A

    Gndf Possibilities of the ITM-A The possibilities of the ITM-A depend on the hardware configuration. The following hardware configurations are available: • ITM-A without additional analog output. • ITM-A with additional analog output. Set the type of control required using dipswitch 6, 7 and 8. ITM-A without analog output - ITM-A CentralFlow The ITM-A can be used as an intelligent control module in a CentralFlow system.
  • Seite 7: Installing The Itm-A

    Gndf Installing the ITM-A Install the ITM-A and associated components as follows: Mount the ITM-A (see page 4) Connect the ITM-A (see page 4) Test the ITM-A (see page 7) Mounting the ITM-A When mounting/installing the ITM-A, the following should be observed: Never mount the ITM-A in a room where animals are present because of the (manual) control.
  • Seite 8 Gndf Settings I/O address Control type DIP 1 DIP 2 DIP 3 DIP 4 DIP 5 DIP 6 DIP 7 DIP 8 Control type adrr. CentralFlow (ATM with DSR) AT(M) without DSR NatuFlow / ProFlow direct (analog output direct with DSR-feedback) NatuFlow / ProFlow direct with inverted manual operation...
  • Seite 9 Gndf Item DIP Switch Control Central Flow (PROLOW ENDSTATION) • Central flow to control ATM unit (Vortex damper and measuring fan DSR). Only with Lumina 20/21 and Lumina 17 controller. AT without DSR (PROFLOW DIRECT) • Direct control. [%] in = [%] out, using with control AT unit, (vortex damper without measuring fan DSR).
  • Seite 10: Testing The Itm-A

    Gndf I/O-network Possibility of communication via the I/O-network. One control computer and a maximum of 31 network modules may be connected to the I/Onetwork. Each connected network module has a unique address. After an address has been changed, the network module should always be restarted (power off-on). In-/output type ITM-A address .
  • Seite 11: Using The Itm-A

    Gndf Using the ITM-A Setting the knob The knob on the front of the ITM-A is used to set the ATM-unit to: • Automatic (A) or • Manual (M) Display (option) A key on the front panel is available as an option. If this key is pressed, the following will be displayed alternately: •...
  • Seite 12: Adjusting The Itm-A

    Gndf Adjusting the ITM-A General Before the ITM-A can be used, the Triac, the maximum number of revolutions and the control input should first be adjusted, depending on the setting. The position of the dipswitches is important for this adjustment (see table below).
  • Seite 13: Adjusting The Maximum Revolutions

    Gndf Adjusting the maximum revolutions Only applicable when using DSR-feedback. Method Open the lid of the ITM-A housing. Position the dipswitches (9 =Off, 10 =Off) and set the knob and the switch on the front to A. Press the knob to start adjustment. The vortex damper will open, the fan will run at high speed after 10 seconds.
  • Seite 14 Gndf Method 99% adjustment Set the analog output of the controller to 99%. Check the voltage, this should be between 0.1 and 1V (with a 0-10V control this is between is 9V and 10V). Turn the knob on the front to its maximum position. The red led (L1) flashes: longer period on, briefly off. The green led (L2) is off.
  • Seite 15: Alarms

    Gndf Alarms Alarm indication Led 1 and Led 2 flash simultaneously. Backup alarm Led 1 and Led 2 flash alternately. Memory alarm...
  • Seite 16: Technical Specifications

    Gndf Technical specifications Power supply Mains voltage 230Vac (-10%, +10%) Mains frequency 50/60Hz Maximum power consumption Fuse electronics see connection diagram Inputs Analog In Voltage 0-10Vdc Temperature sensor type S7 -9.9°C to +99.9°C DSR-feedback 4 pulses per revolution max. frequency: 200Hz Knob Adjust ventilation between 0 –...
  • Seite 17: Connection Diagram

    Gndf Connection diagram VL POWER BOARD Temperature (type S7) / Analog control Control vortex damper DSR sensor RL1/RL2 Relays...
  • Seite 18: Appendix: Eg Declaration Of Conformity

    Fancom B.V. Address: Industrieterrein 34 City: Panningen (the Netherlands) Hereby declares that the: ITM-A / ADS Complies with the provisions of the: EMC directive 2004/108/EC Emission according to NEN-EN-IEC 61326-1: 2013 Immunity according to NEN-EN-IEC 61326-1: 2013 Place: Panningen Date: 01-04-2014...
  • Seite 19 N.B.: De originele, authentieke versie van deze handleiding is de door Fancom B.V. of door een van haar dochterondernemingen (verder aangeduid als Fancom) geproduceerde Engelstalige versie. Achteraf door derden aangebrachte wijzigingen in deze handleiding zijn door Fancom noch gecontroleerd, noch goedgekeurd. Onder wijzigingen verstaat Fancom o.a.
  • Seite 20 Inhoudsopgave Algemene inleiding ............................. 1 Hoe gebruikt u deze handleiding ....................1 Fancom-helpdesk ........................... 1 Veiligheidsinstructies en waarschuwingen ..................2 Mogelijkheden van de ITM-A........................3 ITM-A zonder analoge uitgang – ITM-A ..................3 ITM-A met analoge uitgang – ITM-A ....................3 De ITM-A installeren ...........................
  • Seite 21: Algemene Inleiding

    Kans op gevaarlijke elektrische schokken. Gevaar voor mens of dier. Voorbeeld van een concrete toepassing van de beschreven functionaliteit. Voorbeeld van een berekening. Fancom-helpdesk Voor ondersteuning en antwoord op eventuele vragen kunt u het lokale Fancom Sales & Service Centre raadplegen.
  • Seite 22: Veiligheidsinstructies En Waarschuwingen

    De garantie is niet van toepassing als dit product op een andere wijze wordt geïnstalleerd dan door Fancom is aangegeven. Schakel vóór het installeren de stroom uit.
  • Seite 23: Mogelijkheden Van De Itm-A

    gNdf Mogelijkheden van de ITM-A De mogelijkheden van de ITM-A zijn afhankelijk van de hardwareconfiguratie. U kunt kiezen uit de volgende hardwareconfiguraties: • ITM-A zonder extra analoge uitgang. • ITM-A met extra analoge uitgang. Stel het vereiste type regeling in met DIP-schakelaars 6, 7 en 8. ITM-A zonder analoge uitgang –...
  • Seite 24: De Itm-A Installeren

    gNdf De ITM-A installeren Installeer de ITM-A en de bijbehorende onderdelen als volgt: Monteer de ITM-A (zie pagina 4). Sluit de ITM-A aan (zie pagina 4). Test de ITM-A (zie pagina 7). De ITM-A monteren Let bij het monteren/installeren van de ITM-A op het volgende: Monteer de ITM-A vanwege de (hand)bediening nooit in een ruimte waar dieren aanwezig zijn.
  • Seite 25 gNdf Instellingen I/O-adres Type regeling I/O-a DIP 1 DIP 2 DIP 3 DIP 4 DIP 5 DIP 6 DIP 7 DIP 8 Type regeling CentralFlow (ATM met RTTM) AT(M) zonder RTTM NatuFlow/ProFlow direct (directe analoge uitgang met RTTM) NatuFlow/ProFlow met geïnverteerde directe handbediening (directe analoge uitgang 10–0 V met...
  • Seite 26 gNdf Item DIP-switch Regeling CentralFlow (PROFLOW-EINDSTATION) • CentralFlow regelt ATM-eenheid (smoorklep en RTTM van meetwaaier). Alleen met regelcomputer Lumina 20/21 en Lumina 17. AT zonder RTTM (PROFLOW DIRECT) • Directe regeling. [%] in = [%] uit met regeling AT-eenheid (smoorklep zonder RTTM van meetwaaier).
  • Seite 27: De Itm-A Testen

    gNdf I/O-net Mogelijkheid voor communicatie via I/O-net. Het is mogelijk om één regelcomputer via het I/O-net met maximaal 31 netwerkmodules te verbinden. Alle verbonden netwerkmodules moeten een uniek adres hebben. Wanneer een van de adressen is gewijzigd, moet de desbetreffende netwerkmodule altijd opnieuw worden gestart (voeding uit–aan). In-/uitgangstype Adres ITM-A .
  • Seite 28: De Itm-A Gebruiken

    gNdf De ITM-A gebruiken De knop instellen Met de knop aan de voorzijde van de ITM-A kunt u de ATM-eenheid instellen op: • Automatisch (A) of • Handmatig (M) Display (optie) Het frontpaneel kan worden voorzien van een toets (optie). Als deze toets wordt ingedrukt, wordt het volgende afwisselend weergegeven: •...
  • Seite 29: De Itm-A Afregelen

    gNdf De ITM-A afregelen Algemeen Voordat de ITM-A in gebruik kan worden genomen, moeten de triac, het maximumaantal omwentelingen en de regelingang worden afgeregeld, afhankelijk van de instellingen. De stand van de DIP-schakelaars is belangrijk voor deze afregeling (zie de onderstaande tabel). Afregeling van: DIP 9 DIP 10...
  • Seite 30: Het Maximumaantal Omwentelingen Afstellen

    gNdf Het maximumaantal omwentelingen afstellen Alleen van toepassing bij gebruik van RTTM. Methode Open het deksel van de ITM-A-behuizing. Stel de DIP-schakelaars in (9=Off, 10=Off) en verzet de knop en de schakelaar aan de voorzijde naar A. Druk op de knop om de afregeling te starten. De smoorklep gaat open en de ventilator draait gedurende 10 seconden op hoge snelheid.
  • Seite 31 gNdf 99%-waarde afregelen Stel de analoge uitgang van de regelcomputer in op 99%. Controleer de spanning. Deze moet tussen 0,1 V en 1 V liggen (bij 0–10V-regeling tussen 9 V en 10 V). Draai de knop aan de voorzijde naar de hoogste stand. De rode LED (L1) knippert: lang aan, kort uit. De groene LED (L2) is uit.
  • Seite 32: Alarmen

    gNdf Alarmen Alarmindicatie LED 1 en LED 2 knipperen gelijktijdig. Back-upalarm LED 1 en LED 2 knipperen afwisselend. Geheugenalarm...
  • Seite 33: Technische Gegevens

    gNdf Technische gegevens Voeding Netspanning 230 Vac (-10%, +10%) Netfrequentie 50/60 Hz Maximaal opgenomen vermogen 5 VA Zekeringselektronica zie aansluitschema Ingangen Analoge ingang Spanning 0–10 Vdc Temperatuurvoeler type S7 -9,9 °C tot +99,9 °C RTTM 4 pulsen per omwenteling Max. frequentie: 200 Hz Knop Afregelen ventilatie van 0–100% Uitgangen...
  • Seite 34: Aansluitschema

    gNdf Aansluitschema VOEDINGSKAART VL Temperatuur (type S7) / Analoge regeling Regeling smoorklep RTTM-sensor RL1/RL2 Relais...
  • Seite 35: Bijlage: Eg-Verklaring Van Overeenstemming

    Fabrikant: Fancom B.V. Adres: Industrieterrein 34 Plaats: Panningen (the Netherlands) Verklaart hiermee dat de: ITM-A / ADS Voldoet aan de bepalingen van de: EMC-richtlijn 2004/108/EG Emissienorm conform NEN-EN-IEC 61326-1: 2013 Immuniteitsnorm conform NEN-EN-IEC 61326-1: 2013 Plaats: Panningen Datum: 01-04-2014 Paul Smits...
  • Seite 36 Änderungen in dieser Anleitung wurden von Fancom weder geprüft noch genehmigt. Unter Änderungen versteht Fancom u. a. das Übersetzen in eine andere Sprache als das Englische sowie das Ergänzen und/oder Entfernen von Texten und/oder Abbildungen aus dem Original. Fancom übernimmt keinerlei Haftung für Schäden jeglicher Art, Verletzungen und Garantieforderungen sowie andere Forderungen im Zusammenhang mit derartigen Änderungen, soweit diese Änderungen dazu führen, dass der Inhalt von der von Fancom erstellten englischen...
  • Seite 37 Inhalt Allgemeine Einleitung ..........................1 Zur Verwendung dieses Handbuchs ....................1 Fancom Helpdesk ........................... 1 Sicherheitshinweise und Warnungen ..................... 2 Möglichkeiten des ITM-A ..........................3 ITM-A ohne Analogausgang – ITM-A..................... 3 ITM-A mit Analogausgang – ITM-A....................3 Installation des ITM-A ..........................4 Den ITM-A montieren ........................
  • Seite 38: Allgemeine Einleitung

    Warnung vor einer Gefahr für Menschen oder Tiere. Gefahr von elektrischem Schlag. Gefahr für Mensch und Tier. Beispiel für eine praktische Anwendung der beschriebenen Funktion. Berechnungsbeispiel. Fancom Helpdesk Wenden Sie sich bei Fragen und für Hilfe an das Fancom Sales & Service Centre in Ihrer Nähe.
  • Seite 39: Sicherheitshinweise Und Warnungen

    Bedingungen durch. Dieser Abschnitt enthält zahlreiche allgemeine Sicherheitshinweise. Die Installation und die Behebung eventueller Störungen müssen den geltenden Normen entsprechend von einem Fachelektroinstallateur ausgeführt werden. Falls dieses Produkt nicht entsprechend den von Fancom gegebenen Installationsanweisungen installiert wird, erlischt jeglicher Garantieanspruch.
  • Seite 40: Möglichkeiten Des Itm-A

    gnDf Möglichkeiten des ITM-A Die Möglichkeiten von ITM-A hängen von der Hardwarekonfiguration ab. Folgende Hardwarekonfigurationen sind erhältlich: • ITM-A ohne zusätzlichen Analogausgang. • ITM-A mit zusätzlichem Analogausgang. Typ der erforderlichen Regelung über DIP-Schalter 6, 7 und 8 einstellen. ITM-A ohne Analogausgang – ITM-A. CentralFlow ITM-A kann als intelligentes Regelmodul in einem CentralFlow-System verwendet werden.
  • Seite 41: Installation Des Itm-A

    gnDf Installation des ITM-A Bauen Sie den ITM-A und die dazugehörenden Bauteile wie folgt ein: Montieren Sie den ITM-A (see Seite 4) Schliessen Sie den ITM-A an (see Seite 4) Testen Sie den ITM-A (see Seite 7) Den ITM-A montieren Bei der Montage/Installation von ITM-A ist Folgendes zu beachten: Aufgrund der Handbedienung den ITM-A nicht in einem Raum montieren, in dem sich Tiere befinden.
  • Seite 42: Einstellungen

    gnDf Einstellungen E/A-Adresse Regelungstyp E/A- DIP 2 DIP 3 DIP 4 DIP 5 DIP 6 DIP 7 DIP 8 Regelungstyp Adr. CentralFlow (ATM mit RDRM) AT(M) ohne RDRM NatuFlow/ProFlow direkt (Analogausgang direkt mit RDRM) NatuFlow/ProFlow direkt mit invertierter Handbedienung (Analogausgang 10-0 V direkt mit RDRM) Energiesparend mechanisch Energiesparend mech.
  • Seite 43 gnDf Item DIP-Schalter Steuerung Central Flow (PROLOW-ENDSTATION) • Central Flow zur Regelung der ATM-Einheit (Drosselklappe und Dosierlüfter-RDRM). Nur bei Lumina 20/21 und Lumina 17-Regelcomputer. AT ohne RDRM (PROFLOW DIREKT) • Direkte Regelung. [%] ein = [%] aus, mit Regelungs-AT-Einheit, (Drosselklappe ohne Dosierlüfter-RDRM).
  • Seite 44: Den Itm-A Testen

    gnDf I/O-Netzwerk Möglichkeit der Kommunikation über das I/O-Netzwerk. Ein Regelcomputer und max. 31 Netzwerkmodule können an das I/O-Netzwerk angeschlossen werden. Jedes angeschlossene Netzwerkmodul verfügt über eine eindeutige Adresse. Nachdem eine Adresse geändert wurde, sollte das Netzwerkmodul immer neu gestartet werden (Stromversorgung aus/ein).
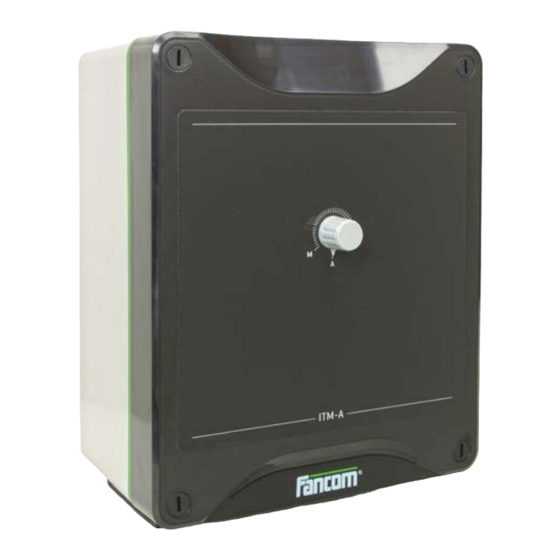
  • Seite 45: Verwendung Des Itm-A

    gnDf Verwendung des ITM-A Knopf einstellen Über den Knopf auf der Vorderseite des ITM-A kann die ATM-Einheit auf Folgendes eingestellt werden: • Automatisch (A) oder • Manuell (M) Display (Option) Eine Taste auf der Vorderseite ist als Option erhältlich. Wenn diese Taste gedrückt wird, wird abwechselnd Folgendes angezeigt: •...
  • Seite 46: Einstellung Des Itm-A

    gnDf Einstellung des ITM-A Allgemeine Bevor ITM-A verwendet werden kann, sollten je nach Einstellung zunächst die Triac, die max. Anzahl an Umdrehungen und der Regeleingang eingestellt werden. Die Position der DIP-Schalter ist für diese Einstellung wichtig (siehe nachfolgende Tabelle). Einstellung von: DIP 9 DIP 10 1-%-Ventilator-Regelausgang einstellen...
  • Seite 47: Max. Umdrehungen Einstellen

    gnDf Max. Umdrehungen einstellen Nur bei Verwendung von RDRM anwendbar. Methode Öffnen Sie den Verschluss des ITM-A-Gehäuses. Positionieren Sie die DIP-Schalter (9 = Off, 10 = Off), und stellen Sie den Knopf und Schalter auf der Vorderseite auf A. Drücken Sie den Knopf, um die Einstellung zu starten. Die Drosselklappe wird geöffnet, der Ventilator dreht sich mit hoher Geschwindigkeit nach 10 Sekunden.
  • Seite 48 gnDf Methode der 99-%-Einstellung Stellen Sie den Analogausgang des Regelcomputers auf 99 %. Überprüfen Sie die Spannung. Der Wert sollte zwischen 0,1 und 1 V liegen (bei einer 0-10-V-Regelung liegt der Wert zwischen 9 V und 10 V). Drehen Sie den Knopf auf der Vorderseite in die max. Position. Die rote LED (L1) blinkt: lange ein, kurz aus. Die grüne LED (L2) ist aus.
  • Seite 49: Alarme

    gnDf Alarme Alarmanzeige LED 1 und LED 2 blinken gleichzeitig. Backup-Alarm LED 1 und LED 2 blinken abwechselnd. Speicheralarm...
  • Seite 50: Technische Daten

    gnDf Technische Daten Stormversorgung Netzspannung 230 V AC (-10 %, +10 %) Netzfrequenz 50/60Hz Max. Leistungsaufnahme 5 VA Sicherungselektronik siehe Anschlussschaltbild Eingänge Analogeingang Spannung 0-10 V DC Temperaturfühler Typ S7 -9,9 bis +99,9 °C RDRM 4 Intervalle pro Umdrehung max. Frequenz: 200Hz Knopf Belüftung von 0 bis 100 % einstellen Ausgänge...
  • Seite 51: Anschlussschaltbild

    gnDf Anschlussschaltbild VL POWER BOARD Temperatur (Typ S7)/Analoge Regelung Drosselklappe regeln RDRM-Fühler RL1/RL2 Relais...
  • Seite 52: Anhang: Eg-Konformitätserklärung

    Anhang: EG-Konformitätserklärung Hersteller: Fancom B.V. Adresse: Industrieterrein 34 Ort: Panningen (The Netherlands) Erklärt hiermit, dass: ITM-A / ADS Die Bestimmungen erfüllt von: EMV-Richtlinie 2004/108/EG Emissionen gemäß NEN-EN-IEC 61326-1: 2013 Immunität gemäß NEN-EN-IEC 61326-1: 2013 Ort: Panningen Datum: 01-04-2014 Paul Smits...
  • Seite 53 N.B. : La version d’origine de ce manuel est en anglais et est publiée par Fancom B.V. ou l’une de ses filiales (ci-après désignées par Fancom). En cas de modifications apportées à ce manuel par un tiers, elles ne sont ni vérifiées ni approuvées par Fancom.
  • Seite 54 Table des matières Présentation générale ..........................1 Utilisation de ce manuel ........................1 Assistance utilisateurs Fancom ...................... 1 Consignes de sécurité et avertissements ..................2 Possibilités de l’ITM-A ..........................3 ITM-A sans sortie analogique - ITM-A .................... 3 ITM-A avec sortie analogique - ITM-A .................... 3 Installation du ITM-A ..........................
  • Seite 55: Présentation Générale

    Avertissement indiquant un danger pour les humains et les animaux. Risque de choc électrique. Danger pour les humains et les animaux. Exemple d’application pratique de la fonctionnalité décrite. Exemple de calcul. Assistance utilisateurs Fancom Pour toute question ou demande d’assistance, veuillez contacter le SAV local de Fancom.
  • Seite 56: Consignes De Sécurité Et Avertissements

    L'installation de l'appareil et la correction de tout dysfonctionnement doivent être effectuées par un électricien agréé. La garantie ne s’applique pas en cas d’installation du produit d’une façon autre que celle indiquée par Fancom. Coupez l’alimentation avant d’installer le produit.
  • Seite 57: Possibilités De L'itm-A

    gndF Possibilités de l’ITM-A Les possibilités de l’ITM-A dépendent de la configuration matérielle. Les configurations matérielles suivantes sont disponibles : • ITM-A sans sortie analogique supplémentaire. • ITM-A avec sortie analogique supplémentaire. Définissez le type de contrôle requis à l’aide des commutateurs DIP 6, 7 et 8. ITM-A sans sortie analogique - ITM-A CentralFlow L’ITM-A peut être utilisé...
  • Seite 58: Installation Du Itm-A

    gndF Installation du ITM-A Installez le ITM-A et ses accessoires comme suit : Montez le ITM-A (voir page 4). Branchez le ITM-A (voir page 4) Testez le ITM-A (voir page 7). Montage du ITM-A Lors du montage/de l’installation de la solution ITM-A, respectez les consignes suivantes : N’installez jamais la solution ITM-A dans une pièce renfermant des animaux du fait de la commande (manuelle).
  • Seite 59 gndF Paramètres Adresse I/O Type de contrôle Adr. DIP 1 DIP 2 DIP 3 DIP 4 DIP 5 DIP 6 DIP 7 DIP 8 Type de contrôle d’E/S CentralFlow (ATM avec DSR) AT(M) sans DSR NatuFlow / ProFlow direct (sortie analogique directe avec asservissement DSR) NatuFlow / ProFlow direct avec fonctionnement manuel...
  • Seite 60 gndF Élémen Commutateur DIP Commande CentralFlow (POSTE TERMINAL PROLOW) • CentralFlow qui contrôle l’unité ATM (registre vortex et mesure du DSR du ventilateur). Uniquement avec les ordinateurs Lumina 20/21 et Lumina 17. AT sans DSR (PROFLOW DIRECT) • Commande directe. [%] en entrée = [%] en sortie, utilisation avec l’unité...
  • Seite 61: Test Du Itm-A

    gndF Réseau d’E/S Il est possible de communiquer via le réseau d’E/S. Un ordinateur et jusqu’à 31 modules réseau peuvent être connectés au réseau d’E/S. Chaque module réseau connecté dispose d’une adresse unique. En cas de modification d’une adresse, le module réseau correspondant doit être redémarré (mise sous/hors tension). Type d’entrée/sortie adresse ITM-A .
  • Seite 62: Utilisation Du Itm-A

    gndF Utilisation du ITM-A Réglage de la molette La molette à l'avant du ITM-A sert à configurer l’unité ATM : • En mode automatique (A) ou • manuel (M) Afficheur (en option) Un bouton est disponible en option sur la face avant. Si vous appuyez sur cette touche, les informations suivantes s’affichent : •...
  • Seite 63: Réglage Du Itm-A

    gndF Réglage du ITM-A Généralités Avant de pouvoir utiliser l’ITM-A, le Triac, le nombre maximum de révolutions et l’entrée de commande doivent être configurés, selon les paramètres. La position des commutateurs DIP est importante pour procéder à ces réglages (voir le tableau ci-dessous). Réglage de : DIP 9 DIP 10...
  • Seite 64: Réglage Du Nombre Maximum De Tours

    gndF Réglage du nombre maximum de tours Uniquement applicable en cas d’utilisation du signal d’asservissement DSR. Méthode Ouvrez le couvercle du boîtier de l’ITM-A. Positionnez les commutateurs DIP (9 = Off, 10 = Off) et placez la molette et le commutateur sur la face avant en position A.
  • Seite 65 gndF Méthode pour le réglage à 99 % Réglez la sortie analogique de l’ordinateur sur 99%. Vérifiez la tension. Elle doit être comprise entre 0,1 et 1 V (et entre 9 et 10 V avec un signal de commande de 0-10 V). Tournez la molette sur la face avant en position maximum.
  • Seite 66: Alarmes

    gndF Alarmes Indication d’alarme Les voyants 1 et 2 clignotent simultanément. Alarme de secours Les voyants 1 et 2 clignotent alternativement. Alarme mémoire...
  • Seite 67: Spécifications Techniques

    gndF Spécifications techniques Alimentation Tension secteur 230 Vca (-10 %, +10 %) Fréquence secteur 50/60 Hz Consommation électrique max. 5 VA Composants électroniques, fusible voir le diagramme de connexion Entrées Entrée analogique Tension 0-10 Vcc Capteur thermique de type S7 -9,9 à...
  • Seite 68: Diagramme De Connexion

    gndF Diagramme de connexion CARTE D’ALIMENTATION VL Température (type S7) / commande analogique Registre vortex Capteur DSR RL1/RL2 Relais...
  • Seite 69: Annexe : Certificat Européen De Conformité

    Industrieterrein 34 Ville : Panningen (The Netherlands) certifie, par le présente, que : ITM-A / ADS est conforme aux dispositions suivantes : Directive sur les émissions électromagnétiques 2004/108/CE Émissions conformément à la norme NEN-EN-IEC 61326-1: 2013 Immunité conformément à la norme NEN-EN-IEC 61326-1: 2013...

Inhaltsverzeichnis