Gutta BS Timber-Line 160 Montageanleitung
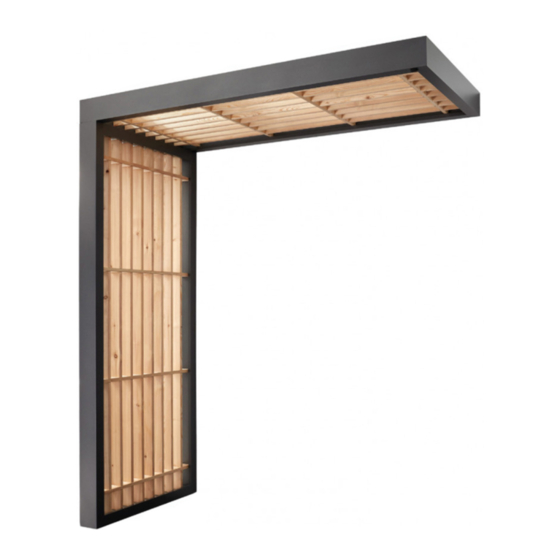
Rechteckvordach
Vorschau ausblenden
Andere Handbücher für BS Timber-Line 160:
- Montageanleitung (20 Seiten) ,
- Montageanleitung (11 Seiten)
Quicklinks
Montageanleitung
D
Assembly instructions
GB
Instructions de montage
F
Rechteckvordach BS Timber-Line
Rechteckvordach BS Timber-Line
BS Timber-Line 160 -
BS Timber-Line 160 - Art.-Nr.: 7600103
BS Timber
BS Timber-Line
-Line 200 - Art.-Nr.: 7600106
200 - Art.-Nr.: 7600106
BS Timber
BS Timber-Line
-Line 250 - Art.-N
250 - Art.-Nr.: 7600109
Seitenteil Timber-Line
Seitenteil Timber
-Line - Art.-Nr.: 7600112
Art.-Nr.: 7600103
r.: 7600109
- Art.-Nr.: 7600112
Nr.: 9219133

Verwandte Anleitungen für Gutta BS Timber-Line 160


Inhaltszusammenfassung für Gutta BS Timber-Line 160
- Seite 1 Nr.: 9219133 Montageanleitung Assembly instructions Instructions de montage Rechteckvordach BS Timber-Line Rechteckvordach BS Timber-Line BS Timber-Line 160 - BS Timber-Line 160 - Art.-Nr.: 7600103 Art.-Nr.: 7600103 BS Timber BS Timber-Line -Line 200 - Art.-Nr.: 7600106 200 - Art.-Nr.: 7600106 BS Timber BS Timber-Line -Line 250 - Art.-N...
-
Seite 2: Wichtige Hinweise
Important Recommandations Reccommendations! importantes ! Wichtige Hinweise! • Prior to assembly please study the assembly in- • Vor der Montage bitte Montageanleitung genau- • Avant le montage, veuillez lire attentivement les structions in detail and check the consignment for estens durchlesen und Produkt auf evtl. Transport- instructions de montage et vérifier que le produit possible faulty parts or damage during transpor- schäden bzw. - Seite 3 Stückliste | Parts list | liste de pièces Bezeichnung Stück Description Pieces Désignation Piéces Timber Timber Timber Dübel Ø 12 mm Plugs Ø 12 mm | Goujons Ø 12 mm U-Scheibe Washers | Laveuse Schraube 10 x 80 mm Screw 10 x 80 mm| Visser 10 x 80 mm Metallschraube 5,5 x 25 mm 14 x 16 x...
- Seite 4 Anbaumaße BS Timber-Line 160 | 200 | 250 Screw size BS Timber-Line 160 | 200 | 250 Taille de vis BS Timber-Line 160 | 200 | 250 1600 mm 1385 mm 2000 mm 892,5 mm 2500 mm 1142,5 mm 77,5 mm 60 mm...
- Seite 5 Montage BS Timber-Line 160 | 200 | 250 Montage BS Timber-Line 160 | 200 | 250 Instructions BS Timber-Line 160 | 200 | 250 Heben Sie den Innenrahmen inkl. Holzleisten aus dem Außenrahmen und gehen Sie dabei wie folgt vor: 1.
- Seite 6 Montage Außenrahmen 160 | 200 | 250 Montage Outer frame 160 | 200 | 250 | Instructions Cadre extérieur 160 | 200 | 250 160ér 200ér 250ér...
- Seite 7 Montage Wasserspeier + Blindstopfen 160 | 200 | 250 Montage Water spout + blind plug 160 | 200 | 250 Instructions Bec d‘eau + bouchon borgne 160 | 200 | 250 Der Blindstopfen kann wahlweise links oder rechts montiert werden. Auf der anderen Seite wird der Wasserspeier oder das Seitenteil (Seite 11) montiert.
- Seite 8 Montage Innenrahmen mit Holz verschraubt 160 / 200 / 250 | Montage Inner frame screwed with wood 160 / 200 / 250 | Instructions Cadre intérieur vissé au bois 160 / 200 / 250 Kleben Sie das Kompriband auf die Oberseite des Innenrahmens. Glue the compression tape to the top of the inner frame.
- Seite 9 Legen Sie die Acrylplatte auf den Innenrahmen. Place the acrylic plate on the inner frame. Placez la plaque acrylique sur le cadre intérieur. Z-Profile lang Z-Profile kurz Z-Profile long | Profilé en Z long Z-Profile short | Profilé en Z court Legen Sie die Z-Profile oben auf das Acrylglas.
- Seite 10 Montage Innenrahmen mit Holz verschraubt 160 / 200 / 250 | Montage Inner frame screwed with wood 160 / 200 / 250 | Instructions Cadre intérieur vissé au bois 160 / 200 / 250 160ér 14 x 200ér 14 x 250ér 16 x Verschrauben Sie die Z-Profile mit dem Außenrahmen.
- Seite 11 Montage Seitenteil Montage Side Panel Montage du panneau latéral Stückliste | Parts list | liste de pièces Bezeichnung Stück Description Pieces Désignation Piéces Seitenteil Timber Dübel Ø 12 mm Plugs Ø 12 mm | Goujons Ø 12 mm U-Scheibe Washers | Laveuse Schraube 10 x 80 mm Screw 10 x 80 mm| Visser 10 x 80 mm Metallschraube 5,5 x 25 mm...
-
Seite 12: Montagemaße Timberline Seitenteil
Anbaumaße BS Timber-Line Seitenteil Screw size BS Timber-Line Side Panel Dimensions de montage du panneau latéral Timber-Line BS Mind. Abstand zum Boden = 40 mm Technical reference Created by Approved by Christian Doering 10.06.2021 Minimum distance to the floor = 40 mm Document type Document status Distance minimale au sol = 40 mm... - Seite 13 Heben Sie den Innenrahmen inkl. Holzleisten aus dem Außenrahmen und gehen Sie dabei wie folgt vor: 1. Z-Profile entfernen | 2. Glasplatte herausnehmen | 3. Innenrahmen herausheben - siehe Bild. Lift the inner frame incl. wooden strips out of the outer frame, proceeding as follows: 1.
- Seite 14 Montage Außenrahmen Montage Outer frame Instructions Cadre extérieur...
- Seite 15 Kleben Sie die Abstandsklötze mit doppelseitigem Kleben Sie die Führung des Wasserrohrs mit Klebeband auf den Unterrahmen des Seitenteils. doppelseitigem Klebeband in den Rahmen ein. Stick the spacer blocks to the bottom frame of the side panel with Tape the water pipe guide into the frame with double-sided tape. double-sided adhesive tape.
- Seite 16 Vor einsetzen der Regenrohrverschraubung: 1. Verschraubung aufdrehen | 2. abgeschraubtes Bauteil über den Schlauch schieben 3. Spiralschlauch einschieben | 4. Verschraubung wieder zudrehen | 5. Regenrohrverschraubung eindrehen | 6. Schlauch durch die Schlauchführung schieben | 7. Schneiden Sie den überschüssigen Spiralschlauch, welcher unten aus dem Seitenteil heraushängt, ab.
- Seite 17 Montage Innenrahmen mit Holz verschraubt Montage Inner frame screwed with wood Instructions Cadre intérieur vissé au bois Kleben Sie das Kompriband auf den Innenrahmen. Stick the compressor tape on the inner frame. Collez le ruban de compression sur le cadre intérieur. Setzen Sie den Innenrahmen mit den verschraubten Holzleisten in den Außenrahmen.
- Seite 18 Setzen Sie die Glasplatte in den Innenrahmen. Place the glass plate into the inner frame. Placez la plaque de verre dans le cadre intérieur. Achtung: Glas - zerbrechlich! Attention: Glass - fragile! Attention : le verre est fragile! Hinweis: Eine 2. Person muss das Glas solange festhalten, bis die Z-Profile fest mit dem Rahmen verschraubt sind. Sonst kann das Glas herausfallen! A 2nd person must hold the glass until the Z-profiles are firmly screwed to the frame.
- Seite 19 16 x Verschrauben Sie die Z-Profile mit dem Außenrahmen. Screw the Z-profiles to the outer frame. Visser les profilés en Z au cadre extérieur.
- Seite 20 Hobbyplatten Rasengitter Gartenprodukte ... und vieles mehr ! Plates for crafts Lawn grids Garden products ... and much more ! www.gutta.com Gutta Werke GmbH Bau- und Heimwerkerprodukte Bahnhofstraße 51-57 D-77746 Schutterwald Telefon 0781 6090 Telefax 0781 6093200 info@gutta.com U(0a34bc-BBJDCI( www.scobalit.de...