Gutta Premium Montageanleitung
Terrassendach
Vorschau ausblenden
Andere Handbücher für Premium:
- Montageanleitung (20 Seiten) ,
- Montageanleitung (24 Seiten)

Verwandte Anleitungen für Gutta Premium


Inhaltszusammenfassung für Gutta Premium
- Seite 1 Terrassendach Premium Montageanleitung 4x3m + 4x4m Assembly instructions Premium patio roof Instructions de montage Toit de terrasse haut de gamme...
-
Seite 2: Die Hohlkammerplatten Dürfen Nicht Ohne Quergelegte Laufbretter (Über Mind. 2 Sparren) Begangen Werden
Montagehinweise | Pflegeinformationen • Beachten Sie die örtlichen Bauvorschriften sowie die Schneelastzonen in ihrer Region • Sortieren Sie die Teile vor der Montage und prüfen Sie die Inhaltsliste gemäß Montageanleitung • Zur Montage des Terrassendach-Bausatzes werden mindestens 2 Personen benötigt •... - Seite 3 Assembly instructions | Care information • Observe the local building regulations and the snow load zones in your region. • Before the assembly sort the parts and check the contents list according to the assembly instructions. • At least 2 persons are required to assemble the terrace roof. •...
- Seite 4 Instructions de montage | Conseils d'entretien • respecter les règlementations du batiment ainsi que les zones de contrainte de neige de votre région • trier les pièces avant l´assemblage et vérifier le contenu de la liste des pièces conformément au mode d´emploi •...
- Seite 5 Stückliste / List of Items / liste des articles Anzahl / Bezeichnung Designation désignation Number / numéro Hohlkammerplatte 980 x 4000 mm Twinwall sheet 980 x 4000 mm Plaque alvéolaire 980 x 4000 mm Wall connection incl. pre-assembled bearing Raccordement mural, profilés préassemblés Wandanschluss inkl.
- Seite 6 Stückliste / List of Items / liste des articles Z.4) Z.10 Z.12 Z.11 Z.13 Z.14 Z.16 Z.15 Z.17 Z.18 Z.20 Z.19...
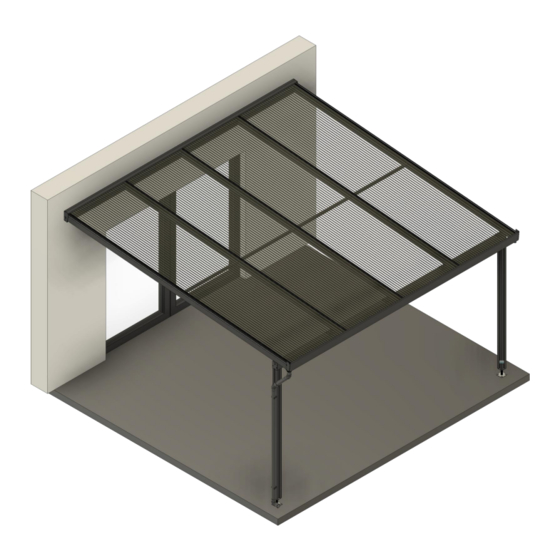
- Seite 7 Explosionszeichnung/ exploded drawing / dessin éclaté...
- Seite 8 Z.3 10x 1008mm 1008mm 1008mm 1008mm B) 1x Z.2 10x Z.4 10x...
- Seite 9 F) 2x M) 2x Z.10 4x Z.11 4x Abstand / Distance / Distance min. 100mm – max. 600mm G) 3x M) 3x Z.11 6x Z.10 6x Abstand / Distance / Distance min. 100mm – max. 600mm...
- Seite 10 C) 1x Z.14 I) 2x...
- Seite 11 Z.12 Z.8 2x Z.6 2x F) 1x links / left / á gauche J) 1x K) 1x I) 2x C) 1x = vormontiert in Punkt 4 = pre-assembled in point 4 = prémonté au point 4...
- Seite 12 G) 1x E) 2x Z.6 2x Z.12 2x Z.9 2x...
- Seite 13 E) 2x Z.6 2x Z.12 2x Z.9 2x G) 1x...
- Seite 14 E) 2x Z.6 2x Z.12 2x Z.9 2x G) 1x...
- Seite 15 Z.12 Z.8 2x Z.6 2x F) 1x rechts/ right / correctes K) 1x J) 1x...
- Seite 16 Z.5 x16...
- Seite 17 Z.19 22x N) 4x...
- Seite 18 Z.2 18x Z.3 8x Z.4 8x...
- Seite 19 Z.16 10x Z.15 10x D) 1x...
- Seite 20 Z.17 Z.18 (Nur bei Acrylplatten im Lieferumfang enthalten / Only for acrylic sheets in the Included in delivery / Uniquement pour les plaques acryliques de la gamme A) 4x Inclus dans la livraison) G) 8x Zum Schutz vor eindringendem Staub und Schmutz kleben Sie die Stirnseiten der Platten mit dem Kantenverschlussband ab.
- Seite 21 H) 2 x Z.20 14x Legen Sie die erste Platte auf und richten Sie sie korrekt aus – beachten Sie auch hier die korrekte Ausrichtung der Schutzfolien. Profiloberteil alle 40 cm mittig vorbohren (Ø7 mm), die erste Bohrung erfolgt nach 6cm. Anschließend auflegen und mit dem Unterteil verschrauben.
- Seite 22 H) 3 x Z.20 21x Montieren Sie in der gleichen Art und Weise die 3. und 4. Platte und verschrauben Sie diesen Deckel wie im Schritt Assemble the 3rd and 4th plates in the same way and screw this cover together as in step 15. Monter les 3ème et 4ème plaques de la même manière et visser ce couvercle ensemble comme à...
- Seite 23 L) 2x Z.5 8x...
- Seite 24 Z.1 4x...