Silvercrest DZ 20 DE Bedienungs- Und Sicherheitshinweise
Vorschau ausblenden
Andere Handbücher für DZ 20 DE:
- Bedienungs- und sicherheitshinweise (125 Seiten)
Inhaltsverzeichnis
Werbung
Verfügbare Sprachen
Verfügbare Sprachen
Quicklinks
TIMER SWITCH
TIMER SWITCH
Operation and Safety Notes
TIMER
Instrucţiuni de utilizare şi de siguranţă
ТАЙМЕР ЗА ЕЛЕКТРОУРЕДИ
Инструкции за обслужване и безопасност
ZEITSCHALTUHR
Bedienungs- und Sicherheitshinweise
IAN 274299
274299_B_Zeitschaltuhren_digital_cover_RO_BG.indd 2
All manuals and user guides at all-guides.com
22.04.16 07:19
Werbung
Kapitel
Inhaltsverzeichnis

Verwandte Anleitungen für Silvercrest DZ 20 DE


Inhaltszusammenfassung für Silvercrest DZ 20 DE
- Seite 1 All manuals and user guides at all-guides.com TIMER SWITCH TIMER SWITCH Operation and Safety Notes TIMER Instrucţiuni de utilizare şi de siguranţă ТАЙМЕР ЗА ЕЛЕКТРОУРЕДИ Инструкции за обслужване и безопасност ZEITSCHALTUHR Bedienungs- und Sicherheitshinweise IAN 274299 274299_B_Zeitschaltuhren_digital_cover_RO_BG.indd 2 22.04.16 07:19...
- Seite 2 All manuals and user guides at all-guides.com Before reading, unfold the page containing the illustrations and familiarise yourself with all functions of the device. Înainte de a citi instrucţiunile, priviţi imaginile şi familiarizaţi-vă cu toate funcţiile aparatului. Преди да прочетете отворете страницата с фигурите и след това се запознайте...
- Seite 3 All manuals and user guides at all-guides.com 274299_B_Zeitschaltuhren_digital_cover_RO_BG.indd 4 22.04.16 07:19...
- Seite 4 All manuals and user guides at all-guides.com 274299_B_Zeitschaltuhren_digital_cover_RO_BG.indd 5 22.04.16 07:19...
-
Seite 5: Inhaltsverzeichnis
All manuals and user guides at all-guides.com List of pictograms used ..Page Introduction Intended use ........Page Control elements ........Page Technical Data ........Page 10 Safety notices ......Page 11 Control- and display elements Control elements ........Page 13 Displays + Explanation .......Page 13 Random function ........Page 15 Operating mode function ....Page 16 Program function........Page 16... - Seite 6 All manuals and user guides at all-guides.com Operation Switching to the clock function ...Page 21 (De) activating continuous operation ...Page 22 Configuring programs ......Page 24 Switching the random function on and off ..........Page 28 Cleaning ..........Page 29 Disposal ..........Page 30 Warranty and Service ..Page 31 Service address ........Page 32...
-
Seite 7: List Of Pictograms Used
All manuals and user guides at all-guides.com List of pictograms used: Observe the warning and safety instructions! Attention! Risk of electric shock! Do not dispose of electric equip- ment in the household waste! Use indoors -10T40 Ambient temperature Micro-switch with a contact opening width of <... -
Seite 8: Timer Switch
All manuals and user guides at all-guides.com Timer Switch Digital – for indoors Introduction Intended use The device is intended as a digital weekly timer switch for use in enclosed, dry rooms and designed for private use. It is not suita- ble for commercial use. -
Seite 9: Control Elements
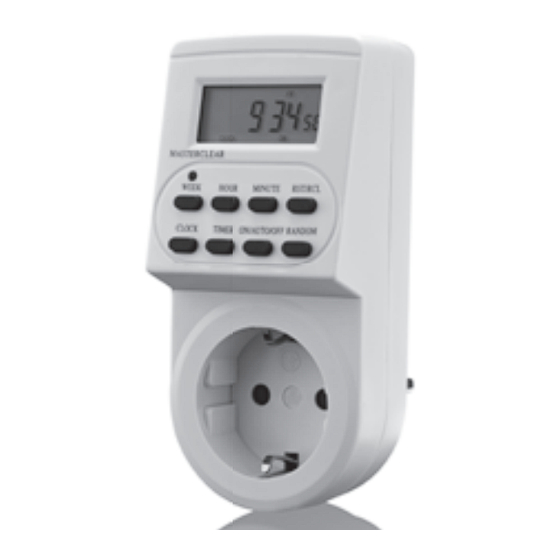
All manuals and user guides at all-guides.com Control elements (Fig. A) LCD display MINUTE button RST / RCL button RANDOM button ON / AUTO / OFF button Socket Plug (reverse) Timer button CLOCK button WEEK button MASTERCLEAR button HOUR button LCD display (Fig. -
Seite 10: Technical Data
PROGRAM Hours display CLOCK Program number AM – PM ON – OFF Technical Data Model designation: DZ 20 DE Operating voltage: 230–240 V ~ 50 Hz Switched voltage: 230–240 V ~ 16(2) A Switching capacity: max. 3600 W Ambient temperature: -10 °C to 40 °C... -
Seite 11: Safety Notices
All manuals and user guides at all-guides.com Programs: 10 ON / OFF program sets Battery: NiMH 1.2 V > 100 h indoors: CE compliant: Safety notices Children are not able to understand the dangers arising from improper use of electric devices. Never leave children unsupervised when using electric devices. - Seite 12 All manuals and user guides at all-guides.com Do not cover the device. Heat accumu- lates when covered, creating a fire hazard. Regularly check the device for damage. Do not replace damaged parts but con- tact the manufacturer or dispose of the de- vice in an environmentally responsible way.
-
Seite 13: Control- And Display Elements
All manuals and user guides at all-guides.com Control- and display elements Control elements MASTERCLEAR button This button will delete all time and program settings. Displays + Explanation Weekdays The abbreviations on the LCD display mean: MO Monday TU Tuesday WE Wednesday TH Thursday FR Friday SA Saturday... - Seite 14 All manuals and user guides at all-guides.com R Symbol The R symbol indicates random switching is activated. The R symbol means random. In this mode the device will switch the con- nected loads on and off at different intervals. S symbol Indicates the clock has been set to summer time.
-
Seite 15: Random Function
All manuals and user guides at all-guides.com Program number Indicates the program number in PROGRAM function. AM – PM Indicates the hour mode. ON – OFF Indicates the switching state: ON = turn-on time, OFF = turn-off time. The switching state is only visible under program function. -
Seite 16: Operating Mode Function
All manuals and user guides at all-guides.com Operating mode function The different operating modes are: AUTO = automatic program operation, ON = continuous operation ON, OFF = continuous operation OFF. Program function This function allows the on- and off times to be programmed for the connected load. -
Seite 17: Preparation
All manuals and user guides at all-guides.com Preparation To start up the device you must: 1. Charge the device. 2. Reset all settings. 3. Set the current time. Charging the device Insert the plug into a mains socket. Charge the rechargeable battery for 14 hours. -
Seite 18: Setting The Current Time
All manuals and user guides at all-guides.com Reset all settings Press the MASTERCLEAR button with a pen or other pointy object. The LCD display will read: All settings cleared. Setting the current time Note: Hold the HOUR, MINUTE button for faster programming. -
Seite 19: Setting Standard And Summer Time
All manuals and user guides at all-guides.com Set the minute with the MINUTE button. Release the CLOCK button Setting standard and summer time Setting summer time Simultaneously press the CLOCK and ON / AUTO / OFF buttons. The will advance the hour display by one hour and the S symbol disap- pears. -
Seite 20: Setting The Hour Mode
All manuals and user guides at all-guides.com Setting standard time Simultaneously press the CLOCK ON / AUTO / OFF buttons. The S symbol disappears from the LCD and the hour decreases by one. Setting the hour mode The LCD can display the current time in 12- or 24-hour mode. -
Seite 21: Operation
All manuals and user guides at all-guides.com Setting to 24-hour mode Simultaneously press the TIMER CLOCK buttons. The LCD will stop showing AM or PM Operation Switching to the clock function The LCD automatically switches back to clock function if a function is not used for more than 30 seconds. -
Seite 22: (De) Activating Continuous Operation
All manuals and user guides at all-guides.com Press the CLOCK button to manually go to the clock function. (De) activating continuous operation This device has the following operating modes: – Continuous operation, – Automatic program operation The default is automatic program operation. You can switch the device to continuous operation separate from the programs. - Seite 23 All manuals and user guides at all-guides.com Deactivating continuous operation Repeatedly press the ON / AUTO / button until the LCD reads Activating automatic program operation Repeatedly press the ON / AUTO / button until the LCD reads AUTO AUTO: device is switched off. AUTO: device is switched on.
-
Seite 24: Configuring Programs
All manuals and user guides at all-guides.com Configuring programs You can set up to 10 ON / OFF programs. The shorted time between switching on and off is one minute. A program consists of the switch-on and switch- off time. Both times must be programmed to be able to use a program. - Seite 25 All manuals and user guides at all-guides.com 3. Press the WEEK button and press repeatedly to select one of the following options: – An individual weekday, – One of the following combinations: MO, TU, WE, TH, FR, SA, SU MO, TU, WE, TH, FR SA, SU MO, TU, WE, TH, FR, SA MO, WE, FR...
- Seite 26 All manuals and user guides at all-guides.com 4. Set the respective time using the HOUR and MINUTE buttons. 5. Press the TIMER button to confirm the selection. The switch-on time has been programmed. The LCD will switch to switch-off time. 6.
- Seite 27 All manuals and user guides at all-guides.com Deactivating programs You can deactivate individual programs or all. To completely deactivate a program, you must deactivate the on and off time. Press the TIMER button. Repeatedly press the TIMER button to select the respective switch-on time. Press the RST / RCL button.
-
Seite 28: Switching The Random Function On And Off
All manuals and user guides at all-guides.com Switching the random function on and off If the random function is activated, all set programs will be ignored from 18:00 to 6:00. Instead of that, there is a random function during this time period, which alternately switches on and off with an interval of 10 to 31 minutes. -
Seite 29: Cleaning
All manuals and user guides at all-guides.com Deactivating the random function Press the RANDOM button. The R symbol will disappear from the Cleaning ATTENTION! RISK OF ELECTRIC SHOCK! Discon- nect the device from the mains before cleaning. ATTENTION! RISK OF ELECTRIC SHOCK! Do not allow liquids to enter the device. -
Seite 30: Disposal
All manuals and user guides at all-guides.com Clean the device with a soft, slightly damped cloth and mild detergent. Ensure the device is completely dry before using it again. Disposal Do not dispose of electric equipment in the household waste! In accordance with European Directive 2012 / 19 / EC relating to old electrical and electronic appliances, used electrical equip-... -
Seite 31: Warranty And Service
All manuals and user guides at all-guides.com Warranty and Service This device is covered by a 3 year warranty from the date of purchase. Please keep your receipt as proof of purchase. The product has been produced to the highest standards and thoroughly checked before dispatch. -
Seite 32: Service Address
All manuals and user guides at all-guides.com Service address Lindenstraße 35 72074 Tübingen Germany E-Mail: exp@bat-tuebingen.com Service phone: 00800 48720741 If you need further information, we recom- mend that you consult Service / FAQ‘s on our homepage www.dvw-service.com. IAN 274299 Manufacturer Lindenstraße 35 72074 Tübingen... - Seite 33 All manuals and user guides at all-guides.com Legenda pictogramelor utilizate ..........Pagina 35 Introducere Utilizare conform destinaţiei ...Pagina 36 Elemente de comandă ....Pagina 37 Date tehnice ........Pagina 38 Indicaţii de siguranţă ..Pagina 39 Elemente de comandă și afișaj Elemente de comandă ....Pagina 41 Afișaje + explicaţie corespunzătoare ......Pagina 42 Funcţia Random .......Pagina 44...
- Seite 34 All manuals and user guides at all-guides.com Setarea orei de vară / iarnă ...Pagina 47 Setarea modului ore ......Pagina 48 Utilizare Schimbarea pe funcţia ceas ...Pagina 50 Pornirea și oprirea funcţionării de durată .........Pagina 50 Setarea programului .......Pagina 52 Funcţia aleatorie pornire și oprire...Pagina 56 Curăţare ........Pagina 58 Înlăturare...
-
Seite 35: Legenda Pictogramelor Utilizate
All manuals and user guides at all-guides.com Legenda pictogramelor utilizate: Respectaţi indicaţiile de avertizare şi siguranţă! Atenţie! Pericol de electrocutare! Nu aruncaţi apratele electrice la gunoiul menajer! Utilizare în spaţii închise -10T40 Temperatura ambiantă Micro-comutator cu o deschi- dere de contact < 3 mm 274299_B_Zeitschaltuhren_digital_content_RO_BG.indd 35 22.04.16 07:19... -
Seite 36: Utilizare Conform Destinaţiei
All manuals and user guides at all-guides.com Timer Digital - pentru interior Introducere Utilizare conform destinaţiei Aparatul este construit ca distribuitor de căl- dură doar pentru utilizarea în spaţii închise, uscate și pentru uz privat. Nu este destinat uzului comercial. Aparatul trebuie utilizat doar de către o persoană. -
Seite 37: Elemente De Comandă
All manuals and user guides at all-guides.com mai departe aparatul, înmânaţi și instrucţiu- nile de utilizare. Elemente de comandă (fig. A) Afișaj LCD TastA MINUT Tasta RST / RCL Tasta RANDOM Tasta PORNIT/ AUTO /OPRIT Priză Ștecher (partea din spate) Tasta Timer Tasta CEAS Tasta SĂPTĂMÂNĂ... -
Seite 38: Date Tehnice
Afișajul pentru ore CEAS Număr program AM – PM PORNIT – OPRIT Date tehnice Denumirea tipului: DZ 20 DE Tensiunea de funcţionare: 230–240 V ~ 50 Hz Tensiunea de comutare: 230–240 V ~ 16(2) A 38 RO 274299_B_Zeitschaltuhren_digital_content_RO_BG.indd 38 22.04.16 07:19... -
Seite 39: Indicaţii De Siguranţă
All manuals and user guides at all-guides.com Puterea de comutare: max. 3600 W Temperatura ambiantă: -10 °C până la 40 °C -10T40 Deviaţie timp: ± 1 minut/lună Timp de comutare minim: 1 Minut Program: 10 PORNIT/OPRIT pereche program Acumulator: NiMH 1,2 V >... - Seite 40 All manuals and user guides at all-guides.com copii nesupravegheaţi să utilizeze apa- ratul electronică. Aparatul trebuie introdus doar în prize instalate. Trebuie conectaţi consumatori doar în limitele de putere menţionate ale apara- tului. Nu acoperiţi aparatul. Sub carcasă se formează căldură și poate apărea peri- colul de incendiu.
-
Seite 41: Elemente De Comandă Și Afișaj
All manuals and user guides at all-guides.com Nu apucaţi aparatul cu mâinile umede și nu îl introduceţi în apă. Pentru a deconecta aparatul, scoateţi-l din priză. Corpurile de încălzit sau alţi consuma- tori similari nu trebuie conectaţi de aparat deoarece acestea nu trebuie acţi- onate nesupravegheat. -
Seite 42: Afișaje + Explicaţie Corespunzătoare
All manuals and user guides at all-guides.com Afișaje + explicaţie corespunzătoare Ziua săptămânii Abrevierile de pe ecranul LCD sunt pentru: MO Luni TU Marţi WE Miercuri TH Joi FR Vineri SA Sâmbătă SU Duminică Simbol R Simbolul R indică că funcţia accidentală de este activată. - Seite 43 All manuals and user guides at all-guides.com Simbolul S Indică că ora a fost comutată pe ora de vară. PORNIT – AUTO – OPRIT Indică modul de funcţionare în care se află aparatul. PROGRAM Indică ce funcţie a programului este pornită. CEAS Indică...
-
Seite 44: Funcţia Random
All manuals and user guides at all-guides.com PORNIT - OPRIT Indică modul de comutare: ON= durata de pornire, OFF= durata de oprire. Nivelul de comutare este vizibil doar pentru funcţia program. Funcţia Random Simbolul R reprezintă Random. Cu această funcţie aparatul pornește și oprește consu- matorul la intervale de timp distincte. -
Seite 45: Funcţia Program
All manuals and user guides at all-guides.com OFF = program de durată OPRIT. Funcţia program Cu această funcţie duratele de pornire și oprire pentru consumatorul conectat se pot regla. Funcţia ceas Această funcţie indică ora curentă pe afișajul LCD. Pregătire Pentru a pune în funcţiune aparatul trebuie: 1. -
Seite 46: Încărcarea Aparatului
All manuals and user guides at all-guides.com Încărcarea aparatului Introduceţi ștecherul în priză. Încărcaţi acumulatorul timp de 14 ore. Resetarea tuturor setărilor Indicaţie: Aparatul nu trebuie introdus în priză pentru a prelua setările. Resetaţi toate setările Apăsaţi tasta MASTERCLEAR cu un pix sau cu un obiect cu vârf ascuţit. -
Seite 47: Setarea Orei Exacte
All manuals and user guides at all-guides.com Setarea orei exacte Indicaâoe: Setarea se efectuează mai ra- pid dacă ţineţi apăsată tasta ORĂ, MINUT. Apăsaţi tasta CEAS și ţineţi-o apăsată. Cu tasta SĂPTĂMÂNĂ setaţi ziua săptămânii. Cu tasta ORĂ setaţi orele. Cu tasta MINUT setaţi minutele. -
Seite 48: Setarea Modului Ore
All manuals and user guides at all-guides.com Setarea orei de iarnă Apăsaţi în același timp tastele CEAS și PORNIT/AUTO/OPRIT . Pe afișajul se derulează afișajul orei o oră înapoi și apare simbolul S Setarea modului ore Pe afișajul LCD se poate fișa ora în format de 12 sau 24 de ore. - Seite 49 All manuals and user guides at all-guides.com Setarea modului de 12 ore Apăsaţi în același timp tastele TIMER și CEAS . Pe ecranul LCD apare AM sau PM Următoarea imagine indică ora 23 în formatul de 12 ore. Setarea modului de 24 ore Apăsaţi în același timp tastele TIMER și CEAS .
-
Seite 50: Schimbarea Pe Funcţia Ceas
All manuals and user guides at all-guides.com Utilizare Schimbarea pe funcţia ceas Ecranul LCD se comută automat în func- ţia ceas atunci când nu mai este utilizată o funcţie timp de peste 30 de secunde. Pentru a comuta manual în funcţia ceas apăsaţi tasta CEAS Pornirea și oprirea funcţionării de durată... - Seite 51 All manuals and user guides at all-guides.com Programul automat este preinstalat. Puteţi comuta aparatul indiferent de programele setate în programul de durată. Pornirea funcţionării de durată Apăsaţi în mod repetat tasta PORNIT/ AUTO/OPRIT până când pe ecranul apare PORNIT Oprirea funcţionării de durată Apăsaţi în mod repetat tasta PORNIT/ AUTO/OPRIT până...
-
Seite 52: Setarea Programului
All manuals and user guides at all-guides.com Pornirea programului automat de funcţionare Apăsaţi în mod repetat tasta PORNIT/ AUTO/OPRIT până când pe ecranul apare AUTO OPRIT AUTO: Aparatul este oprit. PORNIT AUTO: Aparatul este pornit. Setarea programului Puteţi seta oână la 10 programe PORNIT/ OPRIT. - Seite 53 All manuals and user guides at all-guides.com 1. Verificaţi dacă aparatul se află în modul de funcţionare AUTO . În caz contrar activaţi modulde funcţionare AUTO (vedeţi „setarea modului de funcţio- nare“). 2. Cu tasta TIMER puteţi selecta funcţia programului. Pe ecranul LCD apare: 3.
- Seite 54 All manuals and user guides at all-guides.com MO, TU, WE, TH, FR, SA MO, WE, FR TU, TH, SA MO, TU, WE TH, FR, SA MO, WE, FR, SU 4. Cu tasta ORA și MINUT puteţi seta ora dorită. 5. Cu tasta TIMER confirmaţi selecta- rea.
- Seite 55 All manuals and user guides at all-guides.com AUTO/OFF până când pe ecran apare ON. Apoi apăsaţi din nou tasta ca să se afi- șeze AUTO. Dacă ceasul trebuie să fie oprit la ora actu- ală (OFF), tasta ON/AUTO/OFF trebuie apăsată până când pe ecran apare OFF. Apoi apăsaţi încă...
-
Seite 56: Funcţia Aleatorie Pornire Și Oprire
All manuals and user guides at all-guides.com Apăsaţi tasta CEAS pentru a con- firma introducerea și pentru a finaliza. Resetarea programelor Puteţi reactualiza acum doar programele care au fost dezactivate. Procedaţi ca în capitolul ”dezactivarea programului” pentru a reactualiza un program dezactivat. - Seite 57 All manuals and user guides at all-guides.com Pornirea funcţiei aleatorii Verificaţi dacă aparatul este în modul de funcţionare AUTO . În caz contrar activaţi modulde funcţionare AUTO (vedeţi „setarea modului de funcţionare“). Apăsaţi tasta RANDOM . Pe ecranul apare simbolul R Deconectarea funcţiei aleatorii Apăsaţi tasta RANDOM .
-
Seite 58: Curăţare
All manuals and user guides at all-guides.com Curăţare ATENŢIE! PERICOL DE ELECTROCUTARE! Deco- nectaţi aparatul înainte de curăţare. ATENŢIE! PERICOL DE ELECTROCUTARE! Aveţi grijă ca în aparat să nu pătrundă lichide. Lichidul care pătrunde poate cauza un scurtcircuit. ATENŢIE! Pericol cauzat de agenţi de curăţare agresivi. -
Seite 59: Înlăturare
All manuals and user guides at all-guides.com Înlăturare Nu aruncaţi apratele elec- trice la gunoiul menajer! Conform Directivei Europene 2012 / 19 / EC aparatele electrice uzate trebuie colectate separat şi predate unui punct corespunzător de reciclare. Posibilităţile pentru eliminarea aparatului uzat pot fi aflate de la comunita- tea sau administraţia locală. -
Seite 60: Adresă De Service
All manuals and user guides at all-guides.com utilizării corespunzătoare. Garanţia devine nulă în cazul intervenţiilor neautorizate. Drepturile dumneavoastră legale nu sunt limitate de această garanţie. În cazul garan- ţiei trebuie să contactaţi serviciul de asistenţă tehnică. Numai în acest fel se poate garanta o trimitere fără... -
Seite 61: Producător
All manuals and user guides at all-guides.com IAN 274299 Producător Lindenstraße 35 72074 Tübingen Germania 274299_B_Zeitschaltuhren_digital_content_RO_BG.indd 61 22.04.16 07:19... - Seite 62 All manuals and user guides at all-guides.com Легенда на използваните пиктограми ......Страница 64 Увод Употреба по предназначение ...Страница 65 Обслужващи елементи .....Страница 66 Технически данни .......Страница 67 Указания за безопасност ......Страница 69 Обслужващи и индикаторни елементи Обслужващи елементи .....Страница 71 Показания...
- Seite 63 All manuals and user guides at all-guides.com Нулиране на всички настройки ........Страница 76 Настройване на текущото време ......Страница 77 Настройване на лятно и зимно часово време ....Страница 78 Настройване на часов режим..Страница 79 Обслужване Превключване във функция Часово време ......Страница 80 Включване...
-
Seite 64: Легенда На Използваните Пиктограми
All manuals and user guides at all-guides.com Легенда на използваните пиктограми: Спазвайте предупрежденията и указанията за безопасност! Внимание! Опасност от електрически удар! Не изхвърляйте електроуре- дите с битовите отпадъци! Употреба в затворени помещения Температура на -10T40 околната среда Микропревключвател с от- вор... -
Seite 65: Употреба По Предназначение
All manuals and user guides at all-guides.com Таймер за електроуреди Цифров – за употреба на закрито Увод Употреба по предназначение Този уред е дигитален седмичен таймер за употреба само в затворени, сухи помещения и е разработен за лично полз- ване. Той не е предназначен за профе- сионална... -
Seite 66: Обслужващи Елементи
All manuals and user guides at all-guides.com Съхранявайте го добре. При предоста- вяне на уреда на други лица предайте и ръководството за обслужване. Обслужващи елементи (фиг. A) LCD индикация Бутон MINUTE Бутон RST / RCL Бутон RANDOM Бутон ON / AUTO / OFF Контакт... -
Seite 67: Технически Данни
ON – AUTO – OFF Индикация за минути PROGRAM Индикация за часове CLOCK Номер на програмата AM – PM ON – OFF Технически данни Типово обозначение: DZ 20 DE Работно напрежение: 230–240 V ~ 50 Hz 274299_B_Zeitschaltuhren_digital_content_RO_BG.indd 67 22.04.16 07:19... - Seite 68 All manuals and user guides at all-guides.com Напрежение на комутация: 230–240 V ~ 16(2) A Превключвателна способност: макс. 3600 W Температура на околната среда: -10 °C до 40 °C -10T40 Отклонение: ± 1 минута/месец Минимално време за превключване: 1 минута Програми: 10 двойки...
-
Seite 69: Указания За Безопасност
All manuals and user guides at all-guides.com Указания за безопасност Децата не могат да разпознават опасностите, които възникват при работа с електроуреди. Никога не оставяйте децата да използват елек- троуреди без надзор. Включвайте уреда само в безопасно монтирани контакти. Свързвайте само консуматори в рам- ките... - Seite 70 All manuals and user guides at all-guides.com с правилата за опазване на околната среда. Не отваряйте уреда. След отваряне на уреда отпада всяка гаранция. Уредът съдържа акумулаторна бате- рия. Дефектна акумулаторна батерия може да се подменя само от произво- дителя. Не...
-
Seite 71: Обслужващи И Индикаторни Елементи
All manuals and user guides at all-guides.com Обслужващи и индикаторни елементи Обслужващи елементи Бутон MASTERCLEAR С този бутон се изтриват всички настройки за часа и програмата. Показания + съответни обяснения Дни от седмицата Съкращенията върху LCD дисплея са за: MO понеделник TU вторник... - Seite 72 All manuals and user guides at all-guides.com SU неделя R-символ R-символът отчита, че функцията за случаен избор е активирана. R-символът означава случаен избор. Чрез тази функ- ция уредът включва и изключва свързания консуматор на различни интервали от време. S-символ Отчита, че е настроено лятно часово време. ON –...
-
Seite 73: Функция Random
All manuals and user guides at all-guides.com CLOCK Отчита, че функцията за време е включена. Номер на програмата Във функция PROGRAM се отчита номерът на програмата. AM – PM Отчита режима на часовото време. ON – OFF Отчита състоянието на комутация: ON = време... -
Seite 74: Функция За Работен Режим
All manuals and user guides at all-guides.com свързания консуматор на различни интер- вали от време. Функция за работен режим Съществуват следните работни режими: AUTO = Автоматичен режим по зада- дена програма, ON = непрекъснат работен режим ВКЛ. OFF = непрекъснат работен режим ИЗКЛ. Функция... -
Seite 75: Функция Часово Време
All manuals and user guides at all-guides.com Функция Часово време Тази функция отчита текущото време върху LCD дисплея. Подготовка За пускане на уреда в действие е необходимо: 1. да заредите уреда. 2. да нулирате всички настройки. 3. да настроите текущото време Зареждане... -
Seite 76: Нулиране На Всички Настройки
All manuals and user guides at all-guides.com Нулиране на всички настройки Указание: Уредът не трябва да е вклю- чен в контакта, за да се направят на- стройките. Нулиране на всички настройки Натиснете бутона MASTERCLEAR с химикалка или друг остър предмет. На... -
Seite 77: Настройване На Текущото Време
All manuals and user guides at all-guides.com Настройване на текущото време Указание: Настройването се извършва по-бързо, ако задържите натиснати буто- ните HOUR, MINUTE. Натиснете и задръжте бутона CLOCK Посредством бутона WEEK се на- стройва текущият ден от седмицата. Посредством бутона HOUR се... -
Seite 78: Настройване На Лятно И Зимно Часово Време
All manuals and user guides at all-guides.com Настройване на лятно и зимно часово време Настройване на лятно часово време Натиснете едновременно бутоните CLOCK и ON/AUTO/OFF . На LCD дисплея индикацията за часо- вете отчита един час напред и се появява S-символът Настройване... -
Seite 79: Настройване На Часов Режим
All manuals and user guides at all-guides.com и индикацията за часовете отчита един час назад. Настройване на часов режим На LCD дисплея може да се отчита текущото време в режим от 12 или 24 часа. В 12-часов режим индикацията е следната: AM 0 до 12 часа, PM 12 до 24 часа. -
Seite 80: Обслужване
All manuals and user guides at all-guides.com Настройване на 24-часов режим Натиснете едновременно бутоните TIMER и CLOCK . На LCD дисплея угасва AM или PM Обслужване Превключване във функция Часово време LCD дисплеят автоматично прев- ключва във функция за часово време, ако някоя... -
Seite 81: Включване И Изключване На Непрекъснат Работен Режим
All manuals and user guides at all-guides.com За ръчно превключване във функция за часово време натиснете бутона CLOCK Включване и изключване на непрекъснат работен режим Уредът има следните работни режими: – непрекъснат работен режим, – автоматичен режим по зададена програма Фабрично... - Seite 82 All manuals and user guides at all-guides.com Включване на непрекъснат работен режим Натиснете повторно бутона ON/ AUTO/OFF , докато на LCD дисплея се появи ON Изключване на непрекъснат работен режим Натиснете повторно бутона ON/ AUTO/OFF , докато на LCD дисплея се...
-
Seite 83: Настройване На Програмите
All manuals and user guides at all-guides.com Включване на автоматичен режим по зададена програма Натиснете повторно бутона ON/ AUTO/OFF , докато на LCD дисплея се появи AUTO AUTO: Уредът е изключен. AUTO: Уредът е включен. Настройване на програмите Можете да настройвате до 10 програми ВКЛ./ИЗКЛ. - Seite 84 All manuals and user guides at all-guides.com припокриват. Ако настройките за време- ната се припокриват, приоритетно е вре- мето за включване. 1. Проверете дали уредът е в работен режим AUTO . Ако не е така, включете работен режим AUTO (виж „Настройване на работния режим“).
- Seite 85 All manuals and user guides at all-guides.com – Отделен ден от седмицата, – Една от следните комбинации: MO, TU, WE, TH, FR, SA, SU MO, TU, WE, TH, FR SA, SU MO, TU, WE, TH, FR, SA MO, WE, FR TU, TH, SA MO, TU, WE TH, FR, SA...
- Seite 86 All manuals and user guides at all-guides.com 7. След въвеждане на стойностите за програмирането потвърдете с бутон CLOCK или изчакайте 10 сек., докато се появи текущото време. Възстановяване на актуалното състояние Ако часовникът трябва да бъде включен в актуалното време (ON), натискайте бутона ON/AUTO/OFF дотогава, докато...
- Seite 87 All manuals and user guides at all-guides.com За пълно деактивиране на дадена про- грама, е необходимо да деактивирате времето за включване и изключване. Натиснете бутона TIMER Натиснете повторно бутона TIMER за да изберете желаното време за включване. Натиснете бутона RST/RCL Натиснете...
-
Seite 88: Включване И Изключване На Функцията За Случаен Избор
All manuals and user guides at all-guides.com Включване и изключване на функцията за случаен избор Ако функцията за случаен избор е вклю- чена, във времето от 18 часа до 6 часа се игнорират всички настроени програми. Вместо това в този период от време е ак- тивна... -
Seite 89: Почистване
All manuals and user guides at all-guides.com Изключване на функцията за случаен избор Натиснете бутона RANDOM . На LCD дисплея угасва R-символът Почистване ВНИМАНИЕ! ОПАСНОСТ ОТ ЕЛЕКТРИЧЕСКИ УДАР! Преди почистване изключете уреда от захранването. ВНИМАНИЕ! ОПАСНОСТ ОТ ЕЛЕКТРИЧЕСКИ УДАР! Внимавайте в уреда да... -
Seite 90: Отстраняване Като Отпадък
All manuals and user guides at all-guides.com течност може да предизвика късо съе- динение. ВНИМАНИЕ! Опасност от агресивни почистващи средства. Никога не използвайте агресивни или абразивни средства за почистване. Почиствайте уреда с мека, леко влажна кърпа и мек почистващ препарат. Преди... -
Seite 91: Гаранция И Сервиз
All manuals and user guides at all-guides.com неизползваемите електроуреди трябва да се събират разделно и да се подлагат на екологично рециклиране. Относно въз- можностите за отстраняване на непотреб- ния продукт като отпадък се информирайте от Вашата общинска или градска управа. Гаранция... -
Seite 92: Адрес На Сервиза
All manuals and user guides at all-guides.com телефона със сервиза. Само така може да се гарантира безплатно изпращане на Вашия уред. Адрес на сервиза Lindenstraße 35 72074 Tübingen Германия Имейл: exp@bat-tuebingen.com Сервиз телефон: 00800 48720741 За допълнителна информация препоръч- ваме частта Service / FAQ‘s на нашата интернет... -
Seite 93: Производител
All manuals and user guides at all-guides.com Производител Lindenstraße 35 72074 Tübingen Германия 274299_B_Zeitschaltuhren_digital_content_RO_BG.indd 93 22.04.16 07:19... - Seite 94 All manuals and user guides at all-guides.com Legende der verwendeten Piktogramme .......Seite 96 Einleitung Bestimmungsgemäße Verwendung ..Seite 97 Bedienelemente ........Seite 98 Technische Daten.........Seite 99 Sicherheitshinweise ....Seite 100 Bedien- und Anzeigeelemente Bedienelemente ........Seite 102 Anzeigen + entsprechende Erklärung ...Seite 103 Random-Funktion .........Seite 105 Betriebsmodus-Funktion .......Seite 105 Programm-Funktion ......Seite 106 Uhrzeit-Funktion ........Seite 106...
- Seite 95 All manuals and user guides at all-guides.com Sommer- und Winterzeit einstellen ..Seite 109 Stunden-Modus einstellen ....Seite 110 Bedienung In die Uhrzeit-Funktion wechseln ..Seite 112 Dauerbetrieb ein- und ausschalten ..Seite 112 Programme einstellen ......Seite 114 Zufalls-Funktion ein- und ausschalten ...Seite 119 Reinigung ........Seite 120 Entsorgung...
-
Seite 96: Legende Der Verwendeten Piktogramme
All manuals and user guides at all-guides.com Legende der verwendeten Piktogramme: Warn- und Sicherheitshinweise beachten! Achtung! Gefahr durch elektrischen Schlag! Werfen Sie Elektrogeräte nicht in den Hausmüll! Gebrauch in geschlossenen Räumen -10T40 Umgebungstemperatur Mikroschalter mit einer Kontaktöffnungsweite < 3 mm 96 DE/AT/CH 274299_B_Zeitschaltuhren_digital_content_RO_BG.indd 96 22.04.16 07:19... -
Seite 97: Bestimmungsgemäße Verwendung
All manuals and user guides at all-guides.com Zeitschaltuhr Digital – für den Innenbereich Einleitung Bestimmungsgemäße Verwendung Das Gerät ist als digitale Wochenzeitschaltuhr nur zur Verwendung in geschlossenen, trockenen Räumen vorgesehen und für den Privatgebrauch konstruiert. Es ist für eine ge- werbliche Nutzung nicht geeignet. -
Seite 98: Bedienelemente
All manuals and user guides at all-guides.com Bewahren Sie die Bedienungsanleitung auf. Falls Sie das Gerät weitergeben, geben Sie die Bedienungsanleitung mit. Bedienelemente (Abb. A) LCD-Anzeige Taste MINUTE Taste RST / RCL Taste RANDOM Taste ON / AUTO / OFF Steckdose Stecker (Rückseite) Taste Timer... -
Seite 99: Technische Daten
Sekundenanzeige ON – AUTO – OFF Minutenanzeige PROGRAM Stundenanzeige CLOCK Programmnummer AM – PM ON – OFF Technische Daten Typbezeichnung: DZ 20 DE Betriebsspannung: 230–240 V ~ 50 Hz Schaltspannung: 230–240 V ~ 16(2) A DE/AT/CH 274299_B_Zeitschaltuhren_digital_content_RO_BG.indd 99 22.04.16 07:19... -
Seite 100: Sicherheitshinweise
All manuals and user guides at all-guides.com Schaltleistung: max. 3600 W Umgebungstemperatur: -10 °C bis 40 °C -10T40 Zeitabweichung: ± 1 Minute / Monat Kleinste Schaltzeit: 1 Minute Programme: 10 EIN / AUS- Programmpaare Akku: NiMH 1,2 V > 100 h Gebrauch in geschlossenen Räumen: EG-konform:... - Seite 101 All manuals and user guides at all-guides.com Das Gerät nur in sicher installierte Steck- dosen stecken. Nur Verbraucher innerhalb der angege- benen Leistungsgrenzen des Geräts anschließen. Das Gerät nicht abdecken. Unter der Abdeckung staut sich Hitze, sodass Brand- gefahr besteht. Das Gerät regelmäßig auf Schäden kon- trollieren.
-
Seite 102: Bedien- Und Anzeigeelemente
All manuals and user guides at all-guides.com Um das Gerät spannungslos zu schalten, das Gerät vom Stromnetz trennen. Heizkörper oder ähnliche Verbraucher nicht an das Gerät anschließen, da diese niemals unbeaufsichtigt betrieben werden dürfen. Bedien- und Anzeigeelemente Bedienelemente Taste MASTERCLEAR Diese Taste löscht alle Zeit- und Program- meinstellungen. -
Seite 103: Anzeigen + Entsprechende Erklärung
All manuals and user guides at all-guides.com Anzeigen + entsprechende Erklärung Wochentage Die Abkürzungen in der LCD-Anzeige stehen für: MO Montag TU Dienstag WE Mittwoch TH Donnerstag FR Freitag SA Samstag SU Sonntag R-Symbol Das R-Symbol zeigt an, dass die Zufalls-Funk- tion aktiviert ist. - Seite 104 All manuals and user guides at all-guides.com S-Symbol Zeigt an, dass die Uhrzeit auf Sommerzeit umgestellt ist. ON – AUTO – OFF Zeigt an, in welchem Betriebsmodus sich das Gerät befindet. PROGRAM Zeigt an, dass die Programm-Funktion eingeschaltet ist. CLOCK Zeigt an, dass die Uhrzeit-Funktion einge- schaltet ist.
-
Seite 105: Random-Funktion
All manuals and user guides at all-guides.com ON – OFF Zeigt den Schaltzustand an: ON = Einschaltzeit, OFF = Ausschaltzeit. Der Schaltzustand ist nur in der Programm-Funk- tion sichtbar. Random-Funktion Das R-Symbol steht für Random. Mit dieser Funktion schaltet das Gerät in unterschiedli- chen Zeitabständen den angeschlossenen Verbraucher ein und aus. -
Seite 106: Programm-Funktion
All manuals and user guides at all-guides.com Programm-Funktion Mit dieser Funktion lassen sich Ein- und Ausschaltzeiten für den angeschlossenen Verbraucher einstellen. Uhrzeit-Funktion Diese Funktion zeigt die aktuelle Uhrzeit auf der LCD-Anzeige an. Vorbereitung Um das Gerät in Betrieb nehmen zu können müssen Sie: 1. -
Seite 107: Gerät Aufladen
All manuals and user guides at all-guides.com Gerät aufladen Den Stecker in eine Steckdose stecken. Den Akku 14 Stunden aufladen. Alle Einstellungen zurücksetzen Hinweis: Das Gerät muss nicht in der Steck- dose stecken, um die Einstellungen vorzunehmen. Alle Einstellungen zurücksetzen Die Taste MASTERCLEAR mit einem Kugelschreiber oder einem anderen spit-... -
Seite 108: Aktuelle Zeit Einstellen
All manuals and user guides at all-guides.com Alle Einstellungen sind zurückgesetzt. Aktuelle Zeit einstellen Hinweis: Das Einstellen erfolgt schneller, wenn Sie die Tasten HOUR, MINUTE ge- drückt halten. Die Taste CLOCK drücken und gedrückt halten. Mit der Taste WEEK den aktuellen Wochentag einstellen. -
Seite 109: Sommer- Und Winterzeit Einstellen
All manuals and user guides at all-guides.com Mit der Taste MINUTE die Minuten einstellen. Die Taste CLOCK loslassen. Sommer- und Winterzeit einstellen Sommerzeit einstellen Die Tasten CLOCK und ON / AUTO / gleichzeitig drücken. In der LCD- Anzeige zählt die Stundenan- zeige eine Stunde vor und das S-Symbol... -
Seite 110: Winterzeit Einstellen
All manuals and user guides at all-guides.com Winterzeit einstellen Die Tasten CLOCK und ON / AUTO / gleichzeitig drücken. In der LCD-Anzeige erlischt das S-Symbol und die Stundenanzeige zählt eine Stunde zurück. Stunden-Modus einstellen In der LCD-Anzeige kann die aktuelle Uhrzeit im 12- oder im 24-Stunden-Modus angezeigt werden. - Seite 111 All manuals and user guides at all-guides.com Die folgende Abbildung zeigt die Uhrzeit 23 Uhr im 12-Stunden-Modus. 24-Stunden-Modus einstellen Die Tasten TIMER und CLOCK gleichzeitig drücken. In der LCD-Anzeige erlischt AM oder PM DE/AT/CH 274299_B_Zeitschaltuhren_digital_content_RO_BG.indd 111 22.04.16 07:19...
-
Seite 112: Bedienung
All manuals and user guides at all-guides.com Bedienung In die Uhrzeit-Funktion wechseln Die LCD-Anzeige wechselt automatisch in die Uhrzeit-Funktion zurück, wenn Sie eine Funktion länger als 30 Sekunden nicht verwenden. Um manuell in die Uhrzeit-Funktion zu wechseln die Taste CLOCK drücken. -
Seite 113: Dauerbetrieb Einschalten
All manuals and user guides at all-guides.com Der automatische Programmbetrieb ist voreingestellt. Sie können das Gerät unab- hängig von den eingestellten Programmen in den Dauerbetrieb umschalten. Dauerbetrieb einschalten Die Taste ON / AUTO / OFF wieder- holt drücken, bis in der LCD-Anzeige erscheint. -
Seite 114: Automatischen Programmbetrieb Einschalten
All manuals and user guides at all-guides.com Automatischen Programmbetrieb einschalten Die Taste ON / AUTO / OFF wieder- holt drücken, bis in der LCD-Anzeige AUTO erscheint. AUTO: Gerät ist ausgeschaltet. AUTO: Gerät ist eingeschaltet. Programme einstellen Sie können bis zu 10 EIN / AUS-Programme einstellen. - Seite 115 All manuals and user guides at all-guides.com Zeiteinstellungen dennoch, hat die Einschalt- zeit Vorrang. 1. Prüfen Sie, ob sich das Gerät im Betriebs- modus AUTO befindet. Falls nicht, den Betriebsmodus AUTO einschal- ten (siehe „Betriebsmodus einstellen“). 2. Mit der Taste TIMER die Programm- Funktion auswählen.
- Seite 116 All manuals and user guides at all-guides.com – Eine der folgenden Kombination: MO, TU, WE, TH, FR, SA, SU MO, TU, WE, TH, FR SA, SU MO, TU, WE, TH, FR, SA MO, WE, FR TU, TH, SA MO, TU, WE TH, FR, SA MO, WE, FR, SU 4.
-
Seite 117: Aktuellen Zustand Herstellen
All manuals and user guides at all-guides.com 10 Sek. warten, bis die aktuelle Uhrzeit angezeigt wird. Aktuellen Zustand herstellen Soll die Uhr zur aktuellen Uhrzeit an sein (ON), muss die ON / AUTO / OFF-Taste so oft gedrückt werden, bis ON auf dem Display erscheint. -
Seite 118: Programme Wiederherstellen
All manuals and user guides at all-guides.com Die Taste TIMER drücken. Die Taste TIMER wiederholt drücken, um die gewünschte Einschaltzeit auszu- wählen. Die Taste RST / RCL drücken. Die Taste TIMER drücken, um die Ausschaltzeit auszuwählen. Die Taste RST / RCL drücken. -
Seite 119: Zufalls-Funktion Ein- Und Ausschalten
All manuals and user guides at all-guides.com Zufalls-Funktion ein- und ausschalten Wenn die Zufalls-Funktion eingeschaltet ist, werden in der Zeit von 18 Uhr bis 6 Uhr alle eingestellten Programme ignoriert. Stattdessen läuft in diesem Zeitraum eine Zu- falls-Funktion ab, welche mit einem Intervall von 10–31 Minuten abwechselnd ein- und ausschaltet. -
Seite 120: Zufalls-Funktion Ausschalten
All manuals and user guides at all-guides.com Zufalls-Funktion ausschalten Drücken Sie die Taste RANDOM . In der LCD-Anzeige erlischt das R-Sym- Reinigung ACHTUNG! GEFAHR DURCH ELEKTRISCHEN SCHLAG! Vor dem Reinigen das Gerät vom Stromnetz trennen. ACHTUNG! GEFAHR DURCH ELEKTRISCHEN SCHLAG! Achten Sie 120 DE/AT/CH 274299_B_Zeitschaltuhren_digital_content_RO_BG.indd 120 22.04.16 07:19... -
Seite 121: Entsorgung
All manuals and user guides at all-guides.com darauf, dass keine Flüssigkeit in das Ge- rät eindringt. Eindringende Flüssigkeit kann zu einem Kurzschluss führen. ACHTUNG! Gefahr durch aggressive Reinigungsmittel. Verwenden Sie zur Reinigung nie aggres- sive oder scheuernde Reinigungsmittel. Reinigen Sie das Gerät mit einem wei- chen, leicht feuchten Tuch und mildem Reinigungsmittel. -
Seite 122: Garantie Und Service
All manuals and user guides at all-guides.com Gemäß Europäischer Richtlinie 2012 / 19 / EC über Elektro- und Elektronikaltgeräte müssen verbrauchte Elektrogeräte getrennt gesammelt und einer umweltgerechten Wiederverwertung zugeführt werden. Möglichkeiten zur Entsor- gung des ausgedienten Geräts erfahren Sie bei Ihrer Gemeinde- oder Stadtverwaltung. Garantie und Service Sie erhalten 3 Jahre Garantie ab Kaufdatum auf dieses Gerät. -
Seite 123: Serviceadresse
All manuals and user guides at all-guides.com Servicestelle telefonisch in Verbindung setzen. Nur so kann eine kostenlose Einsendung Ihres Geräts gewährleistet werden. Serviceadresse Lindenstraße 35 72074 Tübingen Deutschland E-Mail: exp@bat-tuebingen.com Service-Nr.: 00800 48720741 Für weitere Informationen empfehlen wir den Bereich Service / FAQ‘s auf unserer Home- page www.dvw-service.com. -
Seite 124: Hersteller
All manuals and user guides at all-guides.com Hersteller Lindenstraße 35 72074 Tübingen Deutschland 124 DE/AT/CH 274299_B_Zeitschaltuhren_digital_content_RO_BG.indd 124 22.04.16 07:19... - Seite 125 All manuals and user guides at all-guides.com Lindenstraße 35 72074 Tübingen Germany Last Information Update · Versiunea informaţiilor · Актуалност на информацията Stand der Informationen: 04 / 2016 Ident.-No.: 0488005 042016-RO / BG IAN 274299 274299_B_Zeitschaltuhren_digital_cover_RO_BG.indd 1 22.04.16 07:19...