
Verwandte Anleitungen für geo-FENNEL S-Digit 60WL+


Inhaltszusammenfassung für geo-FENNEL S-Digit 60WL+
- Seite 1 DE | EN | FR All manuals and user guides at all-guides.com S-Digit 60WL + S-Digit 120WL + BEDIENUNGSANLEITUNG USER MANUAL MODE D‘EMPLOI www.geo-fennel.de www.geo-fennel.com www.geo-fennel.fr...
-
Seite 2: Lieferumfang
All manuals and user guides at all-guides.com Sehr geehrter Kunde, vielen Dank für das Vertrauen, welches Sie uns beim Erwerb Ihres neuen geo-FENNEL-Gerätes ent- gegengebracht haben. Dieses hochwertige Qualitätsprodukt wurde mit größter Sorgfalt produziert und qualitätsgeprüft. Die beigefügte Anleitung wird Ihnen helfen, das Gerät sachgemäß zu bedienen. Bitte lesen Sie ins- besondere auch die Sicherheitshinweise vor der Inbetriebnahme aufmerksam durch. -
Seite 3: Stromversorgung
All manuals and user guides at all-guides.com Technische Daten Messbereich 4 x 90° Auflösung 0,1 ° / 0,1 % Genauigkeit 0° + 90° = ± 0,1° Andere Winkelbereiche = ± 0,2° Stromversorgung 3 x AAA Alkaline Betriebsdauer 60 h Temperaturbereich -10°C bis + 45°C Gewicht 0,68 kg / 1,1 kg inkl. -
Seite 4: Bedienelemente
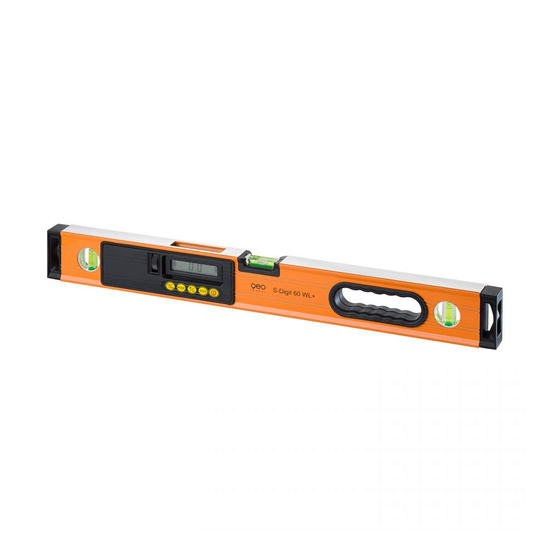
All manuals and user guides at all-guides.com BEDIENELEMENTE 1. Haken 2. Vertikallibelle 3. Griffmulde 4. Horizontallibelle 5. LCD-Display 6. Vertikallibelle 7 . Haken 1) POWER S-Digit 60WL + / S-Digit 120WL + ein- / aus- schalten. 2) HOLD Taste kurz drücken, um den aktuellen Messwert festzuhalten. -
Seite 5: Überprüfung Und Kalibrierung
All manuals and user guides at all-guides.com Richtungspfeil (Annäherung an 0°-/90°-Position) Anzeige Ton an/aus Batteriezustandsanzeige Anzeige N/FT Anzeige °/% Anzeige mm/m ÜBERPRÜFUNG UND KALIBRIERUNG WICHTIG Kalibrierung des Neigungsmessers durchführen: - vor erstmaligem Gebrauch - vor wichtigen Messungen - nach einer starken Stoßbelastung - nach einem grösseren Temperaturwechsel ÜBERPRÜFUNG DER KALIBRIERUNG Gerät auf eine möglichst waagerechte Fläche legen. -
Seite 6: Neigungsmessung
All manuals and user guides at all-guides.com NEIGUNGSMESSUNG Die beiden Pfeile zeigen an, in welche Richtung der S-Digit 60WL + / S-Digit 120WL + gedreht werden muss, um die Waagerechte bzw. die Senkrechte zu erreichen. Wenn die Doppel-Pfeile angezeigt werden, ist die Waagerechte bzw. -
Seite 7: Anwendungsbeispiele
All manuals and user guides at all-guides.com BESONDERE FUNKTION IM BEREICH 0° - 90° 0-Setzung in jeder beliebigen Position: Im Bereich zwischen 0° und 90° kann die Nulllage in jeder Position definiert werden. In der gewünsch- ten Position die Kalibrierungsfunktion einleiten (CAL / REF länger als 3 Sek. drücken) - 3 Sek. warten - wieder CAL / REF drücken - 3 Sek. -
Seite 8: Sicherheitshinweise
All manuals and user guides at all-guides.com SICHERHEITSHINWEISE UMSTÄNDE, DIE DAS MESSERGEBNIS VERFÄLSCHEN KÖNNEN Messungen durch Glas- oder Plastikscheiben; verschmutzte Laseraustrittsfenster; Sturz oder starker Stoß. Bitte Genauigkeit überprüfen. Große Temperaturveränderungen: Wenn das Gerät aus warmer Umgebung in eine kalte oder umgekehrt gebracht wird, vor Benutzung einige Minuten warten. - Seite 9 All manuals and user guides at all-guides.com GARANTIE Die Garantiezeit beträgt zwei (2) Jahre, beginnend mit dem Verkaufsdatum. Die Garantie erstreckt sich nur auf Mängel wie Material-oder Herstellungsfehler, sowie die Nichterfüllung zugesicherter Eigenschaf- ten. Ein Garantieanspruch besteht nur bei bestimmungsgemäßer Verwendung. Mechanischer Verschleiß und äußerliche Zerstörung durch Gewaltanwendung und Sturz unterliegen nicht der Garantie.
- Seite 10 All manuals and user guides at all-guides.com Dear customer, Thank you for your confidence in us having purchased a geo-FENNEL instrument. This manual will help you to operate the instrument appropriately. Please read the manual carefully - particularly the safety instructions. A proper use only guarantees a longtime and reliable operation.
-
Seite 11: Technical Data
All manuals and user guides at all-guides.com Technical Data Working range 4 x 90° Resolution 0,1 ° / 0,1 % Accuracy inclination 0° + 90° = ± 0,1° Other angles = ± 0,2° Power supply 3 x AAA Alkaline Operating time 60 h Temperature range -10°C to + 45°C... - Seite 12 All manuals and user guides at all-guides.com FEATURES 1. Hook 2. Vertical vial 3. Handgrip 4. Horizontal vial 5. LCD display 6. Vertical vial 7 . Hook 1) POWER Switch on/off S-Digit 60WL + / S-Digit 120WL +. 2) HOLD Press the button short to freeze and to release the current reading.
- Seite 13 All manuals and user guides at all-guides.com Direction symbol (approching the 0°/90° position) Symbol sound on/off Battery status indicator Unit symbol N/FT Unit symbol °/% Unit symbol mm/m CHECK AND CALIBRATION IMPORTANT Calibration of inclinometer: - before first use - before important measurements - after a hit or drop - after a large fluctuation in temperature CHECK OF CALIBRATION...
-
Seite 14: Additional Functions
All manuals and user guides at all-guides.com MEASUREMENT OF INCLINATION The two arrows in the display indicate in which direction the instrument has to be moved in order to reach the 0° or 90° position. The exact 0° or 90° position is shown by double arrows. The display has an automatic digit inversion for over- head measurements. - Seite 15 All manuals and user guides at all-guides.com SPECIAL FEATURE WITHIN THE RANGE OF 0° - 90° O-setting in any position required: In the range between 0° and 90° the ZERO layer can be defined in any position. Start the calibration function in the position required (press CAL / REF longer than 3 sec.) - wait 3 sec.
-
Seite 16: Safety Notes
All manuals and user guides at all-guides.com SAFETY NOTES SPECIFIC REASONS FOR ERRONEOUS MEASURING RESULTS Measurements through glass or plastic windows; dirty laser emitting windows; after the instrument has been dropped or hit. Please check the accuracy. Large fluctuation of temperature: If the instrument will be used in cold areas after it has been stored in warm areas (or the other way round) please wait some minutes before carrying out measurements. - Seite 17 All manuals and user guides at all-guides.com WARRANTY This product is warranted by the manufacturer to the original purchaser to be free from defects in material and workmanship under normal use for a period of two (2) years from the date of purchase. During the warranty period, and upon proof of purchase, the product will be repaired or replaced (with the same or similar model at manufacturers option), without charge for either parts or labour.
-
Seite 18: Livré Comme Suit
Cher client, Nous tenons à vous remercier pour la confiance que vous avez témoignée, par l‘acquisition de votre nouvel instrument geo-FENNEL. Les instructions de service vous aideront à vous servir de votre instrument de manière adéquate. Nous vous recommandons de lire avec soin tout particulièrement les consignes de sécurité de ladite notice avant la mise en service de votre appareil. -
Seite 19: Données Techniques
All manuals and user guides at all-guides.com Données techniques Plage de mesure 4 x 90° Résolution 0,1 ° / 0,1 % Précision 0° + 90° = ± 0,1° autres plages d‘angle = ± 0,2° Alimentation en courant 3 x AAA alcaline Durée de marche 60 h Plage de temérature... - Seite 20 All manuals and user guides at all-guides.com DESCRIPTON 1. Crochet 2. Niveau à bulle verticale 3. Ouverture à main 4. Niveau à bulle horizontale 5. LCD Display 6. Niveau à bulle verticale 7 . Crochet 1) POWER Mettre le S-Digit 60WL + / S-Digit 120WL + en mache / en arrêt.
- Seite 21 All manuals and user guides at all-guides.com Indication de la direction par flèches (rapprochement position 0°/90°) Affichage marche / arrêt du son Indicateur de l‘état de piles Affichage N/FT Affichage °/ % Affichage mm/m RÉVISION ET CALIBRAGE IMPORTANT Effectuer le calibrage du niveau digital: - avant la première utilisation de l‘appareil - avant d‘effectuer des mesures importantes - après un choc très fort...
-
Seite 22: Fonctions Supplémentaires
All manuals and user guides at all-guides.com MESURE D‘INCLINAISON Les deux flèches indiquent le sens dans lequel il faut tourner l‘appareil S-Digit 60WL + / S-Digit 120WL + pour obtenir le plan horizontal ou le plan vertical. L ‘affichage de la double flèche signifie que le plan horizontal ou vertical est atteint. - Seite 23 All manuals and user guides at all-guides.com FONCTION PARTICULIÈRE SUR LA PLAGE DE 0° À 90° Mettre l‘appareil à ZERO en position facultatif. Sur la plage de 0° à 90° l‘appareil peut être calibré en position ZERO en chaque position. Mettre l‘appareil en position désirée et commencer la procédure de calibrage (presser la touche CAL / REF 5 sec.) - attendre 3 sec.
- Seite 24 All manuals and user guides at all-guides.com NOTICES DE SÉCURITÉ CIRCONSTANCES POUVANT FAUSSER LES RéSULTATS DE MESURES Mesures effectuées à travers des plaques de verre ou de matière plastique; mesures effectuées à tra- vers la fenêtre de sortie du faisceau laser lorsqu‘elle est sale. Mesures après que le niveau soit tombé ou ait subi un choc très fort.
- Seite 25 All manuals and user guides at all-guides.com GARANTIE La durée de garantie est de deux (2) ans à partir de la date d‘achat. Cette garantie ne couvre que les défauts tels que le matériel défectueux ou les anomalies de fabrication, ainsi que le manque des propriétés prévues.
- Seite 26 All manuals and user guides at all-guides.com...
- Seite 27 All manuals and user guides at all-guides.com...
- Seite 28 All manuals and user guides at all-guides.com geo-FENNEL GmbH Technische Änderungen vorbehalten. Kupferstraße 6 All instruments subject to technical changes. D-34225 Baunatal Sous réserve de modifications techniques. Tel. +49 561 / 49 21 45 +49 561 / 49 72 34 info@geo-fennel.de...