Inhaltsverzeichnis
Werbung
Verfügbare Sprachen
Verfügbare Sprachen
Quicklinks
Werbung
Inhaltsverzeichnis

Verwandte Anleitungen für EuroLite AKKU Bar-3 QCL Glow Flex Bar QuickDMX


Inhaltszusammenfassung für EuroLite AKKU Bar-3 QCL Glow Flex Bar QuickDMX
-
Seite 2: Inhaltsverzeichnis
Inhaltsverzeichnis EINFÜHRUNG ..............................4 Produktmerkmale ............................5 SICHERHEITSHINWEISE ..........................6 GERÄTEBESCHREIBUNG..........................8 INSTALLATION ..............................9 DMX512-ANSTEUERUNG ..........................10 QuickDMX ..............................10 Übertragungsarten ............................10 Übertragung 1:1 ............................10 Übertragung 1:Mehrere ..........................11 Parallelübertragung ............................11 Adressierung des Geräts ..........................11 LADEVORGANG ............................ - Seite 3 Diese Bedienungsanleitung gilt für die Artikelnummer / This user manual is valid for the article number: 41700117 Das neueste Update dieser Bedienungsanleitung finden Sie im Internet unter: You can find the latest update of this user manual in the Internet under: www.eurolite.de 3/44 00133036, Version 1.0...
-
Seite 4: Einführung
BEDIENUNGSANLEITUNG AKKU Bar-3 Glow QCL Flex QuickDMX GEFAHR! Elektrischer Schlag durch Kurzschluss Seien Sie besonders vorsichtig beim Umgang mit gefährlicher Netzspannung. Bei dieser Spannung können Sie einen lebensgefährlichen elektrischen Schlag erhalten. Öffnen Sie das Gerät niemals. Lesen Sie vor der Verwendung des Geräts diese Bedienungsanleitung. Sie erhalten dadurch wichtige Hinweise für den korrekten Betrieb. -
Seite 5: Produktmerkmale
Produktmerkmale Neigbare AKKU-LED-Leiste und Mood-Light mit 4in1-LEDs und QuickDMX • Um 90° neigbare Leiste mit 3 leistungsstarken 8-W-RGBW-LEDs (4in1) und abnehmbarer milchiger Diffusorplatte • Mood-Light mit milchiger Frontscheibe für ein angenehm weiches Licht mit 15 SMD-RGBW-LEDs (4in1) • Kompakt und lichtstark •... -
Seite 6: Sicherheitshinweise
SICHERHEITSHINWEISE WARNUNG! Lesen Sie aufmerksam die Sicherheitshinweise und benutzen Sie das Produkt nur wie in dieser Anleitung beschrieben, damit es nicht versehentlich zu Verletzungen oder Schäden kommt. Verwendungszweck • Bei diesem Gerät handelt es sich um einen Scheinwerfer, mit dem sich dekorative Lichteffekte erzeugen lassen. - Seite 7 Warnung vor Verbrennung und Brand • Der zulässige Umgebungstemperaturbereich (Ta) beträgt -5 bis +45 °C. Verwenden Sie das Gerät niemals außerhalb dieses Temperaturbereichs. • Die Gehäusetemperatur (Tc) kann im Betrieb bis zu 70 °C betragen. Vermeiden Sie den Kontakt mit Personen oder Gegenständen.
-
Seite 8: Gerätebeschreibung
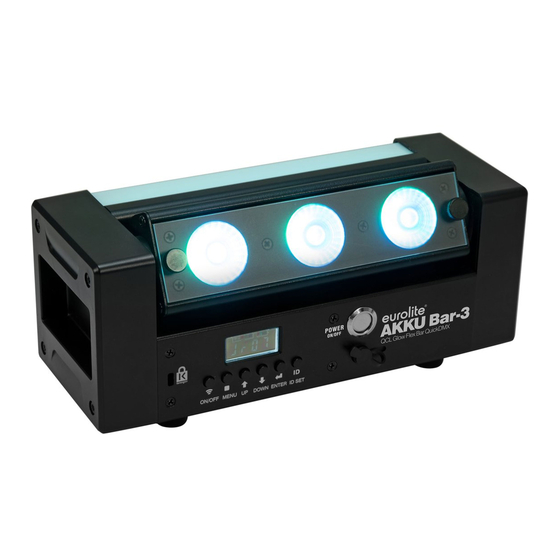
GERÄTEBESCHREIBUNG (1) Gewinde für Schraube der Diffusorplatte (2) Mood-Light (3) LED-Leiste (neigbar) (4) Infrarotsensor für die Fernbedienung (5) Linse/LED (6) QuickDMX-Statusanzeige (7) Ladezustandsanzeige (8) Kensington-Sicherheitsanschluss (9) Funktion QuickDMX Ein/Aus (10) Menu-Taste (11) Up-Taste (12) Down-Taste (13) Enter-Taste (14) Display/Control Board (15) ID-SET-Taste, zum Ändern des Funkkanals und Koppeln der Geräte (16) Spannungsversorgungseingang... -
Seite 9: Installation
INSTALLATION WARNUNG! Verletzungsgefahr durch Herabfallen Über Kopf installierte Geräte können beim Herabstürzen erhebliche Verletzungen verursachen! Stellen Sie sicher, dass das Gerät sicher installiert ist und nicht herunterfallen kann. Die Montage darf nur durch eine Fachkraft erfolgen, die mit den Gefahren und den einschlägigen Vorschriften hierfür vertraut ist. -
Seite 10: Dmx512-Ansteuerung
DMX512-ANSTEUERUNG Über Ihren DMX-Controller können Sie die einzelnen Geräte individuell ansteuern. Dabei hat jeder DMX- Kanal eine andere Belegung mit verschiedenen Eigenschaften. Die einzelnen DMX-Kanäle und ihre Eigenschaften sind unter DMX-Protokoll aufgeführt. QuickDMX Schließen Sie den Sender an das DMX-Steuergerät an. Nehmen Sie die Sender und die AKKU Bar-3 Glow in Betrieb. -
Seite 11: Übertragung 1:Mehrere
Übertragung 1:Mehrere Das DMX-Signal wird bei einem Sender eingespeist und von diesem per HF gesendet. Mehrere Empfänger mit identischem Übertragungskanal empfangen das HF-Signal und geben es als DMX-Signal aus. Parallelübertragung Es können 6 DMX-Funknetze mit 6 Sendern parallel betrieben werden, ohne dass sie sich gegenseitig stören. -
Seite 12: Ladevorgang
Bitte beachten Sie: Über das Display des Gerätes wird der Status der DMX-Verbindung angezeigt: Schalten Sie das Gerät ein. Das Gerät prüft, ob DMX-512 Daten empfangen werden oder nicht. Wenn Daten empfangen werden, erscheint „d.001“ mit der definierten Startadresse auf dem Display. Werden keine Daten empfangen, erscheint „d001“... -
Seite 13: Bedienung
Das Display leuchtet auf und Sie können die gewünschten Einstellungen mit den Tasten des Control Boards auswählen. Das Gerät hat zwei Betriebsarten. Es kann entweder im Standalone-Modus über das Control Board und die EUROLITE IR-13 Fernbedienung oder im DMX-gesteuerten Modus über einen handelsüblichen DMX- Controller und QuickDMX, mit einem geeigneten Funksender, drahtlos betrieben werden. Standalone-Modus Das Gerät lässt sich im Standalone-Betrieb ohne Controller einsetzen. -
Seite 14: Control Board
Control Board Das Control Board bietet mehrere Möglichkeiten: so lassen sich z. B. die DMX-Startadresse eingeben, das vorprogrammierte Programm abspielen oder der DMX-Kanal Modus auswählen. Drücken Sie die Menu-Taste, um das Hauptmenü aufzurufen. Durch Drücken der Up/Down-Tasten können Sie sich im Hauptmenü bewegen. Zur Auswahl des gewünschten Menüpunktes drücken Sie die Enter-Taste. Durch Drücken der Up/Down-Tasten können Sie die Auswahl verändern. - Seite 15 Dimmerintensität der roten LED-Farbe (LED-Leiste) r1 (r000-r255) 000 – 255 (zunehmend) Dimmerintensität der grünen LED-Farbe (LED-Leiste) G1 (G000-G255) 000 – 255 (zunehmend) Dimmerintensität der blauen LED-Farbe (LED-Leiste) b1 (b000-b255) 000 – 255 (zunehmend) Dimmerintensität der weißen LED-Farbe (LED-Leiste) U1 (U000-U255) 000 –...
-
Seite 16: Fernbedienung Ir-13
Fernbedienung IR-13 Die Fernbedienung steuert die folgenden Funktionen: Zunehmende Abnehmende Helligkeit Helligkeit Grün Blau Weiß 50% / 100% 100% R + 24% G 90% G + 23% B 22% R + 87% B Leistung 100% R + 47% G 82% G + 46% B 48% R + 75% B Strobe-Effekt 100% R + 71% G... -
Seite 17: Dmx-Protokoll
DMX-Protokoll 3-Kanal-Modus Steuerkanal 1 - Farb-Presets Wert Eigenschaft 0 255 Farb-Presets Steuerkanal 2 - Weiß Wert Eigenschaft 0 255 Weiß (0=aus, 255=100% weiß) Steuerkanal 3 - Dimmer Wert Eigenschaft 0 255 Allmähliche Einstellung der Dimmerintensität von 0 bis 100 % 7-Kanal-Modus Steuerkanal 1 - Rot Wert... - Seite 18 Steuerkanal 6 - Strobe Wert Eigenschaft Keine Funktion Musikgesteuert 6 10 Keine Funktion 11 255 Strobe-Effekt mit zunehmender Geschwindigkeit Steuerkanal 7 - Auswahl LED-Leiste/Mood-Light Wert Eigenschaft 0 32 Auswahl aus Control Board Einstellung (LAnp) LED-Leiste an, Mood-Light aus 33 99 LED-Leiste aus, Mood-Light an 100 199 LED-Leiste und Mood-Light beide an...
- Seite 19 Steuerkanal 7 - Mood-Light Blau Wert Eigenschaft 0 255 Blau (0=aus, 255=100% blau) Steuerkanal 8 - Mood-Light Weiß Wert Eigenschaft 0 255 Weiß (0=aus, 255=100% weiß) 9-Kanal-Modus Steuerkanal 1 - Dimmer Wert Eigenschaft 0 255 Allmähliche Einstellung der Dimmerintensität von 0 bis 100 % Steuerkanal 2 - Rot Wert Eigenschaft...
- Seite 20 128 159 Fading colors 160 191 Auf- und Abblenden (15 Farben) 192 223 Switching colors (15 Farben) 224 255 Musikgesteuert Steuerkanal 8 - Geschwindigkeit Spezialeffekte Wert Eigenschaft 0 255 Zunehmende Geschwindigkeit Steuerkanal 9 - Dimmergeschwindigkeit (Sprungantwort) Wert Eigenschaft Dimmergeschwindigkeit aus Control Board Einstellung (nodE) Ansprechverhalten von LEDs 6 55 Ansprechverhalten von Halogenlampen, schnell...
- Seite 21 Steuerkanal 6 - Strobe Wert Eigenschaft 0 14 Keine Funktion 15 255 Strobe-Effekt mit zunehmender Geschwindigkeit Steuerkanal 7 - Spezialeffekte, Musiksteuerung Wert Eigenschaft 0 31 Keine Funktion 32 63 Aufblenden 64 95 Abblenden 96 127 Aufblenden - Abblenden 128 159 Fading colors 160 191 Auf- und Abblenden (15 Farben)
-
Seite 22: Reinigung Und Wartung
REINIGUNG UND WARTUNG Das Gerät sollte äußerlich in regelmäßigen Abständen von Verunreinigungen wie Staub usw. gereinigt werden. Insbesondere die Linsen sollten sauber sein, damit das Licht mit maximaler Helligkeit abgestrahlt werden kann. Trennen Sie das Gerät vom Netz und lassen Sie es abkühlen, bevor Sie mit der Reinigung beginnen. Reinigen Sie die Oberflächen mit einem fusselfreien, angefeuchteten Tuch. -
Seite 23: Technische Daten
EUROLITE QuickDMX Funksender/Empfänger Best.-Nr. 70064703 EUROLITE QuickDMX Funksender Best.-Nr. 70064700 EUROLITE TPC-10 Klammer, silber Best.-Nr. 59006856 EUROLITE Sicherungsseil A 3x600mm bis 5kg, silber Best.-Nr. 58010310 EUROLITE IR-13 Fernbedienung Best.-Nr. 50530568 EUROLITE KG-180S Kabelschloss zur Gerätesicherung mit Schlüssel Best.-Nr. 58010060 EUROLITE KG-180Z Kabelschloss zur Gerätesicherung mit Zahlenschloss Best.-Nr. -
Seite 24: Introduction
USER MANUAL AKKU Bar-3 Glow QCL Flex QuickDMX DANGER! Electric shock caused by short-circuit Be careful with your operations. With a dangerous voltage you can suffer a dangerous electric shock when touching the wires. Never open the housing. Please read these instructions carefully before using the product. They contain important information for the correct use of the product. -
Seite 25: Product Features
Product features Tiltable battery-powered LED bar and mood light with 4in1 LEDs and QuickDMX • 90° tiltable bar with 3 high-power 8 W RGBW LEDs (4in1) and removable milky diffuser • Mood light with milky front screen provides a pleasantly soft light with 15 SMD RGBW LEDs (4in1) •... -
Seite 26: Safety Instructions
SAFETY INSTRUCTIONS WARNING! Please read the safety warnings carefully and only use the product as described in this manual to avoid accidental injury or damage. Intended use • This device is a spotlight for creating decorative lighting effects. This device is designed for professional use in the field of event technology, e.g. - Seite 27 Warning – risk of burns and fire • The admissible ambient temperature range (Ta) is -5 to +45°C. Do not operate the device outside of this temperature range. • The housing temperature (Tc) can be up to 70°C during use. Avoid contact by persons and materials. •...
-
Seite 28: Description Of The Device
DESCRIPTION OF THE DEVICE (1) Thread for the screw of the diffuser (2) Mood light (3) LED bar (tiltable) (4) Infrared sensor for the remote control (5) Lens/LED (6) QuickDMX status indicator (7) Charge level indicator (8) Kensington security slot (9) Function QuickDMX On/Off (10) Menu button (11) Up button... -
Seite 29: Installation
INSTALLATION WARNING! Risk of injury caused by falling objects Devices in overhead installations may cause severe injuries when crashing down. Make sure that the device is installed securely and cannot fall down. The installation must be carried out by a specialist who is familiar with the hazards and the relevant regulations. For a homogeneous and soft light of the LED bar, please use the enclosed diffuser plate. -
Seite 30: Dmx512 Control
DMX512 CONTROL You can control the device individually via your DMX-controller. Every DMX-channel has a different occupation with different features. The individual channels and their features are listed under DMX-protocol. QuickDMX Connect the transmitter to the DMX controller. Set each transmitter and the AKKU Bar-3 Glow into operation. Press the function button to activate QuickDMX. -
Seite 31: Transmission 1:Many
Transmission 1:Many The DMX signal is fed to a transmitter which sends it via RF. Several receivers with the same transmission channel receive the RF signal and distribute it as a DMX signal. Parallel Transmission It is possible to operate 6 wireless DMX networks with 6 transmitters in parallel without mutual interference by adjusting them to different transmission channels. -
Seite 32: Charging
Note: The modes of DMX512 data are shown via the display of the device: After switching on, the device will automatically detect whether DMX 512 data is received or not. If the data is received, the display will show "d.001" with the actually set address. If there is no data received at the DMX-input, the display will show "d001"... -
Seite 33: Operation
The device has two operating modes. It can be operated in stand-alone mode via the control board and the EUROLITE IR-13 remote control or in DMX-controlled mode via a standard DMX controller and wireless via QuickDMX with suitable wireless transmitter. -
Seite 34: Control Board
Control Board The Control Board offers several features: you can easily set the starting address, run the pre-programmed program or select a DMX channel mode. The main menu is accessed by pressing Menu. Browse through the menu by pressing Up or Down. Press Enter in order to select the desired menu. - Seite 35 Dimmer intensity of red LED color (LED bar) r1 (r000-r255) 000 – 255 (increasing) Dimmer intensity of green LED color (LED bar) G1 (G000-G255) 000 – 255 (increasing) Dimmer intensity of blue LED color (LED bar) b1 (b000-b255) 000 – 255 (increasing) Dimmer intensity of white LED color (LED bar) U1 (U000-U255) 000 –...
-
Seite 36: Remote Control Ir-13
Remote control IR-13 The remote control has the following functions: Brightness up Brightness down Green Blue White 50% / 100% 100% R + 24% G 90% G + 23% B 22% R + 87% B power 100% R + 47% G 82% G + 46% B 48% R + 75% B Strobe effect... -
Seite 37: Dmx Protocol
DMX Protocol 3 channel mode Control-channel 1 - Color presets Value Feature 0 255 Color presets Control-channel 2 - White Value Feature 0 255 White (0=off, 255=100% white) Control-channel 3 - Dimmer Value Feature 0 255 Gradual adjustment of the dimmer intensity from 0 to 100 % 7 channel mode Control-channel 1 - Red Value... - Seite 38 Control-channel 6 - Strobe Value Feature No function Sound Control 6 10 No function 11 255 Strobe-effect with increasing speed Control-channel 7 - Select LED bar/mood light Value Feature 0 32 Selection from Control Board setting (LAnp) LED bar on, mood light off 33 99 100 199 LED bar off, mood light on...
- Seite 39 Control-channel 7 - Mood light blue Value Feature 0 255 Blue (0=off, 255=100% blue) Control-channel 8 - Mood light white Value Feature 0 255 White (0=off, 255=100% white) 9 channel mode Control-channel 1 - Dimmer Value Feature 0 255 Gradual adjustment of the dimmer intensity from 0 to 100 % Control-channel 2 - Red Value Feature...
- Seite 40 128 159 Fading colors 160 191 Fade in and fade out (15 colors) 192 223 Switching colors (15 colors) 224 255 Sound Control Control-channel 8 - Speed special effects Value Feature 0 255 Increasing speed Control-channel 9 - Dimmer speed (step response) Value Feature Control Board setting dimmer speed (nodE)
- Seite 41 Control-channel 6 - Strobe Value Feature 0 14 No function 15 255 Strobe-effect with increasing speed Control-channel 7 - Special effects, sound control Value Feature 0 31 No function 32 63 Fade in 64 95 Fade out 96 127 Fade in - fade out 128 159 Fading colors 160 191...
-
Seite 42: Cleaning And Maintenance
CLEANING AND MAINTENANCE The outside of the device should be cleaned periodically to remove contaminants such as dust etc. The lens, in particular, should be clean to ensure that light will be emitted at maximum brightness. Disconnect the device from power and allow it to cool before cleaning. Clean the surface with a soft lint-free and moistened cloth. -
Seite 43: Technical Specifications
No. 70064703 EUROLITE QuickDMX Wireless Transmitter No. 70064700 EUROLITE TPC-10 Coupler, silver No. 59006856 EUROLITE Safety Bond A 3x600mm up to 5kg, silver No. 58010310 EUROLITE IR-13 Remote Control No. 50530568 EUROLITE KG-180S Cable Lock Anti-theft Protection with Key No. 58010060 EUROLITE KG-180S Cable Lock Anti-theft Protection with Combination Lock No. - Seite 44 Eurolite is a brand of Steinigke Showtechnic GmbH · Andreas-Bauer-Str. 5 · 97297 Waldbüttelbrunn Germany D00133036 Version 1.0 Publ. 09/03/2021...