Herunterladen Inhalt Inhalt Diese Seite drucken

Werbung

Verfügbare Sprachen
  • DE

Verfügbare Sprachen

  • DEUTSCH, seite 1
OMNICHEF
Mini-Backofen
Mini oven
Mini horno
Mini four
Mini forno
10030102 10030103
www.klarstein.com

Werbung

Inhaltsverzeichnis
loading

Inhaltszusammenfassung für Klarstein 10030102

  • Seite 1 OMNICHEF Mini-Backofen Mini oven Mini horno Mini four Mini forno 10030102 10030103 www.klarstein.com...
  • Seite 3: Inhaltsverzeichnis

    Geräteübersicht und Zubehör 5 Français 19 Español 27 Bedienung 6 Italiano 35 Zubereitungstabelle 9 Reinigung und Pflege 10 Hinweise zur Entsorgung 10 Hersteller & Importeur (UK) 10 TECHNISCHE DATEN Artikelnummer 10030102, 10030103 Stromversorgung 220-240 V~ 50/60 Hz Leistung 1500 W...
  • Seite 4: Sicherheitshinweise

    SICHERHEITSHINWEISE • Lesen Sie sich alle Hinweise sorgfältig durch und bewahren Sie die Anleitung zum Nachschlagen gut auf. • Berühren Sie keine heißen Oberflächen, fassen Sie nur die Regler und Griffe an. • Benutzen Sie das Gerät in Anwesenheit von Kindern nur unter Aufsicht. •...
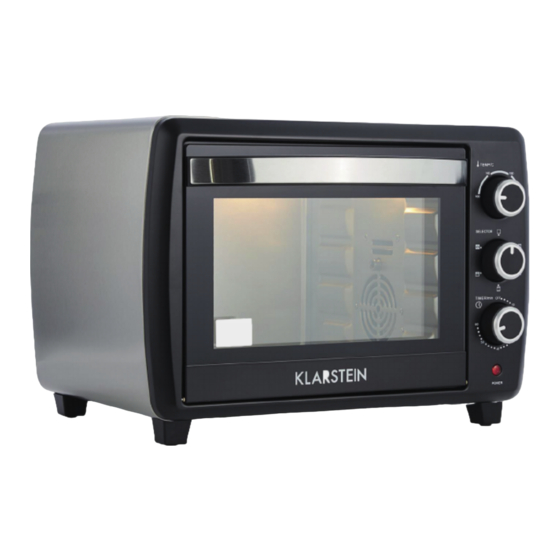
  • Seite 5: Geräteübersicht Und Zubehör

    GERÄTEÜBERSICHT UND ZUBEHÖR Heizstäbe Funktionswahl Glastür Zeitschaltuhr Garraum Standfüße Einschübe Rost Türgriff Griff Gehäuse Backblech Temperaturregler Griff für den Spieß Betriebsleuchte Spießhalterung VORSICHT Brandgefahr! Falls Sie Backpapier verwenden, achten Sie darauf, dass es die ungeschützten Heizelemente nicht berührt. Andernfalls kann sich das Backpapier entzünden.
  • Seite 6: Bedienung

    BEDIENUNG Bevor Sie das Gerät das erste Mal benutzen Setzen Sie das Backblech und den Rost ein. Stellen Sie den Funkionswahlregler auf Ober- und Unterhitze. Stellen Sie die Temperatur auf 230 °C ein und heizen Sie den leeren Ofen für 10 Minuten. Hinweis: Am Anfang kann es zu einer Rauchentwicklung und verbranntem Geruch kommen.
  • Seite 7: Drehspießfunktion

    Verwendung des Zubehörs Backblech und Rost Zubehör Speisen (Beispiele) Verwendung des Griffs Brathähnchen, Hähnchenflügel, Frikadelle, Gratin, Kuchen, und fast alle anderen Gerichte Gebackene Kartoffeln, Trockene Speisen Für tropfende Lebensmittel Drehspießfunktion Verwendung mit dem Drehspieß Einsetzen des Drehspießes Mit dieser Funktion wird ein links rechts gleichmäßiges Garen gewährleistet.
  • Seite 8: Umluftbetrieb

    Drehspieß einsetzen Drehspieß Drehpießgriff herausnehmen Setzen Sie den Zum Herausnehmen Verwenden Sie zum Drehspieß auf der einen verwenden Sie den Herausnehmen des Seite in die Öffnung und Griff, um den Drehspieß Drehspießes immer den auf der anderen Seite in auf der Halterung und Drehspießgriff.
  • Seite 9: Zubereitungstabelle

    VORSICHT Verbrennungsgefahr! Öffnen Sie während des Backens nicht die Glastür und benutzen Sie beim Entnehmen der Speisen und des Zubehörs immer Ofenhandschuhe oder verwenden Sie den Drehspießgriff. Heizmodi Oberhitze und Unterhitze + Umluft Oberhitze + Umluft Oberhitze und Unterhitze Oberhitze + Drehspieß Oberhitze und Unterhitze + Drehspieß...
  • Seite 10: Reinigung Und Pflege

    REINIGUNG UND PFLEGE Ziehen Sie vor der Reinigung immer zuerst den Stecker aus der Steckdose. Falls nötig, wischen Sie die Wände mit einem feuchten Lappen und einem milden Reinigungsmittel ab. Benutzen Sie zur Reinigung keine Stahl- und Scheuerschwämme oder Scheuermittel, da diese die Wände zerkratzen können. Waschen Sie die Zubehörteile mit heißem Seifenwasser ab.
  • Seite 11: Technical Information

    Safety instructions 12 Appliance overview and accessories 13 Operation 14 Preparation chart 17 Cleaning and care 18 Disposal instructions 18 Manufacturer & Importer (UK) 18 TECHNICAL INFORMATION Product code 10030102, 10030103 Power supply 220-240 V~ 50/60 Hz Power 1500 W...
  • Seite 12: Safety Instructions

    SAFETY INSTRUCTIONS • Read all instructions carefully and keep the manual in a safe place for future reference. • Do not touch any hot surfaces. Please make sure to only use the handles and control dials. • Please ensure that you supervise children when using this appliance. •...
  • Seite 13: Appliance Overview And Accessories

    APPLIANCE OVERVIEW AND ACCESSORIES Heating elements Function setting Glass door Timer Cooking chamber Legs Shelf positions Wire shelf Door handle Handle Housing Baking tray Temperature control dial Skewer handle Operating lights Skewer mount CAUTION Fire hazard! If you are using baking paper, ensure that it does not touch any exposed heating elements.
  • Seite 14: Operation

    OPERATION Before using the appliance for the first time Insert the baking tray and wire shelf Set the function dial to top / bottom grill. Set the temperature to 230°C and heat the oven empty for 10 minutes. Note: The oven may produce smoke and/or a burning smell when pre-heating. This is not indicative of a defect.
  • Seite 15 Accessory use Baking tray and wire shelf Accessories Dishes (Example) Use of the handle Roast chicken, chicken wings, burgers, gratin, cakes, and almost all other dishes. Jacket potatoes, dry foods For foods that drip fat etc. Skewer function For use with the rotary spit Using the rotary spit This function ensures your food is left...
  • Seite 16 To insert the spit To remove the spit Spit handle Insert the spit into the In order to remove it Always use the handle to hole on one side and the use the handle to firstly remove the rotary spit. respective bracket on the remove the spit from the other side of the oven.
  • Seite 17: Preparation Chart

    CAUTION Burn risk! Do not open the glass door during use and always use oven gloves or the rotary spit handle to remove food and accessories. Heat settings Top heat and bottom heat + convection function Top heat + convection function Top heat and bottom heat Top heat + rotary spit Top heat and bottom heat + rotary spit +...
  • Seite 18: Cleaning And Care

    CLEANING AND CARE Disconnect the power plug from the socket before cleaning. If necessary, clean the internal walls of the oven with a damp cloth and mild cleaning agent. Do not use any metal or scouring sponges to clean the walls as this may scratch them.
  • Seite 19: Fiche Technique

    Appareil et accessoires 21 Utilisation 22 Tableau des temps de cuisson 25 Nettoyage et entretien 26 Informations sur le recyclage 26 Fabricant et importateur (GB) 26 FICHE TECHNIQUE Numéro d'article 10030102, 10030103 Alimentation 220-240 V~ 50/60 Hz Puissance 1500 W...
  • Seite 20: Consignes De Sécurité

    CONSIGNES DE SÉCURITÉ • Lisez attentivement toutes les consignes et conservez le mode d'emploi pour vous y référer ultérieurement. • Ne touchez aucune surface chaude, utilisez uniquement les boutons de réglage et les poignées. • En présence d'enfants, surveillez toujours l'appareil. •...
  • Seite 21: Appareil Et Accessoires

    APPAREIL ET ACCESSOIRES Barres chauffantes Sélecteur de fonction Porte vitrée Minuterie Espace de cuisson Pieds de support Inserts Grille Poignée de porte Poignée Boîtier Plaque de cuisson Régulateur de température Poignée de broche Témoins de marche Support de broche ATTENTION Risque d'incendie ! Si vous utilisez du papier sulfurisé, assurez-vous qu'il ne touche pas les éléments chauffants non protégés.
  • Seite 22: Utilisation

    UTILISATION Avant la première utilisation de l'appareil Insérez la grille et la plaque de cuisson Réglez le sélecteur de fonction sur chauffage de sole et de voûte. Réglez la température sur 230°C et chauffez le four vide pendant 10 minutes. Remarque : au début, il peut y avoir de la fumée et une odeur de brûlé.
  • Seite 23 Utilisation des accessoires Plaque et grille de cuisson Accessoires Plats (exemples) Utilisation de la poignée Poulet rôti, ailes de poulet, boulette de viande, gratin, gâteau et presque tous les autres plats Pommes de terre au four, plats secs Pour égoutter les aliments Fonction rôtissoire Utilisation avec la broche...
  • Seite 24 Installation de la Pour retirer la broche Poignée de la broche broche Placez la broche dans Pour retirer, utilisez la Utilisez toujours la l'ouverture d'un côté poignée pour soulever poignée pour retirer la et dans le support de la broche sur le support broche.
  • Seite 25: Tableau Des Temps De Cuisson

    ATTENTION Risque de brûlure ! N'ouvrez pas la porte vitrée pendant la cuisson et utilisez toujours des gants de cuisine ou utilisez la poignée de la broche pour retirer les aliments et les accessoires. Modes de chauffage Chaleur voûte et sole + convection Chaleur de voûte + convection Chaleur voûte et de sole Chaleur de voûte + rôtissoire...
  • Seite 26: Nettoyage Et Entretien

    NETTOYAGE ET ENTRETIEN Débranchez toujours la fiche de la prise avant le nettoyage. Si nécessaire, essuyez les murs avec un chiffon humide et un détergent doux. N'utilisez pas de tampons à récurer ou de nettoyants abrasifs car ils peuvent rayer les parois. Lavez les accessoires à...
  • Seite 27: Datos Técnicos

    Puesta en marcha 30 Tabla de tiempos de preparación 33 Limpieza y cuidado 34 Indicaciones sobre la retirada del aparato 34 Fabricante e importador (Reino Unido) 34 DATOS TÉCNICOS Número de artículo 10030102, 10030103 Suministro eléctrico 220-240 V~ 50/60 Hz Potencia 1500 W...
  • Seite 28: Indicaciones De Seguridad

    INDICACIONES DE SEGURIDAD • Lea atentamente todas las indicaciones y conserve este manual de instrucciones para futuras consultas. • No toque ninguna superficie caliente, toque solo los reguladores y mangos. • Si utiliza el aparato en presencia de niños, estos deberán estar bajo supervisión.
  • Seite 29: Vista General Del Aparato Y Accesorios

    VISTA GENERAL DEL APARATO Y ACCESORIOS Elemento calefactor Perilla de funciones Puerta de cristal Temporizador Cámara de horneado Patas Soporte de la bandeja Parrilla Asa de la puerta Carcasa Bandeja de horno Regulador de temperatura Mango para el espetón Luz de funcionamiento Soporte para espetón ATENCIÓN ¡Peligro de incendio! Si utiliza papel de horno, asegúrese de que no...
  • Seite 30: Puesta En Marcha

    PUESTA EN MARCHA Antes de utilizar el aparato por primera vez Introduzca la bandeja y la parrilla. Configure la perilla de funciones para calor arriba y abajo. Ajuste la temperatura a 230 °C y precaliente el horno vacío durante 10 minutos. Nota: al principio puede generarse un olor a quemado y humo.
  • Seite 31 Uso de los accesorios Bandeja y parrilla Accesorio Platos (ejemplos) Uso de los mangos Pollo asado, alitas de pollo, hamburguesas, gratinados, tartas y casi todos los platos Patatas asadas, platos secos Para alimentos que gotean Espetón Uso con el espetón Colocación del espetón Con esta función se garantiza un izquierda...
  • Seite 32 Colocar el espetón Retirar el espetón Mango del espetón Coloque el espetón en el Para retirarlo, utilice el Para extraer el espetón, orificio correspondiente mango para levantar el utilice siempre el mango y el otro extremo del espetón del soporte y correspondiente.
  • Seite 33: Tabla De Tiempos De Preparación

    ATENCIÓN ¡Riesgo de quemaduras! No abra la puerta de cristal durante la cocción y utilice siempre manoplas o el mango giratorio para retirar los alimentos y los accesorios. Modos de calentamiento Calor arriba y calor abajo + convección Calor arriba + convección Calor arriba y calor abajo Calor arriba + espetón Calor arriba y calor abajo + espetón +...
  • Seite 34: Limpieza Y Cuidado

    LIMPIEZA Y CUIDADO Antes de limpiar el aparato, desconéctelo de la toma de corriente. Si fuera necesario, limpie las paredes con un paño húmedo y un detergente neutro. No utilice estropajos ni productos abrasivos, ya que podrían rayar las paredes. Lave los accesorios con agua tibia y jabón.
  • Seite 35: Dati Tecnici

    Istruzioni di sicurezza 36 Dispositivo e accessori 37 Utilizzo 38 Tabella preparazioni 41 Pulizia e manutenzione 42 Indicazioni per lo smaltimento 42 Produttore e importatore (UK) 42 DATI TECNICI Numero articolo 10030102, 10030103 Alimentazione 220-240 V~ 50/60 Hz Potenza 1500 W...
  • Seite 36: Istruzioni Di Sicurezza

    ISTRUZIONI DI SICUREZZA • Leggere attentamente tutte le istruzioni e conservare il manuale per consultazioni future. • Stare lontani dalle superfici calde e toccare esclusivamente i pulsanti e le apposite impugnature. • Prestare particolare attenzione se si utilizza l'apparecchio in presenza di bambini.
  • Seite 37: Dispositivo E Accessori

    DISPOSITIVO E ACCESSORI Resistenze Manopola di selezione della funzione Sportello in vetro Timer Vano di cottura Piedi d'appoggio Inserti Griglia Maniglia dello sportello Impugnatura Alloggiamento Teglia Manopola della temperatura Impugnatura dello spiedo Spie di funzionamento Supporto per lo spiedo ATTENZIONE Pericolo di incendio! Quando si usa la carta da forno, fare attenzione a non farla entrare a contatto con gli elementi riscaldanti.
  • Seite 38: Utilizzo

    UTILIZZO Prima di utilizzare l'apparecchio per la prima volta Inserire la teglia e la griglia all'interno del forno. Impostare la manopola di selezione della funzione su resistenza superiore e inferiore. Impostare la temperatura a 230°C e scaldare il forno vuoto per 10 minuti.
  • Seite 39 Utilizzo degli accessori Teglia e griglia Accessori Pietanza (esempi) Utilizzo dell'impugnatura Pollo arrosto, alette di pollo, polpette di carne, verdure gratinate e quasi tutte le altre pietanze Patate al forno, cibi secchi Per prodotti che sgocciolano Girarrosto Utilizzo del girarrosto Montaggio del girarrosto Grazie a questa funzione è...
  • Seite 40 Montare il girarrosto Rimuovere il girarrosto Impugnatura del girarrosto Fissare lo spiedo su Durante la rimozione, Durante la rimozione, un lato nell'apertura utilizzare l'impugnatura utilizzare sempre e sull'altro lato nel per sollevare lo spiedo l'apposita impugnatura. supporto. sul supporto e staccarlo dall'apertura.
  • Seite 41: Tabella Preparazioni

    ATTENZIONE Pericolo di ustioni! Non aprire lo sportello di vetro durante la cottura e, quando si tirano fuori i piatti o gli accessori del forno, utilizzare sempre dei guanti o l'impugnatura dello spiedo. Modalità di cottura Resistenza superiore e inferiore + ventilato Resistenza superiore + ventilato Resistenza superiore e inferiore...
  • Seite 42: Pulizia E Manutenzione

    PULIZIA E MANUTENZIONE Staccare sempre la spina dalla presa prima della pulizia. Se necessario, pulire le pareti con un panno umido e un detersivo delicato. Non utilizzare spugne in acciaio o detergenti abrasivi. Sciacquare le componenti degli accessori con acqua calda e sapone. Le componenti degli accessori possono anche essere lavati nella lavastoviglie.

Diese Anleitung auch für:

10030103

Inhaltsverzeichnis