Herunterladen Inhalt Inhalt Diese Seite drucken
Inhaltsverzeichnis

Werbung

Verfügbare Sprachen
  • DE

Verfügbare Sprachen

  • DEUTSCH, seite 1
Digitaler Küchentimer
Digital kitchen timer | Temporizador de cocina digital |
Minuteur de cuisine numérique | Contaminuti da
cucina digitale | Cyfrowy timer kuchenny
Bedienungsanleitung
TD 1902
Operating Manual | Manual de instrucciones |
Mode d'emploi | Istruzioni per l'uso | Instrukcja obsługi

Werbung

Inhaltsverzeichnis
loading

Inhaltszusammenfassung für ADE TD 1902

  • Seite 1 Digital kitchen timer | Temporizador de cocina digital | Minuteur de cuisine numérique | Contaminuti da cucina digitale | Cyfrowy timer kuchenny Bedienungsanleitung TD 1902 Operating Manual | Manual de instrucciones | Mode d’emploi | Istruzioni per l’uso | Instrukcja obsługi...
  • Seite 2 Design vereint. Dieser Timer ist ein praktischer Begleiter für Küche, Bad, Haushalt oder Hobby. Die langjährige Erfahrung der Marke ADE stellt eine technisch hohen Standard und bewährte Qualität sicher. Wir wünschen Ihnen viel Freude beim perfekten Zeitmanagement!
  • Seite 3: Allgemeines

    Allgemeines Über diese Anleitung Diese Bedienungsanleitung be- schreibt den sicheren Umgang und die Pflege des Artikels. Bewahren Sie diese Bedienungsanleitung auf, falls Sie später etwas nachlesen möchten. Wenn Sie den Artikel an jemand anderen weitergeben, geben Sie auch diese Anleitung mit.
  • Seite 4: Zeichenerklärung

    Zeichenerklärung Dieses Symbol in Verbindung mit dem Wort GEFAHR warnt vor schweren Verletzungen. Dieses Symbol in Verbindung mit dem Wort WARNUNG warnt vor Verletzungen mittleren und leich- ten Grades. Dieses Symbol in Verbindung mit dem Wort HINWEIS warnt vor Sachschäden. Dieses Symbol kennzeichnet zusätzliche Informationen und allgemeine Hinweise.
  • Seite 5: Inhaltsverzeichnis

    Inhaltsverzeichnis Allgemeines ............3 Bestimmungsgemäßer Gebrauch ....6 Sicherheit ............... 6 Lieferumfang ............9 Auf einen Blick ............10 Inbetriebnahme ..........12 Grundfunktionen ..........13 Kurzzeitmessung durchführen ....14 Stoppuhrfunktion nutzen ......16 Weckfunktion nutzen ........17 Alarmart wählen ..........19 Reinigen ..............20 Störung und Abhilfe ........20 Technische Daten ..........21 Konformitätserklärung ........22 Garantie ..............22...
  • Seite 6: Bestimmungsgemäßer Gebrauch

    Bestimmungsgemäßer Gebrauch Der digitale Timer ist als Uhr und Kurzzeitmesser für den Privatgebrauch konzipiert. Sicherheit ‚ Dieser Artikel kann von Kindern ab 8 Jahren und darüber sowie von Personen mit verringerten physischen, sensorischen oder mentalen Fähigkeiten oder Mangel an Erfahrung und Wissen benutzt werden, wenn sie beaufsichtigt oder bezüglich des sicheren Gebrauchs des Artikels unterwie- sen wurden und die daraus resultierenden...
  • Seite 7: Gefahr Von Brand/Verbrennung Und/ Oder Explosion

    ‚ Batterien können bei Verschlucken lebens- gefährlich sein. Artikel und Batterien für Kleinkinder unerreichbar aufbewahren. Falls Batterien verschluckt wurden, sofort medi- zinische Hilfe in Anspruch nehmen. GEFAHR für Kinder ‚ Kinder von Verpackungsmaterial fernhalten. Bei Verschlucken besteht Erstickungsgefahr. GEFAHR von Brand/Verbrennung und/ oder Explosion ‚...
  • Seite 8 und Auslaufgefahr, außerdem können Gase entweichen! ‚ Kontakt der Batterieflüssigkeit mit Haut, Augen und Schleimhäuten vermeiden. Bei Kontakt betroffene Stellen sofort mit reichlich klarem Wasser ausspülen und umgehend Arzt aufsuchen. VORSICHT vor Sachschäden ‚ Timer vor starken Stößen, Erschütterungen und Feuchtigkeit schützen. ‚...
  • Seite 9: Lieferumfang

    gelagert werden. Erhöhte Auslaufgefahr! ‚ Batterie- und Gerätekontakte bei Bedarf vor dem Einlegen reinigen. ‚ Keine Änderungen an dem Artikel vorneh- men. Reparaturen nur von einer Fachwerk- statt durchführen lassen. Unsachgemäß durchgeführte Reparaturen können erhebliche Gefährdungen für den Benutzer verursachen. Lieferumfang ‚...
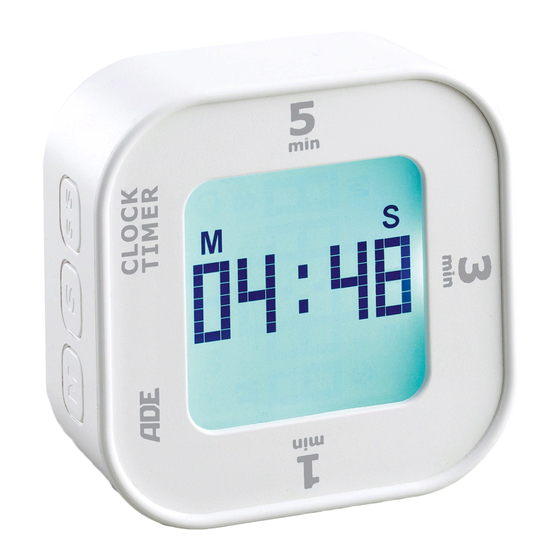
  • Seite 10: Auf Einen Blick

    Auf einen Blick 1 Bedientasten M, S und S/S 2 Display 3 5 Minuten Timer 4 3 Minuten Timer 5 1 Minuten Timer...
  • Seite 11 Funktionsschalter für Alarmart Batteriefach für 2x LR03 (AAA), 1,5 V Batteriefachdeckel...
  • Seite 12: Inbetriebnahme

    Inbetriebnahme Für den Gebrauch benötigen Sie zwei Batterien des Typs LR03 (AAA), 1,5 V. Batteriefachdeckel abnehmen und alte Batterie entfernen. 1. Verschlusslasche des Batteriefachdeckels nach unten drücken und Batteriefachdeckel abnehmen. 2. Batterien so einlegen, wie auf dem Boden des Batteriefachs abgebildet. Auf die rich- tige Polarität (+/-) achten.
  • Seite 13: Grundfunktionen

    Grundfunktionen Uhrzeit stellen Sobald der Timer mit Strom versorgt wird, blinkt im Display „0:00“. ‚ Wenn Sie die Taste S oder S/S gedrückt halten, erfolgt der Vor- bzw. Rücklauf der angezeigten Werte schneller. ‚ Wenn zwischen zwei Tastendrü- cken mehr als 20 Sekunden liegen wird der Vorgang abgebrochen und Sie müssen ihn wiederholen.
  • Seite 14: Kurzzeitmessung Durchführen

    3. Durch Drücken der Taste S (vorwärts) oder S/S (rückwärts) Minutenzeit einstellen. 4. Taste M drücken; die Zeiteinstellung ist abgeschlossen. Uhrzeitformat wählen − Taste S länger gedrückt halten bis im Display „12 H“ oder „24 H“ angezeigt wird. Beim 12-Stunden-Format werden Nachmittags- stunden mit „PM“...
  • Seite 15 Nach dem Ablauf ertönt ein Alarm. 2. Taste S/S drücken, um den Alarm zu been- den oder Timer so drehen, dass die Uhrzeit wieder angezeigt wird. Um laufenden Timer zu unterbrechen und wieder fortzusetzen Taste S/S drücken. Beachten Sie: ‚ Wenn Sie nach dem Ablauf des Count- downs nichts machen, schaltet sich der Alarm nach ca.
  • Seite 16: Stoppuhrfunktion Nutzen

    Individuellen Countdown starten 1. Taste S/S gedrückt halten, bis im Display „00:00“ angezeigt wird. 2. Mit M die Minuten einstellen. 3. Mit S die Sekunden einstellen. 4. S/S drücken um den Countdown zu starten, ggf. zu unterbrechen und wieder zu starten. Um Anzeige wieder auf „00:00“...
  • Seite 17: Weckfunktion Nutzen

    Um Anzeige wieder auf „00:00“ zu stellen, Tasten M und S/S gleichzeitig länger gedrückt halten. 3. Um wieder die Uhrzeit angezeigt zu bekom- men, Taste S/S länger gedrückt halten. Weckfunktion nutzen Weckzeit einstellen 1. Taste M kurz drücken, um in den Einstellmo- dus für die Weckzeit zu gelangen (Vorein- stellung „6:30“).
  • Seite 18: Weckalarm Beenden

    5. Durch Drücken der Taste S oder S/S Weck- minute einstellen. 6. Taste M drücken. 7. Mit S oder S/S-Taste Snooze-Zeit (Zeit zwischen zwei Weckwiederholungen) ein- stellen. Einstellbare Zeit: zwischen 5 und 60 Minuten. 8. Taste M drücken. Einstellung der Uhrzeit/ Snooze-Zeit ist abgeschlossen.
  • Seite 19: Alarmart Wählen

    ‚ Beliebige Taste drücken, um den Wecka- larm für 24 Stunden zu unterbrechen. Sie werden am nächsten Tag zur gleichen Uhrzeit wieder geweckt. ‚ Wenn Sie 1x kurz S/S drücken erlischt das Glockensymbol im Display: Die Weck- funktion ist ausgeschaltet. Durch erneutes Drücken von S/S wird die Weckfunktion wieder aktiviert (Display-Anzeige beach- ten).
  • Seite 20: Reinigen

    ‚ Display-Beleuchtung, Vibration ‚ Pieptöne ‚ Display-Beleuchtung, Pieptöne Reinigen HINWEIS vor Sachschaden Timer nicht in Wasser oder andere Flüssigkeiten tauchen. Keine harten, kratzenden oder scheuernden Reini- gungsmittel verwenden. − Timer bei Bedarf mit einem weichen, trockenen Tuch entstauben oder mit einem leicht angefeuchteten Tuch abwischen.
  • Seite 21: Technische Daten

    Technische Daten Modell: Digitaler Küchentimer TD 1902 Batterie: 2x LR03 (AAA), 1,5 V Bemessungsstrom: max. 82-85 mA Inverkehrbringer (keine Service-Adresse): Waagen-Schmitt GmbH Hammer Steindamm 27-29 22089 Hamburg, Germany Unsere Produkte werden ständig weiterentwi- ckelt und verbessert. Aus diesem Grund sind Design- und technische Änderungen jederzeit...
  • Seite 22: Konformitätserklärung

    Konformitätserklärung Hiermit erklärt die Waagen-Schmitt GmbH, dass der digitale Küchentimer TD 1902 den Richtli- nien 2014/30/EU und 2011/65/EU entspricht. Die Erklärung verliert ihre Gültigkeit, falls an dem Gerät eine nicht mit uns abgestimmte Än- derung vorgenommen wurde. Hamburg, Januar 2020...
  • Seite 23: Entsorgen

    Entsorgen Verpackung entsorgen Entsorgen Sie die Verpackung sortenrein. Geben Sie Pappe und Karton zum Altpapier, Folien in die Wertstoff-Sammlung. Artikel entsorgen Entsorgen Sie den Artikel entsprechend der Vor- schriften, die in Ihrem Land gelten. Geräte dürfen nicht im normalen Hausmüll entsorgt werden. Am Ende seiner Lebensdauer ist der Artikel einer geordneten Entsorgung zuzuführen.
  • Seite 24 Belastung der Umwelt vermieden. Geben Sie das Altgerät an einer Sammelstelle für Elek- troschrott oder einem Wertstoffhof ab. Wenden Sie sich für nähere Auskünfte an Ihr örtliches Entsorgungsunternehmen oder Ihre kommunale Verwaltung. Batterien und Akkus gehören nicht in den Hausmüll Alle Batterien und Akkus müssen bei einer Sammelstelle der Gemeinde, des Stadtteils oder im Handel abgegeben werden.
  • Seite 26 This timer is a practical companion for the kitchen, bathroom, household, or hobby. The wealth of experience of the ADE brand ensures a high technical standard and proven quality. We wish you a lot of success with perfect...
  • Seite 27: General Information

    General information About this operating manual This operating manual describes how to operate and maintain your product safely. Keep this operating manual in a safe place for future reference. If you pass this product on to someone else, pass on this operating manual as well.
  • Seite 28: Explanation Of Symbols

    Explanation of symbols This symbol combined with the word DANGER warns of serious injuries. This symbol combined with the word WARNING warns of moderate and mild injuries. This symbol combined with the word NOTE warns of material damage. This symbol indicates additional information and general notes.
  • Seite 29 Table of Contents General information ........27 Intended use ............30 Safety ..............30 Scope of delivery..........33 Overview ..............34 Start-up ..............36 Basic functions ...........37 Using the timer ..........38 Using the stopwatch function .....40 Using the alarm function .......41 Selecting the alarm type ........43 Cleaning...............
  • Seite 30: Intended Use

    Intended use The digital timer is designed as a clock and timer for private use. Safety ‚ This product may be used by children aged 8 and above, as well as by persons with reduced physical, sensory, or mental capacities or lacking experience and knowledge if they are supervised or have been instructed in the safe use of the product and understand the risks that may...
  • Seite 31 ‚ Batteries, when swallowed, can be life- threatening. Keep the product and batteries out of reach of small children. If batteries have been swallowed, seek medical help immediately. DANGER for children ‚ Keep children away from packaging material. There is a risk of choking if swallowed.
  • Seite 32 ‚ Avoid contact of the battery fluid with skin, eyes, and mucosa. In case of contact, immediately rinse the affected areas with plenty of clean water and consult a doctor. BEWARE of material damage ‚ Protect the timer from strong shocks, vibrations, and moisture.
  • Seite 33: Scope Of Delivery

    ‚ Do not make any changes to the product. Only allow repairs to be carried out by a specialist workshop. Repairs carried out improperly can considerably endanger the user. Scope of delivery ‚ Digital kitchen timer ‚ 2x LR03 (AAA) batteries, 1.5 V, 3 V ‚...
  • Seite 34: Overview

    Overview 1 Control keys M, S and S/S 2 Display 3 5-minute timer 4 3-minute timer 5 1-minute timer...
  • Seite 35 Function switch for alarm type Battery compartment for 2x LR03 (AAA), 1.5 V Battery compartment cover...
  • Seite 36: Start-Up

    Start-up For use, you need two 1.5 V LR03 (AAA) batteries. Remove the battery compartment cover and remove the old battery. 1. Press the locking tab of the battery compartment cover down and remove the battery compartment cover. 2. Insert the batteries as shown on the bottom of the battery compartment.
  • Seite 37: Basic Functions

    Basic functions Setting the time As soon as the timer is supplied with power, “0:00” flashes on the display. ‚ If you hold down the S or S/S key, the displayed values progress in increasing or decreasing order faster. ‚ If there are more than 20 seconds between two key presses, the process is cancelled and you have to repeat it.
  • Seite 38: Selecting The Time Format

    3. Set the minute by pressing the S (forward) or S/S (reverse) key. 4. Press the M key; the time setting is complete. Selecting the time format − Hold down the S key until “12 H” or “24 H” appears on the display. In the 12-hour format, afternoon hours are indicated as “PM”.
  • Seite 39 The countdown starts automatically. An alarm sounds after the countdown has elapsed. 2. Press the S/S key to stop the alarm or turn the timer so that the time is displayed again. To interrupt the running timer and continue again, press the S/S key. Pay attention to the following: ‚...
  • Seite 40: Using The Stopwatch Function

    Starting the individual countdown 1. Hold down the S/S key until “00:00” appears on the display. 2. Set the minutes with M. 3. Set the seconds with S. 4. Press S/S to start the countdown, interrupt if necessary and start again. To reset the display to “00:00”, press and hold down the M and S/S keys simultaneously.
  • Seite 41: Using The Alarm Function

    To reset the display to “00:00”, press and hold down the M and S/S keys simultaneously. 3. To display the time again, hold down the S/S key. Using the alarm function Setting the alarm time 1. Press the M key briefly to enter the setting mode for the alarm time (default “6:30”).
  • Seite 42: Stopping The Alarm

    6. Press the M key. 7. Use the S or S/S key to set the snooze time (time between two alarm calls). Adjustable time: between 5 and 60 minutes. 8. Press the M key. Time/snooze time setting is completed. 9. Briefly press the S/S key, a bell symbol appears in the upper right corner of the display.
  • Seite 43: Selecting The Alarm Type

    ‚ If you press S/S once briefly, the bell symbol on the display goes out: The alarm function is disabled. Pressing S/S again activates the alarm function (note the display). Selecting the alarm type Set the function switch (rear) to select the alarm type of the timer: From left to right: ‚...
  • Seite 44: Cleaning

    Cleaning NOTE on material damage Do not immerse the timer in water or other liquids. Do not use rough, scratching or abrasive cleaning agents. − If necessary, remove dust with a soft, dry cloth, or wipe with a slightly damp cloth. Fault and remedy No function.
  • Seite 45: Technical Data

    Technical data Model: Digital kitchen timer TD 1902 Battery: 2x LR03 (AAA), 1.5 V Rated current: max. 82-85 mA Distributor (no service address): Waagen-Schmitt GmbH Hammer Steindamm 27-29 22089 Hamburg, Germany Our products are constantly being developed and improved. For this reason, design and...
  • Seite 46: Declaration Of Conformity

    Declaration of Conformity Waagen-Schmitt GmbH hereby declares that the TD 1902 digital kitchen timer complies with the 2014/30/EU and 2011/65/EU directives. The declaration will lose its validity if any modification is made to the device without our consent. Hamburg, January 2020...
  • Seite 47: Disposal

    Disposal Disposing of the packaging Dispose of the packaging with similar materials. Dispose of cardboard with waste paper and of films with recyclable materials. Disposing of the product Dispose of the product in accordance with the regulations that apply in your country. Devices must not be disposed of in normal household waste.
  • Seite 48 In this way, valuable materials contained in the device will be recycled and the burden on the environment avoided. Bring the old device to a collection point for electronic waste or to a recycling depot. For more information, contact your local waste disposal firm or your local administrative body.
  • Seite 50 ¡Estimada/o clienta/e! Se ha decidido por la compra de un producto de gran calidad de la marca ADE, que aúna unas funciones inteligentes con un diseño extraordinario. Este temporizador es un práctico complemento para la cocina, el baño, el hogar y el tiempo libre.
  • Seite 51: Información General

    Información general Acerca de estas instrucciones Este manual de instrucciones describe el manejo seguro y el cuidado del artículo. Conserve este manual de instrucciones por si necesita volver a consultarlo. Si le entrega el artículo a otra persona, acompáñelo también de estas instrucciones.
  • Seite 52: Explicación De Símbolos

    Explicación de símbolos Este símbolo unido a la palabra PELIGRO advierte de heridas graves. Este símbolo unido a la palabra ADVERTENCIA advierte de heridas de grado medio o leve. Este símbolo unido a la palabra INDICACIÓN advierte de daños materiales. Este símbolo significa información adicional e indicaciones generales.
  • Seite 53 Índice Información general ........51 Uso adecuado.............54 Seguridad .............54 Material suministrado ........57 De un vistazo ............58 Puesta en funcionamiento ......60 Funciones básicas ..........61 Realizar mediciones de periodos cortos ..63 Utilizar la función cronómetro .....65 Utilizar la función despertador ....66 Seleccionar tipo de alarma ......68 Limpieza ...............69 Problemas y soluciones ........69 Datos técnicos ............70...
  • Seite 54: Uso Adecuado

    Uso adecuado El temporizador digital está diseñado como reloj y cronómetro para uso privado. Seguridad ‚ Este artículo puede ser utilizado por niños mayores de 8 años y por personas con discapacidad física, sensorial o mental o con falta de experiencia o conocimientos, siempre que estén supervisados o se les instruya sobre el uso seguro del artículo y comprendan los riesgos que pueden...
  • Seite 55 ‚ Las pilas pueden suponer un peligro de muerte si se ingieren. Mantenga el artículo y las pilas fuera del alcance de los niños. Si se ingiere una pila, debe acudirse inmediatamente en busca de asistencia médica. RIESGOS para los niños ‚...
  • Seite 56 fuego o cortocircuitarse. En caso contrario, existe un riesgo mayor de explosión y fuga y además pueden producirse gases. ‚ Evite el contacto del líquido de las pilas con la piel, ojos y mucosas. En caso de contacto, limpie inmediatamente la zona afectada con agua limpia y acuda al médico sin pérdida de tiempo.
  • Seite 57: Material Suministrado

    ‚ No someta las pilas a condiciones extremas, por ejemplo no las coloque sobre superficies calientes ni a la luz directa del sol. ¡Riesgo elevado de fugas! ‚ Cuando sea necesario, limpie los contactos del aparato y de las pilas antes de colocarlas.
  • Seite 58: De Un Vistazo

    De un vistazo 1 Botones de control M, S y S/S 2 Pantalla 3 Temporizador de 5 minutos 4 Temporizador de 3 minutos 5 Temporizador de 1 minuto...
  • Seite 59 Interruptor de función para tipo de alarma Compartimento para pilas, 2 x LR03 (AAA), 1,5 V Tapa del compartimento de las pilas...
  • Seite 60: Puesta En Funcionamiento

    Puesta en funcionamiento Para usarlo, necesita dos pilas LR03 (AAA) de 1,5 V. Retire la tapa del compartimento de las pilas y retire las pilas antiguas. 1. Presione hacia abajo la pestaña de bloqueo de la tapa del compartimento de las pilas y retire la tapa del compartimento de las pilas.
  • Seite 61: Funciones Básicas

    ‚ Elimine las pilas conforme a la normativa medioambiental, consulte "Eliminación". Funciones básicas Ajustar la hora Tan pronto como el temporizador reciba energía, en la pantalla parpadeará "0:00". ‚ Si mantiene pulsado el botón S o S/S, los valores mostrados avanzarán o retrocederán más rápido.
  • Seite 62 Pulsando el botón S (hacia delante) o S/S (hacia atrás) se establece la hora. 2. Pulse el botón M. Los minutos parpadearán en la pantalla. 3. Pulsando el botón S (hacia delante) o S/S (hacia atrás) se establecen los minutos. 4.
  • Seite 63: Realizar Mediciones De Periodos Cortos

    Realizar mediciones de periodos cortos Iniciar cuenta atrás preestablecida Para un cronometraje corto, comience una de las tres cuentas atrás preestablecidas. Puede elegir entre uno, tres y cinco minutos. 1. Gire el temporizador para que el período de tiempo elegido apunte hacia arriba. La cuenta atrás comenzará...
  • Seite 64 Tenga en cuenta que: ‚ Si no hace nada después de que finalice la cuenta atrás, la alarma se apagará automáticamente tras 30 segundos aproximadamente. En la pantalla parpadeará "00:00". Si pulsa S/S, el temporizador restablecerá su valor original, por ejemplo, "01:00". Pulse S/S nuevamente para reiniciar el temporizador.
  • Seite 65: Utilizar La Función Cronómetro

    Para restablecer la pantalla a "00:00", mantenga pulsados los botones M y S/S al mismo tiempo. 5. Para volver a mostrar la hora, mantenga pulsado el botón S/S. Utilizar la función cronómetro 1. Mantenga pulsado el botón S/S hasta que en la pantalla aparezca "00:00".
  • Seite 66: Utilizar La Función Despertador

    Utilizar la función despertador Ajustar hora de alarma 1. Pulse brevemente el botón M para activar el modo de configuración para la hora de la alarma (configuración predeterminada "6:30"). 2. Mantenga pulsado el botón M hasta que los dígitos de la hora parpadeen en la pantalla. 3.
  • Seite 67 8. Pulse el botón M. La configuración de la hora/tiempo de repetición se ha completado. 9. Pulse el botón S/S brevemente y en la esquina derecha superior de la pantalla aparecerá un símbolo de una campana La función de alarma está activada. Parar la alarma A la hora programada le despertará...
  • Seite 68: Seleccionar Tipo De Alarma

    La función de alarma está desactivada. Al pulsar de nuevo S/S se activará la función de alarma (preste atención a la indicación de la pantalla). Seleccionar tipo de alarma Mediante la posición del interruptor de función (posterior), se selecciona el tipo de alarma del temporizador: De izquierda a derecha: ‚...
  • Seite 69: Limpieza

    Limpieza ADVERTENCIA de daños materiales No introduzca el temporizador en agua ni en ningún otro líquido. No utilice productos de limpieza duros, que puedan rayar o que haya que frotar. − Cuando sea necesario, quite el polvo al temporizador con un paño suave y seco o límpielo con un paño ligeramente humedecido.
  • Seite 70: Datos Técnicos

    Datos técnicos Modelo: Temporizador de cocina digital TD 1902 Pilas: 2 x LR03 (AAA)/1,5 V Intensidad de corriente: máx. 82-85 mA Distribuidor (no hay dirección de servicio técnico): Waagen-Schmitt GmbH Hammer Steindamm 27-29 22089 Hamburgo, Alemania Nuestros productos se están desarrollando y mejorando continuamente.
  • Seite 71: Declaración De Conformidad

    Declaración de conformidad Waagen-Schmitt GmbH declara que el temporizador digital de cocina TD 1902 cumple con las directrices 2014/30/UE y 2011/65/UE. La declaración perderá su validez en caso de se haya realizado una modificación en el aparato sin haber sido previamente aprobada por nuestra parte.
  • Seite 72: Eliminación

    artículo a su distribuidor con el justificante de compra (explicando el motivo de la reclamación). Eliminación Eliminación del embalaje Elimine el embalaje separando los materiales. Lleve el papel y cartón al contenedor de cartón y las láminas al de plásticos. Eliminación del artículo Elimine el artículo conforme a la normativa correspondiente aplicable en su país.
  • Seite 73 Para ello, se deben reciclar las piezas del aparato y así evitar un daño al medio ambiente. Deposite el aparato antiguo en un punto de recogida de restos electrónicos o desechos reciclables. Para más información, diríjase a su empresa de recogida de residuos o administración local.
  • Seite 74 Chère cliente, cher client ! Nous sommes ravis que vous ayez choisi un appareil de haute qualité de la marque ADE, qui allie des fonctions intelligentes à un design exceptionnel. Ce minuteur est un compagnon pratique pour la cuisine, le bain, le ménage ou les hobbys. Les années d’expérience de la marque ADE...
  • Seite 75: Généralités

    Généralités À propos de ce mode d’emploi Ce mode d’emploi décrit l’utilisation conforme ainsi que les procédures d’entretien de l’article. Conservez ce manuel pour toute référence ultérieure. Si vous cédez l’article à une tierce personne, transmettez-lui également ce mode d’emploi. Le non-respect de ce mode d’emploi peut entraîner des blessures ou endommager l’article.
  • Seite 76 Légende Ce symbole, associé au mot DANGER, prévient de blessures graves. Ce symbole, associé au mot ATTENTION, prévient de blessures moyennes et légères. Ce symbole, associé au mot AVERTISSEMENT, prévient de dommages matériels. Ce symbole désigne des informations supplémentaires ainsi que des indications d’ordre général.
  • Seite 77 Table des matières Généralités ............75 Utilisation conforme ........78 Sécurité ..............78 Contenu de l’emballage .........81 Vue d’ensemble ..........82 Mise en marche initiale ........84 Fonctions principales ........85 Déclencher la minuterie rapide ....86 Utiliser la fonction chronomètre ....89 Utilisez la fonction réveil ........89 Sélection du type d’alarme ......91 Nettoyage ............92 Dysfonctionnement et solutions ....93...
  • Seite 78: Utilisation Conforme

    Utilisation conforme Ce minuteur numérique à fonction horloge et minuterie est destiné à un usage privé. Sécurité ‚ Cet article peut être utilisé par des enfants dès l’âge de 8 ans ainsi que par des personnes aux capacités physiques, sensorielles ou mentales limitées ou de peu d’expérience et de connaissances si ceux-ci sont sous surveillance ou ont été...
  • Seite 79 ‚ Les piles peuvent être dangereuses pour la santé en cas d’ingestion. Placez l’appareil et ses piles hors de portée des petits enfants. En cas d’ingestion des piles, consultez immédiatement un médecin. DANGER pour les enfants ‚ Tenir l’emballage à l’écart des enfants. Il existe un risque d’étouffement en cas d’ingestion.
  • Seite 80 démontées, jetées au feu ou court- circuitées. Autrement, le risque d’explosion ou de fuite augmente, par ailleurs des gaz peuvent s’échapper ! ‚ Éviter le contact du liquide de la pile avec la peau, les yeux et les muqueuses. En cas de contact, rincer immédiatement et abondamment à...
  • Seite 81: Contenu De L'emballage

    ‚ Évitez de soumettre les piles à des conditions extrêmes, par ex. en les posant sur un objet chaud ou à la lumière directe du soleil. Risque accru de fuite pour les piles ! ‚ Si besoin, nettoyer les bornes de la pile et de l’appareil avant l’insertion.
  • Seite 82: Vue D'ensemble

    Vue d’ensemble 1 Touches de commande M, S et S/S 2 Écran 3 Minuterie de 5 minutes 4 Minuterie de 3 minutes 5 Minuterie de 1 minute...
  • Seite 83 Sélecteur de fonction pour le type d’alarme Compartiment à piles pour 2x LR03 (AAA), 1,5 V Couvercle du compartiment à piles...
  • Seite 84: Mise En Marche Initiale

    Mise en marche initiale Cet appareil fonctionne à l’aide de deux piles LR03 (AAA) de 1,5 V. Pour retirer le couvercle du compartiment à piles et remplacer la pile usagée : 1. Appuyez sur la languette de verrouillage du couvercle du compartiment à piles et retirez-le.
  • Seite 85: Fonctions Principales

    ‚ Mettre l’ancienne pile au rebut dans le respect de l’environnement, voir « Mise au rebut ». Fonctions principales Réglage de l’horloge Dès que le minuteur est sous tension, « 0:00 » clignote à l’écran. ‚ Lorsque vous maintenez la touche S ou S/S enfoncée, les valeurs affichées avancent ou reculent plus rapidement.
  • Seite 86: Déclencher La Minuterie Rapide

    2. Appuyez sur la touche M. Le chiffre des minutes clignote à l’écran 3. Réglez les minutes en appuyant sur la touche S (pour avancer) ou S/S (pour reculer). 4. Appuyez sur la touche M pour terminer le réglage de l’heure. Sélection du format de l’heure −...
  • Seite 87 1. Orientez la minuterie de sorte que la durée souhaitée, indiquée sur l’appareil, soit placée sur le haut. Le compte à rebours démarre automatiquement. Une alarme retentira à la fin. 2. Appuyez sur la touche S/S pour arrêter l’alarme ou orientez le minuteur de façon à réafficher l’heure.
  • Seite 88 ‚ Le type d’alarme dépend de la position du sélecteur de fonction, voir « Sélection du type d’alarme ». Démarrer un compte à rebours particulier 1. Maintenez la touche S/S enfoncée jusqu’à ce que « 00:00 » s’affiche à l’écran. 2. Réglez les minutes à l’aide de la touche M. 3.
  • Seite 89: Utiliser La Fonction Chronomètre

    Utiliser la fonction chronomètre 1. Maintenez la touche S/S enfoncée jusqu’à ce que « 00:00 » s’affiche à l’écran. 2. Appuyez sur S/S pour démarrer, interrompre et relancer le chronométrage. Pour ramener l’affichage à « 00:00 », appuyez simultanément sur les touches M et S/S et maintenez-les enfoncées quelque temps.
  • Seite 90 2. Maintenez la touche M enfoncée jusqu’à ce que le chiffre de l’heure clignote à l’écran. 3. Réglez l’heure de réveil en appuyant sur la touche S ou S/S. 4. Appuyez sur la touche M. Le chiffre des minutes clignote à l’écran 5.
  • Seite 91: Arrêter La Sonnerie Du Réveil

    Arrêter la sonnerie du réveil À l'heure réglée, vous serez réveillé par la sonnerie. ‚ Si aucune touche n’est enfoncée, l’alarme s’éteint automatiquement au bout d’une minute. Vous serez alors réveillé le jour suivant à la même heure. ‚ Appuyez sur une touche quelconque pour interrompre l’alarme pendant 24 heures.
  • Seite 92: Nettoyage

    De la gauche vers la droite : ‚ Éclairage de l’écran, bips sonores, vibrations ‚ Éclairage de l’écran, vibrations ‚ Bips sonores ‚ Éclairage de l’écran, bips sonores Nettoyage AVERTISSEMENT Risque de dommages matériels Ne pas plonger le minuteur dans l'eau ou tout autre liquide. Ne pas utiliser de produit de nettoyage corrosif, agressif ou abrasif.
  • Seite 93: Dysfonctionnement Et Solutions

    Dysfonctionnement et solutions L’appareil ne fonctionne pas. ‚ Piles déchargées ou insérées à l’envers ? Caractéristiques techniques Modèle : Minuteur de cuisine numérique TD 1902 Piles : 2x LR03 (AAA), 1,5 V Intensité nominale : max. 82-85 mA Distributeur (n’effectuant pas les réparations) : Waagen-Schmitt GmbH Hammer Steindamm 27–29...
  • Seite 94: Déclaration De Conformité

    à tout moment. Déclaration de conformité Par la présente, Waagen-Schmitt GmbH déclare que le minuteur de cuisine numérique TD 1902 est conforme aux directives 2014/30/UE et 2011/65/UE. La déclaration perd sa validité si l’appareil subit une modification sans notre accord.
  • Seite 95: Garantie

    Garantie La société Waagen-Schmitt GmbH garantit la prise en charge gratuite, par des réparations ou par un échange, de tout dysfonctionnement résultant d’un défaut matériel ou de fabrication pendant 2 ans à compter de la date d’achat. Dans le cas où vous souhaitez faire usage de cette garantie, veuillez remettre l’article ainsi que la preuve d’achat (en indiquant les raisons de votre réclamation) à...
  • Seite 96 Mise au rebut de l’article Veuillez éliminer l’article selon les prescriptions en vigueur dans votre pays en matière de traitement des déchets. Les appareils électriques ne doivent pas être éliminés avec les déchets ménagers classiques. À la fin de sa durée de vie, l’article doit être soumis à...
  • Seite 97 Les piles et batteries ne doivent pas être éliminées avec les déchets ménagers Toutes les piles et batteries doivent être déposées dans un point de collecte de votre localité ou rapportées à leur point d’achat. Les piles et batteries seront ainsi traitées dans le respect de l’environnement.
  • Seite 98: Gentile Cliente

    Gentile cliente! La ringraziamo per aver scelto un prodotto di alta qualità della ADE che unisce funzioni intelligenti e un design fuori dal comune. Il presente contaminuti è un pratico accessorio per la cucina, il bagno, la casa e gli hobby. La lunga esperienza della ADE garantisce standard tecnici elevati e qualità...
  • Seite 99: Informazioni Generali

    Informazioni generali Informazioni sulle presenti istruzioni per l'uso Queste istruzioni per l'uso descrivono l'utilizzo sicuro e la cura del prodotto. Conservarle per eventuali consultazioni future. In caso di cessione del prodotto a terzi, consegnare anche le presenti istruzioni per l'uso. La mancata osservanza delle istruzioni per l'uso può...
  • Seite 100: Descrizione Dei Simboli

    Descrizione dei simboli Questo simbolo accompagnato dalla parola PERICOLO mette in guardia contro il rischio di gravi lesioni. Questo simbolo accompagnato dalla parola AVVERTENZA indica il rischio di lesioni di lieve o media entità. Questo simbolo accompagnato dalla parola ATTENZIONE indica il rischio di danni alle cose.
  • Seite 101 Indice dei contenuti Informazioni generali ........99 Destinazione d'uso ........102 Sicurezza ............102 Ambito della fornitura........105 Descrizione ............106 Messa in funzione .......... 108 Funzioni principali ......... 109 Misurazione di tempi brevi ......110 Cronometro ............113 Sveglia ..............113 Selezionare il tipo di allarme ......116 Pulizia ..............117 Risoluzione dei problemi ......117 Dati tecnici ............118...
  • Seite 102: Destinazione D'uso

    Destinazione d'uso Il timer digitale è stato concepito per essere utilizzato come orologio e timer di breve durata per uso privato. Sicurezza ‚ Il dispositivo può essere utilizzato da bambini con un’età superiore a 8 anni e da persone che hanno capacità fisiche, sensoriali o mentali ridotte, oppure con mancanza di esperienza o di conoscenza, solo sotto la supervisione di una persona...
  • Seite 103 superiore agli 8 anni e sotto la supervisione di una persona adulta. ‚ L'ingestione delle batterie può costituire un pericolo mortale. Tenere articolo e batterie fuori dalla portata dei bambini piccoli. In caso di ingestione delle batterie, consultare immediatamente un medico. PERICOLO per i bambini ‚...
  • Seite 104 ‚ Le batterie non devono essere ricaricate, riattivate con altri mezzi, smontate, buttate nel fuoco o messe in cortocircuito. Altrimenti, sussiste un forte rischio di esplosione o perdita e potrebbero svilupparsi vapori tossici! ‚ Evitare il contatto del liquido delle batterie con la pelle, gli occhi e le mucose.
  • Seite 105: Ambito Della Fornitura

    ‚ Durante l'inserimento e la sostituzione delle batterie, prestare attenzione alla corretta polarità (+/-). ‚ Non sottoporre le batterie a temperature estreme, ad esempio conservandole vicino a termosifoni o alla luce diretta del sole. Serio rischio di fuoriuscita di liquido! ‚ Se necessario, pulire i contatti del dispositivo e delle batterie prima di inserirle.
  • Seite 106: Descrizione

    Descrizione 1 Pulsanti di controllo M, S e S/S 2 Display 3 Timer 5 minuti 4 Timer 3 minuti 5 Timer 1 minuto...
  • Seite 107 Interruttore di funzione per il tipo di allarme Vano per 2 batterie di tipo LR03 (AAA) da 1,5 V Coperchio del vano batterie...
  • Seite 108: Messa In Funzione

    Messa in funzione Per l'uso sono necessarie due batterie da 1,5 V LR03 (AAA). Rimuovere il coperchio del vano batteria e rimuovere le vecchie batterie. 1. Spingere verso il basso la linguetta di bloccaggio del coperchio del vano batterie e rimuovere il coperchio del vano batterie.
  • Seite 109: Funzioni Principali

    Funzioni principali Impostazione dell'ora Non appena il timer viene alimentato, sul display lampeggia "0:00". ‚ Se si tiene premuto il tasto S o S/S, i valori visualizzati si spostano più velocemente in avanti o indietro. ‚ Se tra una pressione del tasto e l'altra passano più...
  • Seite 110: Misurazione Di Tempi Brevi

    2. Premere il pulsante M. La cifra dei minuti sul display lampeggia 3. Premendo il tasto S (in avanti) o S/S (indietro), impostare i minuti. 4. Premere il pulsante M; l'impostazione dell'orario è completata. Selezionare il formato dell'ora − Tenere premuto il tasto S fino a quando il display non visualizza "12 H"...
  • Seite 111 1. Ruotare il timer in modo che il periodo di tempo desiderato punti verso l'alto. Il conto alla rovescia si avvia automaticamente. Scaduto il tempo, suona un allarme. 2. Premere il tasto S/S per arrestare l'allarme o ruotare il timer per visualizzare nuovamente l'ora.
  • Seite 112 ‚ Il tipo di allarme dipende dalla posizione dell'interruttore di funzione, vedi selezione del “tipo di allarme". Avviare il conto alla rovescia personalizzato 1. Tenere premuto il tasto S/S fino a quando il display non visualizza "00:00". 2. Impostare i minuti con M . 3.
  • Seite 113: Cronometro

    Cronometro 1. Tenere premuto il tasto S/S fino a quando il display non visualizza "00:00". 2. Premere S/S per avviare, interrompere e riavviare la misurazione del tempo. Per riportare il display a "00:00", premere M e S/S contemporaneamente per un periodo di tempo più...
  • Seite 114 2. Tenere premuto il tasto M fino a quando la cifra dell'ora non lampeggia nel display. 3. Premendo il tasto S o S/S impostare l’orario della sveglia. 4. Premere il pulsante M. La cifra dei minuti sul display lampeggia. 5. Premendo il tasto S o S/S impostare i minuti della sveglia.
  • Seite 115: Interruzione Del Segnale Della Sveglia

    Interruzione del segnale della sveglia All'ora impostata per la sveglia, il dispositivo emetterà dei bip. ‚ Se non viene premuto alcun tasto, l'allarme si spegne automaticamente dopo 1 minuto. suonerà nuovamente il giorno dopo. ‚ Premere un pulsante qualsiasi per interrompere l'allarme per 24 ore.
  • Seite 116: Selezionare Il Tipo Di Allarme

    Selezionare il tipo di allarme Con la posizione dell'interruttore di funzione (lato posteriore) si seleziona il tipo di allarme del timer: Da sinistra a destra: ‚ Illuminazione del display, segnali acustici, vibrazione ‚ Illuminazione del display, vibrazione ‚ Segnale acustico ‚...
  • Seite 117: Pulizia

    Pulizia ATTENZIONE a eventuali danni al prodotto Non immergere il timer in acqua o in altri liquidi. Non utilizzare detergenti aggressivi o abrasivi. − Se necessario, spolverare il timer con un panno morbido e asciutto o pulirlo con un panno leggermente inumidito. Risoluzione dei problemi Il dispositivo non funziona.
  • Seite 118: Dati Tecnici

    Dati tecnici Modello: Contaminuti da cucina digitale TD 1902 Batterie: 2x LR03 (AAA)/1,5 V Corrente nominale: max. 82-85 mA Distributore (nessun servizio di assistenza): Waagen-Schmitt GmbH Hammer Steindamm 27-29 22089 Amburgo, Germania I nostri prodotti sono costantemente sviluppati e perfezionati. Pertanto, modifiche tecniche e nel...
  • Seite 119: Dichiarazione Di Conformità

    Dichiarazione di conformità Con la presente Waagen-Schmitt GmbH dichiara che il timer digitale per cucina TD 1902 è conforme alle direttive 2014/30/UE e 2011/65/UE. La presente dichiarazione perde ogni sua validità qualora al dispositivo vengano apportate modifiche senza la nostra autorizzazione.
  • Seite 120: Smaltimento

    Smaltimento Smaltimento dell'imballaggio Smaltire l'imballaggio nella raccolta differenziata. Conferire il cartone nella raccolta della carta e la pellicola in quella del materiale riciclabile. Smaltimento del prodotto Smaltire il prodotto secondo le norme vigenti nel proprio paese. Non smaltire il dispositivo con i normali rifiuti domestici.
  • Seite 121 In tal modo si rende possibile il riutilizzo del materiale riciclabile contenuto nell’apparecchio limitando l’impatto sull’ambiente. Smaltire l’apparecchio usato presso un centro di raccolta per rifiuti elettrici o un centro di riciclaggio. Per ulteriori informazioni rivolgersi alla ditta di smaltimento locale o alla propria amministrazione comunale.
  • Seite 122: Szanowny Kliencie

    Szanowny Kliencie! Zakupiony wysokiej jakości produkt marki ADE łączy w sobie inteligentne funkcje z wyjątkową stylistyką. Timer ten stanowi praktyczną pomoc w kuchni, łazience, gospodarstwie domowym i hobby. Wieloletnie doświadczenie marki ADE gwarantuje wysoki standard techniczny oraz sprawdzoną jakość. Życzymy przyjemności w doskonałym gospodarowaniu czasem! Zespół...
  • Seite 123: Informacje Ogólne

    Informacje ogólne O niniejszej instrukcji Niniejsza instrukcja obsługi zawiera opis bezpiecznej obsługi i pielęgnacji artykułu. Instrukcję obsługi należy przechowywać w celu jej późniejszego wykorzystania. Jeżeli produkt będzie przekazywany innej osobie, należy przekazać również tę instrukcję. Nieprzestrzeganie instrukcji obsługi może spowodować obrażenia ciała lub uszkodzenie produktu.
  • Seite 124: Objaśnienie Znaków

    Objaśnienie znaków Ten symbol w połączeniu ze słowem NIEBEZPIECZEŃSTWO ostrzega przed poważnymi obrażeniami ciała. Ten symbol w połączeniu ze słowem OSTRZEŻENIE ostrzega przed obrażeniami ciała średniego i lekkiego stopnia. Ten symbol w połączeniu ze słowem WSKAZÓWKA ostrzega przed stratami materialnymi. Ten symbol oznacza dodatkowe informacje i ogólne wskazówki.
  • Seite 125 Spis treści Informacje ogólne ......... 123 Użycie zgodne z przeznaczeniem ... 126 Bezpieczeństwo ..........126 Zakres dostawy ..........129 W skrócie ............130 Uruchomienie...........132 Funkcje podstawowe ........133 Uruchamianie odliczania (minutnik) ..135 Korzystanie ze stopera ........137 Korzystanie z funkcji budzenia ....138 Wybór rodzaju alarmu .........
  • Seite 126: Użycie Zgodne Z Przeznaczeniem

    Użycie zgodne z przeznaczeniem Timer cyfrowy jest przeznaczony do użytku prywatnego jako zegarek i minutnik. Bezpieczeństwo ‚ Ten produkt może być używany przez dzieci od 8 roku życia oraz przez osoby z ograniczonymi zdolnościami fizycznymi, sensorycznymi lub umysłowymi bądź takie, którym brakuje doświadczenia i wiedzy, tylko wtedy, gdy są...
  • Seite 127 ‚ Połknięcie baterii stanowi zagrożenie dla życia. Produkt i baterie należy przechowywać w miejscach niedostępnych dla dzieci. W razie połknięcia baterii należy natychmiast skontaktować się z lekarzem. NIEBEZPIECZEŃSTWO dla dzieci ‚ Dzieci należy trzymać z dala od opakowania. Połknięcie grozi uduszeniem. NIEBEZPIECZEŃSTWO pożaru/obrażeń...
  • Seite 128 innym przypadku grozi niebezpieczeństwo wybuchu lub wycieku kwasu z baterii bądź ulotnienia się gazów! ‚ Unikać kontaktu kwasu z baterii ze skórą, oczami oraz śluzówką. W przypadku kontaktu z kwasem z baterii natychmiast przemyć wspomniane miejsca dużą ilością czystej wody oraz niezwłocznie skontaktować...
  • Seite 129: Zakres Dostawy

    ‚ Nie przechowywać baterii w skrajnych warunkach, np. na grzejnikach lub w miejscach narażonych na bezpośrednie promieniowanie słoneczne. Podwyższone niebezpieczeństwo wycieku! ‚ W razie potrzeby wyczyścić styki urządzenia i baterii przed ich włożeniem. ‚ Nie dokonywać zmian w produkcie. Naprawy należy przeprowadzać w wykwalifikowanym serwisie.
  • Seite 130: W Skrócie

    W skrócie 1 Przyciski M, S i S/S 2 Wyświetlacz 3 Timer 5-minutowy 4 Timer 3-minutowy 5 Timer 1-minutowy...
  • Seite 131 Włącznik funkcyjny rodzaju alarmu Komora na baterie 2x LR03 (AAA), 1,5 V Pokrywa komory na baterie...
  • Seite 132: Uruchomienie

    Uruchomienie Do uruchomienia produktu niezbędne są dwie baterie typu LR03 (AAA), 1,5 V. Zdjąć pokrywę komory baterii i wyjąć zużytą baterię. 1. Nacisnąć klapkę pokrywy komory baterii do dołu i zdjąć pokrywę komory baterii. 2. Baterie ułożyć w taki sposób, jak jest to przedstawione na spodzie komory na baterie.
  • Seite 133: Funkcje Podstawowe

    ‚ Stare baterie należy utylizować zgodnie z zasadami ochrony środowiska, patrz „Utylizacja”. Funkcje podstawowe Ustawienie czasu Po włączeniu zasilania timera na wyświetlaczu będzie migać „0:00”. ‚ Jeżeli naciśniemy i przytrzymamy przycisk S lub S/S, wyświetlane wartości będą przewijały się szybciej w przód lub w tył. ‚...
  • Seite 134 1. Nacisnąć i przytrzymać przycisk M, aż na wyświetlaczu zacznie migać cyfra godzin. Naciskając przycisk S (w przód) lub S/S (w tył), ustawić godzinę. 2. Nacisnąć przycisk M. Na wyświetlaczu będzie migać cyfra minut 3. Naciskając przycisk S (w przód) lub S/S (w tył), ustawić...
  • Seite 135: Uruchamianie Odliczania (Minutnik)

    Uruchamianie odliczania (minutnik) Uruchamianie ustawionego wstępnie odliczania wstecznego W przypadku funkcji minutnika uruchomić jedno z trzech ustawionych wstępnie odliczeń wstecznych. Do wyboru są jedna, dwie lub pięć minut. 1. Przekręcić timer w taki sposób, aby żądany czas odliczania był skierowany do góry. Odliczanie wsteczne rozpocznie się...
  • Seite 136 Należy pamiętać: ‚ Jeżeli po upływie ustawionego czasu odliczania nie wykonasz żadnej czynności, alarm wyłączy się automatycznie po upływie ok. 30 sekund. Na wyświetlaczu migać będzie wtedy „00:00”. Po naciśnięciu przycisku S/S timer zostanie ustawiony ponownie na pierwotną wartość, np. „01:00”. Po naciśnięciu przycisku S/S timer uruchomi się...
  • Seite 137: Korzystanie Ze Stopera

    4. Nacisnąć przycisk S/S, aby uruchomić odliczanie, ewentualnie przerwać je i uruchomić ponownie. Aby ustawić wskazanie ponownie na „00:00”, nacisnąć i przytrzymać równocześnie przyciski M i S/S. 5. Aby ponownie wyświetlić godzinę, nacisnąć i przytrzymać przycisk S/S. Korzystanie ze stopera 1.
  • Seite 138: Korzystanie Z Funkcji Budzenia

    3. Aby ponownie wyświetlić godzinę, nacisnąć i przytrzymać przycisk S/S. Korzystanie z funkcji budzenia Ustawianie czasu budzenia 1. Nacisnąć krótko przycisk M, aby przejść do trybu ustawienia czasu budzenia (ustawienie wstępne „6:30”). 2. Nacisnąć i przytrzymać przycisk M, aż na wyświetlaczu zacznie migać...
  • Seite 139: Wyłączanie Alarmu Budzenia

    Możliwość ustawienia czasu pomiędzy 5 a 60 minut. 8. Nacisnąć przycisk M. Ustawienie godziny/ czasu drzemki jest zakończone. 9. Nacisnąć krótko przycisk S/S, w prawym górnym rogu wyświetlacza pojawi się symbol dzwonka . Funkcja budzenia jest aktywowana. Wyłączanie alarmu budzenia Przy ustawionym czasie budzenia, nastąpi ono dźwiękami pisku: ‚...
  • Seite 140: Wybór Rodzaju Alarmu

    ‚ Jeżeli naciśniesz jeden raz krótko przycisk S/S, symbol dzwonka wyświetlaczu zgaśnie: Funkcja budzenia jest wyłączona. Ponowne naciśnięcie przycisku S/S aktywuje ponownie funkcję budzenia (zwróć uwagę na wskazanie na wyświetlaczu). Wybór rodzaju alarmu Zmieniając położenie przycisku funkcyjnego (strona tylna), można wybrać rodzaj alarmu timera: Od lewej do prawej: ‚...
  • Seite 141: Czyszczenie

    ‚ podświetlenie wyświetlacza, piszczenie Czyszczenie WSKAZÓWKA dotycząca strat materialnych Nie zanurzać timera w wodzie ani w innych cieczach. Nie używać twardych, drapiących lub szorujących środków czystości. − W razie potrzeby usunąć z timera kurz miękką, suchą szmatką lub przetrzeć go lekko zwilżoną...
  • Seite 142: Dane Techniczne

    Dane techniczne Model: Cyfrowy timer kuchenny TD 1902 Bateria: 2x LR03 (AAA)/1,5 V Prąd znamionowy: max. 82-85 mA Dystrybutor (nie adres serwisu): Waagen-Schmitt GmbH Hammer Steindamm 27-29 22089 Hamburg, Niemcy Nasze produkty są stale rozwijane i usprawniane. Z tego powodu zawsze możliwe są zmiany w...
  • Seite 143: Deklaracja Zgodności

    Deklaracja zgodności Waagen-Schmitt GmbH oświadcza niniejszym, że cyfrowy timer kuchenny TD 1902 jest zgodny z dyrektywami 2014/30/UE i 2011/65/UE. Niniejsza deklaracja traci swoją ważność przy samowolnej zmianie wprowadzonej w urządzeniu bez uzgodnienia z producentem. Hamburg, styczeń 2020 r. Waagen-Schmitt GmbH...
  • Seite 144: Utylizacja

    Utylizacja Utylizacja opakowania Opakowanie należy utylizować zgodnie z jego rodzajem. Tektura i karton powinny trafić do pojemnika na papier, folia do pojemnika na surowce wtórne. Utylizacja produktu Produkt należy utylizować zgodnie z przepisami obowiązującymi w danym kraju. Urządzeń nie wolno wyrzucać razem ze zwykłymi odpadami domowymi.
  • Seite 145 Surowce wtórne znajdujące się w urządzeniu zostaną przekazane do recyklingu, co zmniejszy zanieczyszczenie środowiska. Zużyte urządzenie należy oddać do punktu zbiórki odpadów elektrycznych lub do punktu zbiórki surowców wtórnych. Więcej informacji można uzyskać od lokalnego zakładu utylizacji lub administracji gminy. Baterii i akumulatorów nie wolno wyrzucać...

Inhaltsverzeichnis