Werbung
Quicklinks
Einleitung:
Vielen Dank, dass Sie sich für ein hochwertiges be quiet! Produkt
entschieden haben. Diese Anleitung wird Ihnen beim Installationsprozess behillich
sein, und Sie Schritt für Schritt durch diesen leiten. Sollten bei der Installation
Schwierigkeiten auftreten, zögern Sie nicht, uns unter service@be-quiet.net zu
kontaktieren. Unser Customer-Service-Team steht Ihnen gerne für Fragen zur
Verfügung. be quiet! kann keinerlei Haftung für durch Kompatibilitätsprobleme
bedingte Schäden übernehmen.
Congratulations on your purchase of a high-quality be quiet!
Introduction:
product. These instructions provide step-by-step help with the installation process.
If you encounter problems during installation, please don't hesitate to contact
us at service@be-quiet.com. Our customer service team will gladly answer your
questions. be quiet! cannot assume any responsibility for damages related to
compatibility problems.
Nous vous remercions d'avoir choisi un produit de qualité be
Introduction :
quiet!. Cette notice est conçue pour vous aider à installer votre matériel. Elle vous
guidera pas à pas dans cette tâche. Si vous rencontrez des diicultés au cours de
cette installation, n'hésitez pas à nous contacter sous service@be-quiet.fr. Notre
équipe de service à la clientèle se fera un plaisir de répondre à vos questions.
be quiet! ne peut assumer la responsabilité des dommages résultants de problèmes
d'incompatibilité.
Lieferumfang / Scope of delivery / Fourniture
/ Contenido / Zestaw zawiera
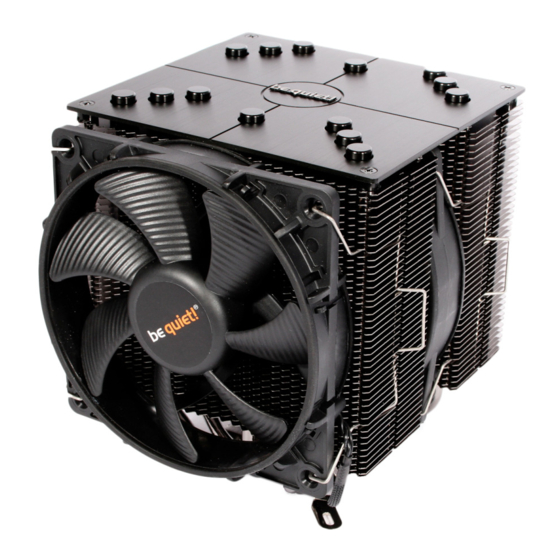
be quiet! Dark Rock Pro 2 CPU-Kühler/ be quiet! Dark Rock
Pro 2 CPU cooler / Le radiateur de CPU Dark Rock Pro 2 /
Ventilador de CPU be quiet! Dark Rock Pro 2 / chłodzenie CPU
Dark Rock Pro 2 be quiet!
SilentWings
®
Lüfter inkl. Befestigungsmaterial / SilentWings
®
fan incl. attachment materials / Ventilateur SilentWings
®
avec
matériel de ixation / Ventilador SilentWings
®
con material
de ijación / Wentylator SilentWings
wraz z elementami
®
mocującymi
Intel/AMD Backplate / Intel/AMD back plate / Plaque arrière
Intel/AMD / Placa de apoyo de Intel/AMD / backplate Intel/AMD
Intel Montagebrücken LGA1150, 1155, 1156 / Intel mounting
brackets LGA1150, 1155, 1156 / Supports de montage Intel
LGA1150, 1155, 1156 / Puentes de montaje de LGA1150, 1155,
1156 / Mostki montażowe Intel LGA1150, 1155, 1156
Intel Montagebrücken LGA1366, 775 / Intel mounting brackets
LGA1366, 775 / Supports de montage Intel LGA1366, 775 /
Puentes de montaje de Intel LGA1366, 775 / Mostki montażowe
Intel LGA1366, 775
Intel Montagebrücken LGA2011 / Intel mounting brackets
LGA2011 / Supports de montage Intel LGA2011 / Puentes de
montaje de Intel LGA2011 / Mostki montażowe Intel LGA2011
AMD Montagebrücken / AMD mounting brackets / Supports
de montage AMD /Puentes de montaje de AMD / mostki
montażowe AMD
M3x15 Schrauben / M3x15 screws / Vis M3x15 / Tornillos M3x15
/ śruby M3x15
M3x3 Schrauben / M3x3 screws / Vis M3x3 / Tornillos M3x3
/ śruby M3x3
C-Proil Distanzhalter / C proile spacers / Proilés d'entretoise
en C /Distanciador peril C / Uchwyty dystansowe o proilu C
LGA2011 Distanzmuttern / LGA2011 spacer nuts /
Écrous-entretoises pour support LGA2011 / Tuercas
distanciadoras LGA2011 / Nakrętki dystansowe LGA2011
LGA2011 Sechskant-Muttern / LGA2011 hexagonal nut /
Écrous hexagonaux pour support LGA2011 / Tuercas
hexagonales LGA2011 / Nakrętki sześciokątne LGA2011
LGA2011 Sechskant-Maulschlüssel / LGA2011 hexagonal
spanner / Clé à fourche pour les écrous 6 pans de support
LGA2011 / Llave de boca hexagonal LGA2011 / Klucz płaski
sześciokątny LGA2011
Wärmeleitpaste / Thermal paste / Pâte thermique / Pasta
conductora de calor / pasta termoprzewodząca
Instrucciones:
Muchas gracias por haber elegido un producto de calidad de
be quiet! Estas instrucciones le ayudarán en el proceso de instalación y le guiarán
paso por paso. Si se topase con diicultades durante la instalación, no dude en
contactarnos a través de service@be-quiet.net. Nuestro equipo de atención al
cliente estará encantado de ayudarle. be quiet! no asume ninguna responsabilidad
por los daños debidos a problemas de compatibilidad.
Dziękujemy, że zdecydowali się Państwo na zakup produktu
Wprowadzenie:
najwyższej jakości marki be quiet!. Niniejsza instrukcja pomoże Państwu w
procesie instalacji i poprowadzi Was przez niego krok po kroku. W razie wystąpienia
trudności podczas instalacji proszę skontaktować się z nami pod adresem
info@be-quiet.pl. W razie pytań nasz dział obsługi klienta jest do Państwa
dyspozycji. Firma be quiet! nie ponosi odpowiedzialności za uszkodzenia
spowodowane problemami z kompatybilnością.
Quantity
1
2
1
2
2
2
2
4
4
4
4
4
1
1
Installation:
ACHTUNG: Sollte Ihr Mainboard bereits über ein Retention-
Modul zur Befestigung von CPU-Kühlern verfügen, so entfernen Sie dieses
zunächst. Überprüfen Sie vor dem Einbau des Kühlers, ob sämtliche Teile zur
Installation vorhanden sind.
NOTE: If your mainboard already has a retention module for
Installation:
aixing the CPU cooler, then you must irst remove it. Please check that all parts
required for installation are on hand before attempting to install the cooler.
ATTENTION : Si la carte mère est déjà équipée d'un système de
Montage :
rétention pour la ixation d'un ventirad, commencer par le retirer. Avant de mettre
le radiateur en place, contrôler la présence de l'ensemble des pièces.
Socket
Socket
LGA2011
LGA1150, LGA1155, LGA1156
Intel LGA775/1150/1155/1156/1366 & AMD
Befestigung der Backplate:
Platzieren Sie die längeren Schrauben
beindlichen Bohrlöcher. Beachten Sie hierzu die Bohrlöcher für den jeweiligen Sockel (siehe Abbildung rechts).
Zum ixieren der Backplate auf dem Mainboard verwenden Sie anschließend die C-Proil Distanzhalter
werden seitlich an der Schraube angedrückt bis diese einrasten.
Move the long screws
through the drill holes from the rear toward the front
Installing the back plate:
of the back plate. Please mind that the correct drill hole is used for the respective socket. Then use the C-proile
to ix the back plate to the mainboard. These are pressed onto the screw from the side until they click
spacers
into place.
Placer les vis longues
à l'arrière de la plaque dans les trous perforés.
Fixation de la plaque arrière :
Observer la correspondance entre trous de montage et supports. (voir igure à droite). Pour la ixation de la
plaque arrière sur la carte mère, utiliser en dernier les proilés d'entretoisement en C
appliqués contre les vis latéralement jusqu'à encliquetage.
Fijación de placa de apoyo:
coloque los tornillos más largos
parte posterior de la placa de apoyo. Tenga en cuenta los oriicios de perforación para cada zócalo (consulte la
ilustración de la derecha). Para ijar la placa de apoyo en la placa base, utilice a continuación el distanciador de
peril C
que se aprieta lateralmente en los tornillos hasta encajar.
Mocowanie backplate:
Umieścić dłuższe śruby
w wywierconych otworach znajdujących się z tyłu
backplate. Mieć przy tym na względzie wywiercone otwory dla danego gniazda (patrz rysunek po prawej). Do
zamocowania backplate na płycie głównej należy następnie użyć uchwytów dystansowych o proilu C
Są one przyciskane bokiem do śruby, aż zaskoczą.
Beachten sie bei LGA1150/1155/1156 Mainboards, dass die Befestigung der Intel Backplate
Achtung:
innerhalb der Aussparungen der Backplate
liegen.
Note:
For LGA1150/1155/1156 mainboards, mind that the cut-outs on the back plate
to the fastening point of the intel back plate.
Avec les cartes mères à supportLGA1150/1155/1156, s'assurer que la ixation de la plaque
Attention :
arrière intel s'insère dans les découpes de celle-ci
.
Atención:
Con las placas base LGA1150/1155/1156, tenga en cuenta que la ijación de la placa de apoyo
de intel esté dentro de las ranuras de la placa de apoyo
.
W przypadku płyt głównych LGA1150/1155/1156 zwrócić uwagę na to, żeby mocowania backplate
Uwaga:
intel leżały w wyżłobieniach backplate
.
Montaje:
ATENCIÓN: Si la placa base ya dispone de un módulo de retención
para la ijación de ventiladores de CPU, retírelo primero. Antes de montar el
ventilador, compruebe que tiene todas las piezas para la instalación.
Montaż:
UWAGA: Jeśli płyta główna posiada już moduł przytrzymujący do
zamocowania schładzaczy CPU, należy go najpierw wyjąć. Przed montażem
schładzacza sprawdzić, czy obecne są wszystkie części potrzebne do instalacji.
Socket
Socket
LGA1366, LGA775
AM2(+), AM3(+), FM1, FM2
auf der Rückseite der Backplate
. Diese
( Bottom view )
. Ces derniers sont
en los oriicios de perforación de la
.
are positioned next
Socket
754, 939, 940
1366
1150/1155/1156
775
AM2(+)
AM3(+)
FM1 / FM2
754
939
940
Werbung

Verwandte Anleitungen für BE QUIET! Dark Rock Pro 2


Inhaltszusammenfassung für BE QUIET! Dark Rock Pro 2
- Seite 1 / Contenido / Zestaw zawiera be quiet! Dark Rock Pro 2 CPU-Kühler/ be quiet! Dark Rock Pro 2 CPU cooler / Le radiateur de CPU Dark Rock Pro 2 / Ventilador de CPU be quiet! Dark Rock Pro 2 / chłodzenie CPU...
- Seite 2 Intel LGA2011 Intel LGA2011 Befestigung der LGA2011 Haltevorrichtung: Schrauben Sie zuerst die Distanzmuttern Montage des CPU-Kühlers: ACHTUNG: Entfernen Sie zunächst die Schutzfolie von der Unterseite des in die Gewinde des LGA2011 Sockelrahmens. Verwenden Sie hierzu den Sechskant-Maulschlüssel Kühlers! Platzieren Sie den Kühlkörper auf der CPU. Ziehen Sie die Sechskant-Muttern mit Hilfe des Sechkant- Aixing of the LGA2011 clamping system: Maulschlüssels...