Werbung
Verfügbare Sprachen
Verfügbare Sprachen
imagePASS-M3/
Network Multi-PDL Printer Unit-M3
INSTALLATION PROCEDURE
PROCÉDURE D'INSTALLATION DE
Contrôleur Multi-PDL M3
Multi-PDL Controller M3
INSTALLATIONSVERFAHREN
Network Multi-PDL Printer Unit-M3
PROCEDURA DI INSTALLAZIONE
Network Multi-PDL Printer Unit-M3
PROCEDIMIENTO DE INSTALACIÓN
E N G L I S H
F R A N Ç A I S
D E U T S C H
I T A L I A N O
E S P A Ñ O L
Werbung
Inhaltsverzeichnis

Verwandte Anleitungen für Canon Multi-PDL M3


Inhaltszusammenfassung für Canon Multi-PDL M3
- Seite 1 Network Multi-PDL Printer Unit-M3 INSTALLATION PROCEDURE PROCÉDURE D’INSTALLATION DE Contrôleur Multi-PDL M3 Multi-PDL Controller M3 INSTALLATIONSVERFAHREN Network Multi-PDL Printer Unit-M3 PROCEDURA DI INSTALLAZIONE Network Multi-PDL Printer Unit-M3 PROCEDIMIENTO DE INSTALACIÓN E N G L I S H F R A N Ç A I S...
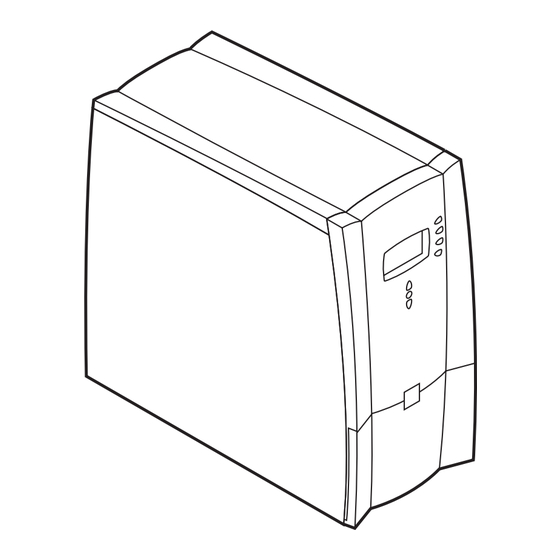
- Seite 2 1.1 Checking components 1.1.1 Unpacking and Check of Included Items Unpack the shipping box, and check to make sure that none of the following is missing: F-1-1 [1] Main unit [2] Power cable [3] Media Pack [4] Cross Ethernet cable E N G L I S H...
-
Seite 3: Installation Procedure
1.2 Installation procedure 1.2.1 Before Making Connections - Be sure there will be as much space as indicated for the installation of the machine, making sure that the Copier's back is at lest 20 cm from the closest wall: 20cm+ (8 in.) Back panel PS-M3 20cm+ (8 in.) - Seite 4 Function>Print Pages>PS Test Page/Configuration. 12) Generate a PCL Test page and a Configuration page as follows, and check to see that the output is normal. Function>Print Pages>PCL Test Page/Configuration. F-1-5 5) Turn the main unit [1] ON. F-1-6 6) When ‘Select Language’ has appeared, select the appropriate language.
- Seite 6 1.1 Checking components 1.1.1 Déballage et Vérification des Éléments Inclus Déballer la boîte de transport, et s’assurer qu’il ne manque aucun des éléments suivants: F-1-1 [1] Unité principale [2] Câble d’alimentation [3] Pack Media [4] Câble Ethernet croisé F R A N Ç A I S...
- Seite 7 1.2 Installation procedure 1.2.1 Avant d'Effectuer les Connexions S'assurer qu'il y aura assez d'espace, comme indiqué, pour l'installation de la machine, en s'assu rant que le dos de la machine est situé à au moins 20 cm du mur le plus proche : 20cm+ (8 in.) panneau arriere PS-M3...
- Seite 8 11) Créer une page de test PS et une page de Config- uration comme suit, et s’assurer que le résultat est normal. Function>Print Pages>PS Test Page/Configuration. 12) Créer une page de test PCL et une page de Config- uration comme suit, et s’assurer que le résultat est normal.
- Seite 10 1.1 Checking components 1.1.1 Entpacken und Überprüfen Sie die enthaltenen Teile Packen Sie die Versandkiste aus, und achten Sie darauf, dass keines der folgenden Elemente fehlt: F-1-1 [1] Haupteinheit [2] Stromkabel [3] Medienpaket [4] Ethernet-Kreuzkabel D E U T S C H...
- Seite 11 1.2 Installation procedure 1.2.1 Vor dem Anschließen Achten Sie bei der Installation der Maschine darauf, dass wenigstens 20 cm zwischen der R . kseite der Maschine und der nächsten Wand frei bleiben. 20cm+ (8 in.) Ruckplatte PS-M3 20cm+ (8 in.) Seitenkonsole F-1-2 1.2.2 Voreinstellungen...
- Seite 12 11) Erstellen Sie eine PS-Testseite und eine Konfigurationsseite wie folgt, und prüfen Sie, dass der Ausdruck normal ist. Function > Print Pages > PS Test Page / Configuration. 12) Erstellen Sie eine PCL-Testseite und eine Konfigurationsseite wie folgt, und prüfen Sie, dass der Ausdruck normal ist.
- Seite 14 1.1 Checking components 1.1.1 Disimballo e verifica dei componenti Aprire l’imballo e verificare che siano presenti tutti i componenti indicati di seguito: F-1-1 [1] Unità principale [2] Cavo di alimentazione [3] Pacchetto supporti [4] Cavo incrociato Ethernet I T A L I A N O...
-
Seite 15: Installazione
1.2 Installation procedure 1.2.1 Prima del l a realiz- zazione delle Assicurarsi che sia presente lo spazio minimo indicato per l'installazione della macchina, e soprattutto che il retro della macchina si trovi ad almeno 20 cm di distanza dalla parete più vicina. 20cm+ (8 in.) pannello posteriore PS-M3... - Seite 16 11) Generare una pagina di prova e una pagina di con- figurazione come segue, e verificare che la stampa sia corretta. Pages>PS Test Page/Configuration. 12) Generare una pagina di prova e una pagina di con- figurazione come segue, e verificare che la stampa sia corretta.
- Seite 18 1.1 Checking components 1.1.1 Desembalaje Abra la caja de embarque, compruebe que cuenta con todos los elementos siguientes; F-1-1 [1] Unidad principal [2] Cable de alimentación [3] Media Pack [4] Cable Ethernet cruzado E S P A Ñ O L...
-
Seite 19: Instalación
1.2 Installation procedure 1.2.1 Preparación antes de instalar Como el bosquejo áspero el espacio que instala la máquina que hace punto es garantizado. El espacio sobre los 20cm es necesario de la parte pos- terior y del lado del máquina que hace punto. 20cm+ (8 in.) Panel trasero PS-M3... - Seite 20 que aparezca la indicación «Idle» en la unidad princi- pal. 11) De la siguiente manera, genere una página de prueba PS y una página de configuración, y compruebe que sean normales. Function>Print Pages> PS Test Page/Configuration. 12) De la siguiente manera, genere una página de prueba PCL y una página de configuración, y compruebe que sean normales.
- Seite 22 PUB. F-IM-6405-000 PRINTED IN USA OR JAPAN...