Herunterladen Inhalt Inhalt Diese Seite drucken
Inhaltsverzeichnis

Werbung

Verfügbare Sprachen
  • DE

Verfügbare Sprachen

  • DEUTSCH, seite 26
Instructions for use
Gebrauchsanweisung
Instrucciones de uso
Instruções de utilização
Istruzioni per l uso
PAPI004215-INTER5 - Version 21.04
Régulateur pH
pH regulator
pH-Regler
Regulador del pH
Regulador de pH
Regolatore di pH

Werbung

Inhaltsverzeichnis
loading

Inhaltszusammenfassung für ULS PAPI004215-INTER5

  • Seite 1 Instructions for use Gebrauchsanweisung Instrucciones de uso Instruções de utilização Istruzioni per l uso Régulateur pH pH regulator pH-Regler Regulador del pH Regulador de pH Regolatore di pH PAPI004215-INTER5 - Version 21.04...
  • Seite 2: Inhaltsverzeichnis

    SOMMAIRE FRANCAIS ............................3 2. COFFRET ELECTRONIQUE ............................. 4 2.1. Première mise en service ........................... 4 2.2. Voyants ................................4 2.3. Ecran .................................. 4 2.3.1. Généralités .............................. 4 2.3.2. Affichage par défaut ..........................5 2.4. Clavier ................................5 2.5. Navigation dans les menus ..........................6 2.6.
  • Seite 3 Les visuels ci-dessous sont non contractuels. Le bidon de correcteur pH doit être suffisamment éloigné de tout autre produit chimique et de tout appareillage électrique. 1 : Capteur température (en option) 2 : Coffret électronique 3 : Filtre lesteur 4 : Pompe péristaltique 5 : Pool Terre (en option) 6 : Porte-sonde 8 : Sonde pH...
  • Seite 4: Coffret Electronique

    2. COFFRET ELECTRONIQUE 2.1. Première mise en service A la première mise sous tension du coffret électronique, effectuer la programmation ci-dessous. Menus successifs Réglages possibles Navigation Français English Deutsch Español Italiano Nederlander Pour chaque menu, sélectionner un réglage avec les Portugués touches , puis valider avec la touche OK.
  • Seite 5: Affichage Par Défaut

    2.3.2. Affichage par défaut Réglages possibles via le menu Aperçu Signification « » Mesure du pH En ligne automatique de correcteur pH est en cours. Mesure du pH Le point juste à droite de "XX.X" Tableau de bord injection automatique correcteur pH est en cours.
  • Seite 7: Fonctionnalités Générales

    2.6. Fonctionnalités générales 2.6.1. Sélection de la langue Menu Réglages possibles Réglage par défaut Français English Deutsch Español Français Italiano Nederlander Portugués 2.6.2. Menu Réglages possibles Réglage par défaut Jour / Mois / Année 01/01/01 Heure / Minute aléatoire 2.6.3. Spécification du volume de la piscine Menu Réglages possibles Réglage par défaut...
  • Seite 8: Communication Bluetooth

    2.6.5. Ajustage de la mesure Si le capteur température est désactivé, le menu ci- Menu Réglages possibles Réglage par défaut Valeur positive, Mesure actuelle de - à + 5°C par rapport à la mesure affichée, par pas de 0,5°C 2.6.6. Communication Bluetooth Menu Paramètre Fonction...
  • Seite 9: Régulation Du Ph

    2.7. Régulation du pH 2.7.1. Etalonnage de la sonde pH première mise en service de de la sonde pH : - à chaque début de saison lors de la remise en service - après chaque remplacement de la sonde pH. 1) Ouvrir les solutions étalon pH 7 et pH 10 3) Si la sonde est déjà...
  • Seite 10: Ajustage De La Mesure Ph

    2.7.4. Ajustage de la mesure pH Menu Réglages possibles Réglage par défaut De 6,5 à 7,5, par pas de 0,1 Mesure actuelle 2.7.5. Réglage de la consigne pH Menu Réglages possibles Réglage par défaut De 6,8 à 7,6, par pas de 0,1 2.7.6.
  • Seite 11: Sécurités

    2.8. Sécurités 2.8.1. Alarmes et alerte OPERATIONS AUTOMATIQUES ET IMMEDIATES CONFIGURATION AU DECLENCHEMENT SECURITES ACQUITTEMENT* PAR DEFAUT Affichage spécifique Arrêt de la régulation pH Appuyer sur la touche OK ou Alarmes Activées (appui court ou long, selon Alerte Activée * Tant qu correspondante est maintenue, et le message Possibilité...
  • Seite 12: Précautions Importantes Concernant La Pompe Péristaltique

    2.8.2. Précautions importantes concernant la pompe péristaltique Ce chapitre est applicable si le coffret électronique est muni d'un capot cachant la pompe péristaltique. Lorsque la pompe péristaltique tourne. DANS CE CAS, NE PAS RETIRER LE CAPOT DU COFFRET ELECTRONIQUE QUI RECOUVRE LA POMPE PERISTALTIQUE. Décompte temporel en temps réel.
  • Seite 13: Garantie

    3. GARANTIE Avant tout contact avec votre revendeur, merci de bien vouloir vous munir : - de - du n° de série du coffret électronique. - de la date d'installation de l'équipement. - des paramètres de votre piscine (salinité, pH, taux de chlore, température d'eau, taux de stabilisant, volume de la piscine, temps de filtration journalier, etc.).
  • Seite 14 TABLE OF CONTENTS ENGLISH 1. INSTALLATION DIAGRAM ............................. 3 2. ELECTRONICS UNIT ............................... 4 2.1. First commissioning ............................4 2.2. LEDs ..................................4 2.3. Screen ................................4 2.3.1. Overview ..............................4 2.3.2. Default display ............................5 2.4. Keypad ................................5 2.5.
  • Seite 15: Installation Diagram

    1. INSTALLATION DIAGRAM The images below are non-binding. The pH corrector container must be installed a safe distance away from any electrical device or any other chemicals. 1: Temperature sensor (optional) 2: Electronics unit 3: Filter with ballast 4: Peristaltic pump 5: Pool Terre (optional) 6: Probe holder 7: Injection connector...
  • Seite 16: Electronics Unit

    2. ELECTRONICS UNIT 2.1. First commissioning The first time you power up the electronics unit, carry out the programming below. Successive Possible settings Navigation menus French English Deutsch Español Italiano Nederlander For each menu, select a setting with the buttons, Portugués then confirm with the OK button.
  • Seite 17: Default Display

    2.3.2. Default display Possible settings Overview Meaning menu pH measurement In-line automatic pH corrector injection is in progress. pH measurement only displayed when automatic pH Dashboard corrector injection is in progress. Measures the water temperature 2.4. Keypad COMMAND KEY (depending on FUNCTION the model) Switch on the electronics unit.
  • Seite 19: General Functions

    2.6. General functions 2.6.1. Selecting the display language Menu Possible settings Default setting French English Deutsch Español French Italiano Nederlander Portugués 2.6.2. Setting the date and time Menu Possible settings Default setting Day/Month/Year 01/01/01 Hour/Minute random 2.6.3. Specification of the volume of the pool Menu Possible settings Default setting...
  • Seite 20: Calibration Of The Water Temperature Measurement

    2.6.5. Calibration of the water temperature measurement If the temperature sensor is disabled, the menu below does not appear. Menu Possible settings Default setting Positive value, Current measurement from - to + 5°C compared to the value displayed, in increments of 0.5°C 2.6.6.
  • Seite 21: Ph Regulation

    2.7. pH regulation 2.7.1. Calibrating the pH probe The original pH probe provided is already calibrated. It is therefore not necessary to calibrate the pH probe when putting the equipment into service for the first time. However, the pH sensor must be calibrated: - at the start of each season when the equipment is re-commissioned, - each time the pH probe is replaced.
  • Seite 22: Calibration Of The Ph Measurement

    2.7.4. Calibration of the pH measurement Menu Possible settings Default setting From 6.5 to 7.5, in increments of 0.1 Current measurement 2.7.5. Setting the pH setpoint Menu Possible settings Default setting From 6.8 to 7.6, in increments of 0.1 2.7.6. Manual injection Setting Menu Functions...
  • Seite 23: Safety

    2.8. Safety 2.8.1. Alarms and alerts IMMEDIATE AND AUTOMATIC OPERATIONS ON DEFAULT ACTIVATION SAFETY DISMISSAL* CONFIGURATION Specific display Stop pH regulation Press the OK or button (press Alarms Activated or press and hold, depending on Alert Activated whether it is an alarm or alert). * The corresponding alarm or alert is maintained while the detected fault remains in place, and the corresponding message reappears a few moments after dismissal.
  • Seite 24: Important Precautions Regarding The Peristaltic Pump

    2.8.2. Important precautions regarding the peristaltic pump This chapter is applicable if the electronics unit is fitted with a cover hiding the peristaltic pump. When one of the messages below is displayed, the peristaltic pump is running. IN THIS CASE, DO NOT REMOVE THE COVER OF THE ELECTRONICS UNIT COVERING THE PERISTALTIC PUMP.
  • Seite 25: Warranty

    3. WARRANTY Before contacting your dealer, please have the following to hand: - your purchase invoice. - the serial no. of the electronics unit. - the installation date of the equipment. - the parameters of your pool (salinity, pH, chlorine levels, water temperature, stabiliser level, pool volume, daily filtration time, etc.) We have used every effort and all our technical experience to design this equipment.
  • Seite 26 INHALTSVERZEICHNIS DEUTSCH 1. INSTALLATIONSSCHEMA .............................. 3 2. SCHALTKASTEN................................4 2.1. Erste Inbetriebnahme ............................4 2.2. Leuchtanzeigen ..............................4 2.3. Display ................................4 2.3.1. Allgemeines ............................. 4 2.3.2. Standardanzeige ............................5 2.4. Tastatur ................................5 2.5. Navigation in den Menüs ........................... 6 2.6.
  • Seite 27: Installationsschema

    1. INSTALLATIONSSCHEMA Die folgenden Abbildungen sind nicht vertraglich bindend. Der Kanister mit dem pH-Korrekturmittel muss in ausreichender Entfernung von allen anderen chemischen Produkten und elektrischen Geräten gelagert werden. 1 : Temperatursensor (optional) 2: Schaltkasten 3: Ballastfilter 4 : Peristaltikpumpe 5: Pool-Erdung (optional) 6: Sondenträger 7: Injektionsverbindung 8 : pH-Sonde...
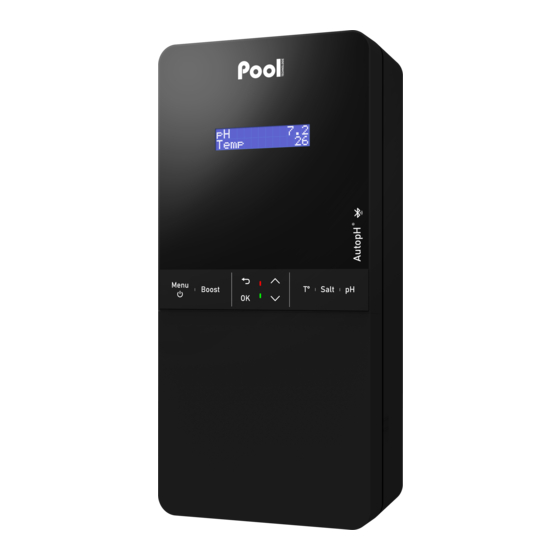
  • Seite 28: Schaltkasten

    2. SCHALTKASTEN 2.1. Erste Inbetriebnahme Beim erstmaligen Einschalten des Schaltkastens die untenstehende Programmierung durchführen. Aufeinanderfolgende Verfügbare Einstellungen Navigation Menüs Français English Deutsch Español Italiano Nederlander Wählen Sie für jedes Menü eine Einstellung mit den Portugués Tasten und bestätigen Sie dann mit der Taste 10 bis 160 m3, in Schritten von 10 m3 Tag / Monat / Jahr...
  • Seite 29: Standardanzeige

    2.3.2. Standardanzeige Verfügbare Einstellungen über das Menü Übersicht Bedeutung " " Messung des pH-Werts In Reihe Der Punkt rechts neben "pH" wird nur angezeigt, wenn eine automatische Einspritzung des pH-Korrekturmittels läuft. Messung des pH-Werts Der Punkt rechts neben "XX.X" wird angezeigt, wenn eine...
  • Seite 31: Allgemeine Funktionen

    2.6. Allgemeine Funktionen 2.6.1. Auswahl der Anzeigesprache Menü Verfügbare Einstellungen Standardeinstellung Deutsch English Deutsch Español Deutsch Italiano Nederlander Portugués 2.6.2. Einstellung des Datums und der Uhrzeit Menü Verfügbare Einstellungen Standardeinstellung Tag / Monat / Jahr 01.01.01 Stunde / Minute zufällig 2.6.3.
  • Seite 32: Anpassung Der Wassertemperaturmessung

    2.6.5. Anpassung der Wassertemperaturmessung Wenn der Temperatursensor deaktiviert ist, wird das unten stehende Menü nicht angezeigt. Menü Verfügbare Einstellungen Standardeinstellung Positiver Wert, von - bis + 5°C im Verhältnis zum angezeigten Messwert, Aktuelle Messung in Schritten von 0,5°C 2.6.6. Bluetooth Kommunikation Menü...
  • Seite 33: Ph-Wert-Regulierung

    2.7. pH-Wert-Regulierung 2.7.1. Kalibrierung der pH-Sonde Die im Lieferumfang enthaltene Original-pH-Sonde ist bereits kalibriert. Daher ist es nicht erforderlich, bei der ersten Inbetriebnahme des Gerätes eine Kalibrierung der pH-Sonde durchzuführen. Allerdings ist es zwingend erforderlich, eine Kalibrierung der pH-Sonde durchzuführen: - zu Beginn jeder Saison bei der Wiederinbetriebnahme.
  • Seite 34: Anpassung Der Ph-Wert-Messung

    2.7.4. Anpassung der pH-Wert-Messung Menü Verfügbare Einstellungen Standardeinstellung 6,5 bis 7,5, in Schritten von 0,1 Aktuelle Messung 2.7.5. Einstellung des pH-Sollwerts Menü Verfügbare Einstellungen Standardeinstellung 6,8 bis 7,6, in Schritten von 0,1 2.7.6. Manuelle Einspritzung Verfügbare Einstellung Menü Funktionen Anweisungen Einstellungen standardmäßig Um eine Einspritzung zu...
  • Seite 35: Sicherheitsfunktionen

    2.8. Sicherheitsfunktionen 2.8.1. Alarme und Warnung AUTOMATISCHE UND SOFORTIGE VORGÄNGE BEI AUSLÖSUNG SICHERHEITSVORRICHTUNGEN STANDARDKONFIGURATION BESTÄTIGUNG* Stoppen der Spezifische pH-Wert- Anzeige Regulierung Drücken Sie die Alarme Aktiviert Taste OK oder (je nach Alarm oder Warnung Aktiviert Nein Warnung kurz oder lange drücken). * Solange ein erkannter Fehler besteht, wird der entsprechende Alarm oder die Warnung aufrechterhalten und die entsprechende Meldung erscheint einige Augenblicke nach der Bestätigung erneut.
  • Seite 36: Wichtige Vorsichtsmaßnahmen Bezüglich Der Peristaltikpumpe

    2.8.2. Wichtige Vorsichtsmaßnahmen bezüglich der Peristaltikpumpe Dieses Kapitel ist zu beachten, wenn der Schaltkasten mit einer Abdeckung ausgestattet ist, die die Peristaltikpumpe abdeckt. Wenn eine der folgenden Meldungen angezeigt wird, arbeitet die Peristaltikpumpe. IN DIESEM FALL NICHT DIE ABDECKUNG DES SCHALTKASTENS ENTFERNEN, DIE DIE PERISTALTIKPUMPE ABDECKT. Zeit-Countdown in Echtzeit.
  • Seite 37: Garantie

    3. GARANTIE Bevor Sie sich an Ihren Fachhändler wenden, halten Sie bitte Folgendes bereit: - Ihre Kaufrechnung. - Die Seriennummer des Schaltkastens. - Das Datum der Installation des Geräts. - Die Parameter Ihres Beckens (Salzgehalt, pH-Wert, Chlorgehalt, Wassertemperatur, Stabilisatorgehalt, Fassungsvermögen des Pools, tägliche Filtrationszeit usw.).
  • Seite 38 ÍNDICE ESPAÑOL 1. DIAGRAMA DE INSTALACIÓN ............................3 2. CUADRO ELÉCTRICO ..............................4 2.1. Primera puesta en funcionamiento ........................4 2.2. Pilotos ................................4 2.3. Pantalla ................................4 2.3.1. Cuestiones generales ..........................4 2.3.2. Visualización por defecto ........................5 2.4. Teclado ................................
  • Seite 39: Diagrama De Instalación

    1. DIAGRAMA DE INSTALACIÓN Las imágenes siguientes no son contractuales. El bidón de corrector de pH debe estar suficientemente alejado de todos los productos químicos y todos los aparatos eléctricos. 1 : Captador de temperatura (opcional) 2 : Cuadro eléctrico 3 : Filtro de lastre 4 : Bomba peristáltica 5 : Pool Terre (opcional)
  • Seite 40: Cuadro Eléctrico

    2. CUADRO ELÉCTRICO 2.1. Primera puesta en funcionamiento Al conectar el cuadro eléctrico por primera vez, llevar a cabo la programación que se indica a continuación. Menús sucesivos Ajustes posibles Navegación Francés English Deutsch Español Italiano Nederlander Para cada menú, hay que seleccionar un valor con las Portugués teclas y confirmar con la tecla OK.
  • Seite 41: Visualización Por Defecto

    2.3.2. Visualización por defecto Ajustes posibles a través del menú Vista Significado « » Medición del pH El punto que se encuentra justo a la derecha de "pH" se visualiza En línea únicamente cuando hay una inyección automática de corrector de pH en curso.
  • Seite 43: Funciones Generales

    2.6. Funciones generales 2.6.1. Selección del idioma de la interfaz Menú Ajustes posibles Ajuste predeterminado Francés English Deutsch Español Francés Italiano Nederlander Portugués 2.6.2. Ajuste de la fecha y la hora Menú Ajustes posibles Ajuste predeterminado Día / Mes / Año 01/01/01 Hora / Minutos aleatorio...
  • Seite 44: Ajuste De La Medición De La Temperatura Del Agua

    2.6.5. Ajuste de la medición de la temperatura del agua Si el captador de temperatura está desactivado, no aparecerá el siguiente menú. Menú Ajustes posibles Ajuste predeterminado Valor positivo, de - a + 5°C con respecto a la medición visualizada, Medición actual en intervalos de 0,5°C 2.6.6.
  • Seite 45: Regulación Del Ph

    2.7. Regulación del pH 2.7.1. Calibración de la sonda de pH La sonda PH suministrada ya está calibrada. Por tanto, no es necesario efectuar una calibración la primera vez que se ponga en marcha el equipo. Sin embargo, es obligatorio realizar la calibración de la sonda de pH: - en cada inicio de temporada durante la nueva puesta en marcha del equipo.
  • Seite 46: Ajuste De La Medición Ph

    2.7.4. Ajuste de la medición pH Menú Ajustes posibles Ajuste predeterminado De 6,5 a 7,5, en intervalos de 0,1 Medición actual 2.7.5. Ajuste del punto de consigna pH Menú Ajustes posibles Ajuste predeterminado De 6,8 a 7,6, en intervalos de 0,1 2.7.6.
  • Seite 47: Seguridad

    2.8. Seguridad 2.8.1. Alarmas y alertas OPERACIONES AUTOMÁTICAS E CONFIGURACIÓN INMEDIATAS AL ACTIVARSE SEGURIDAD CANCELACIÓN* PREDETERMINADA Visualización Parada de la específica regulación del pH Pulsar en la tecla OK o Alarmas Activadas Sí (pulsación breve o prolongada en Alerta Activada función de la alarma o alerta).
  • Seite 48: Precauciones Importantes Relativas A La Bomba Peristáltica

    2.8.2. Precauciones importantes relativas a la bomba peristáltica Este capítulo es aplicable si el cuadro eléctrico dispone de una tapa que oculta la bomba peristáltica. Cuando aparece uno de los mensajes siguientes, la bomba peristáltica está en funcionamiento. EN ESTE CASO, NO RETIRAR LA TAPA DEL CUADRO ELÉCTRICO QUE CUBRE LA BOMBA PERISTÁLTICA.
  • Seite 49: Garantía

    3. GARANTÍA Antes de ponerse en contacto con su distribuidor, tenga a mano: - la factura de compra; - el número de serie del cuadro eléctrico; - la fecha de instalación del equipo; - los parámetros de su piscina (salinidad, pH, índice de cloro, temperatura del agua, índice de estabilizante, volumen de la piscina, tiempo de filtrado diario, etc.).
  • Seite 50 ÍNDICE PORTUGUÊS 1. ESQUEMA DE INSTALAÇÃO ............................3 2. QUADRO ELETRÓNICO ..............................4 2.1. Primeira colocação em funcionamento ......................4 2.2. Indicadores luminosos ............................4 2.3. Visor ................................... 4 2.3.1. Observações gerais ..........................4 2.3.2. Visualização predefinida .......................... 5 2.4. Teclado ................................
  • Seite 51: Esquema De Instalação

    1. ESQUEMA DE INSTALAÇÃO As imagens abaixo não são contratuais. O recipiente de corretor de pH deverá estar suficientemente afastado de qualquer produto químico e de qualquer aparelhagem elétrica. 1: Sensor de temperatura (opcional) 2: Quadro eletrónico 3: Filtro lastrador 4: Bomba peristáltica 5: Ligação à...
  • Seite 52: Quadro Eletrónico

    2. QUADRO ELETRÓNICO 2.1. Primeira colocação em funcionamento Na primeira ligação sob tensão do quadro eletrónico, efetuar a programação abaixo. Menus Ajustes possíveis Navegação sucessivos Français English Deutsch Español Italiano Nederlander Para cada menu, selecionar um ajuste com as Português teclas , e validar com a tecla OK.
  • Seite 53: Visualização Predefinida

    2.3.2. Visualização predefinida Ajustes possíveis através do Pré-visualização Significado menu « » Medição do pH Online O ponto imediatamente à direita de «PH» surge apenas quando uma injeção automática do corretor de pH está em curso. Medição do pH O ponto à direita de «XX.X» surge apenas quando injeção...
  • Seite 55: Funcionalidades Gerais

    2.6. Funcionalidades gerais 2.6.1. Seleção do idioma de visualização Menu Ajustes possíveis Ajuste predefinido Français English Deutsch Español Français Italiano Nederlander Português 2.6.2. Ajuste da data e hora Menu Ajustes possíveis Ajuste predefinido Dia/Mês/Ano 01/01/01 Hora/Minuto aleatório 2.6.3. Especificação do volume da piscina Menu Ajustes possíveis Ajuste predefinido...
  • Seite 56: Ajuste Da Medição Da Temperatura Da Água

    2.6.5. Ajuste da medição da temperatura da água Se o sensor de temperatura estiver desativado, o menu abaixo não aparece. Menu Ajustes possíveis Ajuste predefinido Valor positivo, Medição atual de - a + 5°C relativamente à medição exibida, por incrementos de 0,5°C 2.6.6.
  • Seite 57: Ajuste Do Ph

    2.7. Ajuste do pH 2.7.1. Calibração da sonda de pH A sonda de pH fornecida de origem já está calibrada. Por conseguinte, não é necessário efetuar uma calibração na primeira colocação em funcionamento do equipamento. No entanto, é obrigatório efetuar uma calibração da sonda pH: - a cada início de estação, aquando da colocação em funcionamento do equipamento.
  • Seite 58: Ajuste Da Medição Do Ph

    2.7.4. Ajuste da medição do pH Menu Ajustes possíveis Ajuste predefinido De 6,5 a 7,5, por incrementos de 0,1 Medição atual 2.7.5. Ajuste da definição de pH Menu Ajustes possíveis Ajuste predefinido De 6,8 a 7,6, por incrementos de 0,1 2.7.6.
  • Seite 59: Seguranças

    2.8. Seguranças 2.8.1. Alarmes e alertas OPERAÇÕES AUTOMÁTICAS E CONFIGURAÇÃO IMEDIATAS À DESATIVAÇÃO SEGURANÇA RECONHECIMENTO* PREDEFINIDA Visualização Paragem do específica ajuste de pH Prima a tecla OK ou Alarmes Ativados (carregar uma vez ou durante alguns segundos Alerta Ativado Não de acordo com o alarme ou alerta).
  • Seite 60: Precauções Importantes Relativas À Bomba Peristáltica

    2.8.2. Precauções importantes relativas à bomba peristáltica Este capítulo aplica-se se o quadro eletrónico possuir uma tampa que oculte a bomba peristáltica. Quando surgir uma das mensagens abaixo, a bomba peristáltica está em funcionamento. NESTE CASO, NÃO RETIRE A TAMPA DO QUADRO ELETRÓNICO QUE COBRE A BOMBA PERISTÁLTICA. Contagem temporal em tempo real.
  • Seite 61: Garantia

    3. GARANTIA Antes de entrar em contacto com o seu revendedor, agradecemos que tenha consigo: - a sua fatura de compra. - o n.º de série do quadro eletrónico. - a data de instalação do equipamento. - as configurações da sua piscina (salinidade, pH, taxa de cloro, temperatura da água, taxa de estabilizante, volume da piscina, tempo de filtração diário, etc.).
  • Seite 62 INDICE ITALIANO 1. SCHEMA D'INSTALLAZIONE ............................3 2. CENTRALINA ELETTRONICA ............................4 2.1. Prima messa in funzione ............................ 4 2.2. Spie luminose ..............................4 2.3. Schermo ................................4 2.3.1. Informazioni generali..........................4 2.3.2. Visualizzazione predefinita ........................5 2.4. Tastiera ................................5 2.5.
  • Seite 63: Schema D'installazione

    1. SCHEMA D'INSTALLAZIONE Le immagini sottostanti non sono contrattualmente vincolanti. Il barile correttore pH deve essere sufficientemente distante da qualsiasi altro prodotto chimico e da qualsiasi apparecchiatura elettrica. 1: Sensore temperatura (optional) 2: Centralina elettronica 3: Filtro zavorrato 4: Pompa peristaltica 5: Pool Terra (optional) 6: Porta sonda 7: Raccordo di iniezione...
  • Seite 64: Centralina Elettronica

    2. CENTRALINA ELETTRONICA 2.1. Prima messa in funzione Alla prima accensione della centralina elettronica, effettuare la programmazione indicata qui di seguito. Menu successivi Regolazioni possibili Navigazione Français English Deutsch Español Italiano Nederlands Per ogni menu, selezionare una regolazione con i tasti Portugués , quindi convalidare con il tasto OK.
  • Seite 65: Visualizzazione Predefinita

    2.3.2. Visualizzazione predefinita Regolazioni possibili tramite il menu Anteprima Significato " " Valore del pH Per riga Il punto giusto a destra di "pH" viene visualizzato solamente quando una iniezione automatica di correttore pH è in corso. Valore del pH Il punto giusto a destra di "XX.X viene visualizzato...
  • Seite 67: Funzionalità Generali

    2.6. Funzionalità generali 2.6.1. Selezione della lingua di visualizzazione Menu Regolazioni possibili Regolazione predefinita Français English Deutsch Español Français Italiano Nederlands Portugués 2.6.2. Regolazione della data e dell'ora Menu Regolazioni possibili Regolazione predefinita Giorno / Mese / Anno 01/01/01 Ora / Minuti aleatoria 2.6.3.
  • Seite 68: Regolazione Della Misura Della Temperatura Dell'acqua

    2.6.5. Regolazione della misura della temperatura dell'acqua Se il sensore temperatura è disattivato, il menu sottostante non viene visualizzato. Menu Regolazioni possibili Regolazione predefinita Valore positivo, da - a + 5 °C rispetto al valore visualizzato, Valore attuale per incrementi/decrementi di 0,5 °C 2.6.6.
  • Seite 69: Regolazione Del Ph

    2.7. Regolazione del pH 2.7.1. Calibrazione della sonda pH La sonda pH fornita in origine è già calibrata. Non è quindi necessario effettuare una calibrazione al momento della prima messa in funzione dell'apparecchiatura. Tuttavia, è obbligatorio effettuare una calibrazione della sonda pH: - a ogni inizio di stagione al momento della rimessa in funzione dell'apparecchiatura.
  • Seite 70: Regolazione Del Valore Del Ph

    2.7.4. Regolazione del valore del pH Menu Regolazioni possibili Regolazione predefinita Da 6,5 a 7,5, per incrementi/decrementi di 0,1 Valore attuale 2.7.5. Regolazione del valore del pH Menu Regolazioni possibili Regolazione predefinita Da 6,8 a 7,6, per incrementi/decrementi di 0,1 2.7.6.
  • Seite 71: Sicurezze

    2.8. Sicurezze 2.8.1. Allarmi e avviso OPERAZIONI AUTOMATICHE E IMMEDIATE ALL'ATTIVAZIONE CONFIGURAZIONE SICUREZZE CONFERMA RICEZIONE* PREDEFINITA Visualizzazione Arresto della specifica regolazione pH Premere il tasto OK oppure Allarmi Attivi Sì (pressione breve o prolungata a seconda che si Avviso lanciato tratti di un allarme o un avviso).
  • Seite 72: Precauzioni Importanti Relative Alla Pompa Peristaltica

    2.8.2. Precauzioni importanti relative alla pompa peristaltica Questo capitolo è applicabile se la centralina elettronica è dotata di un coperchio che nasconde la pompa peristaltica. Quando viene visualizzato uno dei messaggi sottostanti, la pompa peristaltica gira. IN QUESTO CASO, NON RIMUOVERE IL COPERCHIO DELLA CENTRALINA ELETTRONICA CHE COPRE LA POMPA PERISTALTICA.
  • Seite 73: Garanzia

    3. GARANZIA Prima di contattare il rivenditore, premunirsi: - della fattura d'acquisto - del n° di serie della centralina elettronica - della data di installazione dell'apparecchiatura - dei parametri della piscina (salinità, pH, tasso di cloro, temperatura dell'acqua, tasso di stabilizzante, volume della piscina, tempo di filtrazione giornaliero, ecc.).

Inhaltsverzeichnis