Herunterladen Inhalt Inhalt Diese Seite drucken
LENSHOOKE X1 PRO Benutzerhandbuch
Vorschau ausblenden Andere Handbücher für X1 PRO:
Inhaltsverzeichnis

Werbung

Verfügbare Sprachen
  • DE

Verfügbare Sprachen

  • DEUTSCH, seite 39
X1 PRO
Semen Quality Analyzer
English
User Manual
Deutsche
Benutzerhandbuch
日本語
ユーザーマニュアル
Italiano
Manuale d'uso
Português
Manual do usuário

Werbung

Inhaltsverzeichnis
loading

Inhaltszusammenfassung für LENSHOOKE X1 PRO

  • Seite 1 X1 PRO Semen Quality Analyzer English User Manual Deutsche Benutzerhandbuch 日本語 ユーザーマニュアル Italiano Manuale d'uso Português Manual do usuário...
  • Seite 2 Semen Quality Analyzer User Manual X1 PRO Rev.29-0X10003 20210219X1E003...
  • Seite 3 Please read this user manual carefully first, to ensure proper use of the product. This user manual is also available at www.LENSHOOKE.com. Symbols The following icons may appear in the content of this user manual. Symbol for “NOTICE” Symbol for “CAUTION”...
  • Seite 4: Inhaltsverzeichnis

    Table of Contents ............................Introduction Intended Use ......................................................III. Product Overview ............................Consumables ............................. Major Function ............................Accessories ............................. Getting Started VII........................Cleaning & Maintenance VIII............................Error Message ........................Analyzer Specifications .............................. Reference ............................. Statement XII........................XIII.
  • Seite 5: Introduction

    I. Introduction LensHooke X1 PRO Semen Quality Analyzer is for in vitro diagnostic only. The user should read this User ® Manual first, to get familiar with the device and its proper operation procedure prior to use the analyzer. “LensHooke Semen Test Cassette”...
  • Seite 6: Product Overview

    III. Product Overview LensHooke X1 PRO Semen Quality Analyzer ® Top View 140.00mm Front View Rear View Touch Screen USB Port Test Cassette Insert Slot USB Port Power Button HDMI Port Reset Button Power Adaptor Port NOTE USB Port : USB 2.0 Reset Button : If the analyzer crashes, please use a pin to press the reset button.
  • Seite 7 Touch Screen Icon 1 2 3 4 5 2019/11/01 21:42 HDMI connection icon: This analyzer is connected to monitor by a HDMI port. USB connection icon: This analyzer is connected to a USB Drive. Thermal Receipt Printer connection icon: This analyzer is connected to a Thermal Receipt Printer. Power Adaptor connection icon: This analyzer is connected to a power adaptor.
  • Seite 8: Consumables

    X QC Beads (For Semen) X QC Reticle (For Semen) LensHooke ® X QC Video (For Semen) The result might be inaccurate, if you DO NOT use the LensHooke Semen Test Cassette or ® LensHooke X QC series products. ®...
  • Seite 9: Major Function

    V. Major Function LensHooke X1 PRO Semen Quality Analyzer ® Turn on / off Turning on the analyzer: Push the power button down for 2 seconds to turn on the analyzer (as Image 1). When the touch screen lights up (as Image 2), the analyzer is ready to operate.
  • Seite 10 2. Check if the analyzer is under the normal operating environment. 3. Check battery status. If the battery is low, connect the power adaptor before testing. Prepare the Sample Refer to the LensHooke Semen Test Cassette user manual to prepare the sample. ®...
  • Seite 11 Test the Sample New Test Step 1. Select the “New Test” icon. Step 2. Please input the patient ID number and select the “ ” icon to go to the next step. 2019/11/01 21:42 2019/11/01 21:42 NOTE DO NOT exceed 20 characters and symbols for the patient ID#. If you want to input a letter, please hold the icon for around 1 second and select the letter.
  • Seite 12 2019/11/01 21:42 2019/11/01 21:42 NOTE Please select to adjust the semen volume. DO NOT move the cassette or analyzer during the results calculation. Step 4. Insert the test cassette (with sample) into the slot and push it to the end. 2019/11/01 21:42 Review the Test Result Recent Tests...
  • Seite 13: Quality Control

    Quality Control (1) Select “Utilities” and then select the “Quality Control” icon. 2019/11/01 21:42 2019/11/01 21:42 (2) Please input the LOT number on the label of the LensHooke X QC Beads (For Semen) or ® LensHooke X QC Reticle (For Semen) or LensHooke X QC Video (For Semen).
  • Seite 14 ® ® Reticle (For Semen) or LensHooke X QC Video (For Semen) to operate and then insert the ® cassette into the “Insert Slot” or insert the LensHooke X QC Video USB into USB Port. ® 2019/11/01 21:42 2019/11/01 21:42...
  • Seite 15 X QC Reticle (For Semen), the ® analyzer will show the message as below to warn you, and vice versa. If N/A shows on the result screen, it means that the LensHooke X QC Beads (For Semen) or ® LensHooke X QC Reticle (For Semen) is expired.
  • Seite 16 Backup All Records (1) Prepare a USB Drive in advance. (Capacity : 1GB or more) (2) Select “Utilities” and then select “Backup All Records”. 2019/11/01 21:42 2019/11/01 21:42 (3) Insert the USB Drive. When the “Backup” icon turns blue, select it to backup the records. 2019/11/01 21:42 2019/11/01 21:42 When the records have been backed up to your USB Drive successfully, select the “OK”...
  • Seite 17: System Update

    System Update (1) Prepare the a USB Drive with system update software. (Capacity : 1GB or more) (Please contact with your local distributor for the system update software). (2) Select “Utilities” and then select the “System Update” icon. 2019/11/01 21:42 2019/11/01 21:42 Please connect the device with the power adaptor, and plug the USB Drive with the update file into the analyzer.
  • Seite 18 NOTE If the ‘‘Update File is Corrupted’’ warning message appears on the screen, it means you did not download the complete file. Please download the system update file again to the USB Drive and redo the system update. If the ‘‘Update Failed’’ warning message appears on the screen, it means the USB Drive for system update has been removed, please insert the USB Drive with system update file again to redo the system update.
  • Seite 19 (2) Select the yellow ‘‘Delete’’ icon to confirm and delete all the records. 2019/11/01 21:42 2019/11/01 21:42 (3) Select the ‘‘OK’’ icon to return to the previous page. 2019/11/01 21:42 2019/11/01 21:42 NOTE The records cannot be recovered after you delete them. Make sure you want to delete them perma- nently before selecting the ‘‘Delete’’...
  • Seite 20 (3) Select the “Insert” icon and wait until the message of “Insert successfully!” appears on the screen. 2019/11/01 21:42 2019/11/01 21:42 2019/11/01 21:42 NOTE The LOGO image must be in PNG format by 2040x168 pixels, and file has to be named “lenshooke_X1_pdf_logo.png”.
  • Seite 21: Network Connection

    Date & Time (1) Select “Settings” and then select the “Date & Time” icon. 2019/11/01 21:42 2019/11/01 21:42 (2) You can select the format of the date by selecting the icon “ ” or “ ”, and adjust date & time by selecting “...
  • Seite 22 The default setting is “Automatic”. When you choose this icon, the device use dynamic IP address, which is assigned when the network is connected and changes over time. 2019/11/01 21:42 (4) If you want to change to the static IP address, please select “Manual” and then select “IP address”, “Subnet Mask”, “Gateway”...
  • Seite 23 (2) Select “Admin Password” icon. Switch on “ ” of Admin Password to secure your access. 2019/11/01 21:42 2019/11/01 21:42 Input any six characters as your new Admin Password, and then select the “ ” icon to go to the next step. Please input the six characters again to verify the new Admin Password. 2019/11/01 21:42 2019/11/01 21:42 6 characters...
  • Seite 24 LAN Password (1) Select “Settings” and then select the “Access Password” icon. 2019/11/01 21:42 2019/11/01 21:42 Select the “LAN Password” icon, and the password will appear on the screen. If you want to change this LAN Password, you can select “Change”. 2019/11/01 21:42 2019/11/01 21:42 Input any six-digit numeric code to set up the new password.
  • Seite 25 Brightness (1) Select “Settings” and then select the “Brightness” icon. 2019/11/01 21:42 2019/11/01 21:42 (2) Adjust the brightness of the screen by selecting “ ” or “ ”, and then select the “ ” icon to return to the previous page. 2019/11/01 21:42 2019/11/01 21:42 Language...
  • Seite 26: Accessories

    VI . Accessories License Dongle To Refill the License When you unpack the LensHooke Semen Test Cassette box, you will find the license dongle on ® the top. (2) Please check if the test cassette type is correct before you insert the dongle to refill the license.
  • Seite 27 Once the license dongle has been used with the analyzer, it cannot be used again. If you insert this dongle again, the dongle error message will appear on the screen. 2019/11/01 21:42 Please insert the dongle to refill the license immediately after unpacking the box of the LensHooke ® Semen Test Cassette.
  • Seite 28 Please use one of the following browers to access the login page. - Firefox (Ver: 62 or more), Chrome (Ver: 69 or more), Microsoft Edge for Window 10, and Safari...etc. (Please refer to www.LensHooke.com for more details.) Only support iPad, PC or laptop.
  • Seite 29: Barcode Scanner

    To connect the Barcode Scanner to the Analyzer Please connect the barcode scanner to the the analyzer using the USB Port. The barcode scanner to input the patient's ID or the LOT of LensHooke X QC Beads (For Semen), ®...
  • Seite 30: Getting Started

    Cleaning Wipe is single-use only. DO NOT reuse. ® Keep LensHooke X1 PRO Semen Quality Analyzer away from dust, water or any liquids, and ® extreme environment (which is beyond the operation or storage environment stated in the specifi- cation).
  • Seite 31 I. Test Cassette Insert Slot: Turn off the analyzer before cleaning. Prepare 2 pcs of LensHooke Cleaning Wipe. ® Please drop 4 drops of the 75% alcohol for each 2 sides of a LensHooke Cleaning Wipe. ® FLIP DROPS DROPS...
  • Seite 32 Allow surface to remain wet for 2 minute. Allow to air dry. Your LensHooke X1 PRO Semen Quality Analyzer has been tested to ensure that there is no change ® in performance or external materials of the analyzer after 10,950 cleaning cycles and 10,950 disinfecting cycles.
  • Seite 33: Error Message

    Please remove the test cassette and select the “OK” icon to return to home page. Please insert another new test cassette redo the action. If this message still appears, contact our customer service. *Make sure you're using correct LensHooke Semen ® Test Cassette. Error 4: 2019/11/01 21:42 Software Error.
  • Seite 34: Analyzer Specifications

    X. Analyzer Specifications Analyzer name Power adaptor: LensHooke X1 PRO Semen Quality Analyzer Input: 100~240 Vac, 50~60 Hz,0.5 A ® Output: 5 Vdc, 2 A Max Control panel Operation environment 3.5-in resistive touch screen Temperature 15°C ~ 38°C (59°F ~ 100°F) External power input Humidity <70%...
  • Seite 35: Statement

    Avoid strangulation resulting from baby or child entanglement in monitoring cables. Avoid choking resulting from a child swallowing a small part. The test result is followed WHO Laboratory Manual for the Examination and Processing of Human Semen. Please refer to the user manual of LensHooke Semen Test Cassette. ®...
  • Seite 36: Warranty

    XIV. Warranty Bonraybio offers a one-year warranty from the day you purchase the LensHooke X1 PRO Semen ® Quality Analyzer. During the warranty period, we will repair or replace the analyzer free of charge. The warranty only applies to the original LensHooke X1 PRO Semen Quality Analyzer from Bonraybio.
  • Seite 38 Semen Quality Analyzer Benutzerhandbuch X1 PRO Rev.29-0X10300 20210226X1E003DE...
  • Seite 39: Lieferumfang

    Bitte lesen Sie sich diese Bedienungsanleitung sorgfältig durch, um die optimale Funktionalität des Gerätes zu gewährleisten. This user manual is also available at www.LENSHOOKE.com. Symbole Folgende Symbole können in dieser Bedienungsanleitung verwendet werden: Hinweis Vorsicht Seitenzahl Nicht zur Wiederverwendung Verwendbar bis...
  • Seite 40 Inhalt Einführung ............................Verwendungszweck ..........................III. Produktübersicht ..........................Verbrauchsmaterial ..........................Hauptfunktionen ........................... Zubehör ..............................VII. Erste Schritte ............................VIII. Reinigung und Wartung ........................Fehlermeldungen ..........................Spezifikationen ............................. Referenzen ............................XII. Erklärung /Rechtliche Hinweise ......................XIII. Warnhinweise und Vorsichtsmaßnahmen ..................XIV. Garantie ..............................
  • Seite 41: Einführung

    I. Einführung Der LensHooke X1 PRO Semen Quality Analyzer ist ausschließlich für die In-vitro-Diagnostik bestimmt. ® Lesen Sie zuerst diese Bedienungsanleitung, um sich mit dem Gerät und seiner ordnungsgemäßen Funktionsweise vertraut zu machen, bevor Sie das Analysegerät benutzen. Der Begriff „LenseHooke Semen Test Cassette“...
  • Seite 42: Produktübersicht

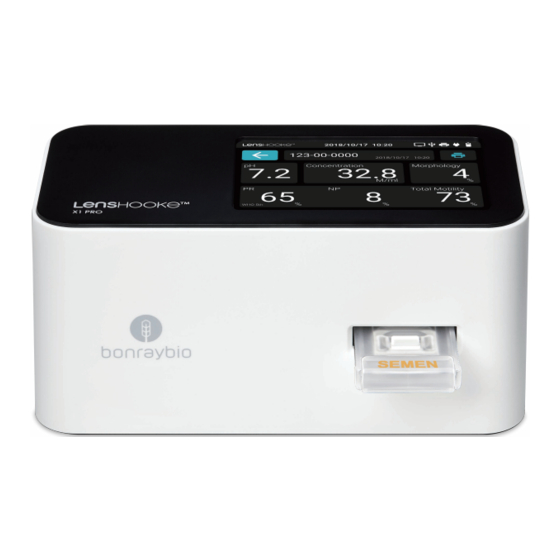
    III. Produktübersicht LensHooke X1 PRO Semen Quality Analyzer ® Aufsicht 140.00mm Vorderseite Rückseite Touchscreen USB-Anschluss Einschub für Testkassette USB-Anschluss Netzschalter HDMI-Anschluss Reset-Taste Netzteilanschluss HINWEIS USB-Anschluss: USB 2.0 Reset-Taste: Wenn das Analysegerät abstürzt, verwenden Sie bitte eine Nadel, um die Reset-Taste zu drücken.
  • Seite 43: Die Folgenden Symbole Sind Funktionsbezogen

    Touch Screen Icon 1 2 3 4 5 yyyy/mm/dd hr:mi Symbol für die HDMI-Verbindung: Dieses Analysegerät ist über einen HDMI-Anschluss mit dem Monitor verbunden. Symbol für die USB-Verbindung: Dieses Analysegerät ist über einen USB-Anschluss mit dem USB-Laufwerk verbunden. Symbol für die Verbindung des Thermodruckers: Dieses Analysegerät ist an einen tragbaren Thermodrucker angeschlossen.
  • Seite 44: Verbrauchsmaterial

    HINWEIS Bei den Abbildungen der Produkte handelt es sich um schematische Darstellungen. Der C-KUP Probenverflüssigungsbecher dient zur Aufnahme von Samenproben. Die LensHooke Semen Test Cassette beinhaltet eine spezielle Zählkammer für den LensHooke ® ® PRO Semen Quality Analyzer Die LensHooke Cleaning Wipe werden zur Reinigung des Einschubschachts der Testkassette ®...
  • Seite 45: Hauptfunktionen

    V. Hauptfunktionen LensHooke X1 PRO Semen Quality Analyzer ® Ein- und Ausschalten Einschalten des Analysegeräts: Drücken Sie die Ein-/Aus-Taste für ca. 2 Sekunden, um das Gerät einzuschalten (wie in Abbildung 1). Wenn der Touchscreen aufleuchtet (wie in Abbildung 2), ist das Gerät betriebsbereit.
  • Seite 46: Analysegerät Vorbereiten

    Netzteil an das Analysegerät an und schalten Sie dieses wieder ein. Analysegerät vorbereiten 1. LensHooke X1 PRO Semen Quality Analyzer auf eine ebene, glatte Oberfläche stellen. ® 2. Die empfohlenen Umgebungsbedingungen einhalten. 3. Batteriestatus überprüfen. Bei niedrigem Batteriestand das Gerät vor dem Testen an das Stromnetz anschließen.
  • Seite 47 Testen der Probe Neuer Test Schritt 1. Schritt 2. Bitte geben Sie die Patienten ID ein Klicken Sie auf das Symbol und klicken Sie auf , um zum “Neuer Test”. nächsten Schritt zu gelangen. yyyy/mm/dd hr:mi yyyy/mm/dd hr:mi Neuer Test ID # 123-00-0000 HINWEIS...
  • Seite 48 yyyy/mm/dd hr:mi yyyy/mm/dd hr:mi 123-00-0000 123-00-0000 Ejakulatvolumen : HINWEIS Bitte klicken Sie auf , um das Samenvolumen einzustellen. Die Testkassette bzw. das Analysegerät während der Messung nicht bewegen. Schritt 4. Führen Sie die Testkassette bis zum hinteren Ende in den Einschub ein. yyyy/mm/dd hr:mi 123-00-0000 Legen Sie die Testkassette mit der...
  • Seite 49 (1) Klicken Sie auf das Symbol „Werkzeuge” und dann auf das Symbol „QC-Test”. yyyy/mm/dd hr:mi yyyy/mm/dd hr:mi Werkzeuge (2) Bitte geben Sie die LOT-Nummer auf dem Etikett der LensHooke X QC Beads (Samenkontrollkit), ® des LensHooke X QC Reticles (Samenkontrollkit) oder des LensHooke X QC Videos ein.
  • Seite 50 (10) 19101940123 Motility 40 ± 2 % Morphology 12 ± 1 % (3) Folgen Sie den Anweisungen der Packungsbeilage der LensHooke QC Beads, des Lenshooke ® ® QC Reticles oder des LensHooke X QC Videos. Führen Sie die Kassette bis ganz hinten in den ®...
  • Seite 51 X QC Reticle (For Semen) misst NUR die Konzentration. ® Das LensHooke X QC Video misst NUR die Motilität und Morphologie. ® Wenn eine Lot Nummer der LensHooke X QC ® yyyy/mm/dd hr:mi Beads eingegeben wird, aber ein LensHooke ®...
  • Seite 52: Datensätze Sichern

    Datensätze sichern (1) Bereiten Sie einen USB-Stick vor (Kapazität: ≥ 1GB). (2) Klicken Sie auf das Symbol „Werkzeuge” und dann auf das Symbol „Datensätze sichern”. yyyy/mm/dd hr:mi yyyy/mm/dd hr:mi Werkzeuge Stecken Sie den USB-Stick ein. Wenn das Symbol „Sichern” blau wird, klicken Sie darauf, um die Datensätze zu sichern.
  • Seite 53 System Update Bereiten Sie den USB-Stick mit der System-Update-Software vor. (Speicherplatz des USB-Sticks: ≥ 1 GB). Bitte wenden Sie sich an Ihren lokalen Händler, um die System-Update-Software zu erhalten. (2) Klicken Sie auf das Symbol „Werkzeuge” und dann auf das Symbol „System Update”. yyyy/mm/dd hr:mi yyyy/mm/dd hr:mi Werkzeuge...
  • Seite 54: Geräteinformation

    HINWEIS Wenn die Warnmeldung „Aktualisierungsdatei ist beschädigt“ auf dem Bildschirm erscheint, wurde nicht die gesamte Datei heruntergeladen. Bitte laden Sie die System-Update-Datei erneut auf den USB-Stick herunter und führen Sie das System-Update nochmals durch. Wenn die Warnmeldung „Aktualisierung fehlgeschlagen“ auf dem Bildschirm erscheint, wurde der USB-Stick für das System-Update entfernt.
  • Seite 55 (2) Klicken Sie zur Bestätigung auf das gelbe Symbol „Löschen“ und löschen Sie alle Datensätze. yyyy/mm/dd hr:mi yyyy/mm/dd hr:mi Datensätze löschen Bestätigen Sie das Löschen aller Datensätze. (3) Klicken Sie auf das Symbol „OK“, um zur Startseite zurückzukehren. yyyy/mm/dd hr:mi yyyy/mm/dd hr:mi yyyy/mm/dd hr:mi Datensätze löschen...
  • Seite 56: Einstellungen

    (3) Klicken Sie auf „Einfügen“ und warten Sie, bis die Nachricht „Einfügen erfolgreich!“ auf dem Bildschirm erscheint. yyyy/mm/dd hr:mi yyyy/mm/dd hr:mi Logo einfügen Logo einfügen Einfügen… yyyy/mm/dd hr:mi Logo einfügen Einfügen erfolgreich! HINWEIS Die Bilddatei für das Logo muss “lenshooke_X1_pdf_logo.png“ benannt werden und im png Format mit 2040 x 168 px abgespeichert sein.
  • Seite 57: Datum Und Uhrzeit

    Datum und Uhrzeit (1) Klicken Sie auf das Symbol „Einstellungen” und dann auf das Symbol „Datum & Zeit”. yyyy/mm/dd hr:mi yyyy/mm/dd hr:mi Einstellungen (2) Sie können das Format durch Anklicken der Symbole „ ” oder „ ” auswählen und können Datum und Uhrzeit durch Anklicken des Symbols „...
  • Seite 58 Die Standardeinstellung ist “Automatisch”. Dabei benutzt das Analysegerät eine dynamische IP-Adresse, die beim Anschluss an ein Netzwerk automatisch zugewiesen wird und sich ändern kann. yyyy/mm/dd hr:mi IP Konfiguration (4) Soll eine statische IP-Adresse verwendet werden, muss “Manuell” ausgewählt werden. Nun können die Einstellungen für “IP Adresse”, “Subnetzmaske”...
  • Seite 59 Passwörter Klicken Sie auf das Symbol „Einstellungen” und dann auf das Symbol „Passwort”. 2019/11/01 21:42 yyyy/mm/dd hr:mi yyyy/mm/dd hr:mi Einstellungen (2) Wählen Sie die Schaltfläche „Admin-Passwort”. Aktivieren Sie „Gesicherter Zugang”, um den Zugang zu beschränken. yyyy/mm/dd hr:mi yyyy/mm/dd hr:mi 2019/11/01 21:42 Passwort Admin-Passwort Admin-Passwort...
  • Seite 60 LAN Passwort Klicken Sie auf das Symbol „Einstellungen” und dann auf das Symbol „Passwort”. yyyy/mm/dd hr:mi yyyy/mm/dd hr:mi Einstellungen Wählen Sie „LAN-Passwort”, um das Passwort anzeigen zu lassen. Möchten Sie das Passwort ändern, klicken Sie auf die Schaltfläche „Ändern”. yyyy/mm/dd hr:mi yyyy/mm/dd hr:mi Passwort LAN-Passwort...
  • Seite 61: Einstellung Der Bildschirmhelligkeit

    Einstellung der Bildschirmhelligkeit Klicken Sie auf das Symbol „Einstellungen” und dann auf das Symbol „Helligkeit”. yyyy/mm/dd hr:mi yyyy/mm/dd hr:mi Einstellungen Passen Sie die Helligkeit des Bildschirms an, indem Sie auf das Symbol „ ” oder „ ” klicken. Klicken Sie anschließend auf das Symbol „ ”, um zur vorherigen Seite zurückzukehren.
  • Seite 62: Zubehör

    VI . Zubehör Lizenz-Dongle: Lizenz auffüllen Wenn Sie die LensHooke Semen Test Cassette Box auspacken, finden Sie den Lizenz-Dongle im ® Deckel der Box. (2) Überprüfen Sie den Typ der Testkassette, bevor Sie den Dongle zum Auffüllen der Lizenz einstecken.
  • Seite 63 Bildschirm. Jeder Lizenz-Dongle kann nur einmal verwendet werden. Wenn Sie diesen Dongle erneut verwen- den, erscheint eine Dongle-Fehlermeldung auf dem Bildschirm. Bitte stecken Sie den Dongle unmittelbar in das Gerät, sobald Sie die Box der LensHooke Semen ® Test Cassette auspacken, um die Lizenz sofort wieder aufzufüllen.
  • Seite 64: Andere Geräte: Zugriff Auf Das Analysegerät

    Bitte verwenden Sie die folgenden Browser, um den Login Bereich zu öffnen: Firefox (Version: 62 oder höher), Chrome (Version: 69 oder höher), Microsoft Edge für Windows 10 oder Safari. (Weitere Details finden Sie unter www.LensHooke.com.) Unterstützung für iPad, PC oder Laptop Solange das Analysegerät mit dem lokalen Netzwerk verbunden ist, wird empfohlen, das Gerät ans...
  • Seite 65: Barcode Scanner

    Barcode Scanner To connect the Barcode Scanner to the Analyzer Bitte den Barcode Scanner mit einem USB Port des Anylaysegerätes verbinden. Der Barcode Scanner kann zur Eingabe der Patienten ID oder LOT der LensHooke X QC Beads ® (For Semen), LensHooke...
  • Seite 66: Erste Schritte

    Cleaning Wipe sind für den Einmalgebrauch bestimmt. NICHT wiederverwenden. ® Halten Sie das LensHooke X1 PRO Semen Quality Analyzer von Staub, Wasser, Flüssigkeiten und ® extremen Umweltbedingungen fern (siehe auch technische Daten für Lagerung und Betrieb). Reinigen Sie das Gehäuse des LensHooke X1 PRO Semen Quality Analyzer täglich, wenn Sie die...
  • Seite 67 I. Schalten Sie das Analysegerät vor der Reinigung aus. Schalten Sie das Analysegerät vor der Reinigung aus. Bitte bereiten Sie 2 LensHooke Cleaning Wipe vor. ® Bitte träufeln Sie vier Tropfen 75%igen Alkohols auf beide Seiten eines LensHooke Cleaning Wipe. ® Wenden Tropfen...
  • Seite 68: Fehlermeldungen

    Startseite zurückzukehren. Bitte legen Sie eine neue Testkassette ein und wiederholen Sie die Aktion. Wenn diese Meldung weiterhin angezeigt wird, wenden Sie sich an unseren Kundendienst. Vergewissern Sie sich, dass Sie die richtige LensHooke Semen Test Cassette verwenden. ® Fehler 4: yyyy/mm/dd hr:mi „Software-Fehler“...
  • Seite 69: Spezifikationen

    X. Spezifikationen Name des Analysegerätes Netzteil: LensHooke X1 PRO Semen Quality Analyzer Eingang: AC 100-240 V / 50-60 Hz / 0,5 A ® Ausgang: DC 5 V / 2 A Max. Bedienfeld: Betriebsbedingungen: 3,5 Zoll resistiver Touchscreen Temperatur: 15-38°C (59-100°F) Externe Spannungsversorgung: Luftfeuchtigkeit: <70 %...
  • Seite 70: Erklärung /Rechtliche Hinweise

    Gerät und Zubehör außerhalb der Reichweite von Kindern aufbewahren, um ein Strangulieren durch Netz- und Verbindungkabel Erstickung durch Verschlucken von Kleinteilen zu verhindern. Das Testergebnis folgt dem WHO-Laborhandbuch für die Untersuchung und Verarbeitung von menschlichem Sperma. Bitte beachten Sie das Benutzerhandbuch der LensHooke Semen Test ®...
  • Seite 71: Garantie

    XIV. Garantie Bonraybio bietet eine einjährige Garantie ab dem Tag, an dem Sie den LensHooke X1 PRO Semen ® Quality Analyzer erworben haben. Während der Garantiezeit wird das Analysegerät kostenlos repariert oder ersetzt. Die Garantie gilt nur für das original LensHooke X1 PRO Semen Quality Analyzer von Bonraybio.
  • Seite 73 Semen Quality Analyzer ユーザーマニュアル X1 PRO Rev.29-0X10900 20210317X1E003JP...
  • Seite 74 製品を適切に使用するために、 最初にこのユーザーマニュアルをよくお読みください。 このユーザーマ ニュアルは www.LENSHOOKE.com でも入手できます。 記号 このユーザーマニュアルの内容には、 次のアイコンが表示される場合があります。 「注記」 「注意」 「ページ番号」 「再使用禁止」 「使用期限」 「ロッ ト番号」 「シリアル番号」 「製造年月日」 「製造元」 「EU欧州代理人」 「IN VITRO DIAGNOSTIC DEVICE」 「管理温度」 「使用説明書を参照」 「WEEE司令の適用表示」 CEマーク 「使用説明書を参照」 このアイコンは米国専用です。 パッケージに含まれるもの 電源アダプター (アナライザー用) LensHooke X1 PRO ® Semen Quality Analyzer...
  • Seite 75 目次 はじめに ..............................使用目的 ............................... 製品の概要 ............................III. 消耗品 ..............................主な機能 ............................... アクセサリー ............................機器のセッ トアップ ..........................VII. クリーニングとメンテナンス ......................... VIII. エラーメッセージ ..........................仕様 ..............................参考 ..............................ステートメント ............................XII. 注意事項 .............................. XIII. 保証 ..............................XIV.
  • Seite 76: はじめに

    I. はじめに X1 PRO Semen Quality Analyzerは、 in vitro診断専用です。 ご使用前には必ず本取扱説明書を読 LensHooke ® み、 機器の使用方法を理解した上で機器の使用を行ってください。 ここで言う“LensHooke Semen Test Cassette”は“LensHooke CS0 Semen Test Cassette”、“LensHooke ® ® ® CS1 Semen Test Cassette”のことを意味します。 製品に関するご質問やご不明な点がございましたら、 サービスホッ トライン (+886-4-2491-2385) までお電話 頂くか、 販売代理店 までお気軽にお問い合わせください。 サービスホッ トライン : 月 金 8:30 17:30(GMT+8) II.
  • Seite 77: 製品の概要

    III. 製品の概要 LensHooke X1 PRO Semen Quality Analyzer ® 上面 140.00mm 正面 背面 タッチスクリーン USB ポート テストカセッ ト挿入スロッ ト USB ポート 電源スイッチ HDMI ポート リセッ トボタン 電源アダプター接続口 注意 USB ポート: USB 2.0 リセッ トボタン : 本体がフリーズ等した際には、 ピン等で背面のリセッ トボタンを押します。 HDMI ポート : このアナライザーでは、 HDMIケーブルを高解像度モニターに接続して、 画像とデータ...
  • Seite 78 タッチスクリーンアイコン 1 2 3 4 5 yyyy/mm/dd hr:mi 新規検査 検査履歴 ユーティリティ 残り 済み テスト テスト 設定 リフィルを行うため の新しいドングルを 挿入してください。 HDMI 接続アイコン: アナライザーは、 HDMIポート経由で外部モニターと接続されていることを示します。 USB接続アイコン: アナライザーはUSBポート経由でUSBドライブと接続されています。 サーマルレシートプリンター接続アイコン: アナライザーはサーマルレシートプリンターに接続されて います。 電源アダプター接続アイコン: このアナライザーは電源アダプターに接続されています。 バッテリーアイコン: バッテリーの残量を示します。 注意 USB接続アイコン: キーボードやマウス、 ドングル等のその他の機器をUSBポート経由で接続した際 、 このアイコンはスクリーン上に表示されません。 タッチスクリーンからは以下の機能を行うことができます。 ユーティ リティ: 機能が含まれます: - 品質管理: アナライザー/デバイスの品質を確認します。...
  • Seite 79: 消耗品

    IV. 消耗品 LensHooke X1 PRO Semen Quality Analyzerの消耗品は次のとおりです。 ® LensHooke C-KUP LensHooke LensHooke ® ® ® Cleaning Wipe Liquefaction Test Cup Semen Test Cassette Semen Test Cassette LensHooke LensHooke LensHooke ® ® ® X QC Video (For Semen) X QC Beads (For Semen) X QC Reticle (For Semen) 正確な測定を行うためには必ずテストカセッ...
  • Seite 80: 主な機能

    V. 主な機能 LensHooke X1 PRO Semen Quality Analyzer ® 電源のon/off アナライザーの電源を入れる: 図1の様に電源ボタンを2秒間押し続けるとアナライザーの電源が入ります。 タッチスクリーンが点灯すると、 アナライザーの操作準備が整います (図2) 。 yyyy/mm/dd hr:mi 新規検査 検査履歴 ユーティリティ 残り 済み テスト テスト 設定 リフィルを行うため の新しいドングルを 挿入してください。 画1 画2 アナライザーの電源を切る: 電源を切る際には電源ボタンを10秒間押し続けてアナライザーを直接オフにするか、 電源ボタンを タッチスクリーンに 「電源オフ」 が表示されるまで2秒間押し続け、 アイコンを選択してオフにします。 テス トカセッ トの挿入/取り外し...
  • Seite 81 アナライザーを3ヶ月以上使用しない場合には必ず使用する前に充電を行ってください。 バッテリーが空になると日付と時間がデフォルト設定に戻る可能性があります。 必ず確認をしてから 使用してください (17ページ参照) 。 画面に “バッテリーが過熱しています” または ”バッテリーの温度が低すぎます“ という警告メッセージ が表示された場合、 アナライザーは安全のため 5分以内に自動的に電源を落として機器を保護します 。 上記の警告メッセージが表示された場合は、 機器の電源を切り、 15 ∼38℃、 湿度70%以下の環境 下に1時間以上置いた後、 電源アダプターを接続し、 機器の電源を入れて使用してください。 テス トアナラ イザーを準備する アナライザーを平らな面に置いてください。 アナライザーが通常の動作環境にあるかどうかを確認します。 バッテリーの状態を確認します。 バッテリー残量が少ない場合は、 テストする前に電源アダプターを接続し てください。 精液サンプルの採取 詳細については、 LensHooke CS0 Semen Test Cassetteのユーザーマニュアルを参照してください。 ®...
  • Seite 82 検査を始める 新しいテスト ステップ2. 患者ID番号を入力し、 「 」 アイコ ステップ1. 「新規検査」 アイコンを選択します。 ンを選択して次のステップへ進みま す。 yyyy/mm/dd hr:mi yyyy/mm/dd hr:mi 新規検査 新規検査 検査履歴 ユーティリティ 123-00-0000 ID # 残り 済み テスト テスト 設定 テストカセット : CS0 / CS1 注意 患者IDには20桁以上を超えての文字または記号は入力しないでください。 文字を入力する場合は、 アイコンを0.5∼1秒間押し続けて、 文字を選択してください。 記号を入力する には、 「 」...
  • Seite 83 yyyy/mm/dd hr:mi yyyy/mm/dd hr:mi 精液分析 精液分析 123-00-0000 123-00-0000 123-00-0000 精液量:N / A IDと入力した情報を確認してくださ い。 - 液状化の時間 : N / A 色調:N / A 精液量:N / A 次 注意 「 」 と 「 」 を使用して、 精液量を入力します。 測定結果の計算中にはテストカセッ トやアナライザーを動かさないで下さい。 ステップ4. 検体を滴下したカセッ トをスロッ ト yyyy/mm/dd hr:mi の奥まで挿入します。...
  • Seite 84 設定 ロゴの挿入 すべての検査 情報 テストカセット : データの削除 CS0 / CS1 (2) LensHooke X QC Beads (For Semen), LensHooke X QC Reticle (For Semen), LensHooke X QC ® ® ® Video (For Semen)のラベル上に記載のロッ ト番号を入力します。 入力したロッ ト番号を確認し、 “ ” を選択し次のステップに進みます。 2019/11/01 21:42 yyyy/mm/dd hr:mi 品質管理...
  • Seite 85 40 ± 2 % Morphology 12 ± 1 % (3) LensHooke® X QC Beads (For Semen)、 LensHooke® X QC Reticle (For Semen)、 LensHooke® X QC Video (For Semen)の説明書に従って操作し、 カセッ トを 挿入スロッ ト に挿入するか、 LensHooke® X QC Video USB を USB ポートに挿入します。...
  • Seite 86 ® 検査に使用するQC製品が異なりま のカセッ トを挿入した場合、 右図の様なメッセー す。 ジが表示されます。 また、 その逆も同様のメッセージが表示されます。 挿入されたQC製品のロットが入力された ロットと同じかどうかを確認してくださ い。 LensHooke X QC Beads (For Semen), LensHooke X QC Reticle (For Semen)の使用期限が過ぎて ® ® いる場合には検査結果に N/A と表示がされます。 使用期限の残っている新しい 製品を使用してくだ さい。 yyyy/mm/dd hr:mi yyyy/mm/dd hr:mi Level 1 Level 1...
  • Seite 87 全ての検査結果をバックアップする (1) 容量が1GB以上空きのあるUSBメモリーを用意します。 (2) 「ユーティ リティ」 を選択し、 「 検査データのバックアップ」 を選択します。 2019/11/01 21:42 yyyy/mm/dd hr:mi 2019/11/01 21:42 yyyy/mm/dd hr:mi ユーティリティ 新規検査 検査履歴 ユーティリティ Rev. X1.XXXX 品質管理 検査データの システムアップデート バックアップ 残り 済み テスト tests 設定 ロゴの挿入 すべての検査 情報 テストカセット : データの削除 CS0 / CS1 2019/03/16 USBメモリーを機器背面のUSBドライブ挿入口に挿します。...
  • Seite 88 システムの更新 システム更新のファイルが入ったUSBメモリーを準備します (空き容量1GB以上、 システム更新については販売店までお問い合わせ下さい) 。 「ユーティ リティ」 アイコンから、 「 システムアップデート」 を選択します。 yyyy/mm/dd hr:mi yyyy/mm/dd hr:mi 2019/11/01 21:42 2019/11/01 21:42 ユーティリティ 新規検査 検査履歴 ユーティリティ Rev. X1.XXXX 品質管理 検査データの システムアップデート バックアップ 残り 済み テスト tests 設定 ロゴの挿入 すべての検査 情報 テストカセット : データの削除 CS0 / CS1 2019/03/16 電源コードに接続し、...
  • Seite 89 注意 「更新ファイルが破損しています」 というメッセージが画面に表示された場合、 ファイルのダウンロード が不完全だった可能性があります。 システム更新ファイルを再度USBドライブにダウンロードして、 シ ステムの更新をやり直して下さい。 「更新に失敗しました」 というメッセージが画面に表示された場合にはUSBドライブが取り外された 可能性があります。 システム更新ファイルを含むUSBドライブを機器に挿入してシステムアップデート を再度実行してください。 情報 [ユーティ リティ]アイコンから、 [情報]を選択して、 アナライザーの情報を確認します。 yyyy/mm/dd hr:mi 2019/11/01 21:42 yyyy/mm/dd hr:mi 2019/11/01 21:42 ユーティリティ 新規検査 検査履歴 ユーティリティ Rev. X1.XXXX 品質管理 検査データの システムアップデート バックアップ 残り 済み テスト tests 設定...
  • Seite 90 (2) 黄色の 「削除」 アイコンを選択して、 すべての検査データの確認および削除を行います。 2019/11/01 21:42 yyyy/mm/dd hr:mi 2019/11/01 21:42 yyyy/mm/dd hr:mi 30件の検査データはバックアップさ 全ての検査データの削除 れていません。全ての検査データを 削除してもよろしいですか? 全ての検査データを削除することを 確認してください。 この操作は取り消しができません。 検査データ数:30 日付:yyyy/mm/dd - yyyy/mm/dd 削除 戻る 削除 (3) 「OK」 アイコンを選択してホームページに戻ります。 2019/11/01 21:42 yyyy/mm/dd hr:mi 2019/11/01 21:42 yyyy/mm/dd hr:mi 全ての検査データの削除 新規検査 検査履歴...
  • Seite 91 (3) 「挿入」 ボタンを選択し、 「 挿入が正常に終了しました。 」 と表示されるまで待ちます。 2019/11/01 21:42 yyyy/mm/dd hr:mi 2019/11/01 21:42 yyyy/mm/dd hr:mi ロゴの挿入 ロゴの挿入 画像ファイルの入ったUSBドラ 挿入中… イブを挿入します。 USBドライブを抜き差ししないでくだ 最後に更新された日時 挿入 yyyy/mm/dd 2019/11/01 21:42 yyyy/mm/dd hr:mi ロゴの挿入 挿入が正常に終了しました。 最後に更新された日時 yyyy/mm/dd 注意 挿入するロゴはサイズが2040 x 168ピクセル且つファイル名が “lenshooke_X1_pdf_logo.png” の PNGファイルである必要があります。 ロゴファイルはフォルダ内等に保存せず、 直接USBドライブの最上層に保存します。 設定...
  • Seite 92: Ipアドレスの設定

    日付と時刻 (1) 「設定」 アイコンから、 「 日付時刻」 を選択します。 2019/11/01 21:42 2019/11/01 21:42 yyyy/mm/dd hr:mi yyyy/mm/dd hr:mi 設定 新規検査 検査履歴 ユーティリティ WHOスタン 日付時刻 ネットワーク ダード 接続 残り 済み テスト テスト 設定 言語 輝度 アクセスコード テストカセット : 2019/03/16 CS0 / CS1 (2) 画面下部の 「 」...
  • Seite 93 (3) 初期設定は自動設定になっています。 この設 yyyy/mm/dd hr:mi 2019/11/01 21:42 定を選択すると、 デバイスは、 ネットワークが IPアドレスの設定 接続されているときに割り当てられ、 時間の 経過とともに変化する動的なIPアドレスを使 自動設定 用します。 手動設定 設定 (4) 静的IPアドレスを使用する場合には手動設定を選択し、 IPアドレス、 サブネッ トマスク、 ゲートウェイ をそれぞれ選択肢、 必要な情報を入力します。 2019/11/01 21:42 2019/11/01 21:42 yyyy/mm/dd hr:mi yyyy/mm/dd hr:mi IPアドレスの設定 - 手動設定 IPアドレスの設定 IPアドレス 自動設定 サブネットマスク...
  • Seite 94 新しい管理者パスワードとして6文字を入力し、 「 」 アイコンを選択して、 次のステップで新しい 管理者パスワードを確認するため、 パスワード6文字を再度入力します。 yyyy/mm/dd hr:mi yyyy/mm/dd hr:mi 2019/11/01 21:42 2019/11/01 21:42 新しい管理者パスワードを確認 新しい管理者パスワードを入力 6 桁 123ABC 新しい管理者パスワードを確認したら、 「 」 アイコンを選択して次の手順に進みます。 前のページに戻るには 「OK」 を選択してください。 yyyy/mm/dd hr:mi yyyy/mm/dd hr:mi 2019/11/01 21:42 2019/11/01 21:42 管理者パスワード 設定 管理者パスワードが正常に設定され ました! WHOスタン 日付時刻...
  • Seite 95 「LANパスワード」 アイコンを選択すると、 パスワードが画面に表示されます。 変更したい場合 「変更」 ボタンからをパスワードを変更できます。 2019/11/01 21:42 yyyy/mm/dd hr:mi yyyy/mm/dd hr:mi 2019/11/01 21:42 LANパスワード アクセスコード シリアル番号:X10RB09T10010 管理者パスワード LANパスワード:000000 IP : 196.168.1.2 LANパスワード 変更 6桁の数字コードを入力して、 新しいパスワードを設定します。 新しいパスワードを入力したら、 「 」 アイコンをクリックして、 次のステップに進みます。 「 OK」 を押して、 前のページに戻ります。 2019/11/01 21:42 yyyy/mm/dd hr:mi 2019/11/01 21:42 yyyy/mm/dd hr:mi LANパスワード...
  • Seite 96 タッチスク リーンの輝度の調整 (1) 「設定」 アイコンから、 「 輝度」 を選択します。 yyyy/mm/dd hr:mi yyyy/mm/dd hr:mi 2019/11/01 21:42 設定 新規検査 検査履歴 ユーティリティ WHOスタン 日付時刻 ネットワーク ダード 接続 残り 済み テスト テスト 設定 言語 輝度 アクセスコード テストカセット : CS0 / CS1 2019/03/16 「 」 または 「 」...
  • Seite 97: アクセサリー

    VI . アクセサリー ライセンスドングル ライセンス (テスト回数) のリフィル Semen Test Cassetteボックスを開梱すると、 箱の天井にライセンスドングルが同梱さ LensHooke ® れています。 (2) ドングルを使用してリフィルを行う前に必ずテストカセッ トの型番が使用する製品の型番と合致してい るかを確認します。 (3) ライセンスドングルを機器背面のUSBポートに挿入します。 2019/11/01 21:42 2019/11/01 21:42 yyyy/mm/dd hr:mi yyyy/mm/dd hr:mi 新規検査 検査履歴 ユーティリティ New Test New Test Recent Recent Utilities Utilities Tests Tests 残り...
  • Seite 98 テスト テスト 設定 Settings リフィル リフィル Refill ドングルID:1-191101001 メーカー純正ではないライセンスドングルを挿入した場合、 「 リフィル」 アイコンは点灯しません。 一度リフィルに使用したライセンスドングルは再使用できません。 使用済みドングルを機器に再度挿 入すると、 ドングルエラーメッセージが画面に表示されます。 LensHooke Semen Test Cassetteの箱を開梱したらすぐにライセンスドングルを挿入してライセン ® スを補充して下さい。 2019/11/01 21:42 yyyy/mm/dd hr:mi 新しいドングルを挿入してライセンスを補充すると、 「 済み」 の回数が0にリセッ トされ、 「 残り」 の回 数がその時点での残数に追加され表示されます。 ユーティリティ 検査履歴 新規検査 yyyy/mm/dd hr:mi ユーティリティ...
  • Seite 99 (3) ログイン後、 機器に保存されている検査データのレポート (PDFファイル) と動画 (MP4ファイル) を閲覧 できます。 (4) PDF, MP4, CSVファイルのダウンロードができます。 同時に多数の外部機器から同一のアナライザーにアクセスすると機器のパフォーマンスに影響が出る 場合があります。 ログインページにアクセスするには、 次のブラウザのいずれかを使用してください。 - Firefox (Ver: 62 or more), Chrome (Ver: 69 or more), Microsoft Edge for Window 10, Safari等 (詳細については、 www.LensHooke.comを参照してください。 ) この機能は iPad, パソコン、 ノートPCのみに対応しています。 LANに接続する際には付属の電源ケーブルを機器に繋げてご使用ください。...
  • Seite 100 バーコードスキャナー バーコードスキャナーとアナライザーの接続 機器背面のUSBポートからバーコードスキャナーをアナライザーに接続します。 。 . バーコードリーダーは患者IDの入力や品質管理時に使用するX QCビーズのロッ トを入力する際に 使用できます。 2019/11/01 21:42 yyyy/mm/dd hr:mi 2019/11/01 21:42 yyyy/mm/dd hr:mi 新規検査 品質管理 19062725081 123-00-0000 ID # バーコードスキャナーは機器背面のUSBポートから接続して使用下さい。 本機器では、 以下の文字、 数字、 記号のみを読み取ることができます。 ^&- ‘[]...
  • Seite 101: 機器のセッ トアップ

    VII. 機器のセッ トアップ アナライザーのセッ トアップ: (1) 「Start」 を選択し、 使用する言語をリストから選択します。 yyyy/mm/dd hr:mi Setting Up 日付時刻の設定:“ ” または “ ”ボタンで日付時刻の表示を選択します。 また “ ” と “ ” ボタンで日時の変更をします。 ” ボタンで使用するWHOスタンダードの版を選択します。 WHOスタンダードの設定: “ 保護されたアクセス: アナライザーのアクセス権を保護しながら使用する場合は、 アイコンを スライドさせて青の状態にし、 新しい管理者パスワードとして任意の6文字を入力します。 2019/11/01 21:42 yyyy/mm/dd hr:mi 2019/11/01 21:42 yyyy/mm/dd hr:mi 管理者パスワード...
  • Seite 102: クリーニングとメンテナンス

    定期クリーニング テストカセッ ト挿入スロッ トのクリーニングには、 「LensHooke Cleaning Wipe」を使用ください。 ® 他の製品を使用してのテストカセッ ト挿入スロッ トのクリーニングは行わないでください。 Cleaning Wipeは単回使用品です。 再利用はしないで下さい。 LensHooke ® X1 PRO Semen Quality Analyzer精子運動解析装置は、 ほこ りや水、 液体を避けて、 過酷 LensHooke ® な環境 (仕様書に記載されている操作環境や保管環境を超えた環境) 外で保管してください。 X1 PRO Semen Quality Analyzerは日常的にクリーニングを行い、 清潔に保つことを LensHooke ® お勧めします。 クリーニングの手順...
  • Seite 103 (1) クリーニングを行う前に機器の電源を切ります。 (2) アルコール綿を使用して、 アナライザー本体を綺麗になるまでを拭きます。 (3) 使用したアルコール綿は廃棄します。 III. 電源アダプター: (1) アルコールを含まない洗剤を使用して布を浸してください。 (2) 布を絞って、 電源アダプターを丁寧に掃除します。 (3) きれいな水に浸した布で再度その部分を掃除します。 LensHooke X1 PRO Semen Quality Analyzerのクリーニングには、 LensHooke Cleaning Wipeを使用し ® ® ます。 X1 PRO Semen Quality Analyzerは、 10,950回のクリーニングサイクルと10,950回の消毒 LensHooke ® サ イクル の 後 、 アナラ イ ザ ー の 性 能 や 外 部 材 料 に 変 化 が な い ことを 確 認 さ れ て い ま す。...
  • Seite 104: エラーメッセージ

    カメラエラー エラー3:カメラエラー カメラに問題がある可能性があります。 機器を再起動し、新たなカセットで検査を 行ってください。エラーが解消されない際 はカスタマーサービスまでお問い合わせく テストカセッ トを取り外して 「OK」 を選択し、 ホーム画面 ださい。 に戻ります。 新しいテストカセッ トを挿入して、 再度検査 を行います。 このエラーが継続して表示される場合は代理店までお 問い合わせください。 *必ず検査にはLensHooke Semen Test Cassetteを使 ® 用していることを確認してください。 エラー4: 2019/11/01 21:42 yyyy/mm/dd hr:mi ソフトウェアエラー エラー4:ソフトウェアエラー ソフトウェアに問題がある可能性があります。 機器を再起動し、新たなカセットで検査を テストカセットを取り外し、 「 OK」 を選択し、 ホーム画面 行ってください。エラーが解消されない際...
  • Seite 105 X. 仕様 製品名 電源アダプター 入力: 100~240 Vac, 50~60 Hz,0.5 A LensHooke X1 PRO Semen Quality Analyzer ® 出力: 5 Vdc, 最大2 A コントロールパネル 動作環境 3.5インチの抵抗膜方式タッチスクリーン 温度 15°C~38°C (59°F~100°F) 外部電源入力 湿度 <70% AC 100-240V / 50~60 Hz; 出力 DC 5V / 2A 保管環境...
  • Seite 106: ステートメント

    ケーブル等がもつれて窒息を引き起こす恐れがあるので、 子供の手の届かないところで保管して下さい。 小さなパーツを飲み込んでしまう恐れがあるので、 子供の手の届かないところで保管して下さい。 検査結果はWHOラボマニュアル ‒ ヒト精液検査と主義に準拠しています。 LensHooke Semen Test ® Cassetteのユーザーマニュアルを参照してください。 注意 LensHooke X1 PRO Semen Quality Analyzer, LensHooke Semen Test Cassette, C-KUP ® ® Liquefaction Test Cup, LensHooke X QC Beads (For Semen), LensHooke X QC Reticle (For ®...
  • Seite 107 XIV. 保証 製造元では 本機器(レンズフック X1 PRO 精子自動分析装置 LensHooke X1 PRO Semen Quality Analyzer) ® において購入日から1年間の保証を設けています。 保証期間内に起きました機器の不良については無償で 対応させて頂きます。 本保証は製造元からの純正品のみの対応となります。 また機器の改良や、 誤った使用方法におきましての 故障等はこの限りではありません。 メーカー : Bonraybio 株式会社 MDSS GmbH Address : 4F., No.118, Gongye 9th Rd., Schiffgraben 41 Dali Dist., Taichung City 41280, 台湾(R.O.C.)
  • Seite 109 Semen Quality Analyzer Manuale d'uso X1 PRO Rev.29-0X10400 20210224X1E003IT...
  • Seite 110: La Confezione Include

    Leggere attentamente il manuale operatore al fine di un corretto utilizzo dello strumento. Questo manuale è disponibile anche sul sito www.LENSHOOKE.com. Simboli Simboli presenti nel Manuale Operatore “AVVISO” “ATTENZIONE” “NUMERO DI PAGINA” “NON RIUTILIZZARE” “SCADENZA” “LOTTO” “NUMERO DI SERIE” “DATA DI PRODUZIONE”...
  • Seite 111 Indice ............................Introduzione ............................Uso Previsto ........................Descrizione del prodotto III............................Consumabili ..........................Funzioni Principali .............................. Accessori ............................Per Iniziare VII. VIII. Pulizia e Manutenzione ........................Messaggi di Errore ................................................Informazioni sullo Strumento ..............................Fonti ............................XII. Dichiarazione ........................
  • Seite 112: Introduzione

    Altri parametri del sistema CASA (MSC, PMSC, VAP, VSL, VCL, LIN, STR, WOB, ALH, e BCF) Morfologia (forme normali, %) Il LensHooke X1 PRO Semen Quality Analyzer non fornisce una valutazione in merito alla fertilità del ® paziente ed è indicato esclusivamente per uso diagnostico in vitro. Per uso Professionale.
  • Seite 113: Descrizione Del Prodotto

    III. Descrizione del prodotto LensHooke X1 PRO Semen Quality Analyzer ® Vista dall’alto 140.00mm Vista Anteriore Vista Posteriore Touch Screen Porta USB Vano per la Cassetta Porta USB Tasto Accensione Porta HDMI Tasto Reset Attacco per l’Alimentatore NOTA Porta USB : High-speed USB 2.0 Tasto Reset : Se l’analizzatore si blocca, premere il pulsante Reset con l’aiuto di uno spillo.
  • Seite 114 Icone sullo schermo touch screen 1 2 3 4 5 yyyy/mm/dd hr:mi Nuovo test Icona per la connessione HDMI: L’analizzatore può essere collegato al monitor tramite una porta HDMI. Icona per la connessione USB: L’analizzatore può essere collegato ad una chiavetta USB tramite una porta USB.
  • Seite 115: Consumabili

    X QC Beads (For Semen) X QC Reticle (For Semen) LensHooke ® X QC Video (For Semen) Il risultato potrebbe essere impreciso se NON si utilizza LensHooke Semen Test Cassette o i ® prodotti della serie LensHooke X QC. ®...
  • Seite 116: Funzioni Principali

    V. Funzioni Principali LensHooke X1 PRO Semen Quality Analyzer ® Accensione e spegnimento, on / off Accensione: Premere il pulsante di accensione per 2 secondi per accendere l’analizzatore (Fig.1). Quando si accende lo schermo (Fig. 2), l’analizzatore è pronto. yyyy/mm/dd hr:mi...
  • Seite 117: Preparazione Del Campione

    2. Verificare che l'analizzatore si trovi in ambiente operativo idoneo. 3. Verificare lo stato della batteria. Se la batteria è scarica, collegare l'adattatore di alimentazione prima del test. Preparazione del campione Fare riferimento al manuale utente LensHooke Semen Test Cassette per preparare il campione. ®...
  • Seite 118 Esecuzione dell’Analisi Nuovo Test Passaggio 1. Selezionare icona Passaggio 2. Inserire ID paziente e selezionare “Nuovo Test”. icona “ ” per andare al passaggio seguente. yyyy/mm/dd hr:mi yyyy/mm/dd hr:mi Nuovo test 123-00-0000 ID # NOTA NON UTILIZZARE più di 15 caratteri o simboli per l’ID# del paziente. Per inserire una lettera premere l’icona per 0.5-1 secondi e selezionare la lettera.
  • Seite 119 yyyy/mm/dd hr:mi yyyy/mm/dd hr:mi 123-00-0000 123-00-0000 Volume Semen: NOTA Cliccare per correggere il volume del campione. NON muovere la cassetta test o l'analizzatore durante il calcolo dei risultati. Passaggio 4. Inserire la cassetta test (con il campione) nella fessura e spingerla fino in fondo. yyyy/mm/dd hr:mi 123-00-0000 Inserire test cassetta contenente il...
  • Seite 120 Update Inserire Eliminare tutti LOGO i dati (2) Inserire il numero di LOTTO sull'etichetta di LensHooke X QC Beads (For Semen) o LensHooke ® ® QC Reticle (For Semen) o LensHooke X QC Video (For Semen). Confermare il numero di LOTTO e ®...
  • Seite 121 ® ® Semen) o LensHooke X QC Video (For Semen) per il funzionamento, quindi inserisci la cassetta ® nello “slot di inserimento” o inserisci il video USB LensHooke X QC nella porta USB. ® yyyy/mm/dd hr:mi yyyy/mm/dd hr:mi Controllo di qualità...
  • Seite 122 X QC Reticle (For Semen), ® l'analizzatore mostrerà il messaggio di avviso come sotto. Se nella schermata dei risultati viene visualizzato N / A, significa che le sfere del LensHooke X QC ® Beads (For Semen) o LensHooke X QC Reticle (For Semen) sono scadute.
  • Seite 123 Backup tutti i dati (1) Preparare una chiavetta USB. (Memoria: minimo 1GB) (2) Cliccare l’icona “Utilità” e cliccare l’icona “Backup tutti i dati”. yyyy/mm/dd hr:mi yyyy/mm/dd hr:mi Utilità Nuovo Test test recenti (3) Inserire la chiavetta USB. Quando l’icona “Backup” diventa blu, cliccarla per fare il backup tutti i dati. yyyy/mm/dd hr:mi yyyy/mm/dd hr:mi Backup tutti i dati...
  • Seite 124 Sistema Update Preparare la chiavetta USB con l’aggiornamento del software. (Memoria della chiavetta USB: almeno 1GB) (Contattare il distributore locale per l’aggiornamento del software). Cliccare l’icona “Utilità” e cliccare l’icona “Sistema Update”. yyyy/mm/dd hr:mi 2019/11/01 21:42 yyyy/mm/dd hr:mi Utilità Nuovo Test test recenti...
  • Seite 125: Icone Sullo Schermo

    NOTA Se compare il messaggio ‘‘Update File is Corrupted’’ significa che non è stato scaricato il file completo. Scaricare il file di aggiornamento del Sistema e procedere nuovamente all’aggiornamento. Se compare il messaggio ‘‘Update Failed’’ significa che la chiavetta USB è stata rimossa. Inserire nuovamente la chiavetta USB con il file di aggiornamento del sistema e ripetere la procedura.
  • Seite 126 (2) Cliccare l’icona gialla ‘‘Elimina’’ per confermare e cancellare tutti i risultati. yyyy/mm/dd hr:mi yyyy/mm/dd hr:mi Eliminare tutti i dati Conferma per eliminare tutti i dati. (3) Cliccare l’icona ‘‘OK’’ per ritornare alla schermata iniziale. yyyy/mm/dd hr:mi yyyy/mm/dd hr:mi Utilità Eliminare tutti i dati 30/30 dati sono stati cancellati.
  • Seite 127 (3) Seleziona l'icona “Inserisci” e attendi fino al messaggio “Inserimento riuscito!” che appare sullo schermo. yyyy/mm/dd hr:mi yyyy/mm/dd hr:mi Inserire LOGO Inserire LOGO Inserimento… yyyy/mm/dd hr:mi Inserire LOGO Inserimento avvenuto! NOTA L'immagine LOGO deve essere in formato PNG da 2040x168 pixel e il file deve essere denominato “lenshooke_X1_pdf_logo.png”.
  • Seite 128 Data e Ora Cliccare l’icona “IMPOST.” e successivamente “Data e Ora”. yyyy/mm/dd hr:mi yyyy/mm/dd hr:mi IMPOST. (2) Si può selezionare il formato GG/MM/AAAA, MM/GG/AAAA o AAAA/MM/GG cliccando sull’ icona “ ” o “ ”, e impostando data e ora cliccando l’icona “ ”...
  • Seite 129 L'impostazione predefinita è “Automatico”. Quando scegli questa icona, il dispositivo utilizza l'indiriz- zo IP dinamico, che viene assegnato quando la rete è connessa e cambia nel tempo. yyyy/mm/dd hr:mi Configurazione IP L'impostazione predefinita è “Manuale”. Quando scegli questa icona, il dispositivo utilizza l'indirizzo IP dinamico, che viene assegnato quando la rete è...
  • Seite 130 Selezionare l'icona della password amministratore. Accendere di Admin Password per proteggere il tuo accesso. yyyy/mm/dd hr:mi yyyy/mm/dd hr:mi Accesso Password PSWD AMM. PSWD AMM. Accesso di Sicurezza LAN password Immettere sei caratteri qualsiasi come nuova password amministratore, selezionare l'icona “ ”...
  • Seite 131 Password LAN (1) Selezionare “IMPOST.” e quindi selezionare l'icona “Accesso password”. yyyy/mm/dd hr:mi yyyy/mm/dd hr:mi IMPOST. Selezionare l'icona della password LAN e la password apparirà sullo schermo. Se si desidera modificare questa password LAN, è possibile selezionare Modifica. yyyy/mm/dd hr:mi yyyy/mm/dd hr:mi Accesso Password LAN password...
  • Seite 132 Luminosità (1) Cliccare l’icona “IMPOST.” e successivamente l’icona “Luminosità”. yyyy/mm/dd hr:mi yyyy/mm/dd hr:mi IMPOST. Impostare la luminosità dello schermo cliccando le icone “ ” o “ ” , e poi cliccare l’icona “ ” per tornare alla pagina precedente. yyyy/mm/dd hr:mi 2019/11/01 21:42 IMPOST.
  • Seite 133: Accessori

    VI . Accessori License Dongle Per Ricaricare la disponibilità delle cassette All’apertura della scatola contenente le LensHooke Test Cassette, la “license dongle” si troverà ® sopra alla scatola. Verificare che il tipo di cassetta test sia corretto prima di inserire il dongle per ricaricare la licenza.
  • Seite 134 Una volta utilizzata, la “license dongle” non può essere riutilizzata. Se inserita nuovamente apparirà un messaggio di errore. 2019/11/01 21:42 yyyy/mm/dd hr:mi Inserire il dongle per ricaricare la licenza subito dopo aver aperto la scatola LensHooke Semen ® Test Cassette.
  • Seite 135 - Firefox (Ver: 62 o superiore), Chrome (Ver: 69 o superiore), Microsoft Edge per Windows 10 e Safari ... ecc. (Fare riferimento a www.LensHooke.com per maggiori dettagli.) Supporta solo iPad, PC o laptop. Lo status dei dati sulla LAN è inteso solo per lo status analizzatore .
  • Seite 136 Lettore Barcode Collegare un Lettore Barcode allo Strumento Collegare il lettore barcode allo strumento tramite porta USB Port. (2) Il lettore barcode può essere usato per scannerizzare l’ID# del campione del paziente o il LOTTO# del X QC Beads, X QC Reticle, e X QC Video per il test di controllo qualità. yyyy/mm/dd hr:mi yyyy/mm/dd hr:mi Nuovo test...
  • Seite 137: Per Iniziare

    Cleaning Wipe è monouso. NON riutilizzare. ® Tenere LensHooke X1 PRO Semen Quality Analyzer lontano da polvere, acqua o liquidi e ambienti ® estremi (che sono al di fuori dell'ambiente operativo o di conservazione indicato nelle specifiche. Pulire l’esterno dello strumento LensHooke X1 PRO Semen Quality Analyzer tutti i giorni dopo ®...
  • Seite 138 ® ® LensHooke X1 PRO Semen Quality Analyzer è stato testato per assicurare che non vi siano alterazi- ® oni nelle performance o nei materiali dello strumento dopo 10,950 cicli di pulizia e 10,950 cicli di disinfezione. Questo test ha simulato 10 cicli di pulizia e disinfezione al giorno per la durata media di...
  • Seite 139: Messaggi Di Errore

    Rimuovere la “Test cassette” e cliccare l’icona “OK” per ritornare alla pagina iniziale. Inserire una nuova “Test cassette” e ripetere l’analisi. Se il messaggio dovesse ricomparire, contattare il servizio clienti. *Accertarsi che si stia utlizzando le LensHooke Semen ® Test Cassette corrette. Errore 4: yyyy/mm/dd hr:mi “Errore Software”.
  • Seite 140: Informazioni Sullo Strumento

    X. Informazioni sullo Strumento Nome dello strumento Adattatore LensHooke X1 PRO Semen Quality Analyzer Input: 100~240 Vac, 50~60 Hz,0.5 A ® Output: 5 Vdc, 2 A Max Pannello di Controllo Temperatura di Analisi 3.5-in touch screen Temperatura 15°C~38°C (59°F~100°F) Alimentazione esterna Umidità...
  • Seite 141: Dichiarazione

    Processing of Human Semen. Si prega riferissi al manuale d’uso del LensHooke Semen Test Cassette. ® NOTA LensHooke X1 PRO Semen Quality Analyzer, LensHooke Semen Test Cassette, C-KUP ® ® Liquefaction Test Cup, LensHooke X QC Beads (For Semen), LensHooke X QC Reticle (For ®...
  • Seite 142: Garanzia

    Durante il period di garanzia lo strumento verrà riparato o sostituito senza costi aggiuntivi. La garanzia è valida solo sullo stumento originale LensHooke X1 PRO Semen Quality Analyzer prodot- ® to da Bonraybio. La garanzia non sarà applicata se lo strumento è stato modificato o utilizzato in maniera impropria.
  • Seite 144 Semen Quality Analyzer Manual do usuário X1 PRO Rev.29-0X10700 20210308X1E003PT...
  • Seite 145 Por favor, leia atentamente este manual do usuário para garantir o uso adequado do produto. Este manual do usuário também está disponível em www.LENSHOOKE.com. Símbolos Os seguintes ícones podem aparecer no conteúdo deste manual do usuário. Símbolo para “AVISO” Símbolo para “CUIDADO”...
  • Seite 146 Índice ............................Introdução ............................. Uso Pretendido ..........................III. Resumo do Produto ............................Consumíveis ..........................Principais funções ............................Acessórios ............................... VII. Iniciando ........................VIII. Limpeza e Manutenção ..........................Mensagens de Erro ......................Especificações do Analisador ............................. Referência ............................XII. Declaração ..........................XIII.
  • Seite 147: Introdução

    I. Introdução LensHook X1 PRO Semen Quality Analyzer é apenas para diagnóstico in vitro. O usuário deve ler este ® Manual do Usuário primeiro para se familiarizar com o dispositivo e seu procedimento de operação adequa- do antes de usar o analisador.
  • Seite 148: Resumo Do Produto

    III. Resumo do Produto LensHooke X1 PRO Semen Quality Analyzer ® Vista do topo 140.00mm Vista frontal Visão traseira Tela sensível ao toque Porta USB Teste Slot de inserção de cassete Porta USB Botão de energia HDMI Botão de Reset...
  • Seite 149 Ícone da tela de toque 1 2 3 4 5 yyyy/mm/dd hr:mi Ícone de conexão HDMI: este analisador está conectado ao monitor pelo HDMI. Ícone de conexão USB: este analisador está conectado à unidade por um porta USB. Ícone de conexão da impressora térmica: este analisador está conectado à impressora térmica portátil.
  • Seite 150: Consumíveis

    X QC Beads (For Semen) X QC Reticle (For Semen) LensHooke ® X QC Video (For Semen) O resultado pode ser impreciso, se você NÃO usar o LensHooke Semen Test Cassette ou os ® produtos da série LensHooke X QC.
  • Seite 151: Função Principal

    V. Função Principal LensHooke X1 PRO Semen Quality Analyzer ® Ligar / desligar Ligue o analisador: Pressione o botão por cerca de 2 segundos para ligar (como na Imagem 1). Quando a tela acende (como na Imagem 2), o analisador está pronto para operar.
  • Seite 152 2. Verifique se o analisador está sob o status operacional normal. 3. Verifique o status da bateria. Se a bateria estiver fraca, conecte o adaptador de energia antes de testar. Prepare a Amostra 1. Consulte o manual do usuário do LensHooke Semen Test Cassette para preparar a amostra. ®...
  • Seite 153 Teste a amostra Novo teste Passo 1. Clique no ícone “Novo Teste”. Passo 2. Por favor, digite o número de identifi- cação e clique para ir para a próxima etapa. yyyy/mm/dd hr:mi yyyy/mm/dd hr:mi NOTE NÃO use mais de 20 caracteres e símbolos para o número de ID do paciente. Se você...
  • Seite 154 yyyy/mm/dd hr:mi yyyy/mm/dd hr:mi NOTE Por favor clique ajustar o volume de esperma. NÃO mova o cassete ou analisador durante o cálculo dos resultados. Passo 4. Insira o cassete de teste (com amostra) yyyy/mm/dd hr:mi na abertura do equipamento e empurre-o até...
  • Seite 155 Controle de qualidade Clique no ícone de “Utilidades” e, em seguida, clique no ícone de “Controle de qualidade”. yyyy/mm/dd hr:mi yyyy/mm/dd hr:mi (2) Insira o número do LOTE no rótulo do LensHooke X QC Beads (For Semen) ou LensHooke X QC ®...
  • Seite 156 ® (For Semen) ou LensHooke X QC Video (For Semen) para operar e, em seguida, insira o cassete ® no “slot de inserção” ou insira o USB do LensHooke X QC Video na porta USB. ® yyyy/mm/dd hr:mi yyyy/mm/dd hr:mi Controle de Qualidade Por favor insira o USB de X QC Video.
  • Seite 157 X QC Reticle (For Semen), o ® analisador mostrará a mensagem abaixo para avisá-lo, e vice-versa. Se N/A aparecer na tela de resultados, isso significa que o LensHooke X QC Beads (For Semen) ® ou o LensHooke X QC Reticle (For Semen) estão vencidos. Utilize um novo ou entre em contato ®...
  • Seite 158 Backup de todos os registros (1) Prepare uma unidade USB com antecedência. (Capacidade: 1GB ou mais) Clique no ícone de “Utilidades” e, em seguida, clique no ícone de “Efetuar Backup”. yyyy/mm/dd hr:mi yyyy/mm/dd hr:mi (3) Insira o drive USB. Quando o ícone de “Backup” ficar azul, clique nele para fazer backup dos registros. yyyy/mm/dd hr:mi yyyy/mm/dd hr:mi (4) Quando os registros foram copiados para o seu drive USB com sucesso, clique no ícone “OK”...
  • Seite 159 Atualização do Sistema (1) Prepare a unidade USB com o software de atualização do sistema. (A capacidade do drive USB: 1GB ou mais) (Entre em contato com o seu distribuidor local para o software de atualização do sistema). (2) Clique no ícone “Utilidades” e, em seguida, clique no ícone “Atualização do sistema”. yyyy/mm/dd hr:mi yyyy/mm/dd hr:mi Por favor, conecte o dispositivo ao adaptador de energia e conecte a unidade USB com o arquivo de...
  • Seite 160 NOTE Se a mensagem de aviso ‘‘Atualizar arquivo estiver corrompido’’ Se a mensagem de aviso “Atualizar arquivo estiver corrompido" for exibida na tela, isso significa que você não fez o download do arquivo completo. Faça o download do arquivo de atualização do sistema novamente para a unidade USB e refaça a atualização do sistema.
  • Seite 161 (2) Clique no ícone amarelo ‘‘Excluir’’ para confirmar e excluir todos os registros. yyyy/mm/dd hr:mi yyyy/mm/dd hr:mi (3) Clique no ícone ‘‘OK’’ para retornar à página inicial. yyyy/mm/dd hr:mi yyyy/mm/dd hr:mi NOTE Os registros não podem ser recuperados depois que você os excluir. Certifique se de que deseja excluí...
  • Seite 162 (3) Selecione o ícone “Inserir” e aguarde até a mensagem “Inserir com sucesso!” aparecer na tela. yyyy/mm/dd hr:mi yyyy/mm/dd hr:mi yyyy/mm/dd hr:mi NOTE A imagem do LOGO deve estar no formato PNG por 2040x168 pixels e o arquivo deve ser nomeado “lenshooke_X1_pdf_logo.png”.
  • Seite 163 Data e Hora (1) Clique no ícone “Definições” Configurações “Data e Hora”. yyyy/mm/dd hr:mi yyyy/mm/dd hr:mi (2) Você pode selecionar o formato de data selecionando o ícone “ ” ou “ ”e ajustar data e hora clicando no ícone “ ”...
  • Seite 164 A configuração padrão é “Automático”. Quando você escolhe esse ícone, o dispositivo usa um endereço IP dinâmico, que é atribuído quando a rede está conectada e muda com o tempo. yyyy/mm/dd hr:mi (4) Se você deseja alterar para o endereço IP estático, selecione “Manual” e, em seguida, selecione “Endereço IP”, “Máscara de sub-rede”, “Gateway”...
  • Seite 165 (2) Selecione o ícone “Senha do Administrador” senha aparecerá na tela. Ative a senha do administrador para proteger seu acesso. yyyy/mm/dd hr:mi yyyy/mm/dd hr:mi Coloque uma senha de 6 caracteres clique em “ ” para ir para a próxima etapa. Coloque a senha novamente para verificação.
  • Seite 166 Senha LAN (1) Clique no ícone “Definições” e, em seguida, clique no ícone “Senha de Acesso”. yyyy/mm/dd hr:mi yyyy/mm/dd hr:mi Selecione “Senha LAN” e a senha aprecerá na tela. Se desejar trocar a senha selecione “Mudar”. yyyy/mm/dd hr:mi yyyy/mm/dd hr:mi Insira qualquer código numérico de seis dígitos para configurar a nova senha.
  • Seite 167 Configuração de brilho da tela (1) Clique no ícone “Definições” e, em seguida, clique no ícone “Brilho”. yyyy/mm/dd hr:mi yyyy/mm/dd hr:mi Ajuste o brilho da tela clicando no ícone “ ” ou “ ” e, em seguida, clique no ícone “ ”...
  • Seite 168: Acessórios

    VI . Acessórios Dongle de licença Para recarregar a licença Quando você abrir a caixa de LensHooke CS0 Semen Test Cassette, você encontrará o dongle de ® licença na parte superior da caixa. (2) Verifique se o tipo de cassete de teste está correto antes de inserir o dongle para recarregar a licença.
  • Seite 169 Por favor, insira o dongle para reabastecer a licença imediatamente quando v ocê desembalar a yyyy/mm/dd hr:mi caixa do LensHooke Semen Test Cassette ® Quando você insere um novo dongle para reabastecer a licença, o cálculo de “Usados” retornará a zero e o cálculo de “Livres”...
  • Seite 170 Adaptador Ethernet USB para RJ45 Gigabit Analisador: Conecte à rede local (rede local) Por favor, use USB para RJ45 Adaptador Gigabit Ethernet para conectar o analisador à LAN (rede local) por cabo. Outro dispositivo: acesso ao analisador Por favor, abra o navegador do seu computador / laptop e digite o IP. (Você pode verificar essas informações no analisador clicando no ícone Configurações &...
  • Seite 171 Para conectar o Scanner de Código de Barras ao Analisador Por favor, conecte o scanner de código de barras com o analisador por porta USB. O scanner de código de barras insere a identificação do paciente ou o LOTE do LensHooke X QC ®...
  • Seite 172: Iniciando

    VIII. Limpeza e Manutenção Suggestion for Cleaning Routine O slot de inserção do cassete de teste só pode ser limpo com a “LensHooke Cleaning Wipe”. ® NÃO use outros materiais para limpar o slot de inserção do cassete de teste.
  • Seite 173 I. Encaixe da inserção do cassete de teste: Desligue o analisador antes de limpar. Prepare 2 peças da LensHooke Cleaning Wipe. ® Por favor, derrube 4 gotas de álcool a 75% em cada lado da LensHooke Cleaning Wipe. ® FLIP FLIP...
  • Seite 174: Mensagens De Erro

    “OK” para retornar à página inicial. Por favor, insira outra nova cassete de teste para refazer a ação. Se esta mensagem ainda aparecer, entre em contato com o nosso serviço ao cliente. *Certifique-se de estar usando o LensHooke Semen ® Test Cassette correto.
  • Seite 175: Especificações Do Analisador

    X. Especificação do Analisador Nome do Analisador Adaptador de energia: LensHooke X1 PRO Semen Quality Analyzer Entrada: 100~240 Vac, 50~60 Hz,0.5 A ® Saida: 5 Vdc, 2 A Max Painel de controle Ambiente de operação Tela sensível ao toque de 3,5 polegadas Temperatura 15°C~38°C (59°F~100°F)
  • Seite 176: Declaração

    Evite asfixia resultante de uma criança engolir uma pequena parte. O resultado do teste é seguido pelo Manual de Laboratório da OMS para o Exame e Processamento de Sêmen Humano. Por favor, consulte o manual do usuário de LensHooke Semen Test Cassette.
  • Seite 177: Garantia

    XIV. Garantia A Bonraybio oferece uma garantia de um ano a partir do dia em que você adquirir o LensHooke X1 PRO ® Semen Quality Analyzer. Durante o período de garantia, iremos reparar ou substituir o analisador gratuita- mente. A garantia aplica-se apenas ao original LensHooke X1 PRO Semen Quality Analyzer da Bonraybio.

Inhaltsverzeichnis