
Verwandte Anleitungen für BEARWARE 303586/20190116DG054


Inhaltszusammenfassung für BEARWARE 303586/20190116DG054
- Seite 1 DEUTSCH / 2 ENGLISH / 16 FRANÇAIS / 30 ITALIANO / 44 ESPAÑOL / 58 WEATHERSTATION Mod.-Nr.: 303586/20190116DG054...
- Seite 2 Vielen Dank, dass Sie sich für ein Produkt von BEARWARE entschieden haben. Damit Sie auch lange Freude mit Ihrem erworbenen Gerät haben werden, lesen Sie sich bitte die nachfolgende Kurzanleitung aufmerksam durch. Prüfen Sie vor Inbetriebnahme der gelieferten Ware, ob diese vollständig, fehlerfrei und unbe- schädigt ist.
- Seite 3 3. Zusätzliche Hinweise zu diesem Gerät Verwenden Sie dieses Gerät nicht, wenn es beschädigt ist. Setzen Sie bitte die Ba- sisstation keiner Feuchtigkeit und auch keinem direkten Sonnenlicht aus. Stellen Sie vor der Verwendung des Produktes sicher, dass die zur Verfügung ste- hende Netzspannung mit der Betriebsspannung, die auf dem Typenschild angege- ben ist, übereinstimmt.
- Seite 4 4. Produkt-Details Deutsch...
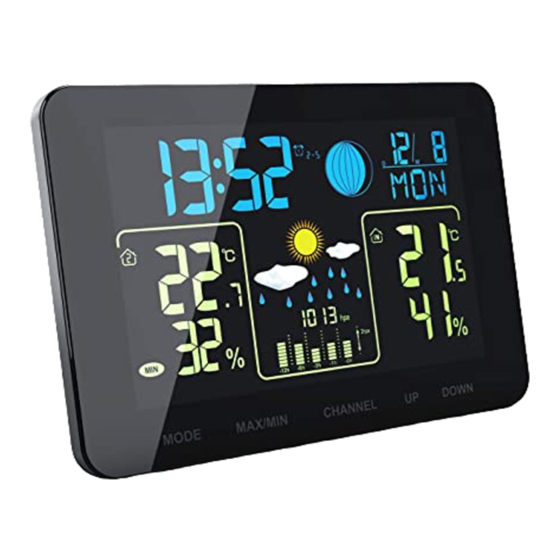
- Seite 5 Taste DCF-Symbol Uhrzeit-Anzeige „Nass“-Anzeige Außensensor Kanal-Anzeige Temperatur und Luftfeuchtigkeits-Trends Niedriger Batteriestand-Anzeige (Außensensor) „MIN“ / „MAX“-Anzeige „MODE“-Taste Außentemperatur und Luftfeuchtigkeitsanzeige „MAX/MIN“-Taste Barometer-Anzeige „CHANNEL“-Taste „UP“-Taste „DOWN“-Taste Innentemperatur und Luftfeuchtigkeitsanzeige Frost-Alarm „Heiß“-Anzeige Datums-Anzeige Mondphasen-Anzeige Alarmzeiten-Anzeige Snooze/Sleep-Taste (Touch Sensor) Display (Außensensor) „C/F“-Taste „Kanalwechsel“-Schalter Deutsch...
- Seite 6 5. Inbetriebnahme Entnehmen Sie das Produkt aus der Verpackung und entfernen Sie jegliches Ver- packungsmaterial. Öffnen Sie das Batteriefach des Außensensors und legen Sie 2x 1,5V AAA Batterien hinein. Anschließend öffnen Sie das Batteriefach auf der Rückseite der Haupteinheit und legen 3x 1,5V AAA Batterien ein. Alternativ können Sie ein 5V Netzteil mit einem USB-Ausgang (z.B.
- Seite 7 Sie aktivieren die Suche erneut, indem Sie die “DOWN”-Taste für ungefähr 3 Se- kunden drücken, bis das DCF-Symbol im Display erscheint. Wahlweise können Sie die Zeit manuell setzen. Mehr dazu finden Sie im Abschnitt “Grundeinstellungen”. Hinweis: Während der Suche nach dem DCF-Signal können Sie keine weiteren Tas- ten betätigen.
- Seite 8 Wetterpiktogramme: Die aktuelle errechnete Wetterlage wird im Display der Wetterstation angezeigt. Trendanzeige: Die Trendanzeige ändert sich steigend oder fallend, sofern eine Änderung der Luftfeuchtigkeit von ± 1°C oder ± 3% eintritt. Innentemperaturanzeige: Die Innentemperatur wird von der Basisstati- on gemessen und bis zu einem Zehntel Grad genau angezeigt.
- Seite 9 Niedrige Batterie: Wenn das Batteriesymbol auftaucht, sind die eingeleg- ten Batterien erschöpft und sollten schnellstmöglich gegen Neue ausgetauscht werden. Dies gilt für den Außensensor sowie für die Basisstation. Außentemperaturanzeige: Die Außentemperatur wird von dem Außen- sensor gemessen und bis zu einem Zehntel Grad genau angezeigt.
- Seite 10 8. Grundeinstellungen Hinweis: Ein Drücken der “SNOOZE/LIGHT” Taste auf der Oberseite des Gehäuses schaltet die Hintergrundbeleuchtung ein. Bitte beachten Sie, dass die Basisstation nicht auf 2 Tasten gleichzeitig reagiert. Daher emp- fehlen wir, jeweils nur eine Taste zu drücken. Während der Stromversorgung über den Netzbetrieb schaltet die “SNOO- ZE/LIGHT”-Taste bei mehrfachem Drücken die Hintergrundbeleuchtung in den verschiedenen Dimmstufen durch.
-
Seite 11: Alarmeinstellung
8.1 Frost-Alarm Diese Wetterstation besitzt einen Frost-Alarm. Sollte die Außentemperatur zwischen -°3C und +1°C schwanken, blinkt das Frost-Alarm-Symbol im Display der Wetterstation. Sobald die Außentemperatur kälter als -3°C ist, wird das Frost- Alarm-Symbol dauerhaft angezeigt. 8.2 Alarmeinstellung Die Wetterstation kann bis zu 2 Alarmeinstel- lungen speichern, welche separat ein- sowie ausgeschaltet werden können. - Seite 12 Alarm aktivieren Drücken Sie die “UP”-Taste in der Standardanzeige. Anschließend erscheint neben der Uhrzeit ein Alarmsymbol. Dies bedeutet, dass der Alarm aktiviert ist. Drücken Sie die “ALARM”-Taste erneut, um Alarm 1 zu deaktivieren und Alarm 2 zu aktivie- ren. Ein erneutes Drücken auf die “ALARM”-Taste aktiviert Alarm 1 und Alarm 2 zusammen.
- Seite 13 Luftdruck Der Luftdruck wird automatisch jede Stunde gemessen und im Display angezeigt. Die Tabelle zeigt einen ungefähren Trend des Luftdruckes an. 10. Zusätzliche Einstellungen DCF-Signal Die Basisstation synchronisiert die interne Uhr jede Nacht mit dem DCF-Signal. Um das DCF-Signal manuell zu empfangen, drücken und halten Sie die “DOWN”-Taste für 3 Sekunden, bis folgendes Symbol im Display erscheint und blinkt: “...
- Seite 14 Setzen Sie das Gerät keinen plötzlichen Temperaturwechseln oder starken Vibrati- onen aus, da dies die Elektronikteile beschädigen könnte. Prüfen Sie vor der Ver- wendung das Gerät auf Beschädigungen. Das Gerät sollte nicht benutzt werden, wenn es einen Stoß abbekommen hat oder in sonstiger Form beschädigt wurde. Beachten Sie bitte die nationalen Bestimmungen und Beschränkungen.
- Seite 15 Batterie nicht in den Hausmüll gegeben werden darf. WEEE Richtlinie 2012/19/EU WEEE Register-Nr: DE 67896761 Hiermit erklärt die Firma WD Plus GmbH, dass sich das Gerät 303586/20190116DG054 in Übereinstimmung mit den grundlegenden Anforderungen und den übrigen einschlägigen Bestimmungen befindet. Eine vollständige Konformitätserklärung erhalten Sie bei: WD Plus GmbH, Wohlenbergstraße 16, 30179 Hannover...
- Seite 16 Thank you for choosing a BEARWARE product. Please read the following user ma- nual carefully so as to get the most from the product you have purchased. Before using the product, first check that the delivered item is complete, accurate and undamaged.
- Seite 17 3. Additional information about this device Do not use this device if it is damaged. Do not expose the base station to moisture and even direct sunlight. Before using the product, ensure that the available supply voltage corresponds to the operating voltage indicated on the specification plate. Before using for the first time, make sure that the cables are not damaged.
- Seite 18 4. Product details English...
- Seite 19 Button DCF symbol Time display "Moist" display Outdoor sensor channel display Temperature and humidity trends Low battery indicator (outdoor sensor) "MIN" / "MAX" display "MODE" button Outdoor temperature and humidity "MAX/MIN" button Barometer display "CHANNEL" button "UP” button "DOWN” button Indoor temperature and humidity Frost alarm "Hot"...
- Seite 20 5. Initial use Take the product out of the package and remove all the packaging material. Open the battery compartment of the outdoor sensor and insert two 1.5V AAA batteries. Then open the battery compartment on the back of the main unit and insert three 1.5V AAA batteries.
- Seite 21 Re-activate the search by pressing the "DOWN" button for about 3 seconds until the DCF symbol is shown in the display. Alternatively, you can set the time manual- ly. For more information in this regard, see the "Basic Settings" section. Note: You can not press any other buttons while scanning for the DCF signal.
- Seite 22 Weather pictograms: The currently determined weather conditions are shown in the display of the weather station. Trend display: The trend display increases or decreases if the humidity changes by ± 1°C or ± 3%. Indoor temperature display: The indoor temperature is measured by the base station and is shown to an accuracy of one tenth of a degree.
- Seite 23 Low battery: If the battery symbol appears, then the inserted batteries are discharged and should be replaced with new batteries as soon as possible. This applies for the outdoor sensor as well as the base station. Outdoor temperature display: The outdoor temperature is measured by the outdoor sensor and shown to an accuracy of one tenth of a degree.
- Seite 24 8. Basic settings Note: Pressing the "SNOOZE/LIGHT" button at the top of the housing switches the backlight on. Please note that the base station does not respond to 2 buttons at the same time. Therefore, it is advisable to press only one button.
-
Seite 25: Alarm Setting
8.1 Frost alarm This weather station has a frost alarm. If the outdoor temperature varies between - °3C and + 1°C, the frost alarm symbol flashes on the display of the weather station. Once the outdoor temperature drops below -3°C, the frost alarm symbol is displayed continuously. - Seite 26 Enabling the alarm Press the "UP" button in the default screen. An alarm icon is subsequently displayed next to the time. This means that the alarm is enabled. To disable alarm 1 and to enable alarm 2, press the "ALARM" button again. Pressing the "ALARM" button again enables alarm 1 and alarm 2.
- Seite 27 Atmospheric pressure The atmospheric pressure is automatically measured every hour and shown in the display. The table shows the approximate trend of the atmospheric pressure. 10. Additional settings DCF signal The base station synchronises the internal clock every night with the DCF signal. To receive the DCF signal manually, press and hold the "DOWN"...
- Seite 28 Do not expose the device to sudden changes in temperature or strong vibrations, as this could damage the electronic components. Check the device for any damage before using it. The device should not be used if it was subject to impact or has been damaged in some other manner.
- Seite 29 The symbol of the crossed-out dustbin means that the battery may not be disposed of in household waste. WEEE directive 2012/19/EU WEEE Register no.: DE 67896761 The company WD Plus GmbH hereby certifies that the device 303586/ 20190116DG054 complies with the fundamental requirements and all other relevant stipulations. A complete conformity statement can be obtained from: WD Plus GmbH, Wohlenbergstraße 16, 30179 Hanover English...
- Seite 30 Nous vous remercions d'avoir choisi un produit BEARWARE. Pour que vous puissiez profiter longtemps de votre appareil acheté, veuillez lire attentivement le mode d'emploi suivant. Avant la mise en service du produit livré, vérifiez s'il est complet, sans défauts et intact.
- Seite 31 3. Indications supplémentaires concernant cet appareil N'utilisez pas cet appareil s’il est endommagé. N’exposez pas la station de base à l'humidité ou à la lumière solaire directe. Assurez-vous avant l’utilisation du produit que la tension de secteur disponible correspond à la tension de fonctionnement indiquée sur la plaque signalétique. Assurez-vous, avant la première utilisation, qu’aucun câble n’est pas endommagé.
- Seite 32 4. Particularités du produit Français...
- Seite 33 N° Touche Symbole DCF Affichage de l'heure Affichage « humidité » Capteur extérieur affichage du canal Tendances de la température et de l'humidité de l'air Affichage batterie faible (capteur extérieur) Affichage « MIN » / « MAX » Touche « MODE » Affichage de la température extérieure et de l'humi- dité...
- Seite 34 5. Mise en service Sortez le produit de l'emballage et retirez tout matériau d'emballage. Ouvrez le compartiment à batteries du capteur extérieur et placez 2 batteries AAA de 1,5 V. Ouvrez le compartiment à batteries au dos de l'unité principale et placez-y aussi 3 batteries AAA de 1,5 V.
- Seite 35 Vous pouvez activer la recherche à nouveau en maintenant la touche « DOWN » enfoncée durant environ 3 secondes, jusqu’à ce que le symbole DCF apparaissent de nouveau sur l'écran. Vous pouvez régler l’heure manuellement, au choix. Vous trouverez plus d’informations à ce sujet dans la section « Paramètres de base ». Remarque : pendant la recherche du signal DCF, vous ne pouvez actionner autre touche.
- Seite 36 Pictogrammes météorologiques : Les conditions météorologiques actuelles calculées sont affichées comme suit sur l'écran de la station météorologique. Affichage de tendance : L'affichage de tendance change par ordre de grandeur croissant ou décroissant si un changement de l'humidité de l'air de ± 1°C ou ± 3% est observé.
- Seite 37 Batterie faible : Lorsque le symbole de batterie apparait, les batteries insérées sont épuisées et doivent être remplacées le plus rapidement possible. Cela vaut pour le capteur extérieur comme pour la station de base. Affichage de la température extérieure : La température extérieure est mesurée par le capteur extérieur et affichée avec une précision d’un dixième de degré.
- Seite 38 8. Paramètres de base Remarque : Le fait d'appuyer sur le large bouton « SNOOZE/LIGHT » sur la face supérieure du boîtier allume l'éclairage de fond. Veuillez noter que la station de base ne réagit pas à 2 touches simultanément. Pour cette raison, il est recommandé...
-
Seite 39: Réglage De L'alarme
8.1 Alarme de gel Cette station météorologique est dotée d'une alarme de gel. En cas de variation de la température extérieure entre -°3C et +1°C, le symbole de l'alarme de gel clignote sur l'affichage de la station météorologique. Une fois que la température extérieure est inférieure à... - Seite 40 Activer l’alarme Appuyez sur la touche « UP » sur l'affichage standard. Un symbole d’alarme apparait ensuite à côté de l’heure. Cela signifie que l’alarme est activée. Appuyez de nouveau sur la touche « ALARM » pour désactiver l’alarme 1 et activer l’alarme 2.
- Seite 41 Pression atmosphérique La pression de l'air est mesurée automatiquement chaque heure et affichée à l'écran. Le tableau affiche une tendance approximative de la pression de l'air. 10. Paramètres supplémentaires Signal DCF La station de base synchronise l’horloge interne avec le signal DCF chaque nuit. Pour recevoir le signal DCF manuellement, maintenez la touche «...
- Seite 42 N'exposez pas l'appareil à des changements de température brusques ou de fortes vibrations, qui pourraient endommager les pièces électroniques. Vérifiez l'appareil avant l'utilisation, pour détecter des dommages. L'appareil ne doit pas être utilisé s'il a reçu un coup ou a été autrement endommagé. Veuillez respecter les dispo- sitions et restrictions nationales.
- Seite 43 Directive DEEE 2012/19/UE DEEE Numéro de registre : DE 67896761 La société WD Plus GmbH déclare par la présente que l’appareil 303586/20190116DG054 est conforme aux exigences fondamentales et aux autres dispositions pertinentes de la directi- ve. Pour obtenir une déclaration de conformité complète, adressez-vous à : WD Plus GmbH, Wohlenbergstraße 16, 30179 Hanovre...
- Seite 44 Grazie per aver scelto un prodotto di BEARWARE. Per utilizzare con soddisfazione l'apparecchio acquistato, si prega di leggere attentamente le seguenti istruzioni per l’uso. Prima della messa in funzione della merce consegnata, verificare che sia integra, esente da difetti e non danneggiata.
- Seite 45 3. Istruzioni aggiuntive per questo apparecchio Non utilizzare questo apparecchio se è danneggiato. Non esporre la stazione base all'umidità o all’irraggiamento solare diretto. Prima di utilizzare il prodotto accertarsi che la tensione di rete disponibile cor- risponda alla tensione d'esercizio indicata sulla targhetta. Prima del primo utilizzo, accertarsi che i cavi non siano danneggiati.
- Seite 46 4. Dettagli del prodotto Italiano...
- Seite 47 Tasto Simbolo DCF Display orario Display "umido" Display canale sensore esterno Tendenza temperatura e umidità atmosferica Display livello di carica basso batteria (sensore esterno) Display “MIN“ / “MAX“ Tasto "MODE" Display temperatura esterna e umidità atmosferica Tasto “MAX/MIN” Display barometro Tasto "CHANNEL"...
- Seite 48 5. Messa in funzione Rimuovere il prodotto dalla confezione e togliere qualsiasi materiale di imballag- gio. Aprire il vano batterie del sensore esterno e inserire 2 x batterie del tipo AAA da 1,5V. Quindi aprire il vano batterie sul retro dell'unità principale e inserire 3 x batterie del tipo AAA da 1,5V.
- Seite 49 Per riattivare la ricerca, premere il tasto "DOWN" per circa 3 secondi fino a quando nel display appare il simbolo DCF. Facoltativamente è possibile impostare l'ora a mano. Maggiori informazioni in merito sono disponibili nella sezione "Impostazioni di base". Nota: Durante la ricerca del segnale DCF non è possibile azionare altri trasti. Tenere premuto il tasto "DOWN"...
- Seite 50 Pittogrammi meteo: Le attuali condizioni calcolate del tempo vengono visualizzate nel display della stazione meteorologica. Display tendenza: Il display tendenza cambia aumentando o diminuendo se si verifica una variazione dell’umidità pari a ± 1°C o ± 3%. Visualizzazione temperatura interna: La temperatura interna viene misurata dalla stazione di base e visualizzata con precisione al decimo di grado.
- Seite 51 Batteria bassa: Se appare il simbolo della batteria significa che le batterie inserite sono esauste e devono essere sostitui- te quanto prima con delle nuove. Ciò vale sia per il sensore esterno sia per la stazione di base. Visualizzazione temperatura esterna: La temperatura esterna viene misurata dal sensore esterno e visualizzata con precisione al decimo di grado.
- Seite 52 8. Impostazioni di base Nota: Premendo il tasto "SNOOZE/LIGHT"sul lato superiore dell'alloggi- amento, si accende la retroilluminazione. Si fa notare che la stazione di base non reagisce a 2 tasti contemporaneamente. Pertanto si consiglia di premere un tasto alla volta. Durante l'alimentazione di corrente tramite la rete premendo più...
-
Seite 53: Impostazione Allarme
8.1 Allarme del gelo La stazione meteo è caratterizzata da un allarme del gelo. Il simbolo dell’allarme del gelo lampeggia sul display della stazione meteo se la temperatura esterna oscilla tra -°3C e +1°C. Se la temperatura esterna diventa minore di -3°C il simbolo dell’allarme del gelo resta acceso costantemente. - Seite 54 Attivare l'allarme Premere il tasto "UP" nel display standard. Successivamente apparirà accanto all'ora un simbolo d'allarme. Ciò significa che l'allarme è attivato. Premere nuo- vamente il tasto "ALARM" per disattivare Alarm 1 e attivare Alarm 2. Premendo nuovamente il tasto "ALARM", Alarm 1 e Alarm 2 si attivano insieme. Entrambi i simboli d'allarme compaiono nel display.
- Seite 55 Pressione atmosferica La pressione atmosferica è misurata in modo automatico ogni ora ed è quindi visualizzata sul display. La tabella mostra una tendenza approssimativa della pressione atmosferica. 10. Impostazioni aggiuntive Segnale DCF La stazione di base sincronizza l'orologio interno ogni notte con il segnale DCF. Per ricevere il segnale DCF manualmente, premere e tenere premuto il tasto "DOWN"...
- Seite 56 Non esporre l'apparecchio a improvvisi sbalzi termici o forti vibrazioni in quanto potrebbero danneggiarsi le parti elettroniche. Prima di utilizzare l'apparecchio ve- rificare la presenza di eventuali danneggiamenti. Non utilizzare l'apparecchio se ha subito un urto o è stato danneggiato in un altro modo. Rispettare le normative e limitazioni nazionali.
- Seite 57 Direttiva RAEE 2012/19/UE Numero reg. RAEE: DE 67896761 Con la presente la ditta WD Plus GmbH dichiara che l'apparecchio 303586/20190116DG054 è conforme ai requisiti essenziali e alle rimanenti disposizioni in materia. Una dichiarazione di conformità completa è disponibile presso: WD Plus GmbH, Wohlenbergstraße 16, 30179...
- Seite 58 Muchas gracias por escoger un producto de BEARWARE. Para que pueda disfru- tar durante mucho tiempo de su adquisición, le rogamos que lea atentamente las siguientes instrucciones de uso. Antes de ponerlo en marcha, compruebe que el producto suministrado no presenta defectos ni daños.
- Seite 59 3. Instrucciones adicionales para este aparato No utilice este aparato cuando esté dañado. No exponga la estación base a la hu- medad ni a la luz solar directa. Antes de utilizar el producto, asegúrese de que la tensión de red disponible coinci- de con la tensión de funcionamiento que aparece en la placa.
- Seite 60 4. Detalles del producto Español...
- Seite 61 N.º Botón Símbolo DCF Indicador de la hora Indicador de «mojado» Sensor exterior de indicador de canal Tendencias de la temperatura y la humedad del aire Indicador de nivel de las pilas bajo (sensor exterior) Indicador «MIN» / «MAX» Botón «MODE» Indicador de temperatura exterior y humedad del aire Botón «MAX/MIN»...
- Seite 62 5. Puesta en marcha Saque el producto del embalaje y retire todo el material de embalaje. Abra el com- partimento para pilas del sensor externo e introduzca 2 pilas de 1,5 V AAA. Luego, abra el compartimento para pilas situado en la parte posterior de la unidad princi- pal e introduzca 3 pilas de 1,5 V AAA.
- Seite 63 Puede volver a activar la búsqueda al presionar el botón «DOWN» durante aprox. 3 segundos, hasta que el símbolo DCF aparece de nuevo en la pantalla. También puede configurar la hora manualmente. Encontrará más información al respecto en el apartado «Ajustes básicos». Indicación: Durante la búsqueda de la señal DCF no puede accionar otros botones.
- Seite 64 Pictogramas del tiempo: La situación climática estimada actual se visualizará en la pantalla de la estación meteorológica de la siguiente forma. Indicador de la tendencia: La visualización de la tendencia se modifica de manera creciente o decre- ciente si se produce un cambio en la humedad del aire de ± 1 ° C o ± 3 %. Indicador de la temperatura interior: La temperatura interior es medida por la estación base y visualizada con una precisión...
- Seite 65 Pilas bajas: Si aparece este símbolo, significa que las pilas están agotadas y que debe sustituirlas por otras nuevas lo antes posible. Esto es válido tanto para el sensor exterior como para la estación base. Indicador de la temperatura exterior: La temperatura exterior es medida por el sen- sor exterior y visualizada con una precisión de hasta una décima de grado.
- Seite 66 8. Ajustes básicos Indicación: Al pulsar el botón «SNOOZE/LIGHT» en la parte superior de la carcasa enciende la iluminación de fondo. Preste atención a que la estación base no reacciona a 2 botones al mismo tiempo. Por ello, le recomendamos que pulse solo un botón cada vez. Durante el suministro de corriente mediante el funcionamiento de red el botón «SNOOZE/LIGHT»...
-
Seite 67: Ajuste De Alarma
8.1 Alarma de helada Esta estación meteorológica posee una alarma de helada. Si la temperatura exterior fluctúa entre - 3 °C y + 1 °C, el símbolo de alarma de helada parpadea en la pantalla de la estación meteorológica. Tan pronto como la temperatura exterior sea más fría de -3 °C se visualiza de forma permanente la alarma de helada. - Seite 68 Activar la alarma Pulse el botón «UP» en la visualización estándar. A continuación aparecerá un símbolo de alarma al lado de la hora. Esto significa que la alarma está activada. Presione el botón «ALARM» de nuevo para desactivar la alarma 1 y activar la alarma 2.
- Seite 69 Presión del aire La presión del aire se mide automáticamente cada hora y se muestra en la panta- lla. La tabla muestra una tendencia aproximada para la presión del aire. 10. Ajustes adicionales Señal DCF La estación base sincroniza la hora interna con la señal DCF cada noche. Para captar manualmente la señal DCF, presione y mantenga pulsado el botón «DOWN»...
- Seite 70 No lo someta a cambios de temperatura repentinos o fuertes vibraciones porque esto puede dañar las partes electrónicas. Antes del uso del dispositivo, compruebe si hay daños. No debe usarse el dispositivo, si ha recibido golpes o ha sido dañado de alguna forma.
- Seite 71 Directiva WEEE 2012/19/UE Número de registro WEEE: DE 67896761 La empresa WD Plus GmbH declara por la presente que el aparato 303586/20190116DG054 satisface los requisitos esenciales y el resto de disposiciones pertinentes. Solicite una decla- ración de conformidad completa en: WD Plus GmbH, Wohlenbergstraße 16, 30179 Hannover (Alemania) Español...
- Seite 72 GER: Aktuelle Informationen, Treiber, Bedienungsanleitungen und Datenblätter finden Sie auf www.ganzeinfach.de in unserem Down- load-Bereich. ENG: Latest information, drivers, user manuals and data sheets can be found at www.ganzeinfach.de in our download area. FRA: Vous trouverez les dernières informations, les pilotes, les notices et les fiches techniques dans l’espace de téléchargement sur notre site www.ganzeinfach.de.