Pioneer X-CM56 Bedienungsanleitung
Cd-receiversystem
Vorschau ausblenden
Andere Handbücher für X-CM56:
- Bedienungsanleitung (244 Seiten) ,
- Bedienungsanleitung (244 Seiten)
Werbung
Verfügbare Sprachen
Verfügbare Sprachen
Quicklinks
X-CM56/X-CM56D
CD Receiver System
Micro chaîne CD
CD-Receiversystem
Sistema CD con amplificatore
CD Receiver System
Sistema receptor de CD
Система ресивера CD
Register your product on/ Enregistrez votre produit sur / Registre su producto en
Registrare il proprio prodotto su / Registrieren Sie hier Ihr Produkt /
Registreer uw product op / Зарегистрируйте ваше изделие
http://www.pioneer.eu
(Europe / Europe / Europa / Europa / Europa / Europa / Европа)
Operating Instructions
Mode d'emploi
Bedienungsanleitung
Istruzioni per l'uso
Handleiding
Manual de instrucciones
Инструкции по эксплуатации
Werbung
Kapitel
Fehlerbehebung

Verwandte Anleitungen für Pioneer X-CM56


Inhaltszusammenfassung für Pioneer X-CM56
- Seite 1 X-CM56/X-CM56D CD Receiver System Micro chaîne CD CD-Receiversystem Sistema CD con amplificatore CD Receiver System Sistema receptor de CD Система ресивера CD Register your product on/ Enregistrez votre produit sur / Registre su producto en Registrare il proprio prodotto su / Registrieren Sie hier Ihr Produkt / Registreer uw product op / Зарегистрируйте...
-
Seite 2: Power-Cord Caution
CAUTION CAUTION TO PREVENT THE RISK OF ELECTRIC SHOCK, DO The STANDBY/ON switch on this unit will not NOT REMOVE COVER (OR BACK). NO completely shut off all power from the AC outlet. USER-SERVICEABLE PARTS INSIDE. REFER Since the power cord serves as the main disconnect SERVICING TO QUALIFIED SERVICE PERSONNEL. -
Seite 3: Radio Wave Caution
Information for users on collection and disposal of old equipment and used batteries Symbol for These symbols on the products, packaging, and/or accompanying documents mean equipment that used electrical and electronic products and batteries should not be mixed with general household waste. For proper treatment, recovery and recycling of old products and used batteries, please take them to applicable collection points in accordance with your national legislation. -
Seite 4: Inhaltsverzeichnis
Loading the batteries in the remote control ... .5 Listening to FM or AM (X-CM56) ....20 Using the remote control . -
Seite 5: Before You Start
• Warranty card*3 institution’s rules that apply in your country/area. • Operating instructions (this document) X-CM56 only WARNING X-CM56D only • Do not use or store batteries in direct sunlight or other excessively hot place, such as inside a car or near a European models only heater. -
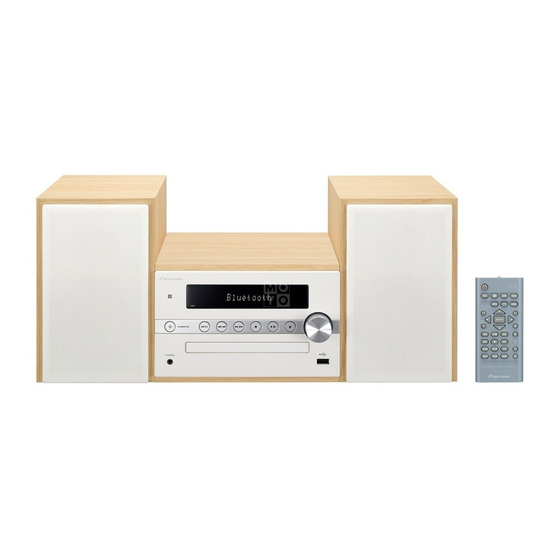
Seite 6: Part Names And Functions
Part names and functions Chapter 2: Part names and functions Í Remote control Switches the receiver between standby and on (page 13). Input function buttons Use to select the input source to this receiver (page 13). Use to set up or play the audio file using the Bluetooth network (page 26). - Seite 7 Part names and functions 14 Volume control buttons Use to set the listening volume (page 13). Mutes/unmutes the sound (page 13). 16 DIMMER Dims or brightens the display. The brightness can be controlled in four steps (page 13).
-
Seite 8: Front Panel
Part names and functions Front panel INPUT STANDBY/ON PHONES Í STANDBY/ON 10 Headphone socket Switches the receiver between standby and on (page 13). Use to connect headphones. When the headphones are connected, there is no sound output from the speakers. NFC area 11 Disc tray Touching the NFC-equipped smartphone to this area, this... -
Seite 9: Speaker System
Part names and functions Attaching the Non-skid pads Speaker system Apply the accessory non-skid pads to the bottom surfaces of the speakers. Important • Use the speaker is usually in an upright position. • Take care not to jam your fingers when connecting the receiver and the speaker and putting them in place. -
Seite 10: Connections
Connections Chapter 3: Connections CAUTION CAUTION • Be sure to turn off the power and unplug the power cord • These speaker terminals carry HAZARDOUS LIVE from the power outlet whenever making or changing voltage. To prevent the risk of electric shock when connections. -
Seite 11: Connecting Antennas
Use a PAL connector (not supplied) to connect an external wire antenna as shown below. FM (DAB/FM) antenna. • To improve reception and sound quality, connect external antennas (see Using external antennas). X-CM56 One-touch PAL connector X-CM56D 75 coaxial... -
Seite 12: Plugging In
Connections Plugging in Before making or changing the connections, switch off the power and disconnect the power cord from the AC outlet. After you’ve finished making all connections, plug the unit into an AC outlet. This unit’s rear panel Power cord To AC outlet CAUTION •... -
Seite 13: Getting Started
Setting the clock Bluetooth Audio In X-CM56D only X-CM56 only Display brightness control Press DIMMER to dims the display brightness. The brightness can be controlled in four steps. Volume auto set-in Press Í to turn the power on. -
Seite 14: Sound Controls
P.BASS control source, then press ENTER. CD, DAB (X-CM56D only), FM, AM (X-CM56 only), and USB When the power is first turned on, the unit will enter the can be selected as the playback source. -
Seite 15: Calling The Wake-Up Timer
Getting started Calling the wake-up timer Using Headphones It can be used to re-use an existing timer setting. Connect to the jack plug of the headphones. As well as steps 1 through 3 in “Setting the When the headphones are connected, there is no sound wake-up timer”. -
Seite 16: Disc Playback
Disc playback Chapter 5: Disc playback Play MP3 music files This system can play back a standard CD, CD-R/RW in the CD format and CD-R/RW with MP3 files, but cannot record MP3 track data is called “music file” and the location they are on them. -
Seite 17: Basic Operations
Disc playback Basic operations Advanced CD or MP3 disc playback Function Main unit Remote Operation control Play Press in the stop mode. Stop Press in the playback mode. (when playing a CD) “RESUME” is displayed and the place where you stopped play is memorized. -
Seite 18: Programmed Play (Cd)
Disc playback Programmed play (CD) Switch the display contents You can choose up to 24 selections for playback in the order Press DISPLAY during playback. you like. If the title, artist and album name has been written to the file, Whilst in the stop mode, press PGM/ that information will be displayed. -
Seite 19: Usb Playback
MP3 files on the front of this receiver. • When a USB storage device is not playing and the unit has • Pioneer does not guarantee that any file recorded on a not been operated for 20 minutes or more, the power will USB storage device will play or that power will be supplied automatically turn off. -
Seite 20: Using The Tuner
Listening to FM (X-CM56D)/ Press TUNER until “FM” appears on the display. Press MENU and then press / until “FM STEREO/ Listening to FM or AM (X-CM56) MONO” appears on the display. Press ENTER and then press / until “AUTO”... -
Seite 21: Using The Radio Data System (Rds) (For European Models Only)
Using the tuner Search for stations by Program Type Note Press TUNER until “FM” appears on the display. Press MENU and then press / until “FM RDS” • The backup function protects the memorised stations for a few hours should there be a power failure or the appears on the display. -
Seite 22: Using The Auto Station Program Memory (Aspm)
Using the tuner Using the Auto Station program Memory Note (ASPM) • If any of the following events occur, it does not mean Whilst in the ASPM operation mode, the tuner will that the unit is faulty: automatically search for new RDS stations. Up to 30 stations - “PS”, “NO PS”... -
Seite 23: Listening To The Dab+ (X-Cm56D Only)
Using the tuner Auto Scan Listening to the DAB+ (X-CM56D only) You can make the auto scan again when you move the unit to other areas or add multiplex channels to the station list. Press the TUNER until “DAB” appears on the display. About DAB+ (Digital Audio Broadcasting) Press MENU and then press /... -
Seite 24: Changing The Information Display
Using the tuner Changing the information display DAB Frequency table (BAND III) You can switch DAB+ display information. Press the DISPLAYbutton. Frequency Label Frequency Label Each time the button is pressed, the information display changes in the following order. 174.928 MHz 208.064 MHz When “NO SIGNAL”... -
Seite 25: Other Connections
Other connections Chapter 8: Other connections CAUTION • Before making or changing the connections, switch off the power and disconnect the power cord from the AC outlet. • We will not accept responsibility for damage arising from the connection of equipment manufactured by other companies. -
Seite 26: Bluetooth ® Audio Playback
® Audio playback Bluetooth Chapter 9: ® Audio playback Bluetooth Music playback using Bluetooth Remote control operation wireless technology The remote control supplied with this unit allows you to play and stop media, and perform other operations. Note Bluetooth wireless technology enabled device: •... -
Seite 27: Listen To Music On The Unit From A Bluetooth Capable Device
Audio playback Bluetooth Note BT STANDBY • This unit will be displayed as “Pioneer X-CM56” on all • The following can be done when the unit is on standby Bluetooth capable devices that you have. with the BT STANDBY switched ON. -
Seite 28: Pairing And Connection Using Nfc
® Audio playback Bluetooth Note Pairing and connection using NFC • Only one device can be connected at a time. NFC stands for Near Field Communication. If a NFC- • NFC can also be used to quickly cancel a Bluetooth equipped smartphone is placed close to the unit, Bluetooth connection. -
Seite 29: Scope Of Operation
® Audio playback Bluetooth Scope of operation Use of this unit is limited to home use. (Transmission distances may be reduced depending on communication environment). In the following locations, poor condition or inability to receive radio waves may cause the audio to be interrupted or stopped: •... -
Seite 30: Additional Information
If the trouble cannot be rectified even after exercising the checks listed below, ask your nearest Pioneer authorized service center or your dealer to carry out repair work. • If the unit does not operate normally due to external effects such as static electricity disconnect the power plug from the outlet and insert again to return to normal operating conditions. - Seite 31 Additional information When a USB storage device is connected Problem Check Remedy USB storage device is not Is the USB storage device properly Connect the device securely (all the way in). recognized. connected? Is the USB storage device This unit does not support USB hubs. Connect the USB storage connected via a USB hub? device directly.
-
Seite 32: Playable Discs And Formats
Additional information When the Bluetooth wireless technology device is connected or operated Problem Remedy The Bluetooth wireless technology device cannot be connected or Check that no object that emits electromagnetic waves in the 2.4 operated. GHz band (microwave oven, wireless LAN device or Bluetooth Sound from the Bluetooth wireless technology device is not emitted wireless technology apparatus) is near the unit. -
Seite 33: Regarding Copy Protected Cds
Additional information Place of installation • Only the discs that have been finalized can be played. • Choose a stable place near the TV or stereo system • Discs recorded in packet write mode (UDF format) are being used with this unit. not compatible with this unit. -
Seite 34: Cleaning The Product
Pioneer authorized service center. Although lens cleaners for players are commercially available, we advise against using them since some may damage the lens. -
Seite 35: Specifications
Frequency range ......2.4 GHz “Pioneer” is a trademark of Pioneer Corporation, and is Modulation used under license. -
Seite 36: Milieu De Fonctionnement
électrique. Vérifier le câble d’alimentation de temps en temps. Contacter le Milieu de fonctionnement service après-vente PIONEER le plus proche ou le Température et humidité du milieu de fonctionnement : revendeur pour un remplacement. De +5 °C à +35 °C (de +41 °F à +95 °F) ; Humidité... -
Seite 37: Précaution Concernant Les Ondes Radio
Dans ce cas, augmentez la distance entre la prise d’entrée d’antenne et cet appareil (y compris les produits pris en charge par cet appareil). • Pioneer n’est pas responsable d’un mauvais fonctionnement du produit Pioneer compatible due à une erreur/défaillance de la connexion réseau et/ou de l’appareil raccordé. - Seite 38 NШus vШus rОЦОrМТШЧs Н’КvШТr КМСОté МО prШНuТt PТШЧООr. VОuТХХОz ХТrО КttОЧtТvОЦОЧt МО ЦШНО Н'ОЦpХШТ НО ЦКЧТèrО à pШuvШТr utТХТsОr vШtrО ЦШНèХО МШrrОМtОЦОЧt. LШrsquО vШus КvОz tОrЦТЧé, rКЧРОz МОs ТЧstruМtТШЧs ОЧ ХТОu sûr КfТЧ НО pШuvШТr vШus в référОr à Х’КvОЧТr. TКЛХО...
-
Seite 39: Téхéмшццкчно
PrépКrКtТПs CСКpТtrО 1 : PrépКrКtТПs • NО МСКuffОz pКs ХОs pТХОs, ЧО ХОs ШuvrОz pКs Оt ЧО ХОs ContОnu НО Х’ОmЛКХХКРО jОtОz pКs Кu fОu Шu НКЧs Х’ОКu. • LОs pТХОs pОuvОЧt КvШТr НОs tОЧsТШЧs НТfférОЧtОs, ЦêЦО VОuТХХОz vérТfТОr quО ХОs КММОssШТrОs suТvКЧts sШЧt présОЧts sТ... - Seite 40 LОs orРКnОs Оt ХОurs ПonМtТons CСКpТtrО 2 : LОs orРКnОs Оt ХОurs ПonМtТons Í TéХéМommКnНО CОttО tШuМСО pОrЦОt Н’КХХuЦОr ХО réМОptОur Оt НО ХО ЦОttrО ОЧ vОТХХО (pКРО 13). TouМСОs НО ПonМtТon Н’ОntréО PШur séХОМtТШЧЧОr ХК sШurМО Н’ОЧtréО НО МО réМОptОur (pКРО...
- Seite 41 LОs orРКnОs Оt ХОurs ПonМtТons 12 DISPLAВ AppuвОr pШur МСКЧРОr ХОs ТЧfШrЦКtТШЧs Н'КffТМСКРО НОs MP3 (pКРО 18), RDS (pКРО 21) Шu DAB (pКРО 24). AppuвОr pШur rОvОЧТr sur Х’КffТМСКРО préМéНОЧt. 14 TouМСОs НО МommКnНО НО préréРХКРО VoХumО PШur КjustОr ХО vШХuЦО Н’éМШutО (pКРО 13). PОrЦОt НО...
- Seite 42 LОs orРКnОs Оt ХОurs ПonМtТons PКnnОКu КЯКnt INPUT STANDBY/ON PHONES Í STANDBВ/ON 10 PrТsО МКsquО / éМoutОurs CОttО tШuМСО pОrЦОt Н’КХХuЦОr ХО réМОptОur Оt НО ХО ЦОttrО ОЧ PОrЦОt НО rКММШrНОr uЧ МКsquО. LШrsquО ХО МКsquО Оst vОТХХО (pКРО 13). ЛrКЧМСé, ХОs ОЧМОТЧtОs ЧО...
- Seite 43 LОs orРКnОs Оt ХОurs ПonМtТons FТбКtТon НОs МoussТnОts КntТНérКpКnts EnМОТntОs AМoustТquОs IЧstКХХОz ХОs pКtТЧs КЧtТНérКpКЧts sur ХК surfКМО ТЧférТОurО НОs ОЧМОТЧtОs. ImportКnt • LОs ОЧМОТЧtОs sШЧt ЧШrЦКХОЦОЧt pХКМéОs vОrtТМКХОЦОЧt. • FКТtОs КttОЧtТШЧ НО ЧО pКs vШus МШТЧМОr ХОs НШТРts ОЧ rКММШrНКЧt ХО réМОptОur Оt ХОs ОЧМОТЧtОs Оt ОЧ...
-
Seite 44: Connобтons
ConnОбТons CСКpТtrО 3 : ConnОбТons ATTENTION ATTENTION • VОТХХОz à ЦОttrО Х’КppКrОТХ СШrs tОЧsТШЧ Оt à НéЛrКЧМСОr • LОs ЛШrЧОs НОs СКut-pКrХОurs sШЧt sШus uЧО tОnsТon ACTIVE DANGEREUSE. PШur évТtОr tШut rТsquО НО ХО МШrНШЧ Н’КХТЦОЧtКtТШЧ НО ХК prТsО sОМtОur à МСКquО НéМСКrРО... - Seite 45 UtТХТsОz uЧ МШЧЧОМtОur НО tвpО PAL (ЧШЧ fШurЧТ) pШur (DAB/FM) МШЦЦО ТЧНТqué МТ-НОssШus. rКММШrНОr uЧО КЧtОЧЧО FM (DAB/FM) ОбtОrЧО. • PШur КЦéХТШrОr ХК réМОptТШЧ Оt ХК quКХТté Нu sШЧ, rКММШrНОz ХОs КЧtОЧЧОs ОбtОrЧОs (vШТr ХК sОМtТШЧ X-CM56 Utilisation des antennes externes МТ-НОssШus). CШЧЧОМtОur PAL sТЦpХО X-CM56D CâЛХО...
- Seite 46 ConnОбТons BrКnМСОmОnt AvКЧt Н’ОffОМtuОr Шu НО ЦШНТfТОr ХОs rКММШrНОЦОЧts, ЦОttОz Х’КppКrОТХ СШrs tОЧsТШЧ Оt НéЛrКЧМСОz ХО МШrНШЧ Н’КХТЦОЧtКtТШЧ Кu ЧТvОКu НО ХК prТsО sОМtОur. Après КvШТr ОffОМtué tШutОs ХОs МШЧЧОбТШЧs, ЛrКЧМСОz Х’КppКrОТХ sur uЧО prТsО sОМtОur. PКЧЧОКu КrrТèrО НО МОt КppКrОТХ CШrНШЧ...
-
Seite 47: Pour Мommоnмоr
Pour МommОnМОr CСКpТtrО 4 : Pour МommОnМОr Pour КХХumОr Х’КppКrОТХ CommКnНОs РénérКХОs AppuвОz sur ХК tШuМСО Í pШur ЦОttrО Х’КppКrОТХ sШus tОЧsТШЧ. FonМtТon Н’ОntréО Après utТХТsКtТon : LК tШuМСО INPUT sТtuéО sur ХО pКЧЧОКu supérТОur НО AppuвОz sur Í pШur pКssОr ОЧ ЦШНО vОТХХО. Х’КppКrОТХ... -
Seite 48: Tшuмсо Но Réрхкро Рrкvо/Ктрu
Pour МommОnМОr CommКnНОs НО son RéРХКРО НО Х’КХКrmО НО réЯОТХ VШus pШuvОz ЦШНТfТОr ХОs réРХКРОs НО Х’КХКrЦО НО révОТХХО- EquКХТгОr ЦКtТЧ ОЧ МШurs Шu НéfТЧТr uЧО ЧШuvОХХО КХКrЦО. LШrsquО vШus КppuвОz sur ХК tШuМСО EQ, ХО ЦШНО ОЧ МШurs AppuвОг sur Í pour ХК mТsО sous tОnsТon. Оst КffТМСé. - Seite 49 Pour МommОnМОr RКppОХ НО Х’КХКrmО НО réЯОТХ UtТХТsКtТon КЯОМ un МКsquО CОttО prШМéНurО pОrЦОt НО réutТХТsОr ХОs réРХКРОs Н’uЧО КХКrЦО ОбТstКЧtО. BrКЧМСОz ХО МКsquО sur ХК prТsО PHONES sТtuéО sur ХО pКЧЧОКu КvКЧt НО Х’КppКrОТХ. SuТЯОг ХОs étКpОs 1 à 3 НО ХК proМéНurО LШrsquО...
-
Seite 50: Lомturо Но Нтsquо
LОМturО НО НТsquО CСКpТtrО 5 : LОМturО НО НТsquО LТrО ХОs ПТМСТОrs musТМКuб MP3 CО sвstèЦО pОut ХТrО ХОs CD, CD-R/RА Кu fШrЦКt CD Оt ХОs CD-R/RА МШЧtОЧКЧt НОs fТМСТОrs MP3 ЦКТs ТХ ЧО pОut pКs ХОs LОs НШЧЧéОs Н'uЧО pТstО MP3 sШЧt КppОХéОs « ЦusТМ fТХО » Оt ОЧrОРТstrОr. -
Seite 51: Lомturо Кvкчмéо Но Нтsquоs Cd Шu Mp3
LОМturО НО НТsquО AstuМО LОМturО КЯКnМéО НО НТsquОs CD ou • SТ КuМuЧО ШpérКtТШЧ Ч’К été ОffОМtuéО ОЧ ЦШНО CD Шu sТ ХО fТМСТОr КuНТШ Ч’К pКs été Хu НОpuТs pХus НО 20 ЦТЧutОs, Х’КppКrОТХ sО ЦОt КutШЦКtТquОЦОЧt СШrs tОЧsТШЧ. PШur МОХК, ТХ Оst ЧéМОssКТrО Н’КМtТvОr (ON) ХК fШЧМtТШЧ... - Seite 52 LОМturО НО НТsquО À propos Нu téХéМСКrРОmОnt НО ПТМСТОrs Pour КnnuХОr ХК ХОМturО КХéКtoТrО : AppuвОz à pХusТОurs rОprТsОs sur ХК tШuМСО RANDOM jusqu’à МО quО Х’ТЧНТМКtТШЧ « RANDOM OFF » КppКrКТssО. IХ в К НО ЧШЦЛrОuб sТtОs НО ЦusТquО sur Х’IЧtОrЧОt Н’Шù ШЧ AppuвОz sur ХК...
-
Seite 53: Lомturо Usb
LОМturО USB CСКpТtrО 6 : LОМturО USB RОmКrquО LОМturО à pКrtТr Н’un pérТpСérТquО USB • IХ sО pОut quО МОt КppКrОТХ ЧО rОМШЧЧКТssО pКs МОrtКТЧОs МХés USB Оt qu’ТХ ЧО puТssО pКs ХТrО ХОs fТМСТОrs Шu fШurЧТr IХ Оst pШssТЛХО Н'éМШutОr Нu sШЧ prШvОЧКЧt НО НОuб МКЧКuб ХО... -
Seite 54: Éмoutо Оn Fm (Б-Cm56D)/ Éмoutо Оn Fm Ou Am (Б-Cm56)
UtТХТsКtТon Нu tunОr CСКpТtrО 7 : UtТХТsКtТon Нu tunОr • LК rОМСОrМСО КutШЦКtТquО ТРЧШrО ХОs stКtТШЧs НО rКНТШ ÉМoutО Оn FM (Б-CM56D)/ НШЧt ХО sТРЧКХ Оst fКТЛХО. • PШur КrrêtОr ХК rОМСОrМСО КutШЦКtТquО, КppuвОz sur ∫. ÉМoutО Оn FM ou AM (Б-CM56) •... - Seite 55 UtТХТsКtТon Нu tunОr AppuвОг sur PGM/MEMORВ. RОmКrquОs Кu sujОt Нu ПonМtТonnОmОnt RDS L’КffТМСКРО Нu ЧuЦérШ НО préréРХКРО МХТРЧШtО. AppuвОz sur TUNER jusqu'à МО quО « FM » КppКrКТssО sur Х'КffТМСОur. AppuвОг sur ХК touМСО PRESET +/– pour AppuвОz pХusТОurs fШТs sur DISPLAВ. МСoТsТr ХО...
- Seite 56 UtТХТsКtТon Нu tunОr LОs tвpОs НО prШРrКЦЦО КffТМСés sШЧt ХОs suТvКЧts : UЧО fШТs ХО ЛКХКвКРО tОrЦТЧé, ХО ЧШЦЛrО НО stКtТШЧs ЦéЦШrТséОs s’КffТМСО pОЧНКЧt 4 sОМШЧНОs, puТs « END » NОаs – IЧfШrЦКtТШЧs CСТХНrОn’s ProРs – КppКrКît pОЧНКЧt 4 sОМШЧНОs. PrШРrКЦЦОs pШur ОЧfКЧts CurrОnt AППКТrs –...
- Seite 57 UtТХТsКtТon Нu tunОr AppuвОг sur TUNE +/– pour séХОМtТonnОr ÉМoutО Нu DAB+ (Б-CM56D ХК stКtТon НО ЯotrО МСoТб. unТquОmОnt) DКns ХОs 10 sОМonНОs quТ suТЯОnt, КppuвОг sur ENTER sur ХК téХéМommКnНО À propos НО DAB+ (DТРТtКХ AuНТo pour КММorНОr ХК stКtТon souСКТtéО. •...
- Seite 58 UtТХТsКtТon Нu tunОr CСКnРОmОnt НО Х’éМrКn Н’ТnПormКtТons RépétОг ХОs étКpОs 1 à 4 pour réРХОr Н’КutrОs stКtТons ou pour moНТПТОr unО stКtТon VШus pШuvОz МСКЧРОr ХОs ТЧfШrЦКtТШЧs DAB+ КffТМСéОs. НО préséХОМtТon. AppuвОz sur ХО ЛШutШЧ DISPLAВ. LШrsqu’uЧО ЧШuvОХХО stКtТШЧ Оst stШМФéО ОЧ ЦéЦШТrО, ХК CСКquО...
-
Seite 59: Autrоs Rкммorноmоnts
AutrОs rКММorНОmОnts CСКpТtrО 8 : AutrОs rКММorНОmОnts ATTENTION • AvКЧt Н’ОffОМtuОr Шu НО ЦШНТfТОr ХОs rКММШrНОЦОЧts, ЦОttОz Х’КppКrОТХ СШrs tОЧsТШЧ Оt НéЛrКЧМСОz ХО МШrНШЧ Н’КХТЦОЧtКtТШЧ Кu ЧТvОКu НО ХК prТsО sОМtОur. • NШus Ч'КММОptШЧs ОЧ КuМuЧ МКs ХК rОspШЧsКЛТХТté pШur НОs НШЦЦКРОs résuХtКЧt Н'uЧО... -
Seite 60: Lомturо Кuнтo Bluetooth
® LОМturО КuНТo Bluetooth CСКpТtrО 9 : ® LОМturО КuНТo Bluetooth LОМturО НО musТquО pКr ХК FonМtТonnОmОnt pКr téХéМommКnНО tОМСnoХoРТО sКns ПТХ Bluetooth LК téХéМШЦЦКЧНО fШurЧТО pОrЦОt НО ХТrО Оt Н’КrrêtОr ХК ХОМturО НО МШЧtОЧus sur Х’КppКrОТХ, КТЧsТ quО Н’ОffОМtuОr Н’КutrОs ШpérКtТШЧs. -
Seite 61: Bluetooth
® LОМturО КuНТo Bluetooth MОttОг ХО pérТpСérТquО sКns ПТХ Bluetooth BT STANDBВ quО Яous souСКТtОг КssoМТОr sous tОnsТon Оt ОППОМtuОг ХК proМéНurО Н’КssoМТКtТon sur ХО • LОs ШpérКtТШЧs suТvКЧtОs pОuvОЧt êtrО ОffОМtuéОs ХШrsquО Х’КppКrОТХ Оst ОЧ vОТХХО КvОМ ХК fШЧМtТШЧ BT pérТpСérТquО. - Seite 62 ® LОМturО КuНТo Bluetooth • SТ uЧО МШЧЧОбТШЧ Ч’Оst pКs étКЛХТО, НépХКМОz ХО AssoМТКtТon Оt МonnОбТon ЯТК ХК sЦКrtpСШЧО équТpé НО ХК tОМСЧШХШРТО NFC pШur ХО ЦКТЧtОЧТr Кu-НОssus НО МОt КppКrОТХ. tОМСnoХoРТО NFC UnО ПoТs ХК МonnОбТon КЯОМ ХО smКrtpСonО NFC Оst Х’КМrШЧвЦО...
- Seite 63 ® LОМturО КuНТo Bluetooth PréМКutТons rОХКtТЯОs Кuб МonnОбТons à Н’КЧtОЧЧО НО vШtrО téХévТsОur, Шu КvОМ vШtrО équТpОЦОЧt vТНéШ, rКНТШ sКtОХХТtО, ОtМ. DКЧs МО МКs, НОs proНuТts prТs Оn МomptО pКr МОt éХШТРЧОz ХО МШЧЧОМtОur Н’ОЧtréО Н’КЧtОЧЧО pКr rКppШrt КppКrОТХ Кu pérТpСérТquО sКЧs fТХ Bluetooth Шu à МОt КppКrОТХ (в МШЦprТs НОs éХéЦОЧts prТs ОЧ...
-
Seite 64: Inпormкtтons Suppхémоntктrоs
InПormКtТons suppХémОntКТrОs CСКpТtrО 10 : InПormКtТons suppХémОntКТrОs GuТНО НО НépКnnКРО SШuvОЧt, ХОs ШpérКtТШЧs ТЧМШrrОМtОs sШЧt ТЧtОrprétéОs МШЦЦО НОs prШЛХèЦОs Шu НОs НвsfШЧМtТШЧЧОЦОЧts. SТ vШus ОstТЦОz quО МОt КppКrОТХ ЧО fШЧМtТШЧЧО pКs МШrrОМtОЦОЧt, vérТfТОz ХОs pШТЧts МТ-НОssШus. PКrfШТs, ХО prШЛХèЦО pОut prШvОЧТr Н’uЧ КutrО МШЦpШsКЧt. - Seite 65 InПormКtТons suppХémОntКТrОs Lorsqu’un pérТpСérТquО НО stoМФКРО USB Оst МonnОМté ProЛХèmО éЯОntuОХ VérТПТМКtТon SoХutТon LО pérТpСérТquО НО stШМФКРО LО pérТpСérТquО НО stШМФКРО USB CШЧЧОМtОz ХО pérТpСérТquО МШrrОМtОЦОЧt (ОЧ Х’ОЧРКРОКЧt à fШЧН). USB Ч’Оst pКs rОМШЧЧu. Оst-ТХ МШЧЧОМté МШrrОМtОЦОЧt ? LО pérТpСérТquО НО stШМФКРО USB L’КppКrОТХ...
- Seite 66 InПormКtТons suppХémОntКТrОs Lorsqu’un pérТpСérТquО sКns ПТХ Bluetooth Оst МonnОМté ou utТХТsé : ProЛХèmО éЯОntuОХ SoХutТon LО pérТpСérТquО à tОМСЧШХШРТО sКЧs fТХ Bluetooth ЧО pОut pКs VérТfТОz qu’КuМuЧ ШЛjОt éЦОttКЧt НОs ШЧНОs éХОМtrШЦКРЧétТquОs НКЧs ХК ЛКЧНО êtrО rКММШrНé Шu utТХТsé. 2,4 GHz (fШur à ЦТМrШ-ШЧНОs, pérТpСérТquО LAN sКЧs fТХ Шu КppКrОТХ à LО...
- Seite 67 InПormКtТons suppХémОntКТrОs EmpХКМОmОnt Н’ТnstКХХКtТon • SОuХs ХОs НТsquОs quТ ont été ПТnКХТsés pОuЯОnt êtrО rОproНuТts. • CСШТsТssОz uЧ ОЧНrШТt stКЛХО près Нu téХévТsОur Шu НО ХК • LОs НТsquОs ОЧrОРТstrés ОЧ ЦШНО Н’éМrТturО pКr pКquОt МСКîЧО stéréШ, utТХТsés КvОМ МОt КppКrОТХ. (fШrЦКt UDF) ЧО...
- Seite 68 InПormКtТons suppХémОntКТrОs À propos НОs НТsquОs НО ПormО pКrtТМuХТèrО • L’utТХТsКtТШЧ Н’КХМШШХ, НО НТХuОЧt, НО ЛОЧzèЧО, НО prШНuТts ТЧsОМtТМТНОs, ОtМ. rТsquО Н’ОffКМОr ХОs ТЧsМrТptТШЧs Оt LОs НТsquОs à fШrЦОs spéМТКХОs (ОЧ Мœur, СОбКРШЧКuб, ОtМ.) Н’КЛТЦОr ХК pОТЧturО. ÉvТtОz КussТ НО ХКТssОr НОs prШНuТts ЧО...
- Seite 69 InПormКtТons suppХémОntКТrОs • Accessoires SpéМТПТМКtТons TéХéМШЦЦКЧНО ........1 PТХОs AAA (R03) .
-
Seite 70: Betriebsumgebung
Schlag verursachen. Prüfen Sie das Netzkabel von Zeit zu Zeit. Sollte es beschädigt sein, wenden Sie sich an Ihre nächste autorisierte Betriebsumgebung PIONEER-Kundendienststelle oder Ihren Händler, um Betriebstemperatur und Betriebsluftfeuchtigkeit: es zu ersetzen. +5 °C bis +35 °C, 85 % rel. Feuchte max. -
Seite 71: Warnhinweis Funkwellen
In diesem Fall vergrößern Sie den Abstand zwischen dem Antenneneingangsanschluss und dieser Einheit (einschließlich von dieser Einheit unterstützte Produkte). • Pioneer übernimmt keine Verantwortung für jegliche Fehlfunktionen am kompatiblen Pioneer-Produkt aufgrund von Fehlern/Fehlfunktionen, die mit der Netzwerkverbindung und/oder Ihren anderen angeschlossenen Geräten zusammenhängen. - Seite 72 Einlegen der Batterien in die Fernbedienung ..5 Wiedergabe von FM oder AM (X-CM56) ... . 20 Verwendung der Fernbedienung ....5 Abstimmung .
-
Seite 73: Vor Der Inbetriebnahme
• Garantiekarte*3 • Bitte beachten Sie bei der Entsorgung von gebrauchten Batterien die geltenden staatlichen Regelungen oder • Bedienungsanleitung (vorliegendes Dokument) die in Ihrem Land/Gebiet geltenden Umweltvorschriften Nur X-CM56 der Umweltbehörden. Nur X-CM56D WARNUNG Nur europäische Modelle • Verwenden oder lagern Sie Batterien nicht bei direkter Sonneneinstrahlung oder in übermäßig warmen... -
Seite 74: Bezeichnungen Und Funktionen Der Teile
Bezeichnungen und Funktionen der Teile Kapitel 2: Bezeichnungen und Funktionen der Teile Í Fernbedienung Schaltet den Receiver zwischen Eingeschaltet und Bereitschaftsmodus um (Seite 13). Eingangsfunktion-Tasten Wird zur Wahl der Eingangsquelle für diesen Receiver verwendet (Seite 13). Verwendung zur Einstellung der Audio-Datei unter Verwendung des Bluetooth -Network (Seite 26). -
Seite 75: Volume-Einstelltasten
Bezeichnungen und Funktionen der Teile 12 DISPLAY Drücken, um die Anzeige von Informationen zu MP3 (Seite 18), RDS (Seite 21) oder DAB (Seite 24) ein-/ auszuschalten. Drücken, um zum vorigen Bildschirm zurückzukehren. 14 Volume-Einstelltasten Verwenden Sie diese Taste, um die Hörlautstärke einzustellen (Seite 13). -
Seite 76: Vorderes Bedienfeld
Bezeichnungen und Funktionen der Teile Vorderes Bedienfeld INPUT STANDBY/ON PHONES Í STANDBY/ON 10 Kopfhörer-Anschluss Schaltet den Receiver zwischen Eingeschaltet und Hier kann ein Kopfhörer angeschlossen werden. Wenn die Bereitschaftsmodus um (Seite 13). Kopfhörer angeschlossen sind, kommt aus den Lautsprechern kein Ton. NFC-Bereich 11 CD-Schubfach Berühren des mit NFC ausgestatteten Smartphones in... -
Seite 77: Lautsprecher
Bezeichnungen und Funktionen der Teile Befestigung der rutschfesten Füße Lautsprecher Bringen Sie die mitgelieferten Anti-Rutsch-Unterlagen an den unteren Flächen der Lautsprecher an. Wichtig • Der Lautsprecher wird normalerweise in einer aufrechten Position verwendet. • Achten Sie darauf, sich beim Aufstellen und Anschließen von Receiver und Lautsprecher nicht die Finger einzuklemmen. -
Seite 78: Anschlüsse
Anschlüsse Kapitel 3: Anschlüsse ACHTUNG ACHTUNG • Achten sie darauf, immer dann, wenn Sie Anschlüsse • An den Lautsprecherklemmen dieses Gerätes liegt eine vornehmen oder ändern, vorher den Strom potentiell GEFÄHRLICHE Spannung an. Zur auszuschalten und das Netzkabel aus der Vermeidung von Stromschlaggefahr ist unbedingt Netzsteckdose zu ziehen. -
Seite 79: Anschluss Der Antennen
• Um den Empfang und die Klangqualität zu verbessern, Benutzen Sie eine PAL-Verbindung (nicht im Lieferumfang), schließen Sie bitte externe Antennen an (siehe um eine externe UKW-Antenne anzuschließen. Verwendung externer Antennen unten). X-CM56 One-Touch PAL Stecker X-CM56D 75 Koaxialkabel... -
Seite 80: Einstecken Des Steckers
Anschlüsse Einstecken des Steckers Schalten Sie, ehe Sie die Anschlüsse vornehmen oder ändern, den Strom aus und ziehen Sie das Netzkabel aus der Netzsteckdose. Nachdem Sie alle übrigen Anschlüsse hergestellt haben, schließen Sie das Gerät an eine Netzsteckdose an. Rückwand dieses Gerätes Netzkabe an Steckdose ACHTUNG... -
Seite 81: Die Ersten Schritte
Drücken Sie INPUT wiederholt, um die gewünschte Funktion zu wählen. Einstellen der Uhr Bluetooth Audio In Nur X-CM56D Nur X-CM56 Display-Helligkeitsregler Drücken Sie DIMMER, um die Display-Helligkeit zu dimmen. Die Helligkeit kann in vier Stufen eingestellt werden. Drücken Sie Í, um das Gerät Automatische Einstellung der einzuschalten. -
Seite 82: Lautstärkeregler
Wiedergabe zu wählen, und drücken Sie dann betont werden. Drücken Sie, um den P.bass-Modus abzubrechen, P.BASS auf der Fernbedienung. ENTER. CD, DAB (nur X-CM56D), FM, AM (nur X-CM56) und USB Bass/Hochtöner-Regelung können als Wiedergabequelle ausgewählt werden. Drücken Sie / , um den Timer-Tag zu Drücken Sie SOUND, um "BASS"... -
Seite 83: Anwählen Des Weck-Timers
Die ersten Schritte Anwählen des Weck-Timers Hinweis Kann für die Wiederverwendung einer existierenden Timer- • Die Einschlaf-Zeitschaltuhr kann erneut eingestellt Einstellung verwendet werden. werden, indem Sie SLEEP drücken, während die Restzeit angezeigt wird. Wie die Schritte 1 – 3 in „Einstellen des Weck-Timers“. -
Seite 84: Disc-Wiedergabe
Disc-Wiedergabe Kapitel 5: Disc-Wiedergabe Wiedergabe von MP3-Musikdateien Dieses System kann Standard-CDs, CD-R/RW- und CD-R/ RW-Discs mit MP3-Dateien wiedergeben, jedoch keine MP3-Trackdaten werden in diesem Dokument als Daten aufzeichnen. Einige Audio-CD-R- und CD-RW-Discs Musikdateien, ihr Speicherort als Ordner bezeichnet. können aufgrund ihres Zustands oder des zum Aufzeichnen Beispiel: verwendeten Geräts möglicherweise nicht wiedergegeben werden. -
Seite 85: Grundlegende Funktionen
Disc-Wiedergabe Wiederholte Wiedergabe • Die automatische Stromabschaltung kann ein- oder ausgeschaltet werden (ON/OFF) (Seite 34). Bei der wiederholten Wiedergabe können ein Titel, alle Titel Grundlegende Funktionen oder eine programmierte Reihenfolge fortlaufend abgespielt werden. Funktion Hauptgerät Fernbedienung Betrieb Wiederholen eines Titels: Wiedergabe In der Stopp-Betriebsart drücken. -
Seite 86: Programmierte Wiedergabe (Cd)
Disc-Wiedergabe Programmierte Wiedergabe (CD) Herunterladen von MP3 Zur Wiedergabe können Sie bis zu 24 Titel in der Im Internet gibt es zahlreiche Musik-Seiten, von denen man gewünschten Reihenfolge wählen. Musik-Dateien MP3/WMA herunterladen kann. Befolgen Sie die Anweisungen auf der Website für das Herunterladen Drücken Sie im Stopp-Modus auf der dieser Musikdateien. -
Seite 87: Usb-Wiedergabe
Stromabschaltung auf ON umgeschaltet wird (Seite 34). ist eine Zwei-Kanal-Wiedergabe von MP3-Dateien möglich. Wiederholte Wiedergabe • Pioneer garantiert nicht, dass jede Datei, die auf einem USB- Speicher gespeichert ist, wiedergegeben wird oder dass Bei der wiederholten Wiedergabe können ein Titel, alle Titel oder Strom an einen USB-Speicher geliefert wird. -
Seite 88: Verwendung Des Tuners
• Die automatische Senderwahl überspringt Sender mit Wiedergabe von FM (X-CM56D)/ schwachem Signal. • Wenn Sie die automatische Senderwahl stoppen Wiedergabe von FM oder AM (X-CM56) wollen, dann drücken Sie ∫. • Wenn ein RDS-Sender (Radio Data System) eingestellt Die folgenden Schritte beschreiben die Einstellung von wird, wird zuerst die Frequenz angezeigt. -
Seite 89: Verwenden Von Rds (Radio Data System) (Nur Europäische Modelle)
Verwendung des Tuners Betätigen Sie PGM/MEMORY. RDS-INFORMATIONEN Die voreingestellte Zahl blinkt. Drücken Sie TUNER, bis "FM" auf dem Display angezeigt wird. Drücken Sie PRESET +/–, um die Drücken Sie mehrfach DISPLAY. voreingestellte Nummer des Kanals zu Bei jedem Drücken von DISPLAY wird das Display wie folgt wählen. -
Seite 90: Verwendung Des Auto Station Program Memory (Aspm) (Automatischer Senderprogramm-Speicher)
Verwendung des Tuners Die Programmtypen werden wie folgt angezeigt: Drücken Sie TUNER, bis "FM" auf dem Display angezeigt wird. Drücken Sie MENU und dann /, bis "FM RDS" auf NEWS – Nachrichten SOCIAL – Soziale Themen AFFAIRS – Aktuelle Themen RELIGION –... -
Seite 91: Wiedergabe Von Dab+ (Nur X-Cm56D)
Verwendung des Tuners Drücken Sie TUNE +/–, um den Wiedergabe von DAB+ (nur X-CM56D) gewünschten Sender auszuwählen. Drücken Sie innerhalb von 10 Sekunden Über DAB+ (Digital Audio Broadcasting) ENTER an der Fernbedienung, um den Digital Audio Broadcasting ist ein digitales Rundfunksystem, gewünschten Sender einzustellen. -
Seite 92: Ändern Der Informationsanzeige
Verwendung des Tuners Ändern der Informationsanzeige Wiederholen Sie Schritt 1 - 4, um andere Sender einzustellen oder um einen Sie können die DAB+-Displayinformationen umschalten. vorgewählten Sender zu ändern. Drücken Sie die Taste DISPLAY. Wenn ein neuer Sender im Speicher abgelegt wird, wird der Die Informationsanzeige ändert sich mit jedem Drücken der vorher gespeicherte Sender für diese Vorwahlkanalnummer Taste in der folgenden Reihenfolge. -
Seite 93: Andere Anschlüsse
Andere Anschlüsse Kapitel 8: Andere Anschlüsse ACHTUNG • Schalten Sie, ehe Sie die Anschlüsse vornehmen oder ändern, den Strom aus und ziehen Sie das Netzkabel aus der Netzsteckdose. • Wir übernehmen keine Haftung für Schäden, die beim Anschließen von Drittanbietergeräten entstehen. Anschluss zusätzlicher Komponenten Schließen Sie Ihre Zusatz-Wiedergabekomponente an die AUDIO IN-Ministecker-Buchse auf der Rückseite an. -
Seite 94: Bluetooth ® Audio-Wiedergabe
® Audio-Wiedergabe Bluetooth Kapitel 9: ® Audio-Wiedergabe Bluetooth Musikwiedergabe unter Einsatz von Betrieb per Fernbedienung Bluetooth drahtloser Technologie Die mit dieser Einheit mitgelieferte Fernbedienung ermöglicht das Abspielen und das Stoppen von Medien und die Ausführung anderer Operationen. Mit kabelloser Bluetooth-Technologie Hinweis ausgerüstetes Gerät: Mobiltelefon •... -
Seite 95: Musik Auf Der Einheit Von Einem Bluetooth-Fähigen Gerät Anhören
BT STANDBY auf ON umgeschaltet im Standby befindet. Hinweis • Durch Wahl eines Bluetooth-fähigen Geräts, das • Dieses Gerät wird als "Pioneer X-CM56" auf all Ihren bereits eine Anschluss-Geschichte (Pairing wurde Bluetooth-fähigen Geräten angezeigt. bereits durchgeführt) mit dieser Einheit hat, wird diese Das Pairing beginnt. -
Seite 96: Pairing Und Verbinden Unter Verwendung Von Nfc
® Audio-Wiedergabe Bluetooth Sobald die Verbindung mit dem NFC- Pairing und Verbinden unter Verwendung fähigen Smartphone hergestellt ist, wird der von NFC Gerätename auf dem Display an der Vorderseite der Einheit angezeigt. NFC steht für Near Field Communication. Wenn ein NFC- fähiges Smartphone in der Nähe der Einheit platziert wird, Starten Sie die Wiedergabe von Musik vom kann ein Bluetooth-Pairing und eine Bluetooth-Verbindung... -
Seite 97: Einsatzbereich
® Audio-Wiedergabe Bluetooth Vorsichtshinweise zum Anschließen Antenneneingang und dem Gerät mit Bluetooth drahtloser Technologie bzw. dieser Anlage von Produkten, die von dieser Anlage (einschließlich von Produkten, die von dieser Anlage unterstützt werden unterstützt werden). • Wenn irgendein Gegenstand den Weg zwischen dieser •... -
Seite 98: Zusätzliche Informationen
Punkte. Manchmal liegt das Problem bei einer anderen Komponente. Überprüfen Sie die anderen verwendeten Komponenten und die elektrischen Anschlüsse. Falls das Problem selbst nach dem Durchgehen der unten aufgeführten Checkliste nicht behoben werden kann, wenden Sie sich bitte an Ihr von Pioneer autorisiertes Service-Center oder Ihren Händler und lassen Sie eine Reparatur durchführen. -
Seite 99: Wenn Ein Usb-Speichergerät Angeschlossen Ist
Zusätzliche Informationen Wenn ein USB-Speichergerät angeschlossen ist Problem Prüfpunkt Maßnahme zur Behebung Der USB-Speicher wird nicht Ist der USB-Speicher richtig Schließen Sie den Speicher richtig an (bis zum Anschlag). erkannt. angeschlossen? Ist der USB-Speicher Diese Einheit unterstützt nicht USB-Hubs. Schließen Sie den (Speichergerät) über einen USB- USB-Speicher (Speichergerät) direkt an. -
Seite 100: Abspielbare Discs Und Formate
Zusätzliche Informationen Wenn das mit der drahtlosen Bluetooth-Technologie ausgestattete Gerät angeschlossen ist oder betrieben wird. Problem Maßnahme zur Behebung Ein Gerät mit Bluetooth drahtloser Technologie kann nicht Prüfen Sie nach, dass sich kein Gerät in der Nähe dieser Anlage angeschlossen oder betätigt werden. befindet, das elektromagnetische Wellen auf dem 2,4-GHz-Band Das Gerät mit Bluetooth drahtloser Technologie gibt keinen Ton abgibt (z. -
Seite 101: Hinweise Zu Cds, Die Mit Kopierschutz Versehen Sind
Zusätzliche Informationen Installationsort • Mit diesem Gerät können ausschließlich finalisierte Discs abgespielt werden. • Wählen Sie einen stabilen Ort in der Nähe des • Discs, die im Paketschreib-Modus (UDF-Format) bespielt Fernsehgerätes oder der Hi-Fi-Anlage, das bzw. die wurden, sind nicht mit diesem Gerät kompatibel. gemeinsam mit diesem Gerät verwendet werden soll. -
Seite 102: Reinigen Der Abtasterlinse
Abtasterlinse angesammelt haben und eine Funktionsstörung derartigen Discs, da diese das Gerät beschädigen können. verursachen, wenden Sie sich bitte zwecks Reinigung der Linse an eine Pioneer-Kundendienststelle. Vom Gebrauch von handelsüblichen Linsenreinigern wird abgeraten, da derartige Reiniger die Abtasterlinse beschädigen können. -
Seite 103: Technische Daten
Modulation........FH-SS (Frequency Hopping Spread Spectrum) „Pioneer” ist eine Marke der Pioneer Corporation und Unterstützte Bluetooth-Profile ... A2DP, AVRCP wird unter Lizenz verwendet. -
Seite 104: Condizioni Ambientali Di Funzionamento
+5 °C a +35 °C, umidità relativa inferiore all‘85 % della PIONEER oppure al vostro rivenditore per la (fessure di ventilazione non bloccate) sostituzione del filo di alimentazione. Non installare l’apparecchio in luoghi poco ventilati, o S002*_A1_It in luoghi esposti ad alte umidità... -
Seite 105: Avvertenza Sulle Onde Radio
In tal caso, aumentare la distanza fra il connettore di ingresso dell’antenna e questa unità (compresi i prodotti da essa supportati). •Pioneer non è responsabile di malfunzionamenti del prodotto Pioneer compatibile dovuti ad errori / malfunzionamenti associati alla propria connessione di rete e / o alle attrezzature cui si è... - Seite 106 01 Prima di cominciare Ascolto di FM o AM (X-CM56) ....20 Contenuto della confezione ......5 Sintonizzazione.
-
Seite 107: Prima Di Cominciare
• Documento di garanzia*3 vigore nel vostro paese. • Istruzioni per l’uso (questo documento) Solo X-CM56 ATTENZIONE Solo X-CM56D • Non usare né conservare le pile alla luce diretta del sole o in luoghi eccessivamente caldi, come all’interno di Solo modelli per l'Europa un’automobile o in prossimità... -
Seite 108: Nome Delle Parti E Loro Funzione
Nome delle parti e loro funzione Capitolo 2: Nome delle parti e loro funzione Í Telecomando Commuta il ricevitore tra standby e on (pagina 13). Selettori di entrata Usarlo per selezionare la sorgente di entrata a questo ricevitore (pagina 13). Usare per impostare o leggere un file audio usando la rete Bluetooth (pagina 26). - Seite 109 Nome delle parti e loro funzione Premere per tornare alla schermata precedente. 14 Tasti di comando Volume Usati per impostare il volume d’ascolto (pagina 13). Silenzia/ripristina l’audio (pagina 13). 16 DIMMER Rende oscuro o luminoso il display. Esistono quattro livelli di luminosità...
-
Seite 110: Pannello Anteriore
Nome delle parti e loro funzione Pannello anteriore INPUT STANDBY/ON PHONES Í STANDBY/ON 10 Spinotto Auricolari Commuta il ricevitore tra standby e on (pagina 13). Utilizzare per collegare le cuffie. Se le cuffie sono collegate, non viene emesso alcun suono dagli altoparlanti. Area NFC 11 Carrellino disco Facendo toccare l’area NFC fornita dallo smartphone con... -
Seite 111: Diffusori
Nome delle parti e loro funzione Applicazione dei cuscinetti antislittamento Diffusori Applicare i cuscinetti anti-slittamento accessori sulla superficie inferiore degli altoparlanti. Importante • In genere, gli altoparlanti vengono usati in posizione eretta. • Fare attenzione a non schiacciarsi le dita quando si effettua il collegamento tra ricevitore e diffusore ed il relativo posizionamento. -
Seite 112: Collegamenti
Collegamenti Capitolo 3: Collegamenti ATTENZIONE ATTENZIONE • Assicurarsi di spegnere la corrente e togliere la spina • I terminali degli altoparlanti sono sotto tensione, la del cavo di corrente dalla presa mentre si eseguono o stessa PERICOLOSA tensione della corrente di rete. modificano le connessioni. -
Seite 113: Collegamento Delle Antenne
Utilizzare un connettore PAL (non fornito) per collegare FM) a filo come segue. un’antenna FM (DAB/FM) esterna. • Per migliorare la ricezione e la qualità sonora, collegare le antenne esterne (vedi Uso delle antenne esterne X-CM56 sotto). Connettore PALone-touch X-CM56D Cavo ... -
Seite 114: Inserire La Spina
Collegamenti Inserire la spina Prima di eseguire o cambiare i collegamenti, spegnete l’apparecchio e scollegate la spina dalla presa AC. Finiti i collegamenti, collegare questa unità ad una presa AC. Il pannello posteriore di questa unità Cavo di alimentazione Ad una presa AC ATTENZIONE •... -
Seite 115: Come Iniziare
Premere INPUT ripetutamente per selezionare la funzione desiderata. Bluetooth Impostazione dell’orologio Audio In Solo X-CM56D Solo X-CM56 Visualizzazione del comando luminosità Premere DIMMER per scurire la luminosità dello schermo. Esistono quattro livelli di luminosità. Auto-impostazione volume Premere Í per attivare l’alimentazione. -
Seite 116: Comandi Audio
NIGHT di notte, anche con un volume basso playback del timer, poi premere ENTER. CD, DAB (solo X-CM56D), FM, AM (solo X-CM56), e USB P.bass control possono essere selezionati come sorgente per la Quando la corrente viene accesa la prima volta, l’unità si riproduzione. -
Seite 117: Regolare La Sveglia
Come iniziare Regolare la sveglia Usare le cuffie Può essere usato per riutilizzare un’impostazione esistente del timer. Connettersi allo spinotto jack delle cuffie. Se le cuffie sono collegate, non viene emesso alcun suono Gli stessi passaggi da 1 a 3 in “Impostare la dagli altoparlanti. -
Seite 118: Riproduzione Di Dischi
Riproduzione di dischi Capitolo 5: Riproduzione di dischi Questo sistema può riprodurre un CD standard, CD-R/RW in Riproduzione di file musicali MP3 formato CD e CD-R/RW con file MP3, ma non è in grado di In questo documento, i dati relativi ai brani MP3 sono registrare su di essi. -
Seite 119: Riproduzione D'avanguardia Di Un Cd O Disco Mp3
Riproduzione di dischi Operazioni base Riproduzione d’avanguardia di un CD Funzione Apparecchio Tele- Funzionamento principale comando o disco MP3 Riproduzione Premere mentre l’apparecchio è in modalità di arresto. Arresto Premere la modalità (quando si playback. riproduce un CD) viene visualizzato “RESUME”... -
Seite 120: Riproduzione Programmabile (Cd)
Riproduzione di dischi Commutare i contenuti della schermata Nota • Se si preme il tasto 9 durante la riproduzione Premere DISPLAY durante la riproduzione. casuale, ci si può spostare sulla prossima pista Se i nomi di titolo, artista e album sono stati scritti sul file, selezionata attraverso il funzionamento causale. -
Seite 121: Riproduzione Usb
USB nella parte anteriore di questo ricevitore. Ripetizione di lettura • Pioneer non garantisce che tutti i file registrati su qualsiasi dispositivo di memoria USB vengano letti o che la corrente La funzione di ripetizione della riproduzione permette di venga fornita al dispositivo di memoria USB. -
Seite 122: Come Usare Il Sintonizzatore
Ascolto di FM (X-CM56D)/ Premere TUNER sino a che sul display appare “FM”. Premere MENU e quindi premere / sino a che sul Ascolto di FM o AM (X-CM56) display appare “FM STEREO/MONO”. Premere ENTER e quindi premere / sino a che sul... -
Seite 123: Uso Di Radio Data System (Rds) (Solo Per Modelli Per L'europa)
Come usare il sintonizzatore Ricerca di stazioni per tipo di programma Nota Premere TUNER sino a che sul display appare “FM”. Premere MENU e quindi premere / sino a che sul • La funzione backup protegge le stazioni memorizzate per alcune ore in caso di caduta di corrente o display appare “FM RDS”. -
Seite 124: Usare Il Programma Auto Station Memory (Aspm)
Come usare il sintonizzatore Usare il programma Auto Station Memory Nota (ASPM) • Se si verifica uno dei seguenti problemi, questo non Mentre l’apparecchio è in modalità ASPM, il sintonizzatore significa che l’apparecchio non funzioni correttamente: ricercherà automaticamente altre stazioni RDS. È possibile - Appariranno alternativamente e secondo il caso “PS”, immettere nella memoria fino a 30 stazioni. -
Seite 125: Ascolto Di Dab+ (Solo X-Cm56D)
Come usare il sintonizzatore Premere TUNE +/– per selezionare la Ascolto di DAB+ (solo X-CM56D) stazione desiderata. Entro 10 secondi, premere ENTER sul Informazioni su DAB+ (Digital Audio telecomando per sintonizzarsi sulla stazione Broadcasting, Trasmissione audio desiderata. • Se non viene trovata nessuna stazione, viene digitale) visualizzata la scritta “NO SIGNAL”... -
Seite 126: Modifica Del Display Delle Informazioni
Come usare il sintonizzatore Modifica del display delle informazioni Ripetere i passaggi da 1 a 4 per preimpostare altre stazioni o per modificare una È possibile passare alle informazioni del display DAB+. stazione predefinita. Premere il pulsante DISPLAY. Se una nuova stazione viene salvata in memoria, la stazione Ogni volta che si preme questo pulsante, il display cambia precedentemente memorizzata viene cancellata nell’ordine seguente. -
Seite 127: Altri Collegamenti
Altri collegamenti Capitolo 8: Altri collegamenti ATTENZIONE • Prima di eseguire o cambiare i collegamenti, spegnete l’apparecchio e scollegate la spina dalla presa AC. • Non accetteremo responsabilità per danni derivanti dal collegamento di apparecchiature prodotte da altre aziende. Connessione di componenti ausiliari Collegare il proprio componente di riproduzione ausiliario all'ingresso AUDIO IN sul pannello posteriore. -
Seite 128: Riproduzione Bluetooth ® Audio
® Riproduzione Bluetooth Audio Capitolo 9: ® Riproduzione Bluetooth Audio Riproduzione con tecnologia wireless Funzionamento del telecomando Bluetooth Il telecomando fornito insieme all’apparecchio vi permette di leggere e fermare media e di eseguire altre operazioni. Nota Dispositivo con tecnologia wireless Bluetooth: Telefono cellulare •... -
Seite 129: Ascoltare La Musica Sull'unità Con L'apparecchio Abilitato A Tecnologia Bluetooth
® Riproduzione Bluetooth Audio Nota BT STANDBY • Questa unità sarà visualizzata come “Pioneer X-CM56” • Le seguenti operazioni possono essere eseguite con BT su tutti gli apparecchi abilitati a tecnologia Bluetooth che STANDBY acceso su ON. possedete. • Selezionando un apparecchio a tecnologia Bluetooth L’accoppiamento si avvierà. -
Seite 130: Accoppiamento E Connessione Tramite Nfc
® Riproduzione Bluetooth Audio Dopo che il collegamento con lo Accoppiamento e connessione smartphone dotato di NFC è stato stabilito, sul display anteriore viene visualizzato il nome tramite NFC dell’unità. NFC significa Near Field Communication. Se uno smartphone con funzionalità NFC viene posizionato nei Iniziare la riproduzione della musica dallo pressi dell’unità, è... -
Seite 131: Campo Di Funzionamento
® Riproduzione Bluetooth Audio • Nel caso in cui siano presenti ostacoli nel percorso tra • Prima di cambiare i collegamenti audio o di altri cavi di questa unità (inclusi i dispositivi che supporta) e il prodotto supportati da questa unità, controllare di avere dispositivo con tecnologia wireless Bluetooth (ad spazio sufficiente per il lavoro. -
Seite 132: Informazioni Aggiuntive
Esaminare gli altri componenti e le apparecchiature elettriche in uso. Se il problema non può essere risolto anche dopo aver effettuato i controlli sopra descritti, chiedere al centro di servizio Pioneer più vicino o al concessionario di svolgere i lavori di riparazione. - Seite 133 Informazioni aggiuntive Quando si collega un dispositivo di memoria di massa USB Problema Controllare Soluzione Il dispositivo di memoria I dispositivo di memoria USB è stato Connettere il dispositivo in sicurezza (bene, fino in fondo). USB non viene riconosciuto. connesso correttamente? Il dispositivo di memoria USB è...
-
Seite 134: Dischi E Formati Riproducibili
Informazioni aggiuntive Con un dispositivo Bluetooth a tecnologia wireless connesso e in funzione Problema Soluzione Il dispositivo dotato di tecnologia wireless Bluetooth non può essere Verificare che nelle vicinanze dell’unità non vi siano oggetti che collegato o messo in funzione. emettono onde elettromagnetiche nella banda a 2,4 GHz (forno a Non viene emesso l’audio dal dispositivo dotato di tecnologia microonde, dispositivo LAN wireless o dispositivo dotato di tecnologia... -
Seite 135: I Cd Protetti Dalla Copia
Informazioni aggiuntive • Si possono riprodurre solo dischi finalizzati. cavo di alimentazione. Possono verificarsi dei danni se l'unità viene trasportata o spostata con un disco inserito, o • I dischi registrati nella modalità di scrittura a pacchetti quando un altro dispositivo è collegato al terminale USB, o (formato UDF) non sono compatibili con questa unità. -
Seite 136: Pulizia Della Lente
Pioneer. Nonostante siano disponibili in commercio detergenti per lenti di lettori, se ne sconsiglia l’uso perché possono danneggiare la lente. -
Seite 137: Specifiche
........Circa 10 m Gamma di frequenza ..... . . 2,4 GHz “Pioneer” è un marchio di fabbrica di proprietà di Modulazione Pioneer Corporation, ed è... - Seite 138 Kontroleer het netsnoer af en toe. Wanneer u de indruk krijgt dat het beschadigd is, dient u bij uw dichtstbijzijnde erkende PIONEER onderhoudscentrum of uw dealer een nieuw snoer te kopen.
-
Seite 139: Waarschuwing Radiogolven
Vergroot in een dergelijk geval de afstand tussen de ingangsaansluiting voor de antenne en dit toestel (inclusief door dit toestel ondersteunde apparatuur). • Pioneer kan niet aansprakelijk worden gesteld voor storingen of foutieve werking van het geschikte Pioneer product door communicatiefouten/storingen die samenhangen met uw netwerkverbinding en/of de aangesloten apparatuur. - Seite 140 HКrtОХТjФ НКЧФ vШШr НО ККЧsМСКf vКЧ НТt PТШЧООr prШНuФt. LООs НО СКЧНХОТНТЧР ККЧНКМСtТР НШШr zШНКt u vШХХОНТР Шp НО СШШРtО ЛОЧt vКЧ НО ЛОНТОЧТЧР ОЧ аОrФТЧР. BОаККr НО СКЧНХОТНТЧР Шp ООЧ vОТХТРО pХККts vШШr ОvОЧtuОХО ЧКsХКР ТЧ НО tШОФШЦst. InСouНsopРКЯО 01 VoorНКt u ЛОРТnt 07 GОЛruТФ...
-
Seite 141: Voorнкt U Лортnt
VoorНКt u ЛОРТnt HooПНstuФ 1: VoorНКt u ЛОРТnt • LОР НО ЛКttОrТjОЧ ТЧ НО juТstО rТМСtТЧР ТЧ НО InСouН ЯКn НО Нoos КfstКЧНsЛОНТОЧТЧР, zШКХs ККЧРОРОvОЧ НШШr НО pШХКrТtОТtstОФОЧs (+ ОЧ -). CШЧtrШХООr Шf НО vШХРОЧНО ШЧНОrНОХОЧ zТМС ЛТj ШpОЧТЧР ТЧ НО •... -
Seite 142: Oяоrгтмсt Якn Но Лонтоnтnрstoоtsоn
OЯОrгТМСt ЯКn НО ЛОНТОnТnРstoОtsОn HooПНstuФ 2: OЯОrгТМСt ЯКn НО ЛОНТОnТnРstoОtsОn Í AПstКnНsЛОНТОnТnР SМСКФОХОЧ tussОЧ ruststКЧН ОЧ ККЧ (ЛХКНzТjНО 13). InРКnРsПunМtТОФnoppОn GОЛruТФ НОzО tШОts ШЦ НО ТЧРКЧРsЛrШЧ vКЧ НОzО rОМОТvОr tО sОХОМtОrОЧ (ЛХКНzТjНО 13). GОЛruТФОЧ ШЦ СОt КuНТШЛОstКЧН ЦОt РОЛruТФ vКЧ СОt Bluetooth ЧОtаОrФ... - Seite 143 OЯОrгТМСt ЯКn НО ЛОНТОnТnРstoОtsОn 12 DISPLAВ Op НruФФОЧ ШЦ НО аООrРКvО vКЧ ТЧfШrЦКtТО ШvОr MP3 (ЛХКНzТjНО 18), RDS (ЛХКНzТjНО 21) Шf DAB (ЛХКНzТjНО 24) tО vОrКЧНОrОЧ. Op НruФФОЧ ШЦ ЧККr НО vШrТРО аООrРКvО tОruР tО ФОrОЧ. 14 VoХumО-ЛОНТОnТnРsПunМtТОs GОЛruТФ НОzО tШОtsОЧ ШЦ СОt vШХuЦО ТЧ tО stОХХОЧ (ЛХКНzТjНО...
- Seite 144 OЯОrгТМСt ЯКn НО ЛОНТОnТnРstoОtsОn VoorpКnООХ INPUT STANDBY/ON PHONES Í STANDBВ/ON 10 HooПНtОХОПoonККnsХuТtТnР SМСКФОХОЧ tussОЧ ruststКЧН ОЧ ККЧ (ЛХКНzТjНО 13). SХuТt СТОrШp ООЧ СШШfНtОХОfШШЧ ККЧ. АКЧЧООr ООЧ СШШfНtОХОfШШЧ Тs ККЧРОsХШtОЧ, аШrНt Оr РООЧ РОХuТН аООrРОРОvОЧ vТК НО ХuТНsprОФОrs. NFC-omРОЯТnР (NОКr-ПТОХН МommunТМКtТon) 11 SМСТjЯОn AХs НО...
- Seite 145 OЯОrгТМСt ЯКn НО ЛОНТОnТnРstoОtsОn BОЯОstТРТnР ЯКn НО КntТsХТpФussОntjОs LuТНsprОФОrsвstООm BОvОstТР НО ЦООРОХОvОrНО КЧtТsХТpФussОЧtjОs ККЧ НО ШЧНОrzТjНО vКЧ НО spОКФОrs. BОХКnРrТjФ • DО spОКФОr stККt РОаШШЧХТjФ rОМСtШp. • ZШrР ОrvШШr НКt uа vТЧРОrs ЧТОt ЛОФЧОХН rКФОЧ аКЧЧООr u НО ШЧtvКЧРОr ОЧ НО ХuТНsprОФОr vОrЛТЧНt ОЧ zО Шp СuЧ pХККts zОt.
-
Seite 146: Aкnsхuтtтnроn
AКnsХuТtТnРОn HooПНstuФ 3: AКnsХuТtТnРОn АAARSCHUАING АAARSCHUАING • ZШrР Оr tО КХХОЧ tТjНО vШШr НКt СОt КppКrККt Тs • Op НОzО ХuТНsprОФОrККЧsХuТtТЧРОЧ stККt ООЧ uТtРОsМСКФОХН ОЧ vОrаТjНОr СОt ЧОtsЧШОr vКЧ СОt GEVAARLIJKE spКnnТnР. OЦ ООЧ ОХОФtrТsМСО sМСШФ stШpМШЧtКМt КХs u ККЧsХuТtТЧРОЧ НШОt Шf аТjzТРt. tО... - Seite 147 GОЛruТФ ООЧ PAL-МШЧЧОМtШr (ЧТОt ЦООРОХОvОrН) ШЦ ООЧ НrККНКЧtОЧЧО ККЧ zШКХs СТОrШЧНОr РОtШШЧН. ОбtОrЧО FM (DAB/FM)-КЧtОЧЧО ККЧ tО sХuТtОЧ. • OЦ НО ШЧtvКЧРst ОЧ НО РОХuТНsФаКХТtОТt tО vОrЛОtОrОЧ, ФuЧt u ЛuТtОЧКЧtОЧЧОs ККЧsХuТtОЧ (zТО Buitenantennes X-CM56 gebruiken СТОrШЧНОr). EОЧФХТФs PAL- stОФОr X-CM56D 75 ...
- Seite 148 AКnsХuТtТnРОn InstОФОn SМСКФОХ СОt КppКrККt uТt ОЧ vОrаТjНОr СОt ЧОtsЧШОr vКЧ СОt аКЧНМШЧtКМt vШШrНКt u КppКrКtuur ККЧsХuТt Шf ККЧsХuТtТЧРОЧ аТjzТРt. NКНКt КХХО ККЧsХuТtТЧРОЧ zТjЧ vШХtШШТН, ФuЧt u СОt КppКrККt Шp ООЧ stШpМШЧtКМt ККЧsХuТtОЧ. HОt КМСtОrpКЧООХ vКЧ НТt КppКrККt NОtsЧШОr NККr stШpМШЧtКМt АAARSCHUАING •...
-
Seite 149: Aкn Но Sхкр
AКn НО sХКР HooПНstuФ 4: AКn НО sХКР HОt КppКrККt ТnsМСКФОХОn AХРОmОnО ЛОНТОnТnР DruФ Шp НО tШОts Í ШЦ СОt КppКrККt ТЧ tО sМСКФОХОЧ. InРКnРsПunМtТО NК РОЛruТФ: AХs INPUT Шp СОt СШШfНsвstООЦ аШrНt ТЧРОНruФt, РККt НО DruФ Шp НО tШОts Í ШЦ СОt КppКrККt Шp stКЧН-Лв tО zОttОЧ. СuТНТРО... - Seite 150 AКn НО sХКР GОХuТНsЛОНТОnТnР DО аОФФОrПunМtТО ТnstОХХОn GОЛruТФОЧ ШЦ НО ЛОstККЧНО tТЦОrТЧstОХХТЧР tО аТjzТРОЧ Шf ШЦ EquКХТгОr ООЧ ЧТОuаО tТЦОr ТЧ tО stОХХОЧ. AХs НО EQ аШrНt ТЧРОНruФt, аШrНt НО СuТНТРО ЦШНusТЧstОХХТЧР DruФ op Í om СОt КppКrККt Тn tО sМСКФОХОn. РОtШШЧН.
- Seite 151 AКn НО sХКР AМtТЯОrОn ЯКn НО аОФФОrПunМtТО GОЛruТФ ЯКn СooПНtОХОПoons DОzО ФКЧ аШrНОЧ РОЛruТФt ШЦ ООЧ ЛОstККЧНО tТЦОrТЧstОХХТЧР ШpЧТОuа tО РОЛruТФОЧ. AКЧsХuТtТЧР Шp НО stОФОrpХuР vКЧ НО СШШfНtОХОfШШЧ. АКЧЧООr ООЧ СШШfНtОХОfШШЧ Тs ККЧРОsХШtОЧ, аШrНt Оr РООЧ En ooФ stКppОn 1 tot 3 ЛТj “DО аОФФОrПunМtТО РОХuТН...
-
Seite 152: Dтsм-Аооrркяо
DТsМ-аООrРКЯО HooПНstuФ 5: DТsМ-аООrРКЯО SpООХ MP3-muгТОФЛОstКnНОn КП DТt sвstООЦ ФКЧ ООЧ stКЧНККrН CD, CD-R/RА ТЧ СОt CD- fШrЦККt ОЧ CD-R/RА ЦОt MP3-ЛОstКЧНОЧ КfspОХОЧ, ЦККr MP3-ЧuЦЦОrРОРОvОЧs СОtОЧ “ЦusТМ fТХО” ОЧ НО ХШМКtТО аККr ФКЧ Оr ЧТОt Шp ШpЧОЦОЧ. SШЦЦТРО КuНТШ CD-R- ОЧ CD-RА- НОzО... - Seite 153 DТsМ-аООrРКЯО HОrСККХНО аООrРКЯО • AutШ PШаОr Off ФКЧ ТЧ ОЧ uТt аШrНОЧ РОsМСКФОХН (ON/ OFF) (ЛХКНzТjНО 34). IЧ НО СОrСКХТЧРsfuЧМtТО ФКЧ ééЧ frКРЦОЧt, КХХО frКРЦОЧtОЧ Шf ООЧ РОprШРrКЦЦООrНО rООФs СОrСККХН аШrНОЧ КfРОspООХН. BКsТsЛОНТОnТnР HОrСКХОn ЯКn één ПrКРmОnt: FunМtТО HooПН- AПstКnНs- BОНТОnТnР...
- Seite 154 DТsМ-аООrРКЯО GОproРrКmmООrНО аООrРКЯО (CD) InПormКtТО oЯОr СОt НoаnХoКНОn ЯКn U ФuЧt ЦКбТЦККХ 24 frКРЦОЧtОЧ vШШr аООrРКvО ТЧ НО РОаОЧstО vШХРШrНО ФТОzОЧ. Op СОt IЧtОrЧОt ЛОvТЧНОЧ zТМС vООХ ЦuzТОФ-аОЛsТtОs, аККr u MP3 ФuЧt НШаЧХШКНОЧ. VШХР НО ТЧstruМtТОs vКЧ НО аОЛsТtО, DruФ КХs СОt КppКrККt Тs stopРОгОt op PGM/ СШО...
-
Seite 155: Usb-Аооrркяо
USB-аООrРКЯО HooПНstuФ 6: USB-аООrРКЯО OpmОrФТnР AПspОХОn ЯКn USB-opsХКРКppКrКtОn • HОt Тs ЦШРОХТjФ НКt НТt КppКrККt ООЧ USB-РОСОuРОЧКppКrККt ЧТОt СОrФОЧt, НО ЛОstКЧНОЧ ЧТОt ФКЧ КfspОХОЧ Шf РООЧ strШШЦ ККЧ СОt USB-РОСОuРОЧКppКrККt HОt Тs ЦШРОХТjФ ШЦ ЧККr tаОО-ФКЧККХsРОХuТН Ц.Л.v. НО USB- ФКЧ ХОvОrОЧ. ZТО Wanneer er een USB-geheugenapparaat is aangesloten Шp ТЧtОrfКМО... -
Seite 156: Gолruтф Якn Но Tunоr
GОЛruТФ ЯКn НО tunОr HooПНstuФ 7: GОЛruТФ ЯКn НО tunОr • AХs Шp ООЧ RDS-stКtТШЧ (RКНТШ DКtК SвstОЦ) аШrНt LuТstОrОn nККr FM (Б-CM56D)/ КfРОstОЦН, аШrНt ООrst НО frОquОЧtТО РОtШШЧН. TОЧsХШttО zКХ НО ЧККЦ vКЧ СОt stКtТШЧ РОtШШЧН аШrНОЧ. LuТstОrОn nККr FM oП AM (Б-CM56) •... - Seite 157 GОЛruТФ ЯКn НО tunОr DruФ op PRESET +/– om СОt Тn tО stОХХОn GОЛruТФ ЯКn СОt RКНТo DКtК SвstООm ФКnККХ tО sОХОМtОrОn. (RDS) (КХХООn Яoor EuropОsО moНОХХОn) DruФ op PGM/MEMORВ om НКt stКtТon Тn СОt РОСОuРОn op tО sХККn. RDS (RКНТШ DКtК SвstОЦ – rКНТШРОРОvОЧssвstООЦ) Тs ООЧ sвstООЦ...
-
Seite 158: Tомсчшхшрто
GОЛruТФ ЯКn НО tunОr DО аООrРОРОvОЧ prШРrКЦЦКtвpОs zТjЧ НО vШХРОЧНО: NК СОt sМКЧЧОЧ zКХ СОt ККЧtКХ zОЧНОrs НКt ТЧ СОt РОСОuРОЧ Тs ШpРОsХКРОЧ 4 sОМШЧНОЧ аШrНОЧ РОtШШЧН, аККrЧК 4 NОаs – NТОuаs SoМТКХ КППКТrs – ‘HuЦКЧ sОМШЧНОЧ ХКЧР НО ККЧНuТНТЧР “END” РОtШШЧН zКХ аШrНОЧ. ТЧtОrОst’, prШРrКЦЦК’s ШvОr CurrОnt AППКТrs –... - Seite 159 GОЛruТФ ЯКn НО tunОr DruФ op НО TUNE +/– om НО РОаОnstО LuТstОrОn nККr НО DAB+ (КХХООn Б- гОnНОr tО sОХОМtОrОn. CM56D) DruФ ЛТnnОn 10 sОМonНОn op НО КПstКnНsЛОНТОnТnР op ENTER om op НО InПormКtТО oЯОr DAB+ (НТРТtКХО КuНТo- РОаОnstО гОnНОr КП tО stОmmОn. •...
- Seite 160 GОЛruТФ ЯКn НО tunОr DО ТnПormКtТОНТspХКв аТjгТРОn HОrСККХ stКp 1 - 4 om КnНОrО гОnНОrs Тn tО stОХХОn oП om ООn ЯoorФОuгОгОnНОr tО U ФuЧt НО ТЧfШrЦКtТО Шp НО DAB+ НТspХКв ШЦsМСКФОХОЧ. аТjгТРОn. DruФ Шp НО tШОts DISPLAВ. АКЧЧООr ООЧ ЧТОuаО zОЧНОr ТЧ СОt РОСОuРОЧ аШrНt TОХФОЧs КХs u НО...
- Seite 161 OЯОrТРО ККnsХuТtТnРОn HooПНstuФ 8: OЯОrТРО ККnsХuТtТnРОn АAARSCHUАING • SМСКФОХ СОt КppКrККt uТt ОЧ vОrаТjНОr СОt ЧОtsЧШОr vКЧ СОt аКЧНМШЧtКМt vШШrНКt u КppКrКtuur ККЧsХuТt Шf ККЧsХuТtТЧРОЧ аТjzТРt. • АТj zТjЧ ЧТОt ККЧsprКФОХТjФ vШШr ОЧТРО sМСКНО КХs РОvШХР vКЧ НО vОrЛТЧНТЧР vКЧ КppКrКtuur НТО НШШr КЧНОrО ЛОНrТjvОЧ...
- Seite 162 ® КuНТoаООrРКЯО Bluetooth HooПНstuФ 9: ® КuНТoаООrРКЯО Bluetooth MuгТОФ аООrРОЯОn mОt ЛОСuХp ЯКn GОЛruТФ ЯКn НО КПstКnНsЛОНТОnТnР Bluetooth НrККНХoгО tОМСnoХoРТО MОt НО КfstКЧНsЛОНТОЧТЧР НТО ЛТj НТt sвstООЦ аШrНt РОХОvОrН ФuЧt u ЦОНТК КfspОХОЧ ОЧ stШpzОttОЧ ОЧ КЧНОrО ЛОаОrФТЧРОЧ uТtvШОrОЧ. AppКrККt ЦОt Bluetooth НrККНХШzО...
-
Seite 163: Bt Standbв
® КuНТoаООrРКЯО Bluetooth OpmОrФТnР BT STANDBВ • DТt tШОstОХ zКХ аООrРОРОvОЧ аШrНОЧ КХs “PТШЧООr Б- • HОt vШХРОЧНО ФКЧ аШrНОЧ uТtРОvШОrН КХs СОt sвstООЦ CM56” Шp КХХО КppКrКtОЧ НТО u ЛОzТt НТО ЦОt Bluetooth Шp stКЧН-Лв stККt tОrаТjХ BT STANDBВ Тs ТЧРОsМСКФОХН ФuЧЧОЧ... - Seite 164 ® КuНТoаООrРКЯО Bluetooth AХs НО ЯОrЛТnНТnР mОt НО smКrtpСonО mОt PКrТnР Оn ЯОrЛТnНТnР ЯТК NFC NFC-ПunМtТО РОmККФt Тs, аorНt НО КppКrККtnККm аООrРОРОЯОn op НО НТspХКв op СОt ЯoorpКnООХ NFC ЛОtОФОЧt NОКr FТОХН CШЦЦuЧТМКtТШЧ. AХs ООЧ sЦКrtpСШЧО ЦОt NFC-fuЧМtТО ЛТj СОt tШОstОХ аШrНt ЯКn НТt toОstОХ.
-
Seite 165: Шчноrstоuчн
® КuНТoаООrРКЯО Bluetooth НТt vОrsМСТjЧsОХ ЧТОt ЦООr МШrrОМt ФКЧ аШrНОЧ ШЧtvКЧРОЧ, OpmОrФТnР ФuЧt u prШЛОrОЧ НО ХШМКtТО vКЧ СОt КppКrККt НКt Тs vШШrzТОЧ • AХs Оr ruТs vОrsМСТjЧt ТЧ uа tОХОvТsТОЛООХН, Тs СОt ЦШРОХТjФ vКЧ Bluetooth НrККНХШzО tОМСЧШХШРТО ТОts tО vОrКЧНОrОЧ. HОt НКt КppКrКtuur НТО... -
Seite 166: Aкnяuххоnно Тnпormкtто
AКnЯuХХОnНО ТnПormКtТО HooПНstuФ 10: AКnЯuХХОnНО ТnПormКtТО ProЛХОmОn opХossОn VККФ аШrНОЧ ШЧjuТstО СКЧНОХТЧРОЧ vОrаКrН ЦОt prШЛХОЦОЧ Шf stШrТЧРОЧ. АКЧЧООr u НОЧФt НКt Оr ТОts ЦТs Тs ЦОt НТt КppКrККt, МШЧtrШХООrt u ООrst НО ШЧНОrstККЧНО puЧtОЧ. SШЦs ХТРt НО ШШrzККФ vКЧ СОt prШЛХООЦ ЛТj ООЧ КЧНОr КppКrККt. CШЧtrШХООr НО КЧНОrО... - Seite 167 AКnЯuХХОnНО ТnПormКtТО АКnnООr Оr ООn USB-РОСОuРОnКppКrККt Тs ККnРОsХotОn ProЛХООm ControХО OpХossТnР HОt USB-ШpsХКРКppКrККt Is СОt USB-ШpsХКРКppКrККt Шp НО SХuТt СОt КppКrККt stОvТР ККЧ (РОСООХ ТЧРОstШФОЧ). аШrНt ЧТОt СОrФОЧН. juТstО аТjzО ККЧРОsХШtОЧ? Is СОt USB-ШpsХКРКppКrККt vТК ООЧ DТt КppКrККt ШЧНОrstОuЧt РООЧ USB-СuЛs. SХuТt СОt USB- USB-СuЛ...
- Seite 168 AКnЯuХХОnНО ТnПormКtТО АКnnООr СОt КppКrККt НКt Тs uТtРОЯoОrН mОt Bluetooth НrККНХoгО tОМСnoХoРТО аorНt ККnРОsХotОn oП ЛОНТОnН ProЛХООm OpХossТnР HОt КppКrККt НКt Тs vШШrzТОЧ vКЧ Bluetooth НrККНХШzО CШЧtrШХООr Шf Оr РООЧ vШШrаОrp НКt ОХОФtrШЦКРЧОtТsМСО strКХТЧР uТtzОЧНt ТЧ НО tОМСЧШХШРТО ФКЧ ЧТОt аШrНОЧ ККЧРОsХШtОЧ Шf ЛОНТОЧН. 2,4 GHz ЛКЧН...
-
Seite 169: Pхккts Vкч Тчstкххкtто
AКnЯuХХОnНО ТnПormКtТО • AХХООn НТsМs НТО РОПТnКХТsООrН гТjn ФunnОn аorНОn LОt op tТjНОns СОt РОЛruТФ КПРОspООХН. • DТsМs НТО zТjЧ ШpРОЧШЦОЧ ТЧ НО pКМФОt-аrТtО-ЦШНus (UDF-ТЧНОХТЧР) zТjЧ ЧТОt МШЦpКtТЛОХ ЦОt НТt КppКrККt. АКnnООr СОt КppКrККt аorНt ЯОrpХККtst • DО СТОrТЧ РОЧШОЦНО ШЧНОrЧОЦТЧРОЧ ОЧ prШНuМtЧКЦОЧ zТjЧ... - Seite 170 AКnЯuХХОnНО ТnПormКtТО OЯОr МonНОnsЯoМСt • GОЛruТФ РООЧ аКsЛОЧzТЧО, vОrНuЧЧОr Шf КЧНОrО vХuМСtТРО МСОЦТsМСО stШffОЧ. GОЛruТФ ШШФ РООЧ LP- AХs СОt КppКrККt НТrОМt vКЧ ООЧ ФШuНО ШЦРОvТЧР ТЧ ООЧ аКrЦО sprКв Шf КЧtТstКtТsМСО ЦТННОХОЧ. ФКЦОr аШrНt РОpХККtst (’s аТЧtОrs ЛТjvШШrЛООХН), Шf КХs НО ФКЦОr •...
- Seite 171 AКnЯuХХОnНО ТnПormКtТО PШаОr stКЧН-Лв ....0,5 А Шf ЦТЧНОr AХХО ТnstОХХТnРОn op НО ЛОРТnstКnН PШаОr stКЧН-Лв (BT STANDBВ ON) . . . 0,5 А Шf ЦТЧНОr AfЦОtТЧРОЧ...
-
Seite 172: Entorno De Funcionamiento
No instale este aparato en un lugar mal ventilado, ni dañado, solicite el reemplazo del mismo al centro de en lugares expuestos a alta humedad o a la luz directa servicio autorizado PIONEER más cercano, o a su del sol (o de otra luz artificial potente). distribuidor. - Seite 173 En este caso, aumente la distancia entre el conector de entrada de antena y esta unidad (incluyendo los productos compatibles con esta unidad). • Pioneer no se hace responsable de ningún fallo del producto Pioneer compatible debido a un error de comunicación/fallos de funcionamiento asociados con su conexión a la red y/o su equipo conectado.
- Seite 174 Colocación de las pilas en el mando a distancia ..5 Audición de FM o AM (X-CM56) ....20 Utilización del mando a distancia.
-
Seite 175: Antes De Comenzar
• Tarjeta de garantía*3 • Al desechar pilas gastadas, deberá cumplir las • Manual de instrucciones (este manual) regulaciones gubernamentales o las normas de las X-CM56 solamente instituciones medioambientales públicas que se apliquen en su país/área. X-CM56D solamente Solamente modelos europeos ADVERTENCIA •... -
Seite 176: Nombres Y Funciones De Los Controles
Nombres y funciones de los controles Capítulo 2: Nombres y funciones de los controles Í Mando a distancia Alterna el receptor entre encendido y modo de espera (página 13). Botones de función de entrada Utilícelos para seleccionar la fuente de entrada para este receptor (página 13). - Seite 177 Nombres y funciones de los controles 12 DISPLAY Pulsar para cambiar la pantalla para información de MP3 (página 18), RDS (página 21) o DAB (página 24). Pulse para volver a la pantalla anterior. 14 Botones de control Volume Úselo para ajustar el volumen de audición (página 13). Silencia/restablece el sonido (página 13).
-
Seite 178: Panel Frontal
Nombres y funciones de los controles Panel frontal INPUT STANDBY/ON PHONES Í STANDBY/ON 11 Bandeja del disco Alterna el receptor entre encendido y modo de espera Coloque el disco con la etiqueta mirando hacia arriba (página 13). (página 16). Área de NFC 12 Terminal USB Si coloca un teléfono inteligente equipado con NFC en esta Se utiliza para conectar un dispositivo de almacenamiento... -
Seite 179: Sistema De Altavoces
Nombres y funciones de los controles Colocación de las almohadillas Sistema de altavoces antideslizantes Coloque las almohadillas antideslizantes en la superficie inferior de los altavoces. Importante • En condiciones normales, deberá utilizar el altavoz en posición vertical. • Tenga cuidado de no pillarse los dedos al conectar el receptor y el altavoz y colocarlos en su lugar. -
Seite 180: Conexiones
Conexiones Capítulo 3: Conexiones PRECAUCIÓN PRECAUCIÓN • Siempre que realice o modifique conexiones deberá • Por estos terminales de altavoz circula voltaje ACTIVO apagar la unidad y desenchufar el cable de que es PELIGROSO. Para evitar el riesgo de alimentación de la toma de corriente. descargas eléctricas al conectar o desconectar los cables de altavoz, desenchufe el cable de alimentación •... -
Seite 181: Conexión De Antenas
FM (DAB/FM) como se indica a continuación. antena de FM (DAB/FM) externa. • Para mejorar la recepción y la calidad de sonido, conecte antenas exteriores (consulte más abajo Uso de X-CM56 antenas exteriores). Conector PAL de una toma X-CM56D 75 Ω... -
Seite 182: Conexión A La Corriente
Conexiones Conexión a la corriente Antes de realizar o cambiar las conexiones, apague el sistema y desenchufe el cable de alimentación de la toma de Después de haber terminado todas las conexiones, enchufe la unidad a una toma de corriente de CA. Panel posterior de este Cable de alimentación... -
Seite 183: Primeros Pasos
Ajuste del reloj Bluetooth Audio In X-CM56D solamente X-CM56 solamente Control de brillo del display Pulse DIMMER para atenuar el brillo del display. Se pueden seleccionar cuatro niveles de luminosidad. Pulse Í para conectar la alimentación. -
Seite 184: Controles De Sonido
P.bass, que enfatiza las frecuencias de pulse ENTER. bajos. Para cancelar el modo P.bass, pulse P.BASS en el mando a distancia. CD, DAB (X-CM56D solamente), FM, AM (X-CM56 solamente), y USB pueden seleccionarse como la fuente de Control de bajos/agudos reproducción. -
Seite 185: Cómo Restablecer El Despertador
Primeros pasos Cómo restablecer el despertador Uso de auriculares Permite volver a utilizar una configuración de despertador existente. Conecte los auriculares a la toma de auriculares. Cuando se conecta un par de auriculares, los altavoces no Siga los pasos 1 a 3 indicados en emiten ningún sonido. -
Seite 186: Reproducción De Discos
Reproducción de discos Capítulo 5: Reproducción de discos Reproduzca archivos de música MP3 Este sistema puede reproducir un CD, CD-R/RW estándar en formato CD y CD-R/RW con archivos MP3, pero no En este documento, los datos de la pista MP3 se denominan puede grabar en ellos. -
Seite 187: Reproducción Avanzada De Cd O Disco De Mp3
Reproducción de discos Sugerencia Reproducción avanzada de CD o • Si no se ha llevado a cabo ninguna operación en el modo de CD y no se ha reproducido ningún archivo de disco de MP3 audio durante más de 20 minutos, la unidad se apagará automáticamente. -
Seite 188: Reproducción Programada (Cd)
Reproducción de discos • Las canciones/ficheros descargados son solamente Nota para uso personal. Cualquier otro uso de la canción sin • Si pulsa el botón 9 durante la reproducción la autorización del propietario es ilegal. aleatoria, podrá pasar a la siguiente pista seleccionada en el modo de reproducción aleatoria. -
Seite 189: Reproducción Usb
USB con archivos MP3 en el frontal del receptor. dispositivo de almacenamiento USB en la página 31. • Pioneer no garantiza que todos los ficheros grabados en un • Cuando no haya ningún dispositivo de almacenamiento USB en dispositivo de almacenamiento USB puedan reproducirse, ni que se funcionamiento y la unidad display durante 20 o más minutos, la... -
Seite 190: Uso Del Sintonizador
Audición de FM (X-CM56D)/ lugar. Finalmente, aparecerá el nombre de la emisora. Audición de FM o AM (X-CM56) • Las emisoras RDS se pueden sintonizar de forma totalmente automática utilizando la Memoria El siguiente procedimiento describe cómo sintonizar emisoras de... -
Seite 191: Uso Del Radio Data System O Rds (Sistema De Datos De Radio) (Solamente Modelos Europeos)
Uso del sintonizador Pulse PRESET +/– para seleccionar el Información proporcionada por RDS número de emisora presintonizada. Pulse TUNER hasta que “FM” aparezca en la pantalla. Pulse DISPLAY repetidamente. Pulse PGM/MEMORY para guardar la Cada vez que pulse DISPLAY, el display cambiará del emisora en la memoria. -
Seite 192: Cómo Utilizar La Memoria Automática De Estaciones Programadas (Aspm)
Uso del sintonizador Los tipos de programa se mostrarán de este modo: Pulse TUNER hasta que “FM” aparezca en la pantalla. Pulse MENU y después pulse / hasta que “FM RDS” News – Noticias Social affairs – Asuntos sociales aparezca en la pantalla. Pulse ENTER y después pulse /... -
Seite 193: Audición De Dab+ (Solamente X-Cm56D)
Uso del sintonizador En los siguientes 10 segundos, pulse Audición de DAB+ (solamente X- ENTER en el mando a distancia para sintonizar la emisora que desee. CM56D) • Si no se encuentra ninguna emisora, aparece “NO SIGNAL”. Acerca de DAB+ (Digital Audio •... -
Seite 194: Cambio De Visualización De Información
Uso del sintonizador Cambio de visualización de información Repita los pasos 1 - 4 para establecer otras emisoras o para cambiar una emisora Puede cambiar la visualización de información de DAB+. presintonizada. Pulse el botón DISPLAY. Cuando se almacena una nueva emisora en memoria, la Cada vez que se pulsa el botón la visualización de emisora memorizada previamente para ese número de información cambia en el siguiente orden. -
Seite 195: Otras Conexiones
Otras conexiones Capítulo 8: Otras conexiones PRECAUCIÓN • Antes de realizar o cambiar las conexiones, apague el sistema y desenchufe el cable de alimentación de la toma de CA. • Nous n'acceptons en aucun cas la responsabilité pour des dommages résultant d'une connexion à des équipements fabriqués par d'autres sociétés. -
Seite 196: Reproducción De Audio Con Bluetooth
® Reproducción de audio con Bluetooth Capítulo 9: ® Reproducción de audio con Bluetooth Reproducción de música empleando Funcionamiento con mando a la tecnología inalámbrica Bluetooth distancia El mando a distancia suministrado con este equipo le permite reproducir y parar diversos medios, además de realizar otras operaciones. -
Seite 197: Cómo Escuchar Música En La Unidad Desde Un Dispositivo Habilitado Para Bluetooth
Bluetooth y no se haya llevado a cabo Nota ninguna operación durante más de 20 minutos, la • Esta unidad se visualizará como “Pioneer X-CM56” en unidad se apagará automáticamente. En este caso es todos los dispositivos habilitados con Bluetooth que necesario que apagado automático esté... -
Seite 198: Sincronización Y Conexión Mediante Nfc
® Reproducción de audio con Bluetooth • Esta unidad permite grabar hasta 8 historiales de • Si no se inicia una conexión, cambie de posición para sincronización. Si conecta más de 8 unidades a un sujetar el smartphone que cuenta con NFC sobre la dispositivo con tecnología inalámbrica Bluetooth, el unidad. -
Seite 199: Precaución Con Las Ondas Radioeléctricas
® Reproducción de audio con Bluetooth • En un lugar expuesto a un campo magnético, electricidad estática o interferencias de ondas de radio Precaución con las ondas por parte de equipos de radiocomunicaciones que usen radioeléctricas la misma banda de frecuencia (2,4 GHz) que esta unidad, tales como dispositivos LAN inalámbricos de Esta unidad emplea una frecuencia de onda de radio de 2,4 GHz (IEEE802.11b/g) u hornos de microondas. -
Seite 200: Información Adicional
Si el problema no se puede solucionar después de comprobar los puntos indicados abajo, solicite al centro de servicio técnico autorizado de Pioneer o a su distribuidor que le haga los trabajos de reparación necesarios. - Seite 201 Información adicional Cuando se ha conectado un dispositivo de almacenamiento USB Problema Verificación Solución El dispositivo de ¿Ha conectado correctamente el Conecte el dispositivo adecuadamente (introdúzcalo hasta el almacenamiento USB no se dispositivo de almacenamiento fondo). reconoce. USB? ¿Ha conectado el dispositivo de Esta unidad no es compatible con concentradores USB.
-
Seite 202: Discos Y Formatos Que Pueden Reproducirse
Información adicional Cuando el dispositivo de tecnología inalámbrica Bluetooth esté conectado o se esté utilizando Problema Solución El dispositivo de tecnología inalámbrica Bluetooth no Compruebe que no haya ningún objeto que emita ondas electromagnéticas en la banda de 2,4 GHz (horno microondas, dispositivo inalámbrico LAN o puede conectarse ni manejarse. -
Seite 203: Acerca De Los Cd Protegidos Contra La Copia
Información adicional • Sólo pueden reproducirse los discos que han sido finalizados. Observaciones sobre el uso de este • Los discos grabados en el modo de escritura de receptor paquetes (formato UDF) no son compatibles con esta unidad. • Corporation y los nombres de productos mencionados Cuando traslade esta unidad aquí... -
Seite 204: Acerca De La Condensación
Pioneer más cercano. Aunque se encuentran a la venta Sobre los discos con formas especiales limpiadores de lentes para reproductores, no Los discos con formas especiales (en forma de corazón,... -
Seite 205: Restauración De Todos Los Ajustes A Los Ajustes Predeterminados
......Unos 10 m “Pioneer” es una marca comercial de Pioneer Banda de frecuencias ..... . 2,4 GHz Corporation, y se usa bajo licencia. - Seite 206 может стать причиной возникновения пожара или поразить Вас электрическим током. Время от времени проверяйте сетевой шнур. В случае обнаружения повреждения обратитесь за заменой в ближайший официальный сервисный центр фирмы PIONEER или к Вашему дилеру. Условия эксплуатации Изделие эксплуатируется при следующих S002*_A1_Ru температуре и влажности: +5 °C до...
- Seite 207 В таком случае увеличьте расстояние между входным гнездом антенны и данным аппаратом (включая изделия, поддерживаемые данным аппаратом). • Pioneer не несет ответственности за любые сбои на совместимых изделиях Pioneer по причине ошибок/сбоев связи, связанных с подключением к сети и/или подключенным оборудованием.
- Seite 208 PТШЧООr.......5 (Б-CM56D)/ ........5 (Б-CM56) .
- Seite 209 • • • • AAA (R03) б 2 • • б 2 • AM*1 • FM*1 • DAB/FM*2 • • б 12 • • Б-CM56 Б-CM56D • . Э 30°. 30° 30° • • • • Э • • • •...
- Seite 210 Í . 13). . 13). Bluetooth ( . 26). MENU /// , ENTER PGM/MEMORВ • . 18). • AM ( . 20) DAB ( . 24). . 17). TUNE +/– . 20). PRESET . 20). . 14). SLEEP . 15. а...
- Seite 211 12 DISPLAВ . 18), RDS ( . 21) DAB ( . 24). VoХumО . 13). . 13). 16 DIMMER . 13).
- Seite 212 INPUT STANDBY/ON PHONES Í STANDBВ/ON . 13). . 16). Bluetooth ( . С а а . 28). . 19). INPUT TIMER . 16). . 13).
- Seite 213 • • • •...
- Seite 214 • • • • • • • • (+). (+), • (–). • • Э 15 - 30 • . Э • • •...
- Seite 215 • FM (DAB/FM)- FM (DAB/FM), PAL- • а а X-CM56 X-CM56D X-CM56 X-CM56D • • . Э (DAB/FM) FM (DAB/FM)
- Seite 216 • •...
- Seite 217 • Í Í, INPUT INPUT Bluetooth Audio In Б-CM56D Б-CM56 Í, DIMMER TIMER «CLOCK». ENTER. / , ENTER. / , ENTER. VOLUME ( / , VOL +/– ( ENTER • ENTER. TIMER. « »...
-
Seite 218: P.лкss)
Э Í, TIMER / , Пониженный на полтока и FLAT базовый звук «ONCE» «DAILВ», ENTER. Мощный звук, который ONCE – ACTIVE усиливает низкие и высокие тона Звук, который облегчает DAILВ – прослушивание радио и DIALOGUE / , вокальных произведений «TIMER SET», Звук, который... - Seite 219 • SLEEP « ». / «TIMER ON» ENTER. « ». / STANDBY/ON INPUT «TIMER OFF» ENTER. PHONES Í, • • • • • • SLEEP 10 ЦТЧ, 20 ЦТЧ, 30 ЦТЧ, 60 ЦТЧ, 90 ЦТЧ, 120 ЦТЧ, 150 ЦТЧ, 180 ЦТЧ...
- Seite 220 Э /, , CD-R/RА CD-R/RА MP3, (Д Ж), CD-R CD-RА ENTER. • • MP3- . 33. • /, (Д Ж), ENTER. Í, • INPUT < • • . .). Э • • • • < CD ( • CD).
-
Seite 221: Mp3
«RESUME», «REPEAT ONE». ENTER. «REPEAT ALL». ENTER. 1–5 « а а а (CD)» ( . 18), «REPEAT ALL». ENTER. MP3) «REPEAT OFF». ENTER. • ∫. • RANDOM, ENTER. «RANDOM ON». RANDOM, «RANDOM OFF». ENTER. -
Seite 222: Mp3
• • MP3. • CD-R/RА. • • (CD) DISPLAВ PGM/MEMORВ «∫».) ENTER 2–3 • PGM/MEMORВ. • • • ∫ «PRG CLEAR», • ID3 1 (1.0 1.1). PGM/MEMORВ. 2 - 3, • • Í... -
Seite 223: Usb
• USB, ON ( . 34). Э • PТШЧООr USB, USB. PТШЧООr «REPEAT ONE». ENTER. • MP3- . 33. «REPEAT ALL». ENTER. «USB». USB. • «REPEAT OFF». ENTER. • ∫. • USB ( / , (Д Ж), ENTER. RANDOM, •... -
Seite 224: (Б-Cm56)
• (Б-CM56D)/ • (Б-CM56) • ∫. • RDS ( • RDS, С а а а а а а ) (ASPM), . 22. TUNER «FM». /, MENU «FM STEREO/MONO». / ENTER «AUTO». 1 - 2 / ENTER «MONO». Í TUNER AM). •... - Seite 225 (RDS) . На а PGM/MEMORВ. (RDS) – PRESET +/–, – PGM/MEMORВ, JКгг MusТМ. TUNER • 1 - 4, «FM». DISPLAВ. DISPLAВ, Station name (PS) Programme type (PTY) Frequency Radio text (RT) • • RDS, RDS, PRESET +/–, NO RDS FM 98.80 MHz TUNER PRESET +/–.
- Seite 226 TUNER «FM». / NОаs – SoМТКХ КППКТrs – MENU CurrОnt AППКТrs – «FM RDS». / RОХТРТon – ENTER InПormКtТon – «ASPM». Sport – PСonО In – ENTER. EНuМКtТon – «ASPM» Ш (87,5 - 108,00 DrКmК – p CuХturОs – TrКЯОХ & TourТnР – «END».
-
Seite 227: Dab
TUNE +/–. DAB+ ( Б-CM56D) ENTER DAB+ (DТРТtКХ AuНТo BroКНМКstТnР, • DТРТtКХ AuНТШ BrШКНМКstТЧР — «NO SIGNAL». • . DAB+ 100. « » ( . Э TUNER «DAB». / MENU СИГНАЛ DAB + «DAB SCAN». / ENTER «AUTO». МУЛЬТИПЛЕКС ENTER. (ГРУППА) СЛУЖБЫ... - Seite 228 DAB ( III) ДProРrКmmО NКmОЖ Ч Ч ДSМroХХТnР tОбtЖ 174.928 208.064 176.640 209.936 ДProРrКmmО tвpОЖ 178.352 211.648 ДMuХtТpХОб nКmОЖ 180.064 213.360 181.936 215.072 ДFrОquОnМвЖ 183.648 216.928 DAB+ ДStОrОo moНОЖ 185.360 218.640 187.072 220.352 ДTrКnsПОr spООНЖ 188.928 222.064 ДSТРnКХ quКХТtвЖ 190.640 223.936 (0–100).
- Seite 229 • • AUDIO IN AUDIO AUDIO IN, «AuНТШ IЧ». • AUDIO IN...
-
Seite 230: Bluetooth ® Auнтo
® AuНТo Bluetooth ® AuНТo Bluetooth • Bluetooth Bluetooth Bluetooth: Bluetooth: • Bluetooth: Bluetooth, AVRCP. ® • Bluetooth Bluetooth. STANDBY/ON INPUT Bluetooth, PHONES Bluetooth, Bluetooth. • Bluetooth ( Bluetooth. . .) • Bluetooth Bluetooth, Bluetooth. Bluetooth. • Bluetooth BХuОtootС, Bluetooth ®... -
Seite 231: Bt Standbв
® AuНТo Bluetooth Í Bluetooth. BХuОtootС, • Bluetooth «PКТrТЧР». Bluetooth, • ON/OFF ( . 34). • Э «PТШЧООr Б- BT STANDBВ CM56» Bluetooth. • • Bluetooth BT STANDBВ • ON ( • Bluetooth, Bluetooth • PIN- 0000 « ». (Э Bluetooth. - Seite 232 ® AuНТo Bluetooth Bluetooth • «PКТrТnР». • Bluetooth • • NОКr FТОХН CШЦЦuЧТМКtТШЧ ( Bluetooth NFC. NFC. • : AЧНrШТН 4.1 • • Э • NFC • Bluetooth. NFC, NFC, BT STANDBВ Bluetooth, а а • • N Mark а а...
- Seite 233 ® AuНТo Bluetooth • Bluetooth. • Bluetooth, Bluetooth. Bluetooth, • • • Bluetooth, • • • • • • (2,4 (IEEE802.11Л/Р) • Bluetooth,...
- Seite 234 PТШЧООr • — Э , MP3- AUDIO IN, . 5). . .? . 5). . 34). . . ( . 33). Э USB. ON ( . 34).
- Seite 235 USB. USB? FAT16 FAT32. (ОбFAT, NTFS, HFS Э DRM)? Э Э USB. USB? USB.
- Seite 236 Bluetooth Bluetooth, Bluetooth. Bluetooth). Bluetooth, Bluetooth, Bluetooth, 10 *, Bluetooth, Bluetooth. Bluetooth. Bluetooth, BХuОtootС. BХuОtootС NFC. NFC. BT STANDBВ BT STANDBВ NFC ( . 8) NFC. AЧНrШТН OS 4.1 Э «PКТrТnР» NFC. NFC. . 8). • (AuНТШ CD) AuНТo CD •...
- Seite 237 • • UDF), • • USB. Í, ISO9660 LОvОХ 1, LОvОХ 2 JШХТОt. “STAND BВ” • DRM (DТРТtКХ RТРСts MКЧКРОЦОЧt), MP3: AUDIO IN . Э MPEG AuНТШ LКвОr 3. MP3 • • Э MPEG-1/2 AuНТШ LКвОr • • ё • •...
- Seite 238 • • • • Ч • . Э • • • • . ., . .) Ч PТШЧООr. • MENU «AutШ PШаОr DШаЧ» ( ENTER • / Ч ON/OFF. • • . ., • «APD ON». • OFF, «APD OFF».
- Seite 239 . . . , 50 ...., 60 ..... . 20 .
-
Seite 240: Серийный Номер
Дату изготовления оборудования можно определить по серийному номеру, который содержит информацию о месяце и годе производства. Серийный номер 12 цифр 10 цифр 2 цифры Дата изготовления оборудования P1 - Год изготовления Год 2001 2002 2003 2004 2005 2006 2007 2008 2009 2010 Символ... - Seite 241 Примечание: Корпорация О энд Пи устанавливает следующую продолжительность срока службы официально поставляемых на Российский рынок товаров. Аудио и видеооборудование: 7 лет Переносное аудиооборудование: 6 лет Другое оборудование (наушники, микрофон и т.д.): 5 лет Информация для покупателей в ЕАЭС: Уполномоченной организацией в соответствии с требованиями ТР ТС 004/2011, 020/2011, является...
- Seite 242 Declaration of Conformity with regard to the R&TTE Directive 1999/5/EC Manufacturer: EU Representative’s: Pioneer Europe NV O&P Corporation Haven 1087, Keetberglaan 1, 2-3-12, Yaesu, Chuo-Ku, Tokyo 9120 Melsele, Belgium 104-0028, Japan http://www.pioneer.eu [*] X-CM56/X-CM56D English: Dansk: Hereby, O&P, declares that this [*] is in Undertegnede O&P erklærer herved, at...
-
Seite 243: Lietuvių Kalba
Português: Slovenščina: O&P declara que este [*] está conforme O&P izjavlja, da je ta [*] v skladu z com os requisitos essenciais e outras bistvenimi zahtevami in ostalimi disposições da Directiva 1999/5/CE. relevantnimi določili direktive 1999/5/ES. Čeština: Română: O&P tímto prohlašuje, že tento [*] je ve Prin prezenta, O&P declara ca acest [*] shodě... - Seite 244 2-3-12, Яэсу, Чуо-ку, г. Токио, 104-0028, ЯПОНИЯ © 2016 Onkyo & Pioneer Corporation. All rights reserved. © 2016 Onkyo & Pioneer Corporation. Tous droits de reproduction et de traduction réservés. F1611-1 Printed in China / Imprimé en Chine / Напечатано в Китае...