auna 10026465 Handbuch
Soundbar
Inhaltsverzeichnis
Verfügbare Sprachen
Verfügbare Sprachen
Kapitel
Inhaltsverzeichnis
Fehlerbehebung

Verwandte Anleitungen für auna 10026465


Inhaltszusammenfassung für auna 10026465
- Seite 1 Auna Soundbar 10026465...
-
Seite 2: Inhaltsverzeichnis
Audio von einem USB-Sepicher abspielen 9 Radio hören und Weitere Funktionen 10 Pflege und Wartung 11 Fehlersuche und Fehlerbehebung 9 Hinweise zur Entsorgung und Konformitätserklärung 9 Technische Daten Artikelnummer 10026465 Verstärker Leistungsabgabe 150 W MAX Frequenzbereich 20Hz-20kHz +/- 3 dB Eingangsspannung... -
Seite 3: Lieferumfang
Lieferumfang 1x Soundbar 1x Fernbedienung 1x CR2025 Batterie 1x Koaxialkabel 1x RCA Audiokabel mit 3,5 mm Klinkenstecker 1x FM Antenne 1x Bedienungsanleitung Sicherheitshinweise WARNUNG Um die Gefahr von Stromschlägen zu reduzieren entfernen Sie keine der Abdeckungen. Das Gerät enthält Teile, die dem Benutzer nicht zugänglich sind. Reparaturen dürfen nur von qualifi zierten Fachkräften durchgeführt werden. -
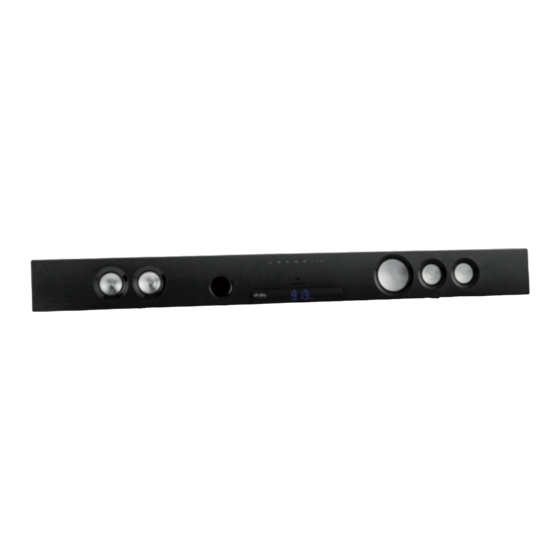
Seite 4: Geräteübersicht Und Funktionstasten
Geräteübersicht und Funktionstasten DISPLAY: Zeigt den aktuellen Status des Geräts an. STANDBY: Zum Anschalten der Soundbar oder um in den STANDBY Modus zu wechseln. SOURCE: Wählen sie mit dieser Taste zwischen TV, AUX, FM, COAX, BT, OPTC, USB, ARC Eingang. PLAY/PAUSE: Zum Starten oder Anhalten eines Titels im USB und Bluetooth Modus. -
Seite 5: Wandmontage Und Fernbedienung Vorbereiten
Wandmontage 1. Richten Sie die Soundbar gerade an der ge- 3. Stecken Sie Dübel und Schrauben (nicht im wünschten Stelle aus. Markieren Sie mit ei- Lieferumfang enthalten) in die Löcher und nem Stift die Stellen für die Bohrlöcher in ei- schrauben Sie die Schrauben so weit herein, nem Abstand von 75 cm. -
Seite 6: Installation Und Anschlüsse
Installation und Anschlüsse Option 1: Geräte über RCA Audiokabel anschließen • HINWEIS: Versichern Sie sich, dass die TV Audioanschlüs- se Ausgänge und keine Eingänge sind. Sollte das der Fall sein, benutzen Sie stattdessen Option 4. • Verbinden Sie das eine Ende des RCA Kabels mit der RCA Ausgangsbuchse von TV, DVD oder Konsole. -
Seite 7: Inbetriebnahme
Inbetriebnahme Stromanschluss Verbinden Sie das Gerät über das mitgelieferte Netzkabel mit einer Steckdose. Schalten Sie den Hauptnetzschalter ein. Standby Modus • Drücken Sie auf die Standby Taste (3 & 10), um das Gerät einzuschalten. • Um das Gerät wieder in den Standby Modus zu versetzen, drücken Sie die Taste erneut. •... -
Seite 8: Bassverstärkung
Bassverstärkung • Um die Bassleistung zu erhöhen, drücken Sie wiederholt auf die BASS (B)+ Taste (R9). • Um die Bassleistung zu reduzieren, drücken Sie mehrmals hintereinander auf die BASS (B)- Taste (R9). Die Bassleistung reicht von -3 bis +3. Ton stummschalten Wenn Sie die MUTE Taste (16) auf der Fernbedienung drücken wird der Ton kurzzeitig stummgeschaltet. -
Seite 9: Audio Von Einem Usb-Sepicher Abspielen
Bluetooth Geräte steuern • Sobald die Geräte verbunden sind können Sie Laustärke, Titelwahl und ähnliche Funktionen ent- weder an Ihrem Bluetooth Gerät einstellen oder Sie benutzen dafür die entsprechenden Tasten an der Soundbar und auf der Fernbedienung. • Drücken Sie die PLAY/PAUSE Taste (U4 & R1) um den gewünschten Titel abzuspielen. Drücken Sie die Taste erneut, um den Titel anzuhalten. -
Seite 10: Sleeptimer
Wichtige Hinweise zum Thema USB • Die Soundbar ist nicht mit allen USB-Speichermedien kompatibel. • Falls Sie ein USB-Verlängerungskabel, einen USB-Hub oder einen USB-Kartenleser wird das Spei- chermedien möglicherweise nicht erkannt. • Wenn sie das USB-Kabel oder das USB-Speichermedium während des Abspielens abziehen, kann es sein, dass die Soundbar nicht an dem Punkt fortfährt, an dem das Abspielen unterbrochen wurde. -
Seite 11: Pflege Und Wartung
Pfl ege und Wartung ACHTUNG Stromschlaggefahr! Ziehen Sie immer den Stecker aus der Steckdose, bevor Sie das Gerät reinigen oder warten. • Versichern Sie sich, dass die Soundbar ausgeschaltet ist und der Stecker aus der Steckdose gezo- gen wurde. • Wischen Sie das Gehäuse mit einem leicht feuchten, fusselfreien Lappen ab. •... -
Seite 12: Konformitätserklärung
Hinweise zur Entsorgung Befi ndet sich die linke Abbildung (durchgestrichene Mülltonne auf Rädern) auf dem Produkt, gilt die Europäische Richtlinie 2002/96/EG. Diese Produkte dürfen nicht mit dem normalen Hausmüll entsorgt werden. Informieren Sie sich über die örtlichen Regelungen zur getrennten Sammlung elektrischer und elektronischer Gerätschaf- ten.