Herunterladen Inhalt Inhalt Diese Seite drucken
Inhaltsverzeichnis

Werbung

Verfügbare Sprachen

Verfügbare Sprachen

BEDIENUNGSANLEITUNG
USER MANUAL
MODE D'EMPLOI
MANUAL DEL USUARIO
HPS-1500
High-Power-Spot
Für weiteren Gebrauch aufbewahren!
©
Copyright
Keep this manual for future needs!
Nachdruck verboten!
Gardez ce mode d'emploi pour des
Reproduction prohibited!
utilisations ultérieures!
Réproduction interdit!
Guarde este manual para posteriores usos.
Prohibida toda reproducción.

Werbung

Inhaltsverzeichnis
loading

Inhaltszusammenfassung für EuroLite HPS-1500

  • Seite 1 BEDIENUNGSANLEITUNG USER MANUAL MODE D’EMPLOI MANUAL DEL USUARIO HPS-1500 High-Power-Spot Für weiteren Gebrauch aufbewahren! © Copyright Keep this manual for future needs! Nachdruck verboten! Gardez ce mode d’emploi pour des Reproduction prohibited! utilisations ultérieures! Réproduction interdit! Guarde este manual para posteriores usos.
  • Seite 2: Inhaltsverzeichnis

    MULTI-LANGUAGE-INSTRUCTIONS Inhaltsverzeichnis Table of contents Sommaire Contenido EINFÜHRUNG..............................4 SICHERHEITSHINWEISE..........................4 BESTIMMUNGSGEMÄßE VERWENDUNG..................... 5 GERÄTEÜBERSICHT............................6 INSTALLATION ..............................7 Lampeninstallation/Lampenwechsel......................7 Überkopfmontage ............................8 BEDIENUNG ..............................9 Anschluss an den DMX-512 Controller / Verbindung Projektor – Projektor..........10 DMX-GESTEUERTER BETRIEB........................10 Adressierung des Projektors........................
  • Seite 3 You can find the latest update of this user manual in the Internet under: Vous pouvez trouvez la dernière version de ce mode d'emploi dans l'Internet sous: Vd. puede encontrar la versión más reciente de este manual en el Internet bajo: www.eurolite.de 41601025X98NXS_V_1_0.DOC 3/43...
  • Seite 4: Einführung

    - sicherstellen, dass gegebenenfalls jede erhaltene Ergänzung in die Anleitung einzuführen ist EINFÜHRUNG Wir freuen uns, daß Sie sich für eine HPS-1500 Lichteffekt entschieden haben. Nehmen Sie die Lichteffekt aus der Verpackung. Prüfen Sie zuerst, ob Transportschäden vorliegen. In diesem Fall nehmen Sie das Gerät nicht in Betrieb und setzen sich bitte mit Ihrem Fachhändler in Verbindung.
  • Seite 5: Bestimmungsgemäße Verwendung

    Das Gerät darf nicht in Betrieb genommen werden, nachdem es von einem kalten in einen warmen Raum gebracht wurde. Das dabei entstehende Kondenswasser kann unter Umständen Ihr Gerät zerstören. Lassen Sie das Gerät solange uneingeschaltet, bis es Zimmertemperatur erreicht hat! Der Aufbau entspricht der Schutzklasse I.
  • Seite 6: Geräteübersicht

    Die maximale Umgebungstemperatur t = 45° C darf niemals überschritten werden. Nehmen Sie das Gerät erst in Betrieb, nachdem Sie sich mit seinen Funktionen vertraut gemacht haben. Lassen Sie das Gerät nicht von Personen bedienen, die sich nicht mit dem Gerät auskennen. Wenn Geräte nicht mehr korrekt funktionieren, ist das meist das Ergebnis von unfachmännischer Bedienung! Soll das Gerät transportiert werden, verwenden Sie bitte die Originalverpackung, um Transportschäden zu vermeiden.
  • Seite 7: Installation

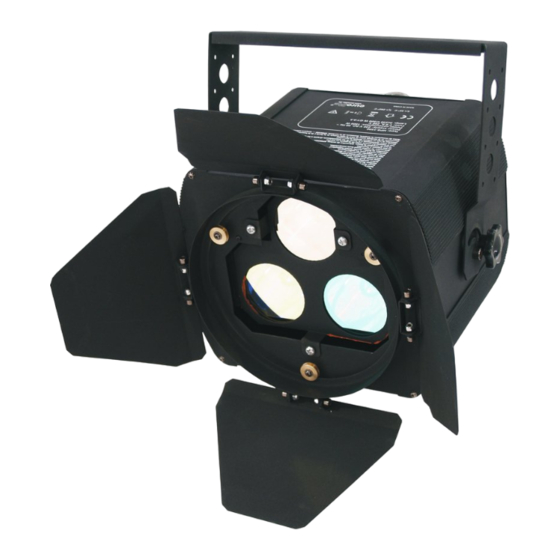
    (5) Feststellschraube (6) Fangsicherung (7) Lüfter (8) Netzanschlußbuchse (9) Sicherungshalter (10) LCD Mode Display (11) OUT Buchse (12) IN Buchse C&B SIGNAL COLOR MODE DOWN INSTALLATION Lampeninstallation/Lampenwechsel LEBENSGEFAHR! Lampen nur bei ausgeschaltetem Gerät einsetzen! Netzstecker ziehen! ACHTUNG! Die Lampe muss gewechselt werden, wenn diese beschädigt ist oder sich durch Wärme verformt hat! Vor dem Wechseln der Lampe, das Gerät allpolig von der Netzspannung trennen (Netzstecker ziehen) und die Lampe unbedingt erst abkühlen lassen (ca.
  • Seite 8: Überkopfmontage

    Schritt 5: Setzen Sie die Lampenserviceklappe wieder auf und ziehen Sie die Schrauben fest. Schalten Sie das Gerät niemals ein, ohne vorher die Serviceklappe geschlossen zu haben! Überkopfmontage LEBENSGEFAHR! Bei der Installation sind insbesondere die Bestimmungen der BGV C1 (vormals VBG 70) und DIN 15560 zu beachten! Die Installation darf nur vom autorisierten Fachhandel ausgeführt werden! Die Aufhängevorrichtungen des Gerätes muss so gebaut und bemessen sein, dass sie 1 Stunde lang ohne...
  • Seite 9: Bedienung

    LEBENSGEFAHR! Vor der ersten Inbetriebnahme muss die Einrichtung durch einen Sachverständigen geprüft werden! BEDIENUNG Wenn Sie das Gerät an die Spannungsversorgung angeschlossen haben, nimmt der HPS-1500 den Betrieb auf. Die Lüfter beginnen zu rotieren und das Display leuchtet auf. 41601025X98NXS_V_1_0.DOC...
  • Seite 10: Anschluss An Den Dmx-512 Controller / Verbindung Projektor - Projektor

    Anschluss an den DMX-512 Controller / Verbindung Projektor – Projektor C&B C&B SIGNAL SIGNAL COLOR COLOR C&B SIGNAL COLOR MODE DOWN MODE DOWN MODE DOWN 120 Ohms DMX-512 Controller Achten Sie darauf, dass die Adern der Datenleitung an keiner Stelle miteinander in Kontakt treten. Die Geräte werden ansonsten nicht bzw.
  • Seite 11: Adressierung Des Projektors

    Um die Startadresse einzustellen drücken Sie die Up/Down-Tasten, bis das Display die gewünschte Adresse anzeigt. Ansteuerung: Nachdem Sie die Startadresse definiert haben, können Sie den HPS-1500 über Ihren Controller ansteuern. Bitte beachten Sie: Das Gerät prüft, ob DMX-512 Daten empfangen werden oder nicht. Wenn Daten empfangen werden, blinkt die Kontroll-LED.
  • Seite 12: Reinigung Und Wartung

    Mode 3 – Color Preset Kanal Eigenschaft Schwarz (alle aus) Blau Magenta Gelb Grün Cyan Weiß (alle an) REINIGUNG UND WARTUNG Der Unternehmer hat dafür zu sorgen, dass sicherheitstechnische und maschinentechnische Einrichtungen mindestens alle vier Jahre durch einen Sachverständigen im Umfang der Abnahmeprüfung geprüft werden. Der Unternehmer hat dafür zu sorgen, dass sicherheitstechnische und maschinentechnische Einrichtungen mindestens einmal jährlich durch einen Sachkundigen geprüft werden.
  • Seite 13: Sicherungswechsel

    Sicherungswechsel Wenn die Feinsicherung des Gerätes defekt ist, darf diese nur durch eine Sicherung gleichen Typs ersetzt werden. Vor dem Sicherungswechsel ist das Gerät allpolig von der Netzspannung zu trennen (Netzstecker ziehen). Vorgehensweise: Schritt 1: Öffnen Sie den Sicherungshalter an der Geräterückseite mit einem passenden Schraubendreher.
  • Seite 14: Introduction

    - pass this manual on to every further owner or user of the product - include every supplementay update with the original manual INTRODUCTION Thank you for having chosen a HPS-1500 lighting effect. Unpack your HPS-1500. Before you initially start-up, please make sure that there is no damage caused by transportation. Should there be any, consult your dealer and do not use the device.
  • Seite 15: Health Hazard

    This device falls under protection-class I. The power plug must only be plugged into a protection class I outlet. Never let the power-cord come into contact with other cables! Handle the power-cord and all connections with the mains with particular caution! Make sure that the available voltage is not higher than stated on the rear panel.
  • Seite 16: Overview

    Please consider that unauthorized modifications on the device are forbidden due to safety reasons! Never remove the serial barcode from the device as this would make the guarantee void. Danger of burning: the barn-doors must never be closed during the operation. The maximum angle is 90° to 180°! If this device will be operated in any way different to the one described in this manual, the product may suffer damages and the guarantee becomes void.
  • Seite 17: Installation

    (6) Attachment eyelet (7) Ventilation fan (8) Power supply (9) Fuseholder (10) LCD Mode Display (11) OUT Socket (12) IN Socket C&B SIGNAL COLOR MODE DOWN INSTALLATION Installing/Replacing the lamps DANGER TO LIFE! Only install the lamps with the device switched off! Unplug from mains before! CAUTION! The lamp has to be replaced when it is damaged...
  • Seite 18: Overhead Rigging

    Do not operate this device with opened lamp service lid! Overhead rigging DANGER TO LIFE! Please consider the DIN 15560 and the respective national norms during the installation! The installation must only be carried out by an authorized dealer! The installation of the device has to be built and constructed in a way that it can hold 10 times the weight for 1 hour without any harming deformation.
  • Seite 19: Operation

    Before taking into operation for the first time, the installation has to be approved by an expert! OPERATION After you connected the effect to the mains, the HPS-1500 start running. The ventilation fans begin to rotate and the display lights up.
  • Seite 20: Dmx-Controlled Operation

    After having addressed all HPS-1500, you may now start operating these via your lighting controller. Note: The HPS-1500 will automatically detect whether DMX 512 data is received or not. If the data is received, the control LED flashes. If there is no data received at the DMX-input, the control LED does not flash.
  • Seite 21: Dmx-Protocol

    DMX-protocol Mode 1 - RGB Channel 1 Characteristic 0 - 255 Blue 0-100 % Channel 2 Characteristic 0 - 255 Red 0-100 % Channel 3 Characteristic 0 - 255 Green 0-100 % Mode 2 – Color & Brightness Channel 1 Characteristic Black (all off) Blue...
  • Seite 22: Replacing The Fuse

    3) The electric power supply cables must not show any damages, material fatigue (e.g. porous cables) or sediments. Further instructions depending on the installation spot and usage have to be adhered by a skilled installer and any safety problems have to be removed. DANGER TO LIFE! Disconnect from mains before starting maintenance operation! We recommend a frequent cleaning of the device.
  • Seite 23: Technical Specifications

    TECHNICAL SPECIFICATIONS Power supply: 230 V/50 Hz Power consumption: 1500 W DMX-control-channels: Max. 3 DMX-512-connection: 3-pin XLR Dimensions (LxWxH): 385 x 320 x 330 mm Weight: 6 kg Maximum ambient temperature t 45° C Maximum housing temperature t 295° C Fuse: F 8 A, 230 V Fitting lamp:...
  • Seite 24: Introduction

    - s'assurer qu'en cas de besoin, chaque modification obtenue soit ajoutée au mode d'emploi. INTRODUCTION Nous vous remercions d'avoir choisi un effet lumineux HPS-1500. Sortez le HPS-1500 de son emballage. Avant tout, assurez vous que l'appareil n'a pas subi de dommages lors de son transport. Si tel était le cas, contactez immédiatement votre revendeur.
  • Seite 25: Emploi Selon Les Prescriptions

    La construction de l'appareil est conforme aux normes de sécurité de catégorie I. La fiche au secteur doit seulement être branchée avec une prise de courant adaptée. Ne laissez pas les câbles d'alimentation en contact avec d'autres câbles. Soyez prudent; lorsque vous manipulez les câbles et les connexions, vous êtes soumis à...
  • Seite 26: Aperçue Des Parties

    Si vous deviez transporter l'appareil, utilisez l'emballage d'origine pour éviter tout dommage. Notez que pour des raisons de sécurité, il est interdit d'entreprendre toutes modifications sur l'appareil. Il est interdit de retirer le code barre de l'appareil. Ceci annulerait toute garantie. Danger d'incendie: ne jamais fermer les coupe-flux pendant l'operation.
  • Seite 27: Installation

    (6) Oeillet de sécurité (7) Ventilateur (8) Connexion secteur (9) Porte-fusible (10) L'affichage de mode LCD (11) Douille OUT (12) Douille IN C&B SIGNAL COLOR MODE DOWN INSTALLATION Installer/Remplacer des lampes DANGER DE MORT! Toujours mettre hors tension avant de mettre en place les lampes! Débrancher avant toute manipulation! ATTENTION! La lampe doit être remplacée lorsqu'elle a été...
  • Seite 28: Montage Par Dessus De La Tête

    Ne jamais mettre l'appareil sous tension sans avoir refermé le couvercle de la lampe. Montage par dessus de la tête DANGER DE MORT! Quand installer l'appareil, il faut considerer les instructions de DIN 15560 et des normes nationales réspectives! L'installation est à faire effectuer par un installateur agrée! Les dispositifs de suspension doivent être construites et conceptionnés de telle manière qu’ils puissent supporter son charge utile de 10 fois pour 1 heure sans déformation permanente nuisible.
  • Seite 29: Danger D'incendie

    Avant la première mise en marche, l’installation doit être contrôlé par un organisme agrée! MANIEMENT Aussitôt que vous avez branché l'appareil au secteur, les ventilateurs de la HPS-1500 commencent à fonctionner. Les ventilateurs commencent à tourner et l'affichage s’allume. 29/43...
  • Seite 30: Connexions Au Contrôleur Dmx-512 / Raccord Projecteur - Projecteur

    Connexions au contrôleur DMX-512 / raccord projecteur - projecteur C&B C&B SIGNAL COLOR SIGNAL COLOR C&B SIGNAL COLOR MODE DOWN MODE DOWN MODE DOWN 120 Ohms DMX-512 Controller Faites attention que les câbles n'ont pas de contact entre eux. Il se peut autrement que les appareil ne fonctionneront pas correctement.
  • Seite 31: Protocôle Dmx

    Attention: Le HPS-1500 reconaîtra s'il recoit des signaux DMX-512 ou non. S' il y a de signaux DMX à la douille entrée DMX, la DEL de contrôle clignote. S' il n'y a pas de signaux DMX à la douille entrée DMX, la DEL de contrôle ne clignote pas.
  • Seite 32: Nettoyage Et Maintenance

    Mode 3 – Color Preset Canal 1 Caractéristique Noir (tous éteint) Bleu Magenta Rouge Jaune Vert Cyan Blanc (tous allumé) NETTOYAGE ET MAINTENANCE L’entrepreneur doit assurer à ce que les installations concernant la sécurité technique et la sécurité des machines soient examinés au moins tous les quatre ans par un expert au cadre de l’épreuve de réception. L’entrepreneur doit assurer à...
  • Seite 33: Remplacer Le Fusible

    Remplacer le fusible Toujours remplacer un fusible par un autre de modèle identique. Avant le remplacement du fusible débrancher l'appareil. Procédure: Pas 1: Ouvriez le porte-fusible au dos de l'appareil avec un tournevis et le retirer du boîtier. Pas 2: Retirez le fusible défectueux du porte-fusible. Pas 3: Installez le nouveau fusible au porte-fusible.
  • Seite 34: Introducción

    -pasar el manual a cada sucesivo poseedor o usuario del producto -asegurar que inserte cada suplemento del manual INTRODUCCIÓN Gracias por haber elegido un efecto luminoso HPS-1500. Desembale su HPS-1500. Antes de la puesta en marcha inicial, por favor asegúrese de que no hay daños causados durante el transporte.
  • Seite 35: Peligro Para La Salud

    Si el aparato ha estado expuesto a grandes cambios de temperatura (p.e. tras el transporte), no lo enchufe inmediatamente. La condensación de agua producida podría dañar su aparato. Deje el aparato desconec- tado hasta que llegue a la temperatura ambiente. Este aparato pertenece a la clase de protección I.
  • Seite 36: Descripción De Las Partes

    Maneje el aparato sólo después de familiarizarse con sus funciones. No permita el manejo a personas que no conocen el aparato lo suficientemente bien. La mayoría de los daños son causados por manejo inadecuado de inexpertos. Si el aparato debe ser transportado, utilize el embalaje original para evitar daños de transporte. ¡Por favor tenga en cuenta que por razones de seguridad las modificaciones no autorizadas del aparato están prohibidas! El código de barras de serie no debe ser quitado del aparato, en caso de que esto ocurra la garantía ya no...
  • Seite 37: Instalación

    (6) Ojete de seguridad (7) Ventilador (8) Conexión a la red (9) Portafusible (10) La pantalla mode LCD (11) Casquillo OUT (12) Casquillo IN C&B SIGNAL COLOR MODE DOWN INSTALACIÓN Instalar/Reemplazar las lámparas ¡PELIGRO DE MUERTE! ¡Instale las lámparas únicamente con el aparato desenchufado! ¡Desenchufe-lo de la corriente! ¡PRECAUCION! ¡La lámpara debe ser reemplazada cuando esté...
  • Seite 38: Montaje Por Encima De La Cabeza

    ¡No maneje este aparato con la tapa de servicio de la lámpara abierta! Montaje por encima de la cabeza ¡PELIGRO DE MUERTE! Cuando instalar el aparato, Vd. debe considerar las instrucciones de DIN 15560 y de las normas nacionales respectivas. ¡La instalación sólo debe ser efectuada por un distribuidor autorisado! La suspensión del aparato debe ser fabricado de una manera que puede llevar 10 vezes la carga por una hora sin sufrir deformaciones dañosas permanentes.
  • Seite 39: Operación

    ¡Antes de la primera puesta en marcha, la instalación debe ser inspeccionada por un perito! OPERACIÓN Después de conectar el efecto a la red, el HPS-1500 comienza a funcionar. Los ventiladores comienzan a girar y la pantalla se enciende. Conexión al controlador DMX / conexión proyector - proyector C&B...
  • Seite 40: Control Por Dmx

    Después de ajustar la dirección de comienzo, Vd. puede controlar el HPS-1500 mediante su controlador DMX. Atención: El HPS-1500 controla si recibe datos DMX-512 o no. Si recibe datos, la LED de control parpadea. Si no recibe datos, la LED de control no parpadea. El aviso aparece: -si no cable XLR (cable de señal del controlador) habia sido puesto en la entrada DMX del HPS-1500.
  • Seite 41: Protocolo Dmx

    -el cable o la clavija esta defectuoso o el cable de señal no está conectado correctamente. Protocolo DMX Mode 1 - RGB Canal 1 Caracteristica 0 - 255 Azul 0-100 % Canal 2 Caracteristica 0 - 255 Rojo 0-100 % Canal 3 Caracteristica 0 - 255...
  • Seite 42: Reemplazar El Fusible

    2) No debe haber deformaciones en la caja, fijaciones y el sitio de instalación (techo, abajamiento, trussing). 3) Los cables de conexión eléctricos no deben haber deterioraciónes, fatiga de material (por ejemplo cables porosos) o depósitos. Otras instrucciones dependente del sitio de instalación y la utilisation deben que ser observadas por el instalador competente y problemas de seguridad deben ser elimindados.
  • Seite 43: Especificaciones Técnicas

    ESPECIFICACIONES TÉCNICAS Alimentación: 230 V/50 Hz Consumo: 1500 W Canales DMX: Max. 3 Conexión DMX 512: XLR tripolar Dimensiones: 385 x 320 x 330 mm Peso: 6 kg Máxima temp. ambiente t 45° C Máxima temp. de la casa (inercia) t 295°...

Inhaltsverzeichnis