Herunterladen Diese Seite drucken
Manfrotto 303SPH Bedienungsanleitung
Vorschau ausblenden Andere Handbücher für 303SPH:

Werbung

Verfügbare Sprachen
  • DE

Verfügbare Sprachen

  • DEUTSCH, seite 20
INSTRUCTIONS
303SPH

Werbung

loading

Inhaltszusammenfassung für Manfrotto 303SPH

  • Seite 1 INSTRUCTIONS 303SPH...
  • Seite 3 INDEX Pag. 4 - 11 “ 12 - 19 “ 20 - 27 “ 28 - 35 “ 36 - 43...
  • Seite 4 Unless your tripod has a built-in levelling device (such as the Manfrotto MDeVe tripod’s 50mm half ball), you will need to use one of the levelling accessories available from the Manfrotto range to ensure accurate levelling of the head (see point SET UP Fix the levelling device (not supplied) to the tripod, then fix the “VR”...
  • Seite 5 MOUNTING THE CAMERA Remove the top assembly (fig. 2) by releasing knob “D”. To slide it completely out of the housing, push safety button “E”. Remove camera plate “CP” (fig. 3) by releasing knob “G”. To slide it completely out of the housing, push safety button “H”.
  • Seite 6 NOTE The position of the housing “M” relative to the long plate “F” will need to be adjusted: loosen screw “O” to slide the housing. The ideal position is with the camera body as far back on the plate as it can go before the front edge “N” of the long plate “F” becomes visible in the camera’s field of view “P”. MOUNT THE CAMERA ON THE HEAD Mount the whole top assembly + camera on the head as shown in figure 7 by sliding the long plate “F”...
  • Seite 7 VERTICAL CAMERA ALIGNEMENT If the camera is not perfectly aligned with vertical axis (see fig. 7b), you can reach the right position by screwing/unscrewing the grub “GS”. APPROXIMATE POSITIONING OF THE “NODAL POINT” (Ref. Figure 8): Align the optical axis of the camera “Q” with the panoramic axis of rotation “R” using “CENTER” marking on plate as a guide, by loosing the knob “V” and moving long plate “S”...
  • Seite 8 ACCURATE POSITIONING 10 11 OF THE “NODAL POINT” If the scene being shot contains objects at varying distances from the point where the shot is being taken (close and distant objects), the “Nodal Point” needs to be more accurately positioned as follows (this procedure is possible ONLY with reflex cameras ): Note:...
  • Seite 9 LATERAL POSITIONING (Ref. Figure 11): Choose a frame that contains both a near object “1” and a distant object “2” situated along the same horizontal line of vision. (See Figure 11A and 11B): unscrew knob “AF” and move the camera around the panoramic axis so that the two objects are first on the left hand side of the frame, then on the right.
  • Seite 10 INSTRUCTIONS FOR SPHERICAL PANORAMIC SHOOTING A spherical panoramic scene is obtained by adding together panoramic sequences taken at different angles from the horizontal. First you will need to choose the number of panoramic sequences you will need to complete the sphere depending on the angle of the lens you will be using.
  • Seite 11 CENTER FC/FS CENTER ADDITIONAL PLATES If you have a very compact camera we suggest you to use the short plates ”SC” (fig. 13) and “FC” (supplied with the head) instead of the two long plates “F” and “S” in order to reduce space and weight of the system.
  • Seite 12 La testa 303SPH è stata progettata per consentire la creazione al computer di scene virtuali partendo da diverse sequenze panoramiche di fotografie digitali o digitalizzate, riprese con differenti angolazioni verticali. La realizzazione di buone sequenze panoramiche prevede quattro requisiti: Livellamento accurato dell’asse di panoramica.
  • Seite 13 MONTAGGIO DELLA FOTOCAMERA Rimuovete il gruppo superiore (fig.2) allentando la manopola “D”. Per estrarre completamente il gruppo dalla sua sede premete il fermo di sicurezza “E”. Rimuovete la piastra della fotocamera “CP” (fig.3) allentando il nottolino “G”. Per estrarre completamente la piastra dalla sua sede premete il fermo di sicurezza “H”.
  • Seite 14 NOTA Occorre regolare la posizione della base “M” rispetto alla piastra lunga “F”: allentate la vite “O” per consentire lo scorrimento della base. La posizione ideale corrisponde ad avere la fotocamera più arretrata possibile sulla piastra senza che il bordo anteriore “N” della piastra lunga “F” risulti visibile nel campo inquadrato dall’obiettivo “P”. MONTAGGIO DELLA FOTOCAMERA SULLA TESTA Montate l’intero gruppo superiore + fotocamera sulla testa come mostrato in figura 7 facendo scorrere la piastra lunga “F”...
  • Seite 15 ALLINEAMENTO DELLA FOTOCAMERA SULL'ASSE VERTICALE Se la fotocamera non è perfettamente allineata sull'asse verticale (vedi fig. 7b), potete raggiungere la posizione corretta avvitando o svitando il grano “GS” POSIZIONAMENTO APPROSSIMATO DEL “PUNTO NODALE” (Ref. figura 8) : allineate l’asse ottico della fotocamera “Q” con l’asse di rotazione panoramica “R” usando come guida l’indicazione “CENTER” sulla piastra, allentando la leva “V”...
  • Seite 16 POSIZIONAMENTO 10 11 ACCURATO DEL “PUNTO NODALE” Se la scena da riprendere comprende soggetti posti a varie distanze dal punto di ripresa (soggetti vicini e lontani), il “Punto Nodale” regolato maggiore accuratezza secondo le seguenti modalità (questa procedura è possibile SOLAMENTE con fotocamere reflex): NOTA: PRIMA REGOLATE LA POSIZIONE...
  • Seite 17 POSIZIONAMENTO LATERALE In riferimento alla figura 11: scegliete un’inquadratura che comprenda tanto un soggetto vicino “1” quanto un soggetto distante “2” posti sullo stesso asse di visione orizzontale. Figure 11A e 11B: svitate la manopola “AF” e muovete la fotocamera intorno all’asse di panoramica fino a portare i due soggetti prima sul lato sinistro e poi su quello destro nell’inquadratura.
  • Seite 18 ISTRUZIONI PER RIPRESE PANORAMICHE SFERICHE Una scena panoramica sferica si ottiene unendo diverse sequenze panoramiche riprese a diversi angoli di inclinazione. Occorre prima definire il numero di sequenze panoramiche necessarie a completare la sfera in base all’angolo coperto dall’obiettivo che si intende usare. Prima di dare inizio alla sequenza panoramica, scegliete l’angolo verticale di partenza usando la scala graduata circolare “Z”...
  • Seite 19 CENTER FC/FS CENTER PIASTRE AGGIUNTIVE Se utilizzate una fotocamere molto compatta vi suggeriamo di usare le piastre corte “SC” (fig.13) e “FC” (fornite con la testa) al posto delle due piastre lunghe “F” e “S”, allo scopo di ridurre l’ingombro ed il peso del sistema. Per sostituire la piastra “S”, svitare la vite “SD”...
  • Seite 20 Funktionen erfüllen. Sofern das verwendete Stativ nicht über eine eingebaute Nivelliervorrichtung verfügt (wie etwa die Halbkugel 50 mm des Manfrotto Stativs MdeVe), ist zur präzisen Nivellierung des Kopfes eine der Nivelliervorrichtungen aus dem Manfrotto Programm erforderlich (siehe Punkt 1).
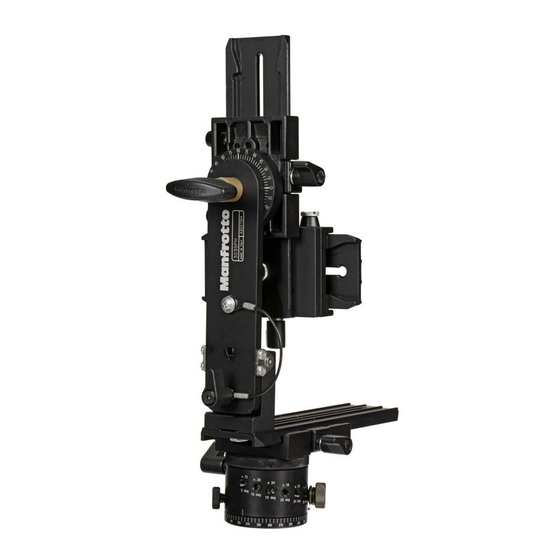
  • Seite 21 BEFESTIGUNG DER KAMERA Entfernen Sie das Oberteil (Abb. 2) nach Lösen der Klemme "D”. Zur völligen Entnahme drücken Sie den Sperrknopf “E”. Lösen Sie die Klemme "G", und entfernen Sie die Einstellschlitten “CP” (Abb. 3). Zur völligen Entnahme drücken Sie den Sperrknopf "H". Am Oberteil finden Sie zwei Anziehschrauben: "J"...
  • Seite 22 ANMERKUNG Die Stellung der Führung “M” zum langen Schlitten “F” erfordert eine Justierung: Lösen Sie die Schraube “O”, und verschieben Sie die Einheit. Im Idealfall befindet sich die Kamera so weit hinten auf dem Schlitten wie möglich, bevor die Vorderkante “N” des langen Schlittens “F” im Gesichtsfeld "P" der Kamera sichtbar wird. ANBRINGEN DER KAMERA AM KOPF Befestigen Sie das gesamte Oberteil mit Kamera wie in Abb.
  • Seite 23 VERTIKALE KAMERAAUSRICHTUNG Sollte die Kamera nicht perfekt in der vertikalen Achse (Abb. 7b) ausgerichtet sein, kann diese mit Madenschraube „GS“ justiert werden. UNGEFÄHRE AUSRICHTUNG AUF DEN KNOTENPUNKT (Abb. 8): Richten Sie die Aufnahmeachse "Q" der Kamera unter Bezug auf die Markierung CENTER auf dem Schlitten auf die Drehachse "Q" aus. Hierzu lösen Sie den Knopf "R"...
  • Seite 24 PRÄZISE AUSRICHTUNG 10 11 DES KNOTENPUNKTES Enthält das Motiv unterschiedlich weit entfernte Details, muss der Knotenpunkt wie folgt präziser ausgerichtet werden (dieses Verfahren ist AUSSCHLIESSLICH mit Spiegelreflexkameras möglich): Anmerkung: NEHMEN SIE ALS ERSTES DIE LÄNGSAUSRICHTUNG VOR DIE SEITENAUSRICHTUNG DARF ERST NACH DER LÄNGSAUSRICHTUNG ERFOLGEN.
  • Seite 25 SEITENAUSRICHTUNG (Abb. 11): Wählen Sie einen Ausschnitt, der auf derselben Horizontalachse sowohl ein Nahobjekt "1" als auch ein Fernobjekt "2" enthält. (Siehe Abb. 11A und 11B): Lösen Sie Klemme "AF", und schwenken Sie die Kamera um die Panorama-Achse, so dass sich die beiden Motivdetails einmal am linken, danach am rechten Bildrand befinden.
  • Seite 26 HINWEISE FÜR KUGELBILDAUFNAHMEN Ein Kugelbild entsteht durch Aneinanderfügen von Panorama-Aufnahmen, die mit unterschiedlichen Winkeln zur Horizontalen gemacht wurden. Zunächst ermittelt man hierfür die Anzahl von Panorama-Aufnahmen, die in Abhängigkeit vom Bildwinkel des Aufnahmeobjektivs zur Erzielung eines Kugelbildes erforderlich sind. Vor Beginn der Panorama-Aufnahmen ermittelt man mit Hilfe der Skala "Z" den vertikalen Startwinkel (Abb. 12). Lösen Sie die Klemme "AF";...
  • Seite 27 CENTER FC/FS CENTER ZUSÄTZLICHE EINSTELLSCHLITTEN Für den Einsatz sehr kompakter Kameras empfehlen wir die Verwendung der kurzen Schlitten "SC" (Abb. 13) und "FC" (die zum Lieferumfang gehören) anstelle der beiden langen Schlitten "F" und "S", um Volumen und Gewicht der Ausrüstung zu verringern. Zum Austausch von Schlitten "S"...
  • Seite 28 À moins que votre trépied ne soit équipé d'un dispositif de mise à niveau intégré (tel que le trépied Manfrotto MDeVe à demi-boule de 50 mm), il vous faudra utiliser l'un des dispositifs de mise à niveau de la gamme Manfrotto afin d'assurer une mise à...
  • Seite 29 MONTAGE DU BOITIER Retirez le système principal coulissant (fig. 2) en desserrant la molette "D". Pour le faire coulisser complétement hors de la base, appuyez sur le bouton de sécurité "E". Retirez le plateau du boîtier "CP" (fig. 3) en desserrant la molette "G".
  • Seite 30 REMARQUE La position du boîtier "M" par rapport au plateau long "F" doit être réglée : desserrez la vis "O" pour faire coulisser la base. Pour obtenir la position idéale du boîtier, regardez dans le viseur et faites coulisser le boîtier vers l'arrière. Dès que vous apercevez l'extrémité...
  • Seite 31 ALIGNEMENT VERTICAL DE L’APPAREIL Si l’appareil n’est pas parfaitement axé verticalement (voir fig.7b), vous pourrez l’ajuster, en vissant ou dévissant légèrement la vis sans tête “GS” RÉGLAGE APPROXIMATIF DU "POINT NODAL" (Voir figure 8) : Alignez l'axe optique "Q" de l'appareil avec l'axe de rotation panoramique "R" en prenant l'inscription "CENTER" du plateau comme référence : desserrez la vis "V"...
  • Seite 32 RÉGLAGE PRÉCIS 10 11 DU "POINT NODAL" Si la scène à photographier comporte des objets situés à des distances variables par rapport au photographe (objets proches et éloignés), le "Point Nodal" doit être réglé plus précisément de la manière suivante (cette procédure est possible avec les appareils reflex UNIQUEMENT) : Remarque :...
  • Seite 33 RÉGLAGE LATÉRAL (Voir figure 11) : Choisissez un cadre contenant un objet proche "1" et un objet éloigné "2" dans le même champ de vision horizontal. (Voir figures 11A et 11B) : dévissez la molette "AF" et faites tourner le boîtier sur son axe panoramique de sorte que les deux objets se retrouvent d'abord sur le côté gauche du cadre, puis sur le côté...
  • Seite 34 INSTRUCTIONS POUR LES PRISES DE VUES PANORAMIQUES SPHÉRIQUES Vous pouvez obtenir un plan panoramique sphérique en rassemblant des séquences panoramiques prises depuis différents angles horizontaux. Il vous faut d'abord choisir le nombre de séquences panoramiques dont vous aurez besoin pour effectuer 360°, selon l'angle de l'objectif que vous utiliserez. Avant de commencer la séquence panoramique, choisissez l'angle vertical de base à...
  • Seite 35 CENTER FC/FS CENTER PLATEAUX SUPPLÉMENTAIRES Si vous possédez un appareil très compact, nous vous recommandons d'utiliser les deux plateaux courts "SC" (fig. 13) et "FC" (fournis avec la tête) à la place des deux plateaux longs "F" et "S", afin de réduire le volume et le poids du système. Pour remplacer le plateau "S", dévissez la vis "SD"...
  • Seite 36 2, 3 y 4. Si su trípode no está provisto de un dispositivo para la nivelación (como el trípode Manfrotto MdeVe con bola media de 50mmm), usted necesitará uno de los accesorios para nivelar de la gama Manfrotto para asegurarse una exacta nivelación de la rótula (vean punto 1).
  • Seite 37 ACOPLAR LA CÁMERA Quiten el ensemblaje superior (fig. 2) soltando el mando “D”. Para que salga completamente de su alojamiento, empujen el botón de seguro “E”. Remuevan el plato “CP” (fig. 3) soltando el mando “G”. Para que salga completamente, empujen el botón de seguro “H”.
  • Seite 38 NOTA La posición del alojamiento “M” correspondiente al plato largo “F” tiene que ser adaptada: aflojen el tornillo “O” para deslizar el alojamiento. La posición ideal es aquellea con el cuerpo cámara colocado en el plato lo más atras posible antes que la punta “N” del plato largo “F” sea visible en el campo visivo “P”. MONTAGE DE LA CÁMARA SOBRE LA RÓTULA Acoplen todo el ensemblaje superior + cámera sobre la rótula según se aprecia en la figura 7 deslizando el plato largo “F”...
  • Seite 39 AJUSTE VERTICAL DE LA CAMARA Si la camara no està perfectamente alineada con el eje vertical (fig. 7b), se puede lograr la posición correcta atornillando/desatornillando el tornillo “GS” AJUSTE APROXIMADO DEL “NODAL POINT” (Ref. Figura 8): Alineen el eje óptico “Q” con el eje panorámico de rotación “R” utilizanzo el señal “CENTER”del plato como guía, aflojando el mando “V” y moviendo el plato largo “S”...
  • Seite 40 AJUSTE EXACTO 10 11 DEL “NODAL POINT” Si la escena encuadrada incluye objetos colocados a varia distancia desde el punto de la encuadradura (objetos cecanos y lejanos), el “Nodal Point” necesita ser posicionado cuidadosamente como sigue: (esta proceso es actuable SOLO con cámaras reflex): Nota: PRIMERO AJUSTEN LA POSICIÓN...
  • Seite 41 COLOCACIÓN LATERAL (Ref. Figura 11): Escojan un fotograma con el objeto cercano “1” y uno lejano “2” ubicados ambos en la misma línea visiva horizontal. (Figura 11A y 11B): desenroscen el mando “AF” y muevan la cámara alrededor del eje panorámico para que los dos objetos se encuentren primero a la izquierda y luego a la derecha del fotograma.
  • Seite 42 ISTRUCCIONES PARA ENCUADRES PANORÁMICOS ESFÉRICOS Una escena panorámica se consigue juntando secuencias panorámicas tomadas desde diferentes ángulos horizontales. Primero deben saber cuantas secuencias panorámicas necesitan para completar la esfera en relación con el ángulo del objetivo que utilizaran. Antes de empezar con la secuencia panorámica, escojan el ángulo vertical inicial utilizando la escala circular “Z” (fig. 12) Desenroscen el mando de bloqueo “AF”...
  • Seite 43 CENTER FC/FS CENTER PLATOS ADICIONALES Si ustedes poséen una cámara muy compacta les aconcejamos utlizar los platos cortos ”SC” (fig. 13) y “FC” (suministrados con la rótula) en cambio de los dos platos largos “F” y “S” para reducir el espacio y el peso del sistema. Para reemplazar el plato “S”...
  • Seite 44 Cod. 303,14 - 06/06 Copyright © 2004 Manfrotto Bassano Italy...