Herunterladen Inhalt Inhalt Diese Seite drucken
Zanussi ZOHKF1X1 Benutzerinformation
Vorschau ausblenden Andere Handbücher für ZOHKF1X1:
Inhaltsverzeichnis

Werbung

Verfügbare Sprachen
  • DE

Verfügbare Sprachen

  • DEUTSCH, seite 71
User Manual
GETTING
STARTED?
EASY.
ZOHKF1X1
ZOHNF1K1
ZOHNF1W1
EN User Manual
Oven
NL Gebruiksaanwijzing
Oven
FR Notice d'utilisation
Four
DE Benutzerinformation
Backofen
PT Manual de instruções
Forno
ES Manual de instrucciones
Horno
2
24
47
71
94
118

Werbung

Inhaltsverzeichnis
loading

Inhaltszusammenfassung für Zanussi ZOHKF1X1

  • Seite 1 User Manual GETTING STARTED? EASY. ZOHKF1X1 ZOHNF1K1 ZOHNF1W1 EN User Manual Oven NL Gebruiksaanwijzing Oven FR Notice d'utilisation Four DE Benutzerinformation Backofen PT Manual de instruções Forno ES Manual de instrucciones Horno...
  • Seite 2: Inhaltsverzeichnis

    VISIT OUR WEBSITE TO: Get usage advice, brochures, trouble shooter, service and repair information: www.zanussi.com/support Subject to change without notice. CONTENTS 1. SAFETY INFORMATION....................2 2. SAFETY INSTRUCTIONS....................4 3. INSTALLATION.......................6 4. PRODUCT DESCRIPTION..................... 8 5. BEFORE FIRST USE......................8 6. DAILY USE........................9 7.
  • Seite 3: General Safety

    Keep all packaging away from children and dispose of it • appropriately. WARNING: Keep children and pets away from the • appliance when it operates or when it cools down. Accessible parts become hot during use. If the appliance has a child safety device, it should be •...
  • Seite 4: Safety Instructions

    2. SAFETY INSTRUCTIONS 2.1 Installation Mounting screws 4x25 mm WARNING! Only a qualified person must 2.2 Electrical connection install this appliance. WARNING! • Remove all the packaging. Risk of fire and electric shock. • Do not install or use a damaged appliance.
  • Seite 5 • Do not put flammable products or items that are wet with flammable products in, Cable types applicable for installation or near or on the appliance. replacement for Europe: WARNING! H07 RN-F, H05 RN-F, H05 RRF, H05 VV-F, H05 Risk of damage to the appliance. V2V2-F (T90), H05 BB-F •...
  • Seite 6: Internal Lighting

    • Be careful when you remove the door intended to be used in other applications from the appliance. The door is heavy! and are not suitable for household room • Clean regularly the appliance to prevent illumination. the deterioration of the surface material. •...
  • Seite 7 (*mm) min. 550 min. 560 3.2 Securing the oven to the cabinet ENGLISH...
  • Seite 8: Product Description

    4. PRODUCT DESCRIPTION 4.1 General overview Control panel Power lamp / symbol Knob for the heating functions Knob for the timer Control knob (for the temperature) Temperature indicator / symbol Heating element Lamp Aqua cleaning container Shelf support, removable Shelf positions 4.2 Accessories •...
  • Seite 9: Daily Use

    6. DAILY USE WARNING! Heating Application Refer to Safety chapters. function 6.1 How to set: Heating function To bake cakes with crispy bottom and to preserve food. Bottom Heat Step 1 Turn the knob for the heating functions to select a heating function. To bake pizza.
  • Seite 10: Using The Accessories

    Step 1 Set the oven function and the temperature. Step 2 Turn the knob for the timer to its full range. Step 3 Turn the knob for the timer to set the switch-off time. When the set time ends, the signal sounds and the oven turns off. Step 4 Turn the knob for the oven functions and the knob for the temperature to the off position.
  • Seite 11: Additional Functions

    Wire shelf, Baking tray: Push the tray between the guide bars of the shelf support and the wire shelf on the guide bars above. 9. ADDITIONAL FUNCTIONS 9.1 Cooling fan 9.2 Safety thermostat When the oven operates, the cooling fan Incorrect operation of the oven or defective turns on automatically to keep the surfaces of components can cause dangerous...
  • Seite 12: Baking And Roasting

    10.2 Baking and roasting Conventional Cook‐ Fan Cooking CAKES (min) (°C) (°C) Whisked recipes 45 - 60 Cake mould Shortbread dough 170 20 - 30 Cake mould Buttermilk 70 - 80 Cake mould, Ø 26 cheesecake Strudel 60 - 80 Baking tray Jam tart 30 - 40...
  • Seite 13 Conventional Cooking Fan Cooking BREAD AND PIZZA (min) (°C) (°C) Rye bread, pre‐ 30 - 45 Bread tin heating is not needed Bread rolls, 6 - 8 230 - 250 230 - 250 10 - 20 Baking tray rolls Pizza 10 - 20 Baking tray / Deep Scones...
  • Seite 14: Conventional Cooking

    Conventional Cooking Fan Cooking MEAT (min) (°C) (°C) Pork shoulder, with 120 - 150 rind Pork shin, 2 pieces 100 - 120 Leg of lamb 110 - 130 Whole chicken 70 - 85 Whole turkey 210 - 240 Whole duck 120 - 150 Whole goose 150 - 200...
  • Seite 15 VEAL POULTRY (°C) (min) (°C) (min) Veal knuckle, 1.5 - 2 kg 160 - 180 120 - 150 Chicken, half, 0.4 - 0.5 190 - 210 35 - 50 kg each Chicken, poulard, 1 - 190 - 210 50 - 70 1.5 kg LAMB Duck, 1.5 - 2 kg...
  • Seite 16 For 2 trays use the first and fourth shelf Set the temperature to 60 - 70 °C. position. FRUIT VEGETA‐ BLES (°C) Plums 8 - 10 Beans 60 - 70 6 - 8 Apricots 8 - 10 Peppers 60 - 70 5 - 6 Apple slices 6 - 8...
  • Seite 17 (°C) (min) Poached fish, 0.3 kg baking tray or dripping pan 35 - 45 Whole fish, 0.2 kg baking tray or dripping pan 25 - 35 Fish fillet, 0.3 kg pizza pan on wire shelf 30 - 40 Poached meat, 0.25 baking tray or dripping pan 35 - 45 Shashlik, 0.5 kg...
  • Seite 18: Care And Cleaning

    (°C) (min) Sponge Conventional Wire shelf 40 - 50 Preheat the oven for cake, cake Cooking 10 minutes. mould Ø26 Sponge Fan Cooking Wire shelf 40 - 50 Preheat the oven for cake, cake 10 minutes. mould Ø26 Sponge Fan Cooking Wire shelf 2 and 4 40 - 60...
  • Seite 19 Clean the cavity after each use. Fat accumulation or other residue may cause fire. Moisture can condense in the oven or on the door glass panels. To decrease the condensa‐ tion, let the oven work for 10 minutes before cooking. Do not store the food in the oven for longer than 20 minutes.
  • Seite 20 Step 1 Open the door fully and hold both hinges. Step 2 Lift and turn the levers fully on both hinges. Step 3 Close the oven door halfway to the first opening position. Then lift and pull forward and remove the door from its seat. Step 4 Put the door on a soft cloth on a stable sur‐...
  • Seite 21: Troubleshooting

    The screen-printing zone must face the inner side of the door. Make sure that after the installation the sur‐ face of the glass panel frame on the screen-printing zones is not rough when you touch it. When installed correctly the door trim clicks. Make sure that you install the internal glass panel in the seats correctly.
  • Seite 22: Energy Efficiency

    ......... Serial number (S.N.) ......... 13. ENERGY EFFICIENCY 13.1 Product Information and Product Information Sheet* Supplier's name Zanussi ZOHKF1X1 949496249 Model identification ZOHNF1K1 949496304 ZOHNF1W1 949496305 Energy Efficiency Index 81.2 Energy efficiency class Energy consumption with a standard load, conventional mode 0.93 kWh/cycle...
  • Seite 23: Environmental Concerns

    Residual heat Moist Fan Baking When the cooking duration is longer than 30 Function designed to save energy during min, reduce the oven temperature to cooking. minimum 3 - 10 min before the end of When you use this function the lamp is off. cooking.
  • Seite 24: Veiligheidsinformatie

    GA NAAR ONZE WEBSITE VOOR: Advies over gebruik, brochures, het oplossen van problemen, service- en reparatie- informatie: www.zanussi.com/support Wijzigingen voorbehouden. INHOUDSOPGAVE 1. VEILIGHEIDSINFORMATIE..................24 2. VEILIGHEIDSVOORSCHRIFTEN.................26 3. MONTAGE ........................29 4. BESCHRIJVING VAN HET PRODUCT................ 30 5. VOOR HET EERSTE GEBRUIK................... 30 6.
  • Seite 25: Algemene Veiligheid

    apparaat te worden gehouden, tenzij ze voortdurend onder toezicht staan. Laat kinderen niet spelen met het apparaat. • Houd alle verpakkingen uit de buurt van kinderen en • verwijder ze op gepaste wijze. WAARSCHUWING: Houd kinderen en huisdieren uit de •...
  • Seite 26: Veiligheidsvoorschriften

    deze vervangen teneinde gevaarlijke situaties te voorkomen. Om de inschuifrails te verwijderen trekt u eerst de voorkant • van de inschuifrail en dan de achterkant uit de zijwanden. Installeer de inschuifrails in de omgekeerde volgorde. 2. VEILIGHEIDSVOORSCHRIFTEN 2.1 Installatie Breedte van de achterkant 559 mm van het apparaat WAARSCHUWING!
  • Seite 27 de niche onder het apparaat, met name niet als deze werkt of als de deur heet is. • De schokbescherming van delen onder stroom en geïsoleerde delen moet op zo'n manier worden bevestigd dat het niet 2.3 Gebruik zonder gereedschap kan worden verplaatst.
  • Seite 28: Afvalverwerking

    – haal vochthoudende schotels en eten neutrale schoonmaakmiddelen. Gebruik uit het apparaat als u klaar bent met geen schuurmiddelen, schuursponsjes, koken. oplosmiddelen of metalen voorwerpen. – wees voorzichtig bij het verwijderen of • Volg als u een ovenspray gebruikt de bevestigen van accessoires.
  • Seite 29: Montage

    3. MONTAGE 3.1 Inbouwen WAARSCHUWING! Raadpleeg de hoofdstukken Veiligheid. (*mm) min. 550 min. 560 (*mm) min. 550 min. 560 NEDERLANDS...
  • Seite 30: Beschrijving Van Het Product

    3.2 Bevestiging van de oven aan de kast 4. BESCHRIJVING VAN HET PRODUCT 4.1 Algemeen overzicht Bedieningspaneel Stroomlampje/symbool Knop voor verwarmingsfuncties Knop voor de timer Bedieningsknop (voor de temperatuur) Temperatuurindicator/symbool Verwarmingselement Lamp Ventilator Bak voor reiniging met water Verwijderbare inschuifrail Roosterhoogtes 4.2 Accessoires •...
  • Seite 31: Voorafgaand Aan Het Eerste Gebruik

    5.1 Voorafgaand aan het eerste gebruik De oven kan een vreemde geur en rook afgeven tijdens het voorverwarmen. Zorg ervoor dat de kamer goed is geventileerd. Stap 1 Stap 2 De oven reinigen Verwarm de lege oven voor Haal alle accessoires en verwijderbare inschuifrails Stel de maximale temperatuur in voor de functie: uit de oven.
  • Seite 32: Klokfuncties

    6.3 Toelichting van: Warmelucht (vochtig) Verwar‐ Toepassing mingsfunc‐ Deze functie wordt gebruikt om te voldoen aan de energie-efficiëntieklasse en ecodesign-vereisten overeenkomstig EU Voor het bakken van taarten met 65/2014 en EU 66/2014. Testen volgens EN een knapperige bodem en het in‐ maken van voedsel.
  • Seite 33: Extra Functies

    Bakrooster: Plaats het rooster tussen de geleidestangen van de inschuifrailen zorg ervoor dat de pootjes om‐ laag wijzen. Bakplaat: Schuif de plaat tussen de geleidestangen van de inschuifrail. Bakrooster, Bakplaat: Plaats de plaat tussen de geleiders van de in‐ schuifrails en het bakrooster op de geleiders erbo‐ ven.
  • Seite 34: Aanwijzingen En Tips

    10. AANWIJZINGEN EN TIPS Voor de bereiding van gebak Raadpleeg de hoofdstukken De ovendeur mag pas worden geopend als Veiligheid. driekwart van de baktijd is verstreken. Als u twee bakplaten tegelijkertijd gebruikt, 10.1 Kookadviezen dient u één niveau ertussen leeg te laten. De oven heeft vijf rekniveaus.
  • Seite 35: Boven- /Onderwarmte Warme Lucht

    Boven- /onderwarmte Warme lucht CA‐ (min) (°C) (°C) Koekjes 140 - 150 30 - 35 Bakplaat Koekjes, twee ni‐ 140 - 150 2 en 4 35 - 40 Bakplaat veaus Koekjes, drie ni‐ 80 - 100 Bakplaat veaus Schuimgebakjes 15 - 20 Bakplaat Broodjes, ver‐...
  • Seite 36 Boven- /onderwarmte Warme lucht VLAAIEN (min) (°C) (°C) Pastataart, voorver‐ 40 - 50 warming is niet nodig Hartige groentetaart, 45 - 60 voorverwarming is niet nodig Quiches 50 - 60 Lasagne 180 - 190 180 - 190 25 - 40 Cannelloni 180 - 190 180 - 190...
  • Seite 37: Turbo Grill

    Boven- /onderwarmte Warme lucht VLEES (min) (°C) (°C) Konijn, in stukken ge‐ 60 - 80 sneden Haas, in stukken ge‐ 150 - 200 sneden Hele fazant 90 - 120 Boven- /onderwarmte Warme lucht (min) (°C) (°C) Forel / Zeebrasem, 3 - 4 40 - 55 vissen Tonijn / Zalm, 4 - 6 filets...
  • Seite 38: Dehydrateren - Warme Lucht

    GEVOGELTE GEVOGELTE (°C) (min) (°C) (min) Gevogelte, porties, 0,2 200 - 220 30 - 50 Kalkoen, 2,5 - 3,5 kg 160 - 180 120 - 150 - 0,25 kg elk Kalkoen, 4 - 6 kg 140 - 160 150 - 240 Halve kip, 0,4 - 0,5 kg 190 - 210 35 - 50...
  • Seite 39: Warmelucht (Vochtig)

    FRUIT FRUIT Pruimen 8 - 10 Schijfjes appel 6 - 8 Abrikozen 8 - 10 Peren 6 - 9 10.6 Warmelucht (vochtig) - aanbevolen accessoires Gebruik de donkere en niet-reflecterende bakjes en schalen. Ze nemen de warmte beter op dan licht en reflecterend servies. Ovenschaaltjes Pizza pan Ovenschotel...
  • Seite 40: Aanwijzingen Voor Testinstituten

    (°C) (min) Hele vis, 0,2 kg bakplaat of lekschaal 25 - 35 Visfilet, 0,3 kg pizzavorm op rooster 30 - 40 Gepocheerd vlees, bakplaat of lekschaal 35 - 45 0,25 kg Sjasliek, 0,5 kg bakplaat of lekschaal 40 - 50 Koekjes, 16 stuks bakplaat of lekschaal 30 - 45...
  • Seite 41: Onderhoud En Reiniging

    (°C) (min) Appeltaart, Boven- /onder‐ Bakrooster 70 - 90 2 blikken warmte Ø20 cm Appeltaart, Warme lucht Bakrooster 70 - 90 2 blikken Ø20 cm Biscuitge‐ Boven- /onder‐ Bakrooster 40 - 50 Verwarm de oven 10 bak, taart‐ warmte minuten voor. vorm Ø26 Biscuitge‐...
  • Seite 42 11.1 Opmerkingen over schoonmaken Maak de voorkant van de oven schoon met een zachte doek, warm water en een mild reini‐ gingsmiddel. Reinig en controleer de deurpakking rond het frame van de uitsparing. Gebruik een reinigingsoplossing om metalen oppervlakken te reinigen. Reinig vlekken met een mild reinigingsmiddel.
  • Seite 43 Stap 3 Stel de temperatuur in op 90 °C. Stap 6 Wacht tot de oven afgekoeld is. Maak de holte droog met een zachte doek. Stap 4 Laat de oven 30 minuten werken. Stap 5 Schakel de oven uit. 11.4 Hoe te verwijderen en installeren: Deur De ovendeur beschikt over twee glasplaten.
  • Seite 44: Probleemoplossing

    Stap 8 Reinig de glasplaten met een sopje. Droog de glasplaten voorzichtig af. Reinig de glas‐ platen niet in de vaatwasser. Stap 9 Installeer na het reinigen de glasplaat en de ovendeur. De bedrukte zone moet naar de binnenkant van de deur gericht zijn.
  • Seite 45: Energiezuinigheid

    Model (MOD.) ......... Productnummer (PNC) ......... Serienummer (S.N.) ......... 13. ENERGIEZUINIGHEID 13.1 Productinformatie- en productinformatieblad* Naam leverancier Zanussi ZOHKF1X1 949496249 Modelidentificatie ZOHNF1K1 949496304 ZOHNF1W1 949496305 Energie-efficiëntie-index 81.2 Energie-efficiëntieklasse Energieverbruik bij een standaardbelasting, stand boven + onder‐ 0.93 kWh/cyclus warmte Energieverbruik bij een standaardbelasting, stand hetelucht 0.69 kWh/cyclus...
  • Seite 46: Milieubescherming

    * Voor de Europese Unie overeenkomstig EU-verordeningen 65/2014 en 66/2014. Voor de Republiek Belarus overeenkomstig STB 2478-2017, aanhangsel G; STB 2477-2017, bijlagen A en B. Voor Oekraïne overeenkomstig 568/32020. De energie-efficiëntieklasse is niet van toepassing op Rusland. EN 60350-1 - Elektrische huishoudelijke kookapparaten - Deel 1: Range-ovens, ovens, stoomovens en grills - Methoden voor prestatiemeting.
  • Seite 47: Information Sur La Sécurité

    VISITEZ NOTRE SITE WEB POUR : Obtenir des conseils d’utilisation, des brochures, un dépanneur, des informations sur le service et les réparations : www.zanussi.com/support Sous réserve de modifications. TABLE DES MATIÈRES 1. INFORMATION SUR LA SÉCURITÉ................47 2. CONSIGNES DE SÉCURITÉ..................49 3.
  • Seite 48: Consignes Générales De Sécurité

    et complexe doivent être tenus à l'écart de l’appareil, à moins d'être surveillés en permanence. Ne laissez pas les enfants jouer avec l'appareil. • Ne laissez pas les emballages à la portée des enfants et • jetez-les convenablement. AVERTISSEMENT : Tenez les enfants et les animaux •...
  • Seite 49: Consignes De Sécurité

    Pour retirer les supports de grille, tirez d'abord sur l'avant • de ceux-ci, puis sur l'arrière, pour les écarter des parois extérieures. Réinstallez les supports de grille en répétant cette procédure dans l'ordre inverse. 2. CONSIGNES DE SÉCURITÉ 2.1 Installation Largeur de l’arrière de l’ap‐...
  • Seite 50 porte de l'appareil ou de la niche d'encastrement sous l'appareil, particulièrement lorsqu'il est en marche ou que la porte est chaude. • La protection contre les chocs des parties 2.3 Utilisation sous tension et isolées doit être fixée de telle manière qu'elle ne puisse pas être AVERTISSEMENT! enlevée sans outils.
  • Seite 51: Éclairage Intérieur

    – ne placez jamais de feuilles • Nettoyez régulièrement l'appareil afin de d'aluminium directement sur le fond maintenir le revêtement en bon état. de la cavité de l'appareil. • Nettoyez l'appareil avec un chiffon doux – ne versez jamais d'eau directement humide.
  • Seite 52: Installation

    3. INSTALLATION 3.1 Encastrement AVERTISSEMENT! Reportez-vous aux chapitres concernant la sécurité. (*mm) min. 550 min. 560 (*mm) min. 550 min. 560 FRANÇAIS...
  • Seite 53: Fixation Du Four Au Meuble

    3.2 Fixation du four au meuble 4. DESCRIPTION DE L'APPAREIL 4.1 Vue d’ensemble Bandeau de commande Voyant / symbole de mise sous tension Manette de sélection des modes de cuisson Manette du minuteur Thermostat Indicateur / symbole de température Élément chauffant Éclairage Ventilateur Bac de nettoyage Aqua Clean...
  • Seite 54: Utilisation Quotidienne

    5.1 Avant la première utilisation Une odeur et de la fumée peuvent s'échapper du four durant le préchauffage. Assurez-vous que la pièce est ventilée. Étape 1 Étape 2 Nettoyez le four Préchauffez le four à vide Retirez les supports de grille amovibles et tous les Réglez la température maximale pour la fonction : accessoires du four.
  • Seite 55: Fonctions De L'horloge

    exigences d’éco-conception selon les normes EU 65/2014 et EU 66/2014. Tests Mode de Application conformément à la norme EN 60350-1. cuisson Pendant la cuisson, la porte du four doit Pour décongeler des aliments (fruits rester fermée pour éviter d'interrompre la et légumes).
  • Seite 56: Fonctions Supplémentaires

    Grille métallique: Poussez la grille entre les barres de guidage des supports de grille et assurez-vous que les pieds sont orientés vers le bas. Plateau de cuisson: Poussez le plateau entre les rails du support de grille. Grille métallique, Plateau de cuisson: Poussez le plateau entre les rails du support de grille et glissez la grille métallique entre les rails se trouvant juste au-dessus.
  • Seite 57: Conseils Et Astuces

    10. CONSEILS ET ASTUCES Cuisson de gâteaux Reportez-vous aux chapitres N'ouvrez la porte du four qu'aux 3/4 du concernant la sécurité. temps de cuisson défini. Si vous utilisez deux plaques de cuisson en 10.1 Conseils de cuisson même temps, laissez un niveau libre entre Le four dispose de cinq niveaux de grille.
  • Seite 58 Chauffage Haut/ Bas Chaleur tournante GÂ‐ TEAUX (min) (°C) (°C) Gâteau aux pru‐ 50 à 60 Moule à pain nes, préchauffer le four à vide Biscuits 140 à 150 30 à 35 Plateau de cuis‐ Biscuits, deux ni‐ 140 à 150 2 et 4 35 à...
  • Seite 59 Chauffage Haut/ Bas Chaleur tournante PAIN ET PIZZA (min) (°C) (°C) Pizza 10 à 12 Plateau de cuis‐ son / Plat à rôtir Scones 10 à 12 Plateau de cuis‐ Préchauffez le four à vide. Utilisez le moule à gâteaux. Chauffage Haut/ Bas Chaleur tournante FLANS...
  • Seite 60: Turbo Gril

    Chauffage Haut/ Bas Chaleur tournante VIANDE (min) (°C) (°C) Palette de porc, avec 120 à 150 couenne Jarret de porc, 2 mor‐ 100 à 120 ceaux Gigot d’agneau 110 à 130 Poulet entier 70 à 85 Dinde entière 210 à 240 Canard entier 120 à...
  • Seite 61 PORC VOLAILLE (°C) (min) (°C) (min) Jarret de porc, pré-cuit, 150 - 170 90 - 120 Poulet, demi0,4 - 0,5 190 - 210 35 - 50 0,75 - 1 kg kg chacune Poulet, poularde, 1 - 190 - 210 50 - 70 1,5 kg VEAU Canard, 1,5 - 2 kg...
  • Seite 62 (kg) Durée de décon‐ Décongélation com‐ gélation (min) plémentaire (min) Truite 0,15 25 - 35 10 - 15 Fraises 30 - 40 10 - 20 Beurre 0,25 30 - 40 10 - 15 Gâteau 10.5 Déshydratation - Chaleur tournante LÉGUMES Couvrez les plateaux avec du papier (°C) sulfurisé...
  • Seite 63 10.7 Chaleur tournante humide Pour de meilleurs résultats, suivez les suggestions indiquées dans le tableau ci- dessous. (°C) (min) Petits pains sucrés, Plateau de cuisson ou plat à 40 - 50 (12 pièces) rôtir Petits pains, (9 piè‐ Plateau de cuisson ou plat à 35 - 45 ces) rôtir...
  • Seite 64 (°C) (min) Tartelettes, (8 pièces) Plateau de cuisson ou plat à 30 - 40 rôtir Légumes, pochés, Plateau de cuisson ou plat à 35 - 45 0.4 kg rôtir Omelette végétarien‐ plaque à pizza sur la grille mé‐ 35 - 45 tallique Légumes méditerra‐...
  • Seite 65: Entretien Et Nettoyage

    (°C) (min) Génoise, Chaleur tour‐ Grille métal‐ 2 et 4 40 - 60 Préchauffez le four moule à gâ‐ nante lique pendant 10 minutes. teau de 26 cm Sablé Chaleur tour‐ Plateau de 140 - 20 - 40 nante cuisson Sablé...
  • Seite 66 Après chaque utilisation, lavez tous les accessoires et séchez-les. Utilisez un chiffon doux avec de l’eau tiède et un détergent doux. Ne lavez pas les accessoires au lave-vaisselle. Ne nettoyez pas les accessoires antiadhésifs avec un produit nettoyant abrasif ou des objets tranchants.
  • Seite 67 Étape 1 Ouvrez complètement la porte et saisissez les 2 charnières de porte. Étape 2 Soulevez et faites tourner les leviers sur les 2 charnières. Étape 3 Fermez la porte du four à la première posi‐ tion d'ouverture (mi-parcours). Puis soulevez et tirez la porte vers l'avant et retirez-la de son logement.
  • Seite 68: Dépannage

    La zone imprimée doit faire face à l'intérieur de la por‐ te. Après l'installation, vérifiez que la surface du pan‐ neau de verre où se trouve la zone imprimée est lisse au toucher (le relief doit être de l'autre côté). Lorsque le cadre de la porte est installé...
  • Seite 69: Rendement Énergétique

    ......... Numéro de série (S.N.) ......... 13. RENDEMENT ÉNERGÉTIQUE 13.1 Informations produit et Fiche d’informations produit* Nom du fournisseur Zanussi ZOHKF1X1 949496249 Identification du modèle ZOHNF1K1 949496304 ZOHNF1W1 949496305 Index d'efficacité énergétique 81.2 Classe d’efficacité énergétique Consommation d'énergie avec charge standard et mode tradition‐...
  • Seite 70: Économie D'énergie

    13.2 Économie d'énergie Chaleur résiduelle Si la cuisson doit durer plus de 30 minutes, réduisez la température du four au minimum Ce four est doté de 3 à 10 minutes avant la fin de la cuisson. La caractéristiques qui vous chaleur résiduelle à...
  • Seite 71: Sicherheitshinweise

    BESUCHEN SIE UNSERE WEBSITE, UM: Anwendungshinweise, Prospekte, Informationen zu Fehlerbehebung, Service und Reparatur zu erhalten: www.zanussi.com/support Änderungen vorbehalten. INHALTSVERZEICHNIS 1. SICHERHEITSHINWEISE.................... 71 2. SICHERHEITSANWEISUNGEN................... 73 3. MONTAGE........................76 4. GERÄTEBESCHREIBUNG...................77 5. VOR DER ERSTEN INBETRIEBNAHME..............77 6. TÄGLICHER GEBRAUCH.................... 78 7.
  • Seite 72: Allgemeine Sicherheit

    Jahren und Personen mit schweren Behinderungen oder Mehrfachbehinderung müssen vom Gerät ferngehalten werden, wenn sie nicht ständig beaufsichtigt werden. Kinder dürfen nicht mit dem Gerät spielen. • Halten Sie sämtliches Verpackungsmaterial von Kindern • fern und entsorgen Sie es ordnungsgemäß. WARNUNG: Halten Sie Kinder und Haustiere während des •...
  • Seite 73: Sicherheitsanweisungen

    gleichermaßen qualifizierten Person ausgetauscht werden, um Gefahren durch elektrischen Strom zu vermeiden. Ziehen Sie die Einhängegitter erst vorne und dann hinten • von der Seitenwand weg und nehmen Sie sie heraus. Führen Sie zum Einsetzen der Einhängegitter die oben aufgeführten Schritte in umgekehrter Reihenfolge durch. 2.
  • Seite 74 Gerät nicht berührt oder in ihre Nähe gelangt, insbesondere wenn das Gerät eingeschaltet oder die Tür heiß ist. • Alle Teile, die gegen direktes Berühren schützen, sowie die isolierten Teile 2.3 Gebrauch müssen so befestigt werden, dass sie nicht ohne Werkzeug entfernt werden WARNUNG! können.
  • Seite 75: Innenbeleuchtung

    – Füllen Sie kein Wasser in das heiße • Reinigen Sie das Geräts mit einem Gerät. weichen, feuchten Tuch. Verwenden Sie – Lassen Sie nach Abschluss des ausschließlich Neutralreiniger. Benutzen Garvorgangs kein feuchtes Geschirr Sie keine Scheuermittel, scheuernde oder feuchte Speisen im Gerät Reinigungsschwämmchen, Lösungsmittel stehen.
  • Seite 76: Montage

    3. MONTAGE 3.1 Montage WARNUNG! Siehe Kapitel Sicherheitshinweise. (*mm) min. 550 min. 560 (*mm) min. 550 min. 560 DEUTSCH...
  • Seite 77: Befestigung Des Ofens Am Möbel

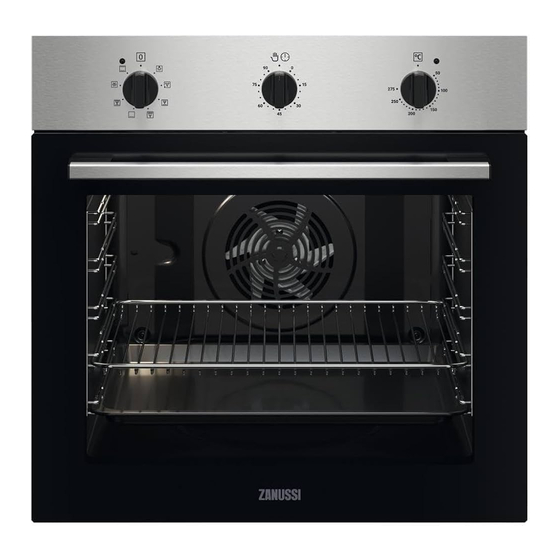
    3.2 Befestigung des Ofens am Möbel 4. GERÄTEBESCHREIBUNG 4.1 Gesamtansicht Bedienblende Betriebskontrolllampe/-symbol Einstellknopf für die Ofenfunktionen Timer-Einstellknopf Einstellknopf (für die Temperatur) Temperaturanzeige/-symbol Heizelement Lampe Ventilator Behälter für die Aqua-Reinigungsfunktion Einhängeschienen, herausnehmbar Einschubebenen 4.2 Zubehör • Backblech Für Kuchen und Plätzchen. •...
  • Seite 78: Täglicher Gebrauch

    5.1 Vor der ersten Inbetriebnahme Der Backofen kann während des Aufheizens Geruch und Rauch verströmen. Stellen Sie sicher, dass der Raum belüftet ist. Schritt 1 Schritt 2 Reinigen Sie den Backofen Heizen Sie den leeren Backofen vor Entfernen Sie alle Zubehörteile und die heraus‐ Stellen Sie die Höchsttemperatur für folgende nehmbaren Einhängegitter aus dem Backofen.
  • Seite 79: Uhrfunktionen

    Anforderungen an die umweltgerechte Gestaltung EU 65/2014 und EU 66/2014 Ofenfunkti‐ Anwendung verwendet. Tests gemäß EN 60350-1. Die Backofentür sollte während des Zum Auftauen von Lebensmitteln Garvorgangs geschlossen bleiben, damit die (Gemüse und Obst). Die Auftauzeit Funktion nicht unterbrochen wird. So wird hängt ab von der Menge und Größe Auftauen gewährleistet, dass der Backofen mit der...
  • Seite 80: Zusatzfunktionen

    Kombirost: Schieben Sie den Kombirost zwischen die Füh‐ rungsschienen der Einhängegitter mit den Füßen nach unten zeigend. Backblech: Schieben Sie das Blech zwischen die Führungs‐ stäbe der Einhängegitter. Kombirost, Backblech: Schieben Sie das Backblech zwischen die Füh‐ rungsstäbe der Einhängegitter und dem Kombirost auf die Führungsstäbe darüber.
  • Seite 81: Tipps Und Hinweise

    10. TIPPS UND HINWEISE Wenn Sie zwei Backbleche gleichzeitig Siehe Kapitel nutzen, lassen Sie eine Ebene dazwischen Sicherheitshinweise. frei. Garen von Fleisch und Fisch 10.1 Garempfehlungen Lassen Sie das Fleisch vor dem Der Backofen hat fünf Einschubebenen. Anschneiden etwa 15 Minuten ruhen, damit der Fleischsaft nicht ausläuft.
  • Seite 82 Ober-/Unterhitze Umluft KU‐ CHEN (Min.) (°C) (°C) Rosinenkuchen, 50–60 Brotform Heizen Sie den leeren Backofen Kekse 140–150 30–35 Backblech Kekse, zwei Ebe‐ 140–150 2 und 4 35–40 Backblech Kekse, drei Ebe‐ 80–100 Backblech Baiser 15–20 Backblech Brötchen, Heizen 25–35 Backblech Sie den leeren Backofen vor Eclairs, eine Ebe‐...
  • Seite 83 Verwenden Sie eine Kuchenform. Ober-/Unterhitze Umluft FLANS (Min.) (°C) (°C) Nudelauflauf, Vorhei‐ 40–50 zen ist nicht erforder‐ lich Gemüseauflauf, Vor‐ 45–60 heizen ist nicht erfor‐ derlich Quiche 50–60 Lasagne 180–190 180–190 25–40 Cannelloni 180–190 180–190 25–40 Verwenden Sie den Kombirost. Ober-/Unterhitze Umluft FLEISCH...
  • Seite 84: Heißluftgrillen

    Ober-/Unterhitze Umluft FLEISCH (Min.) (°C) (°C) Ente, ganz 120–150 Gans, ganz 150–200 Kaninchen, in Stücke 60–80 geschnitten Kaninchen, in Stücke 150–200 geschnitten Fasan, ganz 90–120 Ober-/Unterhitze Umluft FISCH (Min.) (°C) (°C) Forelle / Seebrasse, 3–4 40–55 Fische Thunfisch / Lachs, 4–6 Fi‐ 35–60 lets 10.3 Heißluftgrillen...
  • Seite 85 LAMM GEFLÜGEL (°C) (Min.) (°C) (Min.) Lammrücken, 1 - 1,5 160 - 180 40 - 60 Ente, 1,5 - 2 kg 180 - 200 80 - 100 Gans, 3,5 - 5 kg 160 - 180 120 - 180 Pute, 2,5 - 3,5 kg 160 - 180 120 - 150 Pute, 4 - 6 kg...
  • Seite 86: Feuchte Umluft - Empfohlenes Zubehör

    GEMÜSE OBST (°C) (Std.) (Std.) Bohnen 60 - 70 6 - 8 Pflaumen 8 - 10 Paprika 60 - 70 5 - 6 Aprikosen 8 - 10 Suppengemüse 60 - 70 5 - 6 Apfelscheiben 6 - 8 Pilze 50 - 60 6 - 8 Birnen 6 - 9...
  • Seite 87: Informationen Für Prüfinstitute

    (°C) (Min.) Englischer Sandwich‐ Backform auf Kombirost 35 - 50 kuchen à la Victoria Fisch, pochiert, 0,3 kg Backblech oder tiefes Blech 35 - 45 Fisch, 0,2 kg Backblech oder tiefes Blech 25 - 35 Fischfilet, 0,3 kg Pizzapfanne auf Kombirost 30 - 40 Fleisch, pochiert, 0,25 Backblech oder tiefes Blech...
  • Seite 88: Reinigung Und Pflege

    (°C) (Min.) Apfelku‐ Umluft Kombirost 70 - 90 chen, 2 For‐ men à Ø 20 Biskuit, Ku‐ Ober-/Unterhit‐ Kombirost 40 - 50 Backofen 10 Min. vor‐ chenform Ø heizen. 26 cm Biskuit, Ku‐ Umluft Kombirost 40 - 50 Backofen 10 Min. vor‐ chenform Ø...
  • Seite 89: Entfernen: Einhängegitter

    11.1 Hinweise zur Reinigung Feuchten Sie ein weiches Tuch mit warmem Wasser und etwas mildem Reinigungsmittel an, und reinigen Sie damit die Vorderseite des Backofens. Reinigen und überprüfen Sie die Tür‐ dichtung um den Garraumrahmen. Reinigen Sie die Metalloberflächen mit einer Reinigungslösung. Reinigungsmittel Reinigen Sie Flecken mit einem milden Reinigungsmittel.
  • Seite 90: Aus- Und Einbau Der: Tür

    Schritt 3 Stellen Sie die Temperatur auf 90 °C. Schritt 6 Warten Sie, bis der Ofen kalt ist. Trock‐ nen Sie den Garraum mit einem wei‐ Schritt 4 Lassen Sie den Backofen 30 Min. lang chen Tuch ab. eingeschaltet. Schritt 5 Schalten Sie den Ofen aus.
  • Seite 91: Austausch: Lampe

    Schritt 8 Reinigen Sie die Glasscheiben mit Wasser und Spülmittel. Trocknen Sie die Glasschei‐ ben sorgfältig ab. Reinigen Sie die Glas‐ scheiben nicht im Geschirrspüler. Schritt 9 Setzen Sie nach der Reinigung die Glas‐ scheibe und die Backofentür ein Der bedruckte Bereich muss zur Innenseite der Tür zeigen.
  • Seite 92: Servicedaten

    Wir empfehlen, hier folgende Daten zu notieren: Modell (MOD.) ......... Produktnummer (PNC) ......... Seriennummer (S.N.) ......... 13. ENERGIEEFFIZIENZ 13.1 Produktinformationen und Produktdatenblatt* Herstellername Zanussi ZOHKF1X1 949496249 Modellidentifikation ZOHNF1K1 949496304 ZOHNF1W1 949496305 Energieeffizienzindex 81.2 Energieeffizienzklasse Energieverbrauch bei Standardbeladung, Ober-/Unterhitze 0.93 kWh/Programm Energieverbrauch bei Standardbeladung, Umluft 0.69 kWh/Programm Anzahl der Garräume...
  • Seite 93: Energie Sparen

    13.2 Energie sparen Restwärme Beträgt die Garzeit mehr als 30 Minuten, reduzieren Sie die Ofentemperatur 3 - 10 Der Backofen verfügt über Min. vor Ablauf des Garvorgangs. Durch die Funktionen, mit deren Hilfe Sie Restwärme des Backofens werden die beim täglichen Kochen Energie Speisen weiter gegart.
  • Seite 94: Segurança De Crianças E Pessoas Vulneráveis

    VISITE O NOSSO WEBSITE PARA: Resolver problemas e obter conselhos de utilização, catálogos e informações sobre assistência e reparações: www.zanussi.com/support Sujeito a alterações sem aviso prévio. ÍNDICE 1. INFORMAÇÕES DE SEGURANÇA................94 2. INSTRUÇÕES DE SEGURANÇA................. 96 3. INSTALAÇÃO........................99 4. DESCRIÇÃO DO PRODUTO..................100 5.
  • Seite 95: Segurança Geral

    Não permita que crianças brinquem com o aparelho. • Mantenha todos os materiais de embalagem fora do • alcance das crianças e elimine-os de forma apropriada. AVISO: Mantenha as crianças e os animais domésticos • afastados do aparelho quando ele estiver a funcionar ou a arrefecer.
  • Seite 96: Instruções De Segurança

    prateleiras para fora da parede lateral. Instale os apoios para prateleiras na sequência inversa. 2. INSTRUÇÕES DE SEGURANÇA 2.1 Instalação Profundidade de encastre 548 mm do aparelho AVISO! A instalação deste aparelho tem Profundidade com a porta 1022 mm de ser efetuada por uma pessoa aberta qualificada.
  • Seite 97 • Ligue a ficha à tomada elétrica apenas no • Não altere as especificações deste final da instalação. Certifique-se de que a aparelho. ficha fica acessível após a instalação. • Certifique-se de que as aberturas de • Se a tomada eléctrica estiver solta, não ventilação não ficam obstruídas.
  • Seite 98 2.5 Iluminação interna funções como, por exemplo, aquecimento de divisões. • Cozinhe sempre com a porta do forno AVISO! fechada. Risco de choque elétrico. • Se o aparelho ficar instalado atrás de uma porta de armário, nunca feche a • Relativamente à(s) lâmpada(s) no interior porta com o aparelho em funcionamento.
  • Seite 99: Instalação

    3. INSTALAÇÃO 3.1 Encastre AVISO! Consulte os capítulos relativos à segurança. (*mm) min. 550 min. 560 (*mm) min. 550 min. 560 PORTUGUÊS...
  • Seite 100: Descrição Do Produto

    3.2 Fixação do forno no armário 4. DESCRIÇÃO DO PRODUTO 4.1 Resumo geral Painel de controlo Lâmpada/símbolo de alimentação Botão para as funções de aquecimento do forno Botão do temporizador Botão de controlo (para a temperatura) Símbolo / indicador de temperatura Elemento de aquecimento Lâmpada Ventilador...
  • Seite 101: Utilização Diária

    5.1 Antes da primeira utilização O forno pode emitir algum odor e fumo durante o pré-aquecimento. Certifique-se de que o espaço é ventilado. Passo 1 Passo 2 Limpeza do forno Pré-aqueça o forno vazio Remova todos os acessórios e apoios para prate‐ Regule a temperatura máxima para a função.
  • Seite 102: Funções De Relógio

    e design ecológico de acordo com as normas EU 65/2014 e EU 66/2014. Testes de acordo Função de Aplicação com a norma EN 60350-1. aquecimen‐ A porta do forno deve estar fechada durante a cozedura para que a função não seja Para descongelar alimentos (legu‐...
  • Seite 103: Funções Adicionais

    Prateleira em grelha: Introduza a prateleira entre as barras-guia dos apoios para prateleiras e certifique-se de que os pés de apoio ficam para baixo. Tabuleiro para assar: Introduza o tabuleiro entre as barras-guia do apoio para prateleiras. Prateleira em grelha, Tabuleiro para assar: Introduza o tabuleiro entre as barras-guia dos apoios para prateleiras e a prateleira em grelha sobre as barras imediatamente acima.
  • Seite 104: Sugestões E Dicas

    10. SUGESTÕES E DICAS Cozer bolos Consulte os capítulos relativos à Não abra a porta do forno até ter decorrido segurança. 3/4 do tempo de cozedura. Se utilizar dois tabuleiros para assar em 10.1 Recomendações para cozinhar simultâneo, mantenha um nível vazio entre O forno possui cinco posições de prateleira.
  • Seite 105 Cozedura Convencio‐ Cozedura ventilada BO‐ (min) (°C) (°C) Bolo de ameixa, 50 – 60 Forma retangular pré-aqueça o for‐ no vazio Biscoitos 140 – 150 30 – 35 Tabuleiro para as‐ Biscoitos, dois ní‐ 140 – 150 2 e 4 35 - 40 Tabuleiro para as‐...
  • Seite 106 Cozedura Convencio‐ Cozedura ventilada PÃO E PIZZA (min) (°C) (°C) Pizza massa fina 10 – 20 Tabuleiro para as‐ sar / Tabuleiro pa‐ ra grelhar Scones 10 – 20 Tabuleiro para as‐ Pré-aqueça o forno vazio. Utilize uma forma de bolo. Cozedura Convencional Cozedura ventilada FLANS...
  • Seite 107 Cozedura Convencional Cozedura ventilada CARNE (min) (°C) (°C) Pá de porco, com cou‐ 120 – 150 rato Perna de porco, 2 uni‐ 100 – 120 dades Perna de borrego 110 – 130 Frango inteiro 70 – 85 Peru inteiro 210 – 240 Pato inteiro 120 –...
  • Seite 108 PORCO AVES (°C) (min) (°C) (min) Aves, partes, 0,2 - 200 - 220 30 - 50 Rolo de carne, 0,75 - 1 160 - 170 50 - 60 0,25 kg cada 1/2 Frango, 0,4 - 0,5 190 - 210 35 - 50 Joelho de porco, pré- 150 - 170 90 - 120...
  • Seite 109 (kg) Tempo de des‐ Tempo extra de des‐ congelação congelação (min.) (min.) Manteiga 0,25 30 - 40 10 - 15 Gateau 10.5 Secagem - Cozedura ventilada Cubra os tabuleiros com papel impermeável à gordura ou papel vegetal. LEGUMES (°C) Para obter o melhor resultado, desligue o forno a meio do tempo de secagem, abra a Legumes para sopa 60 - 70...
  • Seite 110 (°C) (min.) Pastéis doces, 12 tabuleiro para assar ou tabu‐ 40 - 50 unidades leiro para recolha de gorduras Pasteis, 9 unidades tabuleiro para assar ou tabu‐ 35 - 45 leiro para recolha de gorduras Pizza, congelada, prateleira em grelha 45 - 55 0,35 kg Torta suíça...
  • Seite 111 (°C) (min.) Legumes mediterrâni‐ tabuleiro para assar ou tabu‐ 35 - 45 cos, 0,7 kg leiro para recolha de gorduras 10.8 Informação para testes Testes de acordo com a norma IEC 60350-1. (°C) (min) Bolos pe‐ Cozedura Con‐ Tabuleiro 20 - 30 quenos, 20 vencional para assar...
  • Seite 112: Manutenção E Limpeza

    (°C) (min) Massa Cozedura Con‐ Tabuleiro 140 - 25 - 45 amanteiga‐ vencional para assar Tosta, 4 - 6 Grelhador Prateleira máx. 2 - 3 minutos para Pré-aqueça o forno du‐ unidades em grelha o primeiro lado; 2 - rante 3 minutos. 3 minutos para o segundo lado Hambúrguer...
  • Seite 113 11.2 Como remover: Apoios para prateleiras Retire os apoios para prateleiras para limpar o forno. Passo 1 Desligue o forno e aguarde até estar frio. Passo 2 Puxe a parte da frente do apoio para prateleiras para fora da parede late‐ ral.
  • Seite 114 Passo 3 Feche a porta do forno até meio, parando na primeira posição de abertura. Em seguida, levante e puxe a porta e remova-a dos en‐ caixes. Passo 4 Coloque a porta numa superfície estável protegida por um pano macio. Passo 5 Segure no friso da porta (B) no rebordo su‐...
  • Seite 115: Resolução De Problemas

    11.5 Como substituir: Lâmpada Segure sempre a lâmpada de halogéneo com um pano para evitar a queima de resíduos de gordura na lâmpada. AVISO! Risco de choque elétrico. A lâmpada pode estar quente. Antes de substituir a lâmpada: Passo 1 Passo 2 Passo 3 Desligue o forno.
  • Seite 116: Eficiência Energética

    Número de série (S.N.) ......... 13. EFICIÊNCIA ENERGÉTICA 13.1 Informação de produto e folha de informação de produto* Nome do fornecedor Zanussi ZOHKF1X1 949496249 Identificação do modelo ZOHNF1K1 949496304 ZOHNF1W1 949496305 Índice de eficiência energética 81.2 Classe de eficiência energética Consumo de energia com uma carga normal, modo convencional 0.93 kWh/ciclo...
  • Seite 117: Preocupações Ambientais

    Calor residual Ventilado com Resistência Quando a duração da cozedura for superior Função concebida para poupar energia a 30 min, reduza a temperatura do forno durante a cozedura. para 3 a 10 min no mínimo antes do fim da Quando utilizar esta função, a lâmpada está cozedura.
  • Seite 118: Información Sobre Seguridad

    VISITE NUESTRO SITIO WEB PARA: Obtener consejos, folletos, soluciones a problemas e información de servicio y reparación: www.zanussi.com/support Salvo modificaciones. CONTENIDO 1. INFORMACIÓN SOBRE SEGURIDAD...............118 2. INSTRUCCIONES DE SEGURIDAD................120 3. INSTALACIÓN......................123 4. DESCRIPCIÓN DEL PRODUCTO................124 5. ANTES DEL PRIMER USO..................124 6.
  • Seite 119: Seguridad General

    personas con minusvalías importantes y complejas, salvo que estén bajo supervisión continua. No deje que los niños jueguen con el aparato. • Mantenga todo el material de embalaje fuera del alcance de • los niños y deséchelo de forma adecuada. ADVERTENCIA: Mantenga a los niños y mascotas alejados •...
  • Seite 120: Instrucciones De Seguridad

    Para quitar los carriles laterales, tire primero del frontal del • carril y luego separe el extremo trasero de las paredes. Coloque los carriles laterales en el orden inverso. 2. INSTRUCCIONES DE SEGURIDAD 2.1 Instalación Fondo con la puerta abier‐ 1022 mm ADVERTENCIA! Sólo un técnico cualificado...
  • Seite 121 2.3 Uso • Conecte el enchufe a la toma de corriente únicamente cuando haya terminado la instalación. Asegúrese de tener acceso al ADVERTENCIA! enchufe del suministro de red una vez Riesgo de lesiones, quemaduras finalizada la instalación. y descargas eléctricas o •...
  • Seite 122 • La pérdida de color del esmalte o el acero estropajos duros, disolventes ni objetos inoxidable no afecta al rendimiento del metálicos. aparato. • Si utiliza aerosoles de limpieza para • Utilice una bandeja honda para pasteles hornos, siga las instrucciones de húmedos.
  • Seite 123: Instalación

    3. INSTALACIÓN 3.1 Empotrado ADVERTENCIA! Consulte los capítulos sobre seguridad. (*mm) min. 550 min. 560 (*mm) min. 550 min. 560 ESPAÑOL...
  • Seite 124: Descripción Del Producto

    3.2 Fijación del horno al mueble 4. DESCRIPCIÓN DEL PRODUCTO 4.1 Resumen general Panel de control Piloto/símbolo de alimentación Mando de las funciones de cocción Mando del temporizador Mando de en control (de la temperatura) Indicador/símbolo de temperatura Resistencia Bombilla Ventilador Contenedor de limpieza con agua Carril lateral, extraíble...
  • Seite 125: Uso Diario

    5.1 Antes del primer uso El horno puede emitir olores y humos durante el precalentamiento. Asegúrese de que la sala esté ventilada. Paso 1 Paso 2 Limpie el horno Precaliente el horno vacío Retire todos los accesorios y carriles de apoyo ex‐ Seleccione la temperatura máxima para la función: traíbles del horno.
  • Seite 126: Funciones Del Reloj

    energética y ecodiseño según EU 65/2014 y EU 66/2014. Pruebas conforme a EN Función de Aplicación 60350-1. cocción La puerta del horno debe estar cerrada Para descongelar alimentos (verdu‐ durante la cocción para que la función no se ra y fruta). El tiempo de desconge‐ interrumpa y que el horno funcione con la lación depende de la cantidad y ta‐...
  • Seite 127: Funciones Adicionales

    Parrilla: Inserte la parrilla entre las guías del carril y asegú‐ rese de que las hendiduras apuntan hacia abajo. Bandeja: Introduzca la bandeja entre las guías del carril de apoyo. Parrilla, Bandeja: Posicione la bandeja entre las guías del carril de apoyo y la parrilla en las guías de encima.
  • Seite 128: Consejos

    10. CONSEJOS Repostería Consulte los capítulos sobre No abra la puerta del horno antes de que seguridad. transcurran 3/4 partes del tiempo de cocción establecido. 10.1 Recomendaciones de cocción Si utiliza dos bandejas al mismo tiempo, deje El horno tiene cinco niveles. un nivel libre entre ambas.
  • Seite 129 Cocción convencio‐ Cocción ventil. PAS‐ TELES (min) (°C) (°C) Pastel de ciruelas, 50 - 60 Molde para pan precaliente el hor‐ no vacío Galletas 140 - 150 30 - 35 Bandeja Galletas, dos ni‐ 140 - 150 2 y 4 35 - 40 Bandeja veles...
  • Seite 130 Cocción convencional Cocción ventil. FLANES (min) (°C) (°C) Pudin de pasta, no se 40 - 50 necesita precalentar Pudin de verduras, no 45 - 60 se necesita precalen‐ Quiches 50 - 60 Lasaña 180 - 190 180 - 190 25 - 40 Canelones 180 - 190 180 - 190...
  • Seite 131 Cocción convencional Cocción ventil. CARNE (min) (°C) (°C) Liebre, en trozos 150 - 200 Faisán entero 90 - 120 Cocción convencional Cocción ventil. PESCADO (min) (°C) (°C) Trucha / Pargo, 3 - 4 pes‐ 40 - 55 cados Atún / Salmón, 4 - 6 filetes 190 35 - 60 10.3 Grill Turbo Precaliente el horno vacío.
  • Seite 132 AVES PESCADO (°C) (min) (AL VAPOR) (°C) (min) Pescado entero, 1 - 210 - 220 40 - 60 Ganso, 3,5 - 5 kg 160 - 180 120 - 180 1,5 kg Pavo, 2,5 - 3,5 kg 160 - 180 120 - 150 Pavo, 4 - 6 kg 140 - 160 150 - 240...
  • Seite 133 FRUTA FRUTA Ciruelas 8 - 10 Manzanas en rodajas 6 - 8 Albaricoques 8 - 10 Peras 6 - 9 10.6 Horneado húmedo + ventil.. accesorios recomendados Utilice molde y recipientes oscuros y mates. Tiene mejor absorción del calor que los platos de color claro y brillantes.
  • Seite 134 (°C) (min) Filete de pescado, molde para pizza sobre parrilla 170 30 - 40 0,3 kg Carne pochada, 0,25 bandeja o bandeja honda 35 - 45 Shashlik, 0,5 kg bandeja o bandeja honda 40 - 50 Galletas, 16 piezas bandeja o bandeja honda 30 - 45 Mostachones de al‐...
  • Seite 135: Mantenimiento Y Limpieza

    (°C) (min) Tarta de Cocción ventil. Parrilla 70 - 90 manzana, 2 moldes, Ø 20 cm Bizcocho, Cocción con‐ Parrilla 40 - 50 Precaliente el horno 10 molde de re‐ vencional minutos. postería Ø26 cm Bizcocho, Cocción ventil. Parrilla 40 - 50 Precaliente el horno 10 molde de re‐...
  • Seite 136 11.1 Notas sobre la limpieza Limpie la parte delantera del horno con un paño suave humedecido en agua templada y ja‐ bón suave. Limpie y compruebe la junta de la puerta alrededor del interior. Utilice un producto de limpieza para limpiar las superficies metálicas. Limpie las manchas con un detergente suave.
  • Seite 137 Paso 3 Ajuste la temperatura a 90 °C. Paso 6 Espere hasta que el horno esté frío. Seque el interior con un paño suave. Paso 4 Deje funcionar el horno 30 minutos. Paso 5 Apague el horno. 11.4 Cómo quitar e instalar: Puerta La puerta del horno tiene dos paneles de cristal.
  • Seite 138: Solución De Problemas

    Paso 8 Limpie los paneles de cristal con agua y ja‐ bón. Seque los paneles de cristal con cuida‐ do. No limpie los paneles de cristal en el la‐ vavajillas. Paso 9 Después de la limpieza, instale el panel de vidrio y la puerta del horno.
  • Seite 139: Datos De Servicio

    Número de serie (S.N.) ......... 13. EFICACIA ENERGÉTICA 13.1 Información del producto y Hoja de información del producto* Nombre del proveedor Zanussi ZOHKF1X1 949496249 Identificación del modelo ZOHNF1K1 949496304 ZOHNF1W1 949496305 Índice de eficiencia energética 81.2 Clase de eficiencia energética Consumo de energía con carga estándar, modo convencional...
  • Seite 140: Ahorro De Energía

    EN 60350-1 - Aparatos electrodomésticos - Parte 1: Placas, hornos, hornos de vapor y parrillas - Métodos para medir el rendimiento. 13.2 Ahorro de energía Calor residual Para una duración de la cocción superior a 30 minutos, reduzca la temperatura del El horno tiene características horno un mínimo de 3 - 10 minutos antes de que le ayudan a ahorrar energía...
  • Seite 144 WWW.ZANUSSI.COM/SHOP...

Diese Anleitung auch für:

Zohnf1k1Zohnf1w1

Inhaltsverzeichnis