Monacor TVCCD-115 COL Bedienungsanleitung
Farbkamera
Quicklinks
®
Farbkamera
D
A
CH
Bitte lesen Sie diese Anleitung vor der Installation gründlich
durch und heben Sie sie für ein späteres Nachlesen auf.
1 Verwendungsmöglichkeiten
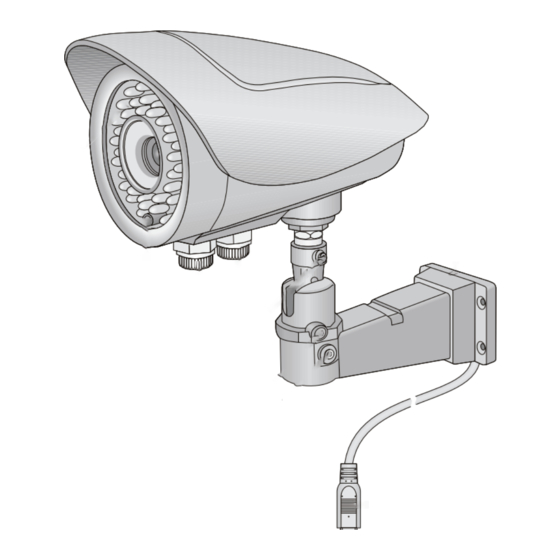
Diese Kamera ist speziell für den Einsatz in Video-Über-
wachungsanlagen (CCTV) konzipiert. Sie wird an der
Wand montiert und ist in ihrem robusten Metallgehäuse
wettergeschützt (Gehäuseschutzklasse IP 65).
Die Kamera ist mit einem 8,5-mm-Bildsensor (
einem Objektiv mit variabler Brennweite (3,5 – 8 mm) aus-
gestattet, das sich von außen einstellen lässt. Zusätzlich
verfügt die Kamera über eine Verstärkungsregelung
(AGC), eine Gegenlichtkompensation und einen automa-
tischen elektronischen Verschluss (Shutter).
Erkennt die Kamera über den Lichtsensor (2) Dunkel-
heit, wechselt sie von Farb- auf S/W-Betrieb und die
48 Infrarot-LEDs (1) schalten sich zur Aufhellung des
Überwachungsbereichs (Reichweite 40 m) ein.
2 Wichtige Hinweise für den Gebrauch
Die Kamera entspricht allen erforderlichen Richtlinien der
EU und ist deshalb mit
gekennzeichnet.
Schu ̈ tzen Sie die Kamera vor extremen Temperaturen
G
(zulässige Einsatztemperatur -20 °C bis +50 °C).
Verwenden Sie zum Reinigen des Gehäuses keine
G
aggressiven Reinigungsmittel oder Chemikalien.
Wird die Kamera zweckentfremdet, falsch installiert
G
oder nicht fachgerecht repariert, kann keine Haftung für
daraus resultierende Sach- oder Personenschäden und
keine Garantie für die Kamera übernommen werden.
Soll die Kamera endgültig aus dem Betrieb
genommen werden, übergeben Sie sie zur
umweltgerechten Entsorgung einem örtlichen
Recyclingbetrieb.
Colour Camera
GB
Please read these operating instructions carefully prior to
the installation and keep them for later reference.
1 Applications
This camera is especially designed for use in video sur-
veillance systems (CCTV). It is mounted to the wall. In its
robust metal housing, the camera is weatherproof (pro-
tective class of housing IP 65).
The camera is equipped with an 8.5 mm (
sensor and a lens with variable focal length (3.5 – 8 mm)
which can externally be adjusted. In addition, the camera
has an automatic gain control (AGC), a backlight compen-
sation, and an automatic electronic shutter.
If the camera recognizes darkness via the light sensor
(2), it will change from colour to B/W operation and the
48 infrared LEDs (1) will light up to illuminate the surveil-
lance zone (range 40 m).
2 Important Notes
The camera corresponds to all required directives of the
EU and is therefore marked with
.
Protect the camera against extreme temperatures
G
(admissible ambient temperature range -20 °C to
+50 °C).
Never use aggressive detergents or chemicals for
G
cleaning the housing.
No guarantee claims for the camera and no liability for
G
any resulting personal damage or material damage will
be accepted if the camera is used for other purposes
than originally intended, if it is not correctly installed, or
not repaired in an expert way.
If the camera is to be put out of operation defini-
tively, take it to a local recycling plant for a dis-
posal which is not harmful to the environment.
Copyright
®
TV
D -1 15 OL
3 Installation und Inbetriebnahme
VORSICHT: Blicken Sie nie aus der Nähe
direkt in die eingeschalteten LEDs (1). Ob-
wohl das Infrarotlicht unsichtbar ist, kann es
Augenschäden verursachen.
Das Anschlusskabel kann durch eine Öffnung in der Wand
oder durch eine der seitlichen Durchbruchstellen (5) am
Sockel geführt werden.
Wichtig! Die Anschlusskupplungen (8, 9) und der Kabel-
⁄
") und
1
verteiler (7) sind nicht wetterfest. Bei einem Außenan-
3
schluss mu ̈ ssen sie entsprechend geschu ̈ tzt werden.
1) Die BNC-Kupplung (9) über ein 75-Ω-Koaxialkabel mit
dem Videoeingang eines Monitors verbinden. Dabei
auf den korrekten 75-Ω-Abschluss am Monitor bzw. bei
einer Serienschaltung am letzten Monitor achten. Bei
einer Kabellänge von mehr als 100 m sollte zum Aus-
gleich von Pegelverlusten durch das Kabel ein Video-
verstärker zwischen die Kamera und das lange Kabel
geschaltet werden.
2) Die Kleinspannungskupplung (8) an eine stabilisierte
Spannungsversorgung anschließen (12 V
Dazu wird ein koaxialer Kleinspannungsstecker mit
5,5 mm Außendurchmesser und 2,1 mm Innendurch-
messer benötigt (Polung beachten: Mittelkontakt = +).
3) Den Monitor einschalten und durch Ausrichten der
Kamera auf den Überwachungsbereich die optimale
Montagestelle fu ̈ r sie feststellen. An dieser Stelle den
Kamerahalter festschrauben.
Die Kamera durch Neigen und Schwenken auf den
Überwachungsbereich ausrichten. Dazu die Feststell-
schrauben (6) fu ̈ r die entsprechenden Bewegungs-
achsen lösen (der benötigte Inbusschlu ̈ ssel liegt bei)
und nach dem Ausrichten wieder festdrehen.
Das Objektiv muss vor direkter Sonneneinstrahlung
geschützt sein, da sonst der Bildabtaster beschädigt
werden kann.
3 Installation and Operation
CAUTION: Never look directly into the lit
LEDs (1) at close range. Although the
infrared light is invisible, it may cause eye
damage.
Lead the connection cable through an opening in the wall
or through one of the lateral punched break-through slots
(5) in the base.
Important! The connecting inline jacks (8, 9) and the
cable distributor (7) are not weatherproof. In case of an
⁄
") image
1
3
outside installation they must be protected accordingly.
1) Connect the BNC inline jack (9) via a 75 Ω coaxial
cable to the video input of a monitor. Observe the cor-
rect 75 Ω termination at the monitor or in case of series
connection at the last monitor. With a cable length of
more than 100 m a video amplifier should be inserted
between the camera and the long cable to compensate
level loss caused by the cable.
2) Connect the low voltage inline jack (8) to a regulated
voltage supply (12 V
coaxial low voltage plug with 5.5 mm outside diameter
and 2.1 mm inside diameter is required (observe the
polarity: centre contact = +).
3) Switch on the monitor and by aligning the camera to
the surveillance zone define the optimum place of
mounting for it. Tightly screw the camera support at this
place.
Align the camera to the surveillance zone by tilting
and panning it. For this purpose release the setscrews
(6) for the corresponding movement axes (the required
hexagon key is supplied) and retighten them after
aligning.
The lens must be protected against direct sunlight
as otherwise the image sensor may be damaged.
4) With the zoom adjusting screw (4) adjust the picture
cutout and with the focus adjusting screw (3) bring the
picture into focus on the monitor (slightly release the
by MONACOR INTERNATIONAL GmbH & Co. KG, Bremen, Germany. All rights reserved.
©
est.-Nr. 18.2110
4) Mit der Zoom-Einstellschraube (4) den Bildausschnitt
4 Technische Daten
Bildabtaster: . . . . . . . . . . . . . CCD, 8,5 mm (
System: . . . . . . . . . . . . . . . . PAL
Synchronisation: . . . . . . . . . . h. 15 625 Hz, v. 50 Hz
Auflösung/Bildpunkte: . . . . . 420 Linien/h. 500 × v. 582
Objektiv: . . . . . . . . . . . . . . . . 1 : 1,4 / 3,5 – 8 mm
Mindestbeleuchtung: . . . . . . 0,1 Lux (IR-LEDs aus)
Signal/Rausch-Abstand: . . . > 52 dB (AGC aus)
Videoausgang: . . . . . . . . . . . 1 Vss/75 Ω, BNC
Stromversorgung: . . . . . . . . . 12 V
Abmessungen, Gewicht: . . . 105 × 125 × 225 mm,1,3 kg
Änderungen vorbehalten.
±10 % /1 A).
±10 % /1 A). For this purpose a
4 Specifications
Image sensor: . . . . . . . . . . . CCD, 8.5 mm (
System: . . . . . . . . . . . . . . . . PAL
Synchronization: . . . . . . . . . . hor. 15 625 Hz, vert. 50 Hz
Resolution/pixels: . . . . . . . . . 420 lines/
Lens: . . . . . . . . . . . . . . . . . . 1 : 1.4 / 3.5 – 8 mm
Minimum illumination: . . . . . . 0.1 lux (IR LEDs off)
S/N ratio: . . . . . . . . . . . . . . . > 52 dB (AGC off)
Video output: . . . . . . . . . . . . 1 Vpp/75 Ω, BNC
Power supply: . . . . . . . . . . . . 12 V
Dimensions, weight: . . . . . . . 105 × 125 × 225 mm, 1.3 kg
Subject to technical modifications.
einstellen und mit der Fokus-Einstellschraube (3) das
Bild auf dem Monitor scharf stellen (ggf. die Inbus-
schraube innerhalb der Einstellschrauben etwas
lösen).
1
2
3
4
6
8
12 V
±10 %
hexagon screw within the adjusting screws, if
required).
hor. 500 × vert. 582
A-0879.99.01.07.2008
⁄
")
1
3
±10 %/1 A
5
7
9
Video
⁄
")
1
3
±10 %/1 A

Verwandte Anleitungen für Monacor TVCCD-115 COL


Inhaltszusammenfassung für Monacor TVCCD-115 COL
- Seite 1 (3) bring the posal which is not harmful to the environment. picture into focus on the monitor (slightly release the Subject to technical modifications. Copyright by MONACOR INTERNATIONAL GmbH & Co. KG, Bremen, Germany. All rights reserved. A-0879.99.01.07.2008 © ®...
- Seite 2 4) Con la vite di regolazione dello zoom (4) fissare la tuzione locale per il riciclaggio. sezione dellʼimmagine e con la vite di regolazione del Con riserva di modifiche tecniche. Copyright by MONACOR INTERNATIONAL GmbH & Co. KG, Bremen, Germany. All rights reserved. A-0879.99.01.07.2008 © ®...