Kapitel
Inhaltsverzeichnis

Inhaltszusammenfassung für Jansen HKT 604 ZB Lite Slider
- Seite 1 Gebrauchs- und Montageanweisung Glaskeramik-Kochfeld Handling and installation instructions Glass ceramic hob Mode d’emploi et instructions de montage Table de cuisson vitrocéramique 240 241 0000 K11...
-
Seite 2: Inhaltsverzeichnis
Allgemeines Inhalt 1 Allgemeines 1 Allgemeines ..............2 1.1 Hier fi nden Sie... 1.1 Hier fi nden Sie............2 Bitte lesen Sie die Informationen in diesem Heft sorgfältig 1.2 Bestimmungsgemäße Verwendung ......2 durch bevor Sie Ihr Kochfeld in Betrieb nehmen. Sie fi nden 2 Sicherheitshinweise und Warnungen......3 hier wichtige Hinweise für Ihre Sicherheit, den Gebrauch, 2.1 Für Anschluss und Funktion ........3... -
Seite 3: Sicherheitshinweise Und Warnungen
Sicherheitshinweise und Warnungen 2 Sicherheitshinweise und Warnungen • Sollte sich das Kochfeld durch einen Defekt der Sensorsteuerung nicht mehr abschalten 2.1 Für Anschluss und Funktion lassen, sofort die Haushalts-Sicherung aus- • Die Geräte werden nach den einschlägigen schalten und den Kundendienst rufen. Sicherheitsbestimmungen gebaut. -
Seite 4: Allgemeines
Allgemeines • Niemals verschlossene Konservendosen und 2.3 Für Personen Verbundschichtverpackungen auf Kochzonen • Diese Geräte können von Kindern ab 8 Jah- erhitzen. Durch Energiezufuhr könnten diese ren sowie von Personen mit reduzierten zerplatzen! physischen, sensorischen oder mentalen Fähigkeiten oder Mangel an Erfahrung und/ •... -
Seite 5: Symbol- Und Hinweiserklärung
Allgemeines 2.4 Symbol- und Hinweiserklärung Zusätzlich werden an einigen Stellen die folgenden Gefah- rensymbole verwendet: Das Gerät wurde nach aktuellem Stand der Technik gefer- tigt. Dennoch gehen von Maschinen Risiken aus, die sich konstruktiv nicht vermeiden lassen. WARNUNG VOR ELEKTRISCHER Um dem Bediener ausreichende Sicherheit zu gewähr- ENERGIE! leisten, werden zusätzlich Sicherheitshinweise gegeben,... -
Seite 6: Gerätebeschreibung
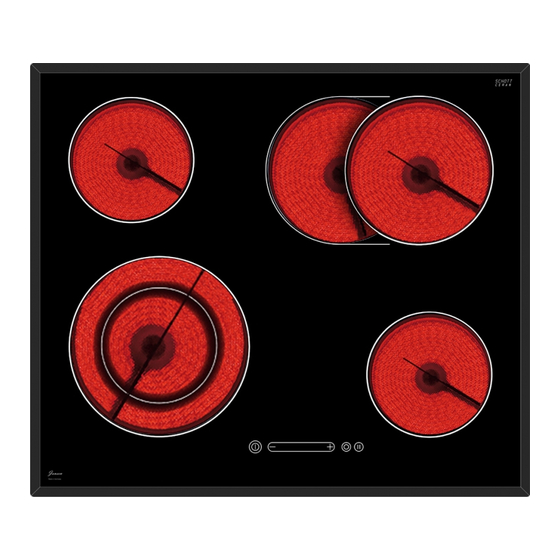
Gerätebeschreibung 3 Gerätebeschreibung Das Dekor kann von den Abbildungen abweichen. 9. Bereitschaftspunkt (Kochstufe) 10. Sensorfeld mit LED 1. Kochzone vorne links 11. Kreiszuschaltungstaste 2. Kochzone hinten links 12. Kontroll-Leuchte Zweikreis 3. Kochzone hinten rechts 13. STOP-Taste 4. Kochzone vorne rechts 14. -
Seite 7: Bedienung Durch Sensortasten
Gerätebeschreibung 3.1 Bedienung durch Sensortasten 3.2 Wissenswertes zum Slider (Sensorfeld) Die Bedienung des Glaskeramik-Kochfeldes erfolgt durch Der Slider funktioniert grundsätzlich wie die Sensortasten, Touch-Control Sensortasten. Die Sensortasten funktio- mit dem Unterschied, dass der Finger auf der Glaskera- nieren wie folgt: mit der Fingerspitze ein Symbol auf der mikoberfl... -
Seite 8: Bedienung
Bedienung 4 Bedienung 3.3 Energiespartipps Nachfolgend fi nden Sie einige wichtige Hinweise, um ener- 4.1 Betriebsdauerbegrenzung giesparend und effi zient mit Ihrem neuen Kochfeld und Das Kochfeld besitzt eine automatische Betriebsdauer-be- dem Kochgeschirr umzugehen. grenzung. Die kontinuierliche Nutzungsdauer jeder Koch- •... -
Seite 9: Tastenbetätigung
Bedienung 4.3 Tastenbetätigung Die hier beschriebene Steuerung erwartet nach der Betä- tigung einer (Auswahl-) Taste anschließend die Betätigung einer nachfolgenden Taste. Die Betätigung der nachfolgenden Taste muss grund- sätzlich innerhalb von 10 Sekunden begonnen werden, ansonsten erlischt die Auswahl. 4.4 Kochfeld und Kochzone einschalten Bereitschaftspunkt 1. -
Seite 10: Stop-Funktion
Bedienung 4.7 STOP-Funktion Der Kochvorgang kann kurzzeitig durch die STOP-Funk- tion unterbrochen werden, z.B. wenn es an der Haustüre klingelt. Um den Kochvorgang mit den gleichen Kochstu- fen fortzusetzen, muss die STOP-Funktion aufgehoben werden. Ein evtl. eingestellter Timer wird angehalten und läuft danach weiter. -
Seite 11: Kindersicherung
Bedienung 4.9 Kindersicherung Die Kindersicherung soll verhindern, dass Kinder verse- hentlich oder absichtlich das Kochfeld einschalten. Dazu wird die Bedienung gesperrt. Kindersicherung einschalten 1. Ein-/Aus-Taste betätigen, um das Kochfeld einzu- schalten. 2. Gleich darauf die Kochstufen-Anzeige hinten rechts und die Kreiszuschaltungstaste gemeinsam gleich- zeitig betätigen. -
Seite 12: Abschaltautomatik (Timer)
Bedienung 4.11 Abschaltautomatik (Timer) Durch die Abschaltautomatik wird jede eingeschaltete Kochzone nach einer einstellbaren Zeit automatisch abgeschaltet. Es können Kochzeiten von 01 bis 99 Minuten eingestellt werden. 1. Das Kochfeld einschalten. Eine oder mehrere Kochzonen ein- schalten und gewünschte Kochstufen wählen. 2. -
Seite 13: Ankochautomatik
Bedienung 4.13 Ankochautomatik Bei der Ankochautomatik erfolgt das Ankochen mit Kochstu- fe 9. Nach einer bestimmten Zeit wird automatisch auf eine geringere Fortkochstufe (1 bis 8) zurückgeschaltet. Bei Anwendung der Ankochautomatik muss lediglich die Fort- kochstufe gewählt werden, mit der das Gargut weitergegart werden soll, weil die Elektronik selbständig zurückschaltet. -
Seite 14: Reinigung Und Pfl Ege
Reinigung und Pfl ege 5 Reinigung und Pfl ege 5.2 Spezielle Verschmutzungen Starke Verschmutzungen und Flecken (Kalkfl ecken, • Vor dem Reinigen das Kochfeld ausschalten und ab- perlmuttartig glänzende Flecken) kühlen lassen. sind am besten zu beseitigen, wenn • Das Glaskeramikkochfeld darf unter keinen Umstän- das Kochfeld noch handwarm ist. -
Seite 15: Was Tun Bei Problemen
Was tun bei Problemen? 6 Was tun bei Problemen? Das Kochfeld bzw. die Kochzone ist plötzlich ausge- schaltet Unqualifi zierte Eingriff e und Reparaturen am Gerät sind • Haben Sie aus Versehen die Ein/Aus-Taste betätigt? gefährlich, weil Stromschlag- und Kurzschlussgefahr besteht. -
Seite 16: Montageanleitung
Montageanleitung 7 Montageanleitung Kochfelddichtung Vor dem Einbau ist die beiliegende Kochfelddichtung 7.1 Sicherheitshinweise für den Küchenmöbel- lückenlos einzulegen. monteur • Furniere, Kleber bzw. Kunststoff beläge der angren- zenden Möbel müssen temperaturbeständig sein (min. 75°C). Sind die Furniere und Beläge nicht genügend temperaturbeständig, können sie sich verformen. - Seite 17 Montageanleitung Clipse [mm] • Die Clipse in den angegebenen Abstän- den in den Arbeitsplatten-Ausschnitt einschlagen. • Durch den horizontalen Anschlag ist keine Höhenausrichtung erforderlich. • Wichtig: der horizontale Anschlag der Clipse muss bündig auf der Arbeitsplatte aufl iegen. (Bruchgefahr vermeiden) •...
-
Seite 18: Elektrischer Anschluss
Montageanleitung 7.3 Elektrischer Anschluss Anschlussmöglichkeiten: 5-poliger Anschluss WARNUNG VOR ELEKTRISCHER ENERGIE! ES BESTEHT LEBENSGEFAHR! In der Nähe dieses Symbols sind span- nungsführende Teile angebracht. Abdeckun- gen, die damit gekennzeichnet sind, dürfen nur von einer anerkannten Elektrofachkraft entfernt werden. • Der elektrische Anschluss darf nur von einem autori- sierten Fachmann vorgenommen werden! •... -
Seite 19: Technische Daten
Außerbetriebhame, Entsorgung 7.4 Technische Daten 8 Außerbetriebhame, Entsorgung 8.1 Außerbetriebnahme Abmessungen Kochfeld Wenn das Gerät eines Tages ausgedient hat, erfolgt die Höhe/ Breite/ Tiefe ..mm Außerbetriebnahme. • Schalten Sie die Sicherung in der Hausinstallation aus, 45 x 600 x 520 um Stromschlaggefahr zu vermeiden. -
Seite 20: General
General Contents 1 General 1 General ................20 1.1 For your information... 1.1 For your information..........20 1.2 Intended use ............20 Please read this manual carefully before using your appli- ance. It contains important safety advice; it explains how to 2 Safety Instructions and Warnings ......21 use and look after your appliance so that it will provide you 2.1 For connection and operation ........21 with many years of reliable service. -
Seite 21: Safety Instructions And Warnings
Safety Instructions and Warnings 2 Safety Instructions and Warnings • If the hob cannot be switched off due to a defect in the sensor control immediately 2.1 For connection and operation disconnect your appliance and call Customer • The appliances are constructed in accordance Service. -
Seite 22: For Persons
Safety Instructions and Warnings • Never use the cooking zones to heat up 2.3 For persons unopened tins of food or packaging made of • These appliances may be used by children material compounds. The power supply may aged 8 years and over and by persons with cause them to burst! physical, sensory or mental impairments or by persons who lack experience and/or know-... -
Seite 23: Explanation For Symbols And Indications
Safety Instructions and Warnings 2.4 Explanation for symbols and indications The following danger symbols are used at some points: The appliance was produced according to state of the art technology. Machines nevertheless give rise to risks which WARNING OF ELECTRICAL ENERGY! cannot be constructively avoided. -
Seite 24: Appliance Description
Appliance description 3 Appliance description The decorative design may deviate from the illustrations. 9. Stand-by dot (cooking level) 10. Sensor fi eld with LED 1. Front left cooking zone 11. Circuit activation key 2. Back left cooking zone 12. Control lamp dual-circuit cooking zone 3. -
Seite 25: Operating The Hob With The Sensor Keys
Appliance description 3.1 Operating the hob with the sensor keys 3.2 Worth knowing about the slider (sensorfi eld) The glass ceramic hob is operated with touch control sen- In principle, the slider functions the same as the touch sor keys. The sensor keys are operated as follows: lightly controls;... -
Seite 26: Operation
Operation 4 Operation 3.3 How to cut power consumption The following are a few useful hints to help you cut your 4.1 Operation time limit consumption of energy and use your new hob and the The induction hob has an automatic time limit function. The cookware effi... -
Seite 27: Operating The Keys
Operation 4.3 Operating the keys The controls described here expect the pressing of a (selection) key to be followed by the pressing of a subse- quent key. The next key will need to be pressed within 10 seconds, otherwise the selection will be deleted. 4.4 Switching on the hob and cooking zones 1. -
Seite 28: Stop Function
Operation 4.7 Stop function The cooking process can be briefl y interrupted with the STOP function, e.g. if the doorbell rings. The STOP func- tion must be released in order to continue cooking at the same power level. If a timer has been set it will pause and will then continue. -
Seite 29: Childproof Lock
Operation 4.9 Childproof lock The childproof lock serves to prevent children from swit- ching on the hob accidentally or intentionally. The controls are blocked here. Switching on the childproof lock 1. Press the ON/OFF key in order to switch on the hob. -
Seite 30: Automatic Switch-Off (Timer)
Operation 4.11 Automatic switch-off (timer) The automatic switch-off device is used to automatically switch off any cooking zone after an adjustable period of time. Cooking times ranging from 01 to 99 minutes can be set. 1. Switch on the hob. Switch on one or more cooking zones and select the required power settings. -
Seite 31: Automatic Boost Function
Operation 4.13 Automatic boost function Food is parboiled at power setting 9 with the automatic boost function. After a certain time, the power level will switch down automatically to a lower simmering setting (1 to8). When using the automatic boost function only the simmering setting with which the food is to be cooked through needs to be selected since the electronic unit switches down automati- cally. -
Seite 32: Cleaning And Care
Cleaning and care 5 Cleaning and care 5.2 Specifi c soiling Heavy soiling and stains (limesca- • Switch the hob off and let it cool down before you clean ling and shiny, mother-of-pearl-type stains) can best be removed when the •... -
Seite 33: What To Do If Trouble Occurs
What to do if trouble occurs? 6 What to do if trouble occurs? The hob or a cooking zone has suddenly switched off • Did you accidentally press the ON/OFF key? Interference with and repairs to the appliance by unquali- fi... -
Seite 34: Instructions For Assembly
Instructions for assembly 7 Instructions for assembly Sealing of the hob Before installation, correctly insert the sealing unit deliver- 7.1 Safety instructions for kitchen unit fi tters ed with the hob. • Veneers, adhesives and plastic surfaces of surrounding furniture must be temperature resistant (at least 75°C). If the veneers and surfaces are not suffi... - Seite 35 Instructions for assembly Clips (mm) • Drive the clips into the worktop cut-out at the intervals indicated. • It is not necessary to adjust the height due to the horizontal stop. • The horizontal drive of the clips must be fl...
-
Seite 36: Electrical Connection
Instructions for assembly 7.3 Electrical connection Electrical connections: 5-pole connection WARNING OF ELECTRICAL ENERGY! RISK OF FATAL INJURY! Live components have been installed near this symbol. Covers bearing this sign may only be removed by a certifi ed skilled electri- cian. -
Seite 37: Technical Data
Decommissioning and disposal of the appliance 7.4 Technical Data 8 Decommissioning and disposal of the ap- pliance Hob dimensions 8.1 Switching the appliance off completely height/ width/ depth ...mm The appliance is to be put out of operation when its useful life has fi... -
Seite 38: Généralités
Généralités Sommaire 1 Généralités 1.1 Ce que vous trouverez ici... 1 Généralités ..............38 Lisez soigneusement les informations portées dans ce 1.1 Ce que vous trouverez ici........38 manuel avant de mettre votre table de cuisson en service. 1.2 Utilisation conforme à l’usage prévu .....38 Vous y trouverez des remarques importantes concernant 2 Consignes de sécurité... -
Seite 39: Consignes De Sécurité Et Avertissements
Consignes de sécurité et avertissements 2 Consignes de sécurité et avertissements • La surface en vitrocéramique est très résistan- te. Évitez toutefois d’y faire tomber des objets 2.1 Pour le raccordement et le fonctionnement durs. Les impacts en forme de point peuvent •... -
Seite 40: Pour Les Personnes
Consignes de sécurité et avertissements • Ne jamais faire chauff er des boites de conser- 2.3 Pour les personnes ves fermées, ni d’emballages stratifi és sur les • Ces appareils peuvent être utilisés par des zones de cuisson. L'alimentation en énergie enfants âgés de plus de 8 ans et par des per- pourrait les faire éclater ! sonnes avec des capacités physiques, senso-... -
Seite 41: Explication Des Symboles Et Des Consignes
Consignes de sécurité et avertissements 2.4 Explication des symboles et des consignes En outre, les symboles de danger suivants marquent cer- tains passages de texte : L'appareil a été fabriqué selon l'état actuel de la technique. Cependant, les machines recèlent toujours des risques qu'il n'est pas possible d'exclure en matière de constructi- ATTENTION - ÉNERGIE ÉLECTRIQUE ! DANGER DE MORT ! -
Seite 42: Description De L'appareil
Description de l’appareil 3 Description de l’appareil Le décor peut être diff érent de celui illustré. 9. Point de disponibilité (position de cuisson) 10. Champ sensitif avec LED 1. Zone de cuisson avant gauche 11. Touche multicircuits 2. Zone de cuisson arrière gauche 12. -
Seite 43: Commande Par Touches Sensitives
Description de l’appareil 3.1 Commande par touches sensitives 3.2 Informations importantes concernant le Slider (champ sensitif) La commande de la table vitrocéramique se fait via les touches sensitives Touch-Control. Les touches sensitives Le Slider fonctionne toujours comme les touches sensiti- fonctionnent de la manière suivante : effl... -
Seite 44: Utilisation
Utilisation 4 Utilisation 3.3 Conseils pour économiser de l’énergie Vous trouvez, ci-après, quelques conseils importants 4.1 Limitation de la durée de fonctionnement concernant l’utilisation économique et effi cace de votre La table de cuisson possède une limitation automatique de nouvelle table de cuisson et les ustensiles de cuisson la durée de fonctionnement. -
Seite 45: Utilisation Des Touches
Utilisation 4.3 Utilisation des touches Dans la commande décrite ici, l’appui d’une touche de sélection doit être suivi par l’appui d’une autre touche. L’appui de la touche suivante doit toujours avoir lieu sous 10 secondes, dans le cas contraire, la sélection s’eff ace. 4.4 Mettre en marche la table de cuisson et la zone de cuisson 1. -
Seite 46: Fonction Stop
Utilisation 4.7 Fonction STOP Le déroulement de la cuisson peut être interrompu mo- mentanément à l’aide de la fonction STOP, p.ex. lorsque quelqu’un sonne à la porte. Pour continuer la cuisson avec les mêmes positions de cuisson, la fonction STOP doit être annulée. -
Seite 47: Sécurité Enfants
Utilisation 4.9 Sécurité enfants La sécurité enfants évite que la table de cuisson soit mise en marche involontairement ou volontairement par des enfants. Toute commande est bloquée. Activer la sécurité Enfants 1. Appuyer sur la touche Marche/Arrêt pour mettre la table de cuisson en marche. -
Seite 48: Arrêt Automatique (Minuterie)
Utilisation 4.11 Arrêt automatique (minuterie) L’arrêt automatique permet d’arrêter automatiquement chaque zone de cuisson en fonctionnement après une durée de cuisson réglable. Vous pouvez régler des temps de cuisson entre 01 à 99 minutes. 1. Mettre en marche la table de cuisson. Mettre en marche une ou plusieurs zones de cuisson et sélectionner la(les) position(s) de cuisson souhaitée(s). -
Seite 49: Précuisson Automatique
Utilisation 4.13 Précuisson automatique Avec la précuisson automatique, la précuisson se fait sur position 9. Après un certain temps, le réglage est ramené automatiquement sur une position inférieure (1 à 8) pour terminer la cuisson. En utilisant la précuisson automatique, il faut régler seulement l'allure de cuisson à... -
Seite 50: Nettoyage Et Entretien
Nettoyage et entretien 5 Nettoyage et entretien 5.2 Salissures résistantes Des salissures importantes et • Avant le nettoyage, éteignez la table de cuisson et taches (taches de calcaire, taches bril- laissez-la refroidir. lantes «nacrées») peuvent facilement • La table de cuisson en vitrocéramique ne doit, en être éliminées lorsque la table de cu- aucun cas, être nettoyée avec un appareil à... -
Seite 51: Que Faire En Cas De Problèmes
Que faire en cas de problèmes ? 6 Que faire en cas de problèmes ? La table de cuisson, voire la zone de cuisson s’arrête subitement. Les interventions ou réparations non qualifi ées sont • Avez-vous involontairement appuyé sur la touche Mar- dangereuses ;... -
Seite 52: Instructions De Montage
Instructions de montage 7 Instructions de montage Joint d’étanchéité Le joint d'étanchéité doit être mis en place avant l'en- 7.1 Consignes de sécurité pour l’installateur des castrement. meubles de cuisine • Les placages, colles ou revêtements plastiques des meubles voisins doivent résister à la chaleur (75 °C au minimum). - Seite 53 Instructions de montage Clips [mm] • Enfoncez les clips dans la découpe réalisée dans le plan de travail en respectant les écarts indiqués. • Grâce à la fi xation horizontale, aucun ajustement vertical n’est nécessaire. • Important : La butée horizontale des clips doit poser à...
-
Seite 54: Raccordement Électrique
Instructions de montage 7.3 Raccordement électrique Possibilités de branchement : raccordement 5 pôles ATTENTION - ÉNERGIE ÉLECTRIQUE ! DANGER DE MORT ! Ce symbole est apposé à proximité de com- posants sous tension. Les couvercles munis de ce symbole doivent être retirés unique- ment par un électricien qualifi... -
Seite 55: Caractéristiques Techniques
Mise hors service, élimination 7.4 Caractéristiques techniques 8 Mise hors service, élimination 8.1 Mise hors service Dimensions de la table de cuisson La mise hors service de l'appareil survient lorsque l'appa- hauteur/ largeur/ profondeur mm reil n'est plus utilisé. • Coupez les fusibles sur l'installation du bâtiment afi...