Werbung
Quicklinks
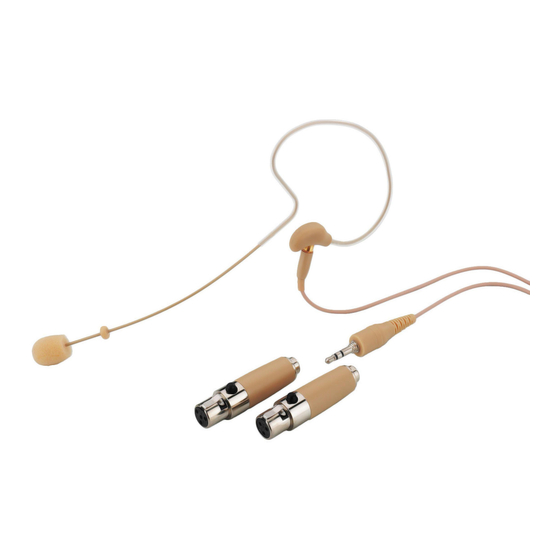
HSE-70A / SK
Bestell-Nr. • Order No. 23.5190
ELECTRONICS FOR SPECIALISTS
ELECTRONICS FOR SPECIALISTS
Ohrbügelmikrofon
Diese Bedienungsanleitung richtet sich an Benutzer ohne
besondere Fachkenntnisse. Bitte lesen Sie die Anleitung
vor dem Betrieb gründlich durch und heben Sie sie für ein
späteres Nachlesen auf.
1 Einsatzmöglichkeiten
Dieses Miniatur-Ohrbügelmikrofon eignet sich optimal für
Gesangs- und Sprachanwendungen, die viel Bewegungsfrei-
heit erfordern. Für den Anschluss an Geräte von MONACOR
(mit 3-pol. Mini-XLR-Anschluss) und an Geräte von JTS (mit
4-pol. Mini- XLR-Anschluss) liegen dem Mikrofon zwei pas-
sende Adapter bei. Für den Anschluss an Geräte anderer Her-
steller sind als Zubehör weitere Adapter erhältlich.
2 Wichtige Hinweise
Das Mikrofon entspricht allen relevanten Richtlinien der EU
und trägt deshalb das
-Zeichen.
•
Setzen Sie das Mikrofon nur im Innenbereich ein und schüt-
zen Sie es vor Tropf- und Spritzwasser, hoher Luftfeuchtigkeit
und Hitze (zulässiger Einsatztemperaturbereich 0 – 40 °C).
•
Verwenden Sie für die Reinigung nur ein trockenes, weiches
Tuch, niemals Chemikalien oder Wasser.
•
Wird das Mikrofon zweckentfremdet, falsch angeschlossen
oder nicht fachgerecht repariert, kann keine Haftung für
daraus resultierende Sach- oder Personenschäden und keine
Garantie für das Mikrofon übernommen werden.
Soll das Mikrofon endgültig aus dem Betrieb ge-
nommen werden, übergeben Sie es zur umwelt-
gerechten Entsorgung einem örtlichen Recycling-
betrieb.
3 Inbetriebnahme
Für den Betrieb des Mikrofons ist ein Taschensender eines
Funksystems nötig, der die Mikrofon-Versorgungsspannung
(
Technische Daten) bereitstellt. Das Mikrofon kann aber
☞
auch über einen Speiseadapter versorgt werden.
1) Das Mikrofonkabel an die Gewindebuchse des Ohrbügels
schrauben (Ersatzkabel HSE-70C als Zubehör erhältlich).
2) Aus den beiden Adaptern den passenden auswählen:
– den Adapter mit 3-poliger Mini-XLR-Kupplung für den
Anschluss an einen Taschensender mit 3-poligem Mini-
XLR-Anschluss (z. B. TXS-...HSE) oder an einen entspre-
chenden Speiseadapter (z. B. EMA-1 oder EMA-300P)
3
1
1 = Masse, 2 = Signal, 3 = Stromversorgung
2
– den Adapter mit 4-poliger Mini-XLR-Kupplung für den
Anschluss an einen Taschensender (z. B. RU-850LTB / 5)
oder an einen Speiseadapter (z. B. PS-500) von JTS
1 = Masse, 2 = Stromversorgung, 3 = Signal
3
1
4
4 = mit Pin 3 verbunden
2
3) Den Stecker des Mikrofonkabels in die Klinkenkupplung
des Adapters schrauben. Die Mini-XLR-Kupplung des Adap-
ters in die Eingangsbuchse des Senders oder des Speise-
adapters stecken. Bei Betrieb mit einem Speiseadapter die-
sen an einen Mikrofoneingang des nachfolgenden Geräts
(z. B. Mischpult) anschließen.
4) Den Windschutz auf das Mikrofon setzen. Den Ohrbügel auf
das linke Ohr setzen, so dass die Ohrläppchenstütze von hin-
ten gegen das Ohrläppchen drückt. Das Mikrofon dicht vor
dem Mund in eine günstige Sprechposition bringen.
Änderungen vorbehalten.
Technische Daten
Specifications
Typ
Type
Richtcharakteristik
Pick-up characteristic
Frequenzbereich
Frequency range
Empfindlichkeit, Impedanz
Sensitivity, impedance
Max. Schalldruck
SPL max.
Stromversorgung
Power supply
Gewicht
Weight
Anschlusskabel
Conncection cable
ELECTRONICS FOR SPECIALISTS
Earband Microphone
These instructions are intended for users without any
specific technical knowledge. Please read these instruc-
tions carefully prior to operation and keep them for later
reference.
1 Applications
This miniature earband microphone is ideally suited for vocal
sound and speech applications which require much freedom
of movement. For connection to units from MONACOR (with
3-pole mini XLR connection) and to units from JTS (with 4-pole
mini XLR connection), the microphone is supplied with two
matching adapters. For connection to units of other manufac-
turers, further adapters are available as accessories.
2 Important Notes
The microphone corresponds to all relevant directives of the EU
and is therefore marked with
•
The microphone is suitable for indoor use only. Protect it
against dripping water and splash water, high air humidity
and heat (admissible ambient temperature range 0 – 40 °C).
•
For cleaning only use a dry, soft cloth; never use chemicals
or water.
•
No guarantee claims for the microphone and no liability for
any resulting personal damage or material damage will be
accepted if the microphone is used for other purposes than
originally intended, if it is not correctly connected, or if it is
not repaired in an expert way.
If the microphone is to be put out of operation
definitively, take it to a local recycling plant for a
disposal which is not harmful to the environment.
3 Setting into Operation
For operation of the microphone, a pocket transmitter of a wire-
less system is required which provides the supply voltage for
the microphone (
☞
can also be supplied with power via a power supply adapter.
1) Screw the microphone cable to the threaded jack of the
earband (replacement cable HSE-70C available as an ac-
cessory).
2) Select the matching adapter from the two adapters:
– the adapter with 3-pole mini XLR inline jack for connec-
tion to a pocket transmitter with 3-pole mini XLR connec-
tion (e. g. TXS-...HSE) or a corresponding power supply
adapter (e. g. EMA-1 or EMA-300P)
3
1
1 = ground, 2 = signal, 3 = power supply
2
– the adapter with 4-pole mini XLR inline jack for connec-
tion to a pocket transmitter (e. g. RU-850LTB / 5) or to a
power supply adapter (e. g. PS-500) from JTS
1 = ground, 2 = power supply, 3 = signal
3
1
4
4 = connected to pin 3
2
3) Screw the plug of the microphone cable to the 2.5 mm in-
line jack of the adapter. Connect the mini XLR inline jack of
the adapter to the input of the transmitter or power supply
adapter. When operating the microphone with a power sup-
ply adapter, connect this unit to a microphone input of the
following unit (e. g. mixer).
4) Place the windscreen onto the microphone. Put the earband
on the left ear so that the lobe support is pressing against
the lobe from behind. Place the microphone close to the
mouth into a favourable talk position.
Caractéristiques techniques
Type micro
Back-Elektret • back electret • back-électret
Caractéristique
Kugel • omnidirectional • omnidirectionnel
Bande passante
Sensibilité, impédance
Pression sonore max.
Alimentation
Poids
Cordon branchement
with 2.5 mm stereo plug • avec fiche jack 2,5 mâle stéréo
MONACOR INTERNATIONAL GmbH & Co. KG • Zum Falsch 36 • 28307 Bremen • Germany
Copyright
by MONACOR INTERNATIONAL. All rights reserved.
©
ELECTRONICS FOR SPECIALISTS
ELECTRONICS FOR SPECIALISTS
.
Specifications). However, the microphone
Subject to technical modification.
HSE-70A / SK
20 – 20 000 Hz
5,6 mV/ Pa / 1 kHz, 2 kΩ
140 dB
⎓ 0,8 – 5 V
6 g
mit 2,5-mm-Stereo-Klinkenstecker
ELECTRONICS
Microphone oreillette
Cette notice s'adresse aux utilisateurs sans connais-
sances techniques particulières. Veuillez lire la présente
notice avant le fonctionnement et conservez-la pour pou-
voir vous y reporter ultérieurement.
1 Possibilités d'utilisation
Ce microphone oreillette miniature est idéalement adapté pour
des applications de discours et de chant requérant une grande
liberté de mouvements. Pour le branchement à des appareils de
MONACOR (avec connexion mini XLR 3 pôles) et à des appa-
reils de JTS (avec branchement mini XLR 4 pôles), deux adap-
tateurs sont livrés avec le microphone. Pour le branchement
à des appareils d'autres fabricants, d'autres adaptateurs sont
disponibles en option.
2 Conseils importants
Le microphone répond à toutes les directives nécessaires de
l'Union Européenne et porte donc le symbole
•
Le microphone n'est conçu que pour une utilisation en in-
térieur. Protégez-le de tout type de projections d'eau, des
éclaboussures, d'une humidité élevée et de la chaleur (plage
de température de fonctionnement autorisée : 0 – 40 °C).
•
Pour le nettoyer, utilisez uniquement un chiffon sec et doux,
en aucun cas de produits chimiques ou d'eau.
•
Nous déclinons toute responsabilité en cas de dommages
matériels ou corporels résultants si le microphone est utilisé
dans un but autre que celui pour lequel il a été conçu, s'il
n'est pas correctement branché ou s'il n'est pas réparé par
une personne habilitée ; en outre, la garantie deviendrait
caduque.
Lorsque le microphone est définitivement retiré du
service, vous devez le déposer dans une usine de
recyclage adaptée pour contribuer à son élimina-
tion non polluante.
CARTONS ET EMBALLAGE
PAPIER À TRIER
3 Fonctionnement
Pour faire fonctionner le microphone, un émetteur de poche
d'un système sans fil est nécessaire, il met à disposition la ten-
sion d'alimentation du micro (
Caractéristiques techniques).
☞
Le microphone peut également être alimenté par un adapta-
teur d'alimentation.
1) Vissez le cordon micro à la prise filetée de l'oreillette (cordon
de remplacement HSE-70C, disponible en option).
2) Parmi les deux adaptateurs, sélectionnez :
– l'adaptateur avec fiche mini XLR 3 pôles femelle pour
brancher à un émetteur de poche avec branchement mini
XLR 3 pôles (p. ex. TXS-...HSE) ou à un adaptateur d'ali-
mentation correspondant (p. ex. EMA-1 ou EMA-300P)
3
1
1 = masse, 2 = signal, 3 = alimentation
2
– l'adaptateur avec fiche mini XLR 4 pôles femelle pour
brancher à un émetteur de poche (p. ex. RU-850LTB / 5)
ou à un adaptateur d'alimentation (p. ex. PS-500) de JTS.
1 = masse, 2 = alimentation, 3 = signal
3
1
4
4 = relié au pin 3
2
3) Vissez la fiche du cordon micro à la fiche jack de l'adapta-
teur. Reliez la fiche mini XLR de l'adaptateur à la prise d'en-
trée de l'émetteur ou de l'adaptateur d'alimentation. Si le
microphone fonctionne avec un adaptateur d'alimentation,
reliez ce dernier à une entrée micro de l'appareil suivant
(p. ex. table de mixage).
4) Placez la bonnette de protection sur le micro. Placez l'oreil-
lette sur l'oreille gauche de telle sorte que la protection du
lobe de l'oreille appuie de l'arrière contre le lobe. Position-
nez le microphone juste devant la bouche dans une position
favorable pour parler.
Tout droit de modification réservé.
A-0654.99.02.08.2019
.
Werbung

Verwandte Anleitungen für Monacor HSE-70A/SK


Inhaltszusammenfassung für Monacor HSE-70A/SK
- Seite 1 Anschlusskabel Conncection cable Cordon branchement with 2.5 mm stereo plug • avec fiche jack 2,5 mâle stéréo MONACOR INTERNATIONAL GmbH & Co. KG • Zum Falsch 36 • 28307 Bremen • Germany A-0654.99.02.08.2019 Copyright by MONACOR INTERNATIONAL. All rights reserved.
- Seite 2 Cable de conexión Kabel połączeniowy con jack 2,5 mm stereo • con conector jack 2,5 mm estéreo • z wtykiem 2,5 mm stereo MONACOR INTERNATIONAL GmbH & Co. KG • Zum Falsch 36 • 28307 Bremen • Germany A-0654.99.02.08.2019 Copyright by MONACOR INTERNATIONAL.