Herunterladen Inhalt Inhalt Diese Seite drucken
Gaggia Brera Bedienungsanleitung

Gaggia Brera Bedienungsanleitung

Espressomaschine
Vorschau ausblenden Andere Handbücher für Brera:

Werbung

Verfügbare Sprachen

Verfügbare Sprachen

Type Sup 037RG
ISTRUZIONI PER L'USO
OPERATING INSTRUCTIONS
BEDIENUNGSANLEITUNG
MODE D'EMPLOI
LEGGERE ATTENTAMENTE QUESTE ISTRUZIONI D'USO PRIMA DI UTILIZZARE LA MACCHINA.
READ THESE OPERATING INSTRUCTIONS CAREFULLY BEFORE USING THE MACHINE.
DIESE BEDIENUNGSANLEITUNG IST VOR DEM ERSTEN GEBRAUCH DER MASCHINE AUFMERKSAM ZU LESEN.
LIRE ATTENTIVEMENT CES INSTRUCTIONS AVANT D'UTILISER LA MACHINE.
FOR HOUSEHOLD USE ONLY
USAGE DOMESTIQUE SEULEMENT

Werbung

Inhaltsverzeichnis
loading

Inhaltszusammenfassung für Gaggia Brera

  • Seite 1 Type Sup 037RG ISTRUZIONI PER L'USO OPERATING INSTRUCTIONS BEDIENUNGSANLEITUNG MODE D’EMPLOI LEGGERE ATTENTAMENTE QUESTE ISTRUZIONI D'USO PRIMA DI UTILIZZARE LA MACCHINA. READ THESE OPERATING INSTRUCTIONS CAREFULLY BEFORE USING THE MACHINE. DIESE BEDIENUNGSANLEITUNG IST VOR DEM ERSTEN GEBRAUCH DER MASCHINE AUFMERKSAM ZU LESEN. LIRE ATTENTIVEMENT CES INSTRUCTIONS AVANT D’UTILISER LA MACHINE.
  • Seite 2: Norme Di Sicurezza

    GENERALITÀ La macchina da caff è è indicata per la preparazione di caff è espresso impiegando caff è in grani; è dotata di un dispositivo per l’ e rogazione del vapore e di acqua calda. Il corpo della macchina dall’ e legante design è stato progettato per uso domestico e non è indicato per un funzionamen- to continuo di tipo professionale.
  • Seite 3: Riparazioni / Manutenzione

    Protezione d’altre persone Tenere i bambini sotto supervisione, per evitare che giochino con l’apparecchio. I bambini non si rendono conto del pericolo connesso agli elettrodomestici. Non lasciare alla portata dei bam- bi ni i ma te ria li utilizzati per im bal la re la mac chi na. Pericolo d’ustioni Evitare di dirigere contro se stessi e/o altri il getto di vapore e/o d’acqua calda: pericolo di scottature! Usare sempre le apposite maniglie o manopole.
  • Seite 4 Coperchio contenitore caff è in grani Contenitore caff è in grani Manopola regolazione macinatura Piano appoggia tazzine Pannello comandi Erogatore caff è Scompartimento caff è pre-macinato Griglia appoggia tazze Indicatore vasca raccogli gocce piena Sportello di servizio Gruppo caff è Cassetto raccogli fondi Protezione per tubo erogazione Tubo erogazione acqua calda / vapore...
  • Seite 5: Installazione

    • Estrarre il serbatoio acqua dalla sua INSTALLAZIONE sede. Per la propria sicurezza e quella di terzi attenersi scrupolosamente • Sciacquarlo e riempirlo con acqua alle istruzioni riportate nel capitolo fresca; non superare il livello (MAX) “Norme di sicurezza”. riportato nel serbatoio. Reinserire il serbatoio nella sede apposita.
  • Seite 6 • Portare l’interruttore generale su “I” per Caricamento circuito poter accendere la macchina. • Per caricare il circuito inserire un conte- nitore sotto al tubo vapore (pannarello, se presente); • Ruotare il selettore in senso orario fi no • Il tasto “STAND-BY” lampeggia. al punto “...
  • Seite 7 Sul display viene visualizzato il seguen- Primo utilizzo o dopo un pe- te simbolo. riodo di lungo inutilizzo. Queste semplici operazioni vi permette- ranno di erogare sempre un ottimo caff è. Fisso 1 Inserire un contenitore capiente sotto 9 Erogare acqua fino alla segnalazione l’...
  • Seite 8: Gaggia Adapting System

    La macchina da caff è Gaggia è dotata di un sistema di auto-regolazione Rimuovere il fi ltrino bianco presente nel che consente d’utilizzare tutti i tipi di serbatoio, conservarlo in luogo asciutto caff è...
  • Seite 9 spina dalla presa di corrente. Non • Quando, nella tazzina, è stato raggiun- immettere caff è in grani quando il to il quantitativo di caffè desiderato, premere nuovamente il tasto “ “. macinacaff è è in funzione. A questo punto il tasto “ “...
  • Seite 10 Per l’utilizzo di tazze grandi. EROGAZIONE CAFFÉ Nota: Nel caso in cui la mac- china non eroghi caff è, verifi - care che il serbatoio acqua contenga acqua. Prima di erogare caff è verifi - care le segnalazioni presenti • Sotto all’ e rogatore possono essere po- sul display, che il serbatoio acqua e il sizionate due tazze/tazzine per erogare contenitore caff è...
  • Seite 11: Erogazione Acqua Calda

    • L’erogazione del caffè si ferma auto- Attenzione: nello scompar- maticamente quando viene raggiunto timento versare solo caffè il livello impostato; è comunque pos- pre-macinato. L’inserimento di altre sibile interrompere l’erogazione del sostanze e oggetti può causare gravi caffè premendo il tasto azionato in danni alla macchina non coperti da precedenza.
  • Seite 12 • Ruotare il selettore in senso orario fi no di acqua calda dentro ad un bicchiere al punto “ ”. e pulire esternamente il tubo vapore (o pannarello ove presente). Questo garantirà una perfetta pulizia di tutte le parti dagli eventuali residui di latte.
  • Seite 13: Pulizia E Manutenzione

    • Riempire con latte freddo 1/3 del PULIZIA E MANUTEN contenitore che si desidera utilizzare ZIONE per preparare il cappuccino. Pulizia generica • Ogni giorno, a macchina accesa, vuota- Per garantire un miglior re e pulire il cassetto raccogli fondi. risultato nella preparazione del cappuccino, il latte utilizzato deve Nota: consigliamo lo svuo-...
  • Seite 14 - riposizionare la parte superiore • Lavare il Gruppo Caff è con acqua tiepi- nel tubo vapore (assicurarsi che sia da; lavare con cura il fi ltro superiore. completamente inserita). • Lavare ed asciugare accuratamente Rimontare la parte esterna del panna- tutte le parti del Gruppo Caff è.
  • Seite 15 ” . Inizia il ciclo di decalcifi cante. risciacquo della macchina. • Versare tutto il contenuto della bottiglia di decalcifi cante concentrato GAGGIA nel serbatoio dell’acqua dell’appa- recchio e riempire con acqua fresca potabile fi no al livello MAX. Reinserire il serbatoio nella macchina.
  • Seite 16 9 Quando l’acqua all’interno del serbatoio 15 Premere il tasto per l’erogazione del è terminata appare il simbolo posto caff è lungo. a lato; questo indica di riportare il 16 Attendere il termine dell’ e rogazione e selettore nella posizione “ ”. vuotare il contenitore con l’acqua.
  • Seite 17 Note sulla decalcifi cazione 22 Mantenere premuto il tasto “ “ per 6 secondi per azzerare la macchina ed Nel paragrafo precedente è stata illustrata eliminare l’allarme della decalcifi cazio- la corretta procedura per la decalcifi cazio- ne della macchina. La macchina acquistata è...
  • Seite 18: Display Pannello Comandi

    DISPLAY PANNELLO COMANDI Segnali di pronto Segnali di avviso • Macchina pronta per l’ e rogazione del caff è • Macchina in fase di riscaldamento per con caff è in chicchi e dell’acqua calda. l’ e rogazione di caff è, acqua calda e vapore. Fisso Lampeggianti •...
  • Seite 19 Segnali d’allarme • Riportare il pomello del rubinetto acqua calda / vapore in posizione corretta. • Il Gruppo Caff è deve essere inserito nella macchina. Lampeggianti • Chiudere lo sportello di servizio. • Svuotare il cassetto raccogli fondi. Fisso • Inserire il cassetto raccogli fondi.
  • Seite 20: Risoluzione Problemi

    “Gaggia Adapting System”. Per i guasti non contemplati dalla suddetta tabella o in caso che i rimedi suggeriti non li risolvano, rivolgersi ad un centro assistenza.
  • Seite 21: Dati Tecnici

    DICHIARAZIONE DI CONFORMITA‘ CE ANNO 09 EC 2006/95, EC 2004/108 SMALTIMENTO GAGGIA S.P.A. Ai sensi dell’art. 13 del Decreto Legislativo 25 luglio 2005, n. 151”Attuazione delle Direttive 2002/95/CE, 2002/96/CE 20087 Robecco sul Naviglio (MI) Italy e 2003/108/CE, relative alla riduzione dell’uso di sostanze dichiariamo sotto la nostra responsabilità...
  • Seite 22 IMPORTANT SAFEGUARDS When using electrical appliances, basic safety precautions should always be followed, including the following: 1. Read all instructions. 2. Do not touch hot surfaces. Use handles or knobs. 3. To protect against fire, electric shock and injury to persons do not immerse cord, plugs, or appliance in water or other liquid.
  • Seite 23 CAUTION This appliance is for household use only. Any servicing, other than cleaning and user maintenance, should be performed by an authorized service center. Do not immerse machine in water. To reduce the risk of fire or electric shock, do not disassemble the machine.
  • Seite 24: General Information

    GENERAL INFORMATION The coff ee machine is suitable for preparing espresso coff ee using either coff ee beans or ground coff ee and is equipped with a device to dispense steam and hot water. The structure of the ma- chine has been designed for domestic use only and is not suitable for continuous professional- type operation.
  • Seite 25 Danger of Burns Never direct the steam/hot water wand towards yourself or others: Danger of scalding! Always use the handles or knobs provided. Machine Location - Suitable Location for Operation and Maintenance For best use, it is recommended to: • Choose a safe, level surface, where there will be no danger of overturning it or being inju- red.
  • Seite 26 Coff ee bean hopper cover Coff ee bean hopper Grinder adjustment knob Cup stacking surface Control panel Dispensing spout Pre-ground coff ee compartment Cup holder grill Full drip tray indicator Service door Brew group Coff ee grounds drawer Wand protective gripper Hot water/steam wand ON-OFF power button Drip tray...
  • Seite 27: Installation

    • Remove the water tank from its seat. INSTALLATION For your safety and the safety of • Rinse and fi ll it with fresh water ma- others, carefully follow the instruc- king sure that it is not fi lled exceeding tions provided in the “Safety Regu- the MAX level indicated in the water lations”...
  • Seite 28: Circuit Priming

    • Switch the power button to “I” to turn Circuit Priming the machine on. • To prime the water circuit, place a container under the steam wand (Pannarello, if supplied). • Turn the selector switch clockwise to set • The “STAND-BY” button blinks. it to the “...
  • Seite 29 The following icon will be displayed. Using the machine for the first time or after a long period of inactivity. These simple operations will make it pos- Steady on sible to always brew excellent coff ee. 9 Dispense water until the no water si- 1 Place a large container under the gnal is displayed, then turn the selec- dispensing spout.
  • Seite 30: Gaggia Adapting System

    The Gaggia coff ee machine is equipped with a self-adjusting Remove the small white filter from the...
  • Seite 31 The machine allows slight adjustments to the coff ee grinder to adapt it to the kind At this point the button “ “ is program- of coff ee used. med; each time it is pressed and released, the machine will brew the same amount To make any adjustment, press and turn of coff ee that was just programmed.
  • Seite 32 For use with large cups. COFFEE BREWING Note: Should the machine not brew coff ee, make sure that the water tank contains water. Before brewing coff ee, check the messages on the display. Check that the water tank and coff ee •...
  • Seite 33: Using Pre-Ground Coff Ee

    button initially pressed. Press and release: the“ “ button for an espresso cof- The machine is adjusted to fee; brew a true Italian espresso the“ “ button for a long coff ee. coffee. This feature may slightly • The brewing cycle then starts. After lengthen the brewing time, allowing the prebrewing cycle, coff ee begins to the intense fl avour of the coff ee to...
  • Seite 34 • Turn the selector switch clockwise to set ned and free of any milk residue. it to the “ ” position. To prepare your cappuccino, we recommend discharging the water in the steam wand. • To discharge the water in the steam wand, place a container under the steam wand (Pannarello, if supplied).
  • Seite 35: Cleaning And Maintenance

    • To heat the milk directly in the cup, CLEANING AND MAIN immerse the steam wand (Pannarello, TENANCE if supplied) in the milk to be heated. General Cleaning • Empty and clean the coffee grounds drawer daily, with the machine turned Note: We recommend em- •...
  • Seite 36 Reassemble the external part of the • Wash the brew group with lukewarm Pannarello. water and carefully clean the upper fi lter. • We recommend cleaning the water tank daily. For an easier removal of the • Thoroughly wash and dry all the parts water tank, move the steam wand / of the brew group.
  • Seite 37 “ ” position . The machine descaling solution. rinse cycle starts. • Pour the entire content of the GAGGIA concentrated descaling solution into the water tank, and then fi ll the tank with fresh drinking water up to the MAX level.
  • Seite 38 9 When the water in the tank is fi nished, 15 Press the button to brew a long cof- the icon on the side is displayed to fee. indicate that the selector switch must 16 Wait until brewing is completed and be brought back to the “...
  • Seite 39 Remarks on Descaling 22 Hold the “ “ button pressed for 6 seconds to reset the machine and The previous section explains the correct cancel the descaling alarm signal. operations to perform to descale the machine. The machine you have purchased is equip- ped with advanced software to check the quantity of used water in order to provide reliable information about the right time...
  • Seite 40: Control Panel Display

    CONTROL PANEL DISPLAY Ready Signals Warning Signals • The machine is ready for brewing coff ee from • The machine is warming up to brew coff ee bean and hot water dispensing. and dispense hot water or steam. Steady on Blinking •...
  • Seite 41: Alarm Signals

    Alarm Signals • Return the hot water / steam knob to its correct position. • Insert the brew group in the machine. Blinking • Close the service door. • Empty the coff ee grounds drawer. Steady on • Insert the coff ee grounds drawer. Blinking •...
  • Seite 42: Troubleshooting

    In this case wait until the machine performs a self-adjusting operation as described in section “Gaggia Adapting System”. Please contact Gaggia Customer Service or an authorized service center for any problems not covered in the above table or when the suggested solutions do not solve the problem.
  • Seite 43: Technical Specifications

    EC 2006/95, EC 2004/108, MACHINE DISPOSAL - The packing materials can be recycled. GAGGIA S.P.A. - Appliance: Unplug the appliance and cut the power cord. 20087 Robecco sul Naviglio (MI) Italy - Deliver the appliance and power cord to a service center or public declare under our responsibility that the product : waste disposal facility.
  • Seite 44: Sicherheitsvorschriften

    ALLGEMEINES Die Kaff eemaschine eignet sich für die Zubereitung von Espresso unter Verwendung von Boh- nenkaff ee. Sie ist mit einer Vorrichtung für die Dampf- und die Heißwasserausgabe ausgestat- tet. Das Gehäuse der Maschine hat ein elegantes Design und ist für den Hausgebrauch konzi- piert worden, nicht aber für den Dauergebrauch bei gewerblichen Anwendungen.
  • Seite 45: Verbrennungsgefahr

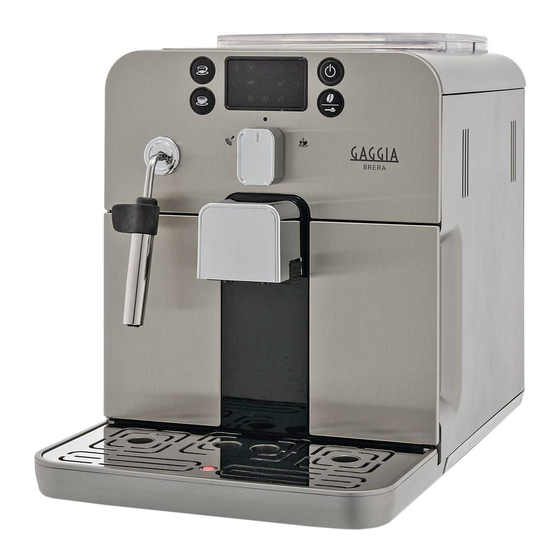
    Schutz anderer Personen Kinder beaufsichtigen, damit sie nicht mit dem Gerät spielen. Kinder können die Gefahrensi- tuationen, die durch Haushaltsgeräte entstehen können, nicht abschätzen. Die für die Verpak- kung der Maschine benutzten Materialien sollten nicht in Reichweite von Kindern aufbewahrt werden.
  • Seite 46 Deckel Kaff eebohnenbehälter Kaff eebohnenbehälter Drehknopf Mahlgradeinstellung Tassenabstellfl äche Bedienfeld Kaff eeauslauf Fach für vorgemahlenen Kaff ee Tassenabstellrost Anzeige Abtropfschale voll Servicetür Brühgruppe Kaff eesatzbehälter Schutz für Ausgabedüse Heißwasser-/Dampfdüse Hauptschalter Einschaltung/ vollständige Ausschaltung Abtropfschale Wassertank Fett für die Brühgruppe Messlöff el für Netzkabel vorgemahlenen Kaff ee Wasserfi lter Intenza...
  • Seite 47: Vorbereitende Arbeiten

    • Den Wassertank aus seiner Aufnahme INSTALLATION herausnehmen. Für Ihre eigene Sicherheit und die • Den Tank ausspülen und mit frischem Dritter sollten die Hinweise im Ka- Wasser füllen. Der Füllstand (MAX), pitel “Sicherheitsvorschriften” strikt der im Tank markiert ist, sollte nicht eingehalten werden.
  • Seite 48: Entlüftung Des Systems

    • Den Hauptschalter auf die Position “I” Entlüftung des Systems stellen, um die Maschine einschalten • Um das System zu entlüften, einen zu können. Behälter unter die Dampfdüse (Pan- narello, soweit vorhanden) stellen. • Den Wahlschalter im Uhrzeigersinn • Die Taste “STANDBY” blinkt. bis zum Punkt “...
  • Seite 49: Erste Inbetriebnahme Oder Benutzung Nach Längerer Nichtbenutzung

    Auf dem Display wird das folgende Erste Inbetriebnahme oder Symbol angezeigt. Benutzung nach längerer Nichtbenutzung. Mit diesen einfachen Vorgängen wird die Dauerhaft Ausgabe eines stets optimalen Kaffees aufl euchtend gewährleistet. 9 Wasser ausgeben, bis der Hinweis 1 Einen Behälter mit ausreichendem erfolgt, dass kein Wasser mehr vor- Fassungsvermögen unter den Auslauf handen ist.
  • Seite 50: Gaggia Adapting System

    Herkunft, Mi- zusammendrücken, um die Luftblasen zu schung und Röstung unterschiedlich sein. entfernen. Die Kaff eemaschine Gaggia ist mit einem System zur Selbsteinstellung ausgestattet, Den kleinen weiβen Filter aus dem Tank mit dem alle handelsüblichen Bohnenkaf- herausnehmen, an einem trockenen Ort feesorten verwendet werden können (mit...
  • Seite 51: Einstellung Kaff Eemenge In Der Tasse

    des Kaff eebehälters sollte stets die • Sobald die gewünschte Kaff eemenge Maschine ausgeschaltet und der Stek- in die Tasse ausgegeben wurde, die ker von der Steckdose abgenommen Taste “ “ erneut drücken. werden. Während sich das Mahlwerk Nun ist die Taste “ “...
  • Seite 52: Mit Bohnenkaff Ee

    Für die Verwendung von großen Tassen. KAFFEEAUSGABE Hinweis: Sollte die Maschine keinen Kaffee ausgeben, so ist zu überprüfen, ob der Wassertank Wasser enthält. Vor der Ausgabe des Kaff ees die Anzeigen auf dem Display • Unter dem Auslauf können auch zwei überprüfen und ob der Wassertank Tassen aufgestellt werden, um gleich- und der Kaff eebehälter vollständig...
  • Seite 53: Mit Vorgemahlenem Kaff Ee

    • Nach dem Vorbrühzyklus beginnt der Achtung: ausschließlich vorge- Kaff ee aus dem Auslauf zu fl ießen. mahlenen Kaffee in das Fach füllen. Die Einfüllung anderer Substan- • Die Kaffeeausgabe wird automatisch zen und Gegenstände kann zu schweren beendet, wenn die eingestellte Menge Schäden an der Maschine führen, die erreicht ist.
  • Seite 54 • Den Wahlschalter im Uhrzeigersinn bis Glas ausgeben und die Dampfdüse zum Punkt “ ” drehen. (oder den Pannarello, soweit vorhan- den) von außen reinigen. Dadurch können eventuelle Milchrückstände von allen Teilen entfernt werden. Für die Zubereitung Ihres Cappuccinos wird empfohlen, das in der Dampfdüse vorhandene •...
  • Seite 55: Reinigung Und Wartung

    • Den Behälter, der für die Cappuccinozu- REINIGUNG UND WAR bereitung benutzt werden soll, zu 1/3 TUNG mit kalter Milch füllen. Allgemeine Reinigung • Den Satzbehälter täglich bei eingeschal- Für die Zubereitung eines teter Maschine entleeren und reinigen. optimalen Cappuccinos sollte die verwendete Milch kalt sein und Hinweis: Es wird empfohlen, aus dem Kühlschrank kommen.
  • Seite 56 Tuch reinigen und eventuelle • Die Brühgruppe mit lauwarmem Milchreste entfernen; Wasser reinigen. Den oberen Filter - den oberen Bereich der Dampfdüse sorgfältig reinigen wieder anbringen (sicherstellen, dass • Alle Teile der Brühgruppe sorgfältig diese vollständig eingesetzt ist). reinigen und trocknen. Den äußeren Bereich des Pannarellos •...
  • Seite 57 (ca. 150 ml). 3 Die Ausgabe beenden, indem der Ausschließlich einen Entkal- Wahlschalter wieder in die mittlere ker GAGGIA benutzen. Dieser Position “ ” gestellt wird. wurde eigens dafür entwickelt, die Lei- stungen und den Betrieb der Maschine 4 Den Entkalker für einen Zeitraum von für deren gesamtes Betriebsleben...
  • Seite 58 9 Ist kein Wasser mehr im Tank vorhan- 15 Die Taste für die Ausgabe des großen den, wird das seitlich dargestellte Kaff ees drücken. Symbol angezeigt. Dieses zeigt an, dass 16 Das Ende der Ausgabe abwarten und der Wahlschalter wieder in die Position den Behälter mit Wasser entleeren.
  • Seite 59: Hinweise Zur Entkalkung

    Hinweise zur Entkalkung 22 Die Taste “ “ für einen Zeitraum von 6 Sekunden drücken, um die Maschine Im vorigen Abschnitt wurde die korrekte auf Null zu stellen und den Alarm für Vorgehensweise für die Entkalkung der die Entkalkung auszuschalten. Maschine erläutert.
  • Seite 60: Display Bedienfeld

    DISPLAY BEDIENFELD Hinweissignale Bereitschaftssignale • Maschine in Aufheizphase für die Ausgabe • Maschine bereit für die Ausgabe von Kaff ee von Kaff ee, heißem Wasser und Dampf. aus Kaff eebohnen und heißem Wasser. Dauerhaft aufl euchtend Blinkend • Maschine bereit für die Ausgabe von Kaff ee •...
  • Seite 61 Alarmsignale • Den Drehknopf des Reglers Heißwasser / Dampf wieder in die korrekte Position drehen. • Die Brühgruppe muss in die Maschine Blinkend eingesetzt werden. • Die Servicetür schließen. • Den Kaff eesatzbehälter leeren. Dauerhaft aufl euchtend • Den Kaff eesatzbehälter einsetzen. Blinkend •...
  • Seite 62 Die Brühgruppe reinigen (Abschnitt “Brühgruppe”). (Siehe Hinweis) System nicht entlüftet. Das System entlüften (Abschnitt “Erste Inbetriebnahme”). Ereignis, das während der automatischen Einige Kaff ees ausgeben, wie im Abschnitt “Gaggia Adapting Einstellung der Portion durch die Maschine System” beschrieben. auftritt. Auslauf verschmutzt.
  • Seite 63: Technische Daten

    Sicherheitsvorrichtungen ....................Thermosicherung EG KONFORMITÄTSERKLÄRUNG JAHR 09 2006/95/EG, 2004/108/EG, GAGGIA S.P.A. 20087 Robecco sul Naviglio (MI) Italy Wir erklären unter eigener Verantwortung, dass das Produkt: ENTSORGUNG...
  • Seite 64 IMPORTANT Lors de l’utilisation d’appareils électriques, il est indispensable de respecter toujours les précautions de sécurité principales, y compris les suivantes : 1. Lire toutes les instructions. 2. Ne pas toucher de surfaces chaudes. Utiliser les poignées ou les boutons. 3.
  • Seite 65 PRÉCAUTIONS La machine est réservée à un usage domestique. Tout entretien, en dehors du nettoyage et de l’entretien usuel par l’usager, doit être fait par un service après- vente autorisé. Ne pas plonger la base dans l’eau. Pour éviter les courts-circuits et les décharges électriques, ne pas démonter la base.
  • Seite 66: Consignes De Sécurité

    GÉNÉRALITÉS La machine à café est indiquée pour la préparation de café expresso avec du café en grains et est équipée d’un dispositif pour la distribution d’eau chaude et de vapeur. La structure de cet appareil au design élégant a été conçue exclusivement pour un usage domestique et n’ e st donc pas indiqué...
  • Seite 67: Protection Des Autres Personnes

    Protection des autres personnes Garder les enfants sous supervision, afi n d’ é viter qu’ils ne jouent avec l’appareil. Les enfants ne se rendent pas compte du danger que représentent les électroménagers. Les matériaux utilisés pour l’ e mballage de la machine doivent être gardés hors de la portée des enfants. Danger de brûlures Ne pas diriger le jet d’...
  • Seite 68 Couvercle du réservoir à café en grains Réservoir à café en grains Bouton de réglage mouture Plaque pour poser les tasses Bandeau de commande Distributeur de café Logement café prémoulu Grille égouttoir Indicateur bac d’ é gouttement plein Porte de service Groupe de distribution Tiroir à...
  • Seite 69: Mise En Place

    • Extraire le réservoir à eau de son loge- MISE EN PLACE ment. Pour votre sécurité et celle des tiers, respecter scrupuleusement les ins- • Le rincer et remplir avec de l’eau fraî- tructions fournies à la section « che ; ne pas dépasser le niveau (MAX) Consignes de sécurité...
  • Seite 70: Amorçage Du Circuit

    • Tourner l’interrupteur général sur « I » Amorçage du circuit pour mettre la machine en marche. • Pour amorcer le circuit, placer un récipient sous la buse de vapeur (Pan- narello, si présent) ; • Tourner le sélecteur dans le sens des •...
  • Seite 71 Le symbole suivant apparaît sur l’affi - Première utilisation ou après cheur. une longue période d’inac- tivité. Ces simples opérations vous permettront Fixe de distribuer toujours un café excellent. 1 Placer un grand récipient sous la buse 9 Distribuer de l’ e au jusqu’à la signalisa- de distribution.
  • Seite 72: Réglage Du Moulin À Café

    La machine à café Gaggia est munie d’un système d’autoréglage permettant d’utili- Enlever le petit fi ltre blanc à l’intérieur du ser tout type de café en grains disponible réservoir, le conserver dans un endroit sec...
  • Seite 73 de courant avant d’intervenir pour • Lorsque la quantité souhaitée de café une raison quelconque à l’intérieur dans la tasse est atteinte, appuyer à du réservoir à café. Ne pas verser de nouveau sur la touche “ “. café en grains lorsque le moulin à café Maintenant la touche “...
  • Seite 74: Distribution De Café

    Pour utiliser de grandes tasses. DISTRIBUTION DE CAFÉ Remarque : Si la machine ne distribue pas de café, vérifi er que le réservoir à eau est plein. Avant de distribuer le café, vérifi er si le réservoir à eau et le réservoir à café sont pleins et les •...
  • Seite 75: Distribution D'eau Chaude

    • La distribution de café s’arrêtera auto- prémoulu. L’introduction de subs- matiquement lorsque le niveau réglé tances ou d’objets différents peut sera atteint ; il est quand même pos- entraîner de graves dommages à la sible d’interrompre la distribution du machine n’étant pas couverts par la café...
  • Seite 76 • Tourner le sélecteur dans le sens des et nettoyer la partie externe de la aiguilles d’une montre jusqu’au point buse de vapeur (ou du Pannarello, si “ ”. présent). Cela assure un nettoyage parfait de toutes les parties de la machine, en enlevant tout éventuel résidu de lait.
  • Seite 77: Nettoyage Et Entretien

    • Remplir 1/3 du récipient servant à NETTOYAGE ET ENTRE préparer le cappuccino avec du lait TIEN froid. Nettoyage général • Tous les jours, vider et nettoyer le tiroir Pour un résultat optimal dans à marc lorsque la machine est allu- la préparation du cappuccino, mée.
  • Seite 78 - replacer la partie supérieure dans la • Laver le Groupe de distribution à l’ e au buse de vapeur (vérifi er qu’elle est tiède ; laver soigneusement le filtre insérée complètement). supérieur. Monter à nouveau la partie extérieure • Laver et essuyer soigneusement tous les du Pannarello.
  • Seite 79 ” . La machine commence le cycle de rinçage. • Verser tout le contenu de la bouteille de détartrant concentré GAGGIA dans le réservoir à eau de l’appareil et le remplir avec de l’eau fraîche potable jusqu’au niveau MAX indiqué. Réinsérer le réservoir dans la machine.
  • Seite 80 9 Lorsque l’ e au dans le réservoir est fi nie, 15 Appuyer sur la touche de distribution le symbole à côté apparaît sur l’affi - du café allongé. cheur. Cela indique qu’il faut remettre 16 Attendre la fi n de la distribution et vider le sélecteur sur la position “...
  • Seite 81 Remarques sur le détartra- 22 Garder la touche “ “ appuyée pendant 6 secondes pour remettre à zéro la machine et éliminer l’alarme Dans la section précédente il y avait une de détartrage. explication de la procédure correcte pour le détartrage de la machine. Cette machine est équipée d’un logiciel de pointe qui vérifi e la quantité...
  • Seite 82: Signaux D'avertissement

    AFFICHEUR DU BANDE AU DE COMMANDE Signaux machine prête Signaux d’avertissement • Machine prête pour la distribution du café • Machine en phase de chauffage pour la avec café en grains et de l’ e au chaude. distribution de café, d’eau chaude et de vapeur.
  • Seite 83: Signaux D'alarme

    Signaux d’alarme • Remettre le bouton du robinet eau chaude/ vapeur sur la bonne position. • Le groupe de distribution doit être inséré dans la machine. Clignotants • Fermer la porte de service. • Vider le tiroir à marc. Fixe •...
  • Seite 84: Dépannage

    Le circuit n’ e st pas amorcé. Réamorcer le circuit (section « Première mise en marche »). Événement extrême se produisant lorsque la Distribuer quelques cafés comme indiqué à la section « Gaggia machine est en train de régler automatique- Adapting System ».
  • Seite 85: Données Techniques

    2006/95/CE, 2004/108/CE. ÉLIMINATION L’ appareil est en conçu et fabriqué pour faciliter sa valorisation, son GAGGIA S.P.A. recyclage ou sa réutilisation conformément à la directive européen- 20087 Robecco sul Naviglio (MI) Italy ne 2002/96/CEE relative aux appareils électriques et électroniques nous déclarons sous notre responsabilité...
  • Seite 86 • 86 •...
  • Seite 87 • 87 •...
  • Seite 88 The manufacturer reserves the right to change the features of the product without prior notice. Der Hersteller behält sich das Recht vor, Änderungen ohne Ankündigung vorzunehmen. Le producteur se réserve le droit d“apporter toutes modifications sans préavis. © Gaggia S.p.A.

Diese Anleitung auch für:

Sup 037rg

Inhaltsverzeichnis