TFA 30.5033 Bedienungsanleitung
Vorschau ausblenden
Andere Handbücher für 30.5033:
- Bedienungsanleitung (28 Seiten) ,
- Bedienungsanleitung (29 Seiten)
TFA Anl. No. 30.5033
26.09.2013
13:40 Uhr
Seite 1
Digitales Thermo-Hygrometer
Digitales Thermo-Hygrometer
Vielen Dank, dass Sie sich für dieses Gerät aus dem Hause TFA entschieden haben.
• Drücken Sie die MODE Taste noch einmal, um zur aktuellen Uhrzeit zurückzukehren.
• Wenn die eingestellte Weckzeit erreicht ist, beginnt der Wecker zu klingeln.
1. Bevor Sie mit dem Gerät arbeiten
• Drücken Sie eine beliebige Taste und der Alarm wird beendet.
• Lesen Sie sich bitte die Bedienungsanleitung genau durch. So werden Sie mit
• Wird der Alarm nicht unterbrochen, schaltet sich der ansteigende Alarmton automa-
Ihrem neuen Gerät vertraut, lernen alle Funktionen und Bestandteile kennen, erfahren
tisch nach ein paar Minuten aus und aktiviert sich erneut zur gleichen Weckzeit wieder.
wichtige Details für die Inbetriebnahme und den Umgang mit dem Gerät und erhalten
• Das Alarmsymbol bleibt im Display stehen.
Tipps für den Störungsfall.
• Wenn der Wecker klingelt, drücken Sie die SNOOZE Taste, um die Snooze-Funktion zu
• Durch die Beachtung der Bedienungsanleitung vermeiden Sie auch Beschädi-
aktivieren.
gungen des Gerätes und die Gefährdung Ihrer gesetzlichen Mängelrechte durch
• Der Alarm wird für die Dauer von 8 Minuten unterbrochen.
Fehlgebrauch.
• Ebenso haften wir nicht für inkorrekte Messwerte und Folgen, die sich aus sol-
7.3 Aktivieren und Deaktivieren des Weckalarms und des stündlichen Alarmtons
chen ergeben können.
• Drücken Sie die MODE Taste im Normalmodus, um in den Alarmmodus zu gelangen.
• Für Schäden, die aus Nichtbeachtung dieser Bedienungsanleitung verursacht
• Die eingestellte Alarmzeit erscheint.
werden, übernehmen wir keine Haftung.
• Drücken Sie die UP Taste einmal, um den Alarm einzuschalten. Auf dem Display
• Beachten Sie besonders die Sicherheitshinweise!
erscheint das Symbol
• Drücken Sie die UP Taste zweimal, um den stündlichen Alarmton einzuschalten. Auf
2. Lieferumfang
dem Display erscheint das Symbol
• Thermo-Hygrometer
• Drücken Sie die UP Taste dreimal, um den Alarm und den stündlichen Alarmton einzu-
• Bedienungsanleitung
schalten. Auf dem Display erscheint das Symbol
• Drücken Sie die UP Taste viermal, um den Alarm und den stündlichen Alarmton auszu-
3. Einsatzbereich und alle Vorteile Ihres neuen Gerätes auf einen Blick
schalten. Die Symbole verschwinden.
• Zur Kontrolle von Innentemperatur und Luftfeuchtigkeit für ein gesundes Wohnklima
• Drücken Sie die MODE Taste, um in den Normalmodus zurückzukehren.
• Mit Höchst- und Tiefstwerten
7.4 Datumsanzeige
• Uhrzeit
• Alarm mit Snooze-Funktion
• Drücken Sie die UP Taste im Normalmodus, um sich das Datum anzeigen zu lassen.
• Stundensignal
• Datumsanzeige
7.5 Temperaturanzeige
• Drücken Sie die °C/°F Taste im Normalmodus, um zwischen °C (Celsius) auf °F (Fah-
4. Zu Ihrer Sicherheit
renheit) als Temperatureinheit umzuschalten.
• Das Produkt ist ausschließlich für den oben beschriebenen Einsatzbereich geeignet.
Verwenden Sie das Produkt nicht anders, als in dieser Anleitung dargestellt wird.
7.5 Höchst- und Tiefstwerte
• Das eigenmächtige Reparieren, Umbauen oder Verändern des Gerätes ist nicht gestat-
• Drücken Sie die MEM Taste.
tet.
• MAX erscheint auf dem Display.
• Dieses Gerät ist nicht für medizinische Zwecke oder zur öffentlichen Information geeig-
• Die höchste Innentemperatur und Luftfeuchtigkeit seit der letzten Rückstellung werden
net und nur für den privaten Gebrauch bestimmt.
angezeigt.
• Drücken Sie die MEM Taste noch einmal.
Vorsicht!
• MIN erscheint auf dem Display.
Verletzungsgefahr:
• Die niedrigste Innentemperatur und Luftfeuchtigkeit seit der letzten Rückstellung wer-
den angezeigt.
• Bewahren Sie das Gerät und die Batterie außerhalb der Reichweite von Kindern auf.
• Um wieder die Anzeige mit den aktuellen Werten zu erhalten, drücken Sie die MEM
• Batterien nicht ins Feuer werfen, kurzschließen, auseinander nehmen oder aufladen.
Taste noch einmal.
Explosionsgefahr!
• Das Gerät verlässt automatisch den MAX/MIN-Modus, wenn die MEM Taste nicht
• Batterien enthalten gesundheitsschädliche Säuren. Um ein Auslaufen der Batterien zu
gedrückt wird.
vermeiden, sollten schwache Batterien möglichst schnell ausgetauscht werden.
• Halten Sie die MEM Taste gedrückt, wenn die maximalen oder minimalen Werte ange-
• Beim Hantieren mit ausgelaufenen Batterien chemikalienbeständige Schutzhandschu-
zeigt werden, um die entsprechenden Werte zu löschen.
he und Schutzbrille tragen!
8. Pflege und Wartung
• Reinigen Sie das Gerät mit einem weichen, leicht feuchten Tuch. Keine Scheuer- oder
Wichtige Hinweise zur Produktsicherheit!
Lösungsmittel verwenden!
• Setzen Sie das Gerät keinen extremen Temperaturen, Vibrationen und Erschütterungen
• Entfernen Sie die Batterie, wenn Sie das Gerät längere Zeit nicht verwenden.
aus.
• Bewahren Sie Ihr Gerät an einem trockenen Platz auf.
• Vor Feuchtigkeit schützen.
8.1 Batteriewechsel
5. Bestandteile
• Tauschen Sie die Batterie aus, wenn die Anzeige oder der Alarmton schwächer wird.
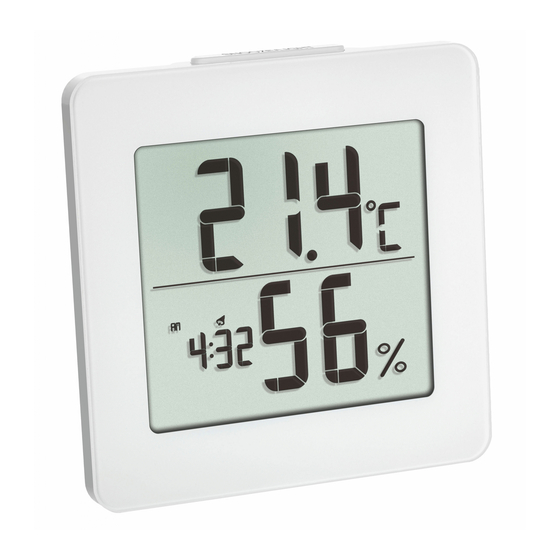
A: Display:
• Öffnen Sie das Batteriefach und legen Sie eine neue Batterie 1,5 V AA ein, +/- Pol wie
A 1: Innentemperatur, MAX/MIN
abgebildet.
A 2: Uhrzeit/Datum/Alarmzeit
• Schließen Sie das Batteriefach wieder.
A 3: Symbole Alarm + Stundenalarm
A 4: Innenluftfeuchtigkeit, MAX/MIN
9. Fehlerbeseitigung
Problem
B: Tasten:
Keine Anzeige auf dem Gerät
B 1: SNOOZE Taste
B 2: MODE Taste
B 3: UP Taste
B 4: MEM Taste
B 5: °C/°F Taste
B 6: RESET Knopf
C: Gehäuse:
Unkorrekte Anzeige
C 1: Ständer mit Batteriefach
Wenn Ihr Gerät trotz dieser Maßnahmen immer noch nicht funktioniert, wenden Sie sich
6. Inbetriebnahme
an den Händler, bei dem Sie das Produkt gekauft haben.
• Ziehen Sie die Schutzfolie vom Display.
• Öffnen Sie das Batteriefach und legen Sie eine neue Batterie 1,5 V AA ein, +/- Pol wie
10. Entsorgung
abgebildet.
Dieses Produkt wurde unter Verwendung hochwertiger Materialien und Bestandteile her-
• Schließen Sie das Batteriefach wieder.
gestellt, die recycelt und wiederverwendet werden können.
• Es werden alle LCD Segmente kurz angezeigt.
Batterien und Akkus dürfen keinesfalls in den Hausmüll!
• Das Gerät ist jetzt betriebsbereit.
Als Verbraucher sind Sie gesetzlich verpflichtet, gebrauchte Batterien und
• Im Display erscheint die aktuelle Innentemperatur und Luftfeuchtigkeit.
Akkus zur umweltgerechten Entsorgung beim Handel oder entsprechen-
• Über der Uhrzeit (12:00 Voreinstellung) erscheint AM.
den Sammelstellen gemäß nationaler oder lokaler Bestimmungen abzuge-
• Um das Gerät auszuschalten, entfernen Sie die Batterie.
ben.
7. Bedienung
Die Bezeichnungen für enthaltene Schwermetalle sind: Cd=Cadmium,
Hg=Quecksilber, Pb=Blei
• Halten Sie die UP Taste im jeweiligen Einstellmodus gedrückt, gelangen Sie in den
Schnelllauf.
Dieses Gerät ist entsprechend der EU-Richtlinie über die Entsorgung von
• Das Gerät verlässt automatisch den Einstellmodus, wenn länger als 60 Sekunden keine
Elektro- und Elektronik-Altgeräten (WEEE) gekennzeichnet.
Taste gedrückt wird.
Dieses Produkt darf nicht mit dem Hausmüll entsorgt werden. Der Nutzer
ist verpflichtet, das Altgerät zur umweltgerechten Entsorgung bei einer
7.1 Einstellung der Uhrzeit und Kalender
ausgewiesenen Annahmestelle für die Entsorgung von Elektro- und Elek-
• Halten Sie die MODE Taste gedrückt.
tronikgeräten abzugeben.
• Die Minutenanzeige blinkt.
• Stellen Sie mit der UP Taste die Minuten ein.
11. Technische Daten
• Drücken Sie die MODE Taste noch einmal und Sie können nun nacheinander die Stun-
Spannungsversorgung:
den, das 24- und 12-Stunden-Anzeigeformat (AM oder PM nach 12 Uhr erscheint im
Display), den Monat und den Tag ansteuern und mit der UP Taste einstellen.
Messbereich Temperatur:
• Bestätigen Sie die Eingabe mit der MODE Taste.
Messbereich Luftfeuchtigkeit:
• Auf dem Display erscheint die eingestellte Uhrzeit.
Anzeige LL/HH:
7.2 Einstellung des Weckalarms
Gehäusemaße:
• Drücken Sie die MODE Taste im Normalmodus, um in den Alarmmodus zu gelangen.
Gewicht:
• 0:00 (Voreinstellung) oder die zuletzt eingestellte erste Weckzeit wird auf dem Display
angezeigt.
• Halten Sie die MODE Taste gedrückt.
• Das Alarmsymbol
erscheint und die Minutenanzeige blinkt.
TFA Dostmann GmbH & Co.KG, Zum Ottersberg 12, D-97877 Wertheim.
• Stellen Sie mit der UP Taste die Minuten ein.
Diese Anleitung oder Auszüge daraus dürfen nur mit Zustimmung von TFA Dostmann ver-
• Bestätigen Sie die Eingabe mit der MODE Taste und stellen Sie die Stunden ein.
öffentlicht werden. Die technischen Daten entsprechen dem Stand bei Drucklegung und
• Bestätigen Sie die Eingabe mit der MODE Taste.
• Auf dem Display erscheinen die eingestellte Weckzeit und das Alarmsymbol. Der Alarm
können ohne vorherige Benachrichtigung geändert werden.
ist aktiviert.
www.tfa-dostmann.de
Digital thermo-hygrometer
Thank you for choosing this instrument from TFA.
1. Before you start using it
• Please make sure to read the instruction manual carefully. This information will help
you to familiarise yourself with your new device, to learn all of its functions and parts, to
find out important details about its first use and how to operate it, and to get advice in
the event of faults.
• Following and respecting the instructions in your manual will prevent damage to
your instrument and loss of your statutory rights arising from defects due to
incorrect use.
• Likewise, we take no responsibility for any incorrect readings and for any conse-
quences which may result from them.
• We shall not be liable for any damage occurring as a result of non-following of
these instructions.
• Please take particular note of the safety advice!
.
• Please keep this instruction manual for future reference.
.
2. Scope of delivery
und
.
• Thermo-Hygrometer
• Instruction manual
3. Field of operation and all the benefits of your new instrument at a glance
• For the control of indoor temperature and humidity to help create a healthy room climate
• With maximum and minimum values
• Time
• Alarm with snooze function
• Hourly chime
• Display of date
4. For your safety
• This product is exclusively intended for the field of application described above. It
should only be used as described within these instructions.
• Unauthorized repairs, modifications or changes to the product are prohibited.
• This product is not be used for medical purpose or for public information, it is only
intended for home use.
Caution!
Risk of injury:
• Keep this instrument and the battery out of the reach of children.
• Batteries must not be thrown into a fire, short-circuited, taken apart or recharged. Risk
of explosion!
• Batteries contain harmful acids. Low batteries should be changed as soon as possible
to prevent damage caused by leaking.
• Wear chemical-resistant protective gloves and glasses when handling leaking batteries.
Important information on product safety!
• Do not place your product near extreme temperatures, vibrations or shocks.
• Protect it from moisture.
5. Elements
A: Display:
A 1: Indoor temperature, MAX/MIN
A 2: Time, date, alarm
A 3: Symbol for the alarm and the hourly chime
A 4: Indoor humidity, MAX/MIN
B: Buttons:
B 1: SNOOZE button
B 2: MODE button
Lösung
B 3: UP button
B 4: MEM button
➜ Batterie polrichtig einlegen
B 5: °C/°F button
B 6: RESET button
➜ RESET Knopf mit einem spitzen Gegenstand
C: Housing:
drücken
➜ Batterie wechseln
C 1: Support with battery compartment
➜ Batterie wechseln
6. Getting started
• Pull the protective foil off the display.
• Open the battery compartment and insert a new battery 1,5 V AA, ensure that the bat-
tery polarity is correct.
• Close the battery compartment again.
• All LCD segments will be displayed for a short moment.
• The unit is ready for use.
• The display shows the current indoor temperature and humidity.
• Above the time (12:00 default) appears AM on the display.
• Take out the battery to shut down the instrument.
7. Operation
• Press and hold UP button in the setting mode for fast running.
• The instrument will automatically quit the setting mode if no button is pressed within 60
seconds.
7.1 Setting of the clock and calendar
• Press and hold the MODE button.
• The minute digits will be flashing.
• Press the UP button to set the minutes.
• Press the MODE button again and the setting sequence is shown as follows: Hours, 12-
hour or 24-hour display format (AM or PM after 12 h appears on the display) month and
day and adjust it with the UP button.
• Confirm the setting with the MODE button.
Batterie 1 x 1,5 V AA
• The display shows the current time.
0°C...+50°C (+32°F...+122°F) °C/°F umschaltbar
7.2 Setting of the alarm time
20...90 % rF
• To enter the alarm mode, press the MODE button in normal mode.
Messung liegt außerhalb des Messbereichs
• 0:00 (default) or the last adjusted alarm time appears on the display.
94 x 37 (95) x 94 mm
• Press and hold MODE button.
• The alarm symbol
appears and the minute digits will be flashing.
140 g (nur das Gerät)
• Press the UP button to set the minutes.
• Confirm the setting with the MODE button and set the hours in the same way.
• Confirm the setting with the MODE button.
• The display shows the adjusted alarm time and the alarm symbol. The alarm is activated.
• Press the MODE button again to return to the current time.
• When the adjusted alarm time is reached, the alarm will ring.
• Press any button and the alarm function will stop working.
• If the alarm is not stopped manually, the increasing alarm will automatically turn off
09/2013
after certain minutes and will be reactivated at the same time.
Digital thermo-hygrometer
Thermo-hygromètre digital
• The alarm symbol stays in the display.
Nous vous remercions d'avoir choisi l'appareil de la Société TFA.
• When the alarm rings, press the SNOOZE button and the snooze function will be acti-
1. Avant d'utiliser l'appareil
vated.
• Veuillez lire attentivement le mode d'emploi.. Vous vous familiariserez ainsi avec
• The alarm will be interrupted for 8 minutes.
votre nouvel appareil, vous découvrirez toutes les fonctions et tous les éléments qui le
composent, vous noterez les détails importants relatifs à sa mise en service et vous
7.3 Activate and deactivate the alarm time and the hourly chime
lirez quelques conseils en cas de disfonctionnement.
• To enter the alarm mode, press the MODE button in normal mode.
• En respectant ce mode d'emploi, vous éviterez d'endommager votre appareil et
• The adjusted alarm time appears on the display.
de perdre vos droits résultant d'un défaut pour cause d'utilisation non-conforme.
• Press the UP button once to activate the alarm. On the display appears the alarm sym-
• De même, nous n'assumons aucune responsabilité pour des relevés incorrects et
bol
.
les conséquences qu'ils pourraient engendrer.
• Press the UP button twice to activate the hourly chime. On the display appears the sym-
• Nous n'assumons aucune responsabilité pour des dommages qui auraient été
bol for the hourly chime
.
causés par le non-respect du présent mode d'emploi.
• Press the UP button three times to activate the alarm and the hourly chime. On the dis-
• Suivez bien toutes les consignes de sécurité!
play appear both symbols
and
.
• Conservez soigneusement le mode d'emploi!
• Press the UP button four times to deactivate both alarms. Both symbols disappear.
• Press the MODE button to return to normal mode.
2. Contenu de la livraison
• Thermomètre-hygromètre
7.4 Display of date
• Mode d'emploi
• Press the UP button in normal mode to show the date.
3. Aperçu du domaine d'utilisation et tous les avantages de votre nouvel appareil
7.5 Temperature display
• Pour le contrôle de la température ambiante et de l'humidité de l'air pour un climat inté-
• Press the °C/°F button to change between °C (Celsius) or °F (Fahrenheit) as tempera-
rieur sain
ture unit.
• Avec valeurs maximales et minimales
• Horloge
7.5 Maximum and minimum values
• Alarme avec fonction snooze
• Press the MEM button.
• Signal de l'heure
• MAX appears on the display.
• The highest indoor temperature and humidity are displayed since the last reset.
4. Pour votre sécurité
• Press the MEM button again.
• L'appareil est destiné uniquement à l'utilisation décrite ci-dessus. Ne l'utilisez jamais à
• MIN appears on the display.
d'autres fins que celles décrites dans le présent mode d'emploi.
• The lowest indoor temperature and humidity are displayed since the last reset.
• Vous ne devez en aucun cas réparer, démonter ou modifier l'appareil par vous-même.
• To go back to the present temperature and humidity display, press the MEM button once
• Cet appareil ne convient ni à une utilisation médicale ou à l'information publique, il est
more.
destiné uniquement à un usage privé.
• The instrument will automatically quit the MAX/MIN mode if no button is pressed.
• Press and hold the MEM button in the respective mode to clear the recorded maximum
Attention!
or minimum values.
Danger de blessure:
8. Care and maintenance
• Gardez l'appareil et la pile hors de la portée des enfants.
• Clean your instrument with a soft damp cloth. Do not use solvents or scouring agents.
• Ne jetez jamais les piles dans le feu, ne les court-circuitez pas, ne les démontez pas et
• Remove the battery if you do not use the product for a long period of time.
ne les rechargez pas. Risques d'explosion!
• Keep the instrument in a dry place.
• Les piles contiennent des acides nocifs pour la santé. Une pile faible doit être rempla-
cée le plus rapidement possible afin d'éviter une fuite.
8.1 Battery replacement
• Pour manipuler des piles qui ont coulé, utilisez des gants de protection chimique spé-
cialement adaptés et portez des lunettes de protection !
• Replace the battery when the display becomes weak or the alarm tone declines.
• Open the battery compartment and insert a new battery 1,5 V AA, ensure that the bat-
tery polaritiy is correct.
Conseils importants de sécurité du produit!
• Close the battery compartment again.
• Évitez d'exposer l'appareil à des températures extrêmes, à des vibrations ou à des
chocs.
9. Troubleshooting
• Protégez-le contre l'humidité.
Problems
Solution
➜ Ensure that the battery polarity is correct
No display on the device
5. Composants
➜ Use a pin to press the RESET button
A: Écran:
➜ Change the battery
A 1: Température ambiante, MAX/MIN
➜ Change the battery
Incorrect indication
A 2: Horloge, date, alarme
A 3: Symbole de l'alarme et symbole du signal de l'heure
If your device fails to work despite these measures contact the supplier from whom you
A 4: Humidité intérieure, MAX/MIN
purchased it.
B: Touches:
10. Waste disposal
B 1: Touche SNOOZE
B 3: Touche UP
This product has been manufactured using high-grade materials and components which
B 5: Touche °C/°F
can be recycled and reused.
Never dispose of empty batteries and rechargeable batteries in household
C: Boîtier:
waste.
C 1: Support avec compartiment à pile
As a consumer, you are legally required to take them to your retail store or
to an appropriate collection site depending on national or local regulations
6. Mise en service
in order to protect the environment.
• Enlevez le film de protection de l'écran d'affichage.
The symbols for the heavy metals contained are:
• Ouvrez le compartiment à pile et insérez une nouvelle pile 1,5 V AA, pôles +/- comme
Cd=cadmium, Hg=mercury, Pb=lead
indiqué.
This instrument is labeled in accordance with the EU Waste Electrical and
• Refermez le compartiment à pile.
Electronic Equipment Directive (WEEE).
• Tous les segments LCD s'allument.
• Votre appareil est maintenant prêt à fonctionner.
Please do not dispose of this instrument in household waste. The user is
• La température actuelle intérieure et l'humidité sont toujours à l'écran.
obligated to take end-of-life devices to a designated collection point for the
• À propos du temps (12:00 par défaut) AM apparaît à l'écran.
disposal of electrical and electronic equipment, in order to ensure environ-
• Pour éteindre votre appareil, retirez la pile.
mentally-compatible disposal.
7. Utilisation
11. Specifications
• Maintenez la touche UP appuyée au mode de paramétrage pour accéder au défilement
Power consumption:
Battery 1 x 1.5 V AA
rapide.
Measuring range temperature:
0°C...+50°C (+32°F...+122°F) °C/°F-reversible
• L'appareil quitte automatiquement le mode de paramétrage si aucune entrée n'a été
effectuée pendant 60 secondes.
Measuring range humidity:
20...90 % rH
7.1 Réglage de l'heure et du calendrier
Display shows LL/HH:
Measuring is out of the range
• Maintenez la touche MODE appuyée.
Housing dimension:
94 x 37 (95) x 94 mm
• L'indicateur des minutes clignote
Weight:
140 g (instrument only)
• Réglez les minutes avec la touche UP.
• Appuyez sur la touche MODE pour ajuster les heures, l'affichage de 12 heures (après
12 h PM apparaît sur l'écran) et de 24 heures, le mois et le jour sont réglables avec la
touche UP.
• Validez au moyen de la touche MODE.
• L'heure actuelle apparaît sur l'écran.
7.2 Réglage alarme de réveil
• Appuyez sur la touche MODE en mode normal pour arriver au mode d'alarme.
• 0:00 (par défaut) ou l'heure d'alarme réglée précédemment apparaît sur l'affichage.
• Maintenez la touche MODE appuyée.
• Le symbole de l'alarme
apparaît et l'indicateur des minutes clignote
• Réglez les minutes avec la touche UP.
• Validez au moyen de la touche MODE et procédez de la même manière pour le para-
métrage des heures.
• Validez au moyen de la touche MODE.
TFA Dostmann GmbH & Co.KG, Zum Ottersberg 12, D-97877 Wertheim.
• La dernière heure de l'alarme et le symbole d'alarme apparaissent sur l'écran. L'alarme
No part of this manual may be reproduced without written consent of TFA Dostmann. The
est activée.
technical data are correct at the time of going to print and may change without prior notice.
• Appuyez sur la touche MODE afin de retourner à affichage de l'heure actuelle.
www.tfa-dostmann.de
09/2013
• Lorsque l'heure d'alarme fixée est atteinte, le réveil commence à sonner.
Réveil radio-piloté
• Appuyez sur une touche de votre choix pour que l'alarme soit désactivée.
• Si l'alarme n'est pas coupée, elle s'arrêtera automatiquement après quelques minutes
et sera de nouveau active pour l'heure de réveil suivant.
• Le symbole reste à l'écran.
• Lorsque le réveil sonne, appuyez sur la touche SNOOZE pour activer la fonction snooze.
• L'alarme s'interrompt pendant 8 minutes.
7.3 Activer et désactiver l'alarme et le signal de l'heure
• Appuyez sur la touche MODE en mode normal pour arriver au mode d'alarme.
• L'heure d'alarme réglée apparaît sur l'écran.
• Appuyez une fois sur la touche UP pour activer l'alarme. Le symbole d'alarme
raît.
• Appuyez deux fois sur la touche UP pour activer le signal de l'heure. Le symbole de
signal de l'heure apparaît
.
• Appuyez trois fois sur la touche UP pour activer l'alarme et le signal de l'heure. Les
symboles
et
apparaissent.
• Appuyez quatre fois sur la touche UP pour désactiver l'alarme et le signal de l'heure.
Les symboles désappariassent.
• Appuyez sur la touche MODE afin de retourner au mode normale.
7.4 Affichage de la date
• Appuyez sur la touche UP en mode normal, cela vous permet d'afficher la date.
7.5 Affichage de la température
• Appuyez sur la touche °C/°F en mode normal, vous pouvez maintenant sélectionner la
température en °C (Celsius) ou en °F (Fahrenheit).
7.5 Valeurs maximales et minimales
• Appuyez sur la touche MEM.
• MAX apparaît sur l'écran.
• La température ambiante maximale et l'humidité maximale depuis la dernière réactuali-
sation apparaissent.
• Appuyez sur la touche MEM.
• MIN apparaît sur l'écran.
• La température ambiante minimale et l'humidité minimale depuis la dernière réactuali-
sation apparaissent.
• Appuyez encore une fois sur la touche MEM et les valeurs actuelles apparaissent sur
l'écran.
• L'appareil quitte automatiquement le mode MAX/MIN si aucune entrée n'a été effec-
tuée.
• Maintenez la touche MEM appuyée pour effacer les valeurs maximales et minimales
selon le mode correspondant.
8. Entretien et maintenance
• Pour le nettoyage de l'appareil, utilisez un chiffon doux et humide. N'utilisez pas de sol-
vants ou d´agents abrasifs!
• Enlevez la pile si vous n'utilisez pas votre appareil pendant une durée prolongée.
• Conservez votre appareil dans un endroit sec.
8.1 Remplacement de la pile
• Remplacez la pile si l'affichage ou la sonnerie de l'alarme s'affaiblissent.
• Ouvrez le compartiment à pile et insérez une nouvelle pile 1,5 V AA, pôles +/- comme
indiqué.
• Refermez le compartiment à pile.
9. Dépannage
Problème
Solution
➜ Contrôlez la bonne polarité de pile
Aucun affichage sur l'écran
➜ Appuyez sur la touche RESET à l'aide d'un objet
B 2: Touche MODE
pointu
B 4: Touche MEM
➜ Changez la pile
B 6: Bouton RESET
Indication incorrecte
➜ Changez la pile
Si votre appareil ne fonctionne toujours pas malgré ces mesures, adressez-vous au ven-
deur auquel vous avez acheté votre appareil.
10. Traitement des déchets
Ce produit a été fabriqué avec des matériaux de construction de haute qualité qui peuvent
être recyclés et réutilisés
Les piles et accus usagés ne peuvent en aucun cas être jetés dans les
ordures ménagères !
En tant qu'utilisateur, vous avez l'obligation légale de rapporter les piles et
accus usagés à votre revendeur ou de les déposez dans une déchetterie
proche de votre domicile conformément à la réglementation nationale et
locale.
Les métaux lourds sont désignés comme suit: Cd=cadmium, Hg=mercure,
Pb=plomb
Cet appareil est conforme aux normes de l'UE relatives au traitement des
déchets électriques et électroniques (WEEE).
L'appareil usagé ne doit pas être jeté dans les ordures ménagères. L'utili-
sateur s'engage, pour le respect de l'environnement, à déposer l'appareil
usagé dans un centre de traitement agréé pour les déchets électriques et
électroniques.
11. Caractéristiques techniques
Alimentation:
Pile 1 x 1,5 V AA
Plage de mesure - température: 0°C...+50°C (+32°F...+122°F) °C/°F réversible
Plage de mesure - humidité:
20...90 % rH
LL/HH apparaît sur l'écran :
Hors de portée de la gamme de mesure
Mesure de boîtier:
94 x 37 (95) x 94 mm
Poids:
140 g (appareil seulement)
TFA Dostmann GmbH & Co.KG, Zum Ottersberg 12, D-97877 Wertheim.
La reproduction, même partielle du présent mode d'emploi est strictement interdite sans
l'accord explicite de TFA Dostmann. Les spécifications techniques de ce produit ont été
actualisées au moment de l'impression et peuvent être modifiées, sans avis préalable.
www.tfa-dostmann.de
Bedienungsanleitung
Instruction manual
Mode d'emploi
appa-
Kat. Nr. 30.5033
Fig. 1
A 1
A 3
A 4
A 2
Fig. 2
B 1
B 4
B 3
B 5
B 2
B 6
Fig. 3
C 1
09/2013

Verwandte Anleitungen für TFA 30.5033


Inhaltszusammenfassung für TFA 30.5033
- Seite 1 öffentlicht werden. Die technischen Daten entsprechen dem Stand bei Drucklegung und • Press any button and the alarm function will stop working. No part of this manual may be reproduced without written consent of TFA Dostmann. The est activée. • Bestätigen Sie die Eingabe mit der MODE Taste.
- Seite 2 TFA Dostmann. I dati tecnici corrispondono allo stato del prodotto al ción de la TFA Dostmann. Los datos técnicos de este producto corresponden al estado en • Quando l'orario di allarme inserito viene raggiunto, la sveglia comincia a suonare.