Herunterladen Diese Seite drucken
Kicker KMTC Benutzerhandbuch

Kicker KMTC Benutzerhandbuch

Marine can-gehäuse
Vorschau ausblenden Andere Handbücher für KMTC:

Werbung

Verfügbare Sprachen

Verfügbare Sprachen

KMTC
Loaded Marine Cans
Owner's Manual

Werbung

loading

Inhaltszusammenfassung für Kicker KMTC

  • Seite 1 KMTC Loaded Marine Cans Owner’s Manual...
  • Seite 2: Installation

    The injection-molded ABS enclosures are UV treated, splash resistant, and weather resilient. Mount the KMTC Loaded Marine Cans in your boat or get creative with a pair of them in the garage, on your 4x4 or Side-by-Side’s roll bars, or in any other bar-mounted application.
  • Seite 3 Step 2: Thread the speaker and LED wires through the bottom of the lower mounting bracket and out of the plastic liner hole in the center. lower mounting bracket swivel base IMPORTANT: You must apply a thin layer of the included anti-seize compound to ALL threaded fasteners before installation.
  • Seite 4 Step 5: Extend the speaker and LED wiring through the hole you have drilled and connect them to your source unit or amplifi er. KICKER recommends you solder the connections and secure them with heat shrink. When hard-wiring the RGB lighting, the black lead is +12V and the red, green, and blue leads are ground.
  • Seite 5 2A fuse ≤7” (max) (17.5cm) +12V Ground battery Step 6: Secure the enclosure to the tower tube with the upper and lower mounting brackets. With the wiring clearance hole you drilled and the wiring shroud on the lower mounting bracket lined up, position the enclosure assembly so that it is tightly against the tower tube.
  • Seite 6: Instalación

    UV, son resistentes a las salpicaduras y al clima. Monte las bocinas marinas cargadas KMTC en su embarcación, o sea creativo con un par de ellas en su cochera, o en su 4x4 o lateralmente en sus barras estabilizadoras, o en cualquier otra aplicación con barras montadas.
  • Seite 7 Paso 2: Pase los cables del altavoz y LED a través de la parte inferior del soporte inferior de montaje y hacia afuera del orifi cio con forro plástico en el centro. soporte inferior de montaje base oscilante IMPORTANTE: Debe aplicar una capa delgada del compuesto antiagarre a TODOS los sujetadores roscados antes de la instalación.
  • Seite 8 Paso 5: Extienda los cables del altavoz y LED a través del orifi cio que perforó y conéctelos a la unidad de fuente o amplifi cador. KICKER recomienda que suelde las conexiones y las asegure con termorretracción. Al cablear la iluminación RGB, el terminal negro es +12V y los terminales rojo, verde y azul son la puesta a tierra.
  • Seite 9 ≤7” fusible (17.5cm) (max) +12V Conexión a tierra batería Paso 6: Asegure la carcasa a la torre de tubería con los soportes superior e inferior de montaje. Con el orifi cio para cableado que perforó y la cubierta del cableado alineados con el soporte inferior de montaje, ubique el conjunto de la carcasa para que esté...
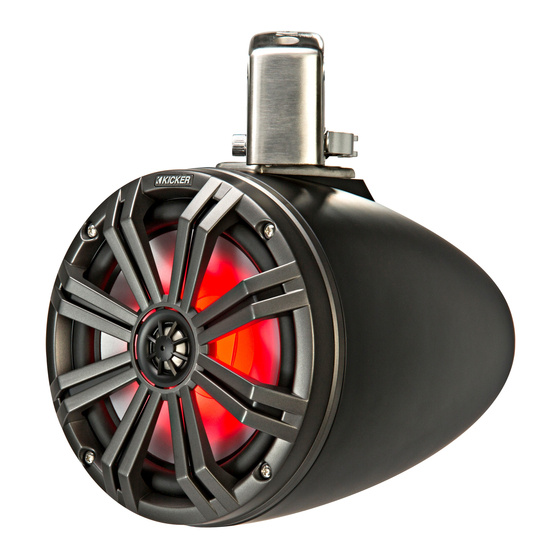
  • Seite 10 Lautsprechergehäuse KMTC65 und KMTC8 sind mit den KICKER-LED-Lautsprechern KM65 und KM8 bestückt. Die ABS-Spritzgussgehäuse sind UV-behandelt, spritzwassergeschützt und wetterbeständig. Montieren Sie die Marine-Lautsprechergehäuse mit KMTC-Lautsprechern auf Ihrem Boot oder lassen Sie Ihrer Kreativität freien Lauf, indem Sie ein Paar dieser Lautsprechergehäuse in Ihrer Garage, am Überrollbügel Ihres Allrad- oder Side-by-Side-Fahrzeugs oder in einer beliebigen anderen Anwendung mit...
  • Seite 11 Schritt 2: Führen Sie die Lautsprecher- und LED-Anschlussdrähte durch die Unterseite der unteren Montagehalterung und weiter durch die kunststoffummantelte Öffnung in der Mitte hindurch. Untere Montagehalterung Schwenkfuß WICHTIG: Sie müssen vor der Installation auf ALLE Schraubverbindungselemente eine dünne Schicht des mitgelieferten Anti-Abnutzungsgemisches aufbringen. Schritt 3: Die Montageteile sind so konzipiert, dass sie bezüglich des Befestigungswinkels eine hohe Vielseitigkeit bieten, um den Schall der Lautsprecher durch Verwendung der Schwenkhebel zur Schnelljustierung auf die ideale Hörposition auszurichten.
  • Seite 12 Schwenkhebel Schritt 5: Führen Sie die Lautsprecher- und LED-Anschlussdrähte durch die Öffnung hindurch, die Sie gebohrt haben, und verbinden Sie diese mit Ihrem Quellengerät oder Verstärker. KICKER empfi ehlt, dass Sie die Anschlüsse verlöten und anschließend mit einem Schrumpfschlauch schützen.
  • Seite 13 Sicherung ≤7” (max) (17,5cm) +12V Erdung batteríe Schritt 6: Sichern Sie das Gehäuse mit der unteren und mit der oberen Montagehalterung am Turmrohr. Wenn Sie die von Ihnen gebohrte Verdrahtungsdurchgangsbohrung und die Verdrahtungshülle an der unteren Montagehalterung aufeinander ausgerichtet haben, positionieren Sie die Gehäusebaugruppe so, dass sie fest gegen das Turmrohr drückt.
  • Seite 14 UV, et résistants aux projections de liquides et aux intempéries. Montez les boîtiers marins équipés de haut-parleurs KMTC sur votre bateau ou soyez plus créatif en installant une paire dans votre garage, sur votre 4x4, sur votre tout-terrain biplace, ou encore dans toute autre application montée sur barre.
  • Seite 15 2ème étape : enfi ler les fi ls du haut-parleur et le câble LED en bas du support de fi xation inférieur puis les faire passer dans le trou doublé de plastique au centre. support de fi xation inférieur base pivotante IMPORTANT : vous devez appliquer une fi...
  • Seite 16 5ème étape : faire passer le câblage de haut-parleurs et LED dans le trou que vous avez percé et les brancher à votre unité source ou à l’amplifi cateur. KICKER recommande de souder les connexions et de les sécuriser avec une gaine thermorétractable.
  • Seite 17 2A fuse ≤7” (max) (17,5cm) +12V Prise de terre batteríe 6ème étape : fi xer le boîtier au tube vertical avec les supports de fi xation supérieur et inférieur. En alignant le trou de dégagement que vous avez percé et le faisceau de câblage sur le support de fi xation inférieur, placer l’ensemble du boîtier de sorte à...
  • Seite 18 ACOUSTICS LIMITED WARRANTY When purchased from an Authorized KICKER Dealer, KICKER warrants this product to be free from defects in material and workmanship under normal use for a period of ONE (1) YEAR from date of original purchase. If this product is identifi...
  • Seite 19: International Warranty

    Sea precavido cuando controle el volumen. La frase “combustible para vivir la vida Livin’ Loud™ a todo volumen” se refi ere al entusiasmo por la vida que la marca KICKER de estéreos de automóvil representa y a la recomendación a nuestros clientes de que vivan lo mejor posible (“a todo volumen”) en todo sentido.
  • Seite 20 ©2017 Stillwater Designs...

Diese Anleitung auch für:

Kmtc65Kmtdc65Kmtc8Kmtc8wKmtc65wKmtdc65w