The device degree of protection is IP20 (DIN EN 60 5 29), the front plate degree of protection is IP66. • Do not expose the device to direct sunlight. • Protect the device against impact/shock loads and strong vibrations. WE2111 A3603-2.0...
Seite 8
In particular, any repair or sol- dering work on motherboards (replacement of compo- nents) is prohibited. When exchanging complete mod- ules, use only original parts from HBM. • The device is delivered from the factory with a fixed hardware and software configuration.
Seite 9
The supply voltage must be between 12 and 24 V . A supply with 110 to 240 V is possible with the option 1-WE2111-AC. • Error messages should only be acknowledged once the cause of the error is removed and no further danger exists.
Seite 10
This particularly concerns personal and machine protection. In the event of a fault, appro- priate precautions must establish safe operating condi- tions. WE2111 A3603-2.0...
Seite 11
General dangers of failing to follow the safety instruc- tions The device is state of the art and as such is failsafe. The device may give rise to residual dangers if it is inappropri- ately installed and operated. WE2111 A3603-2.0...
Italic font is used to emphasize individual terms in the text. Entries to be made by you are also marked, as are all buttons, checkboxes and names for input fields, etc. Menus, commands, dialog boxes and windows as well as tabs are also identified. WE2111 A3603-2.0...
422/485. The WE2111 Viewer PC software is available to make it easy for you to set all parameters. You can download the software free of charge from the HBM web site in the “Dig- ital weighing electronics” area: www.hbm.com/HBM Soft- ware.
Seite 15
Quick start output (4 … 20 mA) and analog voltage output (0 … +10 V). • Plug-in module 1-WE2111-R2 with electrically isolated RS-232 interface. • Plug-in module 1-WE2111-R4 with electrically isolated RS-485 interface. • Table stand 1-WE2111-ZT. • Housing 1-WE2111-ZH.
Quick start Display and symbols Fig. 1: Front panel with displays and keys of the WE2111 Value displayed is gross (G), net (NET) or zero (i.e. the zero value is within the permissible tolerance of the minimum load cell verification interval v ). The net signal is displayed in the figure.
Quick start See also assignment. How to work with the WE2111 This section describes briefly how to turn on the device and what settings you have to make to be able to perform weighing processes. As an example, a single-range bal- ance will be set up for applications not subject to weights and measures approval without a pass code.
Switch on the power supply for the WE2111. The WE2111 runs through a series of self tests after it is switched on. The display first shows bOOt, then all the segments of the display and all the illuminated indicators are activated, including the limit values and units, etc.
SAFE is displayed (SAFE setup mode). Press the key again (briefly). FULL is displayed (FULL setup mode). Press the key. The display alternates between SEtUP, the firmware version (for example P60c), the calibration counter (for example C00008) and buiLd. WE2111 A3603-2.0...
(not possible in all dialogs). In either case the settings you made will be saved and you will exit setup mode. It is also possible to turn off the WE2111 if you do not want any settings to be changed. 3.2.4...
Seite 21
Press the key until UnitS is displayed. Press the key. If kg is not selected as the unit next to the display, press key until it is. Press the key. UnitS is displayed. WE2111 A3603-2.0...
Remove the weight from the weigher and press the key. Z in P (zero in progress) is displayed while the zero balance is being performed. 0.00 flashes in the dis- play when zero balance has been completed. WE2111 A3603-2.0...
Seite 23
The display alternates between SAviNG, the firmware version (for example P60c) and the calibration coun- ter (for example C00008) before the current measured value appears. The WE2111 is now ready for measurements and able to perform weighing processes. WE2111 A3603-2.0...
Depending on the desired interface, connect either the RS-232 or RS-422/485 of your PC with the WE2111. There is a risk with long line lengths (30 m or more) that the bus node will receive different ground potentials. If neces- sary set up potential equalization between the bus nodes with a separate lead.
Seite 25
Quick start 485 you can use the Serial 2 interface to connect the next node. The termination resistors required for the RS422/485 interface are integrated into the WE2111 and are acti- vated by software. Serial 2 pin assignment Connector socket Function...
Seite 26
Possible settings are 300, 600, 1200, 2400, 4800, 9600 (default setting), 19,200, 38,400, 57,600 and 115,200 baud. 9. Press the key to complete the process. 10. Press the key until bitS is displayed. WE2111 A3603-2.0...
Seite 27
NEt.OPt is displayed. 15. Press the key. AddrES is displayed. 16. Press the key. 17. Use the keys to specify the device address to be used (the default setting is 31). 18. Press the key to complete the process. WE2111 A3603-2.0...
Seite 28
1. Click on Connect or select File -> Connect. 2. In the dialog choose the interface that is used on the PC (Serial Port). 3. Choose the set baud rate on the WE2111 (Baud Rate). 4. Specify these interface parameters: (Parity), number of (Data Bits) and number of (Stop Bits).
1. You can use DHCP (factory setting). You can only use this variant if there is a server in the network that assigns an address to the WE2111. The disadvantage is that you have to find out what the as- WE2111 A3603-2.0...
Seite 30
Quick start signed address is. The network administrator can use the MAC address of the WE2111 for automatic assign- ment of a specific IP address. You can read it as the last parameter when entering the Ethernet interface parameter. 2. Set an IP address on the WE2111.
Seite 31
To finish press the key to return to the display of 10. Press the key. (MASK) is displayed. 11. Press the key. is displayed. 12. Press the key. The first group of digits in the current subnet mask is WE2111 A3603-2.0...
Seite 32
(next digit). Confirm with Press the key to go to the next group of digits ) and continue the process to set the re- quired gateway address. To finish press the key to return to the display of WE2111 A3603-2.0...
Seite 33
19. Press the key to display the MAC address. is displayed. 20. Press the key. The first part of the MAC address is displayed in hexa- decimal notation, for example 00.E0.0C. 21. Press the key 2 times. is displayed. WE2111 A3603-2.0...
Seite 34
1. Click on Connect or select File -> Connect. 2. In the dialog choose the interface that is used on the PC (TCP). 3. Specify the IP address set on the WE2111 (TCP Settings, IP Address). 4. Specify 2222 as the TCP port (TCP Settings, TCP Port.
Quick start Dialog for the Ethernet interface (example) Application areas (legal for trade/industrial) See also Setting legal for trade/industrial mode. WE2111 A3603-2.0...
Seite 36
European Union (EU). The relevant details for the weigher must be documented on one of the enclosed plug-in cards. Insert the card in the WE2111 and protect it against changes with a seal (see figure). Fig. 2: Insert plug-in card in position 1.
Seite 37
Range of zero setting Permitted range either -105% of the measuring ±2% or from -1% to +3% range of the measuring range Overload Measuring range + 9 +105% of the measuring minimum load cell verifi- range cation intervals (e) WE2111 A3603-2.0...
You cannot change any parameters relevant to legal verification in this mode. All other settings are possible. Use this pass code to protect the WE2111 against un- intentional changes. To suppress changes made with key as well, you must also deactivate that func- tionality;...
Seite 39
Fig. 3: Rear of the WE2111with the cover of the setup push- button removed. 1: Setup push-button (recessed) 2: The push-button can be pressed in to a tamper-proof position by the loops after the cover is set in place. WE2111 A3603-2.0...
Seite 40
FULL setup mode). The procedure for making the setting is described below. If the pass code is lost, the device must be sent in to HBM. Then all settings will be deleted. Procedure for setting the pass code The settings are only possible in FULL setup mode.
Seite 41
(for example P60c) and the calibration counter (for example C00008) before the current measured value appears. After the rear push-button (r.ENtry) has been activated you must use the rear push-button to call the setup menu for settings relevant to legal verification (FULL setup mode). WE2111 A3603-2.0...
Doing so could destroy the WE2111. Remove the power supply or turn it off before installing or removing a module. You can only connect one of modules WE2111-ZS or WE2111-ZCC and only one of modules WE2111-R2 or WE2111-R4. A total of two modules (with power supply module) can be connected.
Seite 43
Mounting optional modules Fig. 4: Rear view of connecting optional modules Tighten the two fastening screws for the module finger- tight (see figure). WE2111 A3603-2.0...
Seite 44
Use shielded lines for the analog outputs. The lines for the digital inputs/outputs only need to be shielded if the length of the cable exceeds 30 m. WE2111 A3603-2.0...
Mounting optional modules Contact assignment of WE2111-ZCC Function Imprint Current output (+), 600 max. IOUT+ Current output (-), 600 max. IOUT- Voltage output (+), 2000 min. VOUT+ Voltage output (-), 2000 min. VOUT- Input/output 1 I/O1...
5 V (bridge excitation voltage). Use a suitable terminal box to connect multiple load cells, for example type VKK2-8 from HBM, for wiring the load cells. All the load cells cannot be connected in parallel. Consult the operating instructions for your load cells to determine whether this is possible.
Seite 47
Connecting load cells Contact assignment Connector Function Contact no. HBM color socket (pin/imprint) code Excitation voltage (+) 1 (+ Ex) BU (blue) Excitation voltage (-) 3 (- Ex) BK (black) Sense lead (+) 2 (+ Sn) GN (green) Sense lead (-)
Seite 48
If the line resistances of the supply lines are very high (if Zener barriers are used for example) you can turn off the test of the connections. You should only use this option if one of errors E00040, E00080 or E000C0 is displayed after the connection. WE2111 A3603-2.0...
Seite 49
ON (default setting) and OFF. Use the key to specify the desired function. Press the key to confirm the setting. Press the key and hold it for several seconds to save the setting. WE2111 A3603-2.0...
Connecting the power supply Connecting the power supply The WE2111 must be supplied with regulated DC voltage between 12 V and 24 V. The WE2111-AC power supply module is optionally available with a current feed of 110 V to 240 V Connection for DC voltage Fig.
The resistance between the grounding point and the . WE2111 must not exceed 2 The WE2111 is now ready to turn on. Connect the power supply voltage plug into the connector and turn on the power supply voltage.
Seite 52
Rear view of power supply module assembly Tighten the three fastening screws (1) for the module finger-tight. The WE2111 is now ready to turn on. Connect the appropriate mains cable for your power supply to the IEC plug and connect it with your power supply.
Mounting position The device can be mounted in any position. Installation The WE2111 can be used either as a desktop device, for example with the 1-WE2111-ZT option (table stand), or as an installed device. Mounting is the same in either case.
Seite 54
Mechanical installation Fig. 10: Rear view with fastening clamps unfolded WE2111 A3603-2.0...
Interfaces, ports and outputs Eth.nEt Ethernet settings SPEC Special settings tESt Test SEt.PtS Limit values AnALoG Analog output CLOC Date/time FiLE File Alibi memory (DSD) CHG.LOG Change log FACtrY Factory settings, reset –ENd– End of the main menu WE2111 A3603-2.0...
Seite 56
2. <X> For dual-interval or dual-range mode, enter the minimum load cell verification interval (verification interval) for range 2 Ad.tArE <X> Turn on additive taring and define max. tare UNitS with- Define unit out/g/kg/lb/t WE2111 A3603-2.0...
Seite 57
<X> Zero dead band, default setting 0) SENS.CH OFF, ON Turn check of sense leads on/off (default setting ON) (calibration) menu Menu Relevant to Description verification ZErO Adjustment of weigher zero point SPAN Adjustment of weigher full scale/span WE2111 A3603-2.0...
Seite 58
(serial interface) CUStOn diSP, GroSS, Signal for output NEt, totAL Aut.Fnt Max. 50 charac- Format CUSTOM (customer- ters or control specific adjustable format) codes St.CHr <X> Start character ENd.CH1 <X> First end character ENd.CH2 <X> Second end character WE2111 A3603-2.0...
Seite 59
<X> Gateway address, digit groups 1 to GATE.u.4 4. If DHCP is active the current address is displayed. dNS.1 to <X> DNS address, digit groups 1 to 4. If dNS.4 DHCP is active the current address is displayed. WE2111 A3603-2.0...
Seite 60
F key on the front panel and dig- ital inputs 1 to 4. iN.FN.5.8 <X> Entry of the code for the function of digital inputs 5 to 8. SYNC <X> SYNC filters (and data rate) bU22Er Turning the signal tone generator on/off WE2111 A3603-2.0...
Seite 61
(Setpoints) menu SEt.PtS Menu Sub-menu Entry Description Set.Pt.1 to tyPE OFF, Function of the limit values and type Set.Pt.8 ACtivE, of signaling (default setting OFF) nOtiON, ZErO, ErrOr, tArGEt <X> Target level (limit value level) <X> Hysteresis <X> In-flight WE2111 A3603-2.0...
Seite 62
Current date qA.OPt OFF, ON Activate monitoring of the recalibration date (default setting OFF) qA.dAtE <X> Recalibration date (File) menu FiLE Menu Relevant to Entry Description verification Fu.UPd Perform firmware update SAu.SEt Save settings to USB flash drive WE2111 A3603-2.0...
Seite 63
(default setting OFF) PUrGE Delete alibi memory manually iNit Initialize alibi memory (Change log) menu CHG.LOG Menu Relevant to Entry Description verification StAtUS Show status of (storage space occu- pied by) the change log CLEAr Delete change log WE2111 A3603-2.0...
Seite 64
Overview of the menu structure (Factory) menu FACtrY Menu Relevant to Entry Description verification dEFLt Reset settings to factory settings Prn.CFG Print all settings FAC.SuC For service use only, please do not WE2111 A3603-2.0...
(2 mV/V), save the settings on the PC and transfer them elsewhere WE2111 from there. Then per- form the adjustment with direct load if a legal for trade ap- plication is required.
Seite 66
Dual-range mode or dual-interval mode? In non-legal for trade (industrial) mode, with a resolution of WE2111 over 100,000 steps there is no reason to make one of the two settings. However, the Scale type menu item also allows for the adjustment in mV/V.
Seite 67
You can use this variant in addition to calibration and adjustment with a direct load. Resets the adjustment to the factory setting The display must show buiLd or one of the main menu items to be able to make the following setting. WE2111 A3603-2.0...
Taring and types of taring • Setting the recalibration date • Calibration labels and sealing, calibration counter • Alibi memory (DSD) General definitions Preparations for entry Press the key and hold it for several seconds. SAFE is displayed. WE2111 A3603-2.0...
Press the key. SiNGLE (single-range balance, default setting) is dis- played. Press the key to change it. The display alternates between dUAL i (dual-interval mode), dUAL r (dual-range mode) and dirEct (adjust- ment in mV/V is possible). WE2111 A3603-2.0...
Seite 70
CAP1 (capacity of range 1) is dis- played. Press the key. In the factory setting 0030.00 is displayed, otherwise the most recently entered number. Press the key until the first place in the display to be changed is flashing. WE2111 A3603-2.0...
Seite 71
For a dual-range balance or dual-interval weighing ma- chine you must also enter E2 (minimum load cell verifica- tion interval of range 2). To do this press the key twice if E1 is displayed. E2 must be greater than E1. WE2111 A3603-2.0...
20% of the maximum ca- pacity. The display must show buiLd or one of the main menu items to be able to make the following setting. Press the key until CAL is displayed. Press the key. ZErO is displayed. WE2111 A3603-2.0...
Seite 73
Load the weigher with the weight and press the key. S in P (scaling in progress) is displayed while the zero balance is being performed. The weight flashes in the display when balancing has been completed. Press the key to exit the menu. WE2111 A3603-2.0...
(, the difference between the full scale and zero value of the sensor) enter the mV/V value from the calibration pro- tocol of the sensor. Press the key until CAL is displayed. Press the key. ZErO is displayed. WE2111 A3603-2.0...
Seite 75
The currently saved value for the span is displayed. Use the keys to enter the mV/V value for the span. Press the key to complete the process. Press the key to return to the main menu. WE2111 A3603-2.0...
Adding a linearization point Press the key until CAL is displayed. Press the key until Ed.Lin is displayed. Press the key. L1 is displayed (with the percentage of the measuring range for that point). WE2111 A3603-2.0...
Seite 77
Deleting a linearization point Press the key until CAL is displayed. Press the key until CLr.Lin is displayed. Press the key. L1 is displayed (with the percentage of the measuring range for that point). WE2111 A3603-2.0...
Setting the date/time and recalibration date To be able to set the date for a recalibration or service, you must set the date and time of the WE2111. After that you can activate the option (Calibration check) and set the date.
Seite 79
Adjustment and calibration Press the key. The current time in the WE2111 is displayed with the first place flashing. Use the keys to set the current time. Press the key to complete the process. Press the key to return to the main menu.
Seite 80
The currently set date (day and month only) for the checking message is displayed with the first place (day) flashing. Use the keys to set the current day (two places, 01 to 31) and month (two places, 01 to 12). WE2111 A3603-2.0...
Seite 81
When the entered date is reached, CAL DUE appears in the display. The display can be temporarily hidden by pressing a key. The only way you can permanently deacti- vate the display is by entering a new date. WE2111 A3603-2.0...
OPtiON is displayed. Press the key. USE is displayed. Press the key until Auto.Z. (auto-zero) is displayed. Press the key. The currently set function is displayed. The maximum adjustment to the maximum capacity is ±10%. WE2111 A3603-2.0...
Seite 83
Possible settings are OFF (default setting), SLOu (slow, i.e. 0.5 (minimum) verification intervals per sec- ond), FASt (fast) and u.FASt (very fast). The last two settings are not allowed for legal for trade weighers. WE2111 A3603-2.0...
Seite 84
01-03 (-1% to +2% of maximum capacity), 20-20 (±20% of maximum capacity) and 100.100 (±100% of maximum capacity). The last two settings are not allowed for legal for trade weighers. Press the key to confirm the setting. WE2111 A3603-2.0...
Seite 85
A display on the front panel to the left of the measured value >0< indicates if the measured value is within the range of the zero dead band. WE2111 A3603-2.0...
Taring and types of taring Taring and types of taring The WE2111 allows you to use two types of taring: 1. subtractive taring (default setting) In this case the value determined during taring is sub- tracted from the measuring range. With a weigher for 100 kg and a tare value of 40 kg, the weight that can still be measured is therefore only 60 kg.
Seite 87
Press the key to complete the process. Press the key to return to the main menu. Press the key and hold it for several seconds to save the setting. WE2111 A3603-2.0...
Possible settings are NONE (no recognition, not al- lowed in legal for trade applications) and 0.5-1.0 (0.5 verification intervals in 1 second, default setting) to 5.0-0.2 (5 verification intervals in 2 seconds). The first number indicates the number of verification intervals, WE2111 A3603-2.0...
Seite 89
Setting standstill recognition while the second one indicates the number of sec- onds. Press the key to confirm the setting. Press the key and hold it for several seconds to save the setting. WE2111 A3603-2.0...
Filters Filters The WE2111 has three different filter options: 1. FIR low-pass filter, which simultaneously ensures sup- pression of AC hum These filters are linked with the data rate and are set via the SYNC filter (the set value corresponds to the data rate).
Seite 91
Setting moving average calculation The display must show buiLd or one of the main menu items to be able to make the following setting. Press the key. OPtiON is displayed. WE2111 A3603-2.0...
Seite 92
The display must show buiLd or one of the main menu items to be able to make the following setting. Press the key. OPtiON is displayed. Press the key. USE is displayed. Press the key until JittEr is displayed. WE2111 A3603-2.0...
Seite 93
The current setting is displayed (default setting is FinE). Use the key to change the setting. The possible settings are: OFF, FiNE (weak), COArSE (strong). Press the key to complete the process. Press the key to return to the main menu. WE2111 A3603-2.0...
Limit values Limit values The WE2111 has 8 limit value functions (set-points) which you can use to obtain information about various states of the WE2111: • Limit value of loading (over/under weight) • Standstill (status) • Measured value in the zero balance range •...
Seite 95
C for continuous beep and F for flashing display. Press the key to complete the process. Additional settings (target level, hysteresis and in some cases in-flight) are required for monitoring the weight. Otherwise complete the entry with , then press the WE2111 A3603-2.0...
Seite 96
HyS is displayed. Press the key. The set hysteresis is displayed. The first place flashes. Use the keys to enter the hysteresis. Press the key to complete the process. Press the key. FLt (in-flight) is displayed. WE2111 A3603-2.0...
Seite 97
Press the key to return to the main menu. Press the key to set an additional limit value. Press the key and hold it for several seconds to save the settings. WE2111 A3603-2.0...
The display must show buiLd or one of the main menu items to be able to make the following setting. Press the key until SPEC is displayed. Press the key. Press the key until iN.FN.0.4 is displayed (set inputs 0 to 4). WE2111 A3603-2.0...
Seite 99
Press the key. The current setting is displayed. The default setting is ––––. You can use the keys to define the function of the relevant input; see function overview. Press the key to complete the process. WE2111 A3603-2.0...
WE2111 Lock, which means that all keys and digital inputs are blocked. You can use this function for example to lock the weigher with a key switch.
Seite 101
1 to 6 operating mode as the functional type; see Automatic output. Use the digital input for selection via Binary switch to print one of the nine lines of text (for code 152 only see Configuring a customer- specific printout. WE2111 A3603-2.0...
Seite 102
The status is displayed. Use the keys to change an output. – means the output is off, –. means the output is off. Otherwise the number of the input or output is displayed. Press the key to return to the main menu. WE2111 A3603-2.0...
The current setting is displayed. The default setting is diSP (display, i.e. the currently set value). Press the key to define the function. GroSS outputs the gross weight, NEt the net weight. Press the key to complete the process. WE2111 A3603-2.0...
Seite 104
Press the key. Lo is displayed. Use the key to output 0 V or 4 mA (Lo) or else +10 V or 20 mA (Hi). The output continues only as long as the menu item is displayed. WE2111 A3603-2.0...
Seite 105
CAL.Hi is displayed. Press the key. Use the key to toggle between UP (up) and dn (down). Use the key to change the displayed value. The output value will be corrected by the value displayed here. WE2111 A3603-2.0...
Seite 106
Analog output (optional) Press the key to complete the process. Press the and hold it for several seconds to save the setting. WE2111 A3603-2.0...
PC connections or for output to a PLC. Various output formats are available for you to facili- tate this: standard format, format A (HBM format), formats B to D and an adjustable format (CUSTOM), which is a format you can configure yourself.
Seite 108
Sin9LE (single, one-time output, see section on Digital inputs/outputs, F key function: func- tion overview) and NEt (network interface, default set- ting). Press the key to confirm the setting. Press the key. bAUd is displayed. WE2111 A3603-2.0...
Seite 109
422/485). Sixth place: d (DTR handshake) or – (no handshake). The default setting is n81–2– (no parity, 8 data bits, 1 stop bit, no termination resistor, RS-232, no hand- shake). Press the key to complete the entry. WE2111 A3603-2.0...
Seite 110
Press the key. Use the keys to set the format of the output. The possible settings are: Auto.A (format A, standard HBM format), Auto.b (format B), Auto.C (format C), Auto.d (format D) and CUStOn (adjustable CUSTOM format). WE2111 A3603-2.0...
Seite 111
To do this enter the number for the ASCII code of the character in decimal notation. Enter 0 to use no character. The default setting is 2 (STX). Press the key. WE2111 A3603-2.0...
Press the key to complete the process. Press the key and hold it for several seconds to save the changed settings. 17.1.1 Format A The format is defined and cannot be changed. Output includes: sign weight value status WE2111 A3603-2.0...
17.1.3 Format C The format is defined and cannot be changed. Output includes: sign weight value status1 status2 status3 status4 unit Type of output Sign: blank or –. WE2111 A3603-2.0...
In the options for serial interface define whether this format should be used; see Automatic output: Setting output options. For menu item Aut.Fnt press the to specify the settings. You can enter up to 50 characters. Any ASCII character or control code is possible. WE2111 A3603-2.0...
Seite 115
Send weight value in 9 digits No defined length for the weight entry Do not use a sign Use ' ' (positive) and '-' (negative) as sign Use '+' (positive) and '-' (negative) as sign Use '0' (positive) and '-' (negative) as sign WE2111 A3603-2.0...
Seite 116
Send status (G = gross, N = net, E = error, O = overload, U = underload, M = motion) Send status without standstill (G, N, E, O, U) Send gross/net status (G, N) Send standstill status ('M' = motion or ' ') Send standstill (S) or motion (M) status WE2111 A3603-2.0...
Otherwise it will be sent to the lowest serial interface for which output to a printer (Print) is defined. Therefore if you define SEr1 and SEr2 for output, the printout will only be sent to SEr1. WE2111 A3603-2.0...
Seite 118
Specify doub or A.doub as option. Example of the printout: 0005 05/01/14 16:47 365.4 kg G Customer-specific printout (ticket) Specify tic or A.tic as option. Example of the printout: WEIGHT TICKET 05/01/14 16:47 ID: 0008 65.4 365.4 300.0 WE2111 A3603-2.0...
If you want to use one of the optional modules for an electrically iso- lated interface, you must use SEr3 (RS-485 module) or SEr4 (RS-232). These settings are not needed for output via USB. Continue with section Setting the print format. WE2111 A3603-2.0...
Seite 120
Possible settings are 300, 600, 1200, 2400, 4800, 9600 (default setting), 19,200, 38,400, 57,600 and 115,200 baud. Press the key to complete the process. Press the key until bitS is displayed. Press the key. WE2111 A3603-2.0...
Seite 121
Press the key. AddrES is displayed. Press the key. Use the keys to enter the device address to be used (the default setting is 31). Press the key to complete the process. WE2111 A3603-2.0...
Seite 122
The current settings for the number of (printer) blank columns and blank lines is displayed (default setting 00.00) Use the keys to specify how many blank col- umns should be used for the printout with code \C (two left WE2111 A3603-2.0...
Press the key until Prn.OPt is displayed. Press the key until HEAdEr is displayed. Press the key. The current setting is displayed for the first column header. The format is A.BB.CCC with A as the line WE2111 A3603-2.0...
Seite 124
Press the key to be able to enter the next character. Use AA.000 as the last entry to identify that the format information ends there. Use the key to end the entry and return to the tic.Fnt menu. WE2111 A3603-2.0...
Seite 125
Print gross weight value; 7 places with decimal point and leading blanks, 3 places for the unit, blank and 'G' Print column headers Print ID number Print net weight value; 7 places with decimal point and leading blanks, 3 places for the unit, blank and WE2111 A3603-2.0...
Seite 126
Print displayed weight value as for \W, but add an additional value for the total weight \– Delete the last value: The last value to be added with \+ will be subtracted from the total weight again. Example This will produce the following printout: & WE2111 A3603-2.0...
See also Application areas (legal for trade/industrial). You can operate the WE2111 either in industrial mode, in which case all settings are possible, or in legal for trade mode in accordance with OIML R76, in which case only certain settings are possible. Use the Option menu to switch between these two options.
Seite 130
Available, press and hold Undo zero balance Not available Available, press and hold Test mode Limited to max. 5 seconds Possible without restric- tions Instantaneous value Not available Available (hold), peak value, in-flight Animal weigher Not available Available WE2111 A3603-2.0...
Calibration and sealing labels, sealing and calibration counters Calibration and sealing labels, sealing and calibration counters Calibration of the WE2111 is performed entirely digitally. The results are saved power failsafe. Settings that change the calibration are only possible in FULL setup mode (pass code protection recommended).
Seite 132
Write the weigher parameters to a suitable plug-in card and insert it far enough into the insertion slot so that all the parameters can be seen in the window (see figure). Then paste the verification seal over the insertion slot. WE2111 A3603-2.0...
Seite 133
Calibration and sealing labels, sealing and calibration counters Fig. 12: Insertion slot and display of weigher parameters WE2111 A3603-2.0...
(512 kByte) which is not externally accessible to make it possible to save measurements verifiably. Only the functions available in the WE2111 are able to access this memory, thereby eliminating the possibility of manipu- lating the data. In addition, most of the settings are only possible in FULL setup mode, and then they change the calibration counter.
Seite 135
SAFE setup mode. The display must show buiLd or one of the main menu items to be able to make the following setting. Press the key until dSd is displayed. WE2111 A3603-2.0...
To be able to use alibi memory, you must make the fol- lowing settings. Activating alibi memory The display must show buiLd or one of the main menu items to be able to make the following setting. Press the key until dSd is displayed. WE2111 A3603-2.0...
Seite 137
Press the key to confirm the deletion process. Cont y is displayed. Press the key. dONE is displayed. Define the response to full memory Press the key until A.PUrGE is displayed. WE2111 A3603-2.0...
ALibi flashes in the display as long as alibi mode is active. Starting alibi mode Press the key and hold it for several seconds. SAFE is displayed (SAFE setup mode). Press the key again (briefly) until ALibi (alibi mode) is displayed. WE2111 A3603-2.0...
(for example C00008). Key assignment in alibi mode and change mode Keystroke Function Short Displays the previous data set. Long Displays the first (oldest) data set. Short Displays the next data set. Long Displays the last (most recent) data set. WE2111 A3603-2.0...
Seite 140
The export file is saved in the root (root direc- tory) of the storage medium. The filename used is gener- ated from WE2111_<serial number of WE2111>_<current date (yyyymmdd)>_<current time (hhmmss)>_dsd.csv. The pointed brackets in the filename denote the parame- ters that are used.
Seite 141
During the copying process the display shows bUSY, then dONE. Press the key until EJECt (eject) is displayed. Press the key. As soon as Not YEt appears in the display, you can remove the USB flash drive. Then EJECt is displayed again. WE2111 A3603-2.0...
Options Options The WE2111 has various options that are explained in this section. 21.1 Displaying a measured value in mV/V The display must show buiLd or one of the main menu items to be able to make the following setting.
The display must show buiLd or one of the main menu items to be able to make the following setting. Press the key until tESt (test) is displayed. Press the key until O-LOAd (overload) is displayed. WE2111 A3603-2.0...
21.4 Change log The WE2111 contains a non-volatile (power failsafe) memory (512 kByte) which is not externally accessible that logs changes, deletion of the log and firmware updates relevant to legal for trade status. It is called the change log.
Seite 145
Displaying the change log To show the change log on the display, first activate alibi mode. From there you can switch to the display of the change log and then view the individual entries as in alibi mode. WE2111 A3603-2.0...
Seite 146
FAT32 format, however. Other formats will not be rec- ognized. The export file is saved in the root (root direc- tory) of the storage medium. The filename used is gener- ated from WE2111_<serial number of WE2111>_<currrent date (yyyymmdd)>_<current time (hhmmss)>_changelog.csv. The pointed brackets in the filename denote the parameters that are used.
Seite 147
During the copying process the display shows bUSY, then dONE. Press the key until EJECt (eject) is displayed. Press the key. As soon as Not YEt appears in the display, you can remove the USB flash drive. Then EJECt is displayed again WE2111 A3603-2.0...
The display must show buiLd or one of the main menu items to be able to make the following setting. Press the key until SPEC (Special) is displayed. Press the key until bU22Er (buzzer) is displayed. WE2111 A3603-2.0...
SPEC (Special) is displayed. Press the key until bUttON (Special) is displayed. Press the key. The current setting is displayed. The default setting is YYYYY. The places correspond to the order of keys on the front panel. WE2111 A3603-2.0...
FAT32 format, however. Other formats will not be rec- ognized. The export file is saved in the root (root direc- tory) of the storage medium. The filename used is gener- ated from WE2111_<serial number of WE2111>_<current date (yyyymmdd)>_<current time (hhmmss)>_settings.rdb. The pointed brackets in the file- name denote the parameters that are used.
USB flash drive. 21.8 Printing all settings You can send all the settings of the WE2111 to a printer connected to the Serial 2 interface. The display must show buiLd or one of the main menu items to be able to make the following setting.
This setting is only possible in FULL setup mode. The dis- play must show buiLd or one of the main menu items to be able to make the following setting. Press the key until FiLE is displayed. WE2111 A3603-2.0...
Seite 153
Press the key until EJECt (eject) is displayed. Press the key. As soon as Not YEt (not yet) no longer appears in the display, you can remove the USB flash drive. Then EJECt is displayed again. WE2111 A3603-2.0...
Explanation of error displays, error rectification Explanation of error displays, error rectification When an error occurs the WE2111 shows a message with information about the cause. Short messages appear constantly in the display. When longer messages appear, the individual words are displayed one after the other. The words are repeated as long as the error persists.
General defi- nitions. A weigher configuration for more than 100,000 minimum load cell HIGH verification intervals is not allowed. Check the details for nominal (rated) range (maximum capacity) and the minimum load cell verification interval; see General defi- nitions. WE2111 A3603-2.0...
Seite 156
Check the entry for nominal (rated) weigher load, the cable con- nection and whether the capacity of the load cells is sufficient. The adjustment of the zero value (zero) must be made before the ZERO balancing of the span. WE2111 A3603-2.0...
Explanation of error displays, error rectification 22.3 System error All components of the WE2111 are continuously moni- tored to ensure proper function. Errors or violations of per- mitted tolerance limits are display as errors, identified by E in the display. If multiple errors have occurred, the error numbers are added.
Check the cable connection of the load cells for loose weight is not stable. plugs, damaged cables, etc. Check the plug on the WE2111 to ensure it is properly seated. Check whether the set resolution and nominal (rated) range are correct; see Adjustment and calibration.
Seite 159
Check the settings for the serial interface. between the PC and Check the RS-232 cable: Use of a null modem cable is WE2111 is not work- not permitted and pins 6 to 9 must not be connected. ing. Make certain that Sxx (see part 2 of the operating man- ual) is sent before a command or query.
Packaging The original packaging of HBM devices is made from recyclable material and can be sent for recycling. For eco- logical reasons, empty packaging should not be returned to us.
Technical support Technical support If you have problems while working with the WE2111 , HBM technical support offers you: E-mail support software@hbm.com Telephone support Telephone support is available on all working days from 09:00 to 17:00 (CET): +49 (0) 6151 803-0...
42 Automatic output 107 sense leads 48 CUSTOM format 114 format A 112 Contact assignment of WE2111-ZCC format B 113 format C 113 Contact assignment of WE2111-ZS 45 format D 114 CUSTOM format 114 Auto-zero 82 WE2111 A3603-2.0...
Seite 164
Hidden push-button 38 e (minimum load cell verification inter- High resolution 142 val) 71 Housing cut-out 53 E-mail support 161 How to work with the WE2111 17 Error displays 154 Hysteresis (limit value) 95 Error during balancing 155 Error rectification 154 WE2111...
Seite 165
129 Options for zero 82 Legal verification 65 Output (analog) 103 Limit values 94 Output test signal 104 Linearization 67 Output to printer 117 Linearization point 76 Outputs (digital) 98 Load cells connecting 46 Overload counter 143 WE2111 A3603-2.0...
Seite 166
Quick start 14 Setup mode FULL 38 SAVE 38 Rear push-button 38 Software update Reset download from HBM 161 to factory setting 67 Standstill recognition 88 Restrictions in legal for trade applica- tions 35 Support 161 Switching on 18 Symbols in the display 16...
Seite 167
Testing digital outputs 102 Typographical conventions 13 Unit 72 Update download firmware update from HBM 161 download software update from HBM Variants for adjustment and calibration Verification interval 71 Weigher calibration (Quick Start) 22 Weigher parameters 131 Weighing errors 154...
Betrieb setzt sachgemäßen Transport, fach- gerechte Lagerung, Aufstellung und Montage sowie sorg- fältige Bedienung voraus. Betriebsbedingungen • Schützen Sie das Gerät vor direktem Kontakt mit Wasser. • Schützen Sie das Gerät vor Feuchtigkeit und Witte- rungseinflüssen wie beispielsweise Regen oder WE2111 A3603-2.0...
Seite 176
Insbesondere sind jegliche Repa- raturen, Lötarbeiten an den Platinen (Austausch von Bauteilen) untersagt. Bei Austausch gesamter Bau- gruppen sind nur Originalteile von HBM zu ver- wenden. • Das Gerät wird ab Werk mit fester Hard- und Soft- warekonfiguration ausgeliefert.
Seite 177
Sie sind Inbetriebnehmer oder für den Service einge- setzt und haben eine Ausbildung absolviert, die sie zur Reparatur der Automatisierungsanlagen befähigt. Außerdem haben sie die Berechtigung, Stromkreise und Geräte gemäß den Normen der Sicherheits- technik in Betrieb zu nehmen, zu erden und zu kenn- zeichnen. WE2111 A3603-2.0...
Seite 178
Das Gerät darf nicht unmittelbar an das Stromversor- gungsnetz angeschlossen werden. Die Versorgungs- spannung darf 12 bis 24 V betragen. Mit der Option 1-WE2111-AC ist auch eine Versorgung mit 110 bis 240 V möglich. • Fehlermeldungen dürfen nur quittiert werden, wenn die Ursache des Fehlers beseitigt ist und keine Gefahr mehr existiert.
Seite 179
Anlagenschutz. Im Fehlerfall müssen entsprechende Vor- kehrungen einen sicheren Betriebszustand herstellen. Allgemeine Gefahren bei Nichtbeachten der Sicher- heitshinweise Das Gerät entspricht dem Stand der Technik und ist betriebssicher. Von dem Gerät können Restgefahren aus- gehen, wenn es von unsachgemäß eingesetzt oder bedient wird. WE2111 A3603-2.0...
Um einzelne Begriffe im Text hervorzuheben, wird kursive Schrift verwendet. Ebenfalls markiert sind die von Ihnen vorzunehmenden Eingaben, alle Schaltflächen, Kontrollkästchen, die Namen für Eingabefelder etc. Die im Programm verwendeten Menüs, Befehle, Dialogfelder und -fenster sowie Register sind gleichfalls gekennzeichnet. WE2111 A3603-2.0...
Sie in größeren Anlagen bis zu 8 Wägezellen anschließen, eine Linearisierung über bis zu 5 Zwischen- punkte verwenden und verschiedene Filter einsetzen. Der digitale Wägeindikator WE2111 verfügt in der Stan- dardkonfiguration über eine Ethernet-, eine USB- sowie RS-422/485-Schnittstellen. Zur einfachen Einstellung aller Parameter steht Ihnen die PC-Software WE2111 Viewer zur Verfügung.
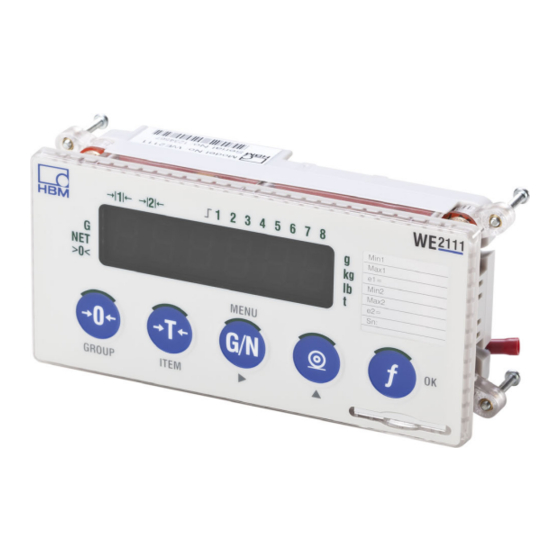
• Gehäuse 1-WE2111-ZH. Display: Anzeige und Symbole Abb. 1: Frontplatte mit Anzeigen und Tasten der WE2111 Angezeigter Wert ist Brutto (G), Netto (NET) oder Null (d. h., der Nullwert ist innerhalb der zulässigen Toleranz des Mindestteilungswertes v ). Im Bild wird das Nettosignal angezeigt.
Schlitz für Einschubkärtchen, kann mit Eichmarke versiegelt werden. Siehe auch Tastenbelegung. Wie arbeiten Sie mit der WE2111 Dieser Abschnitt beschreibt in Kürze, wie Sie das Gerät einschalten und was Sie einstellen müssen, um eine Ver- wiegung durchführen zu können. Als Beispiel wird eine Einbereichswaage für den nicht-eichpflichtigen Bereich...
Menüstruktur. 3.2.1 Einschalten Schalten Sie die Stromversorgung der WE2111 ein. Die WE2111 durchläuft nach dem Einschalten verschie- dene Selbsttests. Das Display zeigt zunächst bOOt, dann werden alle Segmente der Anzeige und alle Leucht- anzeigen aktiviert, z. B. auch die Grenzwerte und Ein- heiten.
Stelle geändert (um eins erhöht). Die Funktion ist abhängig Geht in den Dialog zum ange- von den Einstellungen im zeigten Menüpunkt, über- Setup. nimmt die angezeigte Einstellung oder startet den Eingabemodus. Falls eine Einstellung nicht möglich ist, wird ------ angezeigt. WE2111 A3603-2.0...
. Oder drücken Sie die Taste für mehrere Sekunden (nicht in jedem Dialog möglich). In beiden Fällen werden die vorgenom- menen Einstellungen gespeichert und der Setup-Modus verlassen. Alternativ können Sie auch die WE2111 aus- schalten, um keine Einstellungen zu verändern. WE2111 A3603-2.0...
Drücken Sie die Taste Es wird dP angezeigt (Dezimalpunkt). Drücken Sie die Taste Es wird CAP1 angezeigt (Kapazität Bereich 1). Drücken Sie die Taste Es wird 0030.00 angezeigt. so oft, bis die 3 blinkt. Drücken Sie die Taste WE2111 A3603-2.0...
Seite 189
Es wird UnitS angezeigt. Drücken Sie die Taste für mehrere Sekunden, um die Einstellungen zu speichern. Es werden nacheinander SAviNG, die Firmware-Ver- sion (z. B. P60c) und der Kalibrierzähler (z. B. C00008) angezeigt, bevor der aktuelle Messwert er- scheint. WE2111 A3603-2.0...
Nullabgleich durchgeführt wird. Es wird 0.00 blin- kend angezeigt, wenn der Nullabgleich durchgeführt wurde. Drücken Sie die Taste Es wird ZErO angezeigt. Der Nullabgleich ist damit beendet. Drücken Sie die Taste Es wird SPAN angezeigt. WE2111 A3603-2.0...
Einstellungen zu speichern. Es werden nacheinander SAviNG, die Firmware-Ver- sion (z. B. P60c) und der Kalibrierzähler (z. B. C00008) angezeigt, bevor der aktuelle Messwert er- scheint. Damit ist die WE2111 messbereit und kann Verwiegungen durchführen. 3.2.6 Serielle Verbindung zum PC herstellen (RS-232/422/485) Alle Anschlüsse für die seriellen Schnittstellen stehen an...
Druckers gedacht, die Anschlüsse beider Buchsen sind intern verbunden. Verbinden Sie je nach gewünschter Schnittstelle RS-232 oder RS-422/485 Ihren PC mit der WE2111. Bei größeren Leitungslängen (ab 30 m) besteht die Gefahr, dass die Busteilnehmer unterschiedliche Massepotenziale bekommen. Stellen Sie ggf. über eine gesonderte Leitung den Potenzialausgleich zwischen den Busteilnehmern her.
Seite 193
Das Wichtigste in zehn Minuten Die für die RS422/485-Schnittstelle benötigten Abschluss- widerstände sind in der WE2111 eingebaut und werden per Software aktiviert. Anschlussbelegung Serial 2 Anschluss- Funktion Kontakt-Nr. Abkürzung buchse (Pin) RS-232 Transmit RS-232 DTR Handshake RS-232 Ground GND2 RS-422/485 Receive A (-)
Seite 194
6. Drücken Sie die Taste Es wird bAUd angezeigt. 7. Drücken Sie die Taste 8. Verwenden Sie die Taste , um die Baudrate anzu- geben. Mögliche Einstellungen sind 300, 600, 1200, 2400, 4800, 9600 (Voreinstellung), 19.200, 38.400, 57.600 und 115.200 Baud. WE2111 A3603-2.0...
Seite 195
13. Schließen Sie die Eingabe mit dem Drücken der Taste ab. Fahren Sie bei einer RS-232- oder RS-422- Schnittstelle mit Punkt 15 fort. Bei RS-485 sind wei- tere Einstellungen nötig. so oft, bis NEt.OPt ange- 14. Drücken Sie die Taste zeigt wird. WE2111 A3603-2.0...
Seite 196
Connect. 2. Wählen Sie im Dialog die am PC verwendete Schnitt- stelle aus (Serial Port). 3. Wählen Sie die an der WE2111 eingestellte Baudrate aus (Baud Rate). 4. Geben Sie die Schnittstellenparameter Parität (Parity), Anzahl der Datenbits (Data Bits) und Anzahl der Stoppbits (Stop Bits) an.
Falls keine Verbindung zustande kommt, überprüfen Sie die eingestellten Parameter und die Verkabelung der Schnittstellen. Probieren Sie bei RS-485, die Verbindung zu nur einem Teilnehmer herzustellen, d. h., entfernen Sie alle anderen Teilnehmer bis auf eine WE2111. Dialog für die serielle Schnittstelle (Beispiel) WE2111 A3603-2.0...
1. Sie verwenden DHCP (Werkseinstellung). Diese Variante können Sie nur verwenden, wenn ein Server im Netzwerk vorhanden ist, der eine Adresse an die WE2111 vergibt. Der Nachteil ist, dass Sie die vergebene Adresse herausfinden müssen. Für die au- tomatische Zuteilung einer bestimmten IP-Adresse kann der Netzwerkadministrator die MAC-Adresse der WE2111 verwenden.
Seite 199
Bestätigen Sie mit Drücken Sie die Taste , um zur nächsten Ziffern- gruppe (iP.2) zu kommen, und stellen Sie so die ge- wünschte IP-Adresse ein. Drücken Sie zum Schluss die Taste , um wieder zur Anzeige von iP zu kommen. WE2111 A3603-2.0...
Seite 200
13. Drücken Sie die Taste Es wird (Gateway) angezeigt. 14. Drücken Sie die Taste , falls Sie eine Gateway- Adresse eingeben möchten. Fragen Sie im Zweifel Ihren Netzwerkadministrator, ob die Eingabe erforder- lich ist. Es wird angezeigt. WE2111 A3603-2.0...
Seite 201
Es wird angezeigt. 18. Drücken Sie die Taste Es wird die erste Zifferngruppe der aktuellen DNS- Adresse angezeigt, z. B. 000192. Stellen Sie mit (Ziffer erhöhen) und (nächste Stelle) die richtige Adresse ein. Bestätigen Sie mit WE2111 A3603-2.0...
Seite 202
Es werden nacheinander SAviNG, die Firmware-Ver- sion (z. B. P60c) und der Kalibrierzähler (z. B. C00008) angezeigt, bevor der aktuelle Messwert er- scheint. Vorgehensweise für die Verbindung 1. Klicken Sie auf Connect oder wählen Sie File -> Connect. WE2111 A3603-2.0...
Seite 203
Das Wichtigste in zehn Minuten 2. Wählen Sie im Dialog die am PC verwendete Schnitt- stelle aus (TCP). 3. Geben Sie die an der WE2111 eingestellte IP-Adresse an (TCP Settings, IP Address). 4. Geben Sie 2222 als TCP-Port an (TCP Settings, TCP Port.
Das Wichtigste in zehn Minuten Dialog für die Ethernet-Schnittstelle (Beispiel) Einsatzbereiche (eichpflichtig/indust- riell) Siehe auch Eichpflichtigen/industriellen Modus einstellen. WE2111 A3603-2.0...
Seite 205
Mitgliedsstaaten der Europäischen Union (EU) gültig. Die relevanten Angaben zur Waage müssen auf einem der beiliegenden Einschubkärtchen dokumentiert werden. Das Kärtchen wird dann in die WE2111 einge- schoben und mit einem Siegel gegen Änderungen geschützt (siehe Abbildung). Abb. 2: Einschubkärtchen an Pos. 1 einschieben, das Kärtchen wird dann im Fenster an Pos.
Seite 206
Zulässiger Bereich ent- -105% des Messbereichs weder ±2% oder -1% bis +3% des Messbereichs Überlast Messbereich + 9 Min- +105% des Messbe- destteilungswerte (e) reichs Unterlast Muss innerhalb des Be- -105% des Nennberei- reichs für den Nullpunkt ches liegen WE2111 A3603-2.0...
Nicht verfügbar Verfügbar Momentanwert (Halten) und Tierwaagen-Filter Passcodeschutz Sie können die WE2111 mit zwei Passcodes gegen Ände- rungen schützen: 1. Passcode für den Setup-Modus SAFE In diesem Modus können keine Parameter verändert werden, die für die Eichung relevant sind. Alle anderen Einstellungen sind möglich.
Seite 208
Setup-Modus FULL nur nach dem Drücken des Tasters auf der Rückseite zugänglich ist: Menüpunkt r.ENtry (rear entry mode). Abb. 3: Rückseite der WE2111, die Abdeckung des Setup- Tasters ist entfernt. 1: Setup-Taster (versenkt) 2: Durch die Schlaufen kann der Taster nach dem Einsetzen der Abdeckung verplombt werden.
Seite 209
Setup-Modus FULL müssen Sie den Setup-Taster auf der Rückseite betätigen). Die Vorgehensweise zum Setzen der Einstellung ist unten beschrieben. Bei Verlust des Passcodes muss das Gerät an HBM ein- geschickt werden. Dabei werden alle Einstellungen ge- löscht. Vorgehensweise zum Setzen der Passcodes Die Einstellungen sind nur im Setup-Modus FULL mög-...
Seite 210
Setup-Modus FULL auch in Zukunft nur nach dem Drücken des Tasters auf der Rückseite zugäng- lich ist (Einstellung On). Andernfalls wird NO ENtry angezeigt. Ein bereits gesetzter Passcode muss auch in diesem Fall eingegeben werden. WE2111 A3603-2.0...
Seite 211
(z. B. P60c) und der Kalibrierzähler (z. B. C00008) angezeigt, bevor der aktuelle Messwert er- scheint. Nach dem Aktivieren des hinteren Tasters (r.ENtry) müssen Sie bei allen eichrelevanten Einstellungen (Setup- Modus FULL) das Einstellmenü über den hinteren Taster aufrufen. WE2111 A3603-2.0...
Optionale Module montieren Optionale Module montieren Der Anschluss oder die Demontage eines Moduls darf nicht unter Spannung erfolgen, sonst kann die WE2111 zerstört werden. Entfernen Sie vor einem Ein-/Ausbau die Spannungsver- sorgung oder schalten Sie sie aus. Sie können nur eines der Module WE2111-ZS oder WE2111-ZCC und nur eines der Module WE2111-R2 oder WE2111-R4 anschließen.
Seite 213
Optionale Module montieren Abb. 4: Ansicht von hinten, Anschluss optionaler Module Ziehen Sie die zwei Befestigungsschrauben für das Modul handfest an (siehe Abbildung). WE2111 A3603-2.0...
Seite 214
B. welcher Ein- oder Ausgang wie verwendet werden soll. Verwenden Sie für die Analogausgänge geschirmte Lei- tungen. Die Leitungen für die digitalen Ein-/Ausgänge müssen nur dann geschirmt ausgeführt werden, wenn eine Kabellänge von 30 m überschritten wird. WE2111 A3603-2.0...
Aus EMV-Gründen ist für den Anschluss der Wäge- zelle(n) ein doppelt geschirmtes Kabel vorteilhaft, z. B. der HBM-Typ 4-3301.0071 mit 3 * 2 * 0,14 m . Verbinden Sie den Schirm flächig mit dem (metallisierten) Steckerge- häuse, um den EMV-Schutz zu gewährleisten.
Seite 217
2 (+) auf 1 (+) und 4 (-) auf 3 (-). Die Eingänge für die Fühlerleitungen dürfen nicht offen bleiben, da ansonsten nur eine Fehlermeldung angezeigt wird (E00040, E00080 oder E000C0). Führen Sie den Sechsleiter-Anschluss bis zum Klem- menkasten, falls Sie mehrere Aufnehmer verwenden. WE2111 A3603-2.0...
Seite 218
Falls die Leitungswiderstände der Speiseleitungen sehr hoch werden, z. B. beim Einsatz von Zenerbarrieren, können Sie die Prüfung des Anschlusses ausschalten. Sie sollten diese Option nur verwenden, falls nach dem Anschluss einer der Fehler E00040, E00080 oder E000C0 angezeigt wird. WE2111 A3603-2.0...
Seite 219
OFF (Aus). Verwenden Sie die Taste , um die gewünschte Funk- tion anzugeben. Drücken Sie die Taste , um die Einstellung zu bestä- tigen. Drücken Sie die Taste für mehrere Sekunden, um die Einstellung zu speichern. WE2111 A3603-2.0...
Stromversorgung anschließen Stromversorgung anschließen Die WE2111 muss mit einer geregelten Gleichspannung zwischen 12 V und 24 V versorgt werden. Optional ist auch das Netzteilmodul WE2111-AC erhältlich, über das eine Speisung mit 110 V bis 240 V erfolgen kann. Anschluss bei Gleichspannung Abb.
Stromversorgung anschließen Der Widerstand zwischen Erdungspunkt und WE2111 darf nicht mehr als 2 Ohm betragen. Damit ist die WE2111 bereit zum Einschalten. Stecken Sie den Stecker der Versorgungsspannung in den Anschluss und schalten Sie die Versorgungsspan- nung ein. Anschluss bei Wechselspannung Abb.
Seite 222
Stromversorgung anschließen Stecken Sie das Netzteilmodul so auf, dass die Stecker im Modul in die Anschlussbuchsen der WE2111 gleiten (siehe Abbildung oben). Die Buchse für den Netzstecker muss nach der Mon- tage unten auf dem Modul liegen, der Ausgang für die 12 V-Hilfsspannung oben (siehe Abbildung unten).
Die Einbaulage des Gerätes ist beliebig. Einbau Die WE2111 kann entweder als Tischgerät verwendet werden, z. B. mit der Option 1-WE2111-ZT (Tischständer), oder als Einbaugerät. Die Montage ist in beiden Fällen identisch, das Gehäuse passt in jeden Standard-Gehäu- seausschnitt nach DIN 43700 (138 mm x 67 mm).
Seite 224
Mechanischer Einbau Ziehen Sie die Schrauben (2) handfest an (siehe Abbil- dung unten). Abb. 10: Ansicht von hinten, Befestigungsklammern ausgeklappt WE2111 A3603-2.0...
Waagentyp und Grundeinstellungen OPtiON Optionen Kalibrierung SEriAL Schnittstellen, Ports und Ausgaben Eth.nEt Ethernet-Einstellungen SPEC Spezielle Einstellungen tESt Test SEt.PtS Grenzwerte AnALoG Analogausgang CLOC Datum/Uhrzeit FiLE Datei Alibispeicher (DSD) CHG.LOG Änderungslog (Change log) FACtrY Werkseinstellungen, Reset –ENd– Ende des Hauptmenüs WE2111 A3603-2.0...
Seite 226
<X> Bei Zweiteilungs- oder Zweibe- reichsmodus Kapazität des Be- reichs 2. <X> Bei Zweiteilungs- oder Zweibe- reichsmodus Mindestteilungswert (Verification interval) für Bereich 2 eingeben Ad.tArE <X> Additive Tarierung einschalten und max. Tara festlegen UNitS ohne/ Einheit festlegen g/kg/lb/t WE2111 A3603-2.0...
Seite 227
Z.trAC OFF, SLOu, Nullnachführung (Zero tracking, FASt, u.FASt Voreinstellung OFF) Z.rANGE <X>–<Y> Nullstellbereich von -X% bis +Y% (Zero range, Voreinstellung 02- Z.bANd <X> Nullbereich (Zero dead band, Voreinstellung 0) SENS.CH Nein OFF, ON Überprüfung der Fühlerleitungen ein-/ausschalten (Voreinstellung WE2111 A3603-2.0...
Seite 228
Datenbits, Anzahl der Stoppbits, Aktivierung der Abschlusswider- stände, Angabe des Schnittstel- lentyps und des Handshake- Verfahrens SEr5 und POrt <X> Angabe des Ports für die Ether- SEr6 net-Schnittstellen NEt.OPt AddrES <X> Adresse für die RS-485-Schnitt- stelle WE2111 A3603-2.0...
Seite 229
Max. 6 Zeilen Eingabe der Kopfzeilen für den mit je max. 30 kundenspezifischen Ausdruck Zeichen tic.Fnt Max. 250 Zei- Format des kundenspezifischen chen oder Ausdrucks Steuercodes SPACE <X>.<Y> Anzahl zu druckender Leerzei- chen in horizontaler (<X>) und vertikaler (<Y>) Richtung WE2111 A3603-2.0...
Seite 230
4. Falls DHCP aktiv ist, wird die aktuelle Adresse angezeigt. nAC.1 <X.X.X> Anzeige der MAC-Adresse (nur lesen) in zwei Mal drei Ziffern- gruppen nAC.2 <X.X.X> Anzeige der MAC-Adresse (nur lesen) in zwei Mal drei Ziffern- gruppen WE2111 A3603-2.0...
Seite 231
Nein Signaltongeber ein-/ausschalten Menü tESt (Test) Menü Eingabe Beschreibung SCALE Eingangssignal in mV/V anzeigen. Im eichpflichtigen Betrieb auf 5 Sekunden beschränkt. Hi.rES Hohe Auflösung verwenden. Im eich- (eichpflichtig), pflichtigen Betrieb auf 5 Sekunden be- ON/OFF (industriell) schränkt. WE2111 A3603-2.0...
Seite 232
Quellsignal für den Analogausgang (Vorein- stellung diSP) tyPE Cur., AbS.Cur, Typ des Ausgangs (Strom/Spannung, Vorein- uoLt stellung Cur., d. h. 4-20 mA)) CAL.Lo UP/dn Feinjustage des Nullwertes (Voreinstellung 0) CAL.Hi UP/dn Feinjustage des Endwertes (Voreinstellung 0) Frc.AnL Lo, Hi Ausgang testen WE2111 A3603-2.0...
Seite 233
Änderungslog auf USB-Speicher sichern SAu.dSd Nein Alibispeicher auf USB-Speicher sichern EJECt Nein USB-Speicher zum Entfernen vor- bereiten Menü dSd (DSD) Menü Eichrelevant Eingabe Beschreibung ENAbLE OFF, ON Alibispeicher aktivieren/deaktivieren (Voreinstellung OFF) StAtUS Nein Status (Füllstand) des Alibispei- chers anzeigen WE2111 A3603-2.0...
Seite 234
Status (belegten Platz) des Ände- rungslogs anzeigen CLEAr Änderungslog löschen Menü FACtrY (Factory) Menü Eichrelevant Eingabe Beschreibung dEFLt Einstellungen auf Werkseinstellun- gen zurücksetzen Prn.CFG Nein Alle Einstellungen drucken FAC.SuC Nein Nur für den Service, bitte nicht ver- wenden WE2111 A3603-2.0...
Sie zunächst eine Justierung in mV/V mit den Standardwerten (2 mV/V) vornehmen, die Einstellungen auf dem PC sichern und von dort in andere WE2111 über- tragen. Führen Sie danach die Justierung mit direkter Last durch, falls eine eichpflichtige Anwendung benötigt wird.
Seite 236
– ein zweiter Messbereich verwendet werden. So kann z. B. bis 100 kg Last mit einer Auflösung von 25 g gemessen werden und bis zur Nennlast von z. B. 200 kg mit einer Auflösung von 50 g. WE2111 A3603-2.0...
Justierung und Kalibrierung Zweibereichsmodus oder Zweiteilungsmodus? Im nicht-eichpflichtigen (industriellen) Modus gibt es bei der Auflösung der WE2111 von über 100.000 Schritten keinen Grund, eine der beiden Einstellung vorzunehmen. Der Menüpunkt Scale type ermöglicht allerdings auch die Justierung in mV/V. Die beiden Varianten sind fast identisch, der Unterschied liegt in der Art und Weise, wie sich die eichpflichtige Waage im Betrieb verhält:...
Es wird Cont n angezeigt. Drücken Sie die Taste Es wird Cont y angezeigt. Drücken Sie die Taste Anwendung im eichpflichtigen Bereich Beachten Sie bitte bei der Anwendung im eichpflichtigen Bereich auch folgende Themen: • Einsatzbereiche (Einschränkungen im eichpflichtigen Betrieb) WE2111 A3603-2.0...
Sie zunächst den richtigen Passcode eingeben. Die Anzeige muss buiLd oder einen der Hauptmenü- punkte anzeigen, damit eine der folgenden Einstellungen vorgenommen werden kann. Drücken Sie zum Schluss die Taste für mehrere Sekunden, um alle Einstellung zu speichern und den Eingabemodus zu verlassen. WE2111 A3603-2.0...
Drücken Sie die Taste Drücken Sie die Taste Es wird 000000 angezeigt. Drücken Sie die Taste so oft, bis sich der Dezimal- punkt an der gewünschten Stelle befindet. Drücken Sie die Taste WE2111 A3603-2.0...
Sie auch CAP2 (Kapazität Bereich 2) eingeben. Drücken , wenn wieder CAP1 an- Sie dazu zwei Mal die Taste gezeigt wird. Mindestteilungswert (Verification interval) einge- so oft, bis E1 angezeigt wird. Drücken Sie die Taste Drücken Sie die Taste WE2111 A3603-2.0...
Es wird in der Voreinstellung die Einheit kg neben der Anzeige angewählt und im Display angezeigt. Drücken Sie die Taste so oft, bis die gewünschte Anzeige angewählt ist. Im eichpflichtigen Bereich müssen Sie eine der Einheiten auswählen. Drücken Sie die Taste WE2111 A3603-2.0...
Es wird Z in P (zero in progress) angezeigt, solange der Nullabgleich durchgeführt wird. Es wird z. B. 0.00 blinkend angezeigt, wenn der Nullabgleich durchge- führt wurde. Drücken Sie die Taste Es wird ZErO angezeigt. Der Nullabgleich ist damit beendet. WE2111 A3603-2.0...
Seite 244
, um das Menü zu verlassen. Drücken Sie die Taste für mehrere Sekunden, um die Einstellungen zu speichern. Es werden nacheinander SAviNG, die Firmware-Ver- sion (z. B. P60c) und der Kalibrierzähler (z. B. C00008) angezeigt, bevor der aktuelle Messwert er- scheint. WE2111 A3603-2.0...
Drücken Sie die Taste Drücken Sie die Taste Es wird ZErO angezeigt. Drücken Sie die Taste Es wird der aktuell gemessene Wert angezeigt. Drücken Sie die Taste Es wird der aktuell gespeicherte Nullwert angezeigt. WE2111 A3603-2.0...
Seite 246
Verwenden Sie die Tasten , um den mV/V- Wert für die Spanne einzugeben. Drücken Sie die Taste , um den Vorgang abzu- schließen. Drücken Sie die Taste , um wieder zum Hauptmenü zu gelangen. WE2111 A3603-2.0...
Die Anzeige muss buiLd oder einen der Hauptmenü- punkte anzeigen, damit Sie die folgenden Einstellungen vornehmen können. Linearisierungspunkt hinzufügen so oft, bis CAL angezeigt wird. Drücken Sie die Taste so oft, bis Ed.Lin angezeigt Drücken Sie die Taste wird. WE2111 A3603-2.0...
Drücken Sie die Taste , um wieder zum Hauptmenü zu gelangen. Drücken Sie die Taste für mehrere Sekunden, um die Einstellungen zu speichern. Linearisierungspunkt löschen so oft, bis CAL angezeigt wird. Drücken Sie die Taste WE2111 A3603-2.0...
Einstellungen zu speichern. Datum/Uhrzeit und Rekalibrierdatum setzen Um das Datum für eine Rekalibrierung oder einen Service setzen zu können, müssen Sie Datum und Uhrzeit der WE2111 setzen. Danach können Sie die Option (Calibra- tion check) aktivieren und das Datum setzen. WE2111 A3603-2.0...
Drücken Sie die Taste tinE (time) angezeigt. Es wird Drücken Sie die Taste Die aktuelle Zeit in der WE2111 wird angezeigt, die erste Stelle blinkt. Verwenden Sie die Tasten , um die aktuelle Uhrzeit einzustellen. ...
Tag (zwei Stellen, 01 bis 31) und Monat (zwei Stellen, 01 bis 12) einzustellen. Drücken Sie die Taste Das aktuelle Jahr in der WE2111 wird angezeigt, die erste Stelle der Jahreszahl blinkt. Verwenden Sie die Tasten , um das aktuelle Jahr (vier Stellen) einzustellen.
Seite 252
12) einzustellen. Drücken Sie die Taste Das aktuell eingestellte Jahr für die Überprüfungsmel- dung wird angezeigt, die erste Stelle der Jahreszahl blinkt. Verwenden Sie die Tasten , um das Jahr (vier Stellen) für die Überprüfungsmeldung einzustellen. WE2111 A3603-2.0...
Seite 253
, um wieder zum Hauptmenü zu gelangen. Wenn das eingegebene Datum erreicht ist, wird CAL DUE im Display angezeigt. Die Anzeige kann tem- porär durch Drücken einer Taste ausgeblendet werden. Dauerhaft können Sie die Anzeige nur durch die Eingabe eines neuen Datums deaktivieren. WE2111 A3603-2.0...
Sie die folgende Einstellung vor- nehmen können. Drücken Sie die Taste Es wird OPtiON angezeigt. Drücken Sie die Taste Es wird USE angezeigt. so oft, bis Auto.Z. (auto zero) Drücken Sie die Taste angezeigt wird. WE2111 A3603-2.0...
Sie die folgende Einstellung vornehmen können. Drücken Sie die Taste Es wird OPtiON angezeigt. Drücken Sie die Taste Es wird USE angezeigt. so oft, bis Z.trAC (Zero trak- Drücken Sie die Taste king) angezeigt wird. WE2111 A3603-2.0...
Die Einstellung ist nur im Setup-Modus FULL möglich. Die Anzeige muss buiLd oder einen der Hauptmenüpunkte anzeigen, damit Sie die folgende Einstellung vornehmen können. Drücken Sie die Taste Es wird OPtiON angezeigt. Drücken Sie die Taste Es wird USE angezeigt. WE2111 A3603-2.0...
Einstellung zu speichern. Nullbereich (Zero dead band) Die Einstellung ist nur im Setup-Modus FULL möglich. Die Anzeige muss buiLd oder einen der Hauptmenüpunkte anzeigen, damit Sie die folgende Einstellung vornehmen können. Drücken Sie die Taste Es wird OPtiON angezeigt. WE2111 A3603-2.0...
Seite 258
Drücken Sie die Taste , um die Einstellung zu bestä- tigen. Drücken Sie die Taste für mehrere Sekunden, um die Einstellung zu speichern. Auf der Frontplatte wird links vom Messwert >0< ange- zeigt, wenn der Messwert innerhalb des Nullbereichs liegt. WE2111 A3603-2.0...
Tarierungsarten und Tarierung Tarierungsarten und Tarierung Die WE2111 ermöglicht Ihnen zwei Arten der Tarierung: 1. Subtraktive Tarierung (Voreinstellung) In diesem Fall wird der bei der Tarierung ermittelte Wert vom Messbereich der Waage abgezogen. Bei ei- ner Waage für 100 kg und einem Tarawert von 40 kg kann daher nur noch ein Gewicht von 60 kg gemessen werden.
Seite 260
Taragewicht anzugeben. Drücken Sie die Taste , um den Vorgang abzu- schließen. Drücken Sie die Taste , um wieder zum Hauptmenü zu gelangen. Drücken Sie die Taste für mehrere Sekunden, um die Einstellung zu speichern. WE2111 A3603-2.0...
Es wird die aktuell eingestellte Funktion angezeigt. Verwenden Sie die Taste , um die gewünschte Funk- tion anzugeben. Mögliche Einstellungen sind NONE (keine Erken- nung, im eichpflichtigen Bereich nicht zulässig) und 0.5-1.0 (0,5 Teilungswerte in 1 Sekunde, Voreinstel- WE2111 A3603-2.0...
Seite 262
Dabei gibt die erste Zahl die Anzahl der Teilungswerte und die zweite die Anzahl der Sekunden an. Drücken Sie die Taste , um die Einstellung zu bestä- tigen. Drücken Sie die Taste für mehrere Sekunden, um die Einstellung zu speichern. WE2111 A3603-2.0...
Filter Filter Die WE2111 verfügt über drei verschiedene Filteropti- onen: 1. FIR-Tiefpassfilter, die gleichzeitig für eine Unterdrü- ckung von Netzbrummen sorgen Diese Filter sind mit der Messrate verknüpft und wer- den über das SYNC-Filter eingestellt (der eingestellte Wert entspricht der Messrate). Sie bieten eine hohe Unterdrückung von Vielfachen der eingestellten...
, um die Einstellung zu ändern. Mögliche Einstellungen sind: 10, 12,5, 15, 20, 25, 30, 50, 60, 100. Drücken Sie die Taste , um den Vorgang abzu- schließen. Drücken Sie die Taste , um wieder zum Hauptmenü zu gelangen. WE2111 A3603-2.0...
Mögliche Einstellungen sind: 1, 2, 3, 4, 5, 6, 7, 8, 9, 10, 25, 50, 75, 100, 200. Drücken Sie die Taste , um den Vorgang abzu- schließen. Drücken Sie die Taste , um wieder zum Hauptmenü zu gelangen. WE2111 A3603-2.0...
, um die Einstellung zu ändern. Mögliche Einstellungen sind: OFF (aus), FiNE (schwach), COArSE (stark). Drücken Sie die Taste , um den Vorgang abzu- schließen. Drücken Sie die Taste , um wieder zum Hauptmenü zu gelangen. WE2111 A3603-2.0...
Grenzwerte Grenzwerte Die WE2111 besitzt 8 Grenzwertfunktionen (set-points), die Sie über verschiedene Zustände der WE2111 infor- mieren können: • Grenzwert einer Belastung (Gewicht über-/unter- schritten) • Stillstand (Status) • Messwert im Nullabgleichbereich • Fehler (Status) • Anzeige ist Brutto oder Netto (Status) •...
Seite 268
Vierte Stelle: Logikpegel high (H) oder low (L) bei ak- tiver Funktion. Fünfte Stelle: Art der Alarmierung, – für keine, S für einfachen Beep, d für zweifachen Beep, C für dau- ernden Beep und F für blinkendes Display. WE2111 A3603-2.0...
Seite 269
, um den Vorgang abzu- schließen. Drücken Sie die Taste Es wird HyS angezeigt. Drücken Sie die Taste Es wird die aktuell eingestellte Hysterese angezeigt, die erste Stelle blinkt. Verwenden Sie die Tasten , um die Hysterese einzugeben. WE2111 A3603-2.0...
Seite 270
, um den Vorgang abzu- schließen. Drücken Sie die Taste , um wieder zum Hauptmenü zu gelangen. Drücken Sie die Taste , um einen weiteren Grenzwert einzustellen. Drücken Sie die Taste für mehrere Sekunden, um die Einstellungen zu speichern. WE2111 A3603-2.0...
Eingänge oder die Funktionstaste Die Anzeige muss buiLd oder einen der Hauptmenü- punkte anzeigen, damit Sie die folgende Einstellung vor- nehmen können. so oft, bis SPEC angezeigt Drücken Sie die Taste wird. Drücken Sie die Taste WE2111 A3603-2.0...
Seite 272
Sekunden, um die Einstellung zu speichern. Drücken Sie die Taste Es wird iN.FN.5.8 angezeigt (Eingänge 5 bis 8 set- zen). Drücken Sie die Taste Es wird die aktuelle Einstellung angezeigt, die Vorein- stellung ist ––––. WE2111 A3603-2.0...
Sie können die Funktion z. B. Nein dazu verwenden, bei schräg stehen- der Waage eine weitere Verwiegung zu blockieren. WE2111 verriegeln, d. h., alle Tas- ten und digitalen Eingänge sind ge- blockt. Sie können diese Funktion Nein z. B. dazu verwenden, die Waage über einen Schlüsselschalter zu ver-...
Seite 274
Aktuell angezeigten Gewichtswert halten oder das Halten löschen. Die angezeigte Einheit blinkt, solange der Wert gehalten wird. Spitzenwert oder aktuelles Gewicht anzeigen. Langes Drücken der Taste löscht den Spitzenwert. Die Funktion ist nur im nicht-eichpflichti- gen Betrieb verfügbar. WE2111 A3603-2.0...
Seite 275
Code ausgibt, verschiedene Ausgabetexte vorzu- wählen. Wenn Sie z. B. drei Eingänge kombinieren, können Sie binär die Zahlen 1 bis 7 auswählen. Der nied- rigste Eingang mit der Funktion 8 muss dabei das nied- rigste Bit enthalten. Die auszugebenden Texte müssen WE2111 A3603-2.0...
, um einen Ausgang zu verändern. – bedeutet, der Eingang ist aus, –. bedeutet, der Ausgang ist aus. Andernfalls wird die Ziffer des Ein- oder Ausgangs angezeigt. Drücken Sie die Taste , um wieder zum Hauptmenü zu gelangen. WE2111 A3603-2.0...
Drücken Sie die Taste wird. Drücken Sie die Taste Es wird SrC angezeigt (Source, Quelle). Drücken Sie die Taste Es wird die aktuelle Einstellung angezeigt, die Vorein- stellung ist diSP (Display, d. h. aktuell angezeigter Wert). WE2111 A3603-2.0...
Seite 278
Gewichtes gemessen wird. uoLt gibt eine Spannung zwischen 0 V und +10 V aus. Drücken Sie die Taste , um den Vorgang abzu- schließen. Drücken Sie die Taste für mehrere Sekunden, um die Einstellung zu speichern. WE2111 A3603-2.0...
Drücken Sie die Taste für mehrere Sekunden, um die Einstellung zu speichern. Ausgangssignal justieren so oft, bis AnALoG angezeigt Drücken Sie die Taste wird. so oft, bis CAL.Lo angezeigt Drücken Sie die Taste wird. Drücken Sie die Taste WE2111 A3603-2.0...
Seite 280
, um den angezeigten Wert zu ändern. Der aus- gegebene Wert wird um den hier angezeigten Wert korri- giert. Drücken Sie die Taste , um den Vorgang abzu- schließen. Drücken Sie die Taste für mehrere Sekunden, um die Einstellung zu speichern. WE2111 A3603-2.0...
Schnittstelle für Zweitanzeigen, spezielle PC-Verbin- dungen oder zur Ausgabe an eine SPS verwenden. Dabei stehen Ihnen verschiedene Ausgabeformatierungen zur Verfügung: Das Standardformat, Format A (HBM-Format), die Formate B bis D und ein einstellbares Format (CUSTOM), d. h. ein Format, das Sie selbst konfigurieren können.
Rückseite. Falls Sie eines der optionalen Module für eine galvanisch getrennte Schnittstelle verwenden, müssen Sie SEr3 (RS-485-Modul) oder SEr4 (RS- 232) verwenden. Drücken Sie nach der Auswahl der Schnittstelle die Taste Es wird tYPE angezeigt. Drücken Sie die Taste WE2111 A3603-2.0...
Seite 283
Mögliche Einstellungen sind 300, 600, 1200, 2400, 4800, 9600 (Voreinstellung), 19.200, 38.400, 57.600 und 115.200 Baud. Drücken Sie die Taste , um den Vorgang abzu- schließen. so oft, bis bitS angezeigt wird. Drücken Sie die Taste Drücken Sie die Taste WE2111 A3603-2.0...
Seite 284
Einstellung der Ausgabeoptionen fort. Drücken Sie die Taste Es wird AddrES angezeigt. Drücken Sie die Taste Verwenden Sie die Tasten , um die zu ver- wendende Geräteadresse einzugeben (die Voreinstellung ist 31). WE2111 A3603-2.0...
Verwenden Sie die Tasten , um das Format der Ausgabe einzustellen. Mögliche Einstellungen sind: Auto.A (Format A, Standard HBM-Format), Auto.b (Format B), Auto.C (Format C), Auto.d (Format D) und CUStOn (ein- stellbares Format CUSTOM). Drücken Sie die Taste , um die Einstellung zu bestä-...
Seite 286
Code des Zeichens in dezimaler Schreibweise ein. Geben Sie 0 ein, um kein Zeichen zu verwenden. Die Voreinstel- lung ist 2 (STX). Drücken Sie die Taste Drücken Sie die Taste Es wird ENd.CH1 (end character 1) angezeigt. WE2111 A3603-2.0...
Drücken Sie die Taste , um den Vorgang abzu- schließen. Drücken Sie die Taste für mehrere Sekunden, um die geänderten Einstellungen zu speichern. 17.1.1 Format A Das Format ist festgelegt und kann nicht geändert werden. Ausgegeben wird: Vorzeichen Gewichtswert Status WE2111 A3603-2.0...
Einheit (3 Zeichen): Gewählte Einheit mit führenden Leer- zeichen. Falls kein Stillstand herrscht, werden nur Leer- zeichen gesendet. 17.1.3 Format C Das Format ist festgelegt und kann nicht geändert werden. Ausgegeben wird: Vorzeichen Gewichtswert Status1 Status2 Status3 Status4 Einheit WE2111 A3603-2.0...
Art der Ausgabe Vorzeichen: Leerzeichen oder –. Gewichtswert: 7 Stellen mit Dezimalpunkt und führenden Leerzeichen. 17.1.5 Format CUSTOM (einstellbares Format) Legen Sie in den Optionen für die serielle Schnittstelle fest, ob dieses Format verwendet werden soll, siehe Auto- WE2111 A3603-2.0...
Es wird 002.000 angezeigt, damit Sie das zweite Zeichen eingeben können. Drücken Sie noch einmal die Taste , um die Eingabe vollständig abzuschließen. Verfügbare Steuercodes Steuercode Beschreibung Gewichtswert in 5 Ziffern senden Gewichtswert in 6 Ziffern senden WE2111 A3603-2.0...
Seite 291
Gewichtswert auch bei Überlast (Overload) oder Fehler (Error) senden Gewichtswert bei Fehler ausblenden Bei Fehler '–––' senden Statuszeichen in Großbuchstaben senden Statuszeichen in Kleinbuchstaben senden Im Menüpunkt ausgewählten Gewichtswert senden, sie- Ausgabeoptionen einstellen Angezeigten Gewichtswert senden Bruttogewichtswert senden Nettogewichtswert senden Tarawert senden WE2111 A3603-2.0...
Seite 292
Waagenmodus senden: Einbereichsmodus (' '), bei Zweibereichsmodus oder Zweiteilungsmodus den akti- ven Bereich ('1') oder ('2') der letzten Ausgabe Messwert stabil ('ST'), nicht stabil ('US') oder Überlast ('OL') Zeit im Format hh:mm:ss senden Datum im Format dd/mm/yyyy senden WE2111 A3603-2.0...
Geben Sie SiNG bzw. A.SiNG als Option an. Beispiel für den Ausdruck: 0005 05/01/14 16:47 3654 kg G Zweizeiliger Ausdruck Geben Sie doub bzw. A.doub als Option an. Beispiel für den Ausdruck: 0005 05/01/14 16:47 365.4 kg G WE2111 A3603-2.0...
Geben Sie totAL bzw. A.totAL als Option an. Bei diesem Format kann der Alibispeicher (DSD) nicht ver- wendet werden. Beispiel für den Ausdruck: 000491 05/01/14 16:47:33 100.2 kg G 000492 05/01/14 16:48:12 100.5 kg G 000493 05/01/14 16:48:55 100.3 kg G ITEMS: TOTAL: 301.0 kg WE2111 A3603-2.0...
Drücken Sie die Taste , um die Funktion Print Verwenden Sie die Taste anzugeben. Mögliche Einstellungen sind: OFF (aus), Auto.Lo (automatische Ausgabe mit 10 Hz), Auto.Hi (auto- matische Ausgabe mit der SYNC-Frequenz, siehe SYNC-Filter), Print (Ausgabe auf Drucker aktivie- WE2111 A3603-2.0...
Seite 296
, um die zu ver- wendenden Parameter anzugeben: Erste Stelle: Parität (n = keine, 0 = ungerade, E = ge- rade Parität). Zweite Stelle: Anzahl der Datenbits (7 oder 8). Dritte Stelle: Anzahl der Stoppbits (1 oder 2). WE2111 A3603-2.0...
Seite 297
Drücken Sie die Taste Es wird AddrES angezeigt. Drücken Sie die Taste Verwenden Sie die Tasten , um die zu ver- wendende Geräteadresse einzugeben (die Voreinstellung ist 31). Drücken Sie die Taste , um den Vorgang abzu- schließen. WE2111 A3603-2.0...
Ausdruck), A.tic (automati- scher kundenspezifischer Ausdruck (Ticket)), totAL (alles ausdrucken), A.totAL (automatisch alles aus- drucken). Drücken Sie die Taste , um den Vorgang abzu- schließen. so oft, bis SPACE angezeigt Drücken Sie die Taste wird. WE2111 A3603-2.0...
Sie können zwei Einstellungen konfigurieren: 1. Bis zu 6 Kopfzeilen mit bis zu 30 Zeichen. 2. Das Format, d. h., was gedruckt werden soll. Sie können bis zu 250 ASCII-Zeichen oder Codes ein- geben, um die Formatierung des Ausdrucks zu bestimmen. WE2111 A3603-2.0...
, um das nächste Zeichen eingeben zu können. Verwenden Sie die Taste , um die Eingabe zu beenden und zum Menü HEAdEr zurückzukehren. Einstellen des Formats Die Anzeige muss HEAdEr anzeigen, damit Sie die fol- gende Einstellung vornehmen können. WE2111 A3603-2.0...
Seite 301
Sekunden, um die geänderten Einstellungen zu speichern. Verfügbare Codes Die folgenden Zeichencodes stehen Ihnen für die Angabe der zu druckenden Daten zur Verfügung. Beachten Sie, dass auch der Ausdruck von Kopfzeilen mit einem Code angegeben werden muss. WE2111 A3603-2.0...
Seite 302
Dezimalpunkt und führenden Leerzeichen, 3 Stellen für die Einheit, Leerzeichen und 'N' Gesamtgewichtswert drucken; 7 Stellen mit Dezimalpunkt und führenden Leerzeichen, 3 Stellen für die Einheit, Leerzeichen und 'G' Drucke die Anzahl von Leerzeilen, die im Druckformat angegeben wurden WE2111 A3603-2.0...
Seite 303
Angezeigten Gewichtswert wie bei \W dru- cken, jedoch zusätzlich Wert zum Gesamt- gewicht addieren \– Letzten Wert löschen: der zuletzt bei \+ ad- dierte Wert wird wieder vom Gesamtgewicht subtrahiert Beispiel Es soll folgender Ausdruck entstehen: & WE2111 A3603-2.0...
Eichpflichtigen/industriellen Modus einstellen Siehe auch Einsatzbereiche (eichpflichtig/industriell). Sie können die WE2111 entweder im industriellen Modus betreiben, dann sind alle Einstellungen möglich, oder im eichpflichtigen Modus nach OIML R76, bei dem nur bestimmte Einstellungen möglich sind. Die Umschaltung erfolgt über das Menü Option.
Eich- und Siegelmarken, Versiegelung, Kalibrierzähler Eich- und Siegelmarken, Versiegelung, Kalibrierzähler Die Kalibrierung der WE2111 wird rein digital durchge- führt. Die Ergebnisse werden netzausfallsicher gespei- chert. Einstellungen, die die Kalibrierung verändern, sind nur im Setup-Modus FULL (Passcodeschutz empfohlen) mög- lich. Dabei wird auch der Stand des Kalibrierzählers ver- ändert und kann so auch nachträglich erkannt werden.
Seite 309
Kalibrierzählers wird bei jedem Einschalten und bei jedem Aufruf und Verlassen der Einstellmenüs angezeigt, z. B. C00008. Im eichfähigen Betrieb, d. h. nach der Konformitätsfest- stellung, wird der aktuelle Zählerstand üblicherweise ebenfalls auf dem Einschubkärtchen mit den Waagenpa- rametern (siehe unten) vermerkt. WE2111 A3603-2.0...
Seite 310
Schreiben Sie die Waagenparameter auf ein passendes Einschubkärtchen und schieben Sie es so weit durch den Einschubschlitz, dass alle Parameter im Fenster zu sehen sind (siehe Abbildung). Kleben Sie dann die Siegelmarke über den Einschubschlitz. Abb. 12: Einschubschlitz und Anzeige der Waagenparameter WE2111 A3603-2.0...
Die WE2111 enthält einen nichtflüchtigen (netzausfallsi- cheren), von extern nicht zugänglichen Speicher (512 kByte), um Messungen rückführbar speichern zu können. Nur die in der WE2111 vorhandenen Funktionen können auf diesen Speicher zugreifen, damit die Daten nicht manipuliert werden können. Zusätzlich sind die meisten Einstellungen nur im Setup-Modus FULL möglich...
Die Kapazität des Speichers (erst wird totAL ange- zeigt, dann die Anzahl der Datensätze, die gespei- chert werden können). Alibispeicher manuell löschen Das manuelle Löschen von 10% der ältesten Einträge verändert den Kalibrierzähler nicht und ist auch im Setup- WE2111 A3603-2.0...
Seite 313
Löschen die Aufzeichnungen auf einen USB- Speicherstick kopieren, siehe Alibispeicher exportie- ren. Drücken Sie die Taste , um den Löschvorgang zu bestätigen. Es wird Cont y angezeigt. Drücken Sie die Taste Es wird dONE angezeigt. WE2111 A3603-2.0...
Es wird ENAbLE angezeigt. Drücken Sie die Taste Es wird die aktuelle Einstellung angezeigt, die Vorein- stellung ist OFF. Drücken Sie die Taste Es wird ON angezeigt. Drücken Sie die Taste , um die Einstellung zu bestä- tigen. WE2111 A3603-2.0...
OFF. Bei dieser Einstellung wird bei vol- lem Speicher der Anwender aufgefordert, den Spei- cher manuell zu löschen. Eine manuelle Löschung ändert den Kalibrierzähler nicht. Drücken Sie die Taste , falls der Löschvorgang auto- matisch durchgeführt werden soll, wenn der Speicher voll WE2111 A3603-2.0...
(Alibi-Modus) angezeigt wird. Drücken Sie die Taste Es werden nacheinander 8.8.8.8.8.8., die Version der ADC-Bibliothek (in der Eichzulassung angege- ben), die Prüfsumme der ADC-Bibliothek (ebenfalls in der Eichzulassung angegeben) und der Kalibrierzäh- ler (z. B. C00008) angezeigt. WE2111 A3603-2.0...
Zeigt den vorhergehenden Datensatz an. Lang Zeigt den ersten (ältesten) Datensatz an. Kurz Zeigt den nächsten Datensatz an. Lang Zeigt den letzten (neuesten) Datensatz an. Kurz Datensätze nach einer Druck-ID durchsuchen. Lang Gibt Ihnen die Möglichkeit, den Alibi-Modus zu be- enden. WE2111 A3603-2.0...
Formate werden nicht erkannt. Die Exportdatei wird im Hauptverzeichnis (Stammverzeichnis, root) des Speichers gesichert. Als Dateiname wird WE2111_<Seri- ennummer der WE2111>_<aktuelles Datum (yyyymmdd)>_<aktuelle Uhrzeit (hhmmss)>_dsd.csv ver- wendet. Die spitzen Klammern im Dateinamen kenn- zeichnen die verwendeten Parameter und werden nicht geschrieben.
Seite 319
EJECt (eject, aus- Drücken Sie die Taste werfen) angezeigt wird. Drücken Sie die Taste Sobald nicht mehr Not YEt (noch nicht) angezeigt wird, können Sie den USB-Speicher entfernen. Es wird dann wieder EJECt angezeigt. WE2111 A3603-2.0...
Optionen Optionen Die WE2111 verfügt über verschiedene Optionen, die in diesem Abschnitt erläutert werden. 21.1 Messwert in mV/V anzeigen Die Anzeige muss buiLd oder einen der Hauptmenü- punkte anzeigen, damit Sie die folgende Einstellung vor- nehmen können. so oft, bis tESt (Test) ange- ...
Einstellung zu speichern (industrieller Modus) bzw. um das Gewicht wieder normal anzuzeigen (eichpflichtiger Modus). Im industriellen Modus wird der aktuelle Gewichts- wert mit 10-fach höherer Auflösung angezeigt. Stellen Sie im industriellen Modus wieder OFF ein, um die Anzeige mit der erhöhten Auflösung zu deaktivieren. WE2111 A3603-2.0...
Sekunden, um den Setup-Modus zu verlassen. 21.4 Änderungslog Die WE2111 enthält einen nichtflüchtigen (netzausfallsi- cheren), von extern nicht zugänglichen Speicher (512 kByte), der Änderungen von eichrelevanten Parame- tern, das Löschen des Logs und eichrelevante Firmware- Aktualisierungen protokolliert: das Änderungslog. Es WE2111 A3603-2.0...
Logmaske. Status (belegten Platz) des Änderungslogs an- zeigen Die Anzeige muss buiLd oder einen der Hauptmenü- punkte anzeigen, damit Sie die folgende Einstellung vor- nehmen können. so oft, bis CHG.LOG ange- Drücken Sie die Taste zeigt wird. WE2111 A3603-2.0...
Seite 324
Es wird Drücken Sie die Taste erneut (kurz) so oft, bis CHG.LOG angezeigt wird. Drücken Sie die Taste Blättern Sie durch die einzelnen Einträge, siehe Tasten- belegung im Alibi- und Änderungslog-Modus. Siehe auch Alibi- (Änderungs-)Modus beenden. WE2111 A3603-2.0...
Er muss jedoch im Format FAT32 formatiert sein, andere Formate werden nicht erkannt. Die Exportdatei wird im Hauptverzeichnis (Stammverzeichnis, root) des Speichers gesichert. Als Dateiname wird WE2111_<Seri- ennummer der WE2111>_<aktuelles Datum (yyyymmdd)>_<aktuelle Uhrzeit (hhmmss)>_changelog.csv verwendet. Die spitzen Klam- mern im Dateinamen kennzeichnen die verwendeten Parameter und werden nicht geschrieben.
Sie den USB-Speicher entfernen. Es wird dann wieder EJECt angezeigt Änderungslog löschen Die Anzeige muss buiLd oder einen der Hauptmenü- punkte anzeigen, damit Sie die folgende Einstellung vor- nehmen können. so oft, bis CHG.LOG ange- Drücken Sie die Taste zeigt wird. WE2111 A3603-2.0...
Die Anzeige muss buiLd oder einen der Hauptmenü- punkte anzeigen, damit Sie die folgende Einstellung vor- nehmen können. so oft, bis SPEC (Special) Drücken Sie die Taste angezeigt wird. so oft, bis bU22Er (buzzer) Drücken Sie die Taste angezeigt wird. WE2111 A3603-2.0...
Anzeige muss buiLd oder einen der Hauptmenüpunkte anzeigen, damit Sie die folgende Einstellung vornehmen können. so oft, bis SPEC (Special) Drücken Sie die Taste angezeigt wird. so oft, bis bUttON (button) Drücken Sie die Taste angezeigt wird. WE2111 A3603-2.0...
Formate werden nicht erkannt. Die Exportdatei wird im Hauptverzeichnis (Stammverzeichnis, root) des Speichers gesichert. Als Dateiname wird WE2111_<Seri- ennummer der WE2111>_<aktuelles Datum (yyyymmdd)>_<aktuelle Uhrzeit (hhmmss)>_settings.rdb verwendet. Die spitzen Klammern im Dateinamen kenn- zeichnen die verwendeten Parameter und werden nicht geschrieben.
Sie den USB-Speicher entfernen. 21.8 Alle Einstellungen drucken Sie können alle Einstellungen der WE2111 auf einen an der Schnittstelle Serial 2 angeschlossenen Drucker aus- geben. Die Anzeige muss buiLd oder einen der Haupt- menüpunkte anzeigen, damit Sie die folgende Einstellung vornehmen können.
Drücken Sie die Taste Es wird Cont n angezeigt, da alle Einstellungen au- ßer der Kalibrierung auf die Werkseinstellung zurück- gesetzt werden. Drücken Sie die Taste , um das Rücksetzen zu bestä- tigen. Es wird Cont y angezeigt. WE2111 A3603-2.0...
Mögliche Anzeigen bei einem Fehler: Falls kein USB-Speicher erkannt wurde, wird NO diSh (no disk) angezeigt. Prüfen Sie in diesem Fall den Speicher zunächst an einem PC, z. B., ob kein Schreibschutz gesetzt ist und FAT32-Formatierung verwendet wurde. WE2111 A3603-2.0...
Seite 333
EJECt (eject, aus- Drücken Sie die Taste werfen) angezeigt wird. Drücken Sie die Taste Sobald nicht mehr Not YEt (noch nicht) angezeigt wird, können Sie den USB-Speicher entfernen. Es wird dann wieder EJECt angezeigt. WE2111 A3603-2.0...
Erläuterung der Fehleranzeigen, Fehlerbehebung Erläuterung der Fehleranzeigen, Fehlerbehebung Bei einem Fehler zeigt die WE2111 eine Meldung, die Hinweise auf die Ursache gibt. Kurze Meldungen erscheinen konstant im Display, bei längeren Meldungen werden die einzelnen Worte nacheinander angezeigt. Die Worte werden wiederholt, solange der Fehler besteht. Da je nach Betriebsmodus unterschiedliche Fehler auftreten können, ist dieser Abschnitt zur besseren Übersicht unter-...
Prüfen Sie die Angaben für Nennbereich (Nennlast) und Min- destteilungswert, siehe Generelle Festlegungen. Eine Waagenkonfiguration für mehr als 100.000 Mindestteilungs- HIGH werte ist nicht zulässig. Prüfen Sie die Angaben für Nennbereich (Nennlast) und Min- destteilungswert, siehe Generelle Festlegungen. WE2111 A3603-2.0...
Seite 336
Nullbereich. Prüfen Sie die Kabelverbindung und die Montage der Wägezel- len. SPAN Das Wägezellensignal ist bei den gewählten Einstellungen zu groß. Prüfen Sie die Eingabe für Waagennennlast, die Kabelverbin- dung und ob die Kapazität der Wägezellen ausreicht. WE2111 A3603-2.0...
Spanne (span) durchgeführt werden. 22.3 Systemfehler Die ordnungsgemäße Funktion aller Komponenten der WE2111 wird kontinuierlich überwacht. Fehler oder Über- schreitungen der zulässigen Toleranzgrenzen werden als Fehler mit der Kennung E im Display angezeigt. Falls mehrere Fehler aufgetreten sind, werden die Fehlernum- mern addiert.
Seite 338
E00200 Die Justierdaten sind nicht Überprüfen Sie die Justierung/Kali- mehr gültig. brierung. E00400 Die Daten der Werksein- Bringen Sie die WE2111 zum Ser- stellung sind nicht mehr vice. gültig. E08000 Der EPROM-Speicher ist fehlerhaft. E10000 Ein Zusatzmodul ist fehler- Schalten Sie die Stromversorgung haft.
Prüfen Sie die Kabelverbindung der Wägezellen auf lose wichts ist nicht sta- Stecker, schadhafte Kabel etc. bil. Prüfen Sie die Stecker an der WE2111 auf korrekten Sitz. Prüfen Sie, ob die eingestellte Auflösung und der Nenn- bereich korrekt sind, siehe Justierung und Kalibrierung.
Seite 340
Waagenstillstand erreicht wurde, siehe Stillstandserken- nung. Falls der Stillstand nicht innerhalb von 15 Sekun- den erreicht wird, wird eine Fehlermeldung angezeigt und die Aktion abgebrochen. Im industriellen Modus können Sie festlegen, dass die Aktion trotzdem ausgeführt wird, siehe Tasten deaktivie- ren/aktivieren. WE2111 A3603-2.0...
Art von Entsorgung oder Recycling in Ihrem Land vorgeschrieben ist. Verpackungen Die Originalverpackung der HBM-Geräte besteht aus recyclebarem Material und kann der Wiederverwertung zugeführt werden. Aus ökologischen Gründen sollte auf den Rücktransport der leeren Verpackungen an uns ver- zichtet werden.
Technische Unterstützung Technische Unterstützung Sollten bei der Arbeit mit der WE2111 Probleme auftreten, bietet Ihnen der technische Support von HBM: E-Mail-Unterstützung software@hbm.com Telefon-Unterstützung Die telefonische Unterstützung ist von 9:00 bis 16:00 Uhr (MEZ) an allen Werktagen verfügbar: +49 (0) 6151 803-0 Fax-Unterstützung...
Seite 343
Index Index Wägezellen 48 Wechselspannung 53 Abgleich 67 Anzeige 15 Aktualisierung Ausgabe auf Drucker 125 der Firmware von HBM herunterla- den 174 Ausgang (analog) 109 der Software von HBM herunterla- Ausgänge (digital) 103 den 174 Automatische Ausgabe 113 Alibispeicher 143...
Seite 344
Fehlerbehebung 166 Eichung 67 Filter 95 Eingänge (digital) 103 Firmware-Aktualisierung Einheit festlegen 20 durchführen 164 Einmessen der Waage (Quick Start) 22 von HBM herunterladen 174 Einsatzbereich Format A 119 eichpflichtig 36 Format B 120 industriell 36 Format C 120 Einschalten 17 Format CUSTOM 121 Einschränkungen im eichpflichtigen...
Seite 345
Index Fühlerleitungen Kalibrierzähler 140 Überprüfung ausschalten 50 Kapazität (der Waage) festlegen 20 Kontaktbelegung WE2111-ZCC 47 Kontaktbelegung WE2111-ZS 47 Gehäuseausschnitt 55 Grenzwerte 99 Linearisierung 70 Linearisierungspunkt 79 Hauptmenüpunkte 57 Löschen des Alibispeichers 144 HBM im Internet 174 Hinterer Taster 39 Hohe Auflösung 153...
Seite 346
FULL 39 Netzteilmodul 53 SAVE 39 Nullbereich 89 Siegelmarke 140 Nullnachführung 87 Software-Aktualisierung Nullstellbereich 88 von HBM herunterladen 174 Nullstellen 86 Stillstandserkennung 93 beim Einschalten 86 Stromversorgung anschließen 52 Stromversorgung mit Gleichspannung Optionale Module 44 Stromversorgung mit Wechselspan- Optionen für Null 86...
Seite 347
Zweiter Messbereich 68 Verdeckter Taster 39 Vergleich eichpflichtiger/industrieller Modus 36 Verification interval 73 Waage einmessen (Quick Start) 22 Waagenparameter 140 Wägefehler 166 Wägezellen anschließen 48 Wartung 8 Werkseinstellungen wieder herstellen 70 Wie arbeiten Sie mit der WE2111 16 WE2111 A3603-2.0...
Seite 352
17.2.1 Définir les paramètres généraux et le format d'impression ..129 17.2.2 Configurer une sortie sur papier spécifique au client ... . 133 Configurer le mode soumis à la vérification/industriel ..140 WE2111 A3603-2.0...
à un transport, un stockage, une instal- lation et un montage appropriés et d'assurer un manie- ment scrupuleux. Conditions de fonctionnement • Protégez l'appareil contre tout contact direct avec de l'eau. • Protégez l'appareil contre tout contact direct avec de l'eau. WE2111 A3603-2.0...
Seite 356
à toute réparation ou soudure sur les circuits imprimés (remplacement de composants). En cas de remplacement de modules entiers, n'utiliser que des pièces d'origine HBM. • L'appareil a été livré à la sortie d'usine avec une confi- guration matérielle et logicielle fixe. L'apport de modi- fications n'est autorisé...
Seite 357
• En tant que personne chargée de la mise en service ou de la maintenance, vous disposez d'une formation vous autorisant à réparer les installations d'automati- sation. Vous êtes en outre autorisé à mettre en ser- WE2111 A3603-2.0...
Seite 358
électrique. La tension d'alimentation peut être comprise entre 12 et 24 V . Avec l'option 1- C.C. WE2111-AC, il est également possible d'avoir une ali- mentation comprise entre 110 et 240 V C.A. • Les messages d'erreur ne doivent être acquittés qu'une fois l'origine de l'erreur éliminée et lorsqu'il n'y...
Seite 359
Risques généraux en cas de non-respect des consignes de sécurité L'appareil est conforme au niveau de développement technologique actuel et présente une parfaite sécurité de fonctionnement. L'appareil peut présenter des dangers résiduels s'il est utilisé de manière non conforme. WE2111 A3603-2.0...
Seite 360
Consignes de sécurité WE2111 A3603-2.0...
à entrer, tous les boutons et les cases à cocher, les noms de champs de saisie, etc. Les menus, les commandes, les champs de fenêtre et les boîtes de dialogue ainsi que les onglets sont également marqués. WE2111 A3603-2.0...
USB ainsi que d'interfaces RS-422/485. En vue d'un réglage aisé de tous les paramètres, le logi- ciel PC WE2111 Viewer est à votre disposition. Télé- chargez ce logiciel (gratuit) sur le site de HBM, dans la rubrique « Électronique de pesage » : www.hbm.com/HBM Software.
Seite 363
L'essentiel en bref • Module enfichable 1-WE2111-ZCC doté de 2 entrées et/ou sorties librement configurables, sortie courant analogique (4 … 20 mA) et sortie tension analogique (0 … +10 V). • Module enfichable 1-WE2111-R2 doté d'une interface RS-232 à séparation galvanique.
Afficheur : affichage et symboles Fig. 1: Face avant présentant les affichages et touches du WE2111 1 : la valeur affichée est brute (G), nette (NET) ou zéro (c'est-à-dire que le zéro est compris dans la tolé- rance admissible de la valeur minimale d'un échelon v ).
Voir aussi Affectation des touches. Utilisation du WE2111 Le présent paragraphe décrit brièvement la mise en marche de l'appareil et les réglages nécessaires pour pouvoir réaliser un pesage. A titre d'exemple, une balance mono-sensibilité est configurée sans mot de passe pour le domaine non soumis à...
Mise en marche Mettez le WE2111 sous tension. A l'issue de sa mise sous tension, le WE2111 fait l'objet de divers autotests. L'écran affiche d'abord bOOt, puis tous les segments de l'afficheur et tous les affichages lumineux sont activés, par ex. également les valeurs limites et les unités.
(pas possible dans tous les dialogues). Dans les deux cas, le système enregistre les réglages réalisés et quitte le mode de configuration. Une autre solution consiste aussi à éteindre le WE2111 afin de ne modifier aucun réglage. WE2111 A3603-2.0...
Pressez la touche dP apparaît sur l'afficheur (point décimal). Pressez la touche CAP1 apparaît à l'écran (capacité plage 1). Pressez la touche 0030.00 apparaît sur l'afficheur. Pressez la touche de manière répétée jusqu'à ce que 3 clignote. WE2111 A3603-2.0...
Seite 370
, pendant plusieurs secondes, pour enregistrer les réglages. SAviNG, la version de firmware (par ex. P60c) et le compteur d'étalonnage (par ex. C00008) apparaissent à l'écran l'un après l'autre, avant que ce ne soit le tour de la valeur de mesure actuelle. WE2111 A3603-2.0...
0.00 clignote à l'écran, lorsque l'équilibrage du zéro a été réalisé. Pressez la touche ZErO apparaît sur l'afficheur. L'équilibrage du zéro est donc terminé. Pressez la touche SPAN apparaît sur l'afficheur. WE2111 A3603-2.0...
(par ex. C00008) apparaissent à l'écran l'un après l'autre, avant que ce ne soit le tour de la valeur de mesure actuelle. Le WE2111 est alors prêt à la mesure et peut exécuter des pesages. 3.2.6 Établir une liaison série avec le PC (RS- 232/422/485) Les connecteurs d'interfaces série sont disponibles au...
Seite 373
L'essentiel en bref Suivant l'interface souhaitée, raccordez RS-232 ou RS- 422/485 de votre PC au WE2111. En présence d'un câble plus ou moins long (à partir de 30 m), les nœuds de bus risquent d'obtenir des potentiels de masse différents. Établissez, le cas échéant, une liai- son équipotentielle entre les nœuds de bus par le biais...
Seite 374
L'essentiel en bref Les résistances de terminaison nécessaires à l'interface RS422/485 sont intégrées au WE2111 et sont activées par logiciel. Affectation des contacts Serial 2 Embase Fonction N° de Abréviation contact (broche) RS-232 Transmit RS-232 DTR Handshake RS-232 Ground GND2...
Seite 375
7. Pressez la touche 8. Utilisez la touche , pour indiquer le débit. Les réglages possibles sont : 300, 600, 1200, 2400, 4800, 9600 (valeur par défaut), 19.200, 38.400, 57.600 ET 115.200 bauds. 9. Pressez la touche pour terminer l'opération. WE2111 A3603-2.0...
Seite 376
Pour une interface RS-232 ou RS-422, continuez au point 15. Pour RS-485, aucun autre réglage n'est nécessaire. 14. Pressez la touche jusqu'à ce que NEt.OPt soit affiché. 15. Pressez la touche AddrES apparaît sur l'afficheur. 16. Pressez la touche WE2111 A3603-2.0...
Seite 377
Connect. 2. Dans la boîte de dialogue, sélectionnez l'interface uti- lisée sur le PC (Serial Port). 3. Sélectionnez le débit défini sur le WE2111 (Baud Rate). 4. Entrez les paramètres de parité (Parity), le nombre de bits de données (Data Bits) et le nombre de bits d'arrêt (Stop Bits) de l'interface.
L'essentiel en bref c'est-à-dire que vous retirez tous les nœuds de bus, sauf un WE2111. Boîte de dialogue d'interface série (exemple) 3.2.7 Établir une liaison Ethernet avec le PC Pour une liaison via Ethernet, vous avez deux possibilités : WE2111...
Seite 379
L'inconvénient réside dans le fait que vous deviez trouver l'adresse affectée. Pour l'allocation au- tomatique d'une certaine adresse IP, l'administrateur réseau peut utiliser l'adresse MAC du WE2111 . Vous pouvez extraire cette adresse en tant que dernier pa- ramètre, lors de la saisie des paramètres d'interface Ethernet.
Seite 380
Pressez la touche , pour passer au groupe de chiffres suivant (iP.2), et définissez ainsi l'adresse IP souhaitée. Pour finir, pressez la touche , pour basculer à nou- veau vers l'affichage d'iP. 10. Pressez la touche (MASK) apparaît à l'écran. WE2111 A3603-2.0...
Seite 381
Le système affiche 15. Pressez la touche Le système affiche le premier groupe de chiffres de l'adresse de passerelle actuelle, tel que 000192. A l'aide de (augmenter le chiffre) et (position sui- WE2111 A3603-2.0...
Seite 382
Validez vos entrées par Pressez la touche , pour passer au groupe de chiffres suivant ( ), et définissez ainsi l'adresse de DNS souhaitée. Pour finir, pressez la touche , pour basculer à nou- veau vers l'affichage de WE2111 A3603-2.0...
Seite 383
1. Cliquez sur Connect ou sélectionnez File -> Connect. 2. Dans la boîte de dialogue, sélectionnez l'interface uti- lisée sur le PC (TCP). 3. Indiquez l'adresse IP configurée sur le WE2111 (TCP Settings, IP Address). 4. Indiquez 2222 en tant que port TCP (TCP Settings, TCP Port.
Seite 384
être donnée par l'administrateur. En fonction du réseau, des autorisations supplémentaires sont éventuellement nécessaires. En cas de doute, consultez votre administra- teur réseau. Boîte de dialogue d'interface Ethernet (exemple) WE2111 A3603-2.0...
Configurer le mode soumis à la vérification/in- dustriel. Utilisation dans le domaine soumis à la vérification Le WE2111 peut être utilisé dans le domaine soumis à la vérification. L'homologation CEE du WE2111 est docu- mentée dans l'attestation d'homologation CEE (EC Type approval certificate) téléchargeable à...
Seite 386
à cet effet. Tous les autres paramètres peuvent être protégés par un second mot de passe. En complément, vous pouvez protéger l'accès d'ajustage par le biais d'un bouton caché en face arrière pouvant être plombé, voir protection avancée par bouton caché. WE2111 A3603-2.0...
Seite 387
être supérieures à 0 et inférieures à 100 % de la charge nominale Définir la tare (tare ma- Non autorisé Autorisé (faire une pres- nuelle), définir la valeur li- sion longue de la touche mite ou le post-courant WE2111 A3603-2.0...
Protection par mot de passe Vous pouvez protéger le WE2111 contre les modifica- tions, à l'aide de deux mots de passe. 1. Mot de passe du mode de configuration SAFE Dans ce mode, aucun des paramètres jouant un rôle pour l'étalonnage ne peut être modifié.
Seite 389
à l'arrière : option de menu r.ENtry (rear entry mode). Fig. 3: Arrière du WE2111, cache du bouton de configuration étant retiré. 1 : bouton de configuration (enfoncé) 2 : les boucles permettent un plombage du bouton à...
Seite 390
La procédure de définition du réglage est décrit ci-dessous. En cas d'oubli du mot de passe, l'appareil doit être renvoyé à HBM. Tous les réglages sont supprimés lors de l'opéra- tion. Procédure de définition des mots de passe Ces réglages sont possibles uniquement en mode de...
Seite 391
Un mot de passe déjà défini doit, dans ce cas égale- ment, être saisi. Pressez la touche , pendant plusieurs secondes, pour enregistrer les réglages modifiés. SAviNG, la version de firmware (par ex. P60c) et le compteur d'étalonnage (par ex. C00008) apparaissent WE2111 A3603-2.0...
Seite 392
A l'issue de l'actionnement du bouton en face arrière (r.ENtry), vous devez, pour tous les réglages jouant un rôle pour l'étalonnage, (mode de configuration FULL), faire afficher le menu de configuration par le biais du bouton en face arrière. WE2111 A3603-2.0...
Enfichez le module de sorte que le connecteur du module glisse dans la prise du WE2111 (voir la figure). Si le mon- tage d'un module de bloc d'alimentation est prévu, vous devez utiliser la prise de droite. Autrement, l'utilisation des deux prises pour les modules en option est possible.
Seite 394
Monter des modules en option Fig. 4: Vue de derrière, raccordement de modules en option Serrez fermement les deux vis de fixation du module (voir la figure): WE2111 A3603-2.0...
Seite 395
à des réglages, tels que l'entrée ou la sortie à utiliser et la manière de le faire. Utilisez des câbles blindés pour les sorties analogiques. Les câbles des entrée/sorties numériques ne doivent alors être blindés que si la longueur du câble dépasse 30 m. WE2111 A3603-2.0...
Consultez le manuel d'emploi de vos pesons pour sa- voir si cela est possible. Pour des raisons de CEM, le branchement des pesons par un câble à double blindage, tel que le type HBM 4-3301.0071 de 3 * 2 * 0,14 m est avantageux. Rac- cordez le blindage en nappe au boîtier du connecteur...
Seite 398
Raccorder des pesons Affectation des contacts Embase Fonction N° de contact Code de cou- (broche/gravure) leurs HBM Tension d'alimentation 1 (+ Ex) BU (bleu) Tension d'alimentation (-) 3 (- Ex) BK (noir) Fil de contre-réaction (+) 2 (+ Sn) GN (vert) Fil de contre-réaction (-)
Seite 399
Zener, vous pouvez désactiver le contrôle du branche- ment. Vous ne devriez utiliser cette option que lors de l'affichage de l'une des erreurs E00040, E00080 ou E000C0 à l'issue du raccordement. WE2111 A3603-2.0...
Seite 400
Les réglages possibles sont ON (Activée, valeur par défaut) et OFF (Désactivé). Utilisez la touche , pour indiquer la fonction souhaitée. Pressez la touche , pour valider le réglage. Pressez la touche , pendant plusieurs secondes, pour enregistrer le réglage. WE2111 A3603-2.0...
Brancher l'alimentation électrique Brancher l'alimentation électrique Le WE2111 doit être alimenté en tension continue régulée comprise entre 12 V et 24 V. Le module de bloc d'alimen- tation WE2111-AC permettant une alimentation en 110 V - 240 V est disponible en option.
Raccordez le connecteur de mise à la terre à un point de masse à proximité. La résistance entre le point de masse et le WE2111 ne doit pas dépasser 2 . Le WE2111 est ainsi prêt à être mis sous tension.
Seite 403
Serrez fermement les vis de fixation (1) du module. Le WE2111 est ainsi prêt à être mis sous tension. Branchez le câble secteur correspondant à votre alimen- tation électrique à la prise de sécurité et à votre alimenta- tion électrique.
La position de montage de l'appareil n'a aucune impor- tance. Montage Le WE2111 peut être utilisé en tant qu'appareil de table, par ex. à l'aide de l'option 1-WE2111-ZT (console de table), ou en tant qu'appareil encastré. Dans les deux cas, le montage est identique.
Seite 405
90° à 180° pour qu'ils sortent, suivant la position de fixa- tion souhaitée ou possible (voir la figure ci-dessous). Serrez les vis (2) fermement (voir la figure ci-dessous). Fig. 10: Vue de derrière, clips de fixation sortis WE2111 A3603-2.0...
Interfaces, ports et sorties Eth.nEt Configuration Ethernet SPEC Réglages spéciaux tESt Test SEt.PtS Valeurs limites AnALoG Sortie analogique CLOC Date/Heure FiLE Fichier Mémoire alibi (DSD) CHG.LOG Journal des modifications (Change log) FACtrY Configuration, réinitialisation –ENd– Fin du menu principal WE2111 A3603-2.0...
Seite 407
2. <X> Pour le mode bi-intervalle ou bi-sen- sibilité, entrez la la valeur minimale d'un échelon (Verification interval) pour la plage 2 Ad.tArE <X> Activer le tarage additif et définir la tare max. UNitS sans/g/kg/l Définir l'unité WE2111 A3603-2.0...
Seite 408
Plage de mise à zéro de -X% à +Y% (Zero range, valeur par défaut 02-02) Z.bANd <X> Plage nulle (Zero dead band, valeur par défaut 0) SENS.CH OFF, ON Activer/désactiver le contrôle des fils de contre-réaction (valeur par défaut WE2111 A3603-2.0...
Seite 409
2– d'arrêt, activation des résistances de terminaison, indication du type d'interface et de la procédure de né- gociation SEr5 et POrt <X> Indication du port pour les interfaces SEr6 Ethernet NEt.OPt AddrES <X> Adresse du port RS-485 WE2111 A3603-2.0...
Seite 410
Signal devant sortir GroSS, NEt, totAL Aut.Fnt 50 carac- Format CUSTOM (format réglable tères ou spécifique au client) codes de commande au maxi- St.CHr <X> Caractères de début ENd.CH1 <X> Premier caractère de fin ENd.CH2 <X> Deuxième caractère de fin WE2111 A3603-2.0...
Seite 411
(Ethernet) Eth.nEt Menu Sous-menu Entrée Description dHCP — OFF, ON Activer/désactiver DHCP (valeur par défaut ON) iP.1 à iP.4 <X> Adresse IP, groupes de chiffres 1 à 4. Si DHCP est actif, le système af- fiche l'adresse actuelle. WE2111 A3603-2.0...
Seite 412
FULL.PC <X> Mot de passe du mode de configu- ration FULL (valeur par défaut 0) r.ENtry OFF, ON Mode de configuration FULL uni- quement à l'issue d'une pression de la touche en face arrière (valeur par défaut OFF) WE2111 A3603-2.0...
Seite 413
Utiliser une résolution élevée. Limité à (soumis à la vérifica- 5 secondes en mode soumis à la véri- tion), ON/OFF (indus- fication. triel) iO-1.4 Afficher uniquement (en- État des entrées/sorties numériques 1 à 4 trée), (sortie) en vue d'une modification WE2111 A3603-2.0...
Seite 414
Type de la sortie (courant/tension, valeur uoLt par défaut Cur., c'est-à-dire 4-20 mA) CAL.Lo UP/dn Réglage précis du zéro (valeur par défaut 0) CAL.Hi UP/dn Réglage précis de la pleine échelle (valeur par défaut 0) Frc.AnL Lo, Hi Tester la sortie WE2111 A3603-2.0...
Seite 415
Sauvegarder la configuration sur le support mémoire USB SAu.CL Sauvegarder le journal des modifi- cations sur le support mémoire USB SAu.dSd Sauvegarder la mémoire alibi sur le support mémoire USB EJECt Préparer le support mémoire USB à être déconnecté WE2111 A3603-2.0...
Seite 416
Menu Lié à la Entrée Description vérification StAtUS Afficher l'état (espace occupé) du journal des modifications CLEAr Supprimer le journal des modifica- tions Menu (Factory) FACtrY Menu Lié à la Entrée Description vérification dEFLt Rétablir la configuration d'origine WE2111 A3603-2.0...
Seite 417
Vue d'ensemble de l'arborescence des menus Menu Lié à la Entrée Description vérification Prn.CFG Imprimer la configuration complète FAC.SuC Réservé à la maintenance, prière de ne pas utiliser WE2111 A3603-2.0...
à l'aide des valeurs par défaut (2 mV/V), sauvegar- der les réglages sur le PC, puis de là les transférer sur d'autres WE2111 . Exécutez ensuite l'ajustage avec charge directe, si une application soumise à la vérification est requise.
Seite 419
à la vérification : le nombre d'échelons détermine la résolution sur l'étendue de mesure du peson. Afin d'obtenir une meilleure résolution sur la plage à charge partielle, une seconde étendue de mesure peut être utilisée, à condition de disposer du peson correspondant. WE2111 A3603-2.0...
Seite 420
Mode bi-sensibilité ou mode bi-intervalle ? Dans le mode non soumis à la vérification (industriel), il n'y a aucune raison, avec la résolution des WE2111 de plus de 100.000 échelons, de procéder à l'un des deux réglages. L'option de menu Scale type permet toutefois également l'ajustage en mV/V.
Seite 421
CAL apparaisse à l'écran. Pressez la touche de manière répétée jusqu'à ce que FAC.CAL soit affiché. Pressez la touche Le système affiche Cont n. Pressez la touche Le système affiche Cont y. Pressez la touche WE2111 A3603-2.0...
SEtUP, la version de firmware (par ex. P60c), le compteur d'étalonnage (par ex. C00008) et buiLd ap- paraissent à l'écran l'un après l'autre. Si un mot de passe a été défini pour le calibrage, vous de- vez d'abord entrer le mot de passe correct. WE2111 A3603-2.0...
Seite 423
Lorsque le mode de fonctionnement souhaité apparaît à l'écran, pressez alors la touche Entrer le nombre de décimales (decimal point) Pressez la touche jusqu'à ce que dP soit affiché. Pressez la touche 000000 apparaît sur l'afficheur. WE2111 A3603-2.0...
Seite 424
, pour terminer le réglage. Avec une balance à bi-sensibilité ou bi-intervalle, vous de- vez aussi entrer CAP2 (capacité plage 2). Pressez, à cet effet, deux fois la touche , lorsque CAP1 apparaît à nouveau à l'écran. WE2111 A3603-2.0...
Seite 425
Dans ce cadre, E2 doit être supérieur à E1. Entrer l'unité (unit) Pressez la touche de manière répétée jusqu'à ce que UnitS soit affiché. Pressez la touche L'unité kg est sélectionnée par défaut sur le côté de l'afficheur puis affichée à l'écran. WE2111 A3603-2.0...
: Pressez la touche de manière répétée jusqu'à ce que CAL apparaisse à l'écran. Pressez la touche ZErO apparaît sur l'afficheur. Pressez la touche Le système affiche la valeur mesurée actuellement. WE2111 A3603-2.0...
Seite 427
S in P (scaling in progress) est affiché tant que l'équi- librage du zéro est réalisé. Le poids qui apparaît à l'écran clignote, lorsque l'équilibrage du zéro a été réalisé. Pressez la touche , pour quitter le menu. WE2111 A3603-2.0...
Pour la plage (, la différence entre la pleine échelle et le zéro du capteur), entrez la valeur mV/V du protocole d'éta- lonnage du capteur. Pressez la touche de manière répétée jusqu'à ce que CAL apparaisse à l'écran. WE2111 A3603-2.0...
Seite 429
SPAN soit affiché. Pressez la touche Le système affiche la valeur mesurée actuellement. L'affichage clignote, afin que vous puissiez entrer la valeur mV/V. Pressez la touche La valeur actuellement enregistrée pour la plage ap- paraît à l'écran. WE2111 A3603-2.0...
Le calibrage à l'aide du zéro et de la pleine échelle (Ze- ro/Span) doit déjà avoir été réalisé, sinon l'ajout d'un point de linéarisation n'est pas possible. L'écran doit afficher buiLd ou l'une des options du menu principal, pour que vous puissiez procéder aux réglages ci-dessous : WE2111 A3603-2.0...
Seite 431
Pressez la touche Le système exécute le calibrage et affiche le poids en le faisant clignoter à des fins de contrôle. Pressez la touche pour passer à nouveau au menu principal. WE2111 A3603-2.0...
Seite 432
Pressez la touche pour supprimer ou la touche pour quitter le menu sans suppression. Pressez la touche pour passer à nouveau au menu principal. Pressez la touche , pendant plusieurs secondes, pour enregistrer les réglages. WE2111 A3603-2.0...
CLOC soit affiché. Pressez la touche tinE (time) apparaît à l'écran. Pressez la touche L'heure actuelle sur le WE2111 est affichée et le pre- mier caractère clignote. Utilisez les touches pour régler l'heure actuelle.
(deux caractères, 01 à 31) et le mois (deux caractères, 01 à 12). Pressez la touche L'année actuelle sur le WE2111 est affichée et le pre- mier caractère du nombre de l'année clignote. Utilisez les touches pour régler l'année actuelle (4 caractères).
Seite 435
Pressez la touche L'année réglée actuellement pour la signalisation du contrôle apparaît à l'écran et le premier caractère du nombre correspondant à l'année clignote. Utilisez les touches pour régler l'année (4 caractères) de la signalisation du contrôle. WE2111 A3603-2.0...
Seite 436
à nouveau au menu principal. Une fois la date entrée atteinte, CAL DUE apparaît à l'écran. Cet affichage peut être masqué temporairement en pressant une touche. Une désactivation définitive de cet affichage n'est possible qu'en entrant une nouvelle date. WE2111 A3603-2.0...
: Pressez la touche OPtiON apparaît sur l'afficheur. Pressez la touche USE apparaît sur l'afficheur. Pressez la touche de manière répétée, jusqu'à ce que Auto.Z. (Auto-zero) apparaissent à l'écran. WE2111 A3603-2.0...
Seite 438
: Pressez la touche OPtiON apparaît sur l'afficheur. Pressez la touche USE apparaît sur l'afficheur. Pressez la touche jusqu'à ce que Z.trAC (Zero trac- king) soit affiché. WE2111 A3603-2.0...
Seite 439
: Pressez la touche OPtiON apparaît sur l'afficheur. Pressez la touche USE apparaît sur l'afficheur. Pressez la touche jusqu'à ce que Z.rANGE (Zero range) soit affiché. WE2111 A3603-2.0...
Seite 440
: Pressez la touche OPtiON apparaît sur l'afficheur. Pressez la touche USE apparaît sur l'afficheur. Pressez la touche jusqu'à ce que Z.bANd (Zero dead band) soit affiché. WE2111 A3603-2.0...
Seite 441
, pour valider le réglage. Pressez la touche , pendant plusieurs secondes, pour enregistrer le réglage. En face avant, le système affiche la valeur de mesure >0< à gauche, lorsque cette valeur de mesure est comprise dans la plage nulle. WE2111 A3603-2.0...
Types de tarage et tarage Types de tarage et tarage Le WE2111 vous permet deux types de tarage : 1. Tarage soustractif (valeur par défaut) Dans ce cas, la valeur déterminée lors du tarage est déduite de l'étendue de mesure de la balance. Avec une balance pour 100 kg et une valeur de tare de 40 kg, le poids pouvant être encore mesuré...
Seite 443
Pressez la touche pour terminer l'opération. Pressez la touche pour passer à nouveau au menu principal. Pressez la touche , pendant plusieurs secondes, pour enregistrer le réglage. WE2111 A3603-2.0...
, pour indiquer la fonction souhaitée. Les réglages possibles sont NONE (aucune détec- tion, non autorisé dans le domaine soumis à la vérifi- cation) et 0.5-1.0 (0,5 échelons en 1 seconde, valeur par défaut) jusqu'à 5.0-0.2 (5 échelons en 2 se- WE2111 A3603-2.0...
Seite 445
Dans ce cadre, le premier chiffre indique le nombre d'échelons et le second le nombre de se- condes. Pressez la touche , pour valider le réglage. Pressez la touche , pendant plusieurs secondes, pour enregistrer le réglage. WE2111 A3603-2.0...
Filtre Filtre Le WE2111 prévoit 3 options de filtres différentes : 1. des filtres passe-bas FIR, qui éliminent simultanément le ronflement secteur. Ces filtres sont associés à la vitesse de mesure et sont réglés par le biais du filtre SYNC (la valeur réglée cor- respond à...
Seite 447
Pressez la touche pour passer à nouveau au menu principal. Définir le calcul d'une moyenne flottante L'écran doit afficher buiLd ou l'une des options du menu principal, pour que vous puissiez procéder au réglage ci- dessous : WE2111 A3603-2.0...
Seite 448
à nouveau au menu principal. Définir le calcul d'une moyenne flottante variable L'écran doit afficher buiLd ou l'une des options du menu principal, pour que vous puissiez procéder au réglage ci- dessous : Pressez la touche OPtiON apparaît sur l'afficheur. WE2111 A3603-2.0...
Seite 449
Utilisez la touche , pour modifier le réglage. Les réglages possibles sont : OFF (désactivé), FiNE (faible), COArSE (fort). Pressez la touche pour terminer l'opération. Pressez la touche pour passer à nouveau au menu principal. WE2111 A3603-2.0...
Valeurs limites Valeurs limites Le WE2111 prévoit 8 fonctions de valeurs limites (set- points), que vous pouvez indiquer par le biais de divers états du WE2111 : • Valeur limite d'une charge (poids dépassé/non atteint) • Immobilisation (état) • Valeur de mesure sur la plage d'équilibrage du zéro •...
Seite 451
Quatrième caractère : niveau logique high (H) ou low (L) lorsque la fonction est active. Cinquième caractère : type de signalisation d'alarme, – pour aucune, S pour simple tonalité, d pour double tonalité, C pour une tonalité permanente et F pour un clignotement de l'affichage. WE2111 A3603-2.0...
Seite 452
Pressez la touche HyS apparaît sur l'afficheur. Pressez la touche Le système affiche l'hystérésis actuellement définie et le premier caractère clignote. Utilisez les touches pour entrer l'hystérésis. Pressez la touche pour terminer l'opération. WE2111 A3603-2.0...
Seite 453
Pressez la touche pour terminer l'opération. Pressez la touche pour passer à nouveau au menu principal. Pressez la touche pour régler une valeur limite supplémentaire. Pressez la touche , pendant plusieurs secondes, pour enregistrer les réglages. WE2111 A3603-2.0...
: Pressez la touche jusqu'à ce que SPEC soit affiché. Pressez la touche Pressez la touche de manière répétée jusqu'à ce que iN.FN.0.4 apparaisse à l'écran (définir les entrées 0 à 4). WE2111 A3603-2.0...
Seite 455
Pressez la touche Le système affiche le réglage actuel, la valeur par dé- faut étant ––––. Utilisez les touches , pour définir la fonction de l'entrée concernée, voir Vue d'ensemble des fonctions. Pressez la touche pour terminer l'opération. WE2111 A3603-2.0...
Vous pouvez utiliser cette fonction, par ex., en présence d'une balance se trouvant sur un plan incliné, pour blo- quer tout pesage ultérieur. WE2111 Verrouiller signifie que toutes les touches et les entrées nu- mériques sont bloquées. Vous pouvez utiliser cette fonction, par exemple, pour verrouiller la balance par le biais d'un interrupteur à...
Seite 457
Dès que le poids a été calculé, il appa- raît à l'écran et l'unité clignote. Une pression prolongée de la touche sup- prime le mode balance de pesage d'animaux. Cette fonction n'est dispo- nible qu'en mode de fonctionnement non soumis à la vérification. WE2111 A3603-2.0...
TXT (voir partie II de ce manuel d'emploi). L'impression proprement dite est alors démarrée par le biais du code de commande 152, voir Configurer une sortie sur papier spécifique au client. WE2111 A3603-2.0...
Seite 459
– signifie que l'entrée est désac- tivée, –. signifie que la sortie est désactivée. Sinon, le chiffre de l'entrée ou de la sortie est affiché. Pressez la touche pour passer à nouveau au menu principal. WE2111 A3603-2.0...
AnALoG soit affiché. Pressez la touche SrC apparaît à l'écran (Source). Pressez la touche Le système affiche le réglage actuel, la valeur par dé- faut étant diSP (Display, à savoir valeur affichée ac- tuellement). WE2111 A3603-2.0...
Seite 461
0 V et +10 V. Pressez la touche pour terminer l'opération. Pressez la touche , pendant plusieurs secondes, pour enregistrer le réglage. Sortie d'un signal de test Pressez la touche de manière répétée jusqu'à ce que AnALoG soit affiché. WE2111 A3603-2.0...
Seite 462
Utilisez la touche , pour commuter entre UP (up, vers le haut) et dn (down, vers le bas), et la touche , pour modifier la valeur affichée. La valeur qui sort est corrigée de la valeur affichée à ce niveau. WE2111 A3603-2.0...
Seite 463
, pour modifier la valeur affichée. La valeur qui sort est corrigée de la valeur affichée à ce niveau. Pressez la touche pour terminer l'opération. Pressez la touche , pendant plusieurs secondes, pour enregistrer le réglage. WE2111 A3603-2.0...
API. Dans ce cadre, vous disposez de divers formats de sortie : Le format par défaut, format A (format HBM), les formats B à D et un format réglable (CUSTOM), c'est-à-dire un format que vous pouvez confi- gurer vous-même.
Seite 465
à la fréquence SYNC, voir Filtre SYNC), Print (activer la sortie sur imprimante), Sin9LE (single, sortie unique, voir le paragraphe Entrées/sorties nu- mériques, fonction de touche F : Vue d'ensemble des fonctions) et NEt (interface réseau, valeur par défaut). WE2111 A3603-2.0...
Seite 466
Troisième caractère : nombre de bits d'arrêt (1 ou 2). Quatrième caractère : activation (t) des résistances de terminaison (uniquement pour RS-422/485) ou –. Cinquième caractère : type d'interface (2 = RS-232, 4 = RS-422/485). Sixième caractère : d (négociation DTR) ou – (aucune WE2111 A3603-2.0...
Seite 467
Pressez la touche pour terminer l'opération. Définir les option de sortie Pressez la touche de manière répétée jusqu'à ce que AUt.OPt (Automatic output options) soit affiché. Pressez la touche tyPE apparaît sur l'afficheur. Pressez la touche WE2111 A3603-2.0...
Seite 468
Utilisez les touches pour définir le format de sortie. Les réglages possibles sont : Auto.A (format A, par défaut, format HBM), Auto.b (format B), Auto.C (for- mat C), Auto.d (format D) et CUStOn (format ré- glable CUSTOM). Pressez la touche , pour valider le réglage.
Seite 469
Pressez la touche ENd.CH2 (end character 2) apparaît à l'écran. Utilisez les touches pour indiquer le second caractère de fin. Entrez, à cet effet, le nombre correspon- dant au code ASCII du caractère en format décimal. WE2111 A3603-2.0...
Type de sortie État (1 caractère) : G = valeur brute, N = valeur nette, U = charge insuffisante, O = surcharge, M = pas d'immobilisa- tion (motion) ou E = erreur (error). Signe arithmétique : caractère d'espacement ou –. WE2111 A3603-2.0...
État4 (1 caractère) : mode de balance. Caractère d'espa- cement en mode mono-sensibilité, dans le cadre du mode bi-sensibilité ou du mode bi-intervalle, la plage active ('1') ou ('2') de la sortie Unité (3 caractères) : unité sélectionnée comportant des caractères d'espacement en début WE2111 A3603-2.0...
50 caractères maximum. Utilisez les touches pour indiquer le caractère. Entrez, à cet effet, le nombre correspondant au code ASCII du caractère en format décimal. Entrez 128 pour utiliser le caractère ASCII 0. WE2111 A3603-2.0...
Seite 473
Ne pas utiliser de séparateur décimal '.' en tant que séparateur décimal ',' en tant que séparateur décimal Envoyer la valeur de poids avec des zéros en début Envoyer la valeur de poids sans zéros en début WE2111 A3603-2.0...
Seite 474
Envoyer l'état Immobilisation ('M' = motion ou ' ') Envoyer l'état Immobilisation (S) ou Mouvement (M) Envoyer l'unité ou ' ' pour 'pas d'immobilisation' (motion) Envoyer l'état Immobilisation ('M' = motion), dépasse- ment de capacité ou capacité non atteinte ('C') ou Poids valide (' ') WE2111 A3603-2.0...
Si une imprimante compatible texte est raccordée via USB, l'impression a lieu sur cette dernière. Sinon, la sortie a lieu sur le port série le moins élevé pour lequel une sortie sur imprimante (Print) a été définie. Si vous défi- WE2111 A3603-2.0...
Seite 476
Exemple de sortie sur papier : 0005 05/01/14 16:47 365.4 kg G Impression spécifique au client (ticket) Indiquez tic ou A.tic en tant qu'option. Exemple de sortie sur papier : WEIGHT TICKET 05/01/14 16:47 ID: 0008 65.4 365.4 300.0 WE2111 A3603-2.0...
à séparation galvanique, vous devez utilisez SEr3 (mo- dule RS-485) ou SEr4 (RS-232). Pour la sortie via USB, ces réglages ne sont pas nécessaires. Conti- nuez au paragraphe Définir le format d'impression. WE2111 A3603-2.0...
Seite 478
, pour indiquer de débit. Les réglages possibles sont : 300, 600, 1200, 2400, 4800, 9600 (valeur par défaut), 19.200, 38.400, 57.600 ET 115.200 bauds. Pressez la touche pour terminer l'opération. Pressez la touche jusqu'à ce que bitS soit affiché. WE2111 A3603-2.0...
Seite 479
En cas d'utilisation de l'interface RS-48, pressez la touche de manière répétée jusqu'à ce que NEt.OPt soit affiché. Dans le cas contraire, continuez par la définition du format d'impression. Pressez la touche AddrES apparaît sur l'afficheur. Pressez la touche WE2111 A3603-2.0...
Seite 480
(impression spécifique au client (ticket)), A.SiNG (impression automatique d'une ligne), A.doub (impression automatique de deux lignes), A.tic (impression automatique spécifique au client (ticket)), totAL (imprimer tout), A.totAL (imprimer tout automatiquement). Pressez la touche pour terminer l'opération. WE2111 A3603-2.0...
1. jusqu'à 6 lignes d'en-tête de 30 caractères maximum. 2. Le format, c'est-à-dire ce qui doit être imprimé. Vous pouvez entrer jusqu'à 250 caractères ASCII ou codes, pour définir la mise en page de la sortie sur papier. WE2111 A3603-2.0...
Seite 482
, pour pouvoir entrer le caractère suivant. Utilisez la touche , pour mettre fin à la saisie et revenir au menu HEAdEr . Définition du format HEAdEr doit apparaître à l'écran pour que vous puissiez procéder au réglage ci-dessous. WE2111 A3603-2.0...
Seite 483
, pendant plusieurs secondes, pour enregistrer les réglages modifiés. Codes disponibles Les codes de caractères suivants sont disponibles pour l'entrée des données à imprimer Notez que la sortie sur papier de lignes d'en-tête doit également être indiquée par un code. WE2111 A3603-2.0...
Seite 484
3 caractères pour l'unité, caractère d'espacement et 'N' Imprimer la valeur du poids total ; 7 carac- tères avec un point décimal et des carac- tères d'espacement en début, 3 caractères pour l'unité, caractère d'espacement et 'G' WE2111 A3603-2.0...
Seite 485
\– Supprimer la dernière valeur : le système dé- duit, à nouveau, la dernière valeur ajoutée au niveau de \+ du poids total. Exemple La sortie sur papier obtenue doit être la suivante : & WE2111 A3603-2.0...
Voir aussi Domaines d'application (soumis à la vérifica- tion/industriel). Vous pouvez utiliser le WE2111 soit en mode industriel et les réglages sont alors tous possibles, soit en mode soumis à la vérification selon OIML R76, dans le cadre duquel seuls certains réglages sont possibles. La commu- tation a lieu par le biais du menu Option.
Seite 489
Disponible, faire une pres- sion longue de la touche Annuler la mise à Non disponible Disponible, faire une pres- zéro sion longue de la touche Mode de test Limité à 5 secondes maxi- Possible de manière non li- mitée WE2111 A3603-2.0...
Seite 490
Configurer le mode soumis à la vérification/industriel État de Mode soumis à la Mode industriel fonctionnement vérification (non soumis à la vérification) Valeur instantanée Non disponible Disponible (conserver), crête, post-courant Balance destinée au Non disponible Disponible pesage d'animaux WE2111 A3603-2.0...
Repères d'étalonnage et de plombage, cachet, compteur d'étalonnage Repères d'étalonnage et de plombage, cachet, compteur d'étalonnage Le calibrage du WE2111 est exécuté par voie purement numérique. Les résultats sont enregistrés protégés contre les pannes secteur. Les réglages modifiant le calibrage en sont possibles qu'en mode de configuration FULL (protection par mot de passe recommandée).
Seite 492
C00008. En mode apte à la vérification, à l'issue de la constatation de conformité, l'état actuel du compteur est aussi norma- lement noté sur l'étiquette enfichable avec les paramètres de la balance (voir ci-dessous). WE2111 A3603-2.0...
Seite 493
à cet effet, jusqu'à ce que tous les para- mètres soient visibles dans la fenêtre (voir la figure). Collez ensuite le plombage sur cette fente d'insertion Fig. 12: Fente d'insertion et affichage des paramètres de la balance WE2111 A3603-2.0...
Seules les fonctions disponibles sur le WE2111 peuvent accéder à cette mémoire, afin d'empêcher la manipulation des données. En complé- ment, la plupart des réglages ne sont possibles qu'en mode de configuration FULL et modifient donc le comp- teur d'étalonnage.
Seite 495
La capacité de mémoire (totAL apparaît d'abord, sui- vie du nombre d'enregistrements pouvant être mis en mémoire). Supprimer manuellement la mémoire alibi La suppression manuelle de 10 % des entrées les plus anciennes ne modifie pas le compteur d'étalonnage et est WE2111 A3603-2.0...
, pour valider la suppression. Le système affiche Cont y. Pressez la touche dONE apparaît sur l'afficheur. 20.1 Initialiser et activer la mémoire alibi Les réglages suivants ne sont possibles qu'en mode de configuration FULL et modifient le compteurs d'étalon- nage. WE2111 A3603-2.0...
Seite 497
Initialiser la mémoire alibi Pressez la touche jusqu'à ce que iNit soit affiché. Pressez la touche Le système affiche Cont n, étant donné que l'initiali- sation supprime le contenu de la mémoire entière et donc également tous les enregistrements. WE2111 A3603-2.0...
Seite 498
Une suppression automatique ne modifie pas non plus le compteur d'étalonnage. Pressez la touche , pour valider le réglage. Pressez la touche , pendant plusieurs secondes, pour enregistrer les réglages. WE2111 A3603-2.0...
ADC (également indiquée sur le certificat d'étalonnage) et le compteur d'étalonnage (par ex. C00008). Utilisez les touches en face avant pour visualiser les diverses entrées. Quitter le mode Alibi Pressez la touche pendant plusieurs secondes. uEiGH apparaît à l'écran. WE2111 A3603-2.0...
Seite 500
Longue Permet de quitter le mode Alibi. Courte Affiche l'entrée précédente de l'enregistrement actuel. Longue Affiche la première entrée de l'enregistrement actuel. Courte Affiche l'entrée suivante de l'enregistrement actuel. Longue Affiche la dernière entrée de l'enregistrement actuel. WE2111 A3603-2.0...
Seite 501
Le fichier d'exportation est enregistré dans le répertoire principal (répertoire racine, root) du support mémoire. En tant que nom de fichier, le système utilise WE2111_<numéro de série du WE2111>_<date actuelle (yyyymmdd)>_<heure actuelle (hhmmss)>_dsd.csv. Les crochets figurant dans le nom de fichier caractérisent les paramètres utilisés et ne sont pas inscrits.
Seite 502
EJECt (eject, éjecter) soit affiché. Pressez la touche Dès que Not YEt disparaît (ou n'est pas encore affi- ché), vous pouvez déconnecter la mémoire USB. EJECt apparaît à nouveau à l'écran. WE2111 A3603-2.0...
Options Options Le WE2111 prévoit plusieurs options décrites dans le pré- sent paragraphe. 21.1 Afficher une valeur de mesure en mV/V L'écran doit afficher buiLd ou l'une des options du menu principal, pour que vous puissiez procéder au réglage ci- dessous : ...
à nouveau normalement (mode soumis à la vérifica- tion). En mode industriel, la valeur de poids actuelle est af- fichée avec une résolution 10 fois plus élevée. En mode industriel, mettez à nouveau sur OFF, pour désactiver l'affichage à résolution plus élevée. WE2111 A3603-2.0...
, pendant plusieurs secondes, pour quitter le mode de configuration. 21.4 Journal des modifications Le WE2111 comporte une mémoire non volatile de 512 Ko (protégée contre les pannes secteur) inaccessible de l'extérieur enregistrant les modifications des para- mètres importants pour l'étalonnage, la suppression du fichier journal et les mises à...
Seite 506
L'écran doit afficher buiLd ou l'une des options du menu principal, pour que vous puissiez procéder au réglage ci- dessous : Pressez la touche de manière répétée jusqu'à ce que CHG.LOG apparaisse à l'écran. Pressez la touche StAtUS (status) apparaît à l'écran. WE2111 A3603-2.0...
Seite 507
CHG.LOG soit affiché. Pressez la touche Faites défiler les diverses entrées, voir Affectation des touches en mode Alibi et « Change log » (journal des modifications). Voir aussi Quitter le mode Alibi (Modification). WE2111 A3603-2.0...
Seite 508
Le fichier d'exportation est enregistré dans le répertoire principal (répertoire racine, root) du support mémoire. En tant que nom de fichier, le système utilise WE2111_<numéro de série du WE2111>_<date actuelle (yyyymmdd)>_<heure actuelle (hhmmss)>_changelog.csv. Les crochets figurant dans le nom de fichier caractérisent les paramètres utilisés et ne sont pas inscrits.
Seite 509
Supprimer le journal des modifications L'écran doit afficher buiLd ou l'une des options du menu principal, pour que vous puissiez procéder au réglage ci- dessous : Pressez la touche de manière répétée jusqu'à ce que CHG.LOG apparaisse à l'écran. WE2111 A3603-2.0...
: Pressez la touche de manière répétée jusqu'à ce que SPEC (Special) soit affiché. Pressez la touche de manière répétée jusqu'à ce que bU22Er (buzzer) soit affiché. WE2111 A3603-2.0...
Pressez la touche de manière répétée jusqu'à ce que bUttON (button) soit affiché. Pressez la touche Le système affiche le réglage actuel, la valeur par dé- faut étant YYYYY. Les caractères correspondent à l'ordre des touches en face avant. WE2111 A3603-2.0...
Le fichier d'exportation est enregistré dans le répertoire principal (répertoire racine, root) du support mémoire. En tant que nom de fichier, le système utilise WE2111_<numéro de série du WE2111>_<date actuelle (yyyymmdd)>_<heure actuelle (hhmmss)>_settings.rdb. Les crochets figurant dans le nom de fichier caractérisent les paramètres utilisés et ne sont pas inscrits.
USB. 21.8 Imprimer la configuration complète Vous pouvez imprimer tous les paramètres du WE2111 sur une imprimante raccordée au port Serial 2. L'écran doit afficher buiLd ou l'une des options du menu principal, pour que vous puissiez procéder au réglage ci-dessous : ...
USB ou un disque dur USB. Toutefois, son format doit être FAT32, le système ne détectant pas d'autres formats. Le fichier comportant le nouveau firmware (seul un fichier doit être disponible) doit se trouver dans le répertoire prin- WE2111 A3603-2.0...
Seite 515
à l'écran. En présence de plusieurs fichiers, nAnY rpk apparaît à l'écran. Pressez la touche , pour valider l'opération. Le système affiche Cont y. Pressez la touche bUSY apparaît pendant la copie et ensuite dONE. WE2111 A3603-2.0...
Seite 516
Pressez la touche jusqu'à ce que EJECt (eject, éjecter) soit affiché. Pressez la touche Dès que Not YEt disparaît (ou n'est pas encore affi- ché), vous pouvez déconnecter la mémoire USB. EJECt apparaît à nouveau à l'écran. WE2111 A3603-2.0...
Explication des affichages d'erreurs, élimination d'erreur Explication des affichages d'erreurs, élimination d'erreur En présence d'une erreur, le WE2111 affiche un message fournissant des informations sur la cause. Les messages courts apparaissent durablement à l'écran. Les messages plus longs défilent à l'écran un mot après l'autre. Ces mots sont répétés tant que l'erreur persiste.
échelon, voir Définitions générales. Une configuration de balance pour plus de 100 000 valeurs mini- HIGH males d'échelon n'est pas autorisée. Vérifiez la plage nominale (charge nominale) indiquée et la valeur minimale d'échelon, voir Définitions générales. WE2111 A3603-2.0...
Seite 519
Le signal de peson est trop faible pour les réglages sélectionnés. Vérifiez la charge nominale de balance entrée, le branchement du câble et si la capacité des pesons est trop importante. L'ajustage du zéro (zero) doit être exécuté avant l'équilibrage de ZERO la plage (span). WE2111 A3603-2.0...
22.3 Erreur système Le fonctionnement correct de tous les composants du WE2111 est surveillé en continu. Les erreurs et dépasse- ments des limites de tolérance admissibles apparaissent à l'écran accompagnés du code E. Si plusieurs erreurs se sont produites, le système additionne les numéros d'erreurs.
Vérifiez la connexion des câbles des pesons à la re- n'est pas stable. cherche de connecteurs lâches, de câbles endommagés, etc. Vérifiez que les connecteurs du WE2111 soient bien en place. Vérifiez si la résolution réglée et la plage nominale sont correctes, voir Ajustage et calibrage.
Seite 522
Solutions possibles La liaison entre le Vérifiez la configuration de l'interface série. PC et le WE2111 ne Vérifiez le câble RS-232 : vous ne devez pas utiliser de fonctionne pas. câble null-modem et les broches 6 à 9 ne doivent pas être raccordées.
Seite 523
Détection d'immobilisation. Si l'immobilisation n'est pas obtenue dans les 15 secondes, un message d'erreur apparaît et l'action est annulée. En mode industriel, vous pouvez définir que l'action soit tout de même exécutée, voir Activer/désactiver les touches. WE2111 A3603-2.0...
œuvre dans votre pays. Emballages L'emballage d'origine des appareils HBM se compose de matériaux recyclables et peut donc être recyclé. Pour des raisons écologiques, il est préférable de ne pas nous ren- voyer les emballages vides.
Support technique Support technique Si des problèmes devaient survenir lors de l'utilisation des WE2111 l'assistance technique de HBM vous propose : Assistance par e-mail software@hbm.com Assistance téléphonique L'assistance téléphonique est disponible entre 09:00 et 17:00 heures (HEC) tous les jours ouvrés : +49 (0) 6151 803-0 Assistance par télécopie...
Index Symbols Assistance par e-mail 177 Assistance par télécopie 177 (DSD) 146 Assistance téléphonique 177 Auto-zero 89 Affectation des contacts WE2111-ZCC Affectation des contacts WE2111-ZS Balance multi-intervalle 75 Balance multi-sensibilité 75 Affectation des touches 19 Bouton caché 40 Affichage 16 Bouton en face arrière 40...
Seite 528
Définir le point décimal 21 Détection d'immobilisation 96 Domaine d'application Fils de contre-réaction industriel 37 désactiver le contrôle 51 soumis à la vérification 37 Filtre 98 Domaine soumis à la vérification Fonctions des touches 19 à noter 70 WE2111 A3603-2.0...
Seite 529
Menu de configuration afficher 20 quitter 20 Imprimante formats de sortie 127 Mise à jour du firmware de HBM, télécharger Imrimante sortie spécifique au client 133 logicielle de HBM, télécharger 177 Indice de protection 56 Mise à jour de firmware de HBM, télécharger 177...
Seite 530
Paramètres de balance 143 Seconde étendue de mesure 71 Plage de mise à zéro 91 Set-points 102 Plage nominale de la balance 76 Slot de boîtier 56 Plage nulle 92 Sortie analogique 112 Point de linéarisation 83 ajuster 114 tester 113 WE2111 A3603-2.0...
Seite 531
Zero tracking 90 Suppression de la mémoire alibi 147 Symbole de l'afficheur 16 Tester des entrées numériques 111 Tester des sorties numériques 111 Touche de fonction F 106 Touches activer 163 désactiver 163 Unit 77 Utilisation du WE2111 17 WE2111 A3603-2.0...