Herunterladen Inhalt Inhalt Diese Seite drucken

Werbung

Verfügbare Sprachen
  • DE

Verfügbare Sprachen

  • DEUTSCH, seite 48
NEDERLANDS
In de bijgaande Snelstart handleiding wordt stap voor stap uitgelegd hoe u de
Conceptronic Grab'n'GO 3,5" Media Player met Cardreader kunt gebruiken.
Ingeval van problemen adviseren wij u onze support-site te bezoeken (ga naar:
www.conceptronic.net en klik op 'Support'). Hier vindt u een database met veelgestelde
vragen waar u hoogstwaarschijnlijk de oplossing voor uw probleem kunt vinden.
Heeft u andere vragen over uw product die u niet op de website kunt vinden, neem dan
contact met ons op via e-mail: support@conceptronic.net
Voor meer informatie over Conceptronic producten kunt u terecht op de Conceptronic
website: www.conceptronic.net.
1. Introductie
Voordat u met de bediening van het apparaat begint wordt geadviseerd om deze handleiding
uitvoerig te lezen en te bewaren voor toekomstige naslag.
1.1 Inhoud van de verpakking
Controleer de inhoud van de verpakking voordat u het apparaat aansluit op uw tv of monitor:
• 1x Conceptronic Grab'n'GO 3,5" Media Player met Cardreader
• 1x Afstandsbediening
• 2x Batterij voor Afstandsbediening (AAA, 1.5v)
• 1x Spanningsadapter (12V DC, 2.5A)
• 1x Audio/Video kabel (Composiet)
• 1x Audio/Video (Composiet) naar SCART kabel
• 1x S-VIDEO naar S-VIDEO kabel
• 1x SPDIF Optische kabel
• 1x USB kabel
• 1x Meertalige Snelstart Handleiding
• 1x Standaard voor CMED3PLUS
1.2 Mogelijkheden
• Schakelt automatisch tussen PC en Media Speler optie::
Aangesloten op de PC werkt het apparaat als Massa-Opslag Apparaat.
Aangesloten op de TV/Monitor werkt het apparaat als Media Speler.
Conceptronic CMED3PLUS
Snelstart handleiding
Hartelijk gefeliciteerd met de aanschaf van uw
Conceptronic CMED3PLUS.
1

Werbung

Inhaltsverzeichnis
loading

Inhaltszusammenfassung für Conceptronic CMED3PLUS

  • Seite 1 Conceptronic Grab‘n’GO 3,5” Media Player met Cardreader kunt gebruiken. Ingeval van problemen adviseren wij u onze support-site te bezoeken (ga naar: www.conceptronic.net en klik op ‘Support’). Hier vindt u een database met veelgestelde vragen waar u hoogstwaarschijnlijk de oplossing voor uw probleem kunt vinden.
  • Seite 2 • NOOIT het apparaat schudden, laten vallen of tegen het apparaat stoten. • Om oververhitting tegen te gaan dient u het apparaat niet af te dekken. • De CMED3PLUS ondersteunt alleen het FAT / FAT32 bestandssysteem (NTFS wordt niet ondersteund).
  • Seite 3 NEDERLANDS 2. Functies van de Grab’n’GO 3,5” Media Player met Cardreader 2.1 Uitleg van de CMED3PLUS • Voorzijde 1. Ontvanger voor Afstandsbediening 4. HDD LED 7. SM Kaart Slot 2. Spannings-Indicatie LED 5. MMC/MS/SD kaart Slot 8. USB HOST Aansluiting 3.
  • Seite 4 Zet uw computer aan. Sluit de spannings-adapter aan op de CMED3PLUS en een vrij stopcontact. Sluit de USB kabel aan op de CMED3PLUS en een vrije USB poort op uw computer. De computer zal de CMED3PLUS automatisch herkennen en installeren, een stationsletter toewijzen en gebruiken als Massa-Opslag Apparaat.
  • Seite 5 CMED3PLUS. Controleer de handleiding van uw TV voor het selecteren van de juiste ingang voor de CMED3PLUS. Als u de CMED3PLUS in VGA stand gebruikt, dient u op de knop VGA op de afstandsbediening te drukken om de juiste uitgang te selecteren.
  • Seite 6 NEDERLANDS 4. De Afstandsbediening 4.1 Uitleg van de Afstandsbediening...
  • Seite 7 NEDERLANDS Beschrijving Beschrijving POWER SLOW Zet apparaat in/uit stand-by stand. Langzaam afspelen. (AAN/UIT) P / N FUNC Selecteer het video systeem. (PAL / NTSC) Geef de bestandsinformatie weer of laat het bestandsmenu zien. AUDIO ENTER Selecteer geluids-spoor. Bevestig selectie. SLIDE FILE Start de muziek-slideshow stand of stap-voor- Ververs het FILE menu.
  • Seite 8: Belangrijke Informatie

    (Indien er maar 1 partitie aanwezig is op de Harde Schijf). Als er een USB apparaat (Bijvoorbeeld een externe harde schijf of USB Stick) of geheugenkaart is aangesloten op de CMED3PLUS zal het de CMED3PLUS een Apparaatlijst tonen met de gevonden apparaten.
  • Seite 9 NEDERLANDS 5.2 Uitgebreide bediening Bestandslijst Als er geen externe apparaten zijn aangesloten op de CMED3PLUS (Alleen de interne harde schijf is aanwezig) zal de Bestandslijst getoond worden op het scherm als de CMED3PLAY met / POWER knop wordt ingeschakeld. Als er meerdere apparaten zijn verbonden (USB stick, geheugenkaart,etc.) zal de Apparaatlijst getoond worden zodra de CMED3PLUS ingeschakeld wordt.
  • Seite 10 Codec vereist, welke niet wordt ondersteund door de CMED3PLUS. Als u een bestand probeert af te spelen welke niet ondersteund wordt zult u de melding “CODEC NOT SUPPORTED” zien op uw scherm.
  • Seite 11 NEDERLANDS 6.2 Opties bij het afspelen en beluisteren van muziek Muziek afspelen De Conceptronic CMED3PLUS heeft verschillende mogelijkheden om muziek af te spelen. (WAV, MP3 en WMA worden ondersteund) Het afspelen van muziek: Druk op MENU en kies de map met muziek die u wilt afspelen. Tijdens het afspelen zal de titel van het nummer getoond worden en kunt u de Equalizer wijzigen (Met de TRANS knop).
  • Seite 12 NEDERLANDS Foto’s Inzoomen Druk op de ZOOM knop om ZOOM mode in of uit te schakelen, of om de ZOOM factor te wijzigen. Als een foto is vergroot kunt u met de / / / knoppen uw foto bekijken. Muziek Slide-show (het bekijken van foto’s met achtergrondmuziek) Selecteer de beginfoto en druk op SLIDE om te starten.
  • Seite 13 NEDERLANDS 6.4 Opties in de bestandslijst Gebruik de / knoppen om een bestand of map te selecteren;de (PREV/NEXT) knoppen kunnen gebruikt worden om naar de volgende/vorige pagina te gaan. Als een foto of film is geselecteerd zal een voorbeeld met informatie getoond worden aan de rechterkant van het scherm.
  • Seite 14: Setup Menu

    NEDERLANDS 7. Setup Menu Als het apparaat in STOP stand staat kunt u op de SETUP knop drukken om het SETUP Menu te openen. Gebruik de / / / knoppen om de selectie te wijzigen en druk op de / ENTER knop om de selectie te bevestigen.
  • Seite 15: Tips & Problemen Oplossen

    FAT32 Specificaties kunnen veranderen zonder voorafgaande melding hiervan. 9. Tips & Problemen oplossen Gebruik de onderstaande opties om problemen met de CMED3PLUS op te lossen als deze niet correct functioneert: De Spanningsindicatie LED brandt niet. • De spanningsadapter is niet verbonden met de CMED3PLUS. Sluit de spanningsadapter aan op de...
  • Seite 16 • De Audio kabel is niet goed aangesloten. Controleer of de Audio kabel correct is aangesloten op uw TV of versterker. • De CMED3PLUS is aangesloten op een versterker, maar deze is uitgeschakeld. Schakel de versterker in. • Het geluidsspoor van het MPEG2 of VOB bestand bevat geen geluid. Druk op de AUDIO knop op de afstandsbediening om het juiste geluidsspoor te selecteren.
  • Seite 17 Conceptronic Grab’n’GO 3,5” Media Player with Cardreader. When problems occur, we advise you to go to our support-site (go to www.conceptronic.net and click ‘Support’. Here you will find the Frequently Asked Questions Database. When you have other questions about your product and you cannot find it at our website, then contact us by e-mail: support@conceptronic.net.
  • Seite 18 • NEVER drop, shake or bump the device. • To prevent overheating, do not cover the device. • The CMED3PLUS only supports the FAT / FAT32 File system (NTFS is not supported). WARNING: When you format the Harddisk to NTFS, it only functions as removable Harddisk for your computer.
  • Seite 19 ENGLISH Functionalities of the Grab’n’GO 3,5” Media Player with Cardreader 2.1 Identify the parts of the CMED3PLUS • Front View 1. Remote Control Receiver 4. HDD LED 7. SM Card Slot 2. Power LED 5. MMC/MS/SD Card Slot 8. USB HOST Jack 3.
  • Seite 20 3.1 Connecting to your Computer Turn on your computer. Connect the powersupply to the CMED3PLUS and to the power outlet. Connect the USB Cable to the CMED3PLUS and your computer. The computer will automatically detect and configure the device, assign new drive letter(s), and then use it as a mass storage device.
  • Seite 21 When using a TV you can use the S-VIDEO, Composite, Composite to SCART or Component output of the CMED3PLUS. Please check the manual of your TV to select to correct input channel to display the video output of the CMED3PLUS. If you have used the CMED3PLUS in VGA mode,...
  • Seite 22 ENGLISH The Remote Control 4.1 Explanation of the Remote Control...
  • Seite 23 ENGLISH Description Description POWER SLOW Enter or exit Standby mode. (ON/OFF) Play back slowly. P / N FUNC Select video system. (PAL / NTSC) Show file information or file operations menu. AUDIO ENTER Select audio stream. Confirm selection. SLIDE FILE Enter Music-slide-show mode or step-play.
  • Seite 24: Important Remarks

    2. Switch the device on with the power switch on the back of the device. The Power LED will become solid blue. The device is now operational. When there is no other device connected to the CMED3PLUS, it will show the FILE LIBRARY with the contents of your Harddisk (If only 1 partition is present).
  • Seite 25 FILE LIBRARY To change the connected device: If there are more devices connected to the CMED3PLUS, you can press the MENU button to go to the DEVICE LIST and select a device by pressing / button and the / ENTER button.
  • Seite 26 NOTE: Most Video Codec’s are supported on the CMED3PLUS (Like XviD, AVI, MPEG2, etc.) but it is possible that you have files that require a Codec, which is not included with the CMED3PLUS. If you try to playback a file with a not supported Codec, you will see the message “CODEC NOT SUPPORTED”.
  • Seite 27 ENGLISH When playing back Music files, press button to adjust the play speed and press ENTER/ button to return to normal speed. Direct access button to music folder You can create 1 music folder, which can be directly accessed by pressing the MUSIC-button on the remote control.
  • Seite 28 ENGLISH You can stop viewing the photo by press PAUSE button once (music is still playing). Press PAUSE again, the music will stop. Press the / ENTER button to resume playing. You can set the interval display time between two photos by pressing the DELAY button. Default interval time is set via SETUP MENU->PREFERENCES->DELAY.
  • Seite 29: General Setup

    ENGLISH 7. Setup Menu In stop state, press SETUP button to enter SETUP MENU. Press / / / button to move cursor, and press / ENTER button to confirm selection, press SETUP button when finished. 7.1 General setup • ORIENTATION: keep rotation information. Options: ON, OFF Default: ON •...
  • Seite 30: Specifications

    9. Tips & Troubleshooting Use the tips below for troubleshooting when your CMED3PLUS is not working properly: The Power LED doesn’t light up • The power supply is not connected to the CMED3PLUS. Reconnect the power supply to the CMED3PLUS.
  • Seite 31 • The Audio cable is not connected properly. Make sure the cable is connected correctly to your TV or amplifier. • The CMED3PLUS is connected with an amplifier, but the amplifier is turned off. Turn on the amplifier. • The audio stream of the MPEG2 or VOB file is invalid. Press the AUDIO button on the remote control to adjust to the proper audio stream.
  • Seite 32: Guía De Instalación Rápida

    Si encuentra problemas, le aconsejamos que se dirija a nuestra página web www.conceptronic.net y haga clic en «Support». Aquí encontrará la base de datos de las preguntas más frecuentes o FAQ. Si tiene otras preguntas sobre su producto y no las encuentra en nuestro sitio web, póngase en contacto con nuestro servicio técnico por correo electrónico:...
  • Seite 33 • NUNCA deje caer, sacuda o golpee el dispositivo. • Para evitar su calentamiento, no cubra el dispositivo. • El CMED3PLUS es compatible únicamente con el sistema de archivos FAT/FAT32 (no es compatible con archivos NTFS). ATENCIÓN: Al formatear el disco duro a NTFS, sólo funciona como disco duro extraíble para su ordenador.
  • Seite 34 ESPAÑOL Funcionalidades del reproductor multimedia Grab‘n’GO 3,5” con lector de tarjetas 2.1 Partes del CMED3PLUS • Parte frontal 1. Receptor del mando a distancia 4. LED de disco duro 7. Ranura de tarjeta SM 2. LED de encendido 5. Ranura de tarjeta MMC/MS/SD 8. Entrada de host USB 3.
  • Seite 35 3.1 Conexión al ordenador Encienda el ordenador. Conecte la alimentación al CMED3PLUS y a la toma de corriente. Conecte el cable USB al CMED3PLUS y al ordenador. El ordenador detectará automáticamente el dispositivo y lo configurará, le asignará una nueva letra de unidad y luego lo utilizará...
  • Seite 36: Conexión Al Televisor

    Component del CMED3PLUS. Consulte el manual de su televisor para seleccionar correctamente el canal de entrada y mostrar la salida de vídeo del CMED3PLUS. Si ha utilizado el CMED3PLUS en modo VGA, pulse el botón VGA del mando a distancia para volver a cambiar la salida de vídeo en su televisor.
  • Seite 37 ESPAÑOL Mando a distancia 4.1 Descripción del mando a distancia...
  • Seite 38 ESPAÑOL N.º Descripción N.º Descripción POWER SLOW Entrar o salir del modo Standby. (ON/OFF) Reproducir lentamente. P / N FUNC Seleccionar el sistema de vídeo. (PAL / NTSC) Mostrar la información de fichero o el menú de operaciones de fichero. AUDIO ENTER Seleccionar el flujo de audio.
  • Seite 39: Indicaciones Importantes

    Cuando un dispositivo USB (como un disco duro o Flashdrive USB) o una tarjeta de memoria está conectado al CMED3PLUS, la pantalla mostrará la DEVICE LIST (lista de dispositivos) con todos los dispositivos encontrados. Si el dispositivo conectado contiene una gran cantidad de ficheros, la detección del dispositivo puede tardar un poco.
  • Seite 40 ESPAÑOL 5.2 Funcionamiento detallado Biblioteca de archivos Si no hay ningún dispositivo externo conectado al CMED3PLUS (sólo está presente el disco duro interno), la FILE LIBRARY (biblioteca de ficheros) aparecerá en la pantalla de TV cuando pulse el botón / POWER para entrar al estado de funcionamiento (como se ilustra a continuación).
  • Seite 41 NOTA: El CMED3PLUS es compatible con la mayoría de codecs de vídeo, como XviD, AVI, MPEG2, etc. Sin embargo, es posible que usted necesite para sus archivos algún codec que no incluya el CMED3PLUS. Si trata de reproducir un archivo con un codec no compatible, aparecerá el mensaje...
  • Seite 42 ESPAÑOL 6.2 Opciones sobre reproducir y escuchar música Reproducción de música El CMED3PLUS de Conceptronic ofrece diversos modos de reproducción de música (son compatibles los formatos WAV, MP3 y WMA). Reproducir archivos de música: Pulse el botón MENU y seleccione la carpeta correspondiente donde se encuentran los archivos de música que desea reproducir.
  • Seite 43 ESPAÑOL 6.3 Opciones sobre la reproducción y visualización de fotografías Durante la visualización de fotografías, puede utilizar el botón ROTATE para girar las fotos. El mensaje de rotación de las fotos se mantiene por defecto hasta que apague el dispositivo o lo configure en modo Stand-by.
  • Seite 44 ESPAÑOL 6.4 Funcionamiento de la biblioteca de archivos Utilice el botón / para seleccionar un archivo o una carpeta, y el botón (PREV/NEXT) para pasar a la página anterior/siguiente. Si selecciona una fotografía o un vídeo, podrá disfrutar de una vista previa y de la información correspondiente en la parte derecha de la pantalla.
  • Seite 45: Menú De Configuración

    ESPAÑOL 7. Menú de configuración En estado STOP, pulse el botón SETUP para activar el menú de configuración. Pulse el botón / / / para mover el cursor y después pulse el botón (ENTER) para confirmar la selección. Una vez hecho esto, pulse el botón SETUP. 7.1 Configuración general (General setup) •...
  • Seite 46: Especificaciones

    Aplique los consejos que indicamos a continuación para resolver los problemas que puedan surgir en caso de que su CMED3PLUS no funcione correctamente: El LED de encendido no se ilumina • El CMED3PLUS no está conectado a la toma de alimentación. Conecte el CMED3PLUS a la toma de corriente.
  • Seite 47 El mando a distancia no funciona • Apunte con el mando a distancia directamente hacia el receptor del CMED3PLUS en un ángulo de 30º aproximadamente. • Utilice el mando a distancia teniendo en cuenta su alcance operativo de 5 metros.
  • Seite 48 Verwendung Ihres Conceptronic Grab’n’GO 3,5“ Media Players mit Kartenleser. Sollten irgendwelche Probleme auftreten, empfehlen wir ihnen, auf unsere Support-Seite im Internet zu gehen (www.conceptronic.net) und auf 'Support’ zu klicken. Dort werden sie die "Frequently Asked Questions" Datenbank finden. Falls sie andere Fragen zu ihrem Produkt haben und sie diese nicht auf unserer Website finden können, kontaktieren sie uns bitte per E-Mail: support@conceptronic.net...
  • Seite 49 • Decken Sie das Gerät nicht ab, um eine Überhitzung zu vermeiden. • Der CMED3PLUS unterstützt nur das FAT- / FAT32-Dateisystem (NTFS wird nicht unterstützt). ACHTUNG: Wenn Sie die Festplatte mit NTFS formatieren, kann sie nur als Wechselfestplatte für Ihren Computer verwendet werden.
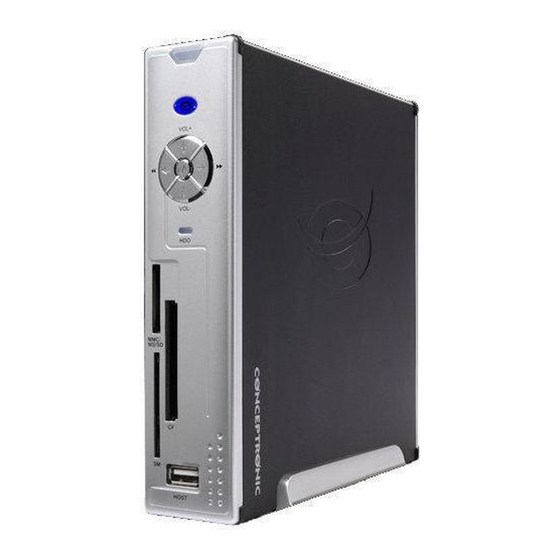
  • Seite 50 DEUTSCH 2. Functionalities of the Grab’n’GO 3,5” Media Player with Cardreader Funktionen des Grab ‘n’ GO 3,5” Media Players mit Kartenleser 2.1. • Vorderseite 1. Fernbedienungsempfänger 4. Festplatten-LED 7. SM-Kartensteckplatz 2. Power LED 5. MMC-/MS-/SD-Kartensteckplatz 8. USB HOST-Buchse 3. Steuerungstasten 6.
  • Seite 51 Schalten Sie Ihren Computer ein. Schließen Sie den CMED3PLUS an die Stromversorgung an. Schließen Sie das USB-Kabel an den CMED3PLUS und Ihren Computer an. Der Computer entdeckt und konfiguriert das Gerät automatisch. Er ordnet ihm als Massenspeichergerät einen neuen Laufwerkbuchstaben zu. (Ihr Laufwerk ist mit Dateisystem FAT32 vorformatiert.)
  • Seite 52 Für Fernseher können Sie die S-VIDEO-, Composite-, Composite-SCART oder Component- Ausgänge des CMED3PLUS verwenden. Sehen Sie bitte im Handbuch Ihres Fernsehers nach, welches der korrekte Eingangskanal für die Videoausgabe des CMED3PLUS ist. Wenn Sie den CMED3PLUS im VGA-Modus verwendet haben, betätigen Sie bitte die VGA-Taste auf der Fernbedienung, um die VIDEO-Ausgabe wieder auf den Fernseher umzuschalten.
  • Seite 53 DEUTSCH Fernbedienung 4.1. Beschreibung der Fernbedienung...
  • Seite 54 DEUTSCH Beschreibung Beschreibung POWER SLOW Standby-Modus aktivieren/deaktivieren Langsame Wiedergabe (EIN/AUS) FUNC Auswahl des Videosystems (PAL / NTSC) Anzeige von Dateiinformationen oder Menü für Dateioperationen AUDIO ENTER Auswahl Audiostrom Auswahl bestätigen SLIDE FILE Aufrufen des Modus Musik-Diashow oder Step- Anzeige der Verzeichnisstruktur des Geräts Play [schrittweises Abspielen] VOL- VIDEO...
  • Seite 55: Wichtige Hinweise

    2. Betätigen Sie den Power-Schalter auf der Rückseite des Geräts, um das Gerät einzuschalten. Daraufhin leuchtet die Power-LED-Anzeige blau. Das Gerät ist jetzt betriebsbereit. Wenn kein anderes Gerät am CMED3PLUS angeschlossen ist, wird die FILE LIBRARY [DATEIBIBLIOTHEK] mit dem Inhalt Ihrer Festplatte angezeigt (wenn nur eine Partition vorhanden ist).
  • Seite 56: Einstellungen Für Filme, Musik Und Fotos

    DEVICELIST [GERATELISTE] FILE LIBRARY [DATEIBIBLIOTHEK] Auswahl des angeschlossenen Geräts: Wenn mehrere Geräte an den CMED3PLUS angeschlossen sind, können Sie durch Drücken der Taste MENU die DEVICE LIST [GERÄTELISTE] aufrufen und durch Drücken der Tasten / und / ENTER ein Gerät auswählen.
  • Seite 57 Wenn Sie mehr als einen Ordner erstellen, der mit „VIDEO ***” beginnt, öffnet das Gerät nur den ersten Ordner. HINWEIS: Der CMED3PLUS unterstützt die meisten Video-Codecs (wie XviD, AVI, MPEG2 usw.). Es ist jedoch möglich, dass Sie Dateien haben, die einen Codec erfordern, der auf dem CMED3PLUS nicht vorhanden ist.
  • Seite 58: Optionen Für Die Musikwiedergabe

    DEUTSCH 6.2 Optionen für die Musikwiedergabe Wiedergabe von Musik Der Conceptronic CMED3PLUS hat verschiedene Betriebsarten, in denen Musik wiedergegeben werden kann. (WAV, MPW und WMA werden unterstützt.) Für die Wiedergabe von Musikdateien: Drücken Sie die Taste MENU und wählen Sie den Ordner, aus dem die Musikdatei wiedergegeben werden soll.
  • Seite 59 DEUTSCH MODE 01: FULL SCREEN [VOLLBILD] MODE 02: RANDOM [ZUFALLSWIEDERGABE] MODE 03: ROLL: TOP TO BOTTOM [VON OBEN NACH UNTEN ÜBERBLENDEN] MODE 04: ROLL: BOTTOM TO TOP [VON UNTEN NACH OBEN ÜBERBLENDEN] MODE 05: ROLL: TOP/BOTTOM TO CENTER [VON OBEN/UNTEN ZUR MITTE ÜBERBLENDEN] MODE 06: ROLL: CENTER TO TOP/BOTTOM [VON DER MITTE NACH OBEN/UNTEN ÜBERBLENDEN] MODE 07: BLIND: TOP TO BOTTOM [ROLLOEFFEKT VON OBEN NACH UNTEN]...
  • Seite 60 DEUTSCH 6.4 Operationen in der File Library Wählen Sie über die Tasten / eine Datei oder einen Ordner. Über die Tasten (VOR/ZURÜCK) können Sie vor-/zurückblättern. Sobald ein Foto oder ein Video ausgewählt wurde, erscheint eine Voranzeige davon auf der rechten Seite des Fernsehbildschirms. Wenn eine Musikdatei ausgewählt wurde, wird die Musikwiedergabe gestartet und die entsprechenden Informationen werden auf der rechten Seite des Bildschirms angezeigt.
  • Seite 61: Allgemeine Einstellungen (General Setup)

    DEUTSCH 7. Einstellungsmenü Drücken Sie im STOP-Status die Taste SETUP, um das SETUP MENU aufzurufen. Bewegen Sie mithilfe der Tasten / / / den Cursor und drücken Sie auf die Taste / ENTER, um die Auswahl zu bestätigen. Drücken Sie danach die Taste SETUP.
  • Seite 62: Spezifikationen

    DEUTSCH 7.3 Präferenzen (Preferences) • VIDEOAUSGABE: EINSTELLEN DER VIDEOAUSGABE. Optionen: S-VIDEO, COMPONENT, P-SCAN YPBPR, VGA und INTERLACE RGB. • OSD LANG [ON-SCREEN-DISPLAY SPRACHE]: AUSWAHL DER OSD-SPRACHE. Optionen: ENGLISH, FRANZÖSISCH, DEUTSCH, ITALIENISCH, PORTUGIESISCH, SPANISCH, NIEDERLÄNDISCH Grundeinstellung: ENGLISCH • OSD MESSAGE [OSD-MITTEILUNGEN]: OSD- MITTEILUNG während der Wiedergabe einer Datei auswählen.
  • Seite 63: Tipps Zur Fehlerbeseitigung

    Im Folgenden finden Sie Tipps zur Fehlerbeseitigung, wenn Ihr CMED3PLUS nicht ordnungsgemäß funktioniert: Die Power-LED-Anzeige leuchtet nicht • Der CMED3PLUS ist nicht an die Stromversorgung angeschlossen. Schließen Sie den CMED3PLUS an die Stromversorgung an. Es erscheint keine Anzeige auf dem Display.
  • Seite 64 [CODEC NICHT UNTERSTÜTZT]”. • Die Filmdatei wurde mit einem Codec erzeugt, den der CMED3PLUS nicht unterstützt. Eine Liste der vom CMED3PLUS unterstützten Codecs finden Sie auf unserer Webseite unter www.conceptronic.net. Der CMED3PLUS zeigt nicht alle(n) Festplatten-Partitionen / Inhalt an. • Die Partition auf der Festplatte ist keine Primärpartition. Partitionieren Sie die Festplatte erneut und stellen Sie sicher, dass alle Partitionen primär sind.
  • Seite 65: Guide D'installation Rapide

    En cas de problèmes, nous vous recommandons de vous adresser à notre service technique (allez à www.conceptronic.net et cliquez sur « support »). Vous trouverez dans cette section la Base de Données des Foires Aux Questions. Si vous avez d’autres questions concernant votre produit et que vous ne trouvez pas la solution sur notre site web, contactez-nous par e-mail : support@conceptronic.net.
  • Seite 66: Précautions D'usage

    • Ne JAMAIS faire tomber, secouer ou porter des coups à l’appareil. • Pour éviter toute surchauffe, ne couvrez pas l’appareil. • Le CMED3PLUS n’est compatible qu’avec le système de fichiers FAT / FAT32 (non compatible avec NTFS). ATTENTION: Lorsque vous formatez votre disque dur sur NTFS, il ne fonctionne que comme Disque dur amovible pour votre ordinateur.
  • Seite 67 FRANÇAIS Fonctions du Lecteur multimédia Conceptronic Grab’n’GO 3,5" avec Lecteur de carte 2.1 Identification des composants du CMED3PLUS • Partie avant 1. Récepteur de Télécommande 4. LED Disque dur 7. Encoche de Carte SM 2. Led d'Alimentation 5. Encoche de Carte MMC/MS/SD 8.
  • Seite 68 3.1 Brancher sur votre Ordinateur Allumez votre ordinateur. Branchez l'alimentation électrique sur le CMED3PLUS et sur la prise électrique. Branchez le câble USB sur le CMED3PLUS et sur votre ordinateur. L’ordinateur détecte automatiquement l’appareil et le configure, lui attribue une lettre correspondant à...
  • Seite 69 CMED3PLUS. Si vous avez utilisé auparavant le CMED3PLUS avec un moniteur VGA, appuyez sur la touche VGA de votre télécommande pour repasser à la sortie VIDÉO de votre téléviseur.
  • Seite 70 FRANÇAIS Télécommande 4.1 Explication des fonctions de la télécommande...
  • Seite 71 FRANÇAIS Nº Description Nº Description POWER SLOW Entrer ou sortir du mode Standby. (ON/OFF) Reproduction lente FUNC Sélectionne le système vidéo. (PAL / NTSC) Présente les informations sur le fichier ou le menu de fonctions du fichier. AUDIO ENTER Sélectionne le courant audio. Confirme la sélection.
  • Seite 72: Fonctionnement De Base

    Lorsqu'un Dispositif USB (Comme un Disque dur ou un lecteur de mémoire flash USB) ou une Carte de Mémoire est branché sur le CMED3PLUS, l'écran présente la LISTE du DISPOSITIF avec tous les dispositifs trouvés. Si le dispositif connecté contient une grande quantité de fichiers, le système peut mettre quelques secondes à...
  • Seite 73 5.2 Fonctionnement plus détaillé FILE LIBRARY (répertoires des fichiers) Si aucun dispositif externe n'est branché sur le CMED3PLUS (seul le disque dur interne est présent), la BIBLIOTHÈQUE DE FICHIERS s’affiche à l’écran de TV lorsque vous appuyez sur le bouton / POWER pour entrer en mode de fonctionnement (illustré...
  • Seite 74 FRANÇAIS Le CMED3PLUS de Conceptronic est compatible avec les fichiers de sous-titres .SMI, .SRT, .SUB et .SSA. Si le fichier de sous-titre a le même nom que le fichier de vidéo sélectionné (seule l’extension change), le fichier de sous-titre sera automatiquement chargé lorsque le fichier MPEG4 sera reproduit.
  • Seite 75 6.2 Fonctions du mode Play & listen to the music (écouter de la musique) Écouter de la musique Le CMED3PLUS de Conceptronic dispose de plusieurs modes vous permettant d’écouter de la musique (les formats WAV, MP3 et WMA sont compatibles).
  • Seite 76 FRANÇAIS Zoomer sur les photographies Appuyez sur la touche ZOOM pour entrer ou sortir du mode ZOOM ou pour modifier le taux de zoom. Lorsqu’une photographie est agrandie, vous pouvez utiliser les touches / / / pour la déplacer. Music-slide-show (visualisation de photos avec fond musical) Sélectionnez une photographie et appuyez sur la touche SLIDE pour commencer.
  • Seite 77 FRANÇAIS 6.4 Fonctionnement du mode FILE LIBRARY (répertoires des fichiers) Utilisez les touches / pour sélectionner un fichier ou un répertoire ; la touche (PREV/NEXT) permet de faire défiler vers le haut ou vers le bas. Si une photographie ou un fichier vidéo est sélectionné, sa pré-visualisation et l’information correspondante apparaîtront à...
  • Seite 78: Menu De Configuration (Set Up)

    FRANÇAIS 7. Menu de configuration (SET UP) En mode STOP, appuyez sur la touche SETUP pour entrer dans le menu SETUP. Appuyez sur la touche / / / pour déplacer le curseur, puis appuyez sur la touche / ENTER pour confirmer votre sélection ;...
  • Seite 79: Caractéristiques

    Suivez les conseils figurant ci-dessous pour résoudre tout problème en cas de dysfonctionnement de votre CMED3PLUS : Le voyant LED d’alimentation ne s’allume pas. • Le CMED3PLUS n’est pas branché à l’alimentation électrique. Branchez l’alimentation électrique au CMED3PLUS. L’écran n’indique rien.
  • Seite 80 • Un fichier AVI est reproduit, mais le fichier de sous-titrage a un nom de fichier différent. Voyez le paragraphe 6.1 pour savoir comment afficher les sous-titres. • Un fichier VOB est reproduit. Le CMED3PLUS ne supporte pas les sous-titres sur les fichiers VOB. Lorsque vous essayez de lire une vidéo, le message "CODEC NON SUPPORTÉ" s'affiche.
  • Seite 81 Se doveste avere altre domande riguardanti il prodotto che non trovate sul nostro sito Web vi preghiamo di contattarci attraverso l’e-mail: support@conceptronic.net Per ulteriori informazioni dei prodotti Conceptronic, la preghiamo di visitare il sito Web della Conceptronic: www.conceptronic.net. 1. Introduzione Prima di utilizzare il prodotto, si consiglia di leggere attentamente il presente manuale e di conservarlo per una successiva consultazione.
  • Seite 82 • NON far cadere, urtare o colpire MAI il dispositivo. • Per evitarne il surriscaldamento, non coprire mai il dispositivo. • Il CMED3PLUS supporta esclusivamente il file system FAT / FAT32 (NTFS non è supportato). AVVERTENZA: Quando il formato dato al disco rigido è NTFS, il dispositivo funzionerà...
  • Seite 83 ITALIANO Funzionalità del Media Player Grab’n’GO 3,5” con lettore di schede 2.1 Descrizione della parti del CMED3PLUS • Parte frontale 1. Ricevitore telecomando 4. LED HDD 7. Ingresso schede SM 2. LED di accensione 5. Ingresso schede MMC/MS/SD Card 8. Presa jack USB HOST 3.
  • Seite 84 3.1 Collegamento su computer 1. Accendere computer. 2. Collegare il cavo di alimentazione al CMED3PLUS e alla presa di corrente. 3. Collegare il cavo USB al CMED3PLUS e al computer. Il computer rileverà e configurerà automaticamente il dispositivo, gli assegnerà una nuova lettera di unità, dopo di che lo utilizzerà...
  • Seite 85 Quando viene usata una TV si possono utilizzare le uscite S-VIDEO, Composita, Composita to SCART o Component del CMED3PLUS.. Consultare il manuale della TV per selezionare il canale d’ingresso corretto per mostrare l’uscita video del CMED3PLUS. Se il CMED3PLUS è stato utilizzato in modalità...
  • Seite 86 ITALIANO Il telecomando 4.1 Descrizione del telecomando...
  • Seite 87 ITALIANO Descrizione Descrizione POWER (Alimentazione) SLOW (Lento) Entra o esce dalla modalità standby (ON/OFF) La riproduzione viene realizzata lentamente FUNC Serve per selezionare il sistema video (PAL / Mostra le informazioni relative ai file o il NTSC) menu operativo dei file AUDIO INTRO Seleziona il flusso audio...
  • Seite 88: Operazioni Di Base

    La periferica è pronta per essere usata. Nel caso in cui non vi sia nessun altro dispositivo collegato al CMED3PLUS, verrà mostrata la BIBLIOTECA FILE con il contenuto del disco rigido (se solo è presente la partizione 1).
  • Seite 89 BIBLIOTECA FILE Come cambiare il dispositivo connesso: Nel caso in cui vi sia più di un solo dispositivo connesso al CMED3PLUS, è possibile premere il pulsante MENU per accedere all’ELENCO DISPOSITIVI e selezionarne uno premendo i tasti / / ENTER.
  • Seite 90 NOTA: Sebbene il CMED3PLUS sia in grado di supportare la maggior parte dei video Codec (come ad esempio XviD, AVI, MPEG2, ecc.), potrebbero esistere comunque file che hanno bisogno di un Codec non compreso nel CMED3PLUS.
  • Seite 91 ITALIANO 6.2 Come riprodurre e ascoltare musica: opzioni Riproduzione della musica Il CMED3PLUS Conceptronic è dotato di diverse modalità per riprodurre la musica (vengono supportati i sistemi WAV, MP3 e WMA) Come riprodurre file musicali: Premere Menu e selezionare la cartella nella quale sono contenuti i file con la musica desiderata.
  • Seite 92 ITALIANO MODALITÀ 01: TUTTO SCHERMO MODALITÀ 02: CASUALE MODALITÀ 03: DISSOLVENZA: DALL’ALTO VERSO IL BASSO MODALITÀ 04: DISSOLVENZA: DAL BASSO VERSO L’ALTO MODALITÀ 05: DISSOLVENZA: DALL’ALTO/BASSO VERSO IL CENTRO MODALITÀ 06: DISSOLVENZA: DAL CENTRO VERSO L’ALTO/BASSO MODALITÀ 07: EFFETTO TENDINA: DALL’ALTO VERSO IL BASSO MODALITÀ...
  • Seite 93 ITALIANO 6.4 Operazioni in Biblioteca File Usare il pulsante / per selezionare un file o una cartella e il pulsante (PREV/NEXT) per andare una pagina in alto o una pagina in basso. Nel caso in cui vengano selezionati una foto o un video, l’anteprima e le informazioni relative verranno mostrate sul lato destro dello schermo TV.
  • Seite 94: Menu Di Configurazione

    ITALIANO 7. Menu di configurazione Quando il dispositivo è in STOP, premere il pulsante SETUP per entrare nel Menu di configurazione (SETUP MENU). Premere il pulsante / / / per spostare il cursore, dopo di che premere il tasto / ENTER per confermare la selezione;...
  • Seite 95 9. Consigli e risoluzione di problemi SeguitE i consigli riportati qui in basso per risolvere eventuali problemi di funzionamento del CMED3PLUS. Il LED di alimentazione non si accende • L’alimentazione di corrente non è collegata al CMED3PLUS. Ricollegare l’alimentatore di corrente al CMED3PLUS.
  • Seite 96 Quali sono le schede di memoria supportate dal CMED3PLUS? • Il CMED3PLUS è in grado di leggere la maggior parte di famiglie di schede di memoria, come ad esempio: Memory stick (MS), Secure Digital (SD), Schede Multimedia (MMC), Schede Smart Media (SM), Compact Flash (CF), Microdrive (MD).
  • Seite 97: Conteúdo Da Embalagem

    O Manual de Instalação Rápida incluído fornece-lhe uma explicação passo a passo sobre como usar o Leitor Multimédia de 3,5” Grab’n’GO com Leitor de Placas da Conceptronic. Se tiver algum problema, aconselhamos consultar o nosso site de assistência (vá a www.conceptronic.net e clique em ‘assistência’...
  • Seite 98 • NUNCA deixe cair, abane ou bata com o aparelho. • Para evitar um sobreaquecimento, não cubra o aparelho. • O CMED3PLUS suporta apenas o sistema de ficheiros FAT / FAT32 (o sistema NTFS não é suportado). ATENÇÃO: Quando formatar o disco rígido para NTFS, este só funciona como disco rígido amovível para o seu computador.
  • Seite 99: Parte Frontal

    PORTUGUÊS Funcionalidades do Leitor Multimédia de 3,5” Grab ‘n’ GO com Leitor de Placas 2.1 Identificação dos elementos do CMED3PLUS • Parte frontal 1. Receptor do comando 4. Luz do HDD 7. Ranhura da Placa SM 2. Luz de alimentação 5.
  • Seite 100 3.1 Ligação ao seu computador 1. Ligue o seu computador. 2. Ligue a fonte de alimentação ao CMED3PLUS e à tomada de parede. 3. Ligue o Cabo USB ao CMED3PLUS e ao seu computador. O computador vai detectar e configurar automaticamente o dispositivo, atribui-lhe uma nova letra de unidade e depois usa-o como dispositivo de armazenamento.
  • Seite 101 Componente do CMED3PLUS. Consulte o manual da sua televisão para seleccionar o canal de entrada correcto para apresentar a saída de vídeo do CMED3PLUS. Se tiver usado o CMED3PLUS no modo VGA, carregue no botão VGA do seu comando para voltar a mudar a saída de VÍDEO novamente para TV.
  • Seite 102 PORTUGUÊS O Comando 4.1 Explicação do Comando...
  • Seite 103 PORTUGUÊS Nº Descrição Nº Descrição POWER SLOW Para entrar ou sair do modo Standby. Para reprodução lenta. (ON/OFF – Ligar/Desligar) P / N FUNC Para seleccionar o sistema de vídeo. (PAL / Para mostrar o menu de informação dos NTSC) ficheiros ou de operações dos ficheiros.
  • Seite 104: Notas Importantes

    (como um disco rígido ou uma memória Flash USB) ou uma Placa de Memória ligada ao CMED3PLUS, o ecrã vai mostrar a DEVICE LIST (LISTA DE DISPOSITIVOS) com todos os dispositivos encontrados. Se o dispositivo ligado tiver uma grande quantidade de ficheiros, pode demorar um pouco antes de o dispositivo ser detectado.
  • Seite 105 PORTUGUÊS 5.2 Funcionamento detalhado Biblioteca de Ficheiros Se não houver nenhum dispositivo externo ligado ao CMED3PLUS (só o HDD interno), a FILE LIBRARY (BIBLIOTECA DE FICHEIROS) vai aparecer no ecrã da televisão quando carregar no botão / POWER para entrar em funcionamento (como se ilustra na figura seguinte).
  • Seite 106 Se criar mais do que uma pasta que comece por “VIDEO ***”, o dispositivo só vai abrir a primeira pasta. NOTA: A maioria dos Codecs de Vídeo é suportada pelo CMED3PLUS (como XviD, AVI, MPEG2, etc.), mas é possível que você tenha ficheiros que necessitem de um Codec que não está incluído no CMED3PLUS.
  • Seite 107 PORTUGUÊS 6.2 Opções para reproduzir e ouvir música Reprodução de Música O CMED3PLUS da Conceptronic tem vários modos de reproduzir música (são suportados WAV, MP3 e WMA) Para reproduzir ficheiros de música: Carregue em Menu e seleccione a pasta correcta da qual quer reproduzir ficheiros de música. A música é...
  • Seite 108 PORTUGUÊS Zoom de fotografias Carregue no botão ZOOM para entrar ou sair do modo ZOOM ou para alterar o nível de zoom. Quando uma fotografia é aumentada, pode usar os botões / / / para se deslocar. Apresentação de diapositivos com música (visualizar fotografias com música de fundo) Seleccione uma fotografia e carregue em SLIDE para começar.
  • Seite 109 PORTUGUÊS 6.4 Operações na biblioteca de ficheiros • Use o botão / para seleccionar um ficheiro ou uma pasta; o botão (PREV/NEXT) para subir ou baixar a página. Se estiver seleccionada uma fotografia ou um vídeo, a respectiva pré-visualização e a informação aparece do lado direito do ecrã de televisão. Se estiver seleccionado um ficheiro de música, esta começa a tocar enquanto se mostra a respectiva informação do lado direito do ecrã.
  • Seite 110 PORTUGUÊS 7. Menu de Configuração (Setup) No modo parado, carregue no botão SETUP para entrar no MENU SETUP. Carregue no botão / / / para mover o cursor, e carregue no botão / ENTER para confirmar a selecção, e depois carregue no botão SETUP quando tiver terminado.
  • Seite 111 PORTUGUÊS 7.3 Preferências (Preferences) • VIDEO OUTPUT (SAÍDA DE VÍDEO): Configurar a saída de vídeo. Opções: S-VIDEO, COMPONENT,P-SCAN YPBPR, VGA e INTERLACE RGB. • OSD LANG (LÍNGUA OSD): seleccionar as línguas OSD. Opções: ENGLISH (INGLÊS), FRENCH (FRANCÊS), GERMAN (ALEMÃO), ITALIAN (ITALIANO), PORTUGESE (PORTUGUÊS), SPANISH (ESPANHOL), DUTCH (HOLANDÊS) Predefinição: ENGLISH (INGLÊS)
  • Seite 112 Use as sugestões seguintes para resolver problemas quando o seu CMED3PLUS não estiver a funcionar devidamente: A luz de Alimentação não acende • A fonte de alimentação não está ligada ao CMED3PLUS. Volte a ligar a fonte de alimentação ao CMED3PLUS. Não há qualquer actividade no visor. •...
  • Seite 113 Quando tentar reproduzir um vídeo, aparece a mensagem “CODEC NOT SUPPORTED” (CODEC NÃO SUPORTADO). • O ficheiro de filme foi criado com um codec não suportado pelo CMED3PLUS. Entre na página web www.conceptronic.net para obter uma lista dos codecs suportados pelo CMED3PLUS.
  • Seite 114: Gyorstelepítési Útmutató

    Gyakran Ismételt Kérdések adatbázist. Ha termékünkkel kapcsolatban további kérdése lenne, és weboldalunkon nem talál rá választ, forduljon hozzánk e-mailben: support@conceptronic.net. A Conceptronic termékekkel kapcsolatos további információért kérjük tekintse meg a Conceptronic weboldalát: www.conceptronic.net. 1. Bevezetés Az egység üzemeltetése előtt alaposan olvassa el az ismertetőt, majd őrizze meg, mert a jövőben szüksége lehet rá.
  • Seite 115 • SOSE ejtse le, rázogassa, illetve üsse neki valaminek az eszközt. • A túlmelegedés megelőzése érdekében, ne takarja le az eszközt. • A CMED3PLUS kizárólag az FAT/ FAT32 fájlrendszert támogatja (az NTFS nem támogatott). VIGYÁZAT: Amikor a merevlemezt NTFS szerint formázza, az csak a számítógép kivehető...
  • Seite 116 MAGYAR A kártyaolvasóval kiegészülő Grab’n’GO 3,5-hüvelykes médialejátszó funkciói 2.1 A CMED3PLUS alkatrészeinek azonosítása • Homloklap 1. A távirányító vevőberendezése 4. HDD LED 7. SM kártyabővítőhely 2.Teljesítménykijelző LED 5. MMC/MS/SD kártyabővítőhely 8. USB HOST dugaszhely 3. Parancsgomb 6. CF kártyabővítőhely • Parancsgomb Rövid ideig lenyomva...
  • Seite 117 3.1 Csatlakoztatás a számítógéphez 1. Kapcsolja be a számítógépet. 2. Csatlakoztassa a tápellátást a CMED3PLUS-hoz, valamint a falicsatlakozóhoz. 3. Csatlakoztassa az US-kábelt a CMED3PLUS-hoz, valamint a számítógéphez. A számítógép az eszközt automatikusan észleli és konfigurálja, az új meghajtó-betűjel(ek)et hozzárendeli, majd végül azt háttértárként használja (a meghajtó...
  • Seite 118: Csatlakoztatás Tv-Készülékhez

    TV használatakor használhatja a CMED3PLUS-nak S-VIDEÓ, összetett, összetett-SCART vagy összetett kimenetét. Ellenőrizze TV-készülékének kézikönyvében, miként kell a CMED3PLUS videokimenetének megjelenítéséhez a helyes bemeneti csatornát kijelölnie. Ha a CMED3PLUS-ot VGA módban használja, a VIDEO kimenetnek újból a TV-re történő átállításához nyomja le a VGA gombot a távirányítón.
  • Seite 119 MAGYAR Távirányító 4.1 A távirányító bemutatása...
  • Seite 120 MAGYAR Leírás Leírás POWER SLOW Be- vagy kilépés készenléti üzemmódból Lassú lejátszás. (ON/OFF). P / N FUNC Videorendszer kijelölése (PAL / NTSC). A fájladatok vagy fájlműveletek menüjének megjelenítése. AUDIO ENTER Audio-adatfolyam kijelölése. Kijelölés megerősítése. SLIDE FILE Zene – diavetítés vagy lépésről-lépésre Az eszköz könyvtárstruktúrájának történő...
  • Seite 121: Fontos Megjegyzések

    2. Az eszközt az annak hátoldalán lévő főkapcsolóval kapcsolhatja be. A teljesítményjelző LED ezután folyamatosan és kéken világít. Innentől fogva az eszköz üzemképes. Ha nincs más eszköz is a CMED3PLUS-hoz csatlakoztatva, akkor ez a merevlemez a FÁJLKÖNYVTÁRAT fogja mutatni, annak tartalmával együtt (ha csupán egyetlen partíció van).
  • Seite 122 5.2 Részletezett műveletek Fájlkönyvtár Ha a CMED3PLUS-hoz külső eszköz nem csatlakozik (csak belső merevlemezes meghajtó van), a FÁJLKÖNYVTÁR jelenik meg majd a TV-képernyőn, amikor – a működési állapotba lépés érdekében – lenyomja a /POWER gombot (az erre utaló ábrák következnek).
  • Seite 123 Ha egynél több, „VIDEO***”-val kezdődő mappát állít elő, az eszköz csak az első mappát fogja megnyitni. MEGJEGYZÉS: A legtöbb videokodeket a CMED3PLUS támogatja (például XviD, AVI, MPEG2, stb.), de lehet, hogy vannak olyan kodeket igénylő fájljai is, amely nem része a CMED3PLUS-nak. Ha nem támogatott kodekes fájl lejátszásával próbálkozik, a következő üzenet fog megjelenni:...
  • Seite 124 MAGYAR 6.2 A zene lejátszása és hallgatása szempontjából kínálkozó lehetőségek Zene lejátszása A Conceptronic CMED3PLUS esetében különböző üzemmódok kínálkoznak, amelyek segítségével a zene lejátszható (támogatott a WAV, MP3 és WMA) Zenei adatállományok lejátszása: Nyomja le a Menu-t és jelölje ki a megfelelő mappát, ahonnan a zenei adatállományokat le kívánja játszani.
  • Seite 125 MAGYAR 6.3 Lehetőségek fényképfelvételek lejátszásakor és megtekintésekor Fényképfelvételek lejátszásakor a ROTATE gombot használhatja a fényképfelvételek közötti léptetésre. Alapértelmezettként a fényképfelvételek forgatására vonatkozó üzenet egészen az eszköz kikapcsolásáig vagy addig megőrződik, amíg át nem váltanak készenléti üzemmódra. Ha nem kívánja a forgatásra vonatkozó üzenetet megőrizni, ezt a funkciót a következők segítségével lehet letiltania: SETUP MENU->GENERAL SETUP->...
  • Seite 126 MAGYAR MEGJEGYZÉS: Ha egynél több, „PHOTO***”-val kezdődő mappát állít elő, az eszköz csak az első mappát fogja megnyitni. 6.4 Műveletek a fájlkönyvtárban A / gomb használatával lehet egy adott fájlt vagy mappát kiválasztani; a (PREV/NEXT) gombbal lehet felfelé/lefelé lapozni. Ha kiválaszt egy fénykép- vagy videofelvételt, annak előnézete és az arra vonatkozó...
  • Seite 127: Beállítás Menü

    MAGYAR 7. Beállítás menü Stop helyzetben a SETUP gomb lenyomásával léphet be a SETUP MENU-be. A / / / gomb benyomásával mozgathatja a kurzort és az / ENTER gomb lenyomásával erősítheti meg a kijelölést, amikor pedig végzett, végül lenyomhatja a SETUP gombot.
  • Seite 128: Műszaki Jellemzők

    MAGYAR Kedvenc beállítások (Preferences) • VIDEO OUTPUT (VIDEÓ KIMENET): A videokimenet beállítása. Lehetőségek: S-VIDEÓ, KOMPONENS, P-SCAN YPBPR, VGA és INTERLACE RGB. • OSD LANG: az OSD-nyelvek beállítására szolgál. Lehetőségek: ENGLISH, FRENCH, GERMAN, ITALIAN, PORTUGESE, SPANISH, DUTCH (ANGOL, FRANCIA, NÉMET, OLASZ, PORTUGÁL, SPANYOL, HOLLAND) Alapértelmezett: ENGLISH (ANGOL) •...
  • Seite 129 Viene riprodotto un file AVI, pero il file contenente i sottotitoli possiede un nome di file diverso. Vedi capitolo 6.1 su come visualizzare i sottotitoli. • Viene riprodotto un file VOB. Il CMED3PLUS non possiede nessun tipo di supporto per i sottotitoli di file VOB.
  • Seite 130 Amikor videofelvétel lejátszásával próbálkozik, a „CODEC NOT SUPPORTED” (A KODEK NINCS TÁMOGATVA) üzenet jelenik meg. • A filmfájlt a CMED3PLUS szempontjából nem támogatott kodekkel állították elő. A CMED3PLUS-re nézve támogatott kodekek listáját illetően lásd a következő webhelyet: www.conceptronic.net. A CMED3PLUS nem jelenít meg minden partíciót/tartalmat a merevlemezes meghajtóról. •...
  • Seite 131 Address Databankweg 7 3821 AL Amersfoort, the Netherlands Hereby declares that the product Type 3,5” Media Player Plus Product CMED3PLUS Complies with following directives: 89/336/EEC EMC directive: Electromagnetic Compatibility 73/23/EEC Low Voltage Directive: Electrical equipment designed for use within certain...

Inhaltsverzeichnis