Inhaltsverzeichnis
Werbung
Verfügbare Sprachen
Verfügbare Sprachen
Quicklinks
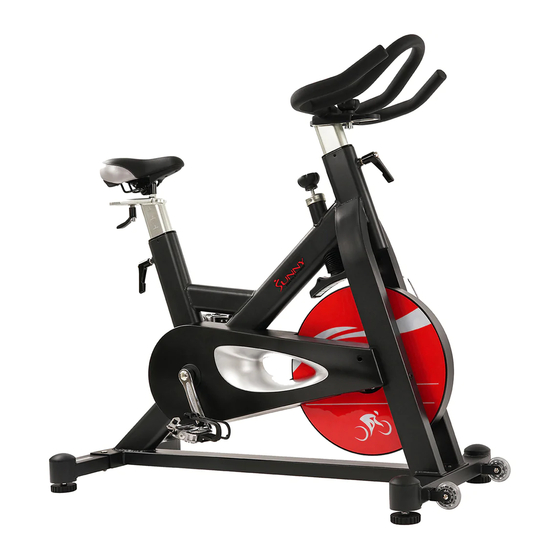
EVOLUTION PRO MAGNETIC BELT
DRIVE INDOOR CYCLING BIKE
English, Page 9 ~ 12
Español, Page 13 ~ 16 ¡IMPORTANTE! Conserve el manual del propietario para las instrucciones de mantenimiento y ajuste.
Français, Page 17 ~ 20
Deutsch, Seite 21 ~ 24
USER MANUAL
IMPORTANT! Please retain owner's manual for maintenance and adjustment instructions. Your satisfaction
is very important to us, PLEASE DO NOT RETURN UNTIL YOU HAVE CONTACTED US:
support@sunnyhealthfitness.com or 1-877-90SUNNY (877-907-8669).
Susatisfacción es muy importante para nosotros, NO DEVUELVA HASTA HABERNOS CONTACTADO:
support@sunnyhealthfitness.comó 1- 877 - 90SUNNY (877-907-8669).
IMPORTANT! Veuillez conserver le manuel du propriétaire pour les instructions de réglage et
d'entretien.Votre satisfaction est très importante pour nous, VEUILLEZ NE PAS EFFECTUER DE
RETOUR AVANT DE NOUS AVOIR CONTACTÉ : support@sunnyhealthfitness.com ou 1- 877 –
90SUNNY (877-907-8669).
WICHTIG! Bitte bewahren Sie das Benutzerhandbuch für Wartungs- und Einstellanweisungen auf. Ihre
Zufriedenheit ist besonders wichtig für uns, BITTE SCHICKEN SIE DAS PRODUKT NICHT ZURÜCK,
EVOR SIE SICH MIT UNS IN VERBINDUNG GESETZT HABEN: support@sunnyhealthfitness.com
oder 1-877-90SUNNY (877-907-8669).
SF-B1714
Werbung
Inhaltsverzeichnis

Verwandte Anleitungen für Sunny SF-B1714


Inhaltszusammenfassung für Sunny SF-B1714
- Seite 1 EVOLUTION PRO MAGNETIC BELT DRIVE INDOOR CYCLING BIKE SF-B1714 USER MANUAL English, Page 9 ~ 12 IMPORTANT! Please retain owner’s manual for maintenance and adjustment instructions. Your satisfaction is very important to us, PLEASE DO NOT RETURN UNTIL YOU HAVE CONTACTED US: support@sunnyhealthfitness.com or 1-877-90SUNNY (877-907-8669).
-
Seite 2: Important Safety Information
IMPORTANT SAFETY INFORMATION We thank you for choosing our product. To ensure your safety and health, please use this equipment correctly. It is important to read this entire manual before assembling and using the equipment. Safe and effective use can only be achieved if the equipment is assembled, maintained, and used properly. -
Seite 3: Informations De Sécurité Importantes
INFORMATIONS DE SÉCURITÉ IMPORTANTES Nous vous remercions d’avoir choisi notre produit. Pour votre santé et votre sécurité, veuillez utiliser correctement cet appareil. Il est important de lire entièrement le présent manuel avant d’assembler l’appareil et de l’utiliser. L’utilisation sûre et efficace n’est possible que si l’appareil est correctement assemblé, entretenu et utilisé. -
Seite 4: Exploded Diagram
EXPLODED DIAGRAM... -
Seite 5: Parts List
PARTS LIST Description Spec. Qty. Description Spec. Qty. Main Frame Bottle Holder Front Stabilizer 40x80x2T Screw M5x10 Rear Stabilizer 40x80x2T Philips Screw M3x10 Handlebar Post 40x80x2T Steel Sleeve Φ12x17x9 Seat Post 40x80x2T Self-tapping Screw M4.5x15 Handlebar Φ25.4x2T Self-tapping Screw M4.2x10 Seat Column Hex Bolt M6x35... -
Seite 6: Lista De Piezas
LISTA DE PIEZAS n.° Descripción Especificación n.° Descripción Especificación Estructura Principal Soporte de Botella Estabilizador Delantero 40x80x2T Tornillo M5x10 Estabilizador Trasero 40x80x2T Tornillo Philips M3x10 Poste del Manubrio 40x80x2T Manga de Acero Φ12x17x9 Poste del Asiento 40x80x2T Tornillo Autorroscante M4.5x15 Manubrio Φ25.4x2T Tornillo Autorroscante... -
Seite 7: Liste Des Éléments
LISTE DES ÉLÉMENTS N° Description Spécification Qté N° Description Spécification Qté Cadre Principal Porte-Bouteille Stabilisateur Avant 40x80x2T M5x10 Stabilisateur Arrière 40x80x2T Vis Cruciforme M3x10 Tige de Guidon 40x80x2T Gaine en Acier Φ12x17x9 Tige de Selle 40x80x2T Vis Auto Taraudeuse M4.5x15 Guidon Φ25.4x2T Vis Auto Taraudeuse... - Seite 8 TEILELISTE Bezeichnung Spezif. Menge Bezeichnung Spezif. Menge Hauptrahmen Flaschenhalter Stabilisator Vorne 40x80x2T Schraube M5x10 Stabilisator Hinten 40x80x2T Kreuzschraube M3x10 Lenkerstütze 40x80x2T Stahlhülse Φ12x17x9 Selbstschneidende Sattelstütze 40x80x2T M4.5x15 Schraube Selbstschneidende Lenkstange Φ25.4x2T M4.2x10 Schraube Sitz-Säule Sechskantschraube M6x35 Kunststoff-Befestigung 50x100x100mm Laufradbefestigung Sitz VL-6100 Nylonmutter M10x9T...
- Seite 9 HARDWARE PACKAGE #23 M10X28 1PC #22 M10 1PC #35 M10 4PCS #24 M10 #36 M10x55 4PCS #25 d19.5xФ38x2T 1PC #37 d10xФ19x1.5T #46 d10xФ29x2T 2PCS 4PCS # 89 S14 S17 1PC # 90 S13 S15 1PC #93 S14 S17 S19 1PC #103 S4 1PC Ordering Replacement Parts (U.S.
- Seite 10 ASSEMBLY INSTRUCTIONS We value your experience using Sunny Health and Fitness products. For assistance with parts or troubleshooting, please contact us at support@sunnyhealthfitness.com or 1-877-90SUNNY (877-907-8669). STEP 1: #35 M10 4PCS #35 M10 4PCS #36 M10x55 4PCS #36 M10x55 4PCS Attach Rear Stabilizer (No.
- Seite 11 We value your experience using Sunny Health and Fitness products. For assistance with parts or troubleshooting, please contact us at support@sunnyhealthfitness.com or 1-877-90SUNNY (877-907-8669). STEP 4: #46 d10xФ29x2T 1PC Loosen 2 Nuts (No. 9A) on Seat (No. 9), and then attach Seat Column (No. 7) to Seat (No.
- Seite 12 ADJUSTMENTS & USAGE GUIDE SEAT ADJUSTMENT SEAT ADJUSTMENT HANDLEBAR ADJUSTMENT Loosen the Spring Knob (No. 21) Loosen the L-shaped Knob (No. 22) Loosen the Spring Knob (No. 21) to to raise or lower the Seat Post (No. move seat forward raise or lower the handlebar to the 5) to the desired position.
-
Seite 13: Maintenance Instructions
MAINTENANCE INSTRUCTIONS This is general information for daily, weekly and monthly maintenance to be performed on your bike. DAILY MAINTENANCE MONTHLY MAINTENANCE After each exercise session, wipe down all 1. Check if all hardware is secure, such as: the equipment: seat, frame, and handlebars. water bottle holder, flywheel nuts, belt/chain Pay special attention to the seat post, guard bolts, brake caliper lock nuts, and... - Seite 14 INSTRUCCIONES DE ARMADO Valoramos su experiencia con los productos de Sunny Health and Fitness. Para asistencia con piezas o solución de problemas, contáctenos en support@sunnyhealthfitness.com o al 1-877- 90SUNNY (877-907-8669). PASO 1: #35 M10 4PZAS #36 M10x55 4PZAS Una el Estabilizador Trasero (n.° 3) a la #89 S14 S17 1PZA Estructura Principal (n.°...
- Seite 15 Valoramos su experiencia con los productos de Sunny Health and Fitness. Para asistencia con piezas o solución de problemas, contáctenos en support@sunnyhealthfitness.com o al 1-877- 90SUNNY (877-907-8669). PASO 4: #46 d10xФ29x2T 1PZA Desatornille las 2 Tuercas (n.° 9A) en el...
-
Seite 16: Freno De Emergencia
AJUSTES Y GUÍ A DE USO REGULACIÓN DEL REGULACIÓN DEL AJUSTE DEL MANUBRIO Afloje la Perilla (n.° 21) para subir o ASIENTO ASIENTO bajar el manubrio a la posición deseada. Afloje la Perilla (n.° 21) para subir Afloje la Perilla Forma de L (n.° 22) Asegúrese de que la Perilla (n.°... -
Seite 17: Instrucciones De Mantenimiento
INSTRUCCIONES DE MANTENIMIENTO Esta es información general para realizar el mantenimiento diario, semanal y mensual en su bicicleta. MANTENIMIENTO DIARIO MANTENIMIENTO MENSUAL 1. Compruebe que todas las herramientas estén Despué s de cada sesión de ejercicio, limpie todo el seguras: el soporte de botella de agua, las tuercas equipo: asiento, marco, y manubrio. -
Seite 18: Instructions D'assemblage
INSTRUCTIONS D’ASSEMBLAGE Nous apprécions votre expérience d'utilisation des produits Sunny Health and Fitness. Pour obtenir de l'aide concernant des pièces ou un dépannage, veuillez nous contacter à support@sunnyhealthfitness.com ou au 1-877-90SUNNY (877-907-8669). ÉTAPE 1: #35 M10 2 unités Fixer le Stabilisateur Arrière (N 3) au #36 M10x55 4 unités... - Seite 19 Nous apprécions votre expérience d'utilisation des produits Sunny Health and Fitness. Pour obtenir de l'aide concernant des pièces ou un dépannage, veuillez nous contacter à support@sunnyhealthfitness.com ou au 1-877-90SUNNY (877-907-8669). ÉTAPE 4: #46 d10xФ29x2T 1 unité Desserrez 2 Écrous (N° 9A) sur le Siège (N°...
-
Seite 20: Frein D'urgence
RÉGLAGES ET GUIDE D’UTILISATION RÉGLAGE DE LA SELLE RÉGLAGE DE LA SELLE RÉGLAGE DU GUIDON Desserrer le Bouton Poussoir à Desserrer le Bouton Poussoir en Desserrer Bouton Poussoir à Ressort (n 21) pour hausser ou Forme de L (n° 22) pour dé placer la Ressort (n 21) pour hausser ou pour pour abaisser la Tige de Selle... -
Seite 21: Instructions D'entretien
INSTRUCTIONS D’ENTRETIEN Il s’agit d’informations générales concernant l’entretien quotidien, hebdomadaire et mensuel à effectuer sur votre vélo. ENTRETIEN QUOTIDIEN ENTRETIEN MENSUEL Après chaque séance d’exercice, essuyez tout 1. Vérifiez que toute la quincaillerie est bien serrée, l’équipement: selle, cadre, guidon. Portez une notamment: le porte-bouteille, les écrous du volant attention particulière à... - Seite 22 MONTAGEANLEITUNG Wir schätzen Ihre Erfahrung im Umgang mit den Produkten von Sunny Health and Fitness. Für Fragen zu Teilen oder Hilfe bei der Fehlerbehebung kontaktieren Sie uns bitte unter support@sunnyhealthfitness.com oder 1-877-90SUNNY (877-907-8669). SCHRITT 1: #35 M10 4P STK #89 S14 S17 1 STK #36 M10x55 4 STK Montieren Sie den Stabilisator Hinten (Nr.
- Seite 23 Wir schätzen Ihre Erfahrung im Umgang mit den Produkten von Sunny Health and Fitness. Für Fragen zu Teilen oder Hilfe bei der Fehlerbehebung kontaktieren Sie uns bitte unter support@sunnyhealthfitness.com oder 1-877-90SUNNY (877-907-8669). SCHRITT 4: #46 d10xФ29x2T 1STK Lösen Sie 2 Schraubenmuttern (Nr. 9A) am...
-
Seite 24: Einstellen Der Balance
EINSTELLUNGEN UND GEBRAUCHSANWEISUNG SITZVERSTELLUNG SITZVERSTELLUNG EINSTELLEN DER Lösen Sie den Feder-Knauf (Nr. Lösen Sie den L-förmigen Knauf LENKSTANGE 21), um die Sattelstütze (Nr. 5) in (Nr. 22), um den Sitz vorwärts oder Lösen Sie den Feder-Knauf (Nr. 21), um die gewünschte Position zu heben rückwärts in die gewünschte Position die Lenkstange nach oben oder unten in oder zu senken. -
Seite 25: Tägliche Wartung
WARTUNGSANWEISUNGEN Hier finden Sie allgemeine Informationen fü r die tä gliche, wö chentliche und monatliche Wartung Ihres Fahrrads. TÄGLICHE WARTUNG MONATLICHE WARTUNG Wischen Sie nach jeder Trainingseinheit alle Teile 1. Überprüfen Sie, ob die Hardware sicher ist, wie z. B.: Wasserflaschenhalter, Schwungradmuttern, des Gerä...