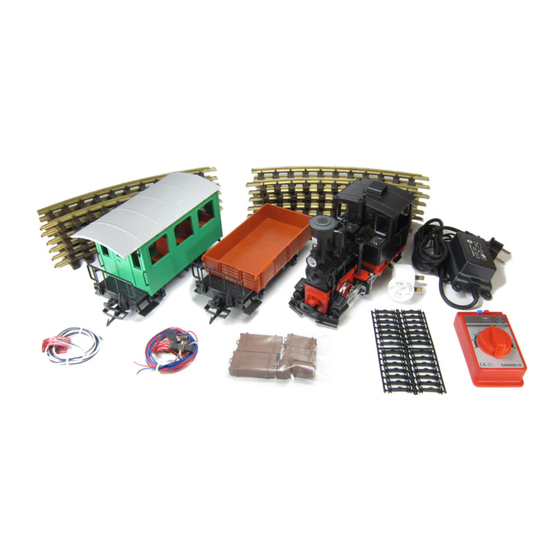
LGB Starter Set Aufbau
Vorschau ausblenden
Andere Handbücher für Starter Set:
- Bedienungsanleitung (21 Seiten) ,
- Bedienungsanleitung (17 Seiten)
Aufbau
Gleise, Trafo, Fahrregler usw.
1
aus der Verpackung nehmen.
2
Gleise zusammenstecken.
Gleise wahlweise mit Gleisklammern sichern.
3
(Zahl auf der Klammer muss nach unten weisen.)
Gleisanschlussklemmen an den Schienen befestigen:
4
Unter den Schienen einhaken und festdrehen.
Gleisanschlusskabel am Fahrregler anschließen: Rotes
5
Kabel an rote Klemme, blaues Kabel an blaue Klemme.
(Auf die Klemme drücken und Kabel ins Loch schieben.)
Schwarze und weiße Klemmen von Fahrregler und Trafo
6
über das schwarz-weiße Kabel verbinden (schwarz auf
schwarz, weiß auf weiß).
Netzstecker in Steckdose stecken.
7
Zug auf das Gleis stellen (Haken der Kupplung weist
8
nach hinten). Wagen und Lok gegeneinander schieben,
bis die Kupplungen einrasten.
Zum Entkuppeln einen flachen Gegenstand (Lineal)
9
zwischen die Kupplungen führen und nach unten
drücken.
Regelknopf drehen, um den Zug vorwärts
10
oder rückwärts fahren zu lassen.
Set-up
© DiskArt™ 1988
Remove the tracks, transformer, throttle, etc.
1
from the packaging.
2
Connect the tracks.
Insert the track clips (optional). Make sure the
3
number on the clip faces down.
Attach the track power cable to the track: Hook the
4
track power terminals under the rails and tighten.
Connect the track power cable to the throttle:
5
red wire to red terminal, blue wire to blue terminal.
(Push terminal inward and insert wire into the hole.)
Connect the black and white terminals of throttle
6
and transformer using the black and white cable
(black terminal to black terminal, white to white).
Plug the power pack into a house current outlet.
7
Place the train on the track (coupler hooks point toward
8
the rear). Push loco and cars together until they couple.
To uncouple, insert a thin tool (ruler) between
9
the couplers and push down.
Turn the control knob on the power pack to make
10
the train go forward and backward.
Installation
Sortir les sections de voie, le transformateur,
1
la commande, etc., de l'emballage.
Raccorder les rails.
2
Insérer les éclisses d'assemblage (en option). Assurez-vous
3
que le numéro sur l'éclisse se trouve vers le sol.
Raccorder le câble d'alimentation de la voie à la voie:
4
accrocher les cosses du câble sous les rails et serrer.
Raccorder le câble d'alimentation de la voie à la commande:
5
connecter le fil rouge à la borne rouge, le fil bleu à la borne bleue
(Pousser la borne vers l'intérieur et insérer le fil dans le trou).
Raccorder les bornes noires et blanches de la commande et
6
du transformateur à l'aide du câble à conducteurs noir et blanc
(borne noire à borne noire, borne blanche à borne blanche).
Brancher le groupe d'alimentation dans une prise de courant
7
dans la maison.
Placer le train sur les rails (les crochets des dispositifs
8
d'attelage doivent pointer vers l'arrière). Pousser la locomotive
et les voitures/wagons l'un contre l'autre jusqu'à accrochage.
Pour dételer, insérer un outil mince (règle) entre les
9
dispositifs d'attelage et pousser vers le bas.
Tourner le bouton de commande du groupe d'alimentation
10
pour déplacer le train dans un sens ou dans l'autre.
1

Verwandte Anleitungen für LGB Starter Set


Inhaltszusammenfassung für LGB Starter Set
- Seite 1 Aufbau Set-up Installation © DiskArt™ 1988 Gleise, Trafo, Fahrregler usw. Remove the tracks, transformer, throttle, etc. Sortir les sections de voie, le transformateur, aus der Verpackung nehmen. from the packaging. la commande, etc., de l’emballage. Gleise zusammenstecken. Connect the tracks. Raccorder les rails.