Configuration y B360-F PRO/ H310-F PRO motherboard y 18 x PCIe Riser Kits (B360-F)/ 13 x PCIe Riser Kits (H310-F) y 18 x graphic cards (B360-F)/ 13 x graphic cards (H310-F) y SSD boot drive y Minimum 4GB RAM (Depends on system configuration)
Seite 3
Installing Multiple Graphics Cards You need to prepare PCIe x16 to PCIe x1 Riser Kits to install multiple graphics cards for mining system and connect as shown below. Connect PCIe power cables from PSU to graphics cards and PCIe x16 risers power jacks.
Seite 4
Multiple graphics cards installation recommendation 6 graphics cards 12 graphics cards A Nv A Nv A Nv A Nv A Nv A Nv A Nv A Nv A Nv A Nv A Nv A Nv A Nv A Nv A Nv A Nv 11 NVIDIA graphics cards + 11 AMD graphics cards +...
Seite 5
Installing Multiple Power Supplies The following diagram shows the installation of multiple power supplies. The main power supply must be connected to the CPU_PWR1, ATX_PWR1, GPU_PWR1~3, SSDs and System Fans. Estimate the total wattage required by the graphics card TGP and install 1 to 4 additional power supplies if necessary.
Seite 6
Calculating Power Consumption The following provides several combinations of power supply installations based on the power consumption of 180W per NVIDIA P104 graphics card and 300W for system components include motherboard, 65W CPU, memory, SSD, keyboard and mouse. Please refer to the specifications for the actual power consumption of the graphics cards and devices.
Seite 7
300W system + 18x 180W graphics cards = 3540W power consumption It is recommended to use at least 3 PSUs, 1x 1500W PSU + 2x 1200W PSUs 300W System 1500W PSU 180W GPU 180W GPU 180W GPU 1st~6th graphics cards 180W GPU 180W GPU 180W GPU...
LED Indications Rear Panel Debug LEDs There are 4 debug LEDs on the back panel. The following table explains the meaning of the debug LEDs. Description Indicates CPU is not detected or fail. DRAM Indicates DRAM is not detected or fail. Indicates GPU is not detected or fail.
Resetting BIOS This section will describe how to clear CMOS with jumper or button. Resetting BIOS by JBAT1 Jumper There is CMOS memory onboard that is external powered from a battery located on the motherboard to save system configuration data. If you want to clear the system configuration, set the jumpers to clear the CMOS memory.
Updating the BIOS with Live Update 6 1. Make sure the LAN driver is already installed and the Internet connection is set properly. 2. Install and launch MSI LIVE UPDATE 6. 3. Select BIOS Update. 4. Click on Scan button.
Seite 11
Setting BIOS When the system boots up, the following figure will appear on the screen. Motherboard Name Mining Mode Indicator GPU Status Hotkey Description y GPU Status - displays the working status of the PCIe slots. Green slot: The graphics card works normally. Red slot: The slot is empty or the graphics card has an error.
Seite 12
Installing Operating System The Windows Operating System currently supports up to 13 graphics cards of the same brand GPU. If you use more than 13 graphics cards, you must use the Linux Mining Operating System. The following instructions are for installing the Windows Operating System.
Seite 14
구성 y B360-F PRO/ H310-F PRO 메인보드 y PCIe 라이저 키트(B360-F) 18개/PCIe 라이저 키트(H310-F) 13개 y 그래픽 카드(B360-F) 18개/그래픽 카드(H310-F) 13개 y SSD 부팅 드라이브 y 최소 4GB RAM(시스템 구성에 따라 다름) y 1 ~ 5개의 전원 공급장치(옵션) 중요 사항...
Seite 15
여러 개의 그래픽 카드 설치하기 아래 그림과 같이 여러 개의 마이닝 시스템용 그래픽 카드를 설치하고 연결하려면 PCIe x16 ~ x1 라이저 키트를 준비해야 합니다. PCIe 전원 케이블을 사용하여 PSU와 그래픽 카드 및 PCIe x16 라이저 전원 잭을 연결합니다. 그래픽 카드를 PCIe x16 라이저에 설치합니다.
Seite 16
권장되는 여러 개의 그래픽 카드 설치 6개의 그래픽 카드 12개의 그래픽 카드 A Nv A Nv A Nv A Nv A Nv A Nv A Nv A Nv A Nv A Nv A Nv A Nv A Nv A Nv A Nv A Nv 11개의...
Seite 17
여러 개의 전원 공급장치 설치하기 다음 그림은 여러 개의 전원 공급장치의 설치를 보여줍니다. 주 전원 공급장치는 CPU_PWR1, ATX_PWR1, GPU_PWR1~3, SSD 및 시스템 팬에 연결해야 합니다. 그래픽 카드 TGP에 필요한 총 전력량을 계산하여 필요한 경우 1 ~ 4개의 추가 전원 공급장치를 설치합니다. 시스템이...
Seite 18
전력 소비량 계산하기 다음은 NVIDIA P104 그래픽 카드당 180 W의 전력 소비량에 따라 설치된 전원 공급장치의 몇 가지 조합을 보여주고 있으며, 시스템 구성요소에 대한 300 W에는 메인보드, 65 W CPU, 메모리, SSD, 키보드 및 마우스가 포함됩니다. 그래픽 카드 및 장치의 실제 전력 소비량은 사양을...
Seite 19
300 W의 시스템 + 180 W의 그래픽 카드 18개 = 3540 W의 총 전력 소비량 최소 3개의 PSU, 즉 1개의 1500 W PSU + 2개의 1200 W PSU를 사용할 것을 권장합니다. 300 W 시스템 1500 W PSU 180 W GPU 180 W GPU 180 W GPU 1번째...
Seite 20
LED 표시 뒷면 패녈 디버그 LED 뒷면 패널에 4개의 디버그 LED가 있습니다. 다음 표는 디버그 LED의 의미를 설명합니다. 설명 CPU가 감지되지 않거나 고장임을 표시합니다. DRAM이 감지되지 않거나 고장임을 표시합니다. DRAM GPU가 감지되지 않거나 고장임을 표시합니다. 부트 부팅 장치가 감지되지 않거나 고장임을 표시합니다. PCIe 슬롯...
Seite 21
BIOS 리셋하기 이 단원에서는 점퍼 또는 버튼을 사용하여 CMOS를 지우는 방법을 설명합니다. JBAT1 점퍼로 BIOS 리셋하기 메인보드에 있는 배터리로부터 외부에서 전원을 공급받아 시스템 구성 데이터를 저장하는 온보드 CMOS 메모리가 있습니다. 시스템 구성을 지우려면 점퍼를 설정하여 CMOS 메모리를 지우십시오. 데이터 유지 CMOS 지우기/ BIOS 리셋...
Seite 22
5. 플래싱 프로세스가 100% 완료되면 시스템이 자동으로 재부팅됩니다. 라이브 업데이트 6으로 BIOS 업데이트하기 1. LAN 드라이버가 이미 설치되었고 인터넷 연결이 제대로 설정되었는지 확인하십시오. 2. MSI 라이브 업데이트 6을 설치하고 실행합니다. 3. BIOS 업데이트를 선택합니다. 4. 검색 버튼을 클릭합니다. 5. 다운로드 아이콘을 클릭하여 최신 BIOS 파일을 다운로드한 후 설치합니다.
Seite 23
BIOS 설정하기 시스템이 부팅되면 다음 그림이 화면에 나타납니다. 메인보드 이름 마이닝 모드 표시등 GPU 상태 핫키 설명 y GPU 상태 - PCIe 슬롯의 작동 상태를 표시합니다. 녹색 슬롯: 그래픽 카드가 정상적으로 작동합니다. 빨간색 슬롯: 슬롯이 비어 있거나 그래픽 카드에 오류가 있습니다. y 메인보드...
Seite 24
운영 체제 설치하기 Windows 운영 체제는 현재 브랜드가 동일한 GPU 그래픽 카드를 최대 13개까지 지원합니다. 13개보다 많은 그래픽 카드를 사용할 경우 Linux Mining 운영 체제를 사용해야 합니다. 다음 지침은 Windows 운영 체제 설치를 위한 지침입니다. 1. CPU, 메모리, SSD, 그래픽 카드 및 전원 공급장치를 올바로 설치합니다. 2.
Seite 25
B360-F PRO/ H310-F PRO Guide d'installation du système de minage...
Seite 26
Configuration y Carte mère B360-F PRO/ H310-F PRO y 18 x kits élévateurs PCIe (B360-F) / 13 x kits élévateurs PCIe (H310-F) y 18 x cartes graphiques (B360-F) / 13 x cartes graphiques (H310-F) y Lecteur de démarrage SSD y Minimum 4 Go de RAM (Dépend de la configuration système) y 1 à...
Seite 27
Installation de plusieurs cartes graphiques Vous devez préparer des kits élévateurs PCIe x16 à x1 afin d'installer plusieurs cartes graphiques pour le système de minage et les connecter comme indiqué ci-dessous. Raccordez les câbles d'alimentation PCIe du PSU aux cartes graphiques et aux prises d'alimentation des élévateurs PCIe x16.
Seite 28
Recommandation concernant l'installation de plusieurs cartes graphiques 6 cartes graphiques 12 cartes graphiques A Nv A Nv A Nv A Nv A Nv A Nv A Nv A Nv A Nv A Nv A Nv A Nv A Nv A Nv A Nv A Nv 11 cartes graphiques NVIDIA +...
Seite 29
Installation de plusieurs alimentations électriques Le diagramme suivant présente l'installation de plusieurs alimentations électriques. L'alimentation électrique principale doit être raccordée à CPU_PWR1, ATX_PWR1, GPU_PWR1~3, aux SSD et aux ventilateurs du système. Estimez la puissance totale requise par le TGP des cartes graphiques et installez 1 à...
Seite 30
Calcul de la consommation électrique Vous trouverez ci-après plusieurs combinaisons d'installations d'alimentation électrique en fonction de la consommation électrique de 180 W par carte graphique NVIDIA P104 et de 300 W pour les composants système, y compris la carte mère, le CPU 65 W, la mémoire, le SSD, le clavier et la souris.
Seite 31
Système 300 W + 18 x cartes graphiques 180 W = consommation électrique de 3540 W Il est conseillé d'utiliser au moins 3 PSU, 1 x PSU 1500 W + 2 x PSU 1200 W. Système 300 W PSU 1500 W GPU 180 W GPU 180 W GPU 180 W...
Indicateurs LED LED de débogage sur le panneau arrière Le panneau arrière comprend 4 LED de débogage. Le tableau suivant explique la signification des LED de débogage. Description Indique que le CPU n'est pas détecté ou présente un dysfonctionnement. Indique que la DRAM n'est pas détectée ou présente DRAM un dysfonctionnement.
Seite 33
Réinitialisation du BIOS Cette section décrit comment effacer la mémoire CMOS avec un cavalier ou un bouton. Réinitialisation du BIOS avec le cavalier JBAT1 La mémoire CMOS intégrée dispose d'une alimentation externe provenant d'une batterie située sur la carte mère pour sauvegarder les données de configuration du système.
Seite 34
Mise à jour du BIOS avec Live Update 6 1. Assurez-vous que le pilote LAN est déjà installé et que la connexion Internet est configurée correctement. 2. Installez et lancez MSI LIVE UPDATE 6. 3. Sélectionnez Mise à jour du BIOS. 4. Cliquez sur le bouton Analyser.
Seite 35
Paramétrage du BIOS Lorsque le système démarre, la figure suivante apparaît à l'écran. Nom de la carte mère Indicateur du mode Minage Statut GPU Description des touches de raccourci y Statut GPU - affiche le statut de fonctionnement des emplacements PCIe. Emplacement vert : La carte graphique fonctionne normalement.
Seite 36
Installation du système d'exploitation Le système d'exploitation Windows prend actuellement en charge jusqu'à 13 cartes graphiques de même marque que le GPU. Si vous utilisez plus de 13 cartes graphiques, vous devez utiliser le système d'exploitation de minage Linux. Les instructions suivantes sont destinées à...
Seite 37
B360-F PRO/ H310-F PRO Mining System Installationsanleitung...
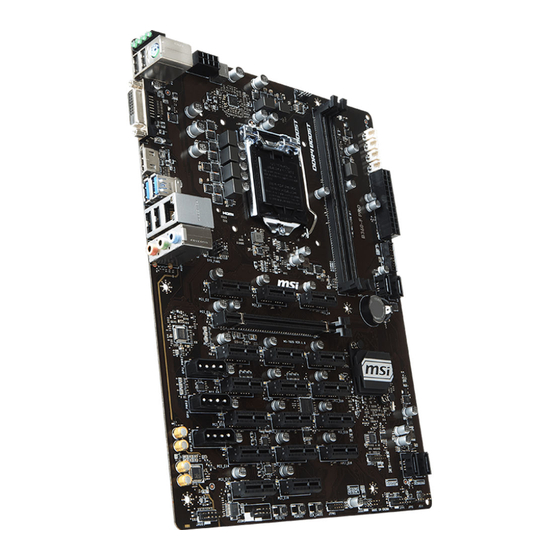
Konfiguration y B360-F PRO/ H310-F PRO Motherboard y 18 x PCIe Riser Kits (B360-F)/ 13 x PCIe Riser Kits (H310-F) y 18 x Grafikkarten (B360-F)/ 13 x Grafikkarten (H310-F) y SSD Startlaufwerk y Mindestens 4GB RAM (abhängig von der Systemkonfiguration)
Seite 39
Installation mehrerer Grafikkarten Sie müssen PCIe x16-auf-x1 Riser Kits vorbereiten, um mehrere Grafikkarten für das Mining System zu installieren und wie unten gezeigt anzuschließen. Schließen Sie PCIe- Stromkabel vom Netzteil an Grafikkarten und PCIe x16 RiserStrombuchsen an. Installieren Sie Grafikkarten auf PCIe x16 Risern.
Seite 40
Empfehlung für die Installation mehrerer Grafikkarten 6 Grafikkarten 12 Grafikkarten A Nv A Nv A Nv A Nv A Nv A Nv A Nv A Nv A Nv A Nv A Nv A Nv A Nv A Nv A Nv A Nv 11 NVIDIA Grafikkarten + 11 AMD Grafikkarten +...
Installation mehrerer Netzteile Das folgende Diagramm zeigt die Installation mehrerer Netzteile. Das Hauptnetzteil muss an CPU_PWR1, ATX_PWR1, GPU_PWR1~3, SSDs und Systemlüfter angeschlossen werden. Schätzen Sie die von der Grafikkarte TGP benötigte Gesamtleistung und installieren Sie bei Bedarf 1 bis 4 zusätzliche Netzteile. Schließen Sie zusätzliche Netzteile an die JPS_ONx Stecker mit einem 24-poligen auf 2-poligen Adapter an, um die zusätzlichen Netzteile beim Einschalten des Systems einzuschalten.
Seite 42
Berechnung der Leistungsaufnahme Im Folgenden finden Sie verschiedene Kombinationen von Netzteilinstallationen, basierend auf dem Stromverbrauch von 180 W pro NVIDIA P104 Grafikkarte und 300 W für Systemkomponenten wie Motherboard, 65 W CPU, Speicher, SSD, Tastatur und Maus. Die tatsächliche Leistungsaufnahme der Grafikkarten und Geräte entnehmen Sie bitte den Spezifikationen.
Seite 43
300W System + 18x 180W Grafikkarten = 3540W Leistungsaufnahme Es wird empfohlen, mindestens 3 Netzteile, 1x 1500W Netzteil + 2x 1200W Netzteile zu verwenden 300W System 1500W PSU 180W GPU 180W GPU 180W GPU 1. ~ 6. Grafikkarte 180W GPU 180W GPU 180W GPU 1200W PSU...
LED Anzeigen Debug-LEDs auf der Rückseite Auf der Rückseite befinden sich 4 Debug-LEDs. Die folgende Tabelle erklärt die Bedeutung der Debug-LEDs. Beschreibung Zeigt an, dass die CPU nicht erkannt wird oder defekt ist. Zeigt an, dass der DRAM nicht erkannt wird oder DRAM defekt ist.
BIOS zurücksetzen In diesem Abschnitt wird beschrieben, wie man CMOS mit Jumper oder Taste löscht. Zurücksetzen des BIOS durch JBAT1 Jumper Der Onboard CMOS Speicher (RAM) wird durch eine externe Spannungsversorgung durch eine Batterie auf dem Motherboard versorgt, um die Daten der Systemkonfiguration zu speichern.
Aktualisieren des BIOS mit Live Update 6 1. Stellen Sie sicher, dass zuvor die LAN-Treiber installiert wurden und eine Internetverbindung eingerichtet ist. 2. Installieren und starten Sie „MSI LIVE UPDATE 6 “ . 3. Wählen Sie BIOS Update aus. 4. Klicken Sie auf die Scan Taste.
Einstellung des BIOS Wenn das System hochfährt, erscheint die folgende Abbildung auf dem Bildschirm. Name des Motherboards Mining Modus Anzeige GPU Status Direkttaste Beschreibung y GPU-Status - zeigt den Betriebsstatus der PCIe-Steckplätze an. Grüner Steckplatz: Die Grafikkarte arbeitet normal. Roter Steckplatz: Der Steckplatz ist leer oder die Grafikkarte hat einen Fehler.
Betriebssystem installieren Das Windows Betriebssystem unterstützt derzeit bis zu 13 Grafikkarten einer GPU derselben Marke. Wenn Sie mehr als 13 Grafikkarten verwenden, müssen Sie das Betriebssystem Linux Mining verwenden. Die folgenden Anweisungen beziehen sich auf die Installation des Windows Betriebssystems. 1.
Seite 49
B360-F PRO/ H310-F PRO Руководство по установке системы для майнинга...
Конфигурация y Системная плата B360-F PRO/ H310-F PRO y Комплект плат расширения PCIe Riser Kit (B360-F), 18 шт./ Комплект плат расширения PCIe Riser Kit (H310-F), 13 шт. y Видеокарты (B360-F), 18 шт./ видеокарты (H310-F), 13 шт. y Загрузочное устройство SSD y ОЗУ...
Seite 51
Установка нескольких видеокарт Для установки нескольких видеокарт в систему майнинга необходимо приготовить платы расширения PCIe x16-к-x1 Riser Kits и подключить, как показано ниже. Подключите шнуры питания PCIe от блока питания к видеокартам и разъемам питания плат расширения PCIe x16. Установите видеокарты на платы...
Seite 52
Рекомендации по установке нескольких видеокарт 6 видеокарт 12 видеокарт A Nv A Nv A Nv A Nv A Nv A Nv A Nv A Nv A Nv A Nv A Nv A Nv A Nv A Nv A Nv A Nv 11 видеокарт...
Seite 53
Установка нескольких источников питания На следующей схеме показана установка нескольких источников питания. Основной источник питания подключается к CPU_PWR1, ATX_PWR1, GPU_PWR1~3, твердотельным накопителям и системным вентиляторам. Оцените общую мощность в ваттах, которая требуется для TGP видеокарт, и при необходимости установите от 1 до 4 дополнительных...
Seite 54
Расчет энергопотребления Ниже представлено несколько вариантов установки источников питания в зависимости от энергопотребления в 180 Ватт на видеокарту NVIDIA P104 и 300 Ватт на системные компоненты, включая системную плату, ЦП 65 Вт, память, твердотельный накопитель, клавиатуру и мышь. Ознакомьтесь с характеристиками фактического потребления электроэнергии видеокартами...
Seite 55
300 Ватт Система + 18 х 180 Ватт видеокарты = 3540 Ватт энергопотребление Рекомендуется использовать не менее 3 блоков питания: 1 х 1500 Ватт + 2 х 1200 Ватт. Система 300 Ватт Блок питания 1500 Ватт 180 Ватт графический процессор 180 Ватт...
Seite 56
Показания светодиодных индикаторов Индикаторы отладки на задней панели На задней панели расположено 4 индикатора отладки. В следующей таблице представлено описание индикаторов отладки. Индикатор Описание Обозначает, что ЦП не обнаружен или ЦП неисправен. Обозначает, что DRAM не обнаружена или неисправна. DRAM Обозначает, что...
Seite 57
Сброс параметров BIOS В этом разделе приводится описание очистки CMOS с помощью перемычки или кнопки. Сброс параметров BIOS с помощью перемычки JBAT1 На плате установлена CMOS-память с питанием от батарейки, расположенной на системной плате, для хранения данных о конфигурации системы. Для сброса конфигурации системы (очистки данных CMOS памяти) воспользуйтесь...
Seite 58
Обновление BIOS с помощью модуля Live Update 6 1. Убедитесь, что драйвер ЛВС уже установлен, и подключение к Интернету правильно настроено. 2. Установите и запустите MSI LIVE UPDATE 6. 3. Выберите Обновление BIOS. 4. Нажмите на кнопку Сканировать. 5. Нажмите на значок Загрузка, чтобы загрузить и установить новейший...
Seite 59
Настройка BIOS В процессе загрузки системы на экране отображается следующий рисунок. Имя системной платы Индикатор режима Состояние майнинга графического процессора Описание клавиш быстрого вызова y Состояние графического процессора - отображается рабочее состояние разъемов PCIe. Зеленый разъем: Видеокарта работает исправно. Красный разъем: Разъем пуст, или возникла ошибка видеокарты. y Имя...
Seite 60
Установка операционной системы Операционная система Windows в настоящее время поддерживает до 13 видеокарт одной марки графического процессора. Если используется более 13 видеокарт, следует использовать операционную систему Linux Mining. При установке операционной системы Windows соблюдайте следующие инструкции. 1. Правильно установите ЦП, память, твердотельный накопитель, видеокарты...
Seite 62
组件 y B360-F PRO/ H310-F PRO 主板 y 18 x PCIe 转接套件 (B360-F)/ 13 x PCIe 转接套件 (H310-F) y 18 x 显卡 (B360-F)/ 13 x 显卡 (H310-F) y SSD 启动盘 y 最少 4GB 内存 (依照系统配置) y 1 到 5 个电源供应器 (选配) 注意...
Seite 63
�装�张显卡 �给�矿�统�装�张显卡, ���先准备�PCIe x 16 转 PCIe x 1 转�套件, 并请依照 下图所�连�� 将电源供应器的 PCIe 电源线 连接至显卡和 PCIe x16 转接卡 的电源插孔� 将显卡�装在 PCIe x16 转�卡� 使用 USB 3.1 Gen1 连接线连接PCIe x1转接卡和 PCIe x16转接卡� 将 PCIe x 1 转�卡�装至 PCIe x1 �槽� 在主板的...
Seite 64
�张显卡�装建议 6 张显卡 12 张显卡 A Nv A Nv A Nv A Nv A Nv A Nv A Nv A Nv A Nv A Nv A Nv A Nv A Nv A Nv A Nv A Nv 11 张 NVIDIA 显卡 + 11 张...
Seite 74
組件 y B360-F PRO/ H310-F PRO 主�� y 18 x PCIe 轉�套件 (B360-F)/ 13 x PCIe 轉�套件 (H310-F) y 18 x 顯�卡 (B360-F)/ 13 x 顯�卡 (H310-F) y SSD 開�� y �少 4GB 記憶� (依照���置) y 1 到 5 個�源供應器 (��) Important PCIe x1 轉...
Seite 85
B360-F PRO/ H310-F PRO マイニングシステムインス トール ガイド...
Seite 86
構成 y B360-F PRO/ H310-F PROマザーボード y 18 x PCIeライザーキッ ト(B360-F)/ 13 x PCIeライザーキッ ト(H310-F) y 18 x グラフィ ックスカード (B360-F)/ 13 x グラフィ ックスカード (H310-F) y SSD�動ドライブ y ��4GBのRAM (システム構成によ って異なります) y ����1~5個 (オプション) �� PCIe x1 to PCIe x16ライザーキッ トは別�購入が必�です�...
Seite 88
��のグラフィ ックスカードの推奨取付位置 6つのグラフィ ックスカードの場合 12のグラフィ ックスカードの場合 A Nv A Nv A Nv A Nv A Nv A Nv A Nv A Nv A Nv A Nv A Nv A Nv A Nv A Nv A Nv A Nv 11のNVIDIAグラフィ ックスカード+ 11のAMDグラフィ...
The point of contact for regulatory matters is MSI, recycling and disposing of their end-of-life products. MSI-NL Eindhoven 5706 5692 ER Son. y Visit the MSI website and locate a nearby distributor B급 기기 (가정용 방송통신기자재) for further recycling information.
Seite 98
MSI will comply with the product take entregar a una empresa autorizada para la recogida de back requirements at the end of life of MSI-branded estos residuos.
Seite 99
MSI si adeguerà a tale Direttiva ritirando tutti i prodotti marchiati MSI che sono stati venduti all’interno dell’Unione Europea alla fine del loro ciclo di vita.
Seite 100
Micro-Star Int’ l Co., Ltd. All other marks and names mentioned may be trademarks of their respective owners. No warranty as to accuracy or completeness is expressed or implied. MSI reserves the right to make changes to this document without prior notice. Technical Support...