ResMed S8 Elite Bedienungsanleitung
Vorschau ausblenden
Andere Handbücher für S8 Elite:
- Gebrauchsanweisung (50 Seiten) ,
- Gebrauchsanweisung (22 Seiten) ,
- Klinische kurzanleitung (8 Seiten)
Inhaltsverzeichnis
Verfügbare Sprachen
Verfügbare Sprachen
Quicklinks
Component of 338112 /1
A
SYSTEM COMPONENTS / SYSTEMKOMPONENTEN / COMPOSANTS DU
SYSTEME / COMPONENTI DEL SISTEMA / COMPONENTES DEL SISTEMA /
COMPONENTES DO SISTEMA / SYSTEEMCOMPONENTEN
Carry handle / Tragegriff /
Poignée de transport / Maniglia
da trasporto / Asa para el
transporte / Pega de transporte /
Handvat
LCD screen / LCD-Display /
Ecran LCD / Schermo a cristalli
liquidi / Visor / Mostrador
LCD / LCD-scherm
1
Module / Modul / Module / Modulo /
Módulo / Módulo / Module
DC input / DC-Eingang / Entrée CC /
Ingresso CC / Entrada de CC /
Entrada CC / Gelijkstroom-ingang
2
AC input / AC-Eingang / Entrée CA / Ingresso CA /
Entrada de CA / Entrada CA / Wisselstroom-ingang
3
4
Note: Some products not available in all regions. Hinweis: Einige Produkte sind nicht in allen Regionen erhältlich. Remarque : certains produits ne sont pas disponibles dans tous les
pays. Nota: Alcuni prodotti non sono disponibili in tutte le regioni. Nota: Algunos productos no están disponibles en todas las regiones. Nota: Alguns produtos não se encontram disponíveis em todas as
regiões. Opmerking: Sommige producten zijn niet in alle regio's verkrijgbaar.
B
INTEGRATED HUMIDIFIER / INTEGRIERTER ATEMLUFTBEFEUCHTER /
HUMIDIFICATEUR INTEGRE / UMIDIFICATORE INTEGRATO / HUMIDIFICADOR
INTEGRADO / HUMIDIFICADOR INTEGRADO / GEÏNTEGREERDE BEVOCHTIGER
™
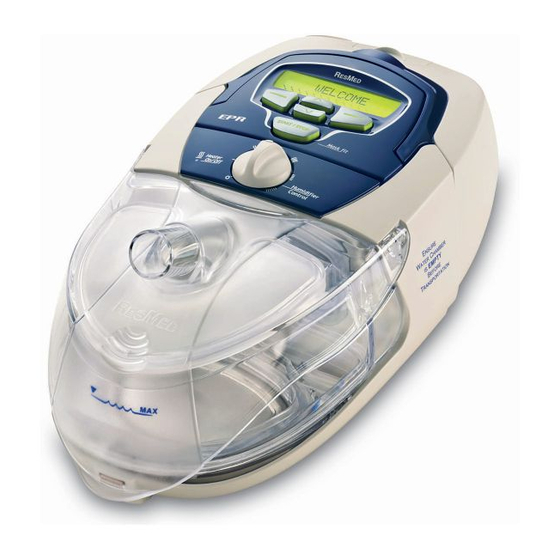
S8 Elite
System
ILLUSTRATIONS
ILLUSTRATIONEN / ILLUSTRATIONS
ILLUSTRAZIONI / FIGURAS
ILUSTRAÇÕES / ILLUSTRATIES
C
OTHER ACCESSORIES / SONSTIGES ZUBEHÖR / AUTRES ACCESSOIRES / ALTRI
ACCESSORI / OTROS ACCESORIOS / OUTROS ACESSÓRIOS / ANDERE
Keypad / Tastenfeld / Clavier /
ACCESSOIRES
Tastierino / Teclado / Teclado /
Toetsenpaneel
Air outlet / Luftauslassöffnung /
Sortie d'air / Presa di uscita
dell'aria / Salida de aire / Saída
de ar / Luchtuitlaat
Air filter cover / Luftfilterabdeckung /
1
Couvercle du logement du filtre à air /
Coperchio del filtro dell'aria /
Cubierta del filtro de aire / Tampa do
filtro de ar / Afdekkap luchtfilter
Air inlet / Lufteinlassöffnung / Entrée
d'air / Presa di ingresso dell'aria /
Entrada de aire / Entrada de ar /
Luchtinlaat
4
2 m
5
HumidAire 3i ™
3 m
2
3
5
D
SETTING UP THE S8
™
/ AUFSTELLEN DES S8
™
DE LA S8
™
/ CONFIGURAZIONE DELL'S8
™
/ INSTALACIÓN
DEL S8
/ MONTAGEM DO S8
/ OPSTELLEN VAN DE S8
™
™
1
2
3
4
/ INSTALLATION
™
Kapitel
Inhaltsverzeichnis
Fehlerbehebung

Verwandte Anleitungen für ResMed S8 Elite


Inhaltszusammenfassung für ResMed S8 Elite
- Seite 1 INTEGRADO / HUMIDIFICADOR INTEGRADO / GEÏNTEGREERDE BEVOCHTIGER DEL S8 / MONTAGEM DO S8 / OPSTELLEN VAN DE S8 ™ ™ ™ ™ S8 Elite System ILLUSTRATIONS Component of 338112 /1 ILLUSTRATIONEN / ILLUSTRATIONS ILLUSTRAZIONI / FIGURAS ILUSTRAÇÕES / ILLUSTRATIES SYSTEM COMPONENTS / SYSTEMKOMPONENTEN / COMPOSANTS DU SYSTEME / COMPONENTI DEL SISTEMA / COMPONENTES DEL SISTEMA / HumidAire 3i ™...
- Seite 2 HUMIDAIRE 3i AND S8 / HUMIDAIRE 3i UND S8 / HUMIDAIRE 3i ET S8 / USING THE DATA CARD / GEBRAUCH DER DATENKARTE / UTILISATION DE LA HUMIDAIRE 3i E S8 / HUMIDAIRE 3i y EL S8 / HUMIDAIRE 3i E S8 / CARTE DE DONNEES / USO DELLA DATA CARD / USO DE LA TARJETA DE HUMIDAIRE 3i EN S8 DATOS / COMO USAR O CARTÃO DE DADOS / GEBRUIK VAN DE DATA CARD...
- Seite 4 Manufactured by: ResMed Ltd 1 Elizabeth MacArthur Drive Bella Vista NSW 2153 Australia Tel: +61 (2) 8884 1000 or 1 800 658 189 (toll free) Fax: +61 (2) 8883 3114 Email: reception@resmed.com.au ResMed Offices: ResMed Corp 14040 Danielson Street Poway CA 92064-6857 USA Tel: +1 (858) 746-2400 or 1-800-424-0737 (toll free) Fax: +1 (858) 746-2900 Email: reception@resmed.com...
- Seite 5 S8 Elite System ™ USER’S MANUAL English...
- Seite 47 S8 Elite System ™ BEDIENUNGSANLEITUNG Deutsch...
- Seite 49 NHALT ..........47 INFÜHRUNG ERANTWORTUNG .
- Seite 50 ........69 EINIGUNG UND ARTUNG ÄGLICHE EINIGUNG ÖCHENTLICHE EINIGUNG...
-
Seite 51: Informationen Zum S8 Elite
INFÜHRUNG Vielen Dank, dass Sie sich für das entschieden haben. Das ist ein ™ S8 E S8 E LITE LITE kompaktes Therapiesystem, das außerdem die Optionen einer integrierten Atemluftbefeuchtung und eines Datenmanagements zur Verfügung stellt. Diese Bedienungsanleitung enthält alle notwendigen Informationen für die korrekte Handhabung Ihres S8 E LITE... -
Seite 52: Warnungen
Datenkommunikationsanschluss angeschlossen werden. Der Anschluss anderer Geräte kann zu Verletzungen oder zur Beschädigung des führen. S8 E LITE sollte nur mit von ResMed, Ihrem Arzt oder Ihrem Atemtherapeuten • S8 E LITE empfohlenen Masken (und Verbindungsstücken) verwendet werden. Die Maske darf nur bei eingeschaltetem und ordnungsgemäß... -
Seite 53: Vorsichtshinweise
Raumtemperatur über 32 C liegt. Wenn kein Wechselstrom (100–240 V AC) zur Verfügung steht, verwenden Sie • stets einen ResMed S8 Gleichstromkonverter. (Der ResMed S8 Gleichstromkonverter ist als optionales Zubehörteil erhältlich.) Wenn es mitgeliefert wird, ist das Datenkartenmodul für den •... - Seite 54 Unwohlsein aufgrund von verschluckter Luft • Ohren- oder Sinusbeschwerden • Augenreizungen • Hautausschläge • Beschwerden im Brustbereich •...
-
Seite 55: Das S8 Elite
Der 2 m lange Atemluftschlauch ist für den Anschluss des an Ihre Maske S8 E LITE vorgesehen. ASKEN Außerdem benötigen Sie ein ResMed-Maskensystem (separat erhältlich). Folgende ResMed-Maskensysteme werden für den Gebrauch mit dem S8 E LITE empfohlen: ASENMASKEN • ODULARNASENMASKE •... -
Seite 56: Atemluftbefeuchter
IRAGE ASKE Hinweis: Einige Modelle sind nicht in allen Ländern erhältlich. WARNUNG Das S8 Elite ist ausschließlich mit ResMed-Masken kompatibel. Lesen Sie hierzu bitte auch den Abschnitt „Warnungen“ auf Seite 48. TEMLUFTBEFEUCHTER Siehe Illustrationen im Abschnitt B der Illustrationsseite. Wenn Sie Probleme mit Trockenheit von Nase, Hals und Mund haben, kann ein Atemluftbefeuchter hilfreich sein. -
Seite 57: Bedienung Des S8 Elite
Stellen Sie das System so auf, dass es nicht versehentlich heruntergestoßen werden kann bzw. dass man nicht über das Stromkabel stolpern kann. Hinweis: Sie können Ihr S8 Elite auch auf den Fußboden neben oder unter Ihrem Bett aufstellen. Stellen Sie sicher, dass der Aufstellungsort staubfrei ist und der Lufteinlass nicht durch Bettzeug, Kleidung oder andere Gegenstände blockiert wird. -
Seite 58: Behandlungsbeginn
Maske an. WARNUNG Die Maske darf nur bei eingeschaltetem und ordnungsgemäß funktionierendem S8 Elite angelegt werden. Sobald die Rampenzeit beginnt, erscheint „RAMPE AKTIV“ auf dem LCD-Display. Gleichzeitig wird der aktuelle Druck anhand von Strichen angezeigt. Jeder Strich entspricht in etwa 2 cm H O. -
Seite 59: Beenden Der Behandlung
EENDEN DER EHANDLUNG Sie können die Behandlung jederzeit durch Abnehmen der Maske bzw. Drücken der Start-/Stopptaste unterbrechen oder indem Sie einfach die Maske abnehmen, vorausgesetzt die SmartStart-Funktion wurde von Ihrem Arzt aktiviert. ENUTZUNG DER ASKENANLEGEFUNKTION ist mit einer Maskenanlegefunktion ausgestattet, die Ihnen die richtige S8 E LITE Anpassung Ihrer Maske erleichtert. -
Seite 60: Anschluss Des Atemluftbefeuchters
Vergewissern Sie sich, dass beim Anschließen oder Abnehmen des Atemluftbefeuchters die Befeuchterkammer des HumidAire 3i leer ist. b. Entfernen Sie vor dem Anschließen des HumidAire 3i die Kontaktabdeckung am S8 Elite. Bringen Sie die Kontaktabdeckung nach dem Abnehmen des Atemluftbefeuchters wieder an. UFBEWAHRUNG DES... -
Seite 61: Bedienfeldtasten
ERWENDUNG DES EDIENFELDES Die Bedienoberfläche des besteht aus einem LCD-Display sowie einem S8 E LITE Bedienfeld für die Navigation durch die Menüs und die Behandlungszufuhr. LCD-Display Pfeil-nach-oben-Taste Rechte Taste Linke Taste Start-/Stopptaste Pfeil-nach-unten-Taste LCD-D ISPLAY Das LCD-Display zeigt die Menüs und Behandlungsbildschirme an. Die LCD-Beleuchtung schaltet sich automatisch ab, wenn 2 Minuten lang keine Eingabe gemacht wurde. -
Seite 62: Ändern Der
Im Bereitschaftsmodus bleiben alle Tasten des -Systems beleuchtet. Während der Behandlung schaltet sich die Tastenbeleuchtung 2 Minuten nach der letzten Menüauswahl automatisch ab und die Start-/Stopptaste leuchtet gedimmt weiter. Ä NDERN DER INSTELLUNGEN Sie können die Einstellungen des mit Hilfe des Tastenfeldes und des LCD- S8 E LITE Displays ändern. -
Seite 63: Verwendung Des Menüs „Standard
„S “ ERWENDUNG DES ENÜS TANDARD Abbildung 1 zeigt das Menü „Standard“. WILLKOMMEN >>>>>> RAMPE: 10Min Menü EDR EINST.: 1 Ändern Beend. NUTZG Std: 08000 Beend. NUTZG: 1000/1068 Beend. MASKE: ULTRA Ändern Beend. SW: SX3960200 Beend. Abbildung 1 : Bildschirm des Menüs „Standard“ Sie können vom Bereitschaftsbildschirm (RAMPE) aus durch Drücken der linken Taste (Menü) auf das Menü... -
Seite 64: Weitere Aufrufbare Informationen
Die folgende Tabelle zeigt die jeweilige Einstellung, die für die verschiedenen Maskentypen ausgewählt werden sollte. Tabelle 2: Einstellungen für Maskentypen Einstellungen Maske ULTRA Ultra Mirage Nasenmaske MIR FULL Mirage Full Face Maske Mirage Full Face Maske Serie 2 Ultra Mirage Full Face Maske ACTIVA Mirage Activa Nasenmaske SWIFT... -
Seite 65: Verwendung Des Detailmenüs
ERWENDUNG DES ETAILMENÜS Abbildung 2 zeigt das Detailmenü. WILLKOMMEN >>>>>> RAMPE: 10Min Menü EINSTELLUNGEN Zugang Beend. EDR EINST.: 1 Ändern Beend. MASKE: ULTRA Ändern Beend. SCHLAUCHLÄNGE: 2m Ändern Beend. AL-BEF: KEINER Ändern Beend. SMARTSTART: EIN Ändern Beend. LECK.-ALARM: AUS Ändern Beend. -
Seite 66: Das Menü „Einstellungen
„E “ ENÜ INSTELLUNGEN Wählen Sie im Menü „Einstellungen“ „Akzeptieren“ (linke Taste) aus, um die Optionen in diesem Menü aufzurufen. Ä NDERN DER INSTELLUNG FÜR DIE RUCKREDUZIERUNG WÄHREND DER (EDR) XSPIRATION Hinweis: Die EDR ist nicht in allen Regionen erhältlich. Möglicherweise hat Ihr Arzt Ihr Gerät darauf eingestellt, den Druck bei der Exspiration zu reduzieren (EDR). -
Seite 67: Das Menü „Ergebnisse
INZUFÜGEN EINES TEMLUFTBEFEUCHTERS UND EINER RONTABDECKUNG RONTABDECKUNG NICHT FÜR ALLE ODELLE ERHÄLTLICH Gehen Sie zu AL-BEF und wählen Sie „Ändern“ aus (linke Taste). Drücken Sie die Pfeil-nach-oben- oder Pfeil-nach-unten-Taste, bis die gewünschte Einstellung angezeigt wird. Sie können das Gerät mit oder ohne Frontabdeckung benutzen. Ä... -
Seite 68: S8 Elite
LCD-D S8 E ELDUNGEN AUF DEM ISPLAY DES LITE Ihr Arzt hat möglicherweise Ihr so eingestellt, dass es Sie an wichtige Ereignisse S8 E LITE erinnert, wie z. B. wann Sie sich mit Ihrem Arzt in Verbindung setzen sollen oder Ihre Datenkarte einführen müssen (falls Ihr Gerät datenkartenfähig ist). -
Seite 69: S8 Module
S8 M ODULE Hinweis: Nehmen Sie die Module nicht ab, während das S8 Elite an eine Stromquelle angeschlossen ist. ist mit einem von zwei Modulen ausgestattet - entweder mit einer S8 E LITE Modulschachtabdeckung oder mit einem Datenkartenmodul. ERWENDUNG EINER ODULSCHACHTABDECKUNG Siehe Illustrationen in Abschnitt F der Illustrationsseite. - Seite 70 Das Kopieren von Daten auf eine Datenkarte dauert bis zu 30 Sekunden. INFÜHREN DER ATENKARTE Schalten Sie das ein und warten Sie, bis der Bereitschaftsbildschirm • S8 E LITE erscheint (RAMPE). Führen Sie die Datenkarte mit dem Pfeil nach oben in den Schlitz am •...
- Seite 71 Hinweis: Diese Meldung erscheint nur einmal. Wird die Datenkarte nach dem Aktualisieren Ihrer Einstellungen erneut eingeführt, erscheint diese Meldung nicht mehr. Nehmen Sie die Datenkarte aus dem Datenkartenmodul heraus. • Bewahren Sie Ihre Datenkarte im Rückumschlag auf, wenn Sie sie nicht •...
-
Seite 73: Reinigung Und Wartung
EINIGUNG UND ARTUNG Die in diesem Abschnitt beschriebenen Reinigungs- und Wartungsabläufe sollten regelmäßig durchgeführt werden. Vollständige Informationen finden Sie in der Bedienungsanleitung Ihrer Maske. ÄGLICHE EINIGUNG ASKE Reinigen Sie die Maske entsprechend den Anweisungen in der mitgelieferten Bedienungsanleitung. TEMLUFTSCHLAUCH Nemen Sie den Atemluftschlauch vom (und ggf. -
Seite 74: Auswechseln Des Luftfilters
Luftfilterabdeckung ordnungsgemäß angebracht sind. Hinweis: Der Luftfilter sollte alle drei Monate ausgewechselt werden. ARTUNG VORSICHT Versuchen Sie nicht, das Gehäuse des S8 Elite zu öffnen. Im Inneren des Gerätes • befinden sich keine vom Anwender auszuwechselnden bzw. zu reparierenden Bauteile. -
Seite 75: Wie Fühlt Sich Dasa
ÄUFIG GESTELLTE RAGEN S8 E IE FÜHLT SICH DAS TMEN MIT DEM LITE AN Bei der ersten Benutzung des kann das Atmen gegen den Luftstrom unter S8 E LITE Umständen etwas unangenehm sein. Das ist normal. Sie werden im Schlaf ganz normal weiter atmen. -
Seite 76: Druckausgleich
S8 E LITE LITE Normanforderungen des US FCC Teil 15, Klasse B, sofern keine externen Datenkabel verwendet werden. Hinweis: Verwenden Sie Ihr S8 Elite im Flugzeug nicht während des Startens und Landens. S8 E (AC) ANN ICH DAS LITE AUCH BENUTZEN... -
Seite 77: Fehlersuche
Wenn Sie ein Problem mit dem Gerät haben, versuchen Sie bitte zunächst, es mit Hilfe einer der folgenden Maßnahmen zu beheben. Kann das Problem nicht beseitigt werden, wenden Sie sich bitte an Ihren Fachhändler oder direkt an ResMed. Versuchen Sie nicht, das Gerät zu öffnen. -
Seite 78: Mögliche Ursache
Schließen Sie beide Enden fest an. Knick oder Loch im Atemluftschlauch. Richten Sie den Atemluftschlauch gerade oder wechseln Sie ihn aus. Das S8 Elite stoppt SmartStart/Stop ist deaktiviert. Aktivieren Sie SmartStart/Stop. nicht, wenn Sie die Maske abnehmen. Obwohl SmartStart Sie verwenden einen nicht Verwenden Sie ausschließlich... - Seite 79 Netzstecker aus der Steckdose und stecken Sie ihn anschließend wieder ein, um das Gerät neu zu starten. Fehlermeldung: Defektes Bauteil. Geben Sie Ihr S8 Elite in Reparatur. SYSTEMFEHLER Service anford.! Fehlermeldung: Sie hatten während der letzten Stellen Sie sicher, dass Ihr Nacht eine übermäßig große...
- Seite 80 Schlitz des Datenkartenmoduls ein. Sie haben möglicherweise die Führen Sie die Datenkarte erneut Datenkarte entfernt, bevor die ein und warten Sie, bis die Einstellungen auf den S8 Elite Meldung „Einst. kopiert werden konnten. übernommen. Karte entnehmen.“ auf dem LCD- Display erscheint.
-
Seite 81: Nicht Auf Dem Lcd
Problem Mögliche Ursache Maßnahme Während Sie Die Datenkarte weist einen Setzen Sie sich umgehend mit versuchen, die Datenfehler auf. Ihrem Arzt in Verbindung. Einstellungen mit Hilfe der Datenkarte zu aktualisieren, erscheint die folgende Meldung auf dem LCD-Display: Einstell. Fehler Karte entnehmen Während Sie Die Einstellungen wurden nicht Setzen Sie sich umgehend mit... -
Seite 83: Technische Daten
LITE UMID 400 Hz; 2,5A <140 VA (110 W) (maximale Leistungsaufnahme). Höchste Momentanleistungsaufnahme <340 VA. Die Gleichstromleistung finden Sie in der Bedienungsanleitung des ResMed S8 • Gleichstromkonverters. Verwenden Sie für den Gleichstromeingang ausschließlich den ResMed S8 Gleichstromkonverter von ResMed. Der tatsächliche Stromverbrauch variiert aufgrund verschiedener Faktoren wie z. B. -
Seite 84: Lle Eräte Falls Zutreffend
ATENKARTENMODUL Abmessungen (H x B x T): 49,7 mm x 42,2 mm x 12 mm ERÄTE FALLS ZUTREFFEND Gehäuse: Flammenhemmendes, technisches Thermoplast Umgebungsbedingungen für Betrieb Betriebstemperatur: +5 °C bis +40 °C Betriebsluftfeuchtigkeit: 10 %–95 % ohne Kondensation Lagerungs- und Transporttemperaturen: -20 °C bis +60 °C Lagerungs- und Transportfeuchtigkeit: 10 %–95 % ohne Kondensation Betriebshöhe: Meeresspiegel bis 2591 m üNN Elektromagnetische Verträglichkeit... -
Seite 85: Richtlinie Und Erklärung Des Herstellers Über Elektromagnetische
ICHTLINIE UND RKLÄRUNG DES ERSTELLERS ÜBER ELEKTROMAGNETISCHE MISSIONEN UND ERTRÄGLICHKEIT Richtlinie und Erklärung des Herstellers über elektromagnetischen Emissionen Das S8 ist für die Verwendung in der unten angegebenen elektromagnetischen Umgebung vorgesehen. Der Kunde bzw. Benutzer des S8 muss sicherstellen, dass das Gerät in einer solchen Umgebung verwendet wird. - Seite 86 Richtlinie und Erklärung des Herstellers über elektromagnetische Verträglichkeit Das S8 ist für die Verwendung in der unten angegebenen elektromagnetischen Umgebung vorgesehen. Der Kunde bzw. Benutzer des S8 muss sicherstellen, dass das Gerät in einer solchen Umgebung verwendet wird. IEC60601-1-2 Normerfül- Elektromagnetische Verträglichkeitstest Testebene...
- Seite 87 Richtlinie und Erklärung des Herstellers über elektromagnetische Verträglichkeit Das S8 ist für die Verwendung in der unten angegebenen elektromagnetischen Umgebung vorgesehen. Der Kunde bzw. Benutzer des S8 muss sicherstellen, dass das Gerät in einer solchen Umgebung verwendet wird. Verträglichkeits- IEC60601-1-2 Normerfül- Elektromagnetische Umgebung - test...
- Seite 88 Empfohlene Abstände zwischen tragbarer und mobiler HF-Kommunikationsausrüstung und dem Das S8 ist für die Verwendung in einer Umgebung vorgesehen, in der gestrahlte HF-Störungen kontrolliert werden. Der Kunde bzw. Benutzer des S8 kann zur Verhinderung von elektromagnetischen Störungen beitragen, indem er gemäß der Empfehlung unten, die sich nach der maximalen Ausgangsleistung der Kommunikationsausrüstung richtet, einen minimalen Abstand zwischen der tragbaren und mobilen HF- Ausrüstung (Sender) und dem S8 einhält.
-
Seite 89: Beschränkte Garantie
ESCHRÄNKTE ARANTIE ResMed garantiert, dass Produkte von ResMed vom Datum des Kaufes seitens des Erstkäufers an für den unten angegebenen Zeitraum frei von Material- und Verarbeitungsfehlern sind. Diese Garantie ist nicht übertragbar. Produkt Garantiezeitraum ResMed Atemluftbefeuchter, ResControl™, ResLink™ 1 Jahr... -
Seite 91: Ndex
NDEX Atemluftbefeuchter Häufig gestellte Fragen 71 HumidAire 3i 52 HumidAire 3i 52 Linderung von Trockenheit 71 Anschluss 56 Reinigung 69 Aufbewahrung 51 Typ 63 Atemluftschlauch 51 Aufstellen 53 Internationale Anwendung 72 Bedienfeld 51 Kontraindikationen 47 Behandlung beenden 55 Kopfband 73 Bereitschaftsbildschirm 54 Bildschirm „Maske“... - Seite 92 Zubehör 52 Rampenzeit 54 Rechte Taste 57 Regelmäßige Reinigung 69 Reinigung Regelmäßig 69 Täglich 69 Wöchentlich 69 ResMed S8 Gleichstromkonverter 72 ResScan Datenkartenmodul 52 S8 Elite Abmessungen 79 Aufstellen 53 Behandlung starten 54 Reisen mit 72 Wartung 70 S8 Module 65 Schlauchlängeneinstellung 62...
- Seite 93 S8 Elite ™ MANUEL UTILISATEUR Français...
- Seite 139 Sistema S8 Elite ™ MANUALE DELL’UTENTE Italiano...
- Seite 183 Sistema S8 Elite ™ MANUAL DEL USUARIO Español...
- Seite 227 Sistema S8 Elite ™ MANUAL DO UTILIZADOR Português...
- Seite 271 S8 Elite systeem ™ HANDLEIDING VOOR DE GEBRUIKER Nederlands...