Herunterladen Inhalt Inhalt Diese Seite drucken

Werbung

Verfügbare Sprachen
  • DE

Verfügbare Sprachen

  • DEUTSCH, seite 35
6
8
X
X
S
e
r
i
e
s

Werbung

Inhaltsverzeichnis
loading

Inhaltszusammenfassung für Symbol 68XX-Serie

  • Seite 2 Symbol reserves the right to make changes to any product to improve reliability, function, or design. Symbol does not assume any product liability arising out of, or in connection with, the application or use of any product, circuit, or application described herein.
  • Seite 3: About This Guide

    Q u i c k R e f e r e n c e Introduction The 68XX is a ruggedized, weather-resistant, hand-held portable computer combining the following capability in one package: • PC-standard architecture (8088 16-bit architecture) • DR-DOS compatibility •...
  • Seite 4 6 8 X X S e r i e s Parts of the 68XX Scan LED Display PWR Key Status LED Keyboard Scan Window Scan Trigger Battery Pack Optical Connectors Battery Charging Compartment Contacts Battery Release Battery Lock Handstrap...
  • Seite 5: Required Accessories

    Q u i c k R e f e r e n c e Required Accessories Required 68XX accessories include: • Lithium Ion or NiCd rechargeable battery pack or intrinsically safe NiCd rechargeable battery pack • CCM 38/6860 4-slot charging and communication module with spare battery charging slot •...
  • Seite 6 6 8 X X S e r i e s Providing Power Power for the 68XX is provided by a Lithium Ion or Nickel Cadmium (NiCd) rechargeable battery pack. Note: The Series 3800 NiCd battery packs, 3872-103, 3872- 105, and 3872-115, CANNOT be used in the 68XX. Installing New or Recharged Batteries To install the battery: 1.
  • Seite 7: Removing The Battery Pack

    Q u i c k R e f e r e n c e 2. Use the enclosed battery locking key to lock the battery into place. As you are turning the locking key, the battery locking mechanism should be turning and locking the battery into place.
  • Seite 8 Required Accessories on page 3 or the Universal Battery Charger. Refer to the QRG for your cradle or the QRG for the UBC for instructions on charging the battery. Caution: Use only Symbol battery 21-32801-01, 21-35217-01, 21-35241-01, or 21-38796-01 in this terminal. CCM 38/6860...
  • Seite 9 Q u i c k R e f e r e n c e Operating the 68XX Powering the 68XX On/Off Power the 68XX on by: • squeezing the scan trigger, • or pressing the PWR key. Note: The battery must be installed, or the 68XX must be in a cradle to power the terminal on.
  • Seite 10 6 8 X X S e r i e s up and down the screen. • 35-key - press the cursor keys to scroll left and right. 46-key - press FUNC then to scroll left, and FUNC then to scroll right. •...
  • Seite 11 Q u i c k R e f e r e n c e 3. Ensure that the scan beam crosses all bars and spaces on the bar code symbol, as shown below: Right Wrong Hold the scanner farther away for larger symbols, and closer for symbols with bars that are close together.
  • Seite 12 6 8 X X S e r i e s You can tilt the 68XX up to 55° forward or back and achieve a successful decode. Practice quickly shows what tolerances to work within. Performing Communications Communicating with a Host The 68XX communicates with a host through the CCM 38/6860, CRD 38/6865, CRD 38/6866, or PC Adapter.
  • Seite 13 Q u i c k R e f e r e n c e The Status LED lights solid green when the 68XX is securely placed in the cradle. 3. Start the communications program on the host and the 68XX. Caution: Do NOT remove the 68XX while the cradle’s red COMM LED is blinking.
  • Seite 14 3. Power the printer and 68XX on. Communicating in a RF Network The PDT 6810 operates in a Symbol Spectrum One RF network; the PDT 684X operates in a Symbol Spectrum24 RF network. The Status LED indicates the state of the terminal’s connection to...
  • Seite 15 Q u i c k R e f e r e n c e Switching from 802.11 to Spring RF Protocol (PDT 6842) Note: The terminal boots up with the 802.11 RF protocol. Perform the following procedure to switch to the Spring RF protocol.
  • Seite 16: Troubleshooting

    6 8 X X S e r i e s The next prompt displays: Enter password → 5. Enter the password RFPROT, then press the ENTER key. The terminal continues to boot up. If a compatibility problem ex- ists, the terminal pauses with an error message. Contact your System Administrator.
  • Seite 17 Q u i c k R e f e r e n c e Symptom Possible Cause Action Low Battery The main battery pack Lithium Ion battery - Re- message. (contin- is running low. (contin- move the battery from the ued) ued) 68XX and charge in a...
  • Seite 18 6 8 X X S e r i e s...
  • Seite 19: A Propos De Ce Guide

    G u i d e u t i l i s a t e u r Présentation Le 68XX est un ordinateur portable robuste et résistant aux intempéries qui réunit les caractéristiques suivantes : • Architecture PC standard (architecture 16 bits 8088) •...
  • Seite 20 S é r i e d e s 6 8 X X Composants du 68XX Témoin du Scan LED lecteur Ecran Display Bouton “Power” (touche de mise PWR Key sous tension) Témoin Status LED d’état Clavier Keyboard Fenêtre de Scan Window lecture Gâchette de Scan Trigger...
  • Seite 21: Accessoires Indispensables

    G u i d e u t i l i s a t e u r Accessoires indispensables Voici quelques accessoires nécessaires pour le terminal 68XX : • Pack de batterie rechargeable lithium-ion ou NiCd ou pack de batterie rechargeable NiCd sûr •...
  • Seite 22 S é r i e d e s 6 8 X X Alimentation Le terminal 68XX est alimenté par un pack de batterie rechargeable au lithium-ion ou Nickel Cadmium (NiCd). Remarque : Les packs de batterie NiCd série 3800, 3872- 103, 3872-105 et 3872-115 NE PEUVENT PAS ETRE utilisés avec le terminal 68XX.
  • Seite 23 G u i d e u t i l i s a t e u r 2. Pour bloquer la batterie en position, utilisez la clé de verrouillage fournie. Lorsque vous tournez la clé, le mécanisme de verrouillage doit pivoter et bloquer la batterie. 3.
  • Seite 24 Reportez-vous au Guide utilisateur de votre puits ou de l’UBC pour connaître la procédure de chargement de la batterie. Attention : Utilisez uniquement les batteries Symbol 21-32801-01, 21-35217-01, 21-35241-01 ou 21-38796-01 dans ce terminal.
  • Seite 25 G u i d e u t i l i s a t e u r Utilisation du terminal 68XX Activation/désactivation du terminal 68XX Mise en marche du terminal 68XX : • appuyez sur la gâchette de lecture, • ou appuyez sur la touche PWR. Remarque : La batterie doit être installée ou le terminal 68XX doit être placé...
  • Seite 26 S é r i e d e s 6 8 X X • Appuyez sur FUNC et sur la touche numérique correspondante pour obtenir les touches de fonction F1 à F10. • Appuyez sur les touches du curseur (35 touches) ou (46 touches) pour faire défiler l’écran vers le haut ou vers le bas.
  • Seite 27 G u i d e u t i l i s a t e u r Utilisation du lecteur intégré Procédure : 1. Appuyez sur la gâchette du lecteur pour mettre le terminal 68XX et le lecteur sous tension. Le témoin du lecteur vire au rouge si la lecture est activée et que le laser est sous tension.
  • Seite 28 S é r i e d e s 6 8 X X Visée : Inclinaison du lecteur Ne tenez pas la fenêtre de lecture du terminal 68XX directement au- dessus du code à barres. Le faisceau laser réfléchi risque de rebondir directement dans la fenêtre de lecture, c’est le phénomène de “réflexion spéculaire”.
  • Seite 29 G u i d e u t i l i s a t e u r Etablissement de communications Communication avec un ordinateur central Le terminal 68XX peut communiquer avec un ordinateur central via le CCM 38/6860, le CRD 38/6865, le CRD 38/6866 ou l’adaptateur PC.
  • Seite 30 3. Mettez en marche l’imprimante et le terminal 68XX. Communication via un réseau radio Le PDT 6810 utilise le réseau radio Spectrum One de Symbol. Le PDT 684X fonctionne sur le réseau radio Spectrum24 de Symbol. Le témoin indique l’état de la connexion du terminal au réseau radio : Eteint indique que la radio fonctionne et est associée à...
  • Seite 31 G u i d e u t i l i s a t e u r Passer de 802.11 au protocole radio Spring (PDT 6842) Remarque : Le terminal se réinitialise avec le protocole ra- dio 802.11. Effectuez la procédure suivante pour passer au protocole radio Spring.
  • Seite 32: Dépannage

    S é r i e d e s 6 8 X X 4. Sélectionnez 2 pour réinitialiser avec le protocole radio Spring. Le message suivant s’affiche : Enter password → 5. Saisissez le mot de passe RFPROT, puis pressez la touche ENTER.
  • Seite 33 G u i d e u t i l i s a t e u r Symptôme Cause possible Solution Message Le pack de batterie Batterie NiCd : Placez le Batterie déchargée principal est déchargé. terminal 68XX dans un puits et rechargez la batterie.
  • Seite 34 S é r i e d e s 6 8 X X Symptôme Cause possible Solution La fenêtre de lecture est Nettoyez la fenêtre de sale. lecture avec un tissu pour lunettes. N’utilisez PAS de tissus imbibés de lotion. Message d’erreur Deux touches au moins Actionnez les touches “Double Key”...
  • Seite 35 K u r z ü b e r s i c h t Einführung Bei dem 68XX handelt es sich um einen robusten, wetter- beständigen, mobilen handheld Computer, der folgende Funktionen vereint: • Standard-PC-Architektur (Prozessor 8088, 16-Bit- Architektur) • DR-DOS-Kompatibilität •...
  • Seite 36: Die Einzelteile Des 68Xx

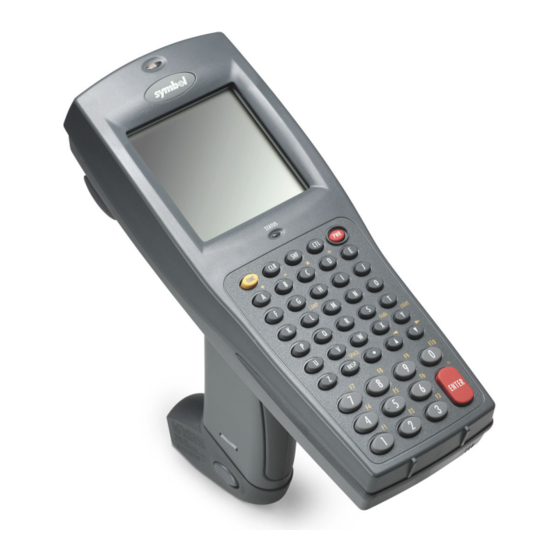
    S e r i e 6 8 X X Die Einzelteile des 68XX Scan-LED Scan LED Anzeige Display Netzschalter PWR Key Status-LED Status LED Tastatur Keyboard Scan Window Scanfenster Scan-Auslöser Scan Trigger Battery Akkusatz Pack Optische Anschlüsse Ladekontakte Akkufächer Akkufach- verriegelung Akkuverriegelung Halteschlaufe...
  • Seite 37: Erforderliches Zubehör

    K u r z ü b e r s i c h t Erforderliches Zubehör Das erforderliche Zubehör für das 68XX umfaßt: • Lithiumionen- oder wiederaufladbarer NiCd-Akkusatz oder eigensicherer, wiederaufladbarer NiCd-Akkusatz • Lade- und Kommunikationsmodul CCM 38/6860 mit vier Fächern und Ladefach für Ersatzakku oder •...
  • Seite 38 S e r i e 6 8 X X Stromversorgung Die Stromversorgung für das 68XX erfolgt durch einen Lithiumionen- oder wiederaufladbaren Nickel-Cadmium- (NiCd-) Akkusatz. Hinweis: Die NiCd-Akkusätze der Serie 3800 (3872-103, 3872-105 und 3872-115) KÖNNEN NICHT für das 68XX verwendet werden. Neue oder aufgeladene Akkus einsetzen So installieren Sie den Akku: 1.
  • Seite 39: Entnahme Des Akkusatzes

    K u r z ü b e r s i c h t 1. Setzen Sie den Akku fest in den unteren Teil des Terminals ein. Gehen Sie so vor, wie es in der nachfolgenden Abbildung dargestellt ist. 2. Drehen Sie die beigfügte Akkuverriegelung, um den Akku zu arretieren.
  • Seite 40 S e r i e 6 8 X X 2. Ziehen Sie den Akkusatz aus dem Griff heraus.
  • Seite 41 Anweisungen zum Aufladen des Akkus enthält die Kurzüber- sicht zu Ihrer Ladestation oder Ihrem Universal-Akku- Ladegerät. Vorsicht: Benutzen Sie für dieses Terminal ausschließlich die Akkus 21-32801-01, 21-35217-01, 21-35241-01 oder 21-38796-01 von Symbol. CCM 38/6860 CRD 38/6865 CRD 38/6866 Laden des Lithiumionenakkus Hinweis: Der Akku wird nicht beschädigt, wenn das Terminal...
  • Seite 42: Die Bedienung Des 68Xx

    S e r i e 6 8 X X UBC 2000 Akku-Ladegerät (Teilenr. 21-32665-24-01) auf. Weitere Informationen finden Sie in der Dokumentaion zum Ladegerät. Die Bedienung des 68XX Ein-/Ausschalten des 68XX So schalten Sie das 68XX ein: • Drücken Sie auf den Scan-Auslöser •...
  • Seite 43 K u r z ü b e r s i c h t Verwenden der Tastatur Das 68XX verfügt über eine alphanumerische Tastatur. Damit lassen sich die 26 Buchstaben des Alphabets (A-Z), Ziffern (0-9) und verschiedene andere Zeichen (+, -, X, ÷, = usw.) darstellen. Die Tastatur verfügt über Farbkennzeichnungen, die angeben, welche Änderungstaste gedrückt werden muß, damit ein bestimmtes Zeichen dargestellt wird bzw.
  • Seite 44 S e r i e 6 8 X X • Drücken Sie CLEAR (35 Tasten) bzw. CLR (46 Tasten), um eine Anwendung oder einen Bildschirm ganz oder teilweise zu verlassen. Es können auch sämtliche eingegebenen Daten, die auf dem Bildschirm dargestellt werden, gelöscht werden. •...
  • Seite 45 K u r z ü b e r s i c h t 3. Stellen Sie sicher, daß der Scanstrahl sämtliche Striche und Zwischenräume des Barcodes erfaßt. Gehen Sie entsprechend der nachfolgenden Abbildung vor: Richtig Falsch Vergrößern Sie die Entfernung zwischen dem Scanner und dem Objekt ein wenig, wenn größere Symbole gescannt wer- den sollen, und verringern Sie diesen Abstand bei Symbolen mit eng beieinander liegenden Strichen.
  • Seite 46: Durchführung Der Kommunikation

    S e r i e 6 8 X X Zielen: In einem bestimmten Winkel halten Halten Sie das Scanfenster des 68XX nicht direkt über den Barcode. Laserlicht, das vom Barcode direkt zurück in das Scanfenster reflektiert wird, wird auch als „Spiegelreflexion“ bezeichnet. Dieses starke Licht kann den Scanner „blenden“...
  • Seite 47 K u r z ü b e r s i c h t So kommunizieren Sie mit einem Host: 1. Führen Sie das Set-up für die Ladestation(en) oder den PC-Adapter so durch, wie dies im 6800 Product Reference Guide (6800 Produktleitfaden) oder in der Kurzübersicht für das Gerät beschrieben ist.
  • Seite 48 Moduls in den Port des Druckers. 3. Schalten Sie den Drucker und das 68XX ein. Kommunikation in einem Datenfunk-Netzwerk Das PDT 6810 wird in einem Symbol Spectrum One-Datenfunk- Netzwerk betrieben und das PDT 684X in einem Symbol Spectrum24-Datenfunk-Netzwerk. Die Status-LED gibt den Status der Verbindung des Terminals mit...
  • Seite 49 K u r z ü b e r s i c h t Blinkt einmal um darauf hinzuweisen, daß der Datenfunkbereich pro Sekunde verlassen wurde oder die Zuordnung zu einem Access Point bzw. einer Basisstation nicht besteht. Weitere Informationen über den Betrieb des PDT 68XX in diesem Datenfunk-Netzwerk finden Sie in der Dokumentation zu dem Spectrum One- bzw.
  • Seite 50 S e r i e 6 8 X X Die nächste Eingabeaufforderung wird angezeigt. RF Protocol Currently 802.11 1. Abort update 2. Make pre-802.11 3. Make 802.11 Select[1,2,3]: 4. Wählen Sie 2, um mit dem Spring RF Protokoll zu starten. Die nächste Eingabeaufforderung wird angezeigt.
  • Seite 51: Fehlerbehebung

    K u r z ü b e r s i c h t Fehlerbehebung Merkmal Möglicher Grund Aktion 68XX läßt sich Akku wurde nicht Überprüfen Sie, ob das nicht einschalten. installiert. 68XX durch Akku mit Strom versorgt wird. Akku wurde nicht NiCd-Akku - Laden Sie geladen.
  • Seite 52 S e r i e 6 8 X X Merkmal Möglicher Grund Aktion Akku ist völlig leer. Der Akku wurde nicht Tauschen Sie den Akku ausgetauscht, nachdem aus. die Meldung Low Battery (Akku ist fast leer) angezeigt wurde. Es sind keine Das 68XX ist nicht Drücken Sie die Taste Zeichen auf der...
  • Seite 53: Informazioni Sulla Guida

    G u i d a R a p i d a Introduzione Il 68XX è un robusto computer portatile resistente agli agenti atmosferici con le seguenti caratteristiche: • Architettura PC standard (architettura a 16 bit 8088) • Compatibilità DR-DOS • Display a 16 linee per 21 caratteri •...
  • Seite 54 S e r i e 6 8 X X Parti del 68XX LED di Scan LED scansione Display Display Tasto di PWR Key accensione LED di stato Status LED Tastiera Keyboard Scan Window Finestra di scansione Scan Trigger Grilletto di scansione Battery Batteria...
  • Seite 55: Accessori Opzionali

    G u i d a R a p i d a Accessori indispensabili Gli accessori indispensabili per il 68XX sono: • Batterie ricaricabili agli ioni di litio e NiCd o batterie ricaricabili NiCd “Intrinsically Safe” • Modulo di comunicazione e di ricarica CCM 38/6860 a 4 posizioni con alloggiamento di ricarica batteria di riserva oppure •...
  • Seite 56 S e r i e 6 8 X X Alimentazione Il 68XX è alimentato da una batteria agli ioni di litio o al Nickel Cadmio (NiCd) ricaricabile. Nota: Le batterie NiCd della serie 3800, 3872-103, 3872-105 e 3872-115 NON possono essere utilizzate con la serie 68XX.
  • Seite 57: Rimozione Della Batteria

    G u i d a R a p i d a 2. Utilizzare la chiave blocca-batteria in dotazione per bloccare la batteria in posizione. Girando la chiave blocca-batteria, viene azionato un meccanismo che blocca la batteria in posizione. 3. Per sbloccare e rimuovere la batteria, sbloccare il meccanismo di blocco con la chiave bloccabatteria ed estrarre la batteria dalla parte inferiore del terminale.
  • Seite 58 S e r i e 6 8 X X 2. Estrarre la batteria fuori dal manico.
  • Seite 59 Accessori indispensabili a pagina 53 o il caricabatteria universale (UBC). Per istruzioni sulla ricarica delle batterie, consul- tare la Guida rapida della base o del caricabatteria universale. Attenzione: Con questo terminale, utilizzare esclusivamente batterie Symbol 21-32801-01, 21-35217-01, 21-35241-01 o 21-38796-01. CCM 38/6860 CRD 38/6865...
  • Seite 60 S e r i e 6 8 X X Uso del 68XX Accensione e spegnimento del 68XX Accendere il 68XX in uno dei seguenti modi: • premendo il grilletto di scansione, • oppure premendo il tasto PWR. Nota: Per accendere il terminale, è necessario installare la batteria o inserire il 68 XX in una base.
  • Seite 61 G u i d a R a p i d a • Premere FUNC e il corrispondente tasto numerico per produrre i tasti di funzione da F1 a F10. • Premere i tasti cursore (tastiera a 35 tasti) o (tastiera a 46 tasti) per scorrere in alto e in basso i dati a video. •...
  • Seite 62 S e r i e 6 8 X X Uso dello scanner laser integrato Per eseguire la scansione: 1. Premere il grilletto dello scanner per accendere sia il 68XX che lo scanner. Se la scansione è abilitata e il laser è attivo, il LED di scansione diventa rosso.
  • Seite 63 G u i d a R a p i d a Mira: consigliata una posizione inclinata Non tenere la finestra di scansione del 68XX verticalmente sul codice a barre. Il raggio laser riflesso dal codice a barre direttamente sulla finestra di scansione, viene detto riflessione speculare. Questa forte rifrazione può...
  • Seite 64 S e r i e 6 8 X X Esecuzione delle comunicazioni Comunicazione con un host Il 68XX comunica con un host tramite CCM 38/6860, CRD 38/6865, CRD 38/6866, o la scheda PCMCIA. Per informa-zioni sull’impostazione del CCM, di basi o di schede PCMCIA, consultare la PDT 6800 Product Reference Guide (Manuale di riferimento del PDT 6800) o la Guida rapida fornite con ciascuna unità.
  • Seite 65 3. Accendere la stampante e il 68XX. Comunicazioni di rete RF Il PDT 6810 funziona su reti RF Symbol Spectrum One, il PDT 684X su reti RF Symbol Spectrum24. Il LED di stato indica lo stato della connessione del terminale alla...
  • Seite 66 S e r i e 6 8 X X Passare da 80211 alla procedura Spring RF (PDT 6842) Nota: Il terminale si avvia con la procedura 802.11 RF. Es- eguire le seguenti operazioni per passare alla procedura Spring RF. 1. Avviare il terminale. Si visualizzerà il seguente messaggio: SOFTWARE UPDATE Update?[y/n]: 2.
  • Seite 67 G u i d a R a p i d a 4. Selezionare 2 per avviare il terminale con la procedura Spring Il messaggio successivo sarà visualizzato nel modo seguente: Enter password → 5. Inserire la password RFPROT, poi premere il tasto ENTER. Il terminale continua l'avviamento.
  • Seite 68: Risoluzione Dei Problemi

    S e r i e 6 8 X X Risoluzione dei problemi Sintomo Possibile causa Azione Il 68XX non si La batteria non è Verificare che il 68XX sia accende. installata. alimentato da una batteria. La Batteria non è caricata. Batteria NiCd - Caricare la batteria nel terminale o rimuovere la batteria e...
  • Seite 69 G u i d a R a p i d a Sintomo Possibile causa Azione Lo scanner non Il codice a barre è Verificare che il codice a decodifica un codice a illeggibile. barre non sia difettoso, ad barre. esempio macchiato o sporco.
  • Seite 70 S e r i e 6 8 X X...
  • Seite 71: Acerca De Esta Guía

    G u í a R á p i d a Introducción El 68XX es un ordenador de mano robusto y resistente a climas extremos que combina las siguientes capacidades en un solo objeto: • Arquitectura de PC estándar (arquitectura 8088 de 16 bits) •...
  • Seite 72 S e r i e 6 8 X X Partes del 68XX LED de Scan LED lectura Pantalla Display Tecla de alimentación PWR Key LED de Status LED estado Teclado Keyboard Ventana del Scan Window scanner Gatillo de Scan Trigger lectura Battery Baterías...
  • Seite 73: Accesorios Necesarios

    G u í a R á p i d a Accesorios necesarios Los accesorios necesarios para el 68XX son: • Baterías recargables de NiCd o litio-ión, o baterías recargables de NiCd intrinsecamente seguras • Módulo de carga y comunicaciones CCM 38/6860 de 4 ranuras, con ranura de carga de baterías de repuesto •...
  • Seite 74: Suministro De Energía

    S e r i e 6 8 X X Suministro de energía Las baterías recargables de níquel cadmio (NiCd) o litio-ión proporcionan la energía del 68XX. Nota: Las baterías de NiCd 3872-103, 3872-105 y 3872-115 de la serie 3800 NO PUEDEN utilizarse en el 68XX. Instalación de baterías nuevas o recargadas Para instalar las baterías: 1.
  • Seite 75 G u í a R á p i d a 2. Utilice la llave de la cerradura del compartimiento de las baterías que se incluye para que las baterías queden fijas en su lugar. Cuando gire la llave, el mecanismo de cierre de las baterías deberá...
  • Seite 76 Guía de referencia rápida del cargador de baterías universal para seguir las instrucciones de carga de las baterías. Precaución: Utilice únicamente las baterías Symbol 21-32801-01, 21-38796-01 ó 21-35241-01 en este terminal. CCM 38/6860...
  • Seite 77 G u í a R á p i d a La batería de litio-ión no se carga cuando el terminal está colocado en un soporte. Use el soporte para las comunicaciones y como lugar para mantener el terminal cuando se instale una batería de litio-ión. Para cargar una batería de litio-ión (n/p 21-40340-01), extraiga la batería del terminal y cárguela en un adaptador de batería UBC2000 n/p 21-32665-24.
  • Seite 78 S e r i e 6 8 X X Funcionamiento del 68XX Encendido/Apagado del 68XX Para encender el 68XX: • apriete el gatillo de lectura, • o pulse la tecla PWR. Nota: Las baterías deben estar instaladas, o bien el 68XX debe estar en el soporte para que pueda encenderse el terminal.
  • Seite 79 G u í a R á p i d a • El teclado numérico por defecto produce los números del 0 al 9. • Pulse FUNC y la tecla numérica correspondiente para producir las teclas de función de F1 a F10. •...
  • Seite 80 S e r i e 6 8 X X Utilización del scanner láser Integrado Para realizar la lectura: 1. Pulse el gatillo del scanner para encender el 68XX y el scanner. El LED de lectura se pone rojo, si la lectura está activada y el láser está...
  • Seite 81 G u í a R á p i d a 4. El LED cambia de rojo a verde en las decodificaciones correctas. El 68XX también puede emitir señales sonoras. Apuntado: mantener en un ángulo No ponga la ventana del scanner del 68XX directamente sobre el código de barras.
  • Seite 82 S e r i e 6 8 X X Para establecer la comunicación con un ordenador central (host): 1. Configure el(los) soporte(s) o adaptador de PC tal como se describe en la Guía de referencia del producto del PDT6800 o en la Guía de referencia rápida del dispositivo.
  • Seite 83 3. Encienda la impresora y el 68XX. Comunicación por radio El PDT 6810 funciona en una radio Spectrum One de Symbol; el PDT 684X funciona en una radio Spectrum24 de Symbol. El LED de estado indica el estado de la conexión del terminal a la...
  • Seite 84 S e r i e 6 8 X X Cambio del 802.11 al protocolo RF Spring (PDT 6842) Note: El terminal arranca con el protocolo RF 802.11. Realice el siguiente procedimiento para cambiar al protocolo RF Spring. 1. Arranque el terminal. El siguiente mensaje aparecerá en la pantalla: SOFTWARE UPDATE Update?[y/n]:...
  • Seite 85: Solución De Problemas

    G u í a R á p i d a 4. Seleccione 2 para arrancar con el protocolo RF Spring. El siguiente mensaje se muestra en la pantalla: Enter password → 5. Introduzca la contraseña RFPROT, luego pulse la tecla ENTER.
  • Seite 86 S e r i e 6 8 X X Síntoma Causa posible Acción Mensaje Batería Las baterías principales Baterías de NiCd - Ponga baja. están bajas de carga. el 68XX en un soporte y recargue las baterías Apague el 68XX y cambie las baterías.
  • Seite 87 G u í a R á p i d a Síntoma Causa posible Acción El scanner no El código de barras es Compruebe que el código decodifica un ilegible. de barras no esté código de barras. defectuoso, por ejemplo, emborronado o sucio. La ventana del scanner Limpie la ventana del está...
  • Seite 88 S e r i e 6 8 X X...
  • Seite 89 ク イ ッ ク リ フ ァ レ ン ス はじめに 68XX は、 耐久性、 耐候性に優れたハンド ヘルド型のポータブル コンピュータで、次のような機能を備えています。 • PCスタンダードアーキテクチャ (8088 16 ビット アーキテク チャ ) • DR-DOS との互換性 • 16 行× 21 桁ディスプレイ • 35 または 46 キーの英数字キーボードによるキー入力 • バーコードレーザスキャナ内蔵 •...
  • Seite 90 6 8 X X シ リ ー ズ 68XX の各部名称 スキャン ディスプレ イ 電源キー ステータス LED キーボード スキャン ウィン ドウ バッテリ パッ スキャン トリガ 光コネクタ 充電接点 バッテリ コンパートメ バッテリ ハンド リリース ストラップ バッテリ ロッ...
  • Seite 91 ク イ ッ ク リ フ ァ レ ン ス 必要なアクセサリ 68XX に必要なアクセサリには、次のものがあります。 • リチウム イオンまたは充電式 NiCd バッテリ パック、ま たは 安全な充電式 NiCd バッテリ パック • CCM 38/6860 4 スロット充電 / 通信モジュール ( 予備バッテ リ充電スロット付き ) または • CRD 38/6865 1 スロット充電 / 通信クレードル または...
  • Seite 92 6 8 X X シ リ ー ズ 電源の供給 68XX は、リチウム イオンニッケル カドミウム (NiCd) 充電式 バッテリ パックによって電源を供給します。 注: シリーズ 3800 NiCd バッテリ パック 3872-103、 3872-105、および 3872-115 は、68XX では使用でき ません。 新しい バッテリ、または充電済みバッテリの取り付け バッテリを取り付けるには、次の手順に従います。 1. バッテリ パックを 6800 のスキャン ウィンドウの側にあ るハンドルに合わせます。 2. バッテリ リリース ボタンを押しながら、バッテリ パック をバッテリ...
  • Seite 93 ク イ ッ ク リ フ ァ レ ン ス 2. 付属のバッテリ ロック キーを使って、バッテリを所定の 位置にロックします。ロック キーを回すと、バッテリ ロック機構が回転し、バッテリが所定の位置にロックされ ます。 3. ロックを解除して、バッテリを取り出すには、バッテリ ロック キーを使ってバッテリ ロック機構を解除し、ター ミナルから引き出します。 バッテリ ロック機 構 バッテリ ロック バッテリ パックの取り外し方 1. ハンドルの両側にあるバッテリ リリース ボタンを押しま す。 リリース ボタンを押 リリース ボタンを す...
  • Seite 94 6 8 X X シ リ ー ズ 2. バッテリ パックをハンドルから引き出します。...
  • Seite 95 ク イ ッ ク リ フ ァ レ ン ス NiCd バッテリの充電方法 必要なアク 68XX の NiCd バッテリを充電するには、89 ページの セサリ で説明しているいずれかのクレードル、または汎用バッ テリ チャージャを使用します。バッテリの充電方法について は、クレードルのクイック リファレンス ガイド、または UBC のクイック リファレンス ガイドを参照してください。 注意: このターミナルでは、必ず 21-32801-01、21-35217- 01、 21-35241-01 または 21-38796-01 のバッテリを使 用してください。 CCM 38/6860 CRD 38/6865 CRD 38/6866 リチウム...
  • Seite 96 6 8 X X シ リ ー ズ 68XX の操作方法 68XX の電源のオン / オフ 次のいずれかの方法で 68XX の電源を入れます。 • スキャン トリガを握ります。 • または、PWR キーを押します。 注: 68XX の電源を入れるには、バッテリが入っているか、 68XX がクレードルに入っている必要があります。 68XX の電源を切るには、PWR キーを押します。 コントラストの調整方法 68XX の画面コントラストは、8 段階で調節できます。コントラ ストを調節するには、次の手順に従います。 • コントラストを上げるには、FUNC を押してから X を押 します。...
  • Seite 97 ク イ ッ ク リ フ ァ レ ン ス す。 • デフォルトの数字キーパッドでは、0 ~ 9 の数字を入力で きます。 • FUNC を押してから数字キーを押すと、ファンクション キー F1 ~ F10 を入力できます。 • 画面を上下にスクロールするには、 カーソル キー キー ) または (46 キー ) を押します。 • 35 キー - カーソル キー を押して左右にスク...
  • Seite 98 6 8 X X シ リ ー ズ 2. 68XX をバー コードに向け、トリガを押します。 3. スキャン ビームがバー コード シンボルのすべてのバーと バー スペースにあたるようにしてください ( 下図参照 )。 正 誤 バー コードが大きい場合はスキャナを離し、バーの間隔が 狭い場合はスキャナを近づけます。 ロングレンジ バージョンは、2 段階のスキャン トリガを サポートしています。最初のナロービームで照準を定め、 2 番目のビームでラベルを読み取ります。 4. 正しく読み取れた場合、LED が赤色から緑色になります。 また 68XX はビープ音を鳴らすこともできます。...
  • Seite 99 ク イ ッ ク リ フ ァ レ ン ス スキャナを構える角度について 68XX のスキャン ウィンドウをバー コード面に対して直角にな らないように構えてください。バー コードに当って反射した レーザ光がスキャン ウィンドウに直接戻ることを鏡面反射と言 います。この強い光により、スキャナが「眼つぶし」状態にな り、読み取りが行えなくなることがあります。この鏡面反射が 起こるエリアを「デッド ゾーン」と言います。 68XX は、前後に 55°まで傾けても正常に読み取ることができま す。実際に試してみれば、どの程度で読み取れるかすぐにわか ります。...
  • Seite 100 6 8 X X シ リ ー ズ 通信の実行 ホストとの通信 68XX は、CCM 38/6860、CRD 38/6865、CRD 38/6866、または PC アダプタを通してホストと通信します。CCM、クレードル、また は PC アダプタのセットアップ方法については、各ユニットに付 『PDT6800 プロダクト リファレンス ガイド』 属されている また 『クイック リファレンス ガイド』 は を参照してください。 ホストと通信するには、次の手順に従います。 『68XX プロダクト リファレンス ガイド』 または機器のク イック リファレンス ガイドの説明に従って、クレードル または...
  • Seite 101 光コネクタ スロット 68XX の光ポート 2. PIM の DB-9 コネクタをプリンタのポートに差し込みます。 3. プリンタと 68XX の電源を入れます。 RF ネットワークでの通信 PDT 6810 は Symbol Spectrum One RF ネットワークで動作し、 PDT 684X は Symbol Spectrum24 RF ネットワークで動作します。 ステータス LED は、 RF ネットワークとの接続状態を次のように示 します。 オフ 無線状態が正常で、アクセス ポイント (Spectrum24) またはベースステーション...
  • Seite 102 6 8 X X シ リ ー ズ 802.11 から Spring RF プロトコルへの交換 (PDT 6842) 注: ターミナルは、802.11 RF プロトコルで起動します。 Spring RF プロトコルへの交換は、以下の手順を実行 してください。 1. ターミナルを起動させる。プロンプトが以下を表示しま す: SOFTWARE UPDATE Update?[y/n]: 2. 4 秒以内にアルファベットの「y」をタイプしてください。 時間内にタイプしないと、ターミナルは 802.11 RF プロト コルで起動します。 次に、プロンプトが以下を表示します: RF PROTOCOL UPDATE OPPORTUNITY Update RF protocol [y/n]:...
  • Seite 103 ク イ ッ ク リ フ ァ レ ン ス 次に、プロンプトが以下を表示します: Enter password → 5. パスワード「RFPROT」を入力し、ENTER キーを押してくだ さい。ターミナルは起動状態を維持します。互換性におい て問題がある場合、ターミナルは一時停止し、エラー メッ セージが出ます。システム管理者に連絡してください。 トラブルシューティング 現象 原因 対処方法 68XX の電源が バッテリが入っていませ バッテリから電源が供給 入らない。 ん。 されていることを確認し てください。 バッテリが充電されて NiCd バッテリ - バッテリ いません。 をターミナル内で充電す るか、バッテリを取り出...
  • Seite 104 6 8 X X シ リ ー ズ 現象 原因 対処方法 Low Battery メインバッテリ パック リチウム イオン バッテリ メッセージが のバッテリ残量が少な - 68XX からバッテリを外 表示される。 くなっています。 し、UBC 2000 アダプタで 充電してください。 (続き) (続き) または 68XX の電源を切り、バッ テリを交換してください。 Low Battery バッテリが完 メッセー バッテリを交換してくだ 全に放電して...
  • Seite 105 ク イ ッ ク リ フ ァ レ ン ス 現象 原因 対処方法 キーを押して アプリケーションが正 システム管理者に連絡して、 も 68XX が応答 常にダウンロードされ アプリケーションを再度ダウ しない。 ていません。 ンロードしてもらってくださ い。...
  • Seite 106 6 8 X X シ リ ー ズ...
  • Seite 107 快 速 查 阅 介绍 68XX 是一个坚固耐用、全天候的手持便携式计算机,它集下列性 能于一身: • PC 标准体系结构 (8088 16 位体系结构) • DR-DOS 兼容性 • 16 行、每行 21 个字符显示 • 35 至 46 键字母数字混合式键盘输入 • 集成的扫描功能 • 可再充电的锂离子和 NiCd 电池组 • 批量通讯或 RF 网络通讯 (使用内置天线) : ® Spectrum One RF 网络...
  • Seite 108 6 8 X X 系 列 68XX 的部件 扫描发光管 显示器 电源键 状态发光管 键盘 扫描窗口 电池组 扫描触发开关 光连接器 充电触点 电池舱 电池 脱扣 手带 电池锁...
  • Seite 109 快 速 查 阅 必需附件 68XX 必需附件包括: • 锂离子或 NiCd 可充电电池组或 内在安全的 NiCd 可充电电池组 • 带有备用电池充电插槽的 CCM 38/6860 4- 插槽充电和通讯模 块 或 • CRD 38/6865 1- 插槽支座充电和通讯支座 或 • CRD 38/6866 4- 插槽充电和通信支座 • RS-232 串行电缆 • 电源 (每支座一个) 。 可选附件...
  • Seite 110 6 8 X X 系 列 所提供电源 68XX 的电源由一个锂离子或镍镉 (NiCd) 可充电电池组提供。 注意 : 3800 系列 NiCd 电池组,3872-103、3872-105 和 3872- 115 不能用于 68XX 中。 安装新的或可充电电池 要安装电池: 1. 将电池组的手柄朝向 6800 的扫描窗口。 2. 将电池组滑动推入电池舱,同时电池脱扣按钮被压入。 扫描窗口 电池 电池舱 锁 电池手柄 脱扣 3. 按下电池锁以固定。 更换内在安全的 PDT 68xx 终端电池组 要插入电池组:...
  • Seite 111 快 速 查 阅 2. 使用附带的电池锁定钥匙将电池锁定到位。当您转动锁定钥 匙时,电池锁定机构将被旋转并把电池锁定到位。 3. 要解锁并取下电池,请使用电池锁钥匙打开电池锁定机构, 并将电池从终端底部拉出。 电池锁定机 构 电池锁钥匙 取下电池组 1. 按下手柄两侧的电池脱扣按钮。 按下脱扣按钮 按下脱扣按钮 2. 将电池组从手柄中滑动拉出。...
  • Seite 112 系 列 对 NiCd 电池充电 必需附件 要对 68XX 中的 NiCd 电池充电,请使用第 107 页 中列出 的一种支座或使用通用电池充电器。有关对电池充电的方法,请 参阅您支座的 QRG 或 UBC 的 QRG。 小心 : 在此终端中只能使用 Symbol 电池 21-32801-01、21- 35217-01,21-35241-01 或 21-38796-01。 CCM 38/6860 CRD 38/6866 CRD 38/6865 对锂离子电池充电 注意 : 将装有锂离子电池的终端放在支座上不会损坏电池。 当终端置于支座上时,锂离子电池不充电。在终端里装有锂离子...
  • Seite 113 快 速 查 阅 操作 68XX 打开 / 关闭 68XX 的电源 通过下列方式打开 68XX 的电源: • 挤压扫描触发开关, • 或按下 PWR 键。 注意 : 必须已装入电池,或者 68XX 必须在支座中以打开 终端电源。 要终止 68XX 的操作,请按下 PWR 键。 调节对比度 68XX 的显示器对比度可设为 8 级。要调节对比度: • 按下 FUNC 然后 X 增加对比度 •...
  • Seite 114 6 8 X X 系 列 • 按下 BKSP 可擦除显示器上输入的信息, 每次擦除一个字符。 • 35键 - 按下SPACE键输入一个空格。 46键 -按下FUNC然后按 下 BKSP( 空格 ) 可输入一个空格。 • 按下 CLEAR(35 键)或 CLR 可部分或完全从应用程序级或 屏幕中退出。也可将屏幕中输入的所有数据擦除。 • 按下 SHIFT (35 键)或 SHF (46 键)可使用换档键盘。 • CTRL(35 键)或 CTL(46 键)用于执行控制功能并受应用 程序控制。...
  • Seite 115 快 速 查 阅 使用集成的激光扫描仪 要进行扫描: 1. 按下扫描仪触发开关打开 68XX 和扫描仪的电源。如果已启 动扫描并且激光已打开,扫描发光管将变为红色。 2. 将 68XX 对准条码并按下触发开关。 3. 确认扫描光束划过条码符号上所有的条和空白,如下所示: 正确 错误 对于较大的符号,将扫描仪移得更远一些,对于条排列紧密 的符号,将扫描仪更靠近一些。 远程版本支持两级扫描触发开关。第一窄光束用于对准,第 二光束用于解码标签。 4. 解码成功则发光管由红变绿。68XX 也可能发出蜂鸣声。...
  • Seite 116 6 8 X X 系 列 对准:保持一个角度 不要将 68XX 的扫描窗直接对着条码。就象我们所知道的镜面反射 一样,激光从条码直接反射回扫描窗口。这一强光能使扫描仪失 去判断力,并使解码变得困难。镜面反射发生的区域称之为 “盲 区” 。 您可以将 68XX 向前或向后倾斜到 55°完成一次成功解码。经过实 践很快可以得出可允许的范围。 扫描成构 可能的镜面反射 扫描成构 55° 55° 阴影区域表示盲区 (±2") 扫描光束 扫描 光束 条码 条码 条码...
  • Seite 117 快 速 查 阅 执行通信 与主机通信 68XX 通过 CCM 38/6860、CRD 38/6865、CRD 38/6866 或 PC 转换器 与主机通信。有关设置 CCM、支座或 PC 适配器的信息,请参阅随 PDT 6800 系列产品参考指南 快速参考指南 同每个设备提供的 或 。 要与主机通信: PDT 6800 系列 1. 按照 产品参考指南 或快速参考指南中所述设置支座或 PC 转换器。 2. 将 68XX 的底座放入支座中。对着支座的后部按压 68XX 的顶 部,直到它稳定就位。...
  • Seite 118 插槽 68XX 的光端口 2. 将 PIM 的 DB-9 连接器插入打印机的端口。 3. 打开打印机和 68XX 的电源。 在 RF 网络中通讯 PDT 6810 将在 Symbol Spectrum One RF 网络中运行; PDT 684X 则 在 Symbol Spectrum24 RF 网络中运行。 状态发光管指明终端与 RF 网络的连接状态: 关闭 指明正在使用射频,且与接入点 (Spectrum24) 或基站 (Spectrum One) 相关联。...
  • Seite 119 快 速 查 阅 从 802.11 切换至 Srping RF 协定 (PDT 6842) 注意 : 通过 802.11 RT 协定引导启动终端。然后通过下述程序 切换至 Spring RF 协定。 1. 引导启动终端。显示下面提示: SOFTWARE UPDATE Update?[y/n]: 2. 请在 4 秒钟内键入 “y” 。否则,终端会以 802.11 RT 协定引导 启动。 显示下一个提示: RF PROTOCOL UPDATE OPPORTUNITY Update RF protocol [y/n]:...
  • Seite 120 6 8 X X 系 列 4. 选择 2 以 Spring RF 协定引导启动。 显示下一个提示: Enter password → 5. 输入密码 REPROT,然后按输入键。终端继续引导启动。如果有 兼容性问题,终端会停滞,并显示一个错误信息。请联系您的 系统管理员。 故障解决 故障现象 可能原因 操作 没有打开 68XX 的 未安装电池。 检验 68XX 已由电池供 电源。 电。 电池未充电。 NiCd 电池—对终端中的 电池充电,或取下电池并 在 CCM 38/6860 或 CRD38/6866 的备用电池...
  • Seite 121 快 速 查 阅 故障现象 可能原因 操作 电池电量低 主电池组电量低。 锂离子电池—自终端卸下 (续) 电池,并用 UBC 2000 转 消息 (续) 换器对其充电。 或 关闭 68XX 的电源并更换 电池。 电池电量低 电池已用尽。 在收到 消 更换电池。 息后没有更换电池。 显示器上不显示字 68XX 电源没有打开。 按下 键。 符。 未装电池组或已耗尽。 更换电池组或对它重新充 电。 对比度未正确调整。 请参阅第 111 页以了解关 键顺序。...
  • Seite 122 6 8 X X 系 列...
  • Seite 123 요 약 설 명 서 소개 68XX 는 궂은 날씨에도 효과적으로 사용할 수 있는 휴대용 컴퓨터 로 한 패키지 안에 다음과 같은 기능이 들어 있습니다 . • PC 표준 구조 (8088 16- 비트 구조 ) • DR-DOS 호환성 • 16X21 문자 디스플레이 •...
  • Seite 124 6 8 X X 시 리 즈 68XX 의 부품 스캔 LED 디스플레이 전원 키 상태 LED 키보드 스캔 창 배터리 스캔 트리거 팩 광 커넥터 충전 배터리 실 연결부 배터리 해제 장치 배터리 잠금 장치 손잡이...
  • Seite 125 요 약 설 명 서 필수 악세서리 필수 68XX 악세서리는 다음과 같습니다 . • 리튬 이온 및 NiCd 충전 가능한 배터리 팩 또는 안전한 충전 가능한 배터리 팩 • 보조 배터리 충전 슬롯이 있는 4- 슬롯 CCM 38/6860 충전 및 통신...
  • Seite 126 6 8 X X 시 리 즈 전원 공급하기 68XX 전원은 리튬 이온 및 니켈 카드뮴(NiCd) 충전 가능한 배터리 팩으로 공급됩니다 . 참고 : 시리즈 3800 NiCd 배터리 팩인 3872-103, 3872-105 및 3872-115 는 68XX 에 사용할 수 없습니다 . 신품...
  • Seite 127 요 약 설 명 서 3. 배터리 잠금을 풀고 밖으로 빼려면 배터리 잠금 키로 배터리 잠금 장치를 풀고 , 배터리를 단말기 바닥에서 잡아 당기십 시오 . 배터리 잠금 장치 배터리 잠금 키 배터리 팩 제거하기 1. 손잡이 양쪽에 있는 배터리 해제 단추를 누르십시오 . 해제...
  • Seite 128 리 에 나열된 크래들 중 하나 또는 범용 배터리 충전기를 사용하십 시오 . 배터리 충전 방법은 크래들 요약 설명서나 UBC 요약 설명 서를 참조하십시오 . 이 단말기에는 Symbol 배터리 21-35217-01, 21-35241-01 주의 : 또는 21-38796-01 만 사용하십시오 . CCM 38/6860...
  • Seite 129 요 약 설 명 서 68XX 작동하기 68XX 전원 켜기/끄기 다음 방법으로 68XX 전원을 켜십시오 . • 스캔 트리거를 당기거나 • 또는 PWR 키를 누릅니다 . 참고 : 배터리가 설치되어 있거나 68XX 가 크래들에 있어야 단말기 전원이 켜집니다 . 68XX 의 작동을 일시 중지하려면 PWR 키를 누르십시오 . 대비...
  • Seite 130 6 8 X X 시 리 즈 • 35- 키 - 커서 키 를 눌러 왼쪽 , 오른쪽으로 스크롤합 니다 . 46- 키 - FUNC 를 누른 다음 , 를 누르면 왼쪽으로 스크롤하고 FUNC 를 누른 다음 를 누르면 오른쪽으로 스크 롤합니다...
  • Seite 131 요 약 설 명 서 3. 아래 그림처럼 스캔 광선은 바코드 기호에 있는 모든 막대와 여백을 가로 질러야 합니다 . 올바름 틀림 바코드가 크면 스캐너를 더 멀리하고 바 사이가 좁은 바코드 의 경우 더 가까이 대십시오 . Long-range 버전은 두 단계 스캔 트리거를 지원합니다 . 첫번 째...
  • Seite 132 6 8 X X 시 리 즈 68XX 을 최대 55° 까지 앞이나 뒤로 기울이면 성공적으로 해독됩 니다 . 허용되는 각도가 어느 정도인지는 연습해 보면 간단히 알 수 있습니다 . 성공적인 성공적인 예상되는 스캔 스캔 거울 반사 빗금친 영역은 사각 지대 (±2") 를...
  • Seite 133 요 약 설 명 서 68XX이 크래들에 제대로 끼워지면 상태 LED는 녹색 점등 상 태가 됩니다 . 3. 호스트와 68XX 에서 통신 프로그램을 실행하십시오 . 크래들의 적색 COMM LED 가 깜박이는 동안에는 주의 : 68XX 를 꺼내지 마십시오 .
  • Seite 134 2. PIM 의 DB-9 커넥터를 프린터 포트에 꽂으십시오 . 3. 프린터와 68XX 전원을 켜십시오 . RF 네트워크에서 통신하기 PDT 6810 은 Symbol Spectrum One RF 네트워크에서 작동하며 PDT 684X 는 Symbol Spectrum24 RF 네트워크에서 작동합니다 . 상태 LED 는 단말기의 RF 네트워크와의 연결 상태를 보여 줍니다...
  • Seite 135 요 약 설 명 서 802.11 에서 Spring RF 프로토콜 (PDT 6842) 로 전환하기 참고 : 단말기는 802.11 RF 프로토콜로 시동됩니다 . Spring RF 프로토콜로 다음 과정을 통해 전환됩니다 . 1. 단말기를 시동합니다 . 다음 프롬프트가 표시됩니다 : SOFTWARE UPDATE Update?[y/n]: 2.
  • Seite 136 6 8 X X 시 리 즈 다음 프롬프트가 아래와 같이 나타납니다 : Enter password → 5. 암호 "RFPROT" 를 입력하고 나서 ENTER 키를 누릅니다 . 단말기가 시동됩니다 . 만일 호환상의 문제가 존재하면 단 말기는 오류 메시지와 함께 중단됩니다 . 시스템 관리자에 게...
  • Seite 137 요 약 설 명 서 증상 예상되는 원인 조치 (배터리 주 배터리 팩 전원이 리튬 이온 배터리 - 배터 부족 ) 메시지 ( 계 부족합니다 ( 계속 ). 리를 로부터 제거하 속 ). 고 어댑터에서 충전 하십시오 . 또는 의 전원을 끄고 배터 리를...
  • Seite 138 6 8 X X 시 리 즈...
  • Seite 139: Regulatory Information

    • Improve work procedures. Regulatory Information All Symbol devices are designed to be compliant with rules and regulations in locations they are sold and will be labeled as required. Any changes or modifications to Symbol Technologies equipment, not expressly approved by Symbol Technologies, could void the user's authority to operate the equipment.
  • Seite 140 6 8 X X S e r i e s FCC RF Exposure Guidelines This device was tested for typical body-worn operations with the holster providing a minimal spacing of 2.0 cm from the body to the back of the terminal/antenna. To maintain compliance with FCC RF exposure compliance requirements, use only belt-clips, holsters, or similar accessories that maintain a 2.0 cm separation distance between the user's body and the back of the terminal, including the antenna.
  • Seite 141 R e f e r e n c e Statement of Compliance Symbol Technologies, Inc., hereby declares that this device is in compliance with all the applicable Directives, 1999/5/EC, 89/336/EEC, 73/23/EEC. A Declaration of Conformity may be obtained from http://www2.symbol.com/doc/ Other Countries Mexico - Restrict Frequency Range to: 2.450 - 2.4835 GHz.
  • Seite 142 6 8 X X S e r i e s In accordance with Clause 5, IEC 825 and EN60825, the following information is provided to the user: ENGLISH HEBREW CLASS 1 CLASS 1 LASER PRODUCT CLASS 2 LASER LIGHT DO NOT STARE INTO BEAM CLASS 2 LASER PRODUCT DANISH / DANSK ITALIAN / ITALIANO...
  • Seite 143: Warranty

    Q u i c k R e f e r e n c e Warranty (A) Seller's hardware Products are warranted against defects in workmanship and materials for a period of twelve (12) months from the date of shipment, provided the Product remains unmodified and is operated under normal and proper conditions.
  • Seite 144: Service Information

    Distributor Operations +44 118 945 7360 Customer support is available 24 hours a day, 7 days a week. For the latest version of this guide go to: http://www.symbol.com/manuals. 70-32644-02 Revision B — July 2002 Symbol Technologies, Inc. One Symbol Plaza Holtsville, NY 11742-1300...

Inhaltsverzeichnis